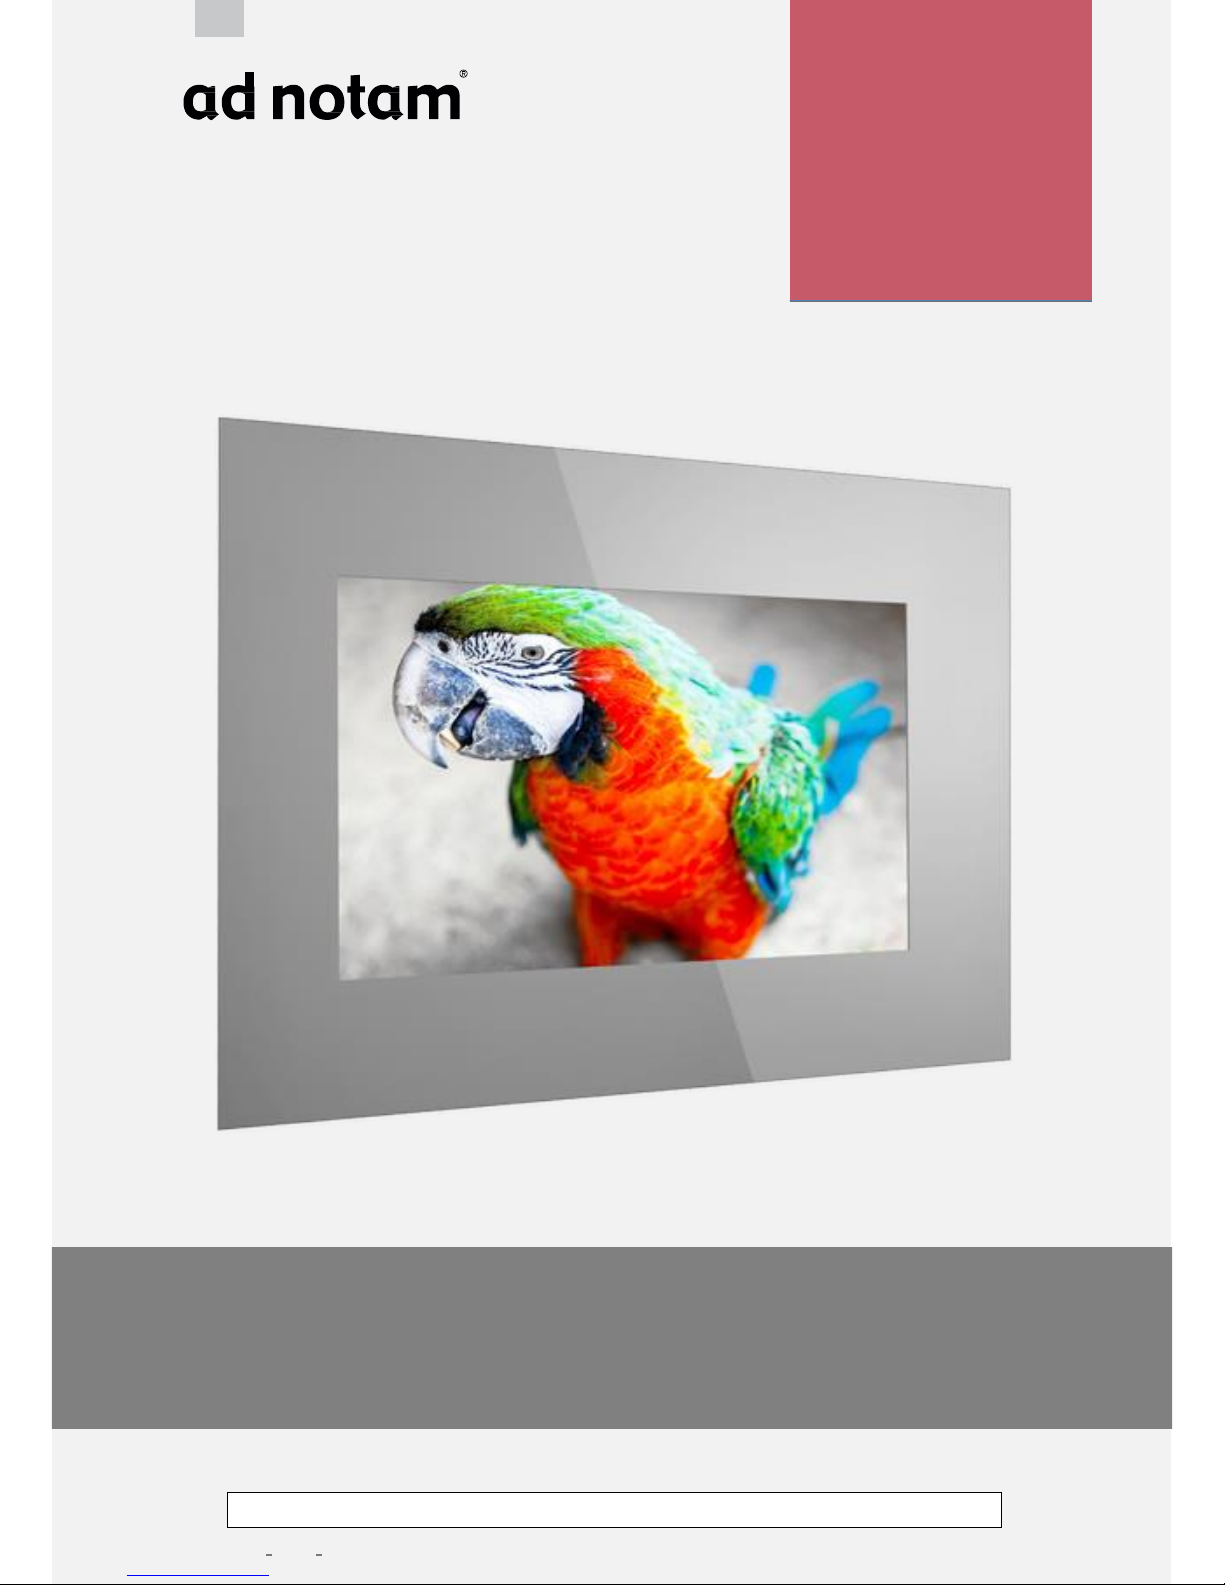
Ad Notam INSERT User manual

Register your product and get support at: www.ad-notam.com
Subject to modification 30-Apr. 2015 www.ad-notam.com
HIDDEN TECHNOLOGY –TECHNOLOGY BECOMES INVISIBLE.
OWNER'S MANUAL
INSERT
For In Wall Installation
EN
MIRROR TV

2
INTRODUCTION
Thank you for choosing ad notam.
You acquired a high-quality product; ad notam means supreme technology and design.
CONTENT
SAFETY
3
WARNINGS
4
CLEANING AND PRODUCT CARE
5
ENVIRONMENTAL
5
AD NOTAM CONFIGURATOR
6
PRODUCT DELIVERY
7
MOUNTING YOUR AD NOTAM
8
-
IN WALL MOUNTING - WALL PREPARATION
9
-
IN WALL MOUNTING - MONITOR
14
-
IN WALL MOUNTING - FINAL ASSEMBLY
17
HIGHLIGHTS SUGGESTED SETTINGS
20
CONNECT YOUR PRODUCT
21
-
POWER
21
-
AUDIO-VIDEO
22
-
EXTERNAL CONTROL
23
USE YOUR SCREEN
24
ON SCREEN DISPLAY (OSD MENU)
25
SERVICE SETTINGS
27
USING YOUR WATERPROOF REMOTE CONTROL
29
-
HOW TO PROGRAM
30
USING YOUR SLIMLINE REMOTE CONTROL
31
USING YOUR TOUCHPAD
32
ADJUSTING YOUR DIGITAL CLOCK
33
SOFTWARE
34
COPYRIGHTS, LICENCES & CERTIFICATES
35
TROUBLESHOOTING
35
SERVICE & SUPPORT
35

3
SAFETY
To prevent damage to your ad notam product or injury to yourself or to others, read the safety instruction in their entirety
before installing and operating the product. Keep these safety instructions where all those who use the product will read them.
Warranty will be null and void for any damage resulting from installation and operation not respecting these instructions.
THIS ICON MARKS WARNING. Indicates that high voltage is present inside. It is dangerous to make any kind of
contact with any internal part of this product.
THIS ICON MARKS WARNING. Indicates important literature concerning operation and maintenance. To prevent
possible injury, read all warning before using this product.
THIS ICON MARKS CAUTION. To prevent the spread of fire, keep candles or other open flames away from this product
at all times.
CAUTION
RISK OF ELECTRIC SHOCK DO NOT OPEN
CAUTION: To reduce the risk of electric shock, do not
remove cover (or back). There are no user serviceable
parts inside. Refer all servicing to qualified personnel.

4
WARNINGS
LIQUIDS. Never expose the product to rain or water.
Never place liquid containers, such as vases, near the
product. If liquids are spilt on or into the product,
disconnect it from the power outlet immediately.
Contact your authorized dealer immediately to have
the product checked before use.
GLASS. Parts of this product are made out of glass.
Handle with care to avoid injury or damage.
HANDLING. Parts of this product are made out of
glass and sharp material. Always wear safety shoes and
gloves when handling the products or its packaging.
HANDLING. ad notam products are made of heavy
components. Two or more people may be needed to
transport large goods. When handling the goods make
sure to separate and disconnects all parts before any
movement. Do not put stress on the LCD nor
glass/mirror. Prepare the environment properly to
gently accommodate any item on a adequately soft
and cushioned surface.
GLASS. The corners and edges of the glass are very
delicate. Take care that they do not hit the wall,
ceiling or floor in any way to avoid damages and split-
offs.
ELECTRICITY. To avoid electric shock, never touch the
inside of this product. Refer to a qualified technician.
ELECTRICITY. Do not overload wall outlets, extension
cords or adaptors above their capacity, since this can
result in fire or electric shock.
ELECTRICITY. Before you connect the product to the
power outlet ensure that the power voltage matches
the value printed on the back of the product. Never
connect the product to the power outlet if the voltage
is different.
ELECTRICITY. To disconnect the product from the
mains power, the power plug of the product must be
disconnected. When disconnecting the power, always
pull the power plug, never the cord. Ensure that you
have full access to the power plug, power cord and
outlet socket at all times.
IRREGULAR OPERATION. If this product does not
operate normally, in particular, if there are any unusual
sounds or smells coming out of it, unplug it
immediately and contact an authorized dealer or
service center.
WET ENVIRONEMT. For installations in wet-rooms
specific installation guidelines apply, which are to be
seen in the context of placing a power adaptor outside
of certain protection zones. These regulations differ by
region. Please contact a specialist for this. In Germany
electrical installations are to be performed by a skilled
technician, while observing the regulations of the
standard DIN VDE 0100 T.701.
INDOOR USE. The product is specifically designed for
indoor use. There is danger of fire and of electric
shocks and damage to the device if it is operated
outdoors.
VENTILATION. Never insert objects into nor cover the
ventilation slots or other openings on the product.
HEAT SOURCES. Do not place this product near or
over heat sources or where it is exposed to direct
sunlight. Never expose your product, remote control
or batteries to excessive heat.
FLAMABLE GAS. Do not use in the presence of
flammable gas, as this could result in explosion or fire.
CHILDREN. Keep out of reach of children. Failure to
observe this precaution could result in injury.

5
CLEANING AND PRODUCT CARE
CLEANING. Use a soft damp cloth (cotton, flannel, etc.)
and gently wipe the surface of the product. Wiping with a
hard cloth or using strong force may scratch the surface of
the product. Never touch, push, rub or strike the screen
with any object.
CLEANING. Avoid using benzene, thinner and other
solvents as they may deform the product and may cause
the paint to peel off. Using a chemical cloth (wet/dry sheet
type cloth, etc.) may cause damages and corrode the
product. To avoid deformation and color fading, wipe off
water drops as soon as possible.
OPERATION. Avoid static images on screen as much as
possible. Static images are images that remain onscreen for
extended periods of time. Static images include onscreen
menus, black bars, time displays, etc. If you must use static
images, reduce screen's contrast and brightness to avoid
screen damage.
ENVIRONMENT. On rare occasions, depending on
temperature and humidity, minor condensation can occur
on the inside of the glass front. To prevent this, do not
expose the product to direct sunlight, heat or extreme
humidity. If condensation occurs, it will disappear
spontaneously after the product has played for a few hours.
ENVIRONMENT. The product must be stored in a dry and
well ventilated room, without extreme temperature
fluctuations. Heat sources and aggressive active substances
may not be stored in the proximity of this product.
ENVIRONMENTAL
ad notam aims to design, produce, deliver and dispose eco-friendly products. Our environmental policy applies to the entire
product lifecycle and business activities.
LOW STANDBY POWER
Our highly advanced power circuitry brings down power
consumption to an extremely low level while in standby
mode
EUROPEAN ENERGY LABEL
END OF USE
The European Energy Label informs you on the energy
efficiency class of this product. The greener the energy
efficiency class of this product is, the lower the energy it
consumes. On the label, you can find the energy efficiency
class, the average power consumption of this product in use
and the average energy consumption for 1 year based on 4
hours´ operations per day.
When this crossed-out wheeled bin symbol is attached to a
product the product is covered by the European Directive
2002/96/EC. Inform yourself about the local separate
collection system for electrical and electronic products. Act
according to your local rules and do not dispose your old
products with your normal household waste. Correct
disposal of the product helps to prevent potential negative
consequences for the environment and human health.

6
AD NOTAM CONFIGURATOR
Your own unique product, made by ad notam, has been designed with ad notam online configurator. Your configuration is a
valuable reference. Keep a hardcopy of your configuration with this owner manual.
The
Shop Drawing - Front View
is necessary for Mirrors and
Glass production, the most visible item of any device
produced by ad notam.
The
Front View
consists of 2 pages:
Shop Drawing Front View
Legend Front View
These 2 pages are directly linked and show respectively
visualization and legend.
The
Shop Drawing - Back View
is necessary for Mirrors, Glass
and additional articles pre-assembly at factory.
The
Back View
consists of 2 pages:
Shop Drawing Back View
Legend Back View
These 2 pages are directly linked and show respectively
visualization and legend.
The
Shop Drawing - Wall View
is necessary for device
installation on site.
The
Wall View
consists of 2 pages:
Shop Drawing Wall View
Legend Wall View
These 2 pages are directly linked and show respectively
visualization and legend.
The
Shop Drawing Parts List
is a detailed articles list
comprising all necessary parts for pre-assembly and final
installation.
The
Parts List
consists of 1 or more pages:
Shop Drawing Parts Lists
These pages are directly linked and show complete scope of
delivery (items and processing services):

7
PRODUCT DELIVERY
WOODEN CRATE AND GIFTBOX INSPECTION
You purchased a high end device. Verify wooden crate and gift box integrity before unloading the product. If damage is
noticed write all the information on the bill of lading and hand it to the driver of the forwarder. Pictures will be required for the
claim process. You can consult your ad notam reseller for additional information.
GIFTBOX
WOODEN CRATE
WHAT IS IN THE BOX
Please check the following contents for completeness before using the product.
MIRROR TV
OWNER´S MANUAL
DFU xxxx
DISPLAY
WATERPROOF
IR REMOTE (Optional)
SLIMLINE
IR REMOTE (Optional)
DIGITAL CLOCK
IR REMOTE (Optional)
MAGNET HOLDER
PLATE (Optional)
IN WALL BRACKET
(Optional)
HOLDING ANGLE
(Optional)
FIXATION MAGNET
(Optional)
DISTANCE RING
(Optional)
MIRROR POWER
Power Supply 200/600
CEILING SPEAKERS
(Optional)
IR RECEIVER
(Optional)
IR LOOP THROUGH
(Optional)
IR EMITTER
(Optional)
VDC EXTENSION
Extension Cable 12/24 V (Optional)
HDMI CABLE
USB CABLE
POWER CORD

8
MOUNTING YOUR AD NOTAM
BEFORE YOU START
Safety, environment, expert tips!
SAFETY
WARNINGS
SAFETY. To prevent damage to your ad notam
product or injury to yourself or to others, read the
safety instruction in their entirety before installing and
operating the product. Keep these safety instructions
where all those who use the product will read them.
Warranty will be null and void for any damage resulting
from installation and operation not respecting these
instructions.
ORIGINAL MATERIAL. Always use ad notam supplied
wall brackets and original spare parts to perform
installation.
WOODEN CRATE. The wooden crate is securing glass
and mirror. Incline the wooden crate adding a thick
spacer (eg. 10 cm wooden bar) underneath the front
foot to avoid all glass and mirror to fall off the crate
while removing the front panel. Open carefully making
sure a second person is on site.
WALL FIXINGS. ad notam doesn´t provide screws and
dowels with this product. Consider the construction
environment, wall type, product weight and
positioning when selecting raw bolts or resin anchors.
QUALIFIED PERSONNEL. Mounting this product
requires structural measures and special skills. Refer
exclusively to qualified personnel.
QUALIFIED PERSONNEL. Electrical connections must
be performed by qualified professionals respecting
national regulations and standards.
ENVIRONMENT
ad notam products include heavy, bulky and delicate items. To prevent damages to your ad notam product or injury to yourself
or to others, prepare the installation environment properly.
CAUTIONS
ENVIRONMENT. Clean the handling and installation
environments properly before installation.
HANDLING. Handling ease requires proper planning.
Verify size, turning angles, bumps and potential
hurdles before handling.
ENVIRONMENT. ad notam mounting systems are
engineered for vertical use only. Verify walls´ verticality
and items vertical and horizontal alignment to prevent
serious injuries and product damage.
HANDLING. Cushions the floor properly using soft
anti slip mats near the handling areas. Lay the items
gently on these cushioned anti slip surfaces when
needed.
HANDLING. Tilt the mirror and DFU top to the wall
with an adequate angle of incidence when resting.
EXPERT TIPS
SCREEN PLACEMENT The ideal distance to watch
your display is 3 times its screen size diagonal with the
eyes leveled at the screen center. Don´t place the
product under direct shining light.
EXTERNAL POWER ADAPTER External power
adapters require a minimum air volume to avoid
overheating and proper long-lasting operations. Allow
at least 10cm all around a 12V DC model or 20cm all
around a 24V DC model.
EXTERNAL POWER ADAPTER Install the external
power adapter in accessible service friendly location, if
you require extension cables refer to your ad notam
specialist. Install the external power adapter on a
steady flat surface, do not hang nor cover.
TOOLS ad notam product´s installation requires
specific professional tools. Verify the following page
for a comprehensive list.

9
MOUNTING YOUR AD NOTAM
ON WALL MOUNTING - WALL PREPARATION
Your own ad notam has been pre-assembled according to your configuration instruction. The product back view including pre-
assembled items is visible on your
shop drawing Page 3 (Back View)
you can find additional information on the visible items on
page 4 (Legend - Back View).
To determine the proper position of your ad notam on the wall the ad notam configuration provides an ideal Wall View
preparation. The Wall View (including necessary items) is visible on
shop drawing
page 5 (Wall View)
. Consult your
shop drawing
page 6 (Legend - Wall View)
for additional information concerning spare parts necessary for installation. Refer to these pages
during installation.
EXPERT TIPS TOOLS
MAGNET HOLDER
PLATE (Optional)
IN WALL BRACKET
(Optional)
HOLDING ANGLE
(Optional)
FIXATION MAGNET
(Optional)
DISTANCE RING
(Optional)
Measuring tape
Carpenter Pencil
Level
Screwdriver Set
Philips Tip
Bolts, screws, screw
anchors, lock washers
Allen Wrench
Power drill
Ratchet
¼ drive for M4-6 Bolts
Please read the safety precautions before
positioning the product. Always use the
supplied wall brackets and parts. Wall
mounting this product requires special skills and
should only be performed by qualified personnel.
Electrical connections are to be performed by a
skilled technician following local regulations.
Two people are required to lift and carry a product
that weights more than 25kg or 55lbs. ad notam
does not guarantee the efficiency of screws and
dowels delivered with this product. Those may
be replaced on site considering the construction
environment, type of wall, product weight and
positioning. ad notam bears no responsibility for
improper mounting or any mounting that results in
accident or injury.
Please Note:
The corners and edges of the glass are
very delicate. Take care that they do not
hit the wall, ceiling or floor in any way to avoid
damages and split-offs.

10
STEP 1 - WALL PREPARATION
1. The following slides explain how to identify and mark the drilling points on the wall. ad notam provides different mounting
combinations. Verify your own
shop drawing page 6 (Wall View Legend)
to identify your wall mounting option. The
column Art. Description provides the description of the selected items necessary for your wall preparation.
2. Reference point. Identify your ad notam position on the wall and identify the bottom left corner of the crystal. Mark this
point with the pencil.
3. Reference point (Point 0) is used in the ad notam
shop drawing Wall View Legend (Page 6)
. The items reference
coordinates are starting from here.
4. Art. Description Verify your own configuration page 6 (Wall View Legend) to identify your mounting option. The column
provides the description of the selected items necessary for your wall preparation.
5. Art. Description IN WALL BRACKET
. (Not found? Move to the next step.)
Verify x-position and y-position. These coordinates
correspond to the IN WALL BRACKET bottom left corner. Start from the reference point moving to the right on the
horizontal axe and mark the point (y-position).
EXPERT TIPS. Before proceeding consider your crystal position. For recessed installation the drilling points must be
positioned at 30 mm from the back of your crystal (25 mm for IN WALL BRACKET 150, 15 cm width). For flush installation
consider: Glass Depth + 30 mm (25 mm for IN WALL BRACKET 150, 15 cm width). Marginal inaccuracy can be corrected
with the long slots in the IN WALL BRACKET.
6. Art. Description IN WALL BRACKET
. (Not found? Move to the next step.)
Position the IN WALL BRACKET and mark the drilling
points with a pencil. Caution: you might have more IN WALL BRACKETs. Repeat the procedure for each one of them.

11
7. Art. Description MAGNET HOLDER PLATE
. (Not found? Move to the next step.)
Verify x-position and y-position. These
coordinates correspond to the MAGNET HOLDER PLATE bottom left corner. Identify the glass upper edge considering
your glass height starting from your reference point. From the upper edge left corner moving to the right on the horizontal
axe identify the x-position of the MAGNET HOLDER PLATE.
EXPERT TIPS. Before proceeding consider your crystal position. For recessed installation the drilling points must be
positioned at 30 mm from the back of your crystal (25 mm for MAGNET HOLDER PLATE 150, 15 cm width). For flush
installation consider: Glass Depth + 30 mm (25 mm for MAGNET HOLDER PLATE 150, 15 cm width). Marginal inaccuracy
can be corrected with the long slots in the MAGNET HOLDER PLATE.
8. Art. Description MAGNET HOLDER PLATE
. (Not found? Move to the next step.)
Position the MAGNET HOLDER PLATE and mark
the drilling points with a pencil. Caution: you might have more MAGNET HOLDER PLATEs. Repeat the procedure for each
one of them.
9. Art. Description - HOLDING ANGLE
. (Not found? Move to the next step.)
Verify x-position and y-position. These coordinates
correspond to the HOLDING ANGLE middle screw drilling point. Start from the reference point moving to the right on the
horizontal axe and mark the point (y-position). Plot a vertical line verifying vertical alignment using the level. Measure and
mark the drilling point on this line accordingly (y-position). Caution: you must have 4 HOLDING ANGLES. Repeat the
procedure for each one of them.
EXPERT TIPS. Before proceeding verify the point horizontal alignment using the level. You can also plot an additional
horizontal line and verify its distance from the crystal upper and bottom edge.

12
STEP 2 - WALL PREPARATION
1) The following paragraphs explain how to mount the different elements on the wall. ad notam provides different mounting
combinations. Verify your own
shop
drawing page 6 (Wall View Legend)
to identify your wall mounting option. The
column Art. Ref. provides the description of the selected items necessary for your wall preparation.
ARCHITECTURAL Structural measures must be
accomplished for an on-wall installation. ad notam
declines any liability for the screws and screw anchors
used on site.
ENVIRONMENT. ad notam mounting systems are
engineered for vertical use only. Verify walls´ verticality
and items vertical and horizontal alignment to prevent
serious injuries and product damage.
2) You marked all drilling points on the wall. Drill at the marks and proceed adding the appropriate screw anchors.
3) Art. Description Verify your own configuration page 6 (Wall View Legend) to identify your mounting option. The column
provides the description of the selected items necessary for your wall preparation.
4) Art. Description PLASTIC SPACERS
. (Not found? Move to the next step.)
These items need to be combined with the IN WALL
BRACKET for recessed installation flush to the wall. Position the item below the IN WALL BRACKET before securing it.
5) Art. Description IN WALL BRACKET
. (Not found? Move to the next step.)
Secure the IN WALL BRACKET verifying screws anchors
alignment before firmly locking the first screw. Proceed with the other screws mirroring their position right and left.
6) Art. Description. MAGNET HOLDER PLATE
. (Not found? Move to the next step.)
Secure the MAGNET HOLDER PLATE verifying
screws anchors alignment before firmly locking the first screw. Proceed with the other screws mirroring their position on
the right and left side.
7) Caution: you might have more MAGNET HOLDER PLATE s. Repeat the procedure for each one of them.

13
10. Art. Description - HOLDING ANGLE
. (Not found? Move to the next step.)
The 4 HOLDING ANGLES hold the monitor on the wall while
providing slight adjustment in order to align the monitor active area with the glass image area. Marginal inaccuracy can be
corrected with the long slots in the HOLDING ANGLES. Secure the 2 bottom HOLDING ANGLES firmly as shown above.
EXPERT TIPS. Before proceeding with the 2 top HOLDING ANGLES read the screen mounting instruction for additional
WARNING and EXPERT TIPS.
11. HOLDING ANGLE
. (Not found? Move to the next step.)
Drive the bolts including spring washers (and plain washers) half way into the
injection nuts of both sides of the DFU casing. Secure the 2 top holding angles at the injection nuts of the DFU casing.
12. HOLDING ANGLE
. (Not found? Move to the next step.).
Lift your ad notam monitor and place it on the lower HOLDING ANGLES so
that the injection nuts on the bottom are aligned with the holes in the HOLDING ANGLE. The holes in the upper HOLDING
ANGLES should be aligned with the screw anchors. Marginal inaccuracy can be corrected with the long slots in the
HOLDING ANGLES. Secure the 2 top HOLDING ANGLES firmly.

14
MOUNTING YOUR AD NOTAM
ON WALL MOUNTING MONITOR
Your own ad notam has been pre-assembled according to your configuration instruction. The product back view including pre-
assembled items is visible on your
shop drawing Page 3 (Back View)
you can find additional information on the visible items on
page 4 (Legend - Back View).
The product Wall View is visible on
shop drawing
page 5 (Wall View)
. Consult your
shop drawing
page 6 (Legend - Wall View)
for additional information concerning spare parts necessary for installation. Refer to these pages
during installation.
EXPERT TIPS TOOLS
DFU xxxx
DISPLAY
WATERPROOF
IR REMOTE (Optional)
SLIMLINE
IR REMOTE (Optional)
DIGITAL CLOCK
IR REMOTE (Optional)
HOLDING ANGLE
(Optional)
MIRROR POWER
Power Supply 200/600
BOLTS M6
(Optional)
BOLTS M4
(Optional)
Screwdriver Set
Philips Tip
Ratchet
¼ drive for M4-6 Bolts
Allen Wrench
Carpenter Pencil
Measuring tape
Level

15
STEP 3 - MONITOR
1) The following paragraphs explain how to mount and connect your ad notam monitor. ad notam provides different mounting
combinations. Verify your own
shop
drawing page 6 (Wall View Legend)
and
shop
drawing page 4 (Back View Legend)
to identify your monitor mounting option. The column Art. Description provides the description of the selected items
necessary for your installation.
ARCHITECTURAL Structural measures must be
accomplished for an on-wall installation. ad notam
declines any liability for the screws and screw anchors
used on site.
ENVIRONMENT. ad notam mounting systems are
engineered for vertical use only. Verify walls´ verticality
and items vertical and horizontal alignment to prevent
serious injuries and product damage.
ENVIRONMENT. Clean the handling and installation
environments properly before installation.
HANDLING. Cushions the floor properly using soft
anti-slip mats near the handling areas. Lay the items
gently on these cushioned anti slip surfaces when
needed.
HANDLING. Tilt the mirror and DFU top to the wall
with an adequate angle of incidence when resting.
EXTERNAL POWER ADAPTER External power
adapters require a minimum air volume to avoid
overheating and proper long-lasting operations. Allow
at least 10cm all around a 12V DC model or 20cm all
around a 24V DC model.
EXTERNAL POWER ADAPTER Install the external
power adapter in accessible service friendly location, if
you require extension cables refer to your ad notam
specialist. Install the external power adapter on a
steady flat surface, do not hang nor cover.
ELECTRICITY. Do not overload wall outlets, extension
cords or adaptors above their capacity, since this can
result in fire or electric shock.
ELECTRICITY. Before you connect the product to the
power outlet ensure that the power voltage matches
the value printed on the back of the product. Never
connect the product to the power outlet if the voltage
is different.
2) You prepared the wall marking the point and pre-installing the necessary items. After cleaning the installation environment
you can proceed with the monitor test and installation.
EXPERT TIPS. Before proceeding with the monitor handling evaluate your installation requirement. Your own unique ad
notam has been pre-assembled at factory and additional items, wiring and connections need to be prepared on site.
Evaluate your handling clearance considering cables lengths and connections. Cushion the handling area properly using
soft anti-slip mats. Lay the items gently on these cushioned anti slip surfaces when needed.
3) Art. Description Verify your own
shop
drawing page 6 (Wall View Legend)
and
shop
drawing page 4 (Back View
Legend)
to identify your monitor mounting option. The column Art. Description provides the description of the selected
items necessary for your installation

16
4) Art. Description - HOLDING ANGLE
. (Not found? Move to the next step.)
Drive the bolts incl. spring washers (and washers) half way
into the injection nuts of both sides of the DFU casing. Secure the 2 top holding angles at the injection nuts of the DFU.
5) Art. Description - HOLDING ANGLE
. (Not found? Move to the next step.).
Lift your ad notam monitor and place it on the lower
HOLDING ANGLES so that the injection nuts on the bottom are aligned with the holes in the HOLDING ANGLE. The holes
in the upper HOLDING ANGLES should be aligned with the screw anchors. Marginal inaccuracy can be corrected with the
long slots in the HOLDING ANGLES. Secure the 2 top HOLDING ANGLES firmly.
EXPERT TIPS. The ad notam monitor can now be affixed with the connection plugs face up to the rear side of the crystal
surface. Clean the crystal rear side and the monitor properly before proceeding.
6) Art. Description MGS (Mounting Bracket)
. (Not found? Move to the next step.)
Drive the bolts incl. spring washers (and plain
washers) half way into the injection nuts of both sides of the DFU casing.
7) Art. Description MGS (Mounting Bracket)
. (Not found? Move to the next step.)
Let the monitor´s locking bolts slide into the
mounting brackets.
EXPERT TIPS. Ensure during the installation, whether the transparent image area of the glass is aligned to the monitor
active area.
EXPERT TIPS. Ensure that the in-built Monitor IR receiver is fully exposed to incoming IR signal verifying its alignment with
the transparent IR window. Any misalignment might result in disability to control your ad notam.
8) Art. Description MGS (Mounting Bracket)
. (Not found? Move to the next step.)
Secure the monitor tightening the bolts if the screen
active area is aligned to the crystal image area and there are only marginal gaps between the monitor and the mounting. If
there is a remarkable gap between the monitor and the MGS mounting bracket implicitly use the lock washers to fill the
gap before tightening the bolts.
Do not overtighten the bolts in order to avoid strains. Overtightening the bolt might affect the self-adhesive tape.

17
MOUNTING YOUR AD NOTAM
ON WALL MOUNTING FINAL ASSEMBLY
Your own ad notam has been pre-assembled according to your configuration instruction. The product back view including pre-
assembled items is visible on your
shop drawing Page 3 (Back View)
you can find additional information on the visible items on
page 4 (Legend - Back View).
The product Wall View is visible on
shop drawing
page 5 (Wall View)
. Consult your
shop drawing
page 6 (Legend - Wall View)
for additional information concerning spare parts necessary for installation. Refer to these pages
during installation.
EXPERT TIPS TOOLS
Glass Suction Cups

18
STEP 4 - FINAL ASSEMBLY
The following paragraphs explain how to identify, mount and secure your ad notam to the wall. ad notam provides different
mounting combinations. Verify your own
shop
drawing page 6 (Wall View Legend)
and
shop
drawing page 4 (Back View
Legend)
to identify your monitor mounting option. The column Art. Description provides the description of the selected items
necessary for your installation.
ENVIRONMENT. ad notam mounting systems are
engineered for vertical use only. Verify walls´ verticality
and items vertical and horizontal alignment to prevent
serious injuries and product damage.
ENVIRONMENT. Clean the handling and installation
environments properly before installation.
EXTERNAL POWER ADAPTER External power
adapters require a minimum air volume to avoid
overheating and proper long-lasting operations. Allow
at least 10cm all around a 12V DC model or 20cm all
around a 24V DC model.
HANDLING. Cushions the floor properly using soft
anti-slip mats near the handling areas. Lay the items
gently on these cushioned anti slip surfaces when
needed.
HANDLING. Tilt the mirror and DFU top to the wall
with an adequate angle of incidence when resting.
EXTERNAL POWER ADAPTER Install the external
power adapter in accessible service friendly location, if
you require extension cables refer to your ad notam
specialist. Install the external power adapter on a
steady flat surface, do not hang nor cover.
ELECTRICITY. Do not overload wall outlets, extension
cords or adaptors above their capacity, since this can
result in fire or electric shock.
ELECTRICITY. Before you connect the product to the
power outlet ensure that the power voltage matches
the value printed on the back of the product. Never
connect the product to the power outlet if the voltage
is different.
1) You prepared the wall marking the points, installed the necessary items, tested and secured the monitor. After cleaning the
installation environment you can proceed with the final assembly.
EXPERT TIPS. Before proceeding with the final assembly evaluate your installation requirements. Your own unique ad
notam has been pre-assembled at factory and additional items, wiring and connections need to be prepared on site.
Evaluate your handling clearance considering cables length and connections. Cushion the handling area properly using soft
anti-slip mats. Lay the items gently on these cushioned anti slip surfaces when needed.
2) Art. Description Verify your own
shop
drawing page 6 (Wall View Legend)
and
shop
drawing page 4 (Back View
Legend)
to identify your final assembly option. The column Art. Description provides the description of the selected items
necessary for your installation
EXPERT TIPS. Clean the crystal rear side and the monitor properly before proceeding.

19
3) Art. Description SELF ADHESIVE METAL PLATE
. (Not found? Move to the next step.)
The SELF ADHESIVE METAL PLATE
(counterpart for IN WALL BRACKET) is pre-mounted to the back side of the glass. Use the suction cups to elevate the
crystal in order to secure the slide-in mechanism at the bottom of the crystal.
4) Art. Description - FIXATION MAGNET
. (Not found? Move to the next step.)
Gently bring the top part of the crystal in vertical
position, the magnets will pull and hold the crystal providing additional support.
EXPERT TIPS. Ensure during the installation, whether the transparent image area of the glass is aligned to the monitor
active area.
EXPERT TIPS. Ensure that the in-built monitor IR receiver is fully exposed to incoming IR signal verifying its alignment with
the transparent IR window. Any misalignment might result in disability to control your ad notam.

20
HIGHLIGHTS - SUGGESTED SETTINGS
INSTANT ON
Your ad notam screen will power ON/OFF within 1 second.
All screen settings are done via the on screen display (OSD)
menu. Access this menu selecting the SETUP key. Scroll
EXPERT TIPS.
Use this setting when connecting a single play out unit to
your device.
INPUT SCAN
Your ad notam screen will automatically power ON/OFF
depending from incoming signals from your play out units.
(De)activate the automatic scan of the input ports for a
valid video signal. Once there is no video signal at the
currently selected input port the screen will search for a
video signal on the other ports by the following sequence:
HDMI 1 > HDMI 2 > > HDMI 1... and so on (See also
SIGNAL LOSS TIMER)
All screen settings are done via the on screen display (OSD)
menu. Access this menu selecting the SETUP key. Scroll
EXPERT TIPS.
Use this setting when connecting more play out units to
your device.
BACKLIGHT
Your ad notam screen´s backlight is set to guarantee a
satisfactory brightness in an optimal environment.
You can adjust the general brightness of the backlight
choosing in a range from 20% up to 100%. down
according to your personal taste.
USB & MEDIA PLAYER
Watch your photos, listen to your music, play your movies
and read your documents.
Save a movie clip on a USB and connect it to the USB Input
of the screen.
Access this menu selecting the SOURCE key. Scroll down
Choose between PHOTO, MUSIC, MOVIE and TEXT
according to the file you aim to open. Scroll with the cursor
and select your file. To return press the EXIT key or press
OK on selecting the RETURN icon. While viewing your files
access the toolbar pressing the OK key.
MOVIE
File Extension
Video
Audio
.avi
Dvix,XviD,MPEG 4
MP3,WMA,AAC
.mpg
MPEG-1/2
.dat
MPEG-1
.mov, .mkv
H.264
MUSIC
File Extension
Video
Audio
.mp3
MP3
.wma
WMA
.m4a/.aac
AAC
PHOTO
File Extension
Video
Audio
.jpg, .Jpeg
Progressive JPEG
Baseline JPEG
.bmp
BMP
.png
Non-Interlaced
Interlaced
USB AUTO PLAY
Your ad notam screen will play your movie clip automatically
when turning ON the device.
It can be combined with the instant on functionality.
All screen settings are done via the on screen display (OSD)
menu. Access this menu selecting the SETUP key. Scroll
vice Setti
EXPERT TIPS.
Activate and select the USB Input in the OSD menu (Read
Service Settings in this manual for additional information).
Table of contents
Other Ad Notam TV manuals