ADDA M680GMA User manual

Operation Manual
Robotic Vacuum Cleaner
M680GMA

TABLE OF CONTENTS
SAFETY INSTRUCTIONS ---------------------------------------------------- 2
* Safety Instructions
FCC Caution
* Battery and Recharging Instructions
WARNING ------------------------------------------------------------------------ 9
SPECIAL FEATURES -------------------------------------------------------- 10
MAJOR COMPONENTS AND ATTACHMENTS ------------------------
M680GMA OVERVIEW ----------------------------------------------------- 11
INSTALLATION GUIDE ------------------------------------------------------ 12
* Installing and Removing Side Brush
* Battery Installation and Removal
* Recharging Battery
* Proof Test
* Preparation of Room Containment
GENERAL OPERATION ----------------------------------------------------- 17
* Preparation for Operation
* Control Panel
* Download APP and scheduling setting
* Basic Operation
CLEANING AND MAINTENANCE ---------------------------------------- 22
* Maintenance Method
* Cleaning Dust Bin
* Cleaning Intake
* Cleaning Side Brushes
* Cleaning TPE Roll Brush
* Maintenance of Main Wheels
TROUBLE SHOOTING ------------------------------------------------------ 28
WARNING OF BATTERY & ADAPTOR USAGE ----------------------- 29
*
10
1

SAFETY INSTRUCTIONS
2
Please read the safety instructions in the Operation Manual
before operating M680GMA and keep this manual handy for
your future reference. Observe the basic safety rules to
prevent any occurrence of fire, electric shock and personal
injury.
Safety Instructions:
1. Please read the Operation Manual before operating
M680GMA.
2. Do not operate M680GMA outdoors.
3. Before starting M680GMA, be sure to install
M680GMA dust bin filter properly in case of any
damage of M680GMA.
4. Do not operate M680GMA on wet floor or in
moisture conditions, e.g. bathroom. Water and
moisture could damage the circuit board in
M680GMA.
5. Prior to operate M680GMA remove any loose
articles on the floor such as clothes, paper, loose
cables, and extension cords as well as making sure
to lift curtains and drapes off the floor to avoid any
possible accidents. In case of a loose cable is
tangled with M680GMA the cable might move
around with M680GMA as M680GMA works and
topple down the table, chairs, or cabinet and cause
property damage.
6. Never stand or sit on M680GMA. Beware of
children or pets while M680GMA is in operation.

SAFETY INSTRUCTIONS
3
7. Never use M680GMA to clean up sparking
cigarette butts or burning ashes from fireplace.
8. Never use M680GMA to clean up combustible or
highly volatile liquids such as gasoline.
9. While M680GMA is in operation, make sure all
doors leading outside are closed.
10. During operation, the heat vent should avoid being
clogged. If heat vent clogged, M680GMA could
be damaged.
11. If M680GMA is malfunctioned or damaged by
force, do not operate M680GMA regardless the
cause.
Please call your local dealer for service
information.
12. Turn off the power and remove the battery from
M680GMA if the unit will not in use for a long
period of time.
13. This appliance can be used by children aged from
8 years and above and persons with reduced
physical, sensory or mental capabilities or lack of
experience and knowledge if they have been
given supervision or instruction concerning use of
the appliance in a safe way and understand the
hazards involved. Children shall not play with the
appliance. Cleaning and user maintenance shall
not be made by children without supervision.
---Children should be supervised to ensure that
they do not play with the appliance.

SAFETY INSTRUCTIONS
4
14. WARNING: the plug must be removed from the
socket-outlet before cleaning or maintaining the
appliance.
15. Automatic battery-operated cleaners shall also be
provided with cautionary instructions for room
preparation and constant care.
16. Make sure that the appliance can be worked freely
in the room (shall not be blocked or overturned
etc…) and make sure that there is nothing that the
appliance can overturn and create a hazard (clear
all Candle, Vase with or without water and fragile
objects etc…that placed on the floor or furniture).

SAFETY INSTRUCTIONS
5
FCC Caution:
This device complies with part 15 of the FCC Rules. Operation
is subject to the following two conditions: (1) This device may
not cause harmful interference, and (2) this device must accept
any interference received, including interference that may
cause undesired operation.
Any Changes or modifications not expressly approved by the
party responsible for compliance could void the user's authority
to operate the equipment.
Note: This equipment has been tested and found to comply
with the limits for a Class B digital device, pursuant to part 15
of the FCC Rules. These limits are designed to provide
reasonable protection against harmful interference in a
residential installation. This equipment generates uses and can
radiate radio frequency energy and, if not installed and used in
accordance with the instructions, may cause harmful
interference to radio communications. However, there is no
guarantee that interference will not occur in a particular
installation. If this equipment does cause harmful interference
to radio or television reception, which can be determined by
turning the equipment off and on, the user is encouraged to try
to correct the interference by one or more of the following
measures:
‧Reorient or relocate the receiving antenna.
‧Increase the separation between the equipment and
receiver.
‧Connect the equipment into an outlet on a circuit different
from that to which the receiver is connected.
‧Consult the dealer or an experienced radio/TV technician for
help.

6
SAFETY INSTRUCTIONS
RF warning for Mobile device:
This equipment should be installed and operated with
minimum distance 20cm between the radiator & your body.

SAFETY INSTRUCTIONS
7
Battery and Recharging Instructions:
1. Please apply the same model’s battery (D.C.
Lithium-ion 14.8V 2900mAh) and adaptor (20V
1200mA) as equipped with the packing.
2. The external flexible cable or cord of this adaptor
cannot be replaced; if the cord is damaged, the
adaptor shall be scrapped.
3. When placing the batteries into the reservoir,
please be sure that the polarity (+/- sign) of the
batteries match with the indication marked inside
the battery reservoir. Otherwise, the power cannot
be switched on.
4. Forbid any un-rechargeable or different type/model
battery. Applying un-rechargeable battery will
cause the machine malfunctions.
5. The battery is rechargeable. Please use the
voltage and current specified on the packing. If
you are not sure of the voltage and current of your
house, please contact your local power company
or a licensed electrician.
6. Use only the battery supplied with your
M680GMA.
7. Charging adaptor is for indoors only.
8. The appliance is only to be used with the power
supply unit provided with the appliance.
9. Do not recharge the battery if the cable or plug of
the battery is damaged.
10. Never touch the charger, plug or cable with damp
hands.

SAFETY INSTRUCTIONS
8
11. If M680GMA requires cleaning, unplug the
adaptor, switch off the unit and take out the
battery.
12. The battery must be removed from the appliance
before it is scrapped.
13. The appliance must be disconnected from the
supply mains when removing the battery.
14. The battery is to be disposed of safely.
Attention should be drawn to the environmental
aspects of battery disposal. Don't throw used
batteries in dustbin. Please contact your retailer in
order to protect the environment.
15. Leakage from battery pack can occur under
extreme usage or temperature conditions.
If the liquid gets on skin, wash quickly with water.
If the liquid gets into the eyes, flush them
immediately with clean water for a minimum of 10
minutes. Seek medical attention.
Contact a specialist dealer or Customer Services
to replace the battery pack. Never replace the
battery pack yourself.

WARNING
9
Following objects are strictly banned, otherwise
the vacuum cleaner will be damaged or fire
calamity will be caused, which bring such
accidents as human body injuries:
- Don’t pick up large or sharp broken such as
glasses.
- Don’t pick up harming or erodent liquids
(solvent, corrosive, detergent…).
- Don’t pick up inflammable or explosive
substance such as gasoline or alcohol.
- Don’t pick up/ vacuum burning or glowing
objects (cigarettes, matches, hot ashes).

SPECIAL FEATURES
MAJOR COMPONENTS AND ATTACHMENTS
M680GMA Cleaner x1 Rechargeable Battery x1
Dust Bin Filter x1
(1 pc Installed in the dustbin)
Adaptor x1
Operation Manual x1
10
Operation
Manual
Side Brush x 2
Congratulations on purchases the M680GMA Robotic Vacuum Cleaner. This revolution
Robotic Vacuum Cleaner is equipped with functions suitable for cleaning up floor surfaces of
home and office such as wood, tile, and linoleum.
M680GMA Robotic Vacuum Cleaner is a household helper.
Working Patterns:
With Gyro and main wheel encoder sensors, M680GMA could build the simple map so
It could clean your rooms and back to the dock station successfully when its power is
low.
With Mobile APP, the real-time mapping could be shown on the APP. Also, the remote
control could be made from APP too.
Docking Station x1
Along the wall"Z" Type
TPE Roll Brush x1 Room Containment x1

Side Brush
Side Brush
Contact Plates for
Automatic Charging
M680GMA OVERVIEW
Heat Vent
Top Cover
(Dust Bin in Side)
11
Control Panel
and LED Display
IR Receiver
(for Docking Station)
Anti-Cliff Sensor
Front Small Wheel
Intake Valve
Wheel Cover
Power Switch
D.C. jack
Left and Right
Wheels
Battery Cover
Bumper
12
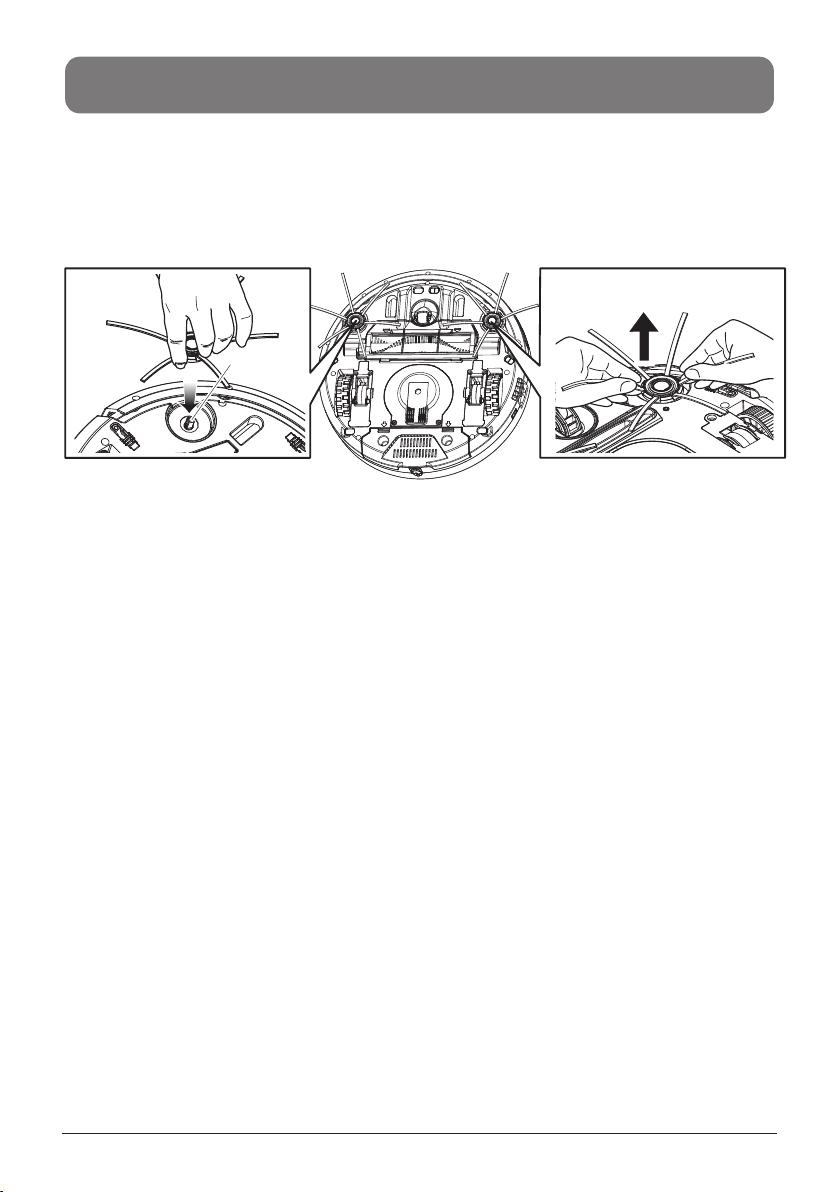
Installing and Removing Side Brush:
To install: Push the brush directly onto the holder.(Fig. 1)
To remove: Hold two opposite sides of the brush as shown in Fig. 2, and evenly pull
upward to remove the brush.
INSTALLATION GUIDE
Fig. 2
PULL UP!
Fig. 1
Side brush
holder
PRESS
CLICK!
13
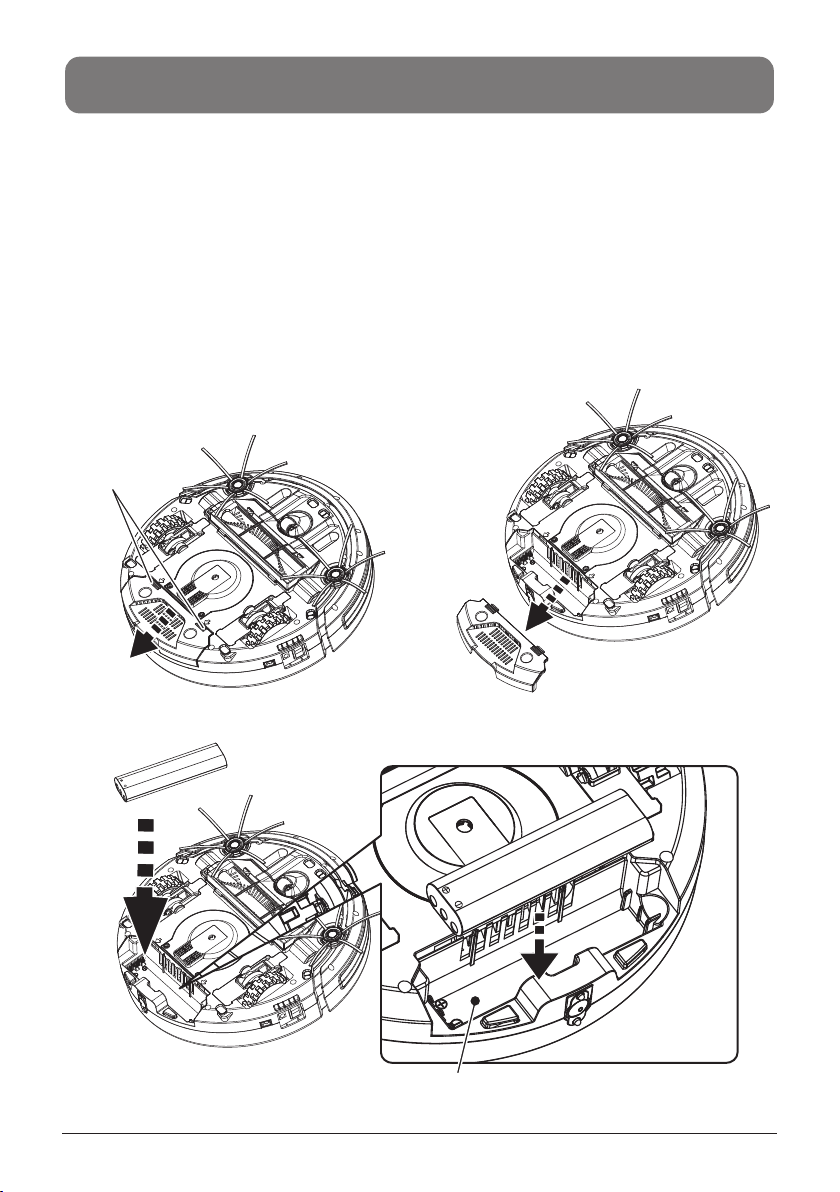
Battery Installation and Removal:
2. The details on how to remove the battery: To open the battery cover first by
pressing the two points “A” (marked in the below diagram) and slide the battery cover
in the direction of arrow “B” (marked in the below diagram). Then push the battery
toward the springs’ side in order to take out the battery easily.
3. The method of replacing battery: To install the new battery in the battery
compartment with correct polarity + and – sign which marked on the battery
compartment. Put to battery connecting dots side down close to the springs mounted
on the battery compartment, then push toward springs for easier inserting the battery.
Be sure to orient the battery contacts with those of the unit.
Slide back the battery cover to close it.
1. Turn off the power switch before installing the battery.
INSTALLATION GUIDE
Battery Reservoir
A
B
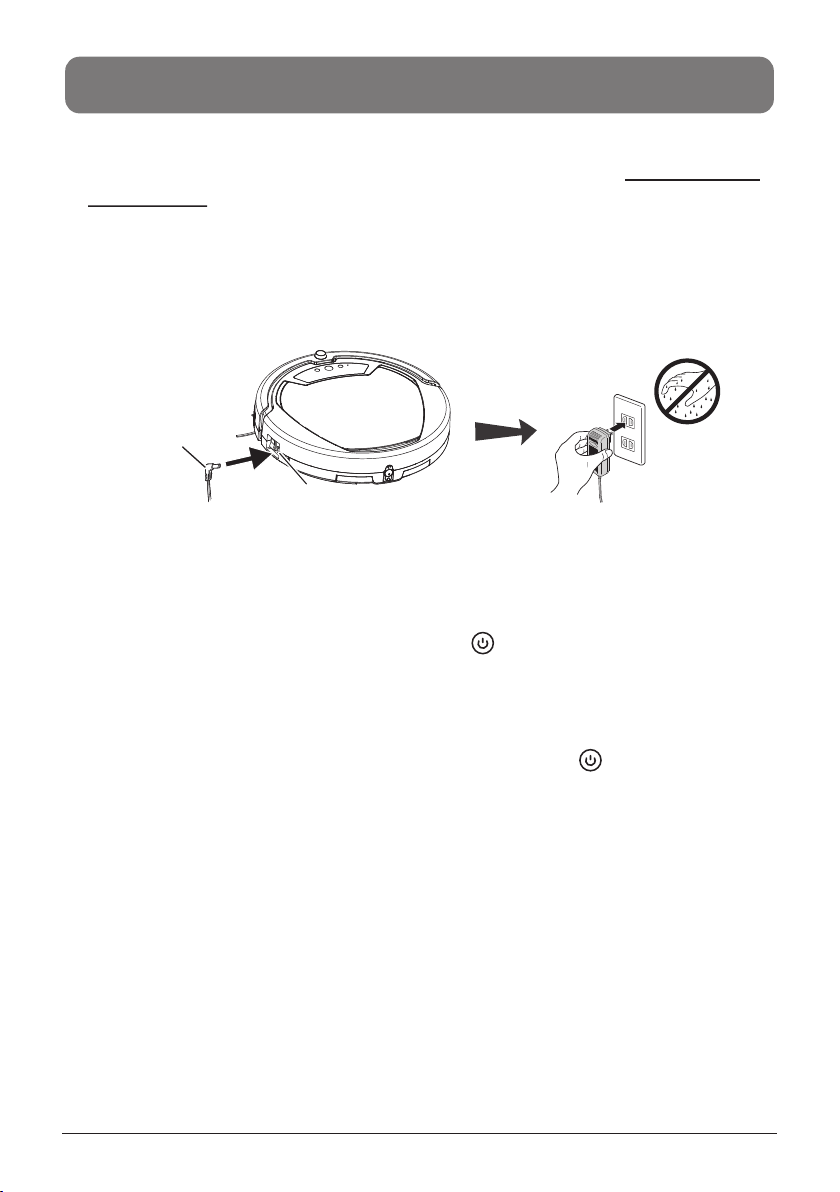
Recharging Battery:
1. Before charging, please check if the battery is properly mounted and turn on the
power switch.
2. Two ways to charge the battery:
A. Push the adaptor plug into d.c. jack at the side of the unit first, and then plug the
a.c end of the adaptor into the a.c. power outlet on the wall. (Please connect the
adaptor to the unit first before connecting to the a.c power outlet.)
B. Make sure the docking station is installed properly, place the unit to the docking
station, make sure the contact points at the back of the unit is contacted with the
contact plate at the docking station.(See page 15 proof test)
3. When charging, the LED indicator below the “ ” (Power) on M680GMA (as
above diagram) will flash green, and it will stay green when the cleaner has been
uninterruptedly charged for 4~6 hours
4. To make sure the battery always at full charged status, the unit will be charged 15
min every hour after full.
5. When the M680GMA is in the "Battery Low" situation, “ ” (Power) will stay in
the RED.
14
INSTALLATION GUIDE
Adaptor Plug
D.C. jack

Proof Test:
Please try to test the installation of docking station, if the vacuum cannot go
back to the docking station and charge successfully, then please replace the
docking station to the proper height.
Test by the unit, turn on the power switch of the unit, Use ( ) on APP or
press robotic control panel icon to control the robot go back to the docking
station for recharging. Please refer to below picture.
15
INSTALLATION GUIDE
50 cm 50 cm
100 cm
Open Space
Power Switch On

16
INSTALLATION GUIDE
Preparation of Room Containment:
"-"
1. Turn the power switch off.
2. Press two points mark A and slide the cover in the direction of arrow B as shown in
the diagram below.
3. Insert four size AA batteries and match "+"and to the battery compartment,
then close the cover of the containment.
A
B
Battery Reservoir

Preparation for Operation:
1. Install the side brushes and install the battery according to the manual.
2. Turn on the power switch on the side of the unit, and charge the battery for 4~6 hours
prior to the first operation.
3. To ensure the best efficiency of the unit, first is to remove clothes, paper, cable,
extension cable scattered on the floor, roll up the curtains and drapes if any to avert
the possible accident. In case of the cable entangled with the cleaner, the cable
could move around as the cleaner is working and might topple down the table,
chairs, even cabinet or cupboard.
※When start the unit.
→Check:
. Dust bin is full.
. Intake Valve is stuck with dirt.
.Wipe out the inner and outside of Intake Valve area.
Room containment of M680GMA may contain the cleaning area by
putting it in a proper place.
For example:
To contain the Robot Cleaner cleaning area A (shaded area) and not crossing to area B
by putting the Room containment in the position as shown in Fig. 3. And to contain area
B (shaded area) by putting the Room Containment in the position as shown in Fig. 4.
1. Operation without connecting to the docking station:
Place the cleaner on the floor and turn on the power switch then press the operation
button to operate, press again to stop.
2. When battery low, the unit is programmed to find the docking station automatically
for recharge. If the unit is failed to return to the docking station, user can put it back
connecting to the docking station manually.
3. Press the “ ” key from APP or press robotic control panel power button
to start clean.
17
GENERAL OPERATION
Fig. 3 Fig. 4

18
GENERAL OPERATION
Control Panel:
Dust Bin Full or Nozzle Block
LED Indicator
Docking Button
(Wifi pairing Button)
Small Area Clean Button
Clean Pattern ICON
Power Button
Double 8 LED Display
Docking LED Indicator
Wifi Connection Status ICON

Download APP and scheduling setting :
How to Download APP:
1. To download " SmartCleanerQ " APP from Playstore or APP store.
2. Scan the QR code and download APP.
Scheduling setting from APP:
※The vacuum cleaner can function normally no matter Wi-Fi is connected
or not.
19
GENERAL OPERATION
Android iOS
Table of contents


