ADLY MOTO ATV50RS User manual

1
FOREWORD
May we, the manufacturer, take this opportunity to thank you for choosing our ATV
to serve you.
This Owner’s Manual is prepared for you the details as to operate and
maintenance necessarily to perform in safety.
Therefore, we would like you to read the manual before operate the vehicle.
It is our sincerely wish that you enjoy operating the ATV and getting fun from it.
Should you have any problems, please feel free to contact our local dealer in your
area.

2
OPERATION WARNING
THIS VEHICLE IS NOT A TOY AND CAN BE HAZARDOUS TO OPERATE.
NEVER OPERATE THIS VEHICLE WITHOUT PROPER INSTRUCTION.
THIS VEHICLE IS NOT FOR YOUTH UNDER 16 YEARS OLD.
ALWAYS WEAR AHELMET.
READ THIS OWNER’S MANUAL CAREFULLY.
IT’S DANGEROUS TO DRIVE ON AN UNCLEAR ROAD CONDITION.
TO LOWER YOUR SPEED WHEN DRIVING AT NIGHT.
NEVER CONSUME ALCOHOL OR DRUGS BEFORE OR DURING RIDING.
NEVER OPERATE THIS VEHICLE ON HILLS TOO STEEP.
ALWAYS INSPECT YOUR VEHICLE EACH TIME YOU USE IT.

3
SAFETY NOTES
★Don’t allow your child to ride without your supervision.
★It's strongly recommend operator ride only.
★Keep a safety distance between your vehicle and other vehicles.
★This vehicle is designed to be operated only on level, off road surfaces, free of
obstacles.
★Both the parent and their children must fully understand everything in this
manual before riding.
★It is illegal to ride this vehicle on public roads or highways. If it is necessary to
cross a public road, please to get off this vehicle and push it across.
★Do not operate this vehicle while under the influence of alcohol or drugs. This
can impair judgments and result in serious injury or even death.

4
SPECIFICATIONS
MODEL
ATV50RS/RS-LC
ENGINE CAPACITY
50cc
TYPE
AIR or LIQUID-COOLED,2 STROKE
STARTING
KICK & ELECTRIC
LUBRICATION
Oil Pump Separate Supply
TRANSMISSION
AUTOMATIC (C.V.T.,V-Belt)
SPARK PLUG
NGK BPR7HS
BATTERY
12V-5AH
OIL CAPACITY
1.0 Liter
FUEL TANK
8.2 Liter
OVERALL LENGTH
1790 mm
OVERALL WIDTH
1050 mm
OVERALL HEIGHT
1060 mm
SEAT HEIGHT
815 mm
WHEEL BASE
1150 mm
CLAIMED DRY WEIGHT
155 kg
BRAKE
Front: R/L Disc Brake Rear: Disc Brake
SUSPENSION
Front: Dual A-arm Rear: Swing arm
with 5 way preload-adjustable shock
FRONT TIRE
21×7-10
REAR TIRE
21×7-10

5
PERIODICAL CHECK & SERVICES
Maintenance Schedule
The maintenance intervals in the following table are based upon average riding
conditions. Riding in unusually dusty areas, require more frequent servicing.
Frequency
Item
Regular Service Mileage ( KM)
500
1000
2000
3000
4000
5000
6000
Spark Plug
I
I
I
Coolant(LC Only)
CHECK EVERY RIDE
Air Filter
CLEAN AND CHECK EACH 1000KM OR AFTER OFF-ROAD USE
Carburetor
I
A
A
C,A
Driver Chain
CHECK AND LUBRICATION EVERY RIDE
Gear Oil
R
I
R
CVT Belt
I
Suspension
I
I
I
Brake System
CHECK EVERY RIDE
Tires Pressure
CHECK EVERY RIDE
Tire Wear
I
I
Steering
I
I
I
Chassis Nuts,Bolts
I
I
I
Battery
I
I
I
I
C: Clean; A: Adjust; G: Grease; I: Inspection, check, replace if necessary

6
CHECK PRIOR TO OPERATE
Inspect your vehicle every day before you run it. It only takes a few minutes to
check and may save your life.
★Check the tires condition and pressure.
★Check the nuts, bolts and other fasteners.
★Check the drive chain condition and slack.
★Check the engine stop switch for good function.
★Check the throttle for smooth opening and closing.
★Check the fuel level in fuel tank and oil level in oil tank.
★Check the brake operation to see is there any tie-up by brake cables.
★Check the easiness for turning to the left and right of steering handle.
★Check brake lever for effective braking. The free play should be between
1-2 cm (about 1/2 inch). Try braking soon as you are driving off.

7
CHECK PRIOR TO OPERATE
Check and refueling
Insert the key and turn to “open”
position for opening the fuel cap.
After refueling, insert the cap properly
and turn the key to “lock” position.
Pull out the key and check fuel cap to
make sure it’s locked
CAUTIONS
:
*Stop the engine for refueling.
*Use unleaded gasoline with octane
level 92 or higher.
*Turn the gasoline cap counter
clockwise to loose it, clockwise to
tighten.
*Avoid overfilling the gasoline, when
refueling, it could cause a fire when
the engine is hot.

8
CHECK PRIOR TO OPERATE
Check and / or Refill Oil
CAUTIONS
:
*Be sure to have sufficient oil, and the cap is installed correctly.
*Total oil tank capacity:1.0 Liter
*Prescribed oil: 2-cycle engine oil only, synthetic type is recommended.
*Use grade SAE 90 for transmission gear oil.
*Long distance driving would damage or burn out the engine parts if oil is
insufficient.
*
*
9
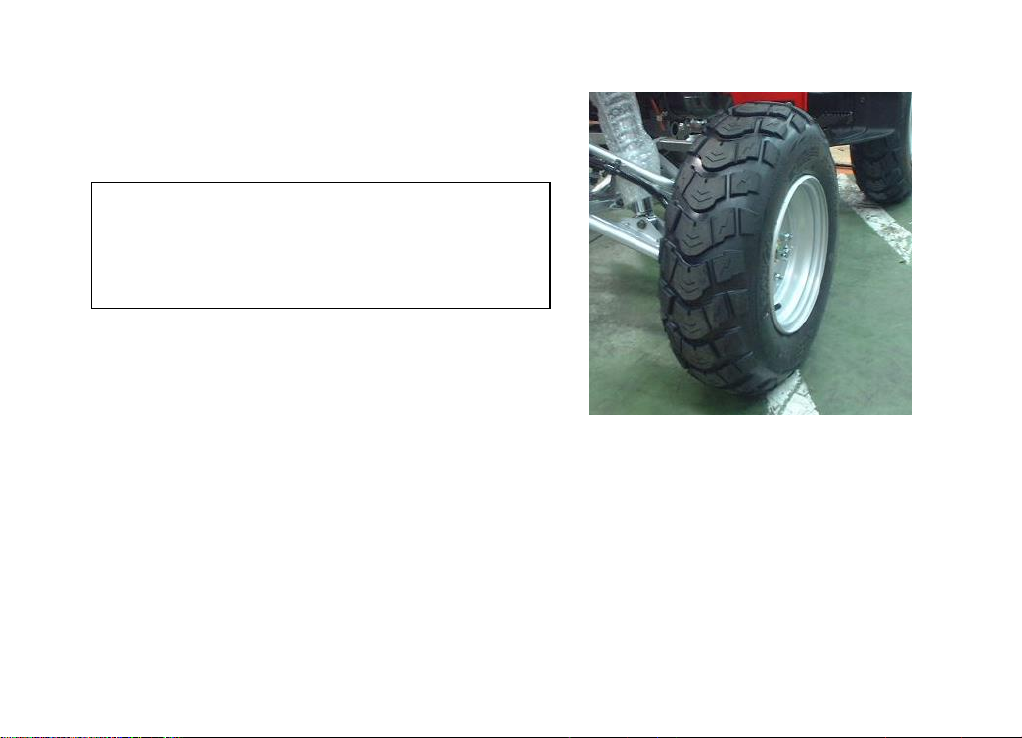
CHECK PRIOR TO OPERATE
Check tires pressure
*Check tire pressure if they are normal.
*Inflate the tire pressure as indicated on the tire.
*Check if there is any gravel in the tread grooves or any nail puncture.
If so clean it.
*Check for any crack or heavy worn-out, if worn-out exceeds the limit,
replace it with new ones,
*Detailed of tire specification please check the marking on tires.
Tire size: front 21 × 7-10 / Rear 21×7-10
Recommended pressure: 5 psi (0.35kgf/cm2)
Max. pressure : 7 psi (0.49 kgf/cm2)
Min. pressure : 3 psi (0.21kgf/cm2)

10
CHECK PRIOR TO OPERATE
Check battery
1. Open the seat.
2. Remove positive and negative
terminals (Negative “Θ”first).
3. Remove battery and check voltage.
Normal voltage:12V and above
4. Keep terminals clean constantly.
Charge the battery base on the
instruction.
Check front and rear shock absorbers.
*Apply pressure on both front steering handle and seat to check the function of
front and rear absorbers.
Check if exhaust is normal
*Check the exhaust system for any abnormal condition.

11
CHECK PRIOR TO OPERATE
Chain adjustment
1. Loosening the fastening screw of swing arm.
2. Loosening the lock nuts and moving the chain tension plate on the swing arm
evenly which can adjusts the chain tension at more or less 10-20 mm space of
the direction from horizontal.
3. Tightening the 4 nuts on swing arm.
4. Lock the adjusting screw of swing arm.
Adjusting Nut

12
CHECK PRIOR TO OPERATE
Coolant level (Liquid cooled only)
With vehicle on a level surface,
liquid should be between MIN and
MAX level marks stamped on the
reservoir surface.
CAUTIONS
:
Check coolant level while engine is
cold.
Never add coolant in cooling system
when engine is hot.
If the coolant is added in the coolant
reservoir, check the level in the
radiator too and add coolant if
necessary.
MAX
MIN

13
CHECK PRIOR TO OPERATE
PREVIOUSLY INSPECTION
FOR SAFETY SAKE AND TO PREVENT VEHICLE DAMAGE,
THE PREVIOUSLY INSPECTION IS ABSOLUTELY REQUIRED.
CAUTION:
The temperature of engine and exhaust muffle is very high.
Be careful while checking engine oil to avoid burns.

14
OPERATION
MAIN SWITCH
OFF
*To turn off the engine.
*The key can be extracted.
ON
*To start the engine.
*The key can not be taken
out.
*To operate the head light.
*The key can not be taken out.
15
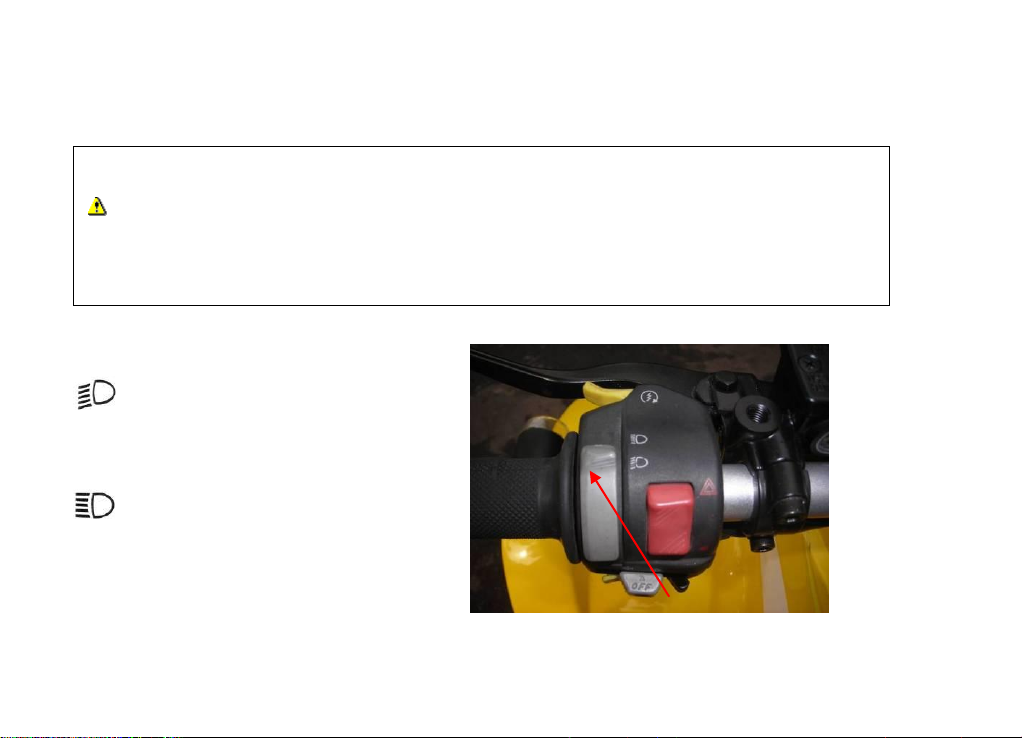
OPERATION
ELECTRIC STARTER
HEADLIGHT BEAM SWITCH
Low beam
*For normal condition.
High beam
*For farther lighting.
*Cranks the engine.
CAUTIONS
:
※Don’t push down the starter button again as the engine is running.
※Don’t press the starter button more than 10 seconds when start up.
Headlight Beam Switch
16
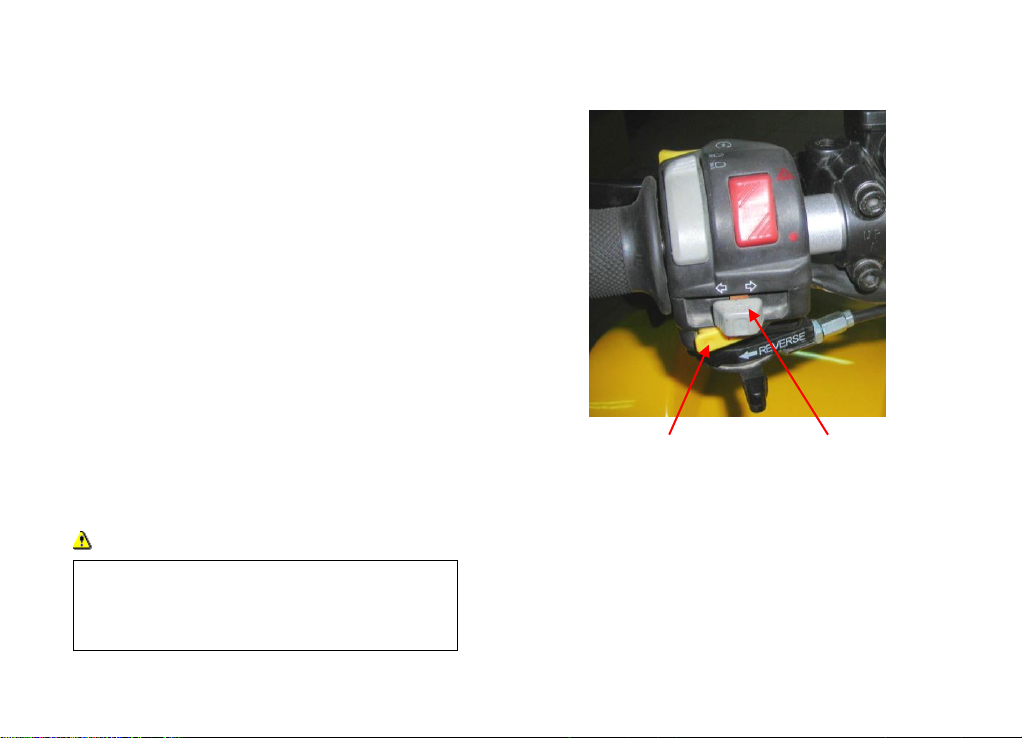
OPERATION
HORN BUTTON
*Turn on main switch and press down the
horn buttom, the horn will sound.
TURN SIGNAL LIGHT SWITCH
Right signal light flashing indicates turning to
the right.
Left signal light flashing indicates turning to the left.
CAUTIONS
:
*Turn on signal light before turns.
*Turn off signal light after turning.
Horn Button
Turn Signal Switch
17
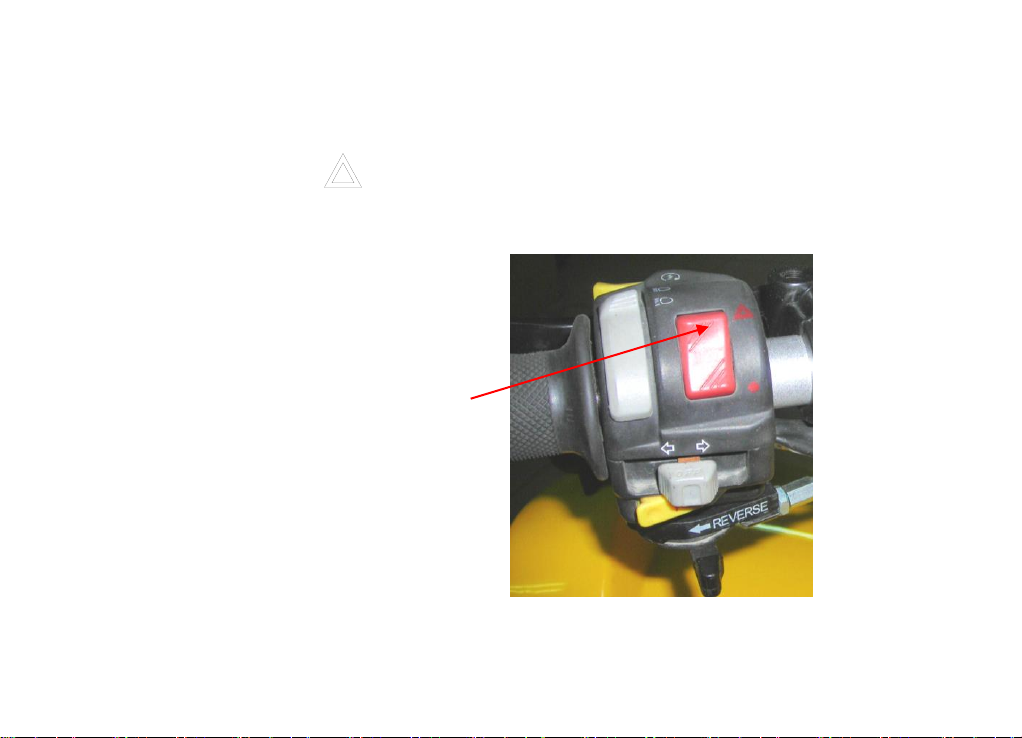
OPERATION
HAZARD WARNING SWITCH
HAZARD ON
*The 4 direction lights will start blinking together.
HAZARD OFF ●
Hazard Switch

18
OPERATION
INSTRUMENT PANEL
L/R turn signal indicator
Neutral indicator
Reverse indicator
Speedometer
Low gear
Drive gear
signal
Oil signal
Odometer
High beam indicator
Mode key
Set key
Trip
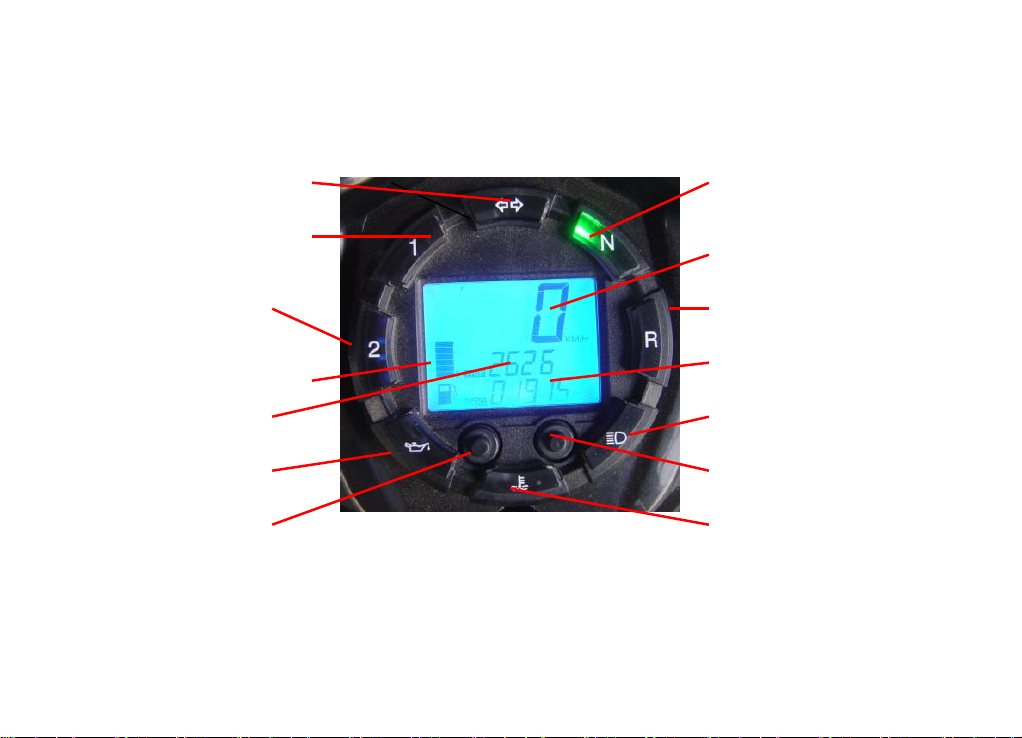
19
OPERATION
INSTRUMENT PANEL-Liquid cooled only
L/R turn signal indicator
Neutral indicator
Reverse indicator
Speedometer
Low gear
Drive gear
signal
Oil signal
Odometer
High beam indicator
Mode key
Set
key
Trip
Coolant temperature
warning light
Fuel level indicator bar

20
OPERATION
FRONT / REAR BRAK
The right hand break lever effect on the
front wheels and the left hand break
lever effect on the rear wheels only.
PARKING BRAKE
Pull the parking brake lever toward
right side will perform brake function.
Pull back the parking brake lever
toward left side will release brake
function.
Parking Brake Lever 2008 and on
ON
OFF
This manual suits for next models
1
Table of contents
Other ADLY MOTO Offroad Vehicle manuals


