AEG SANTO 2992 KG User manual

AUS
ERFAHRUNG
GUT
Kühl-Gefrierkombinationen
SANTO 2992 KG
Fridge-freezer
SANTO 2992 KG
Réfrigérateur-congélateur
SANTO 2992 KG
Gebrauchsanweisungen
Instruction booklet
Mode d’emploi

30
Dear Customer,
Beforeusingthisnewapplianceforthefirsttime,itisimportantthatyoureadthisinstruction
bookletcarefully.Itprovidesthenecessaryinstructionsforsafeoperation,correctinstallation
and cleaning and maintenance of the appliance.
At the end of the booklet, in the section “Technical terms”, you will find an explanation of
all the technical terms used in the text.
Keep the book handy for future reference. If you transfer the appliance to another owner,
make sure that you pass on the booklet together with the appliance.
Note: This instruction booklet covers a number of models which are technically similar
but which have different equipment and fittings. Take into account only the information
which refers specifically to the model purchased.

31
Contents
Safety . . . . . . . . . . . . . . . . . . . . . . . . . . . . . . . . . . . . . . . . . . . . . . . . . . . . . . . . . . .
Disposal . . . . . . . . . . . . . . . . . . . . . . . . . . . . . . . . . . . . . . . . . . . . . . . . . . . . . . . . .
Information on appliance packaging . . . . . . . . . . . . . . . . . . . . . . . . . . . . . . . . . .
Disposal of appliances which are no longer used . . . . . . . . . . . . . . . . . . . . . . . .
Remove all protection fitted for transport . . . . . . . . . . . . . . . . . . . . . . . . . . . . .
Installation . . . . . . . . . . . . . . . . . . . . . . . . . . . . . . . . . . . . . . . . . . . . . . . . . . . . . . .
Positioning . . . . . . . . . . . . . . . . . . . . . . . . . . . . . . . . . . . . . . . . . . . . . . . . . . . . .
The appliance must be ventilated . . . . . . . . . . . . . . . . . . . . . . . . . . . . . . . . . . . .
Levelling the appliance . . . . . . . . . . . . . . . . . . . . . . . . . . . . . . . . . . . . . . . . . . . .
Electrical connection. . . . . . . . . . . . . . . . . . . . . . . . . . . . . . . . . . . . . . . . . . . . . .
Changing the opening direction of the doors. . . . . . . . . . . . . . . . . . . . . . . . . . .
Aligning the doors. . . . . . . . . . . . . . . . . . . . . . . . . . . . . . . . . . . . . . . . . . . . . . . . .
Description of the appliance . . . . . . . . . . . . . . . . . . . . . . . . . . . . . . . . . . . . . . . .
Appliance interior . . . . . . . . . . . . . . . . . . . . . . . . . . . . . . . . . . . . . . . . . . . . . . . .
Cold pack accumulator. . . . . . . . . . . . . . . . . . . . . . . . . . . . . . . . . . . . . . . . . . . .
Control panel and displays . . . . . . . . . . . . . . . . . . . . . . . . . . . . . . . . . . . . . . . . .
Before starting up . . . . . . . . . . . . . . . . . . . . . . . . . . . . . . . . . . . . . . . . . . . . . . . . .
Starting up . . . . . . . . . . . . . . . . . . . . . . . . . . . . . . . . . . . . . . . . . . . . . . . . . . . . . . .
Temperature adjustment. . . . . . . . . . . . . . . . . . . . . . . . . . . . . . . . . . . . . . . . . . . .
Switching the appliance off . . . . . . . . . . . . . . . . . . . . . . . . . . . . . . . . . . . . . . . . .
Temperature alarm . . . . . . . . . . . . . . . . . . . . . . . . . . . . . . . . . . . . . . . . . . . . . . . .
Internal accessories . . . . . . . . . . . . . . . . . . . . . . . . . . . . . . . . . . . . . . . . . . . . . . .
Shelves. . . . . . . . . . . . . . . . . . . . . . . . . . . . . . . . . . . . . . . . . . . . . . . . . . . . . . . .
Door liner . . . . . . . . . . . . . . . . . . . . . . . . . . . . . . . . . . . . . . . . . . . . . . . . . . . . . .
Drinks dispenser. . . . . . . . . . . . . . . . . . . . . . . . . . . . . . . . . . . . . . . . . . . . . . . . .
Food symbols/date cards . . . . . . . . . . . . . . . . . . . . . . . . . . . . . . . . . . . . . . . . . .
Correct positioning of foods . . . . . . . . . . . . . . . . . . . . . . . . . . . . . . . . . . . . . . . .
Freezing fresh food . . . . . . . . . . . . . . . . . . . . . . . . . . . . . . . . . . . . . . . . . . . . . . . .
Ice cubes . . . . . . . . . . . . . . . . . . . . . . . . . . . . . . . . . . . . . . . . . . . . . . . . . . . . . . . .
Automatic defrosting . . . . . . . . . . . . . . . . . . . . . . . . . . . . . . . . . . . . . . . . . . . . . .
Cleaning and maintenance. . . . . . . . . . . . . . . . . . . . . . . . . . . . . . . . . . . . . . . . . .
Tips for reducing energy consumption. . . . . . . . . . . . . . . . . . . . . . . . . . . . . . . .
Troubleshooting. . . . . . . . . . . . . . . . . . . . . . . . . . . . . . . . . . . . . . . . . . . . . . . . . . .
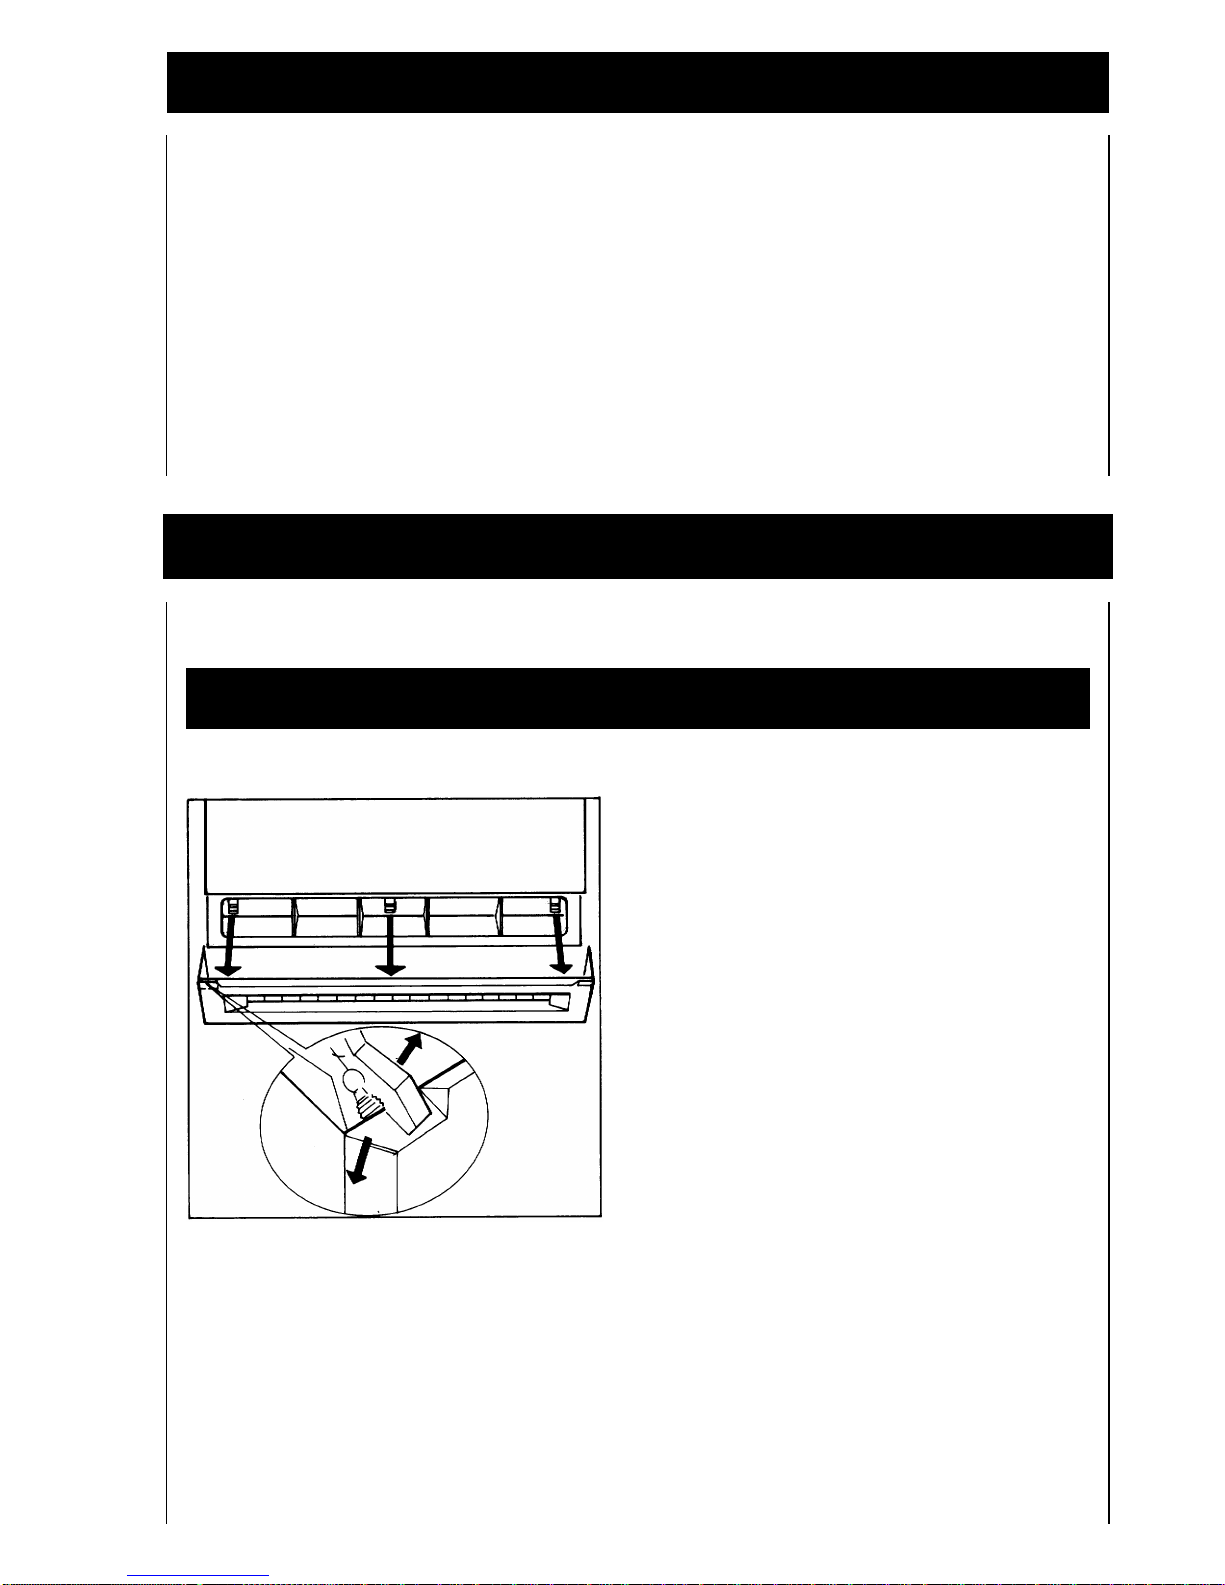
Replacing the interior light bulb. . . . . . . . . . . . . . . . . . . . . . . . . . . . . . . . . . . . . .
Service . . . . . . . . . . . . . . . . . . . . . . . . . . . . . . . . . . . . . . . . . . . . . . . . . . . . . . . . . .
Noises during normal operation . . . . . . . . . . . . . . . . . . . . . . . . . . . . . . . . . . . . .
Regulations, standards, directives . . . . . . . . . . . . . . . . . . . . . . . . . . . . . . . . . . .
Technical terms . . . . . . . . . . . . . . . . . . . . . . . . . . . . . . . . . . . . . . . . . . . . . . . . . . .
32
33
33
33
34
34
34
35
36
36
37
40
41
41
42
42
43
43
44
45
45
46
46
46
47
48
49
51
52
52
52
53
54
55
55
56
56
57

32
Safety
The safety of our refrigerators complies with all the normal technical rules and with the
“Law relating to the safety of appliances”. We would also like to draw the user’s attention
to the following safety recommendations:
Appropriate use of the appliance
❒This appliance is designed for domestic use. It is suitable for refrigerating, freezing
and storing foodstuffs and for making ice cubes. The manufacturer declines respon-
sibility for any damage resulting from of inappropriate or incorrect use of the appli-
ance.
❒For safety reasons, the characteristics of this appliance must not be modified.
❒If the appliance is not used for private domestic purposes, or if it is used for purposes
other than the refrigeration, freezing and storage of foodstuffs, make sure that all cur-
rent local regulations are complied with.
Before starting up the appliance for the first time
❒Check that the appliance has not been damaged during transport. In no circum-
stances should a damaged appliance be used! In the event of damage, contact the
retailer from whom the appliance was purchased.
❒During transport and installation, take care not to damage the cooling circuit compo-
nents.
Child safety
❒Some packing materials (e.g. plastic sheeting, polystyrene) can be dangerous for chil-
dren. Danger of suffocation! Keep children away from packing materials.
❒Render your old appliance inoperative before disposing of it. Pull out the plug, cut off
the electric cable and remove or destroy any catch or locking device. This will prevent
children from getting trapped inside whilst playing (danger of suffocation) and avoid
any other serious threat to their life.
❒Very often, children do not realise that domestic appliances can be dangerous. Keep
children under control and do not allow them to play with these appliances.
Daily use
❒It is possible for the hermetic seal on inflammable gas or liquid containers to break
under the effect of cold, leading to a risk of explosion! Never store inflammable gas or
liquid containers, such as spray cans, lighter fuel refills, etc., inside the appliance.
❒Never place bottles or cans in the freezer compartment. They could split when the
contents freeze - with fizzy drinks, they could even explode! Never place fizzy drinks,
fruit juice, beer, wine, sparkling wine, etc. in the freezer: The only exception is drinks
with a high alcohol content, which may be stored in the freezer.
❒Never consume ice lollies or ice cubes straight from the appliance because, if they
are very cold, they can stick to the lips or tongue and cause frost burns.
❒Never touch frozen food with wet hands. The skin could stick to it.

33
❒Neveroperateelectricaldevices(e.g.icecreammakers,electricmixers)insidetheappli-
ance.
❒Alwaysunplugorswitchofftheapplianceorunscrewthesafetyfuseinthedomesticpow-
er supply before performing any cleaning operations.
❒When unplugging the appliance, always take hold of the plug, never pull just the ca-
ble.
❒If the appliance is malfunctioning, first consult the “Troubleshooting” section of this in-
struction booklet. If you are unable to solve the problem by following the advice given,
do not attempt any further repairs on your own.
❒Repairs to the appliance must be carried out exclusively by specialised personnel.
Repairs carried out by unskilled persons can cause serious injury to the user. If nec-
essary, contact the retailer or our Technical Service Centre.
Information on appliance packaging
All packing materials used are environmentally friendly! They can be disposed of quite
safely with normal household refuse, or burnt in refuse incinerators.
Materials: All plastic materials are recyclable and marked as follows:
>PE< for polyethylene, e.g. outer wrapping and internal bags.
>PS< for expanded polystyrene, e.g. packing spacers; totally free of CFC.
Recycled paper is used for making all cardboard packing and it is recommended that this
material be disposed of in the appropriate selective collection containers.
Disposal of appliances which are no longer used
To protect the environment, appliances must be disposed of in a proper manner.
This applies to your both your old appliance, and to this new one when it reaches the end
of its life.
Disposal
Warning! Render the old appliance inoperative before disposing of it. Pull out the
plug, cut off the electric cable and remove or destroy any catch or locking device.
This will prevent children from getting trapped inside whilst playing (danger of suffo-
cation) and avoid any other serious threat to their life.

34
Warnings for disposal:
– It is prohibited to dispose of the appliance with normal or bulky household refuse.
– Make sure that the cooling circuit, in particular the heat exchanger on the back, is not
damaged.
– Ask your local authority or refuse disposal office for collection dates or the address of
suitable disposal sites.
The appliance and some of its internal equipment are protected to avoid any possible
damage during transport. Before switching the appliance on, remove all adhesive tape,
protective sheets and any other packing and protective materials.
Tip: Remove any residual glue with solvent or benzene stain remover.
Positioning
Position the appliance in a dry, well-ventilated room.
Ambient temperature has an effect on energy consumption. You are therefore advised:
– not to position the appliance in direct sunlight;
– not to place it next to radiators, electric or gas cookers or any other source of heat;
– to position the appliance so that the ambient temperature corresponds to the class
for which it is designed.
The class is shown on the rating plate located inside the appliance, on the left-hand side.
The table below shows the classes relating to various ambient temperatures.
Class for ambient temperature
SN from +10°C to + 32°C
N from +16°C to + 32°C
ST from +18°C to + 38°C
T from +18°C to + 43°C
If positioning the appliance next to a heat source is inevitable, maintain the following min-
imum distances: 3 cm from electric cookers; 30 cm from oil or solid fuel stoves.
Otherwise a thermal insulation panel must be fitted between the heat source and the ap-
pliance.
If the appliance is positioned next to another refrigerator or freezer, a 5 cm gap is needed
to avoid the formation of condensation on the outer walls.
Remove all protection fitted for transport
Installation
Disposal

35
The appliance must be ventilated
Air flows in from under the door, at the front, and flows out upwards, over the back
(Fig. 1/A).
For correct air circulation, it is important that ventilation openings are not covered or ob-
structed.
Important! If the appliance is positioned under a kitchen wall unit, a minimum clearance
of 10 cm must be left between the top of the appliance and the overhanging wall unit
(Fig. 1/B).
Fig. 1

36
Levelling the appliance
❒Tomovetheappliancetotherequiredposition,simplypushlightlyagainstthetopdoorto
tilttheappliancebackwards.Itsweightisthereforetransferredtotherearcastorstoallow
easy movement.
❒Place the appliance on a flat hard floor. The two adjustable feet on the front of the appli-
ance enable it to be accurately levelled by screwing them in or out as required (Fig. 2).
Electrical connection
WARNING: THIS APPLIANCE MUST BE EARTHED.
Please ensure that the voltage and current indicated on the rating plate agree with the
voltage of your electricity supply.
220/240 volts (i.e. 220/240 V AC).
If your appliance has been equipped with a mains lead with a moulded-on type plug, you
must comply with the following regulations: The plug moulded onto the cord incorporates a
fuse. For replacement, use a 13 amp BS 1362 fuse. Only ASTA approved or certified fuses
should be used. The fuse cover/carrier must be replaced in the event of changing the fuse.
The plug must not be used if the fuse cover/carrier is lost. A replacement cover/carrier must
be obtained from an electrical goods retailer. If the socket outlets in your home are not suit-
able for the plug fitted to the appliance, then the plug must be cut off and an appropriate one
fitted. When fitting the plug please note the following points:
Important
The wires in the mains lead are coloured in accordance with the following code:
Green and Yellow - Earth Blue - Neutral Brown - Live
As the colours of the wires in the main lead of this appliance may not correspond with the
coloured markings identifying the terminals in your plug, proceed as follows:
1. The wire which is coloured green and yellow must be connected to the earth terminal
in your plug, which is marked with the letter E or by the earth symbol or coloured
green, or green and yellow.
2. The wire which is coloured brown must be connected to the live terminal which is
Fig. 2
Installation

37
marked with the letter L or coloured red.
3. The wire which is coloured blue must be connected to the neutral terminal which is
marked with the letter N or coloured black.
When wiring the plug, ensure that all strands of wire are securely retained in each terminal.
Do not forget to tighten the main lead clamp on the plug.
Warning! A cut-off plug inserted into a 13 amp socket is a serious safety (shock) hazard.
Ensure that the cut-off plug is disposed of safely.
Voltage 220/240 V AC Fuse rating 13 amps
See rating plate for further information. The rating plate is inside, on the left.
If necessary, the opening direction of the doors can be changed from right-hand (version sup-
plied) to left-hand to suit the specific position of the appliance or for more convenient use.
❒Remove the plinth cover and, with a pair of pliers, release the recess for the bottom
hinge at its left-hand end (Fig. 3).
Changing the opening direction of the doors
Warning! Unplug the appliance before carrying out these operations.
Fig. 3

38
❒Unscrew the bottom hinge (Fig. 4) and remove the freezer compartment door by pull-
ing it downwards.
❒Remove the hole masking plug from the top left-hand side of the freezer compart-
ment door with the help of a small screwdriver; refit it on the opposite side.
❒Unscrew the pin from the top hinge of the freezer compartment door and screw it
back in on the opposite side (Fig. 5).
❒Slide the freezer compartment door onto the top pin.
Fig. 4
Fig. 5
Changing the opening direction of the doors

39
❒Insertthebottomhingeintothebottomofthefreezercompartmentdoorandfullyscrew
up (Fig. 6). Remember to fit the washers.
❒Refit the plinth cover
❒Unscrew the bottom hinge of the refrigerator compartment door (Fig. 7) and remove
the door downwards.
Fig. 6
Fig. 7 Fig. 8

40
❒Unscrewthepinfromthebottomhingeoftherefrigeratorcompartmentdoorandscrewit
back in on the opposite side (Fig. 8).
❒With the help of a screwdriver, remove the hole masking plugs from the left-hand side
and refit them on the right-hand side. (Fig. 9).
❒Unscrew the pin from the top hinge of the refrigerator compartment door and screw it
back in on the left-hand side. (Fig. 9). Remember to fit the washer.
❒Slide the refrigerator compartment door onto the top hinge pin.
❒Insert the bottom hinge of the refrigerator compartment door into the bottom
left-hand side and screw up (Fig. 10).
❒If necessary, align the doors (see section “Aligning the doors”).
rIf necessary, align the door by adjusting the relevant hinge sideways (Fig. 11).
Fig. 9 Fig. 10
Aligning the doors
Fig. 11

41
Description of the appliance
Appliance interior
Control panel and displays
Butter/cheese compartment with door
Shelf for small items (adjustable sideways, can be lifted)
Bottle shelf with tube compartment and drinks dispenser
Fruit and vegetable containers
Shelves
Rating plate (inside the appliance)
0°C “longfresh” cold compartment with pull-out containers
Frozen food drawers (storage and freezing)
Frozen food drawer (storage only)
Fig. 12
1
2
3
4
5
6
7
8
9
10

42
Cold-pack accumulator
(Some models only)
Intheeventofapowercut,thecold-packaccumulatorwillprolongthestorageoffrozenfood
by a few hours.
For safety reasons, during transport, cold-pack accumulators are placed in the bottom
drawer of the freezer compartment.
To use them efficiently, place the frozen cold-pack accumulators on top of frozen foods in
the top drawer (see also section “Before starting-up”).
Control panel and displays
1START/STOP button
2Temperature selector button (refrigerator compartment)
3Temperature display (refrigerator compartment)
4Temperature selector button (freezer compartment)
5Temperature display (freezer compartment)
6Fast freeze button
7ALARM-STOP button
8Freezer compartment temperature alarm pilot light (red)
Fig. 13
°C °C
12 467
853

43
Before starting up
❒Like all new appliances, this appliance has a characteristic “new” smell. Clean the in-
side of the appliance and all accessories before starting it up (see section “Cleaning
and Maintenance”).
❒Before starting up the appliance for the first time, remove the cold-pack accumula-
tors - if supplied - from the bottom drawer of the freezer compartment (see also sec-
tion “Description of the appliance”).
❒To freeze, place the cold-pack accumulators in the top drawer of the freezer com-
partment after the optimum storage temperature of –18°C has been reached.
❒After about 24 hours, place the cold-pack accumulators in the specified position: on
top of frozen food in the top drawer.
❒Insert the plug in the power socket.
❒Press the START/STOP button.
– The interior light comes on. The compressor starts up and from then on operates
automatically.
– Initially, the following symbol “ ” appears in the refrigerator compartment tem-
perature display window. When the temperature inside the refrigerator compart-
ment falls to below +9°C, the temperature inside this compartment is displayed.
– The freezer compartment temperature display window shows the temperature in-
side this compartment.
– The red temperature alarm light flashes to indicate that the temperature inside the
freezer compartment has not reached the required value for safe storage of food.
To stop the flashing alarm, press the ALARM-STOP button.
❒Before placing food in the appliance, wait until the temperatures have reached the fol-
lowing values required for safe storage:
+8°C or colder in the refrigerator compartment;
–18°C or colder in the freezer compartment.
The required temperatures will be reached a few hours after having switched the ap-
pliance on (at a surrounding ambient temperature of 20°C, after about 4 hours).
Information:
– The following temperatures are preset by the manufacturer:
+8°C for the refrigerator compartment;
–18°C for the freezer compartment.
– The temperature inside the 0°C “longfresh” compartment adjusts itself automatically
between 0°C and +3°C e and cannot be adjusted differently.
Important! The inside temperature depends on these factors:
– ambient temperature;
– quantity of food stored;
– frequency and duration of door opening.
Check the displays and red alarm light regularly to make sure the storage temperatures
correspond to the required values.
Starting up

44
Temperature adjustment
The temperatures in the refrigerator and freezer compartments are adjusted separately.
Refrigerator compartment
The temperature in the refrigerator compartment can be adjusted from +2°C to +8°C. A
temperature of +5°C is normally recommended.
❒Press the refrigerator compartment temperature selector button. The value of the
current temperature setting flashes in the display window (value present by the manu-
facturer +5°C).
❒By keeping the selector button depressed for about 5 seconds, the value displayed in
the window decreases by one degree every 2 seconds.
❒For example: 5-4-3 etc. After “2” the Figure “8” appears again.
❒When the required storage temperature value appears in the display, release the but-
ton. After a few seconds, the actual temperature inside the refrigerator compartment
is again displayed.
If the temperature inside the refrigerator compartment is still higher than +9°C, the
symbol “ ” is displayed instead of a temperature value.
Freezer compartment
The temperature in the freezer compartment can be adjusted from –15°C to –24°C.
A temperature of –18°C is normally recommended.
❒Press the freezer compartment temperature selector button. The value of the current
temperature setting flashes in the display window (value present by the manufacturer
–18°C).
❒By keeping the selector button depressed for about 5 seconds, the value displayed in
the window increases by one degree every 2 seconds.
❒For example: –18 –19 –20 etc. After “–24” the Figure “–15” appears again.
❒When the required storage temperature value appears in the display, release the but-
ton. After a few seconds, the actual temperature inside the freezer compartment is
again displayed.
0°C «longfresh» cold compartment
The temperature inside the 0°C “longfresh” compartment adjusts itself automatically be-
tween 0°C and +3°C and cannot be adjusted differently

45
Switching the appliance off
❒To switch the appliance off, press the START/STOP button.
For long periods of non-operation:
❒Switch off the appliance and pull out the plug, or remove or unscrew the safety fuse.
❒Thoroughly clean the inside of the appliance (see section “Cleaning and maintenance”).
❒Leave the doors ajar to prevent the formation of unpleasant odours.
The red temperature alarm light flashes when the temperature inside the freezer com-
partment rises above the correct value.
Possible causes for an excessively high temperature in the freezer compartment are:
– Prolonged opening of the door;
– large quantities of food placed in the appliance (see also section “Freezing”);
– appliance positioned next to a heat source, or ventilation openings covered (see sec-
tion “Positioning”);
– power cut during operation.
The value of the highest temperature registered in the freezer compartment during the
alarm is memorised. This value can be called up and is shown in the display window.
Press the ALARM-STOP button to stop the flashing alarm.
The value of the highest temperature reached during the alarm flashes in the display win-
dow for about 10 seconds. After 10 seconds, the display returns to the value of the actu-
al temperature in the freezer compartment.
Warning! Depending on the extent of the temperature rise, check the condition of the
stored food and decide on how to deal with it.
Note: The red alarm light flashes from the moment the appliance is switched on until the
temperature inside the freezer compartment has reached the required value. If you wish
to stop the flashing alarm, press the ALARM-STOP button.
Temperature alarm

46
Internal accessories
Shelves
❒The large full shelf must always be fitted in the bottom guides immediately above the
fruit and vegetable containers. Leave the shelf in this position to keep fruit and vege-
tables fresh longer.
Storing tall packs:
❒Push the front part of one of the half shelves back over the rear half (Fig. 14). This
creates space for storing tall packs on the shelf below.
Door liner
Shelf for small items
If you wish to store several bottles over a certain height in the bottle shelf, move the shelf
for small items sideways or lift it (Fig. 15/C).
Tube compartment
A special compartment for tubes, medicines and other small size packs is provided in the
bottom the bottle shelf (Fig. 15/D).
Fig. 14

47
Drinks dispenser
The bottle shelf in the refrigerator compartment door liner is pre-equipped for fitting a
drinks dispenser to allow dispensing of chilled drinks.
❒Screw the dispenser onto the bottle (Fig. 16/A).
❒There is a special adapter in the bottom of the bottle shelf. For bottles without a
threaded top, first fit the adapter securely onto the bottle (Fig. 16/B) then screw the
dispenser onto the adapter.
Warning! The necks of plastic bottles are not usually strong enough to allow proper
sealing of the adapter. Use the adapter on glass bottles only.
Fig. 15
Fig. 16

48
Internal accessories
❒Check that there are no leaks.
❒Pull out the flap (Fig. 17/1) to the stop position, turn the bottle upside down and in-
sert it, with the dispenser tab at the back, into the relevant holder (Fig. 17/2).
❒Remove the cover from the bottom of the shelf, if it is still fitted.
❒Press the glass against the dispenser tab and fill the glass (Fig. 18).
❒When the glass is filled to the required level, release the tab.
Food symbols/date cards
(some models only)
On the front of the drawers, there are symbols representing various types of food
(Fig. 19). The numbers indicate the storage time, in months, for these foods. The longer
or shorter times will apply according to the quality of the food and the way in which it has
been handled before freezing. For foods with a high fat content, the shorter time will al-
ways apply.
Some models are supplied with markers for affixing to the front of the drawers. These in-
dicate which type of food is stored in the corresponding drawer/basket (Fig. 19).
Fig. 17 Fig. 18
Fig. 19
Table of contents
Other AEG Refrigerator manuals

AEG
AEG SKB51021AS User manual

AEG
AEG ATK1371 User manual

AEG
AEG SANTO 75448 KGL User manual

AEG
AEG SKE81821DC User manual

AEG
AEG SKS58210F1 User manual

AEG
AEG SKZ81800F0 User manual

AEG
AEG SKS71200F0 User manual

AEG
AEG SKB812F1AC User manual

AEG
AEG sks41240s0 User manual

AEG
AEG OKO_SANTO SUPER 2850-6KA User manual
Popular Refrigerator manuals by other brands

KitchenAid
KitchenAid KBFS25EVBL - 24.8 cu. ft. Refrigerator parts list

Marvel
Marvel MS15RA Installation, operation and maintenance instructions

camry
camry CR 8064 user manual

Lynx
Lynx L24BF User's manual & installation instructions

Hussmann
Hussmann Innovator Installation and service manual

Frigidaire
Frigidaire FGHS2334K - Gallery 23.0 cu. Ft.... parts catalog