AEG SANTO K 9 18 00-4 i User manual

SANTO K 9 18 00-4 i
Integrierbares Kühlgerät
Integrating Fridge
Ré rigérateur intégrable
Gebrauchs- und Einbauanweisung
Operating and Installation Instructions
Notice d’utilisation
AEG Hausgeräte GmbH
Post ach 1036
D-90327 Nürnberg
http://www.aeg.hausgeraete.de
Änderungen vorbehalten
© Copyright by AEG Subject to change without notice
2222 363-31 10/04 Sous réserve de modi ications

17
Dear customer,
Be ore placing your new re rigerator/ reezer into operation please read the-
se operating instructions care ully. They contain important in ormation or
sa e use, or installation and or care o the appliance.
Please keep these operating instructions or uture re erence. Pass them on
to possible new owners o the appliance.
These operating instructions are or use with several technically comparable
models with varying accessories. Please observe the notes which apply to
your model.
Notes which are important or your sa ety or or the proper unctioning o
the appliance are stressed with a warning triangle and/or with signal words
(Warning!, Caution!, Attention!). Please observe the ollowing care ully.
Supplementary in ormation regarding operation and practical applications
o the appliance appear a ter this symbol.
Tips and notes concerning economical and environmentally sound use o
the appliance are marked with the lower.
The operating instructions contain instructions or the correction o possi-
ble mal unctions by the user in the section "What to do i ...". I these
instructions should not be su icient, our customer service department is
always available to you.
Printed on paper manu actured with environmentally sound processes.
who thinks ecologically acts accordingly ...
36
• Limiter le nombre d’ouvertures de la porte et, en tout état de cause, ne
pas laisser ouverte trop longtemps pour éviter une remontée en tempéra-
ture du ré rigérateur.
• Disposer les aliments de telle sorte que l’air puisse circuler librement tout
autour.
Il convient de véri ier régulièrement que la température, notamment celle
de la zone la plus roide, est correcte et le cas chéant, d’ajuster le thermo-
stat en conséquence comme indiqué (page “UTILISATION”).
La mesure de la tempérautre dans un zone (sur une clayette, par exemple)
peut se aire au moyen d’un thermomètre placé, dès le départ, dans un réci-
pient rempli d’eau (verre). Pour avoir une représentation idèle de la réalité,
lisez la température sans manipulation des commandes ni ouvertre de porte.
Respect des règles d’hygiène
• Nettoyez réquemment l’intérieur du ré rigérateur en utilisant un produit
d’entretien doux sans e et oxydant sur les parties métalliques, puis rincer
avec de l’eau additionnèe de jus de citron, de vinaigre blanc ou avec tout
produit désin ectant adapté au ré rigérateur.
• Retirez les suremballages du commerce avant de placer les aliments dans
le ré rigérateur (par exemple suremballages des packs de yaourts).
• Couvrez les aliments.
• Consultez la notice d’utilisation de l’appareil en toutes circonstances et en
particulier pour les conseils d’entretien.
Installation
• Assurez-vous, après avoir installé l’appareil, que celui-ci ne repose pas sur
le câble d’alimentation.
Important: en cas de dommage du câble d’alimentation, il ne doit être
renplacé que par un pro essionnel quali ié.
• L’appareil se réchau e sensiblement au niveau du condenseur et du com-
presseur. Veillez à ce que l’air circule librement tout autour de l’appareil.
Une ventilation insu isante entraînerait un mauvais onctionnement et
des dommages sur l’appareil.
• Suivez les instructions données pour l’installation.
• Après la livraison, attendez 2 heures avant de brancher l’appareil pour que
le circuit rigori ique soit stabilisé.
• Cet appareil est lourd. Faites attention lors de son déplacement.
Veuillez lire attentivement ces remarques avant d’installer et d’utiliser
votre appareil. Nous vous remercions de votre attention.

18
Contents
Safety . . . . . . . . . . . . . . . . . . . . . . . . . . . . . . . . . . . . . . . . . . . . . . . . .19
Disposal . . . . . . . . . . . . . . . . . . . . . . . . . . . . . . . . . . . . . . . . . . . . . . .20
Appliance Packaging In ormation . . . . . . . . . . . . . . . . . . . . . . . . . . . . . .20
Disposal o old Appliances . . . . . . . . . . . . . . . . . . . . . . . . . . . . . . . . . . . .21
Remove transport safeguard . . . . . . . . . . . . . . . . . . . . . . . . . . . . . . .21
Shel holders . . . . . . . . . . . . . . . . . . . . . . . . . . . . . . . . . . . . . . . . . . . . . . .21
Installation . . . . . . . . . . . . . . . . . . . . . . . . . . . . . . . . . . . . . . . . . . . . .22
Installation Location . . . . . . . . . . . . . . . . . . . . . . . . . . . . . . . . . . . . . . . . .22
Your appliance needs air . . . . . . . . . . . . . . . . . . . . . . . . . . . . . . . . . . . . .22
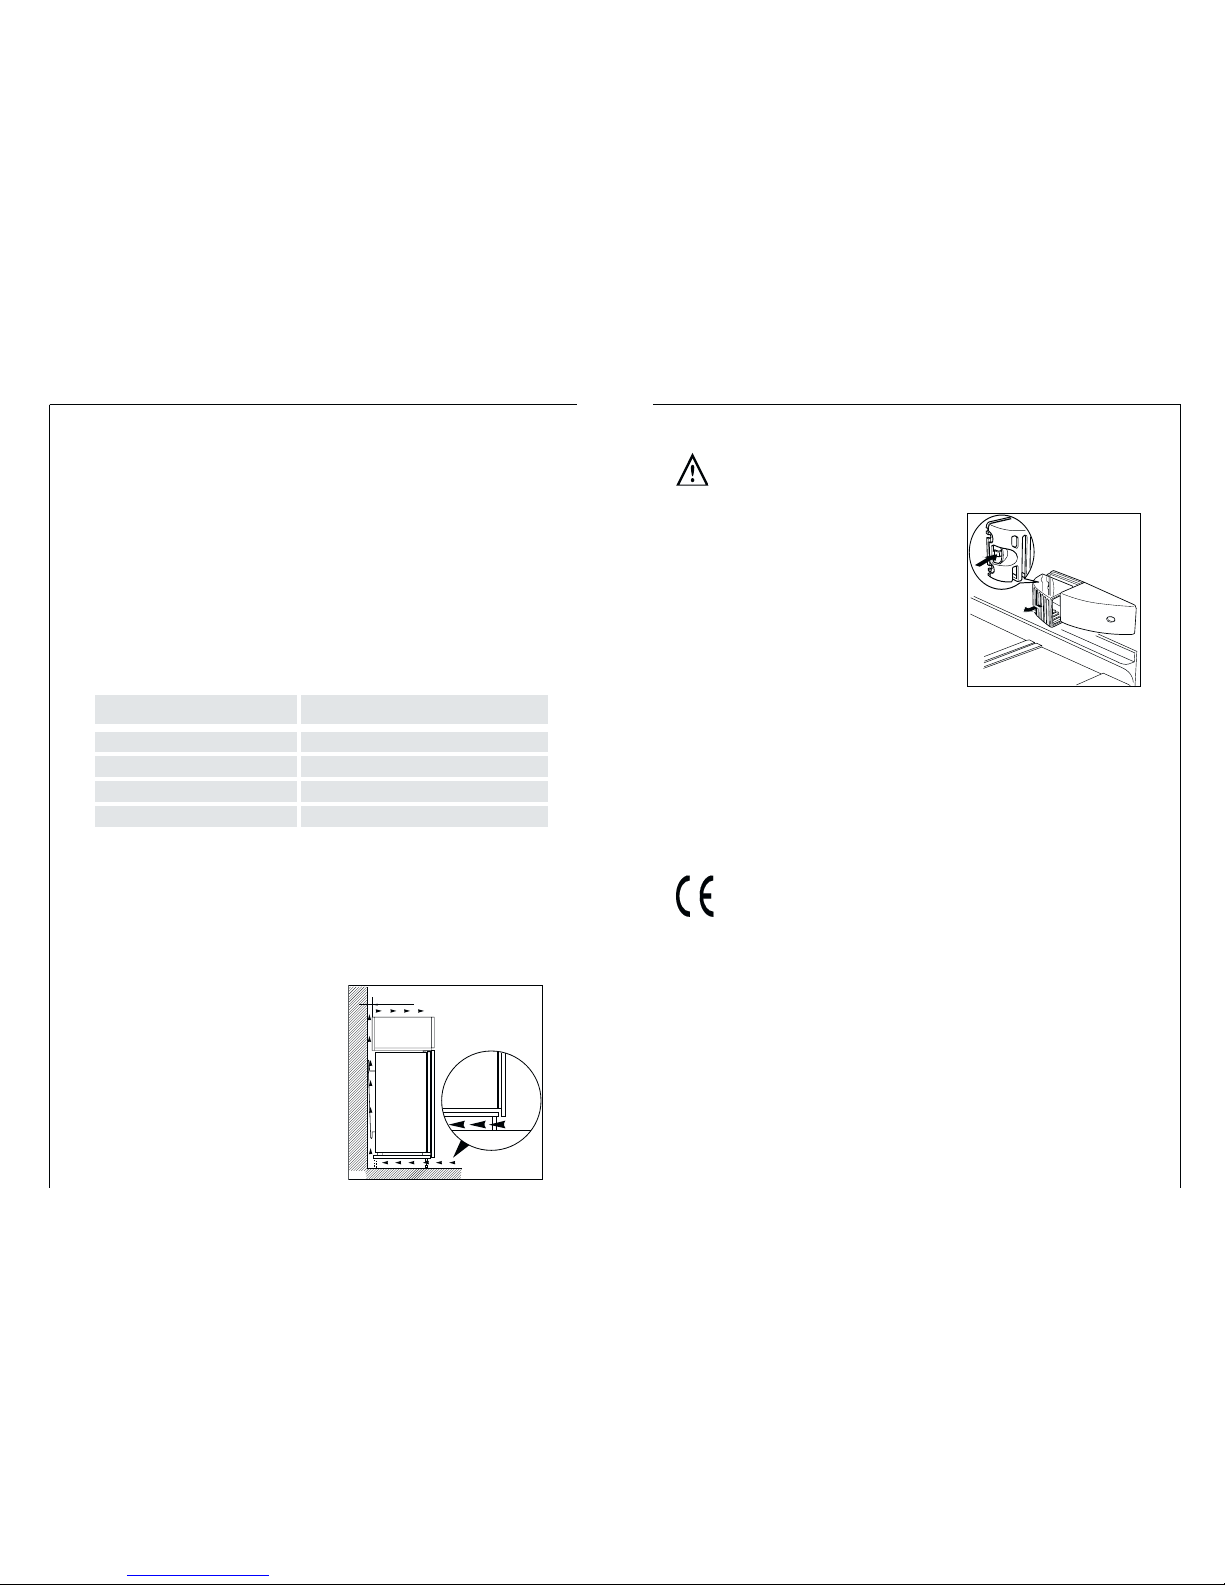
Rehingeing the door . . . . . . . . . . . . . . . . . . . . . . . . . . . . . . . . . . . . . . . . .23
Housing dimension . . . . . . . . . . . . . . . . . . . . . . . . . . . . . . . . . . . . . . . . . .23
Electrical Connection . . . . . . . . . . . . . . . . . . . . . . . . . . . . . . . . . . . . .23
Prior to Initial Start–Up . . . . . . . . . . . . . . . . . . . . . . . . . . . . . . . . . .23
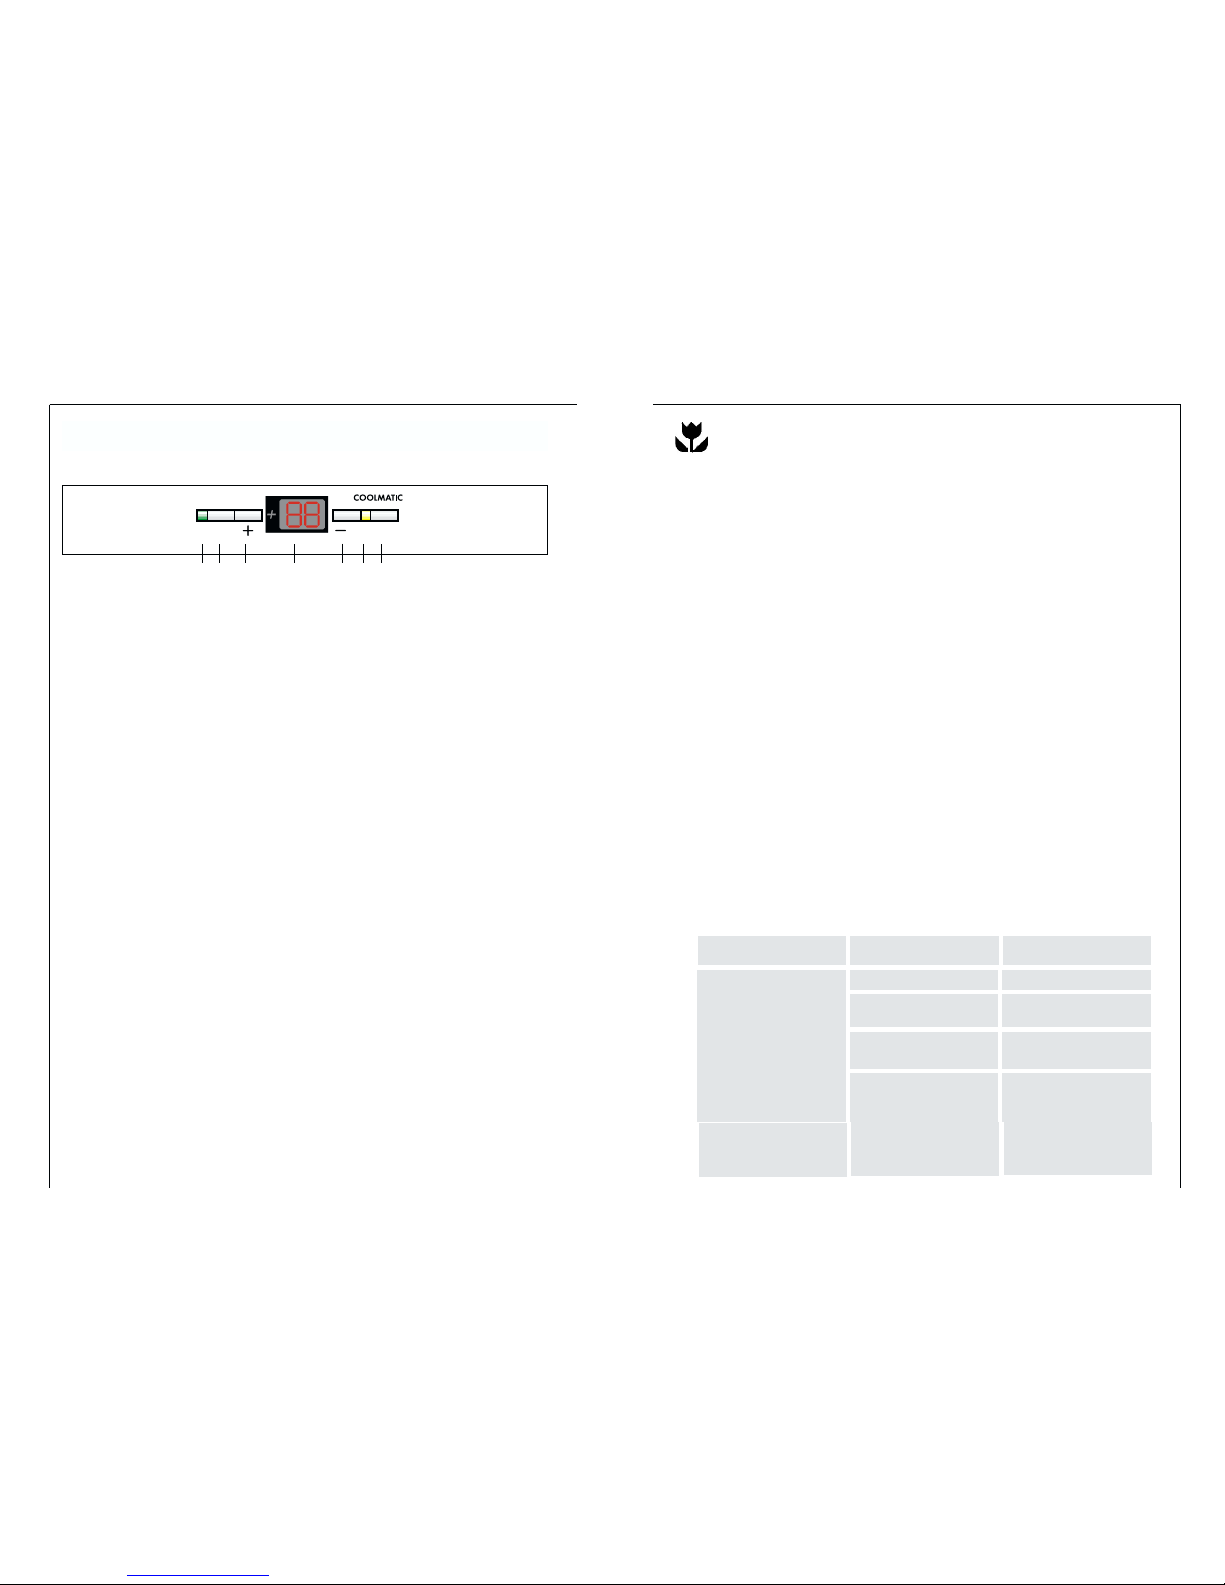
Operating and indicator panel . . . . . . . . . . . . . . . . . . . . . . . . . . . . .24
Starting up and temperature regulation . . . . . . . . . . . . . . . . . . . . .25
Interior Accessories . . . . . . . . . . . . . . . . . . . . . . . . . . . . . . . . . . . . . .2
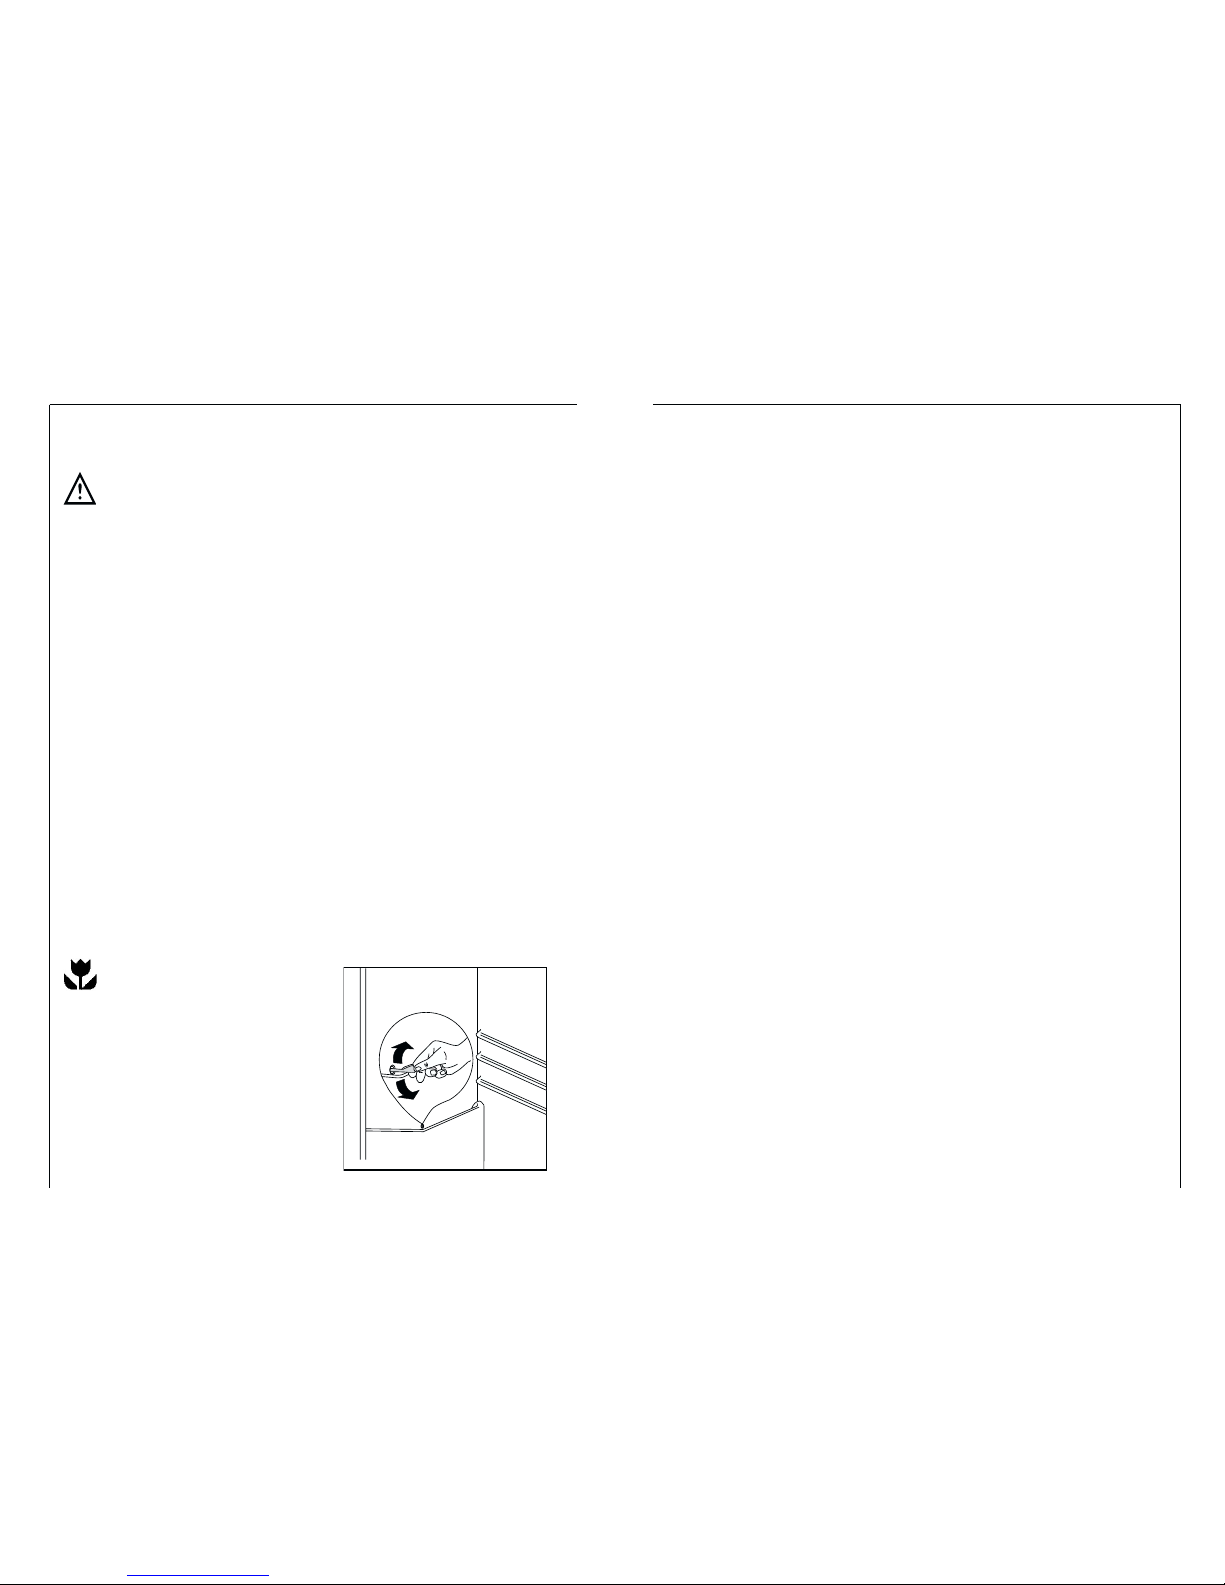
Storage shelves . . . . . . . . . . . . . . . . . . . . . . . . . . . . . . . . . . . . . . . . . . . . .26
Variable Inner Door . . . . . . . . . . . . . . . . . . . . . . . . . . . . . . . . . . . . . . . . . .26
Fresh food refrigeration . . . . . . . . . . . . . . . . . . . . . . . . . . . . . . . . . .27
Defrosting . . . . . . . . . . . . . . . . . . . . . . . . . . . . . . . . . . . . . . . . . . . . .27
Switching off the appliance . . . . . . . . . . . . . . . . . . . . . . . . . . . . . . .27
Cleaning and Care . . . . . . . . . . . . . . . . . . . . . . . . . . . . . . . . . . . . . . 28
Energy Saving Tips . . . . . . . . . . . . . . . . . . . . . . . . . . . . . . . . . . . . . . .29
What to do if . . . . . . . . . . . . . . . . . . . . . . . . . . . . . . . . . . . . . . . . . . .29
Correcting Mal unctions . . . . . . . . . . . . . . . . . . . . . . . . . . . . . . . . . . . . .29
Changing the light bulb . . . . . . . . . . . . . . . . . . . . . . . . . . . . . . . . . .31
Regulations, Standards, Guidelines . . . . . . . . . . . . . . . . . . . . . . . . .31
35
• Débranchez toujours la prise de courant avant de procéder au nettoyage
intérieur et extérieur de l’appareil et au remplacement de la lampe d’éclai-
rage (pour les modèles qui en sont équipés).
• Ne aites pas onctionner d’appareils électriques (par exemple : sorbetiè-
res électriques, mélangeurs,...) à l’intérieur de l’appareil.
Stockage des denrées dans les réfrigérateurs et
règles d’hygiène
La consommation croissante de plats préparés et d’autres aliments ragiles,
sensibles en particulier au non-respect de la chaîne de roid (1), rend néces-
saire une meilleure maîtrise de la température de transport et de stockage
de ces produits.
A la maison, le bon usage du ré rigérateur et le respect de règles rigoureu-
ses contribuent de açon signi icative et e icace à l’amélioration de la con-
servation des aliments.
Conservation des aliments/Maîtrise des températures
• Stockez les aliments selon leur nature dans la zone appropriée:
Zone tempérée: Boissons œu s, beurre, sauces industrielles et préparées,
romages à pâtes cuite, ruits et légumes rais.
Zone fraîche: Produits laitiers, desserts lactés, matières grasses, romages
rais.
Zone la plus froide: Viandes, volailles, poissons, charcuteries, plats préparé,
salades composées, préparations et pâtisseries à base d’œu s ou de crème,
pâtes raîches, pâte à tarte, pizza/quiches, produits rais et romages au lait
cru, légumes prêts à l’empli vendus sous sachet plastique et plus géneérale-
ment,tout produits rais dont la date limite de consommation (DLC) est
associée à une temperature de conservation in érieure ou égale à +4°C.
L’observation des conseils suivantes est de nature à éviter la contamination
croisée et à pévenir une mauvaise conservation des aliments.
• Emaller systématiquement les produits pour éviter que les denrées ne se
contaminent mutuellement.
• Se laver les mains avant de toucher les aliments et plusieurs ois pendant
la préparation du repas si celle-ci implique des maniplations successives
de produits di érents, et après, bien sûr, au moment de passer à table
comme les règles d’hygiène l’imposent.
• Ne pas réutiliser des utensiles ayant déjà servi (cuillère en bois, planche à
dècouper sans les avoir bien nettoyés au préalable).
• Attendre le re roidissement complet des préparations avant de les stocker
(ex : soupe).

19
Safety
The sa ety aspects o our re rigerators/ reezers comply with accepted tech-
nical standards and the German Appliance Sa ety Law. Nevertheless, we
consider it our obligation to make you aware o the ollowing sa ety in or-
mation:
Intended use
• The re rigerator is intended or use in the home. It is suitable or the coo-
ling o ood. I the appliance is used or purposes other than those inten-
ded or used incorrectly, no liability can be accepted by the manu acturer
or any damage that may be caused.
• Alterations or changes to the reezer are not permitted or reasons o
sa ety.
• I you use the re rigerator in a commercial application or orpurposes
other than the cooling o oods, please observe all valid legal regulations
or your application.
Prior to initial start–up
• Check the re rigerator or transport damage. Under no circumstance
should a damaged appliance be plugged in! In the event o damage, please
contact the vendor.
Refrigerant
The re rigerant isobutane (R600a) is contained within the re rigerant circuit
o the appliance, a natural gas with a high level o environmental compa-
tibility, which is nevertheless lammable.
• During transportation and installation o the appliance, be certain that
none o the components o the re rigerant circuit become damaged.
• I the re rigerant circuit should become damaged:
– avoid open lames and sources o ignition;
– thoroughly ventilate the room in which the appliance is situated.
Safety of children
• Packaging (e.g. wraps, polystyrene) can be dangerous or children. There is
a risk o su ocation! Keep packaging material away rom children!
• Please make old appliances unusable prior to disposal. Pull out the mains
plug, cut o the mains cable, break or remove spring or boltcatches, i it-
ted. By doing this you ensure that children cannot lock themselves in the
34
Avertissements importants
Ces avertissements ont été rédigés pour votre sécurité et celle d’autrui
Utilisation
• Cet appareil a été conçu pour être utilisé par des adultes. Veillez à ce que
les en ants n’y touchent pas et ne l’utilisent pas comme un jouet.
• A la réception de l’appareil, déballez-le ou aites-le déballer immédiate-
ment. Véri ez son aspect général. Faites les éventuelles réserves par écrit sur
le bon de livraison dont vous garderez un exemplaire.
• Votre appareil est destiné à un usage domestique normal. Ne l’utilisez pas
à des ins commerciales ou industrielles ou pour d’autres buts que celui pour
lequel il a été conçu.
• Ne modi iez pas ou n’essayez pas de modi ier les caractéristiques de cet
appareil. Cela représenterait un danger pour vous.
• Ne touchez pas avec les mains humides les sur aces givrées et les produits
congelés et ne consommez pas certains produits tels que les bâtonnets
glacés dès leur sortie de l’appareil ; la température très basse à laquelle ils se
trouvent peut provoquer des brûlures ou un arrachement de la peau.
• Les ré rigérateurs et / ou congélateurs ménagers sont destinés uniquement
à la conservation et/ou congélation des aliments.
• Si la température ambiante est in érieure ou égale à 10°C, les per orman-
ces du compartiment congélateur ne seront plus assurées. Ceci est aussi
valable lorsque l’interrupteur de température ambiante est basculé (si votre
appareil en est équipé).
• Un produit décongelé ne doit jamais être recongelé.
• Suivez les indications du abricant pour la conservation et/ou congélation
des aliments.
• Dans tous les appareils de ré rigération et congélation certaines sur aces
peuvent se couvrir de givre. Suivant le modèle, ce givre peut être éliminé
automatiquement (dégivrage automatique) ou bien manuellement.
• N’essayez jamais d’enlever le givre avec un objet métallique, vous risque-
riez d’endommager irrémédiablement l’évaporateur rendant du même coup
l’appareil inutilisable. N’employez pour cela qu’une spatule en plastique.
• Ne décollez pas les bacs à glaçons avec un couteau ou tout autre objet
tranchant.
• Ne placez ni bouteilles ni boîtes de boissons gazeuses dans le congéla-
teur/compartiment basse température, elles pourraient éclater.

20
Disposal
Appliance Packaging Information
All materials are environmentally sound! They can be dumped or burned at
an incinerating plant without danger!
About the materials: The plastics can be recycled and are identi ied as ol-
lows:
>PE< or polyethylene, e.g. the outer covering and the bags in the interior.
>PS< or polystyrene oam, e.g. the pads, which are all ree o chloro luo-
rocarbon.
The carton parts are made rom recycled paper and should be disposed o
at a waste-paper recycling collection location.
ridge when playing (there is risk o su ocation!)or get themselves into
other dangerous situations.
• O ten children cannot recognise the hazards present in household
appliances. It is there ore important that you ensure adequate supervision
and never let children play with the appliance!
Daily Operation
• Containers with lammable gases or liquids can leak at low temperatures.
There is a risk o an explosion! Do not store any containers with lamma-
ble materials such as, or example, spray cans, ire extinguisher re ill car-
tridges etc in the re rigerator/ reezer.
• Do not operate any electrical appliances in the re rigerator/ reezer (e.g.
electric ice cream makers, mixers etc.).
• Be ore cleaning the appliance, always switch o the appliance and unplug
it, or pull the house use or switch o the circuit breaker.
• When unplugging always pull the plug rom the mains socket, do not pull
on the cable.
In case of malfunction
• I the a mal unction occurs on the appliance, please look irst in the "What
to do i ..." section o these instructions. I the in ormation given there
does not help, please do not per orm any urther repairs yoursel .
• Re rigerators/ reezers may only be repaired by quali ied service engineers.
Improper repairs can give rise to signi icant hazards. I your appliance
needs repairing, please contact your specialist dealer or our Customer Ser-
vice.
33
Sommaire
Avertissements importants . . . . . . . . . . . . . . . . . . . . . . . . . . . . . . . .34
Avant la mise en service . . . . . . . . . . . . . . . . . . . . . . . . . . . . . . . . . .38
Utilisation de votre appareil . . . . . . . . . . . . . . . . . . . . . . . . . . . . . . .38
Bandeau de commande . . . . . . . . . . . . . . . . . . . . . . . . . . . . . . . . . . . . . .38
Mise en service - Réglage de la température . . . . . . . . . . . . . . . . . . . .39
Equipement intérieur . . . . . . . . . . . . . . . . . . . . . . . . . . . . . . . . . . . . .41
Les clayette . . . . . . . . . . . . . . . . . . . . . . . . . . . . . . . . . . . . . . . . . . . . . . . . .41
Les balconnets . . . . . . . . . . . . . . . . . . . . . . . . . . . . . . . . . . . . . . . . . . . . . .41
Emplacement des denrées . . . . . . . . . . . . . . . . . . . . . . . . . . . . . . . . .42
Zone la plus roide . . . . . . . . . . . . . . . . . . . . . . . . . . . . . . . . . . . . . . . . . .42
Compartiment ré rigérateur . . . . . . . . . . . . . . . . . . . . . . . . . . . . . . . . . . .42
Entretien et nettoyage . . . . . . . . . . . . . . . . . . . . . . . . . . . . . . . . . . .44
Dégivrage . . . . . . . . . . . . . . . . . . . . . . . . . . . . . . . . . . . . . . . . . . . . . . . . . .44
Nettoyage . . . . . . . . . . . . . . . . . . . . . . . . . . . . . . . . . . . . . . . . . . . . . . . . . .44
Remplacement de l’ampoule d’éclairage . . . . . . . . . . . . . . . . . . . . . . . .45
En cas d’absence prolongée ou de non utilisation . . . . . . . . . . . . . . . .45
En cas d’anomalie de fonctionnement . . . . . . . . . . . . . . . . . . . . . . .45
En cas d’arrêt de onctionnement . . . . . . . . . . . . . . . . . . . . . . . . . . . . . .47
Installation . . . . . . . . . . . . . . . . . . . . . . . . . . . . . . . . . . . . . . . . . . . . .48
Retrait de la protection pour le transport . . . . . . . . . . . . . . . . . . . . . . .48
Arrêts pour clayettes . . . . . . . . . . . . . . . . . . . . . . . . . . . . . . . . . . . . . . . . .48
Emplacement . . . . . . . . . . . . . . . . . . . . . . . . . . . . . . . . . . . . . . . . . . . . . . .48
Branchement électrique . . . . . . . . . . . . . . . . . . . . . . . . . . . . . . . . . . . . . .48
Dimensions de la niche . . . . . . . . . . . . . . . . . . . . . . . . . . . . . . . . . . . . . . .48
Votre appareil a besoin d’air . . . . . . . . . . . . . . . . . . . . . . . . . . . . . . . . . .48
Encastrement . . . . . . . . . . . . . . . . . . . . . . . . . . . . . . . . . . . . . . . . . . . . . . .48
Règlements, normes, directives . . . . . . . . . . . . . . . . . . . . . . . . . . . . .50

21
Remove transport safeguard
The appliance and the interior ittings are protected or transport.
• Pull o the adhesive tape on the le t and right side o the door.
• Remove all adhesive tape and packing pieces rom the interior o the
appliance.
Shelf holders
Your appliance is equipped with shel
retainers that make it possible to
secure the shelves during transporta-
tion.
To remove them proceed as ol-
lows:
Move the shel retainers in the
direction o the arrow, raise the
shel rom the rear and push it
orward until it is reed and
remove the retainers.
Disposal of old Appliances
For environmental reasons, re rigeration appliances must be disposed o
properly. This applies to your old appliance, and - at the end o its service
li e - or your new appliance as well.
Warning! Be ore disposing o old appliances make them inoperable. Remo-
ve plug rom mains, sever the power cable, remove or destroy any snap or
latch closures. This eliminates the danger that playing children lock them-
selves into the appliance (danger o su ocation!) or place themselves into
other li e-endangering situations.
Disposal:
• The appliance may not be disposed o with domestic waste or bulky re u-
se.
• The re rigerant circuit, especially the heat exchanger at the back o the
appliance, may not be damaged.
• In ormation concerning collection schedules or locations can be obtained
rom the local disposal authorities or town hall.
A
C
B
32
Chère Cliente, Cher Client
Conservez cette notice d’utilisation avec votre appareil. Si l’appareil devait
être vendu ou cédé à une autre personne, assurez-vous que la notice d’uti-
lisation l’accompagne. Le nouvel utilisateur pourra alors être in ormé du
onctionnement de celui-ci et des avertissements s’y rapportant.
Ce mode d’emploi s’applique à plusieurs modèles techniqueme comparables,
qui di èrent par leur équipement. Observez uniquementles indications qui
correspondent à votre modèle.
Indications de sécurité
Conseils et recommandations
In ormations liées à la protection de l’environnement
La notice d’utilisation contient des indications qui permettent de remédier
soi-même à d’éventuels dérangements. Voir "En cas d’anomalie de onc-
tionnement". Si ces indications ne su isent pas, consultez le service après
vente de votre magasin vendeur.
Imprimé sur du papier protégeant l’environnement
il ne su it pas de penser écologique il aut agir en conséquence ...

22
Your appliance needs air
For sa ety reasons, minimum
ventilationmust be as shown Fig.
Attention: keep ventilation ope-
nings clear of obstruction;
50 mm
min.
200 cm
2
200 cm2
min.
D567
Climate classi ication or an ambient temperature o
SN +10 bis +32 °C
N+16 bis +32 °C
ST +18 bis +38 °C
T+18 bis +43 °C
I installation next to a source o heat is unavoidable, the ollowing mini-
mum clearances must be maintained at the sides o the appliance:
– or electric cookers 3 cm;
– or oil and coal ired ranges 30 cm.
I these clearances cannot be maintained a heat insulating pad is required
between the cooker and the re rigeration appliance.
Installation
Installation Location
The appliance should be set up in a well ventilated, dry room.
Energy use is a ected by the ambient temperature. The appliance should
there ore
– not be exposed to direct sunlight;
– not be installed next to radiators, cookers or other sources o heat;
– only be installed at a location whose ambient temperature corresponds to
the climate classi ication, or which the appliance is designed.
The climate classi ication can be ound on the serial plate, which is located
at the le t on the inside o the appliance.
The ollowing table shows which ambient temperature is correct or each
climate classi ication: each climate classi ication:
31
Regulations, Standards, Guidelines
This appliance was designed or household use and was manu actured in
accordance with the appropriate standards. The necessary measures in
accordance with appliance sa ety legislation regulations (GSG), accident
prevention regulations or re rigeration appliances (VBG 20) and the regu-
lations o the German Society o Electrical Engineers (VDE) were observed in
the manu acture o this appliance.
The re rigerant circuit has been checked or leaks.
This appliance is in accordance with the ollowing EU guidelines:
– 73/23/EWG dated 19 February 1973 - low voltage guidelines.
– 89/336/EWG dated 3 May 1989
(including guideline change notice 92/31/EWG) - EMV guideline
Changing the light bulb
Warning! There is a risk o electric shocks! Be ore changing the light bulb,
switch o the appliance and unplug it, or pull the use or the circuit breaker.
Light bulb data: 220-240 V, max. 15 W
1. Unplug the mains plug.
2. To change the light bulb press on the
rear hook and at the same time slide
the cover in the direction indicated
by the arrow.
3. Change the de ective light bulb.
4. Re it the light bulb cover.
5. Put the re rigerator back into opera-
tion.

23
Prior to Initial Start–Up
• Please clean the appliance interior and all accessories prior to initial start-
up (see section: “Cleaning and Care”).
Electrical connection
Be ore initial start-up, re er to the appliance rating plate to ascertain i sup-
ply voltage and current values correspond with those o the mains at the
installation location.
e.g.: AC 220 ... 240 V 50 Hz or
220 ... 240 V~ 50 Hz
(i.e. 220 to 240 volts alternating current, 50 Hertz)
The rating plate is inside the appliance on the le t.
A correctly installed, earthed socket is required or the electrical supply. The
supply must have a use rating o at least 10 Amps.
I the socket is not accessible once the appliance is built in, the electrical
installation must include suitable means o isolating the appliance rom the
mains (e.g. use, cut-out, current trip or similar with a minimum contact
separation o 3 mm).
Attention: The mains connection cable may only be replaced by a skilled
electrician. Please contact your dealer or our customer service department
or repairs.
Housing dimensions
Height 1780mm
Depth 550 mm
Width 560 mm
Rehingeing the door
The appliance’s door has been locked in position or transport by means o
pins on both sides.According to the door opening direction, remove relevant
pins at the top and at the bottom.
Warning! When changing the side at which the door opens, the
appliance may not be connected to the mains. Remove plug rom the
mains be orehand.
30
The ood is too warm.
Interior lighting does not
work.
The appliance is near a heat
source.
Temperature is not properly
adjusted.
Please look in the "Initial Start
Up" section.
Light bulb is de ective. Please look in the "Changing
the Light Bulb" section.
Turn the temperature regula-
tor to a colder setting tempo-
rarily.
Door was open or an exten-
ded period.
Please look in the "Installation
location" section.
A large quantity o warm
ood was placed in the
appliance within the last 24
hours.
Open the door only as long as
necessary.
Heavy build up o rost, possi-
bly also on the door seal.
Door seal is not air tight (pos-
sibly a ter changing over the
hinges).
Care ully warm the leaking
sections o the door seal with
a hair dryer (not hotter than
approx. 50 °C). At the same
time shape the warmed door
seal by hand such that it sits
correctly.
Malfunction Possible Cause Remedy
Unusual noises.
The appliance is touching the
wall or other objects.
Appliance is not level.
A component, e.g. a pipe, on
the rear o the appliance is
touching another part o the
appliance or the wall.
The compressor starts a ter a
period o time.
See the "Cleaning and Care"
section.
This is normal, no error has
occurred.
The compressor does not start
immediately a ter changing
the temperature setting.
Water on the loor or on sto-
rage shelves. Water drain hole is blocked.
I necessary, care ully bend
the component out o the
way.
Move the appliance slightly.
Readjust the eet.

24
Operating and indicator panel
AB C D E GF
°C
°C
ON/OFF
A. Mains pilot indicator (green)
B Fridge button ON/OFF
C Temperature setting button ( or warmer temperatures)
D Temperature display
E Temperature setting button ( or colder temperatures)
F COOLMATIC unction "on" indicator (yellow)
G COOLTMATIC button
Temperature setting buttons
The temperature is adjusted using the „C“ (+) and „E“ (-) buttons. These but-
tons are connected to the temperature display.
• The temperature display is switched over rom the display o the ACTUAL
temperature (Temperature display is illuminated) to the display o the DESI-
RED temperature (Temperature display lashes) by pressing one o the two
buttons, „C“ (+) or „E“ (-).
• Each time one o the two buttons is pressed again the DESIRED temperatu-
re is adjusted by 1 °C. The DESIRED temperature must be reached within 24
hours.
I neither button is pressed, the temperature display automatically switches
back a ter a short period (approx. 5 sec.) to the display o the ACTUAL tem-
perature.
DESIRED temperature means:
The temperature that has been selected or inside the ridge. The DESIRED
temperature is indicated by lashing numbers.
ACTUAL temperature means:
The temperature display indicates the current temperature inside the ridge.
The ACTUAL temperature is indicated with illuminated numbers.
29
Appliance does not work.
Appliance is not switched on Switch on the appliance.
Mains plug is not plugged in
or is loose. Insert mains plug.
Fuse has blown or is de ective. Check use, replace i neces-
sary.
Socket is de ective. Mains mal unctions are to be
corrected by an electrician.
Appliance cools too much. Temperature is set too cold.
Turn the temperature regula-
tor to a warmer setting tem-
porarily..
Energy Saving Tips
• Do not install the appliance near cookers, radiators or other sources o
warmth. High ambient temperatures cause longer, more requent opera-
tion o the compressor.
• Ensure su icient air circulation and exhaust at the appliance base and at
the back wall o the appliance. Never cover air vent openings.
• Do not place warm oods into the appliance. Allow warm oods to cool
irst.
• Only leave door open as long as necessary.
• Do not set temperature any colder than necessary.
• Keep the heat emitting condenser, the metall grille on the rear wall o
your appliance, always clean.
What to do if ...
Correcting Malfunctions
A mal unction may be caused by only a minor ault that you can recti y
yoursel using the ollowing instructions. Do not per orm any other work on
the appliance i the ollowing in ormation does not provide assistance in
your speci ic case.
Warning! Repairs to re rigerators/ reezers may only be per ormed by
quali ied service engineers. Improper repairs can give rise to signi icant
hazards or the user. I your appliance needs repairing, please contact your
specialist dealer or our Customer Service.
Malfunction Possible Cause Remedy

25
Temperature display
The temperature display can indicate several pieces o in ormation.
• During normal operation, the temperature currently present in the ridge
(ACTUAL temperature) is displayed.
• When the temperature is being adjusted a lashing display indicates the
ridge temperature currently set (DESIRED temperature).
Starting Up - Setting the Temperature
1. Plug the mains plug into the mains socket.
2. I the display is OFF press ON/OFF button. The green mains pilot indicator
illuminates. The appliances start.
3. Press either the „C“ (+) or „E“ (-) button. The temperature display switches
over and the DESIRED temperature currently set lashes on the temperatu-
re display.
4. Set the required temperature by pressing the „C“ (+) or „E“ (-) buttons (see
section "Temperature setting buttons"). The temperature display will imme-
diately show the changed setting. Each time the button is pressed the tem-
perature is adjusted by 1 °C.
From a ood sa ety point o view +5 °C should be considered su iciently
cold or storing ood in the ridge.
5. Once the required temperature has been set, a ter a short period (approx. 5
sec.) the temperature display will change and again indicate the current
ACTUAL temperature inside the ridge. The display will change rom lashing
to continuous illumination.
Information! When the setting is changed, the compressor does not start
immediately i automatic de rosting is currently taking place. As the stora-
ge temperature within the ridge is reached quickly you can store ood
immediately a ter switching on.
COOLMATIC
The COOLMATIC unction is suited or quick cooling o large quantities o
goods in the re rigerator.
1. The COOLMATIC unction is switched on by pressing the COOLMATIC but-
ton. The yellow light illuminates.
The COOLMATIC unction now provides or intensive cooling. The COOL-
MATIC unction is ended automatically a ter a period o 6 hours.
2. The COOLMATIC unction can be ended manually at any time by pressing
the COOLMATIC button again. The yellow light goes out.
28
Cleaning and Care
For hygienic reasons the appliance interior, including interior accessories,
should be cleaned regularly.
Warning!
• The appliance may not be connected to the mains during cleaning. Dan-
ger o electrical shock! Be ore cleaning switch the appliance o and rem
ve the plug rom the mains, or switch o or turn out the circuit breaker
or use.
• Never clean the appliance with a steam cleaner. Moisture could accumu-
late in electrical components, danger o electrical shock! Hot vapours can
lead to the damage o plastic parts.
• The appliance must be dry be ore it is placed back into service.
Attention!
• Ethereal oils and organic solvents can attack plastic parts, e.g.
– lemon juice or the juice rom orange peals;
– butyric acid;
– cleansers which contain acetic acid.
Do not allow such substances to come into contact with appliance parts.
• Do not use any abrasive cleansers.
1. Remove rozen ood and the ood rom the re rigerator. Wrap rozen ood
in several layers o newspaper. Store it in a cool place, well covered.
2. Switch the appliance o and remove the plug rom the mains, or switch o
or turn out the circuit breaker or use.
3. Clean the appliance and the interior accessories with a cloth and lukewarm
water. Commercially available dish washing detergents may also be used.
4. A ter cleaning wipe with resh water and rub dry.
Accumulation o dust at the conden-
ser increases energy consumption.
For this reason care ully clean the
condenser at the back o the
appliance once a year with a so t
brush or a vacuum cleaner.
5. Check the water drain hole on the
rear wall o the ridge. Clear a
blocked drain hole with the aid o
the green peg in the pack o acces-
sories included with the appliance.
6. A ter everything is dry place applian-
ce back into service.
D037

26
Interior Accessories
Storage Shelves
The glass shel above the ruit and
vegetable compartment should
always remain in position, to ensure
ruit and vegetables stay resh lon-
ger.
The remaining storage shelves can be
adjusted to various heights:
Pull the storage shel orward until it
can be tipped up or down and remo-
ved.
To insert at a di erent height use the same procedure in reverse.
Adjustment or tall goods:
Remove the ront hal o the two-part vario glass storage shel and insert it
at a di erent level. Space is thus gained or storage o tall goods on the
underlying storage shel .
Variable Inner Door
The door compartments can be pulled up and removed, and inserted at
other positions as needed.
D338
Holiday function
The holiday unction sets the temperature at +15°C. This unction allows
you to keep the re rigerator shut and empty during a long holiday period
(e.g. the summer holidays) without the ormation o a bad smell.
1. To turn on the holiday unction, press button (C).
2. Press several time button (C) until the letter “H” (Holiday) appears on the
temperature indicator. Now the re rigerator is in the “holiday” unction in
the energy-saving mode.
The fridge compartment must be empty with holiday function on.
27
S itching off the appliance
To switch o , hold down the ON/OFF button or approx. 3 seconds. This will
result in a countdown rom "3" to "1" taking place in the temperature
display. On reaching "1" the ridge will switch o . The temperature display
will go o .
If the appliance is not going to be used for an extended period:
1. Remove all re rigerated and deep- rozen packages as well as ice trays.
2. Switch o the appliance, holding down the ON/OFF button until the display
goes o (see above).
3. Remove the mains plug or switch o or turn out the circuit breaker or use.
4. Leave the door open to avoid the build up o odours.
Defrosting
Refrigerator
Frost is automatically eliminated rom the evaporator o the re rigerator
compartment every time the motor compressor stops, during normal use.
The de rost water drains out through a trough into a special container at
the back o the appliance, over the motor compressor, where it evaporates.
Fresh food refrigeration
To obtain the best per ormance:
• do not store warm ood or evaporating liquide in the re rigeator
• do cover or wrap the ood, particularly i it has a strong lavour.
• Position ood so that air can circuiate reely round it.
Use ul hints:
Meat (all types): wrap in polythene bags and place on the glass shel above
the vegetable drawer(s)For safety, store in this way only one or two days
at the most.
Cooked foods, cold dishes, etc: these should be covered and may be placed
on any shel .
Fruit and vegetables: these should be thoroughly cleaned and placed in the
special drawer(s) provided.
Butter and cheese: these should be placed in special airtight containers or
wapped in aluminium oil or polythene bags to exclude as much air as pos-
sible.
Milk bootles: these should have a cap and should be stored in the bottle
rack on the door.
Bananas, potatoes, onions and garlic, if not packed, must not be kept in
the refrigerator.
Other manuals for SANTO K 9 18 00-4 i
1
Other AEG Refrigerator manuals

AEG
AEG RKE63826MW User manual

AEG
AEG RCB83724VW User manual

AEG
AEG SANTO 222344532-A-352010 User manual

AEG
AEG S93880KMB3 User manual

AEG
AEG S41600TSW2 User manual

AEG
AEG U 86000-4 User manual

AEG
AEG SKS58800E0 User manual

AEG
AEG Santo 1402u User manual

AEG
AEG SCZ71800F0 User manual

AEG
AEG OSK5O88EF User manual

AEG
AEG OKO-SANTO 2842-6 i User manual

AEG
AEG SFE814D9ZC User manual

AEG
AEG S75358KG38 User manual

AEG
AEG SKD71800F0 User manual

AEG
AEG AIK2104R User manual

AEG
AEG RKB638E2MX User manual

AEG
AEG SKS41240S2 Mounting instructions

AEG
AEG AGN71200F0 User manual

AEG
AEG Santo 1672TK User manual

AEG
AEG S 70170 TK3 User manual