Aeron GD-800 User manual


3

3
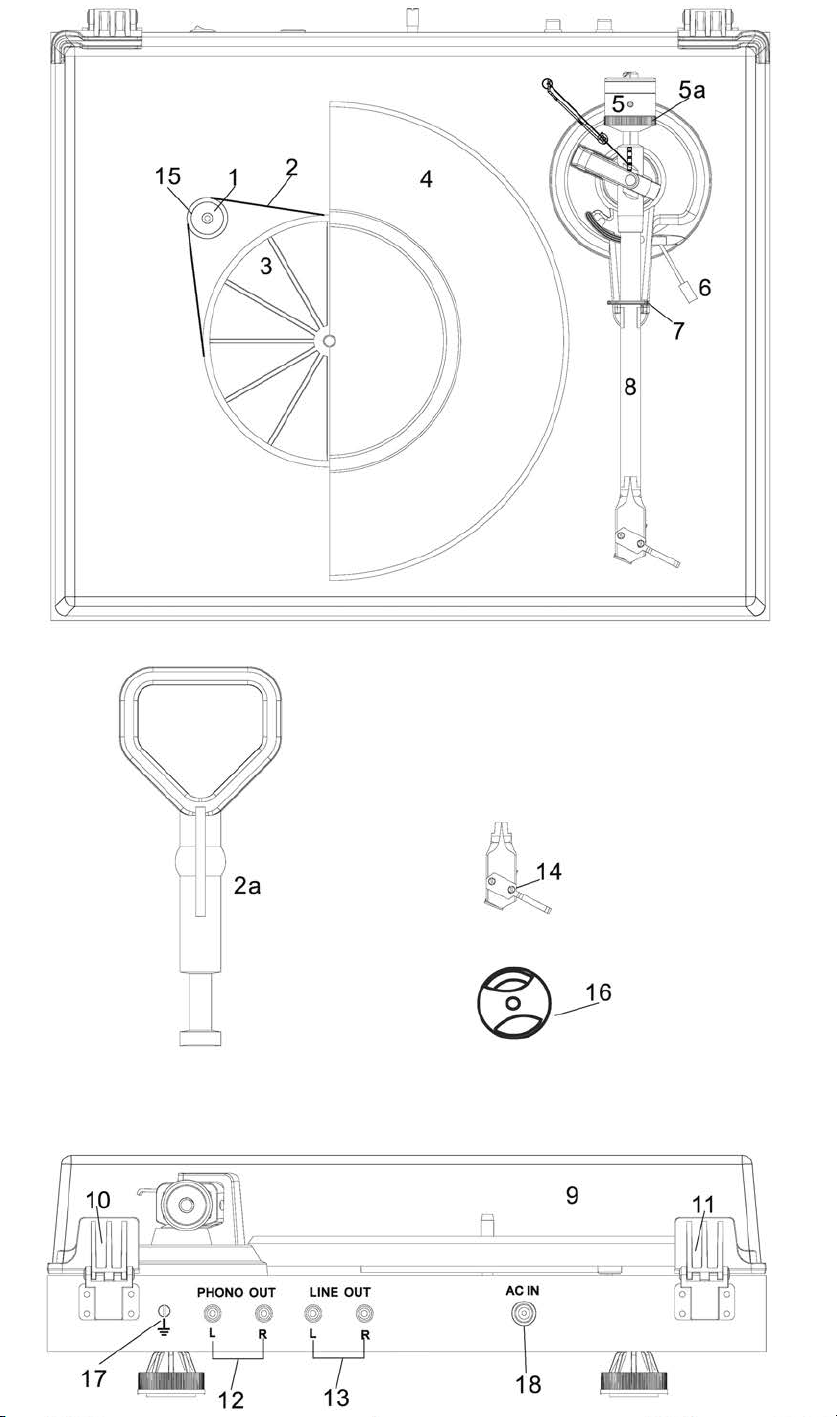
CONTROLS, FEATURES AND CONNECTIONS
1 Stepped Dive Pulley
2 Drive Belt * 2a Belt Hook*
3 Sub-Platter
4 Turntable Platter
5 Tonearm Counterweight * 5a Down force Scale
6 Tonearm Lift Lever
7 Tonearm Rest
8 Tonearm
9 Lid*
10 Lid Hinge
11
12 Phono Out Jacks
13 Line out Jacks
14 Head shell with Finger Lift and Fitted audio-technica AT-3600L Cartridge
15 Motor
16 45RPM Adapter
17 Ground Connecter
18 AC Power Jack
19 AC Power Adapter (not shown)
Lid Hinge
a suitable area. Before starting assembly, familiarize yourself with the parts listed above and
corresponding numbers in the technical drawings on the previous page.Separately packed
items are marked with an asterisk*.
During assembly and adjustment of the deck, small parts could be lost if not carefully placed in
AERON GD-800

4
The turntable is supplied with a factory fitted and adjusted cartridge.
**The following instructions for adjusting the cartridge are provided in case the cartridge is
replaced by a different model at a later date.
Set-Up
-Make sure the surface you wish to use the turntable on is flat and level before placing the
turntable on it.
-Fit the drive belt (2)around the sub-platter (3) and the smaller diameter part of the motor
pulley (1). Avoid getting sweat of grease on the belt as these will deteriorate the performance
and reduce the belt’s lifespan. Use absorbent cloth or towels to remove any oil or grease from
the outer edge of the sub-platter (3) and the belt. Fit the platter (4) and felt mat over the spindle
of the sub-platter (3).
-SAVE ALL PACKAGING.
Cartridge Down force Adjustment
The counterweight (5) supplied is suitable for cartridges weighing between 3.0-6.0g.
- Gently push and turn the counterweight (5) onto the rear of the tonearm. Remove the
cartridge protection cap.
Lower the tonearm lift and position the cartridge in the space between tonearm rest and platter.
Carefully rotate the counterweight (5) until the tonearm balances out. The tonearm should
return to the balanced position if it is moved up or down. This adjustment must be done
carefully.
-Once the tonearm is correctly balanced return it to its’ rest. Hold the counterweight (5) without
moving it, and gently rotate the down force scale ring (5a) until the zero is in line with black line
on the rear of the tonearm (8). Check whether the arm still balances out.
Anti-skating Force Adjustment
Anti-skating Force
5-10mN
10-15mN
15-20mN
20mN and bigger
1st from bearing rings
2nd from bearing rings
3rd from bearing rings (Recommeded setting for factory installed cartridge)
4th from bearing rings
Groove in the stub
AERON GD-800

5
- Rotate the counterweight counter clockwise (seen from the front) to adjust the down force
according to the cartridge manufacturer’s recommendations. One mark on the scale
represents 0.1g of down force.
NOTE: The recommended down force for the factory fitted cartridge is 3.5±0.5g.
Connection to the Amplifier
The uses a moving magnetic cartridge. Connect the phono out cables to
the phono input on your amplifier of pre-amplifier (phono stage). Line inputs such as CD,
Tuner, Tape, or Video are not suitable for phono inputs. Make sure the amplification of the
selected input matches the type of cartridge being used. The factory installed cartridge is 47k
ohms / MM inptut.
Stereo System Connection
The RCA Line Out Jacks (13) output analog line-level signals and could be connected directly
with a par of active/ powered speakers of the appropriate input of your stereo system.
The Red plug connects with the Right channel and the White plug connects with the Left
channel.
NOTE: The RCA Jacks are not designed to be connected directly to the passive/ unpowered
speakers. If connected to the passive speakers, the volume level will be very low.
Main Power Connection
The power adaptor (19) is in the foam packing material. Unpack the power adaptor and plug
the small end into the power input jack (18) located at the underside of the turntable on the
back side. Plug the power adaptor into your power outlet.
Installing the Lid
Install the lid (9) carefully over the hinge prongs.
AERON GD-800

6
Changing Playback Speed
To play records at 45 RPM, first remove the platter (4). Using the belt hook (2a) provided, hook
the belt (2) over the larger diameter part of the motor pulley (1). Refit the platter. To revert to 33
1/3 RPM repeat the proceedings using the smaller step on the pulley.
Maintenance and Cleaning
Your turntable requires little of no regular maintenance. Remove dust with a slightly damp
antistatic cloth. Never use a dry cloth, this will create static electricity and attract more dust!
Antistatic cleaning agents are available at specialist stores, but must be applied sparingly to
avoid damage to rubber parts. It is recommended to install the needle cover before cleaning or
maintenance is carried out to avoid damage.
If the turntable is not used over a long period of time, the drive belt should be removed to
prevent unequal stretching.
NOTE: Always disconnect the record player from the power supply as a precaution before
maintenance!
Useful Tips
The turntable should be positioned on a low-resonance surface such as wood or multiple laye r
ply board to avoid structural vibrations disturbing playback.

7
Red Right channel positive (R+)
White Right channel negative (R-)
Green Left channel negative (L-)
To achieve the best sound reproduction, the cartridge must be precisely aligned on the head
shell. Position the included paper alignment tool over the spindle. Carefully lift the tone arm
and place the tip of the stylus on the points marked 130mm and 250mm. When the tip of the
stylus is placed precisely on these points, the cartridge should be perfectly parallel with the
reference lines on the alignment tool. If necessary, gently rotate the cartridge on the head shell
until the cartridge is parallel with the reference lines at the two points. Once the new cartridge
is positioned correctly, tighten the cartridge mounting screws.
NOTE: If you are unfamiliar or uncomfortable with completing this procedure, we recommend
consulting with a professional to perform the installation.
Blue Left channel positive (L+)
Installing New Cartridges
All cartridges with half inch mounting holes can be installed on this turntable. To install a new
cartridge, start by removing the two screws on the head shell, then remove the factory
installed cartridge. Carefully remove the wire leads from the factory cartridge, taking care not
to damage the wire leads. Leaving the protective cover on, position the new cartridge under
the head shell, aligning the screw holes. Insert one screw in each hole and very lightly tighten
(you will need to rotate the cartridge for final adjustment before fully tightening). Connect the
wire leads to the new cartridge as listed below.

8
Potential Incorrect Use and Fault Conditions
turntables are manufactured to the highest standards and undergo strict quality
controls before leaving the factory. Faults that may possibly occur are not necessarily due to
material or production faults but can sometimes be caused by incorrect use or unfortunate
circumstances. Therefore the following list of common fault symptoms is included.
The platter doesn’t turn although the unit is switched on:
- The unit is not connected to the main power supply.
- No power at the outlet.
- Drive belt is not installed or has slipped off.
No signal through one or other channel or both channels:
- Phone input not selected at amplifier.
- Amplifier not switched on.
- Amplifier or speakers muted.
- No connection to the speakers.
- No connection between turntable and amplifier.
-Wire leads not connected the cartridge.
Aeron
Strong hum on phono input:
- No ground connection from cartridge, arm, or arm cable to amplifier or ground loop.
- Turntable too close to speakers.

Channel balance <2.5dB
Amplifier connection MM - input
Channel separation >18dB
Recommended tracking force 3.5±0.5g
Output voltage 2.5mV
Weight 5g
Technical Specifications: AT-3600L (audio-technica)
Frequency response 20Hz-20kHz
Recommended load resistance 47kohms
Technical Specifications:
Nominal Speeds 33 1/3 & 45RPM
Speed Variance ±0.8%
Wow and Flutter ≤0.15%
Signal to Noise -68dB
Down force Range 3.0-6.0g
Effective Tonearm Length 8.6” (218.5mm)
Overhang 0.73in
Power Consumption 5W
Outboard Power Supply 15V/ 500mA AC
Dimensions (W x H x D) 415 x 360 x 140mm
Weight net 8.5kgs
AERON GD-800
9
General Specifications
Table of contents


