Aerotech OD301US User manual

MODELS
OD301US OS301US
OD301MUS OS301MUS
OD301MNZ OS301MNZ
599125
Fisher & Paykel Appliances © 2003 July 2003
Ô

2
Set Automatic/Delayed Time Cooking
·Check that the clock shows the correct time.
·Select upper or lower oven cavity by pressing UPPER/LOWER (for double
ovens only).
·Press the COOK TIME button. “Cook Time” and “Auto” will flash and
“00:00” will show in the oven display. Turn the PRESS TO CLEAR knob
to select the desired length of cooking time (e.g. 2 hours). The maximum
cook time that can be selected is 23 hours 59 minutes.
·To set the time the oven is to turn off, press the STOP TIME button. “Stop
Time” and “Auto” will flash in the oven display. Set the stop time by
turning the PRESS TO CLEAR button.
·Choose the cooking mode and temperature required. These settings will
automatically be adopted after 8 seconds, or you can press the STOP
TIME button.
Each of the steps in setting Automatic/Delayed Time Cooking must be started
within 8 seconds of the previous step being completed, otherwise the clock
display will revert to the time of day and the process will have to be started
over again.
If there is time to wait before cooking starts, “Delay” and “Auto” will show in
the clock display along with the current time. The oven mode and
temperature displays will dim.
The oven mode and temperature dials will still function as in manual
operation. They can be altered prior to or during cooking, and the oven can
be manually turned off before the set Cook Time has elapsed.
During cooking, “Auto” and the remaining cook time will be shown in the clock
display. When the Cook Time is finished, the oven will beep and cooking will
cease. The temperature and oven mode displays will dim and “Cook Time”
and “Auto” will flash in the clock display. If the oven mode and temperature
dials are turned to OFF, the oven will revert to normal operation after 8
seconds.
The Automatic/Delayed Time function can be cancelled at any time by turning
the temperature and oven mode dials to OFF. After 8 seconds the clock
display will revert to time of day.

3
Set Automatic Stop Cooking
Press the STOP TIME button and turn the PUSH TO CLEAR knob to display
the time the oven is to switch off. Then choose the cooking mode and
temperature. These settings will be adopted and will activate after 8 seconds.
“Auto” and the remaining cook time will show in the clock display. When the
selected cooking time is finished, the oven will beep and cooking will cease.
The temperature and oven mode displays will dim and “Cook Time” and
“Auto” will flash in the clock display. If the oven mode and temperature dials
are turned to OFF, the oven will revert to normal operation after 8 seconds.
User Select Modes
This allows the user to configure some of the settings displayed on the control
panel. To enter User Select mode, ensure that the oven mode and
temperature dials are off and that no automatic/delayed start programs are
operating. Press and hold the TIMER and then CLOCK buttons and hold
down together until the oven beeps (about 2 seconds). The oven mode
display (left hand one on dual ovens) will display “User Select”.
The user select modes that can altered are as follows:
Sabbath Mode
Sabbath mode is designed for religious faiths that observe a “no work”
requirement on the Sabbath. When the oven is in Sabbath mode:
·The oven will not turn off automatically.
·Clock, temperature and oven mode displays will be disabled.
·No tones will sound.
·No error messages or temperature changes will be displayed.
·The oven cavity lights are on.
To set the Sabbath mode:
·Enter the User Select mode.
·Turn the oven mode dial until “Sab Mode” appears in the display.
·Turn the PUSH TO CLEAR knob to select the length of time the oven is to
be kept in Sabbath mode. The maximum is 99 hours in 1 hour steps.
Turn the temperature dial to select a temperature. Bake is the only oven
mode that can be used in Sabbath mode.
·To start Sabbath mode, press PUSH TO CLEAR. The oven mode will
show “Sab Mode” with no back light. The temperature display will show
“---”. Temperatures can be adjusted but the display will not change.

4
·In double oven models, different temperatures can be selected for upper
and lower cavities by using their temperature dials. The oven mode dial
for the lower oven must be turned to True Aero to activate the oven,
although it will operate in Bake.
·The oven can be turned off at any time during the Sabbath mode by
turning the oven mode and temperature dials to the OFF position.
·The oven will not revert to normal operation until the set time has elapsed.
Sabbath mode can be exited at any time by pressing the PUSH TO
CLEAR button for 5 seconds.
Temperature Scale
The temperatures can be displayed as either Fahrenheit or Celsius.
To change the temperature display:
·Enter the User Select mode.
·Turn the oven mode dial until “Temp Scale” appears in the display.
·Press the PUSH TO CLEAR button to select either “C” or “F” in the clock
display.
·Press the CLOCK button to activate.
Short Alert
By default setting, Short Alert is off and the audible beep will sound
continuously at the end of cooking functions until cancelled by pressing the
PUSH TO CLEAR button. When Short Alert is on, an audible beep will sound
5 times at the end of automatic cooking functions and when the timer finishes.
After 5 beeps, the alert will stop, then repeat every 5 minutes until cancelled
by pressing the PUSH TO CLEAR button. The clock display will flash
continuously until cancelled.
To set the Short Alert:
·Enter the User Select mode.
·Turn the oven mode dial until “Short Alert” appears in the display.
·Press the PUSH TO CLEAR button to select either “ON” or “OFF” in the
clock display.
·Press the CLOCK button to activate.

5
Time Mode
The clock display can be altered to show the time in either a 12 hour or 24
hour format.
To change the clock display:
·Enter the User Select mode.
·Turn the oven mode dial until “Time Mode” appears in the display.
·Press the PUSH TO CLEAR button to select either “12H” or “24H” in the
clock display.
·Press the CLOCK button to activate.
Show Clock
This function can be used to hide the time in the clock display. All other
functions, such as Timer, will continue to be shown as normal in the clock
display when the time is hidden.
To hide the clock display:
·Enter the User Select mode.
·Turn the oven mode dial until “Show Clock” appears in the display.
·Press the PUSH TO CLEAR button to select either “ON” or “OFF” in the
clock display. Selecting “OFF” will hide the clock display.
·Press the CLOCK button to activate.
Language
This can be set to display the various settings in either American English
(US), English (EN), French (FR) or Spanish (SP).
To change the language setting:
·Enter the User Select mode.
·Turn the oven mode dial until “Lang US” appears in the display.
·Press the PUSH TO CLEAR button to select “US”, “EN”, “FR” or “SP” in
the clock display.
·Press the CLOCK button to activate.

6
Oven Reset
This will reset the Temperature Scale, Short Alert, Time Mode and Show
Clock to the default settings. Sabbath Mode and Language settings will
remain unaffected.
To reset:
·Enter the User Select mode.
·Turn the oven mode dial until “Reset” appears in the display.
·Press the PUSH TO CLEAR button to select “OFF” in the clock display.
·Press the CLOCK button to activate.
Diagnostics
Entering the Technician Mode
(a) Ensure all oven modes and temperature displays are set to “OFF”.
(b) Ensure no cooking auto functions are set.
(c) Enter User Set Mode by pressing and holding the TIMER button and then
the CLOCK button. Hold for 2 seconds.
(d) Turn the oven mode knob counter clockwise one position.
(e) Enter Sales Mode by pressing and holding the TIMER button and then the
PROBE button. Hold for 5 seconds.
Note: If left in the Sales Mode, only the oven displays will operate.
(f) Return the oven mode knob back to its original position.
(g) Enter Technician Mode by pressing and holding the TIMER button and
then the STOP TIME button. Hold for 2 seconds.
(h) The Oven Mode Display will now show “TECH SELECT”.
Note: The clock display will show the version of software installed in the
product.
(i) The oven is now in Technician Mode. Oven diagnostics can be carried
out.
Exiting the Technician Mode
(a) To exit Technician Mode at any time, press any button other than CLEAR
or TIMER.

7
Technician Mode Navigation
(a) Ensure the Oven Mode Display shows “TECH SELECT”. (Refer to Entering
Technician Mode above.)
(b) Use the Oven Mode knob to navigate through the 19 Tech Select positions.
Note: If any position from 1 to 11 is selected, the components ON / OFF status is
displayed in the oven temperature display. Push the clock twist button to turn the
component ON or OFF.
When an element is turned ON the cavity temperature will be displayed instead of “ON”.
Knob
Position
(clockwise)
Oven Mode
Display Description
1TOP
INNER Broil/Grill Element Inner.
2TOP
OUTER Broil/Grill Element Outer.
3FAN
ELEMNT Fan Element and Oven Fan.
4OVEN
FAN Oven Cavity Fan.
5THROAT
ELEMNT Throat Element.
6LOWER
ELEMNT Base Element.
7COOLNG
FAN Cooling Fan.
8CAT
ELIM Catalytic Smoke Eliminator.
9CAVITY
LIGHT Cavity Lights.
10 LOCK
MOTOR Lock Motor.
11 VENT
FAN Exhaust Fan.
12 NUM
CLEAN
Number Of Pyro Cycles performed.
(Number of times oven has reached
912°F (490°C))
13 CLOCK
TEMP Clock Module Temperature.

8
14 PWR MD
TEMP Power Module Board Temperature.
15 MAX
BOARD
Maximum Temperature recorded on any
Board.
(Push “CLEAR” to reset value)
16 CAVITY
TEMP
The Cavity Temperature measured by
the sensor.
17 FAULT
CODE
The two most recent Fault Codes are
displayed.
(Refer to Note 1)
18 NUM
DAYS
Shows the number of days the product
has been on.
19 DOWN
LOAD
Shows that data can now be
downloaded.
(Press “CLEAR” to begin Smart Tool
Download)
Note 1:
When “FAULT CODE” is selected, the oven temperature display will show the two most
recent fault codes in the following temperature knob positions. If “OFF” is displayed, then
there are no faults logged.
Temperature Knob Position Description
0 Most Recent Fault
12
nd Most Recent Fault
If the same fault occurs consecutively it will only be recorded as one fault.
If the Most Recent Fault code is cleared from the log it will then be recorded
as the 2nd Most Recent Fault. The Most Recent Fault position will be left
blank.
Note: To clear a fault code from the log push CLEAR when it is displayed in
the temperature display.
Accessing Technical Data Log
(a) Enter Technician Mode (refer to previous page).
(b) Choose Tech Select option “DOWN LOAD”
(c) Hold the Fisher & Paykel “Smart Tool” download pen up to the clock
module display (top left corner) to initiate download.
(d) Data can now be viewed on the PC.

9
Technical Data Log
The Technical Data Log has a PC interface containing several sections of
information. These sections can be viewed as follows.
(a) Info Section:
This section contains general identification information for the oven.
(b) Current/Previous Fault Information Sections:
There are four sections displaying information on the two most recent fault
codes for each oven cavity. The information contained details the oven
settings, electronic board temperatures and the status of all oven outputs
at the time the fault occurred.
(c) Status Section:
This section details all the current user settings and the electronic
software and hardware details.
Also included are the following details:
·The number of times each oven cavity was self-cleaned.
·The clock module board maximum temperature.
·The day the maximum temperature occurred.
·The number of days the oven has been in operation since the power-
up.
·The number of times the door has been opened.
(d) Function Log Section
This section details the last ten oven modes used and the oven settings
the user selected.
(e) Self-Clean Log Section
This will record the last five self-clean cycles.
The following data will be recorded when the oven cavity temperature
exceeds 550°F (288°C) and a self-clean cycle is set.
·Day number the Self-Clean Mode was used.
·Heat up time between 550°F (288°C) and the maximum temperature.
·Maximum oven cavity temperature reached during Self-Clean.

10
Fault Codes
F1 displayed in Tech Select only
Maximum allowable temperature (185°F, 85°C) around the electronics was
exceeded.
Procedure:
·Check for cooling fan fault or vent blockages.
Fault Code F2 displayed
Maximum allowable cavity temperature was exceeded during Self-Clean Pyro
cycle.
Procedure:
·Check for temperature sensor faults.
·Check for oven element faults.
·Replace the power module if no other component faults can be found.
Fault Code F3 displayed
The oven temperature is sensed at over 600°F (315°C) during normal
cooking operation.
Procedure:
·Check for temperature sensor fault.
·Check for oven element faults.
·Replace the power module if no other component faults can be found.
Fault Code F4 displayed
A fault occurred in the power module.
Procedure:
·Check all the connections to the power module and clock module.
·If the fault code re-occurs, then replace the power module.

11
Fault Code F5 displayed
A communications error occurred between the clock module and the power module.
Procedure:
·Ensure that the connection between the power module and clock module is secure.
·If the fault code re-occurs, then replace the power module.
Fault Code F7 displayed
Oven door lock fault occurred.
Procedure:
Check that the oven door lock has not jammed.
Note: The door does not lock or unlock in normal operation with the door
open or with the oven cavity temperature over 600°F (315°C). However it will
operate with the door open in diagnostics.
·Check for oven door switch and door lock switch faults.
·Check for temperature sensor faults.
·Replace the power module if no other component faults can be found.
12
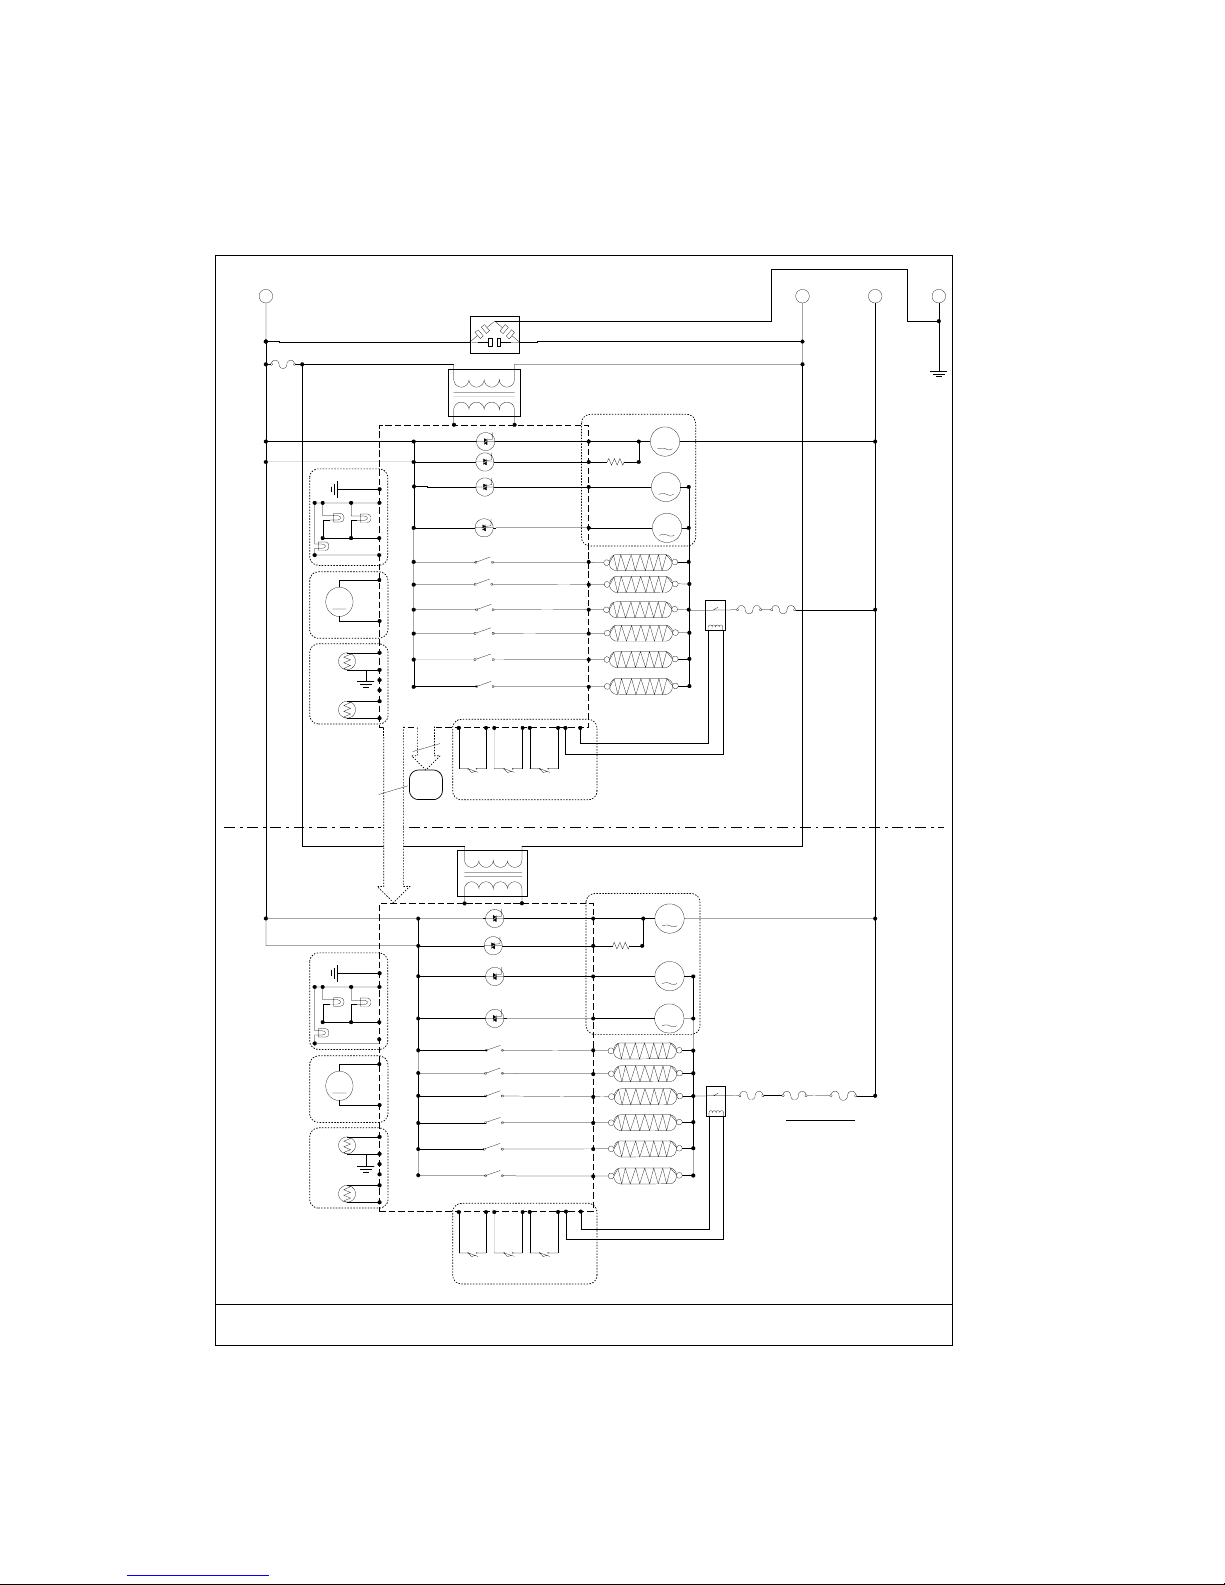
Interference
Protector
XY-Capacitor
M
M
Exhaust Fan 18W
Cool Fan 60W
Pow er Modul e
120VAC
70 WATT
12VAC
220 Ohms
L1 NL2 E
Microtemp Limiter
(Thermal Fuse)
M
M
Exhaust Fan 18W
Cool Fan 60W
Thermal
Limiter 1
Throat 540W
Power Module
120VAC
70 WATT
12VAC
220 Ohms
UPPER
OVEN
LOWER
OVEN
Y
R
OR
LT
BRN
Y
LT
BRN
OR
Y
R
OR
LT
BRN
Y
LT
BRN
OR
Bake 1500W
Fan 2500W
GRY
PI
Thermal
Limiter 3
Throat 540W
Bake 1500W
Outer Broil 1500W
Fan 2500W
Inner Broil 2900W
Smoke Elim. 150W
BRN
Thr PI
Fan
Bot
U.O.
U.I.
C.C.
Thr
Fan
Bot
U.O.
U.I.
C.C.
M
Oven Fan 35W
R
RM
Oven Fan 35W
COLOUR KEY
BLK = BLACK
BLU = BLUE
BRN = BROWN
GRN = GREEN
GRY = GREY
LT BRN = LIGHT BROWN
OR = ORANGE
PI = PINK
R = RED
WHI = WHITE
Y = YELLOW
Oven Wiring Schematic
U.S.A
Part No. 545740 D
Isolating
Relay
Control Line 12V
BLK
BLK
SWITCHES
Lock
Switch 1
BRN
BRN
Lock
Switch 2
BLU
BLU
Door
Switch
WHI
WHI
Meat
Probe
Temp.
Sensor
°t BLK
BLK
°t BLK
BLK
R
M
LOCK
MOTOR 3W
12 VDC BLK
LOCK
R
BLK
BRN
Lamp
20W
Lamp
20W
Lamp
20W
Isolating
Relay
Control Line 12V
BLK
BLK
SWITCHES
Lock
Switch 1
BRN
BRN
Lock
Switch 2
BLU
BLU
Door
Switch
WHI
WHI
Meat
Probe
Temp.
Sensor
°t BLK
BLK
°t BLK
BLK
R
M
LOCK
MOTOR 3W
12 VDC BLK
LOCK
R
BLK
BRN
Lamp
20W
Lamp
20W
Lamp
20W
(BOTTOM RIGHT CORNER)(BOTTOM RIGHT CORNER)
CLOCK
MODULE
11
9
11
CLOCK
TO GENERIC 2
SENSORS SENSORS
R
R
R
R
(TOP RIGHT CORNER)
(TOP RIGHT CORNER)
WHI WHI
WHI WHI
Outer Broil 1500W
Inner Broil 2900W
Smoke Elim. 150W
Thermal
Limiter 2
Thermal
Limiter 4
Thermal
Limiter 5
Wiring Diagrams
Double Oven USA Wiring Schematic

13
Oven Wiring Schematic
U.S.A
Part No. 545739 E
Interference
Protector
XY-Capacitor
L1 NL2
E
Microtemp Limiter
(Thermal fuse)
M
M
Cool Fan 60W
Power Module
120VAC
70 WATT
12VAC
220 Ohms
Y
R
OR
M
Oven Fan 35W
R
Fan 2500W
Bake 1500W
Outer Broil 1500W
Inner Broil 2900W
LT
BRN
Y
LT
BRN
OR
Smoke Elim. 150W
GRY
Throat 540W
PI
C.C.
U.I
.
U.O.
Fan
Bot
Thr
Exhaust Fan 18W
Thermal
Limiter 2
COLOUR KEY
BLK = BLACK
BLU = BLUE
BRN = BROWN
GRN = GREEN
GRY = GREY
LT BRN = LIGHT BROWN
OR = ORANGE
PI = PINK
R = RED
WHI = WHITE
Y = YELLOW
Isolating
Relay
Control Line 12V
BLK
BLK
SWITCHES
Lock
Switch 1
BRN
BRN
Lock
Switch 2
BLU
BLU
Door
Switch
WHI
WHI
Meat
Probe
Temp.
Sensor
°t BLK
BLK
°t BLK
BLK
R
M
LOCK
MOTOR 3W
12 VDC BLK
LOCK
R
BLK
BRN
Lamp
20W
Lamp
20W
Lamp
20W
(BOTTOM RIGHT CORNER)
CLOCK
MODULE
11
CLOCK
R
R
(TOP RIGHT CORNER)
Thermal
Limiter 1
SENSORS
Single Oven USA Wiring Schematic
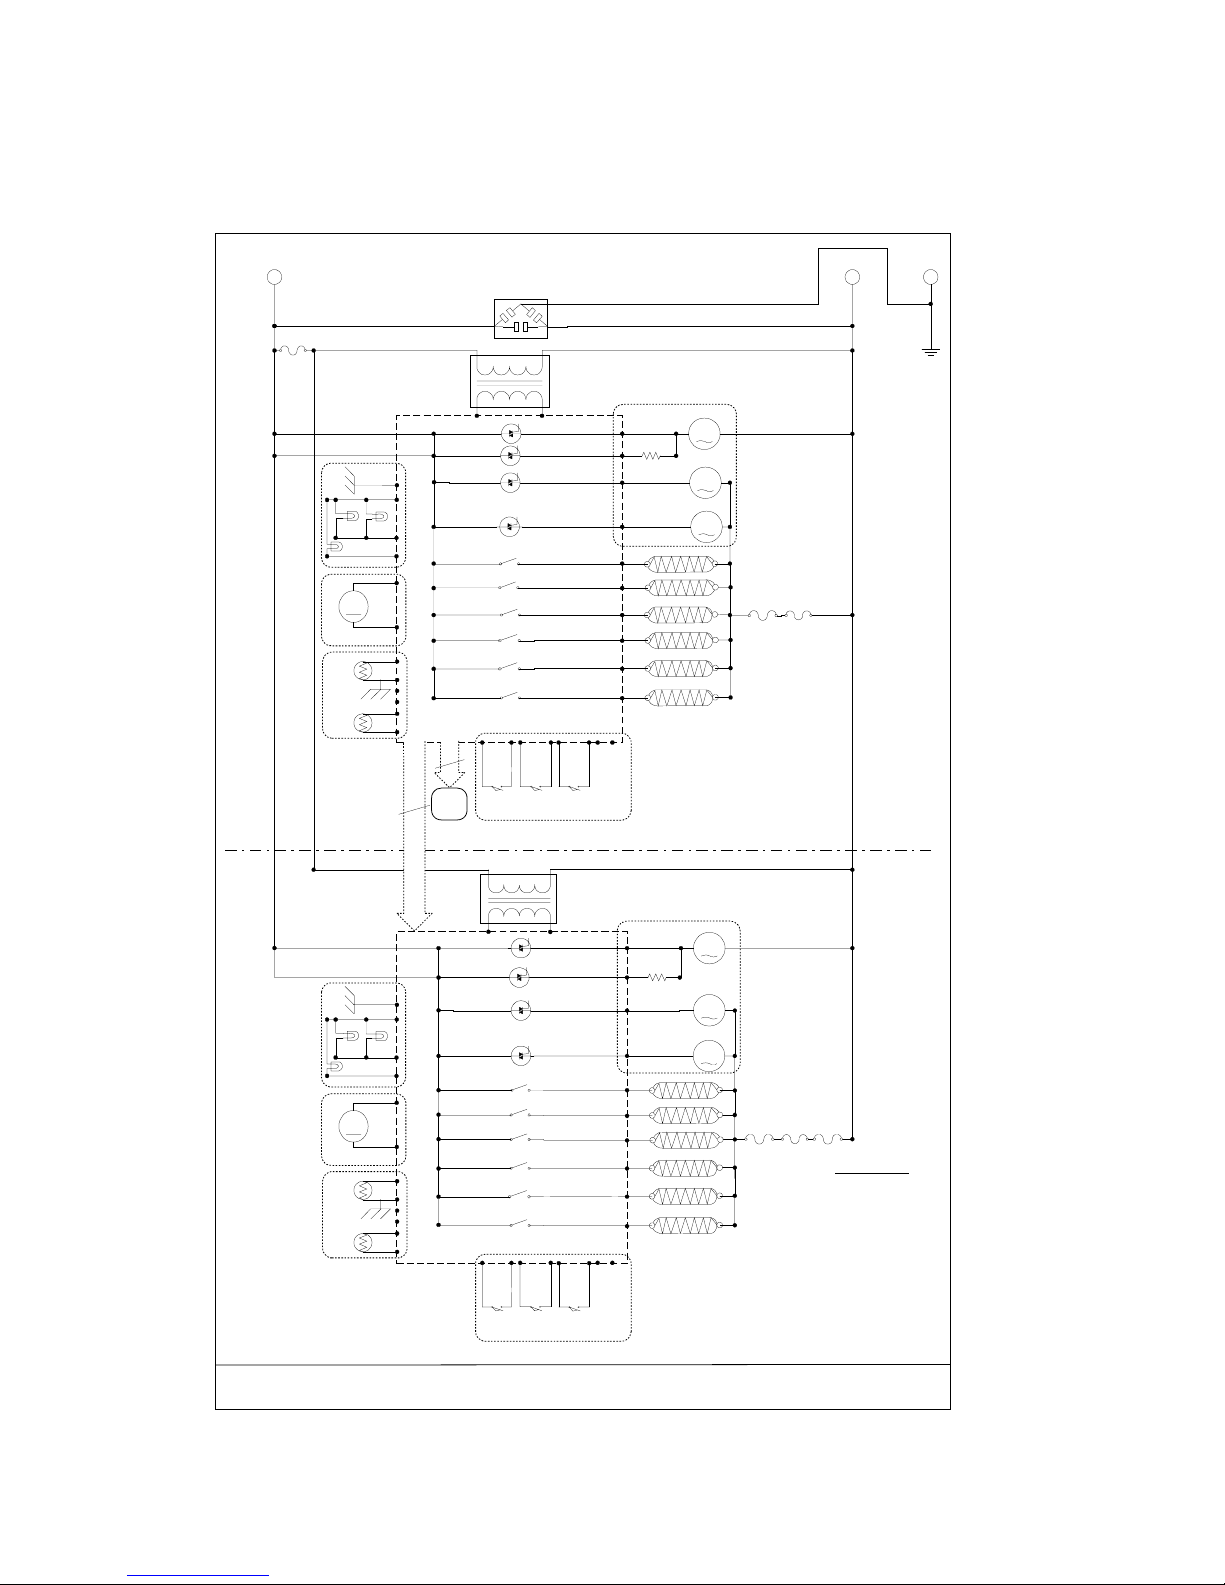
14
Double Oven NZ / AUS Wiring Schematic
Oven Wiring Schematic
NZ/AUS
Part No. 545956 B
Interference
Protector
XY-Capacitor
M
M
Exhaust Fan 18W
Cool Fan 60W
Power Module
240VAC
70 WATT
12VAC
220 Ohms
LNE
M
M
Exhaust Fan 18W
Cool Fan 60W
Thermal
Limiter 1
Throat 540W
Power Module
240VAC
70 WATT
12VAC
220 Ohms
UPPER
OVEN
LOWER
OVEN
Y
R
OR
LT
BRN
Y
LT
BRN
OR
Y
R
OR
LT
BRN
Y
LT
BRN
OR
Bake 1500W
Outer Grill 1500W
Fan 2500W
Inner Grill 2900W
Smoke Elim. 150W
BRN
PI
Thermal
Limiter 3
Throat 540W
Bake 1500W
Outer Grill 1500W
Fan 2500W
Inner Grill 2900W
Smoke Elim. 150W
BRN
Thr PI
Fan
Bot
U.O.
U.I.
C.C.
Thr
Fan
Bot
U.O.
U.I.
C.C.
M
Oven Fan 35W
R
RM
Oven Fan 35W
Thermal
Limiter 2
Thermal
Limiter 4
Thermal
Limiter 5
COLOUR KEY
BLK = BLACK
BLU = BLUE
BRN = BROWN
GRN = GREEN
LT BRN = LIGHT BROWN
OR = ORANGE
PI = PINK
R = RED
WHI = WHITE
Y = YELLOW
SWITCHES
Lock
Switch 1
BRN
BRN
Lock
Switch 2
BLU
BLU
Door
Switch
WHI
WHI
Meat
Probe
Temp.
Sensor
°t BLK
BLK
SENSORS
°t BLK
BLK
R
M
LOCK
MOTOR 3W
12 VDC BLK
LOCK
R
BLK
BRN
Lamp
20W
Lamp
20W
Lamp
20W
(BOTTOM RIGHT CORNER)
Meat
Probe
Temp.
Sensor
°t BLK
BLK
°t BLK
BLK
R
M
LOCK
MOTOR 3W
12 VDC BLK
LOCK
R
BLK
BRN
Lamp
20W
Lamp
20W
Lamp
20W
SWITCHES
Lock
Switch 1
BRN
BRN
Lock
Switch 2
BLU
BLU
Door
Switch
WHI
WHI
CLOCK
MODULE
11
9
11
CLOCK
TO GENERIC 2
Microtemp Limiter
(Thermal fuse)
SENSORS (BOTTOM RIGHT CORNER)
R
R
R
R
(TOP RIGHT CORNER)
(TOP RIGHT CORNER)
WHI WHI
WHI WHI

15
Single Oven NZ / AUS Wiring Schematic
Oven Wiring Schematic
NZ/AUS
Part No. 545955 B
Interference
Protector
XY-C apacitor
LNE
M
M
Cool Fan 60W
Thermal
Limiter 1
Power M odule
240VAC
70 W AT T
12VAC
220 Ohms
Y
R
OR
M
Oven Fan 35W
R
Fan. 2500W
Bake 1500W
Outer Grill 1500W
Inner Grill 2900W
LT
BRN
Y
LT
BRN
OR
Smoke Elim.150W
BRN
Throat 540W
PI
C.C.
U.I
.
U.O.
Fan
Bot
Thr
Exhaust Fan 18W
Thermal
Limiter 2
COLOUR KEY
BLK = BLACK
BLU = BLUE
BRN = BROWN
GRN = GREEN
LT BRN = LIGHT BROWN
OR = ORANGE
PI = PINK
R = RED
WHI = WHITE
Y = YELLOW
SW ITCH ES
Lock
Switch 1
B
R
N
B
R
N
Lock
Switch 2
BL
U
BL
U
Door
Switch
W
HI
W
HI
Meat
Probe
Temp.
Sensor
°t BLK
BLK
°t BLK
BLK
R
M
LOCK
MOTOR 3W
12 VDC BLK
LO
C
K
R
BLK
BRN
Lamp
20W
Lamp
20W
Lamp
20W
(B
O
TT
O
M
RI
G
HT
C
O
R
N
CLOCK
MODULE
11
CL
O
C
K
Microtemp Limiter
(Thermal fuse)
SE
N
S
O
R
R
R
(T
O
P
RI
G
HT
C
O
R
N
WHI WHI
This manual suits for next models
5
Table of contents
Popular Oven manuals by other brands


UUNI
UUNI 3 Essentials user manual

Siemens
Siemens HB301 0K Series instruction manual

altimo
altimo BISOF1SS instruction manual

Kenmore
Kenmore 100.76771410 Use & care guide

Hotpoint Ariston
Hotpoint Ariston MB 91.3 IX / HA operating instructions
/HA S operating instructions")
Hotpoint Ariston
Hotpoint Ariston FHR 540 (AN)/HA S operating instructions