AGA Rangemaster RMB45WDBL/SS Manual

RMB45WDBL/SS
ECL14WDBL/BL
User Guide
&
Installation & Service Instructions
U110608 - 03


1
Thank you for buying a Rangemaster appliance. It should give
you many years trouble-free cooking if installed and operated
correctly. It is important that you read this section before you
start, particularly if you have not used the appliance before.
This appliance is designed for domestic cooking only. Using
it for any other purpose could invalidate any warranty or
liability claim.
Installation and Maintenance
In the UK, the electrical installation should be in accordance
with BS 7671. Otherwise, all installations must be in
accordance with the relevant instructions in this booklet, with
the relevant national and local regulations, and with the local
electricity supply companies’ requirements.
Make sure that the appliance is wired in and switched on.
It is recommended that this appliance is serviced annually.
Only a qualied service engineer should service the appliance
and only approved spare parts should be used.
Always allow the appliance to cool and then switch it o at
the mains before cleaning or carrying out any maintenance
work, unless specied otherwise in this guide.
Personal Safety
The storage drawer can only be used for storage.
NEVER store ammable materials in the drawer.
This includes paper, plastic and cloth items, such
as cookbooks, plastic ware and towels, as well as
ammable liquids.
DO NOT store explosives, such as aerosol cans, on or
near the appliance.
Flammable materials may explode and result in re
or property damage.
Cleaning
Before using for the rst time proceed as follows:
Wipe the appliance with a damp cloth only, and then dry with
a soft cloth.
In the interests of hygiene and safety, the appliance should
be kept clean at all times as a build up of fats and other
foodstus could result in a re.
Clean only the parts listed in this guide.
Clean with caution. If a damp sponge or cloth is used to
wipe spills on a hot surface, be careful to avoid steam burns.
Some cleaners can produce noxious fumes if applied to a hot
surface.
1. Before You Start...

2
The controls consist of a temperature dial and an On/O
switch. These are only visible when the drawer is open. When
the drawer is closed, you can tell when the appliance is
switched on because the On/O switch illuminates through
the hole in the front of the drawer.
It is operated by the temperature knob and can be adjusted
between 30°C and 80°C.
The temperature dial must only be turned in a clockwise
direction as far as it will go and then back again.
To prevent damage to the thermostat, do not force the
temperature knob past the maximum position.
1. To open, push the door to open.
2. Place the crockery.
3. Set the required temperature.
4. Press the power switch, which will light up to conrm
the warming drawer is switched on.
5. Push to close the drawer.
6. Switch the appliance o before removing the warmed
dishes.
The symbols are recommendations for optimum settings and
do not indicate absolute temperature values (Table 2.1).
2. Warming Drawer
D
A
B
C
Warming Times
The time necessary for warming depends on various factors:
• Material and thickness of the dishes.
• Quantity of dishes to be warmed.
• Arrangement of dishes in the drawer.
• Temperature setting.
Therefore exact warming times cannot be provided.
With use, experience will demonstrate optimal warming
times and temperature settings. Temperature setting is
approx.60°C. Evenly heated crockery will take about:
• 30 – 35 minutes for 6 place setting.
• 40 - 45 minutes for 12 place setting.
Warming drawer capacity
The capacity of the warming drawer is 25kg.
The number of items this includes depends on the size and
thickness of your crockery.
A. Temperature control
B. On / O
C. Indicators
D. Warming Drawer

3
To prevent hot drinks from cooling too quickly,
use this temperature setting to warm the cups
to a temperature that is safe to touch.
To prevent hot food from cooling quickly, use
this temperature setting to warm plates or
serving dishes. The use of oven gloves or pot
holders is recommended for this setting.
The thermostat is set to maximum
temperature. The use of oven gloves or pot
holders is necessary for this setting.
Cleaning
Clean the inside of the drawer with hot soapy water and a
soft cloth, rinse and dry.
The Warming Drawer is ideal for storing baking trays and
other cooking utensils.
It can get warm, so do not store anything in it that may melt
or catch re.
• Always disconnect the appliance from the power supply
before undertaking any cleaning.
• Allow the warming drawer to cool fully after use before
undertaking any cleaning.
Warming drawer exterior
• Clean with a damp cloth. If it is very dirty, add a few
drops of dish washing detergent to the water. Dry with
a dry cloth.
• Slight colour differences on the front of the appliance
are due to the use of different materials, such as glass,
plastic and metal.
Front panel
• Use a mild detergent and a soft window cleaning cloth
or a microfibre cloth that does not leave fibres on the
surface. Wipe horizontally, without pressing.
• Do not use corrosive products, hard sponges or rough
cloths for cleaning. Clean the aluminium surfaces with
a dry cloth.
Table 2.1
Capacity
6 place settings
• 6 dinner plates Φ28 cm
• 6 soup bowls Φ10 cm
• 1 serving bowl Φ22 cm
• 1 serving bowl Φ19 cm
• 1 serving bowl Φ17 cm
• 2 meat platters 36 cm
Or:
• 20 dinner plates Φ28 cm
• 36 soup bowls Φ22 cm
• 30 soup bowls Φ10 cm
• 10 dinner plates Φ28 cm
• 10 soup bowl Φ22 cm
• 10 pizza plates Φ36 cm
• 80 espresso cups
• 40 cappuccino cups
• 30 punch glasses
• 18 soup bowls Φ22 cm
• 2 soup terrines 21 cm×18
cm

4
Troubleshooting
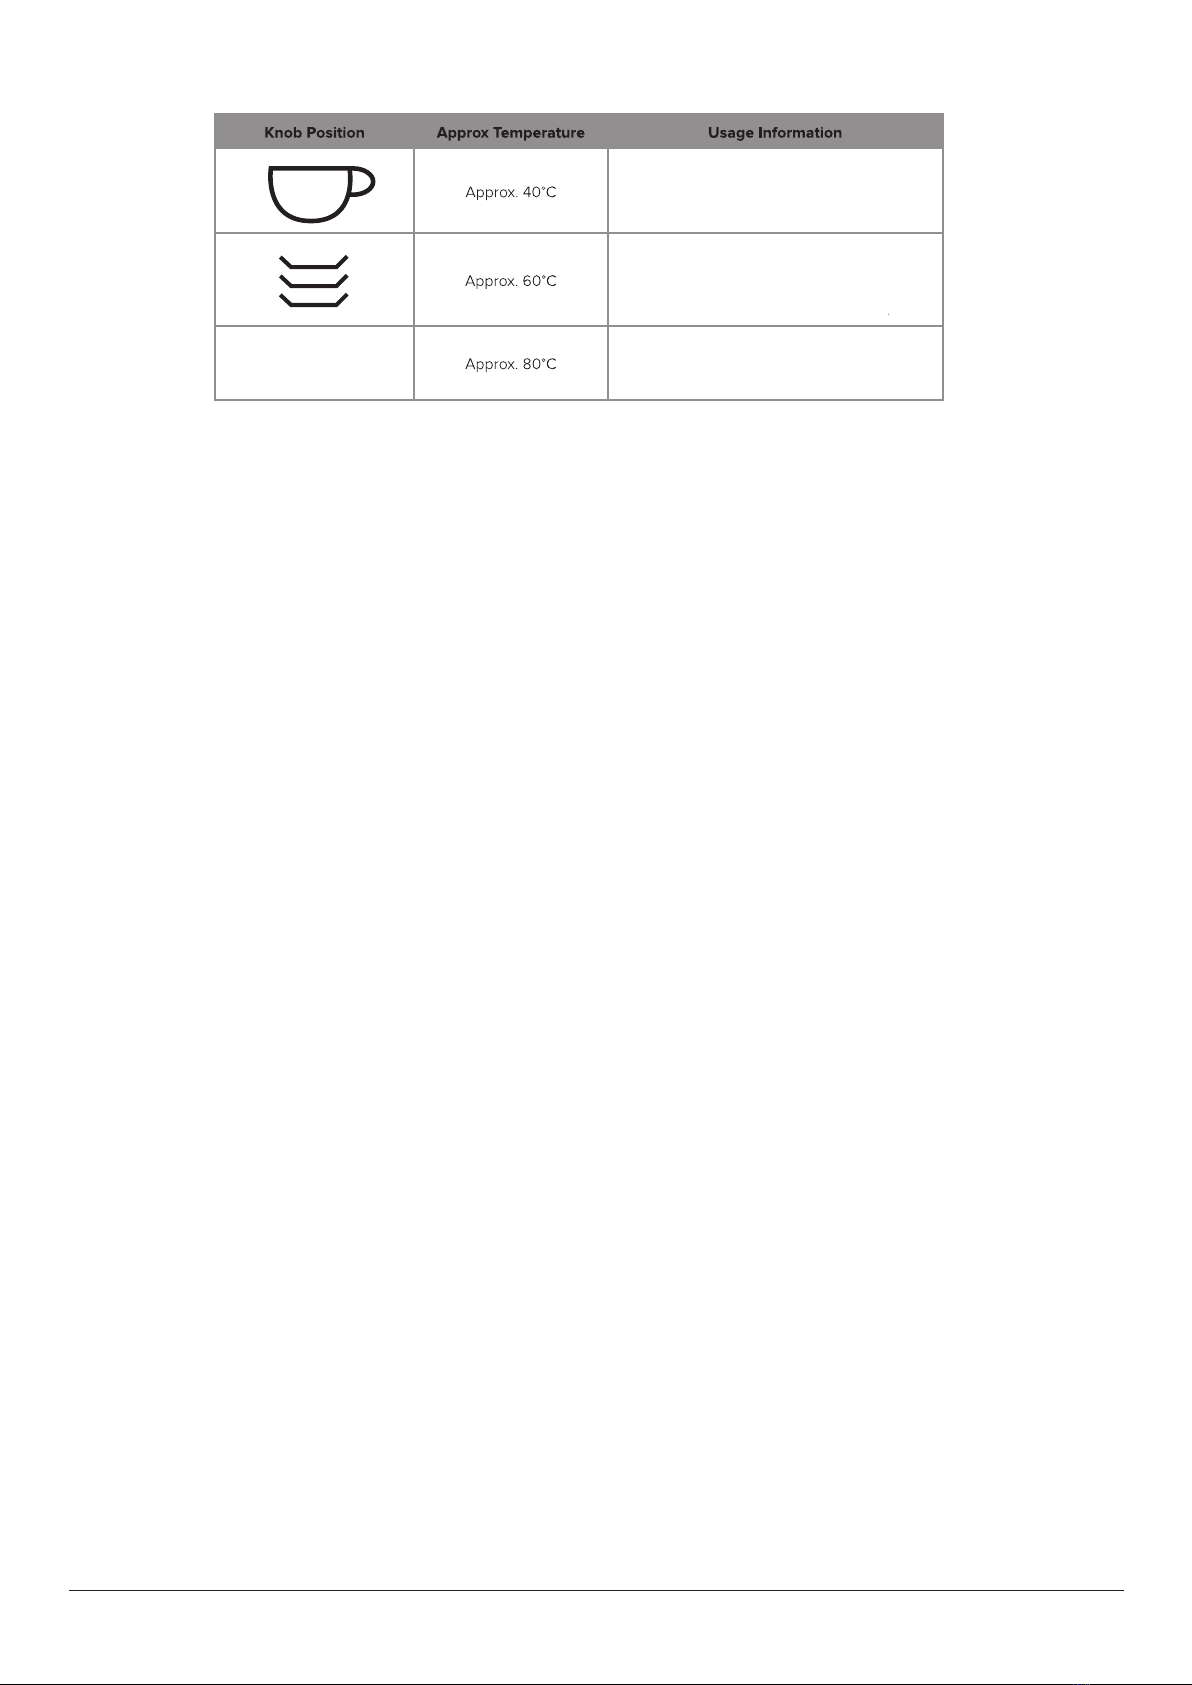
If the dishes are not warm enough, make sure:
• the appliance is on.
• the right temperature has been set.
• the heat openings are not covered by large dishes or
soup-plates.
• the dishes have been warmed for a long enough time.
The crockery does not heat up.
Check whether, you can hear the noise from the fan or not. If
you can hear the noise from the fan:
• there could be problem with the heater element.
• if you cannot hear the noise from the fan: There could
be problem with the fan. - or the mains fuse has blown.
The crockery is too hot.
• there could be faulty on temperature control.
The on/o switch does not light up when the appliance is
switched on.
• there could be defective on the indicator light of the
switch
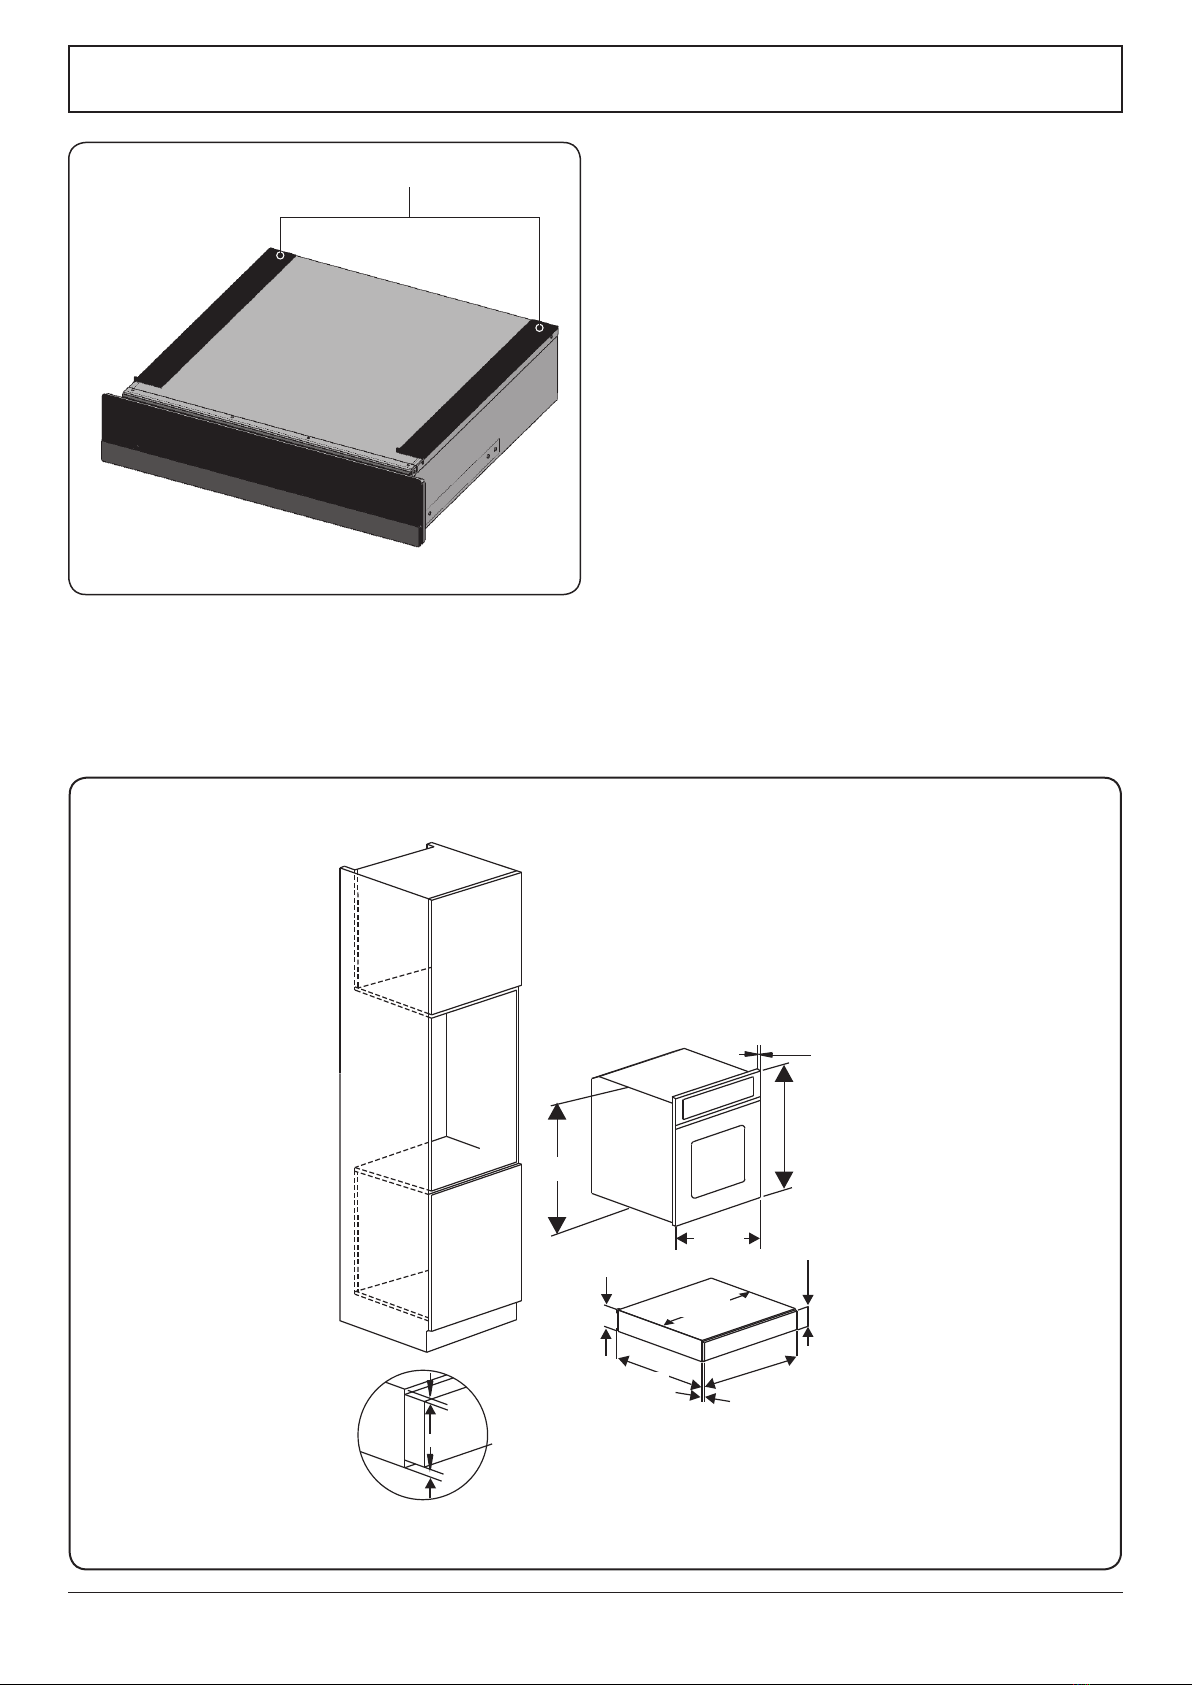
Location of Warming Drawer
Before connecting the appliance to the mains supply make
sure that the voltage and frequency correspond to the rating
on the data plate. This data must be complied with in order to
avoid the risk of damage to the appliance. Consult a qualied
electrician if in any doubt.
The plate warmer may only be built in combination with
those appliances quoted by the manufacturer as being
suitable. The manufacturer cannot guarantee trouble free
operation if the appliance is operated in combination with
appliances other than those quoted by the manufacturer as
being suitable.
When building in the plate warmer in combination with
another suitable appliance, the plate warmer must be tted
above a xed interim shelf in the housing unit to ensure that
the housing unit can support both its weight and that of the
other appliance.
The warming drawer may be installed in a kitchen/kitchen
diner but NOT in a room containing a bath or shower.
This appliance is designed for domestic cooking only. Use for
any other purpose could invalidate any warranty or liability
claim.
The kitchen should be dry and have eective ventilation
according to the existing technical provisions.
The mains lead behind the warming drawer must be placed
in such manner to avoid touching the back panel of the oven
because of the heat it develops during operation.
Remove all packaging materials (foils, articial foam, nails,
etc) away from children as they present potential danger.
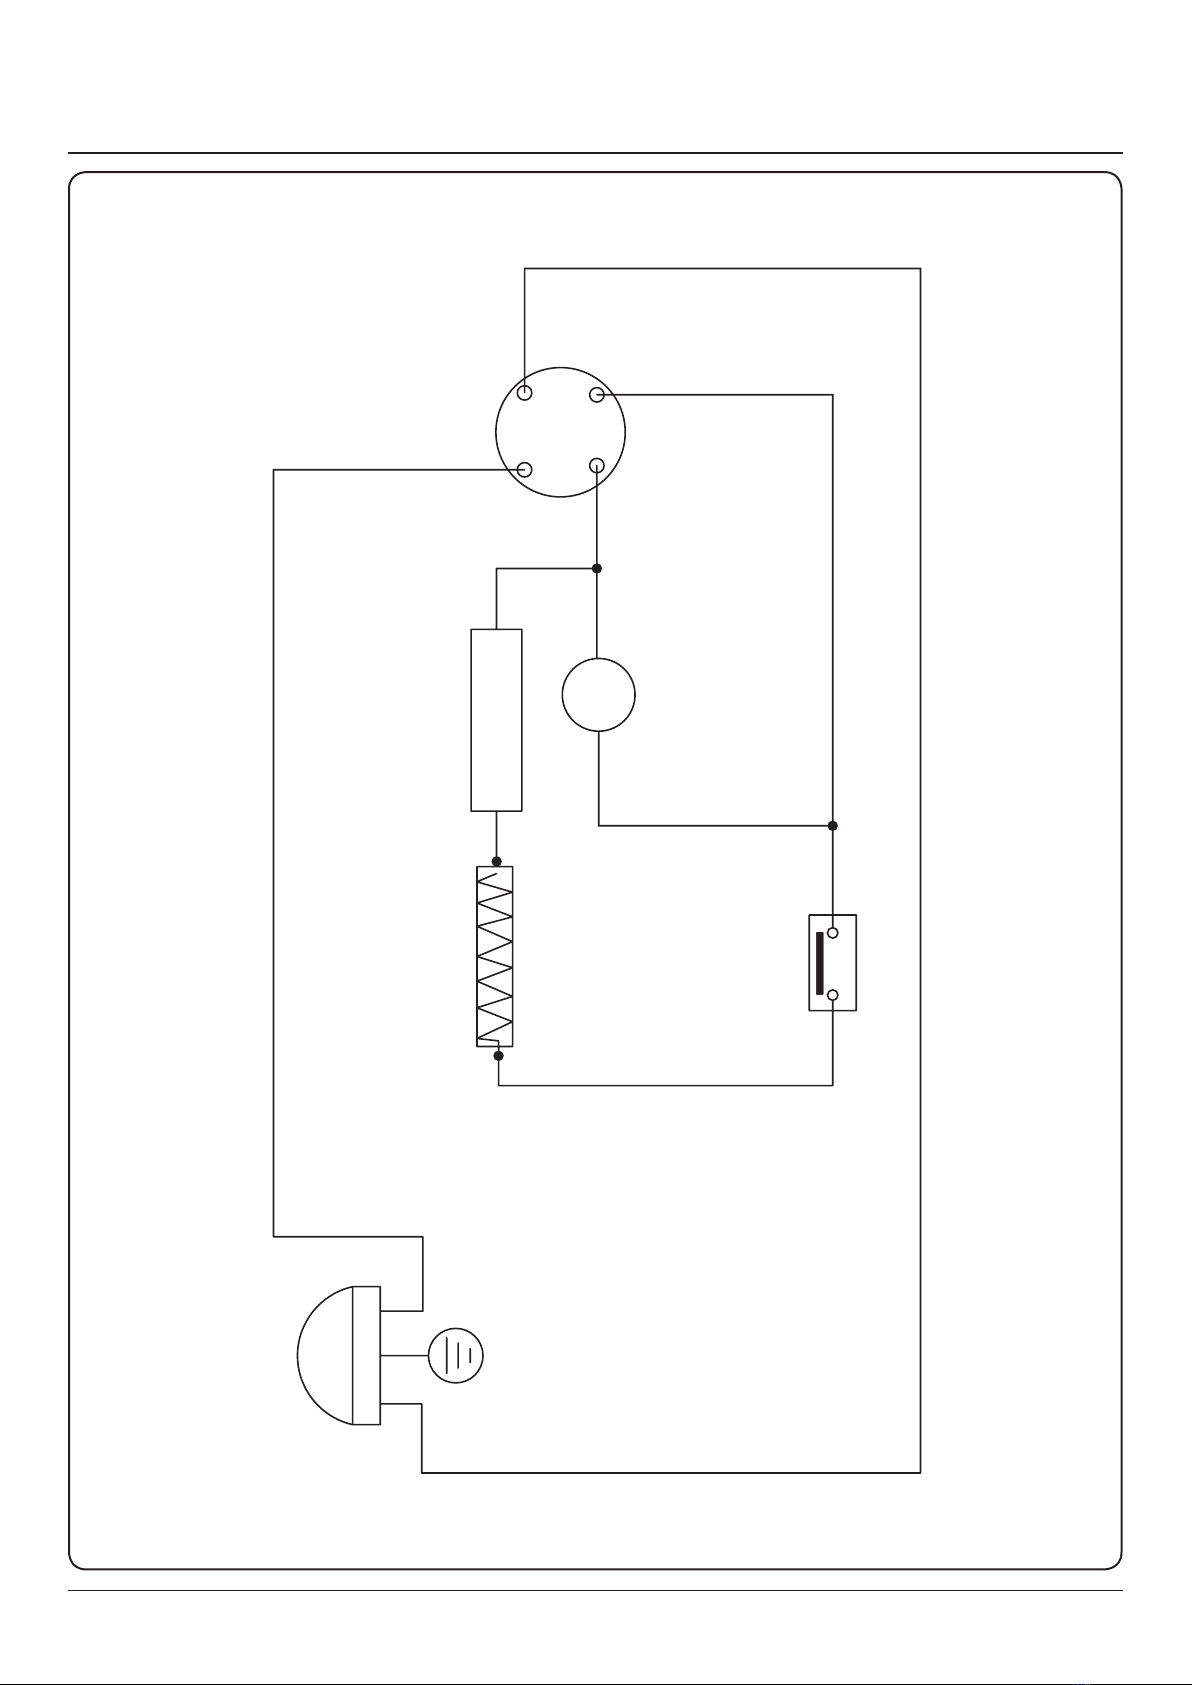
Electrical Connection
The appliance is supplied with a power cord and plug for
connection to a 220-240 V mains supply.
The voltage, rated load and plug rating are given on the data
plate. Please ensure these matches the household mains
supply.
Connection should be made via a switched socket which
is easily accessible after installation. For extra safety it is
advisable to install a residual current device (RCD), with a trip
current of 30 mA. Do not connect via an extension lead.
WARNING THIS APPLIANCE MUST BE EARTHED
The wires in the mains lead are coloured in accordance with
the following code:
• Green/ yellow = earth
• Blue = neutral
• Brown = live
As the colours of the wires in the mains lead of this appliance
may not correspond with the coloured markings identifying
the terminals in your plug proceed as follows when is
necessary to change the plug:
The wire which is coloured green and yellow must be
connected to the terminal in the plug which is marked with
the letter E or by the earth symbol or coloured green or
green and yellow.
The wire which is coloured blue must be connected to the
terminal which is marked with the letter N or coloured black.
The wire which is coloured brown must be connected to the
terminal which is marked with the letter L or coloured red.

INSTALLATION
Check the appliance is electrically safe and gas sound when you have nished.
5
21
128
594
21
548
12
1
537
141
454
594
444
Levelling the appliance
• 2x self-adhesive black shims metal and 1x self-adhesive
stainless steel shim (included).
3 shims are included with this 45 cm built-in appliance. These
shims are only used when you notice the appliance is uneven
in the cabinet.
Check that the dimensions of the cabinet are correct for this
appliance.
Before screwing the appliance in the cabinet, turn the
appliance over and place the two black shims on either side
(Fig. 2.1). The black is an extra shim if one end needs to be
raised higher and should be placed on top of the black shim.
Shims
Fig. 2.1

6
3. Circuit Diagram
POWER
L
N
E
Switch button
1A
2A4B
3B
M1
Heat dissipation fan
Temperature
control switch
Grill
Thermal protector

7
4. Technical Data
INSTALLER: Please leave these instructions with the user.
DATA BADGE LOCATION: Back of the drawer.
COUNTRY OF DESTINATION: GB, IE.
Dimensions
Dimensions Oven Housing
Height 141 594
Width 595 560 - 568
Depth 548 555 (min)
Mass (kg) 16 -
Data
Brand Rangemaster
Model identication RMB45WDBL/SS
ECL14WDBL/BL
Type of drawer Electric
Number of cavities 1
Volume Litres 21
Max load kg 20
Temperature Load 40°C - 80°C
Maximum total electrical load at 230 V (approximate total including hob, oven lights, oven fan, etc.) 420 W

8
If consultation or technical assistance is needed, please
provide the local authorised service agent with the purchase
invoice and the product code/serial number.
The 2 years free maintenance for the operation of the
appliance started from the date of purchase of this product.
Any cosmetic damage to the appliance must be reported
within 90 days of delivery.
Please note that AGA Rangemaster Limited have appointed
UK Warranty Solutions to administer in warranty repairs on
our behalf. If you make a request for an in warranty repair,
your details will be held by Warranty Solutions.
DocNo.111-0003 Warranty No.10
5. Warranty/After Sales Service


Clarence Street, Royal Leamington Spa,
Warwickshire, CV31 2AD, England.
Tel: +44 (0) 800 8046261
E-mail: consumers@agarangemaster.co.uk
This manual suits for next models
1
Table of contents