- 13 - - 14 -
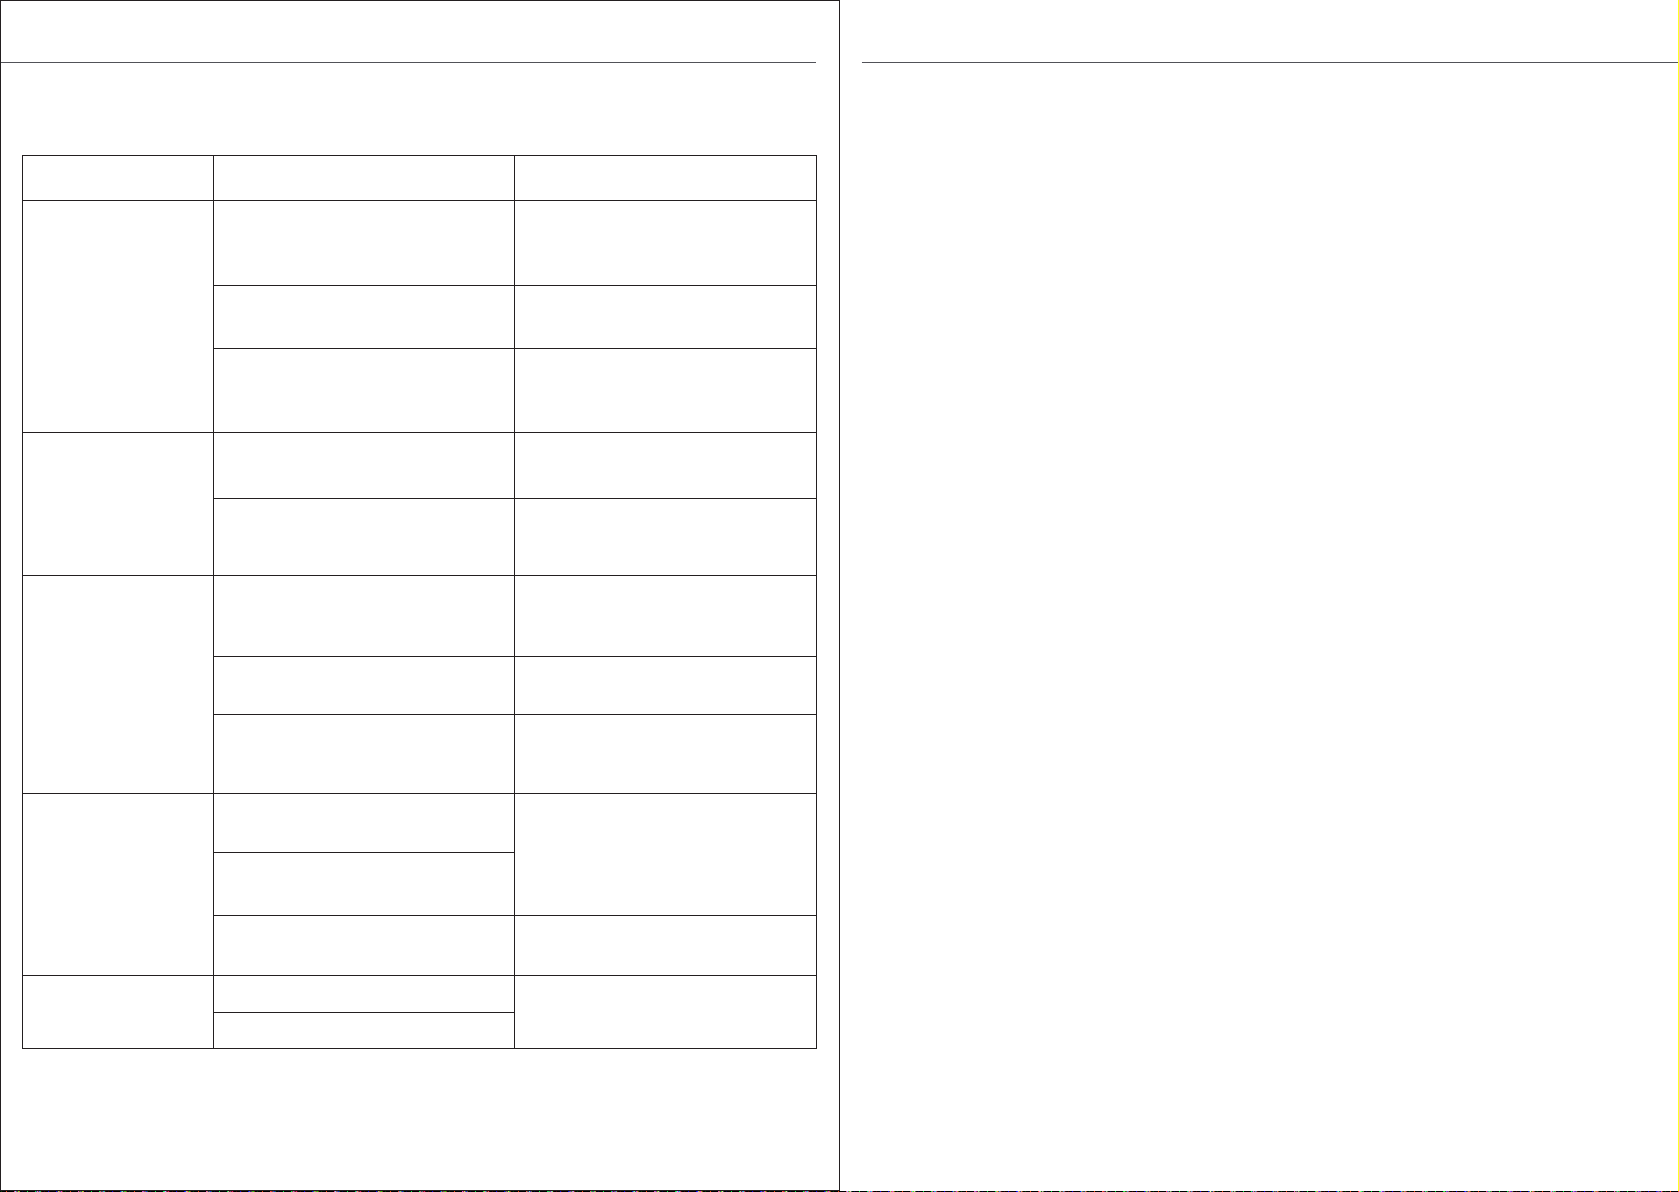
FAULT AND MAINTENANCE
Trouble
Product not
working
Bad cooling
effects
Water pump
doesn't work
The remote control
does not work
Lack of
accessories
Cause Solution
1. The power cord is unplugged or
in poor contact.
2. The LED screen is damaged.
3. Not working after a while or for
other reasons.
1. Plug the power back in firmly or
try plugging it into a different outlet
to connect the power.
2. Contact customer service &
repair center.
3. Please provide the video and
contact customer service & repair
center.
1. Air inlet or air outlet clogged or
there are other heat sources.
2. Other reasons.
1. Remove the obstruction or
remove other sources of heat.
2. Please provide the unusable
video, and contact customer
service & repair center.
1. The water level in the water
tank is lower than the minimum
water level scale.
1. Adding water exceeds the
minimum water level scale.
2. The cooling mode is not
activated.
2. Turn on the cooling mode.
3. Other reasons.
3. Please provide the unusable
video, and contact customer
service & repair center.
1. Exceeding the control range of
the remote control (16ft).
1. Bring the remote control close
to the Air conditioner and make
sure it is pointed at the product.
2. The remote control was not
aiming at the signal receptor on
the unit.
3. The batteries have no electricity
it. 2. Replace the batteries.
1. Lack of ice box. 1. Contact customer service &
repair center.
2. Missing wheel or screw.
WARRANTY
AIR CHOICE warrants this product against defects in materials and/or workmanship under
normal use for a period of ONE (1) YEAR from the date of purchase by the original purchaser
(“Warranty Period”). If a defect arises and a valid claim is received within the Warranty Period,
at its option, AIR CHOICE will either 1) repair the defect free of charge, using new or refurbished
replacement parts, or 2) replace the product with a new product that is at least functionally
equivalent to the original product, or provide a store credit in the amount of the purchase price
of the original product. A replacement product or part, including a user-installable part installed
in accordance with the instructions provided by AIR CHOICE, assumes the remaining warranty
of the original product. When a product or part is exchanged, any replacement item becomes
your property and the replaced item becomes AIR CHOICE’ s property. When a store credit is
issued, the original product must be returned to AIR CHOICE and becomes AIR CHOICE’ s
property. To obtain warranty service, e-mail AIR CHOICE Limited Warranty Service at
airchoice@afterservice.vip. Please be prepared to describe the product that needs service and
the nature of the problem.
This warranty does not apply to:
a) damage caused by failure to follow instructions relating the product’s use or the installation of
components; b) damage caused by accident, abuse, misuse, fire, floods, earthquake or other
external causes; c) damage caused by service performed by anyone who is not a representative
of AIR CHOICE; d) accessories used in conjunction with a covered product; e) a product or part
that has been modified to alter functionality or capability; f) items intended to be replaced
periodically by the purchaser during the normal life of the product including, but not limited to,
batteries or light bulbs; g) any product sold “as is” including, but not limited to, floor
demonstration models and refurbished items; or h) a product that is used commercially or for a
commercial purpose.