Airalia AIR-DH20 User manual

20L Dehumidifier | Model AIR-DH20
Instruction manual
Instruction manual
Bedienungsanleitung
Manual de instrucciones
Manuel d’utilisation
Manuale di istruzioni
EN
DE
SP
FR
IT

23
EN DE SP FR IT EN DE SP FR IT
20L Dehumidifier | Model AIR-DH20 20L Dehumidifier | Model AIR-DH20
Important safety warnings
Introduction
• Use this dehumidifier solely as described in this manual. Any other use not
recommended by the manufacturer may result in hazards including but not limited to
fire and serious injury from electric shock and burns.
• The manufacturer shall not be held liable for any damages resulting from failure to
follow these instructions.
• This dehumidifier is not to be used by persons (including children) with reduced
physical, sensory or mental capabilities, or lack of experience and knowledge unless
they have been given supervision or instruction concerning the use of the dehumidifier
by a person responsible for their safety.
• This dehumidifier is designed for indoor household use only and must not be used
outdoors or for other purposes.
• Never leave the dehumidifier unattended while in use.
• Never leave children or pets alone or unattended in the area where the dehumidifier is
in use. Never allow children to play with this appliance.
• If the dehumidifier is transferred to other users, it should be accompanied by these
instructions.
02 Important safety warnings.
06 Specific information regarding R290 refrigerant gas.
07 Technical specifications & parts description.
08 Use & operation.
10 Draining the water.
12 Cleaning the dehumidifier.
14 Defrosting operation.
14 Useful information / tips.
Thank you
Thank you for purchasing this Airalia dehumidifier.
Before operating your
dehumidifier, please read
this instruction manual
carefully and save it for
future reference.
Before use
• Before operating, remove all packaging materials and check the condition of the
dehumidifier. Do not operate the dehumidifier if there are any signs of damage.
• Before use, always check the condition of the power cable. If the supply cable is
damaged it must be replaced by the manufacturer or a qualified technician.
• Keep the packaging materials (plastic bags, styrofoam) out of the reach of children.
Connecting and disconnecting the dehumidifier
• Ensure that the mains supply complies with the electrical specifications (voltage,
frequency and power) stated in the rating label of the dehumidifier. Ensure that the
power socket matches the dehumidifier plug.
• This dehumidifier must be plugged into an earthed socket.
• To avoid overloading the circuit, do not operate any other high-wattage appliance on
the same circuit as this dehumidifier.
• Always plug/unplug the dehumidifier using the electrical plug itself.
• Do not pull on the mains cable to remove the plug from the socket. In addition, never
move, carry or hang the dehumidifier by the mains cable.
• Ensure the mains cable is fully extended before use and don’t allow it to come into
contact with any part of the dehumidifier.
• To disconnect the dehumidifier completely from the mains supply, you must unplug it
from the socket.
• Do not use extension cables or leads with this dehumidifier as they may overheat and
cause a fire risk.
• This dehumidifier is not intended to be operated via an external timer or separate
remote-control system.
• Do not cover the power cable, for example under carpeting, rugs or runners.
• Do not place the power cable in areas where it may cause a tripping hazard.
• Do not place the power cable in a wet, damp or hot place.
• Do not clip or crease the power cable. Do not wrap the power cable around the
dehumidifier.

45
EN DE SP FR IT EN DE SP FR IT
20L Dehumidifier | Model AIR-DH20 20L Dehumidifier | Model AIR-DH20
Dehumidifier location & transportation
• Keep the dehumidifier upright when transporting. After transporting the dehumidifier,
wait at least one hour before turning it on.
• Ensure the dehumidifier is unplugged from the electrical socket before moving it.
• Do not use the dehumidifier near flammable substances (e.g. petrol, alcohol, paints,
gasses), pressurised containers (e.g. aerosol cans) or sources of heat (e.g. ovens,
heaters).
• Do not use the dehumidifier on sloping surfaces. Always keep it in an upright position
to avoid leaks or causing any hazards.
• Keep the dehumidifier at least 40 cm away from surrounding walls and objects.
• Do not place the continuous drainage hose outside when temperatures are below 0°C.
Cleaning, maintenance and storage
• In the event of a fault or malfunction, turn off the dehumidifier and contact the vendor
or manufacturer.
• Do not attempt to repair or adjust any electrical or mechanical parts in the dehumidifier
yourself or with the assistance of unauthorized personnel. Doing so is unsafe and will
invalidate your warranty.
• When cleaning the dehumidifier, always follow the manufacturer’s recommendations.
• Before every cleaning or maintenance session, make sure the dehumidifier is
disconnected from the mains and the water tank is empty.
• Do not use any corrosive, solvent-based or abrasive cleaners as they can damage the
dehumidifier. Never submerge the dehumidifier in water.
• Do not use the dehumidifier without the air filter. Clean the air filter frequently.
• Always unplug the dehumidifier before emptying the water tank.
• Do not remove the water tank while the dehumidifier is in use. This may cause the
appliance to leak.
• Always empty the water tank before putting the dehumidifier away for storage.
• Water that collects in the dehumidifier is not drinkable; it must be disposed of.
Usage
• Do not insert or allow objects to enter any of the dehumidifier’s vents or openings. This
may damage the appliance and/or cause electric shock, or fire.
• Do not allow water or any other liquids to run into the interior of the appliance, as this
could create a fire and/or electrical hazard.
• Do not operate the dehumidifier with wet hands or feet.
• Do not place anything on top of the dehumidifier.
• Do not cover the dehumidifier while in use.
• Do not useanymethod to accelerate the dehumidifier defrosting process.
Recycling and disposal
• The packaging materials used for this dehumidifier can be recycled. Please dispose
of any packaging in an environmentally friendly manner. Consult your local council for
further details.
• Do not dispose of the dehumidifier with your normal domestic waste but through
an approved disposal centre or at your community waste facility. If in doubt, please
contact your waste disposal centre or local council.

67
EN DE SP FR IT EN DE SP FR IT
20L Dehumidifier | Model AIR-DH20 20L Dehumidifier | Model AIR-DH20
Caution,
risk of fire
Humidity
Indicator Light
Handle
Front Back
Control Panel
Air Exhaust Vent
Air Filter
Air Intel
Continuous Water
Drain Outlet
Water Tank
Water Level
Indicator
Power Cord &
Plug
Wheels
Specific information regarding
R290 refrigerant gas
Thoroughly read all of the following warnings
• This dehumidifier contains 60g of R290 refrigerant gas.
• The dehumidifier must be placed in an area without any continuous sources of ignition
(for example, open flames, operational gas or electrical appliances).
• Do not puncture and do not burn.
• Be aware that R290 refrigerant gas is odourless.
• The dehumidifier must be installed, used and stored in an area greater than 4m2.
• If the dehumidifier is installed, operated or stored in an unventilated area, the room
must be designed to prevent the accumulation of refrigerant leaks that can result in
the risk of fire or explosion due to ignition of the refrigerant caused by electric heaters,
stoves, or other sources of ignition.
• The dehumidifier must be stored in a way that avoids mechanical failure.
• Individuals who operate or work on the refrigerant circuit must have the appropriate
certification issued by an accredited organisation that ensures competence in handling
refrigerants according to a specific evaluation recognized by associations in the
industry.
• Repairs must be performed based on recommendations from the manufacturer.
Maintenance and repairs that require the assistance of other qualified personnel must
be performed under the supervision of an individual who specializes in the use of
flammable refrigerants.
• Do not puncture any part of the refrigerant circuit.
Technical specifications
& parts description
Model No. AIR-DH20
Size 565 x 340 x 240mm
Net Weight 14Kg
Power Supply AC220V - 240V ~ 50Hz
Input Power 420W
Dehumidification Capacity Approx. 20L per day at 30°C, 80%
Water Tank Capacity 6.5L
Operating Temperature 5–32 °C
Refrigerant Gas R290/60g
Hygrometer Yes
Fan Speed 2 speeds (High/Low)
Air Filter Yes

89
EN DE SP FR IT EN DE SP FR IT
20L Dehumidifier | Model AIR-DH20 20L Dehumidifier | Model AIR-DH20
Use & operation
Control panel
D - Fan Speed: Use this function to set the dehumidifier extraction power to High or Low when in Normal mode.
E - Mode: Use this function to switch across the following modes of operation:
A - Power Button: Press this button to switch the dehumidifier ON or OFF. When the dehumidifier is ON,
the display screen (S) shows the current relative percentage of humidity.
B - Humidity Control Set: Press + or – to set the preferred relative humidity (RH) level between 30% and
80% in 5% increments during normal dehumidification mode. The dehumidifier will turn off when the room
reaches the target RH%.
C - Timer Control: Use this function to automatically switch the dehumidifier ON or OFF for a selected
period of time (between 1 and 24 hours). The selected period is displayed on the display screen (S).
Auto-Off Timer: Press the timer control button while the dehumidifier is on.
The display screen will flash. Press + or – to select on the display screen the number of hours you want
the dehumidifier to run before it switches off. Once the desired time is entered, wait for 5 seconds and the
timer indicator light (M) will light up to confirm the timer is set.
Auto-On Timer: Press the timer control button while the dehumidifier is off.
The display screen will flash. Press + or – to select on the display screen the number of hours before you
want the dehumidifier to start running. Once the desired time is entered, wait for 5 seconds and the timer
indicator light (M) will light up to confirm the timer is set.
Now you can adjust the speed of the dehumidifier fan (via button D) and the mode (via button E). If nothing
is selected, the previous speed and humidity setting will be used.
To disable the timer function after setting it up, press the timer control button twice.
F - Laundry Mode Indicator: Indicates when Laundry Mode is selected.
G - Normal Mode Indicator: Indicates when Normal Mode is selected.
H - Ventilation Mode Indicator: Indicates when Ventilation Mode is selected.
I - Automatic Mode Indicator: Indicates when Automatic Mode is selected
J - Defrost Indicator: Indicates when the unit is defrosting (for more information, see the Defrosting
section)
K/L - Fan Speed Indicator: Indicates the power of the dehumidifier fan speed.
Low | High
M - Timer Indicator: Indicates when the timer has been set.
N - Temperature Indicator: Press and hold the + button (B) for 5 seconds until the temperature indicator
light comes on (°C). This will show the current room temperature on the display screen (S).
O - Humidity Indicator: Indicates when a target relative humidity % is set.
P - Target Humidity Indicator: Indicates when the target relative humidity % is reached.
Ventilation Mode
In this mode, the air in the room is filtered via
the back air filter and vented back into the
room at the speed selected (via button D). This
mode does not use the dehumidifying function,
only the fan runs.
Laundry Mode
Use this mode to dry clothes more
quickly. The dehumidifier operates
continuously at maximum dehumidifying
capacity. Speed and humidity control set
functions are disabled in this mode.
Automatic Mode
In this mode, the target relative humidity
is fixed at 55% and the speed of the fan is
controlled automatically:
• The fan speed is automatically set to High
when the room’s relative humidity is higher
than 70% and until it is reduced to 67%.
• The fan speed is automatically set to Low
when the room’s relative humidity is lower
than 67% and until it reaches 55%
Normal Mode
Use this mode to manually set the fan
speed (via button D) and the target
relative humidity (via button B). The
dehumidifier will turn off when the room
reaches the target RH%.
E D C S B A
RQPONMLKJ
F
G
H
I

10 11
EN DE SP FR IT EN DE SP FR IT
20L Dehumidifier | Model AIR-DH20 20L Dehumidifier | Model AIR-DH20
Dehumidifier Back
Water Tank
Handle
Humidity
Indicator Light
Q - Full Water Tank Indicator: Indicates when the dehumidifier water tank is full, removed or incorrectly
slotted.
R - Power Supply Indicator: Indicates when the dehumidifier is switched on.
S - Display Screen: Shows information related to the dehumidifier operation (target relative humidity %,
current room relative humidity %, timer settings, room temperature).
Child Lock: The dehumidifier controls can be locked for child safety. Press and hold the Timer Control
button for 5 seconds to lock and unlock the control panel.
Humidity Indicator Light: Indicates the current relative humidity percentage with three different colours:
Red Light The current relative humidity is above 70%.
Green Light The current relative humidity is between 50%-70%.
Blue Light The current relative humidity is below 50%.
Draining the water
Draining the water collected in the water tank
The dehumidifier condensate water is collected directly in the water tank.
When the water tank is full, the dehumidifier automatically stops, and the “Full Water
Tank” indicator (Q) lights up on the control panel accompanied by a beeping sound.
Follow the steps below to empty the water tank:
Step 1: Turn off the dehumidifier by pressing the Power Button (A).
Step 2: Locate the water tank at the back of the dehumidifier and gently pull the water
tank out.
Continuous external water drainage
It is recommended to use the continuous drainage function when the appliance is used
for long periods and the water tank cannot be emptied regularly. Follow the steps below
to use this function:
Step 1: Turn off the dehumidifier by pressing the Power Button (A).
Step 2: Locate the water tank at the back of the dehumidifier and gently pull it out.
Step 3: Locate the continuous water drain outlet at the back of the dehumidifier.
Step 4: Insert the hose into the continuous water drain outlet and make sure it is
attached correctly.
Step 3: Use the water tank handle to empty it into a sink or bathtub.
Step 4: Slot the empty water tank back into the dehumidifier making sure it is properly
positioned. Any misalignment of the tank will prevent the dehumidifier from starting to
run again and the “Full Water Tank” indicator will carry on lighting.
Do not remove the foam float located inside the water tank. It is used by the
dehumidifier to automatically stop dehumidification when the water tank is full.

12 13
EN DE SP FR IT EN DE SP FR IT
20L Dehumidifier | Model AIR-DH20 20L Dehumidifier | Model AIR-DH20
Air/Dust Filter
Filter Housing
Cover
Cleaning the dehumidifier
WARNING: Always switch off and unplug the dehumidifier from the wall socket before
carrying out any cleaning or maintenance.
Cleaning the unit
Clean the surfaces of the dehumidifier using a soft cloth. Never use corrosive, solvent-
based or abrasive cleaners as this can damage the dehumidifier.
You can use a vacuum cleaner with a brush attachment to gently clean the intake and
exhaust grilles.
Cleaning the water tank
Clean the dehumidifier water tank once every 2 or 3 weeks to avoid the accumulation of
dirt and the growth of mould, mildew and bacteria.
You can do this by pouring a mixture of clean water and mild soap into the tank. Swish it
around and empty the tank. Rinse it thoroughly before slotting it back.
Cleaning the filter
Clean the dehumidifier air/dust filter every two weeks. A dirty filter can reduce the
efficiency of the dehumidifier. To clean the filter, follow the steps below:
Step 1: Remove the filter housing cover from the dehumidifier, this is located at the back
of the unit.
Step 2: Carefully pull out the nylon filter from the filter housing cover.
Step 3: Use a damp cloth or a vacuum cleaner with a brush attachment to gently
remove the dust from the filter.
Step 4: If the filter is too dirty, it can be rinsed with cold water and then dried completely
before putting it back in place.
Continuous Water
Drain Outlet
Step 5: Slot the empty water tank back into the dehumidifier, making sure it is properly
positioned. Any misalignment of the tank will prevent the dehumidifier from starting to
run again, and the “Full Water Tank” indicator will carry on lighting.
Step 6: Position the other end of the hose into a sink or drain. Ensure the hose is free
of bends or kinks and positioned below the water drain outlet. You can now turn on the
dehumidifier.
Continous
Water
Hose

15
EN DE SP FR IT
20L Luftentfeuchter | Modell AIR-DH2014
EN DE SP FR IT
20L Dehumidifier | Model AIR-DH20
Defrosting operation
Frost can build up on the internal coils of the unit. When this happens, the dehumidifying
function will stop automatically, and the unit fan will continue to run until the frost
disappears. This takes only a few minutes, and once the internal coils are defrosted, the
dehumidifying operation will resume.
During the defrosting operation, the defrost indicator (J) will light up on the control
panel. Do not turn off the dehumidifier while the unit is defrosting.
Useful information / tips
• This dehumidifier is equipped with a security function that prevents users from turning
the compressor on and off too frequently. This function delays the dehumidifying
function until the unit has been on for 3 minutes.
• Whenever the dehumidifier is turned on, it uses the settings that were selected before
the last time it was turned off.
• In the event of a power outage while the dehumidifier is running and after the power
is restored, the dehumidifier will start again automatically, keeping all the settings
selected before the outage.
• All compressor dehumidifiers produce heat during the dehumidifying process. The
temperature of the air from the vent will depend on the room environment and the
compressor operation. It can fluctuate, and this is normal.
20 L Luftentfeuchter | Modell AIR-DH20
Bedienungsanleitung
Instruction manual
Bedienungsanleitung
Manual de instrucciones
Manuel d’utilisation
Manuale di istruzioni
EN
DE
SP
FR
IT

16 17
EN DE SP FR IT EN DE SP FR IT
20L Luftentfeuchter | Modell AIR-DH20 20L Luftentfeuchter | Modell AIR-DH20
Wichtige sicherheitshinweise
Einleitung
• Verwenden Sie diesen Luftentfeuchter nur in der in dieser Bedienungsanleitung
beschriebenen Weise. Nicht vom Hersteller empfohlene Verwendung kann gefährlich
sein und zum Beispiel Feuer und schwere Verletzungen durch elektrischen Schlag oder
Verbrennungen verursachen.
• Der Hersteller haftet nicht für Schäden, die aus der Nichtbeachtung dieser
Anweisungen resultieren.
• Dieser Luftentfeuchter darf nicht von Personen (einschließlich Kindern) mit
eingeschränkten physischen, sensorischen oder geistigen Fähigkeiten oder
mangelnder Erfahrung und Kenntnis benutzt werden, es sei denn, sie werden von
einer für ihre Sicherheit verantwortlichen Person beaufsichtigt oder erhielten von einer
solchen Person Anweisungen zum Gebrauch des Luftentfeuchters.
• Dieser Luftentfeuchter ist nur für den Gebrauch in Innenräumen und darf nicht im
Freien oder für andere Zwecke verwendet werden.
• Lassen Sie den Luftentfeuchter während des Betriebs niemals unbeaufsichtigt.
• Lassen Sie Kinder oder Haustiere niemals allein oder unbeaufsichtigt in dem Bereich, in
dem der Luftentfeuchter in Betrieb ist. Lassen Sie Kinder niemals mit dem Gerät spielen.
16 Wichtige sicherheitshinweise.
20 Spezifische informationen zum kältemittel R290-gas.
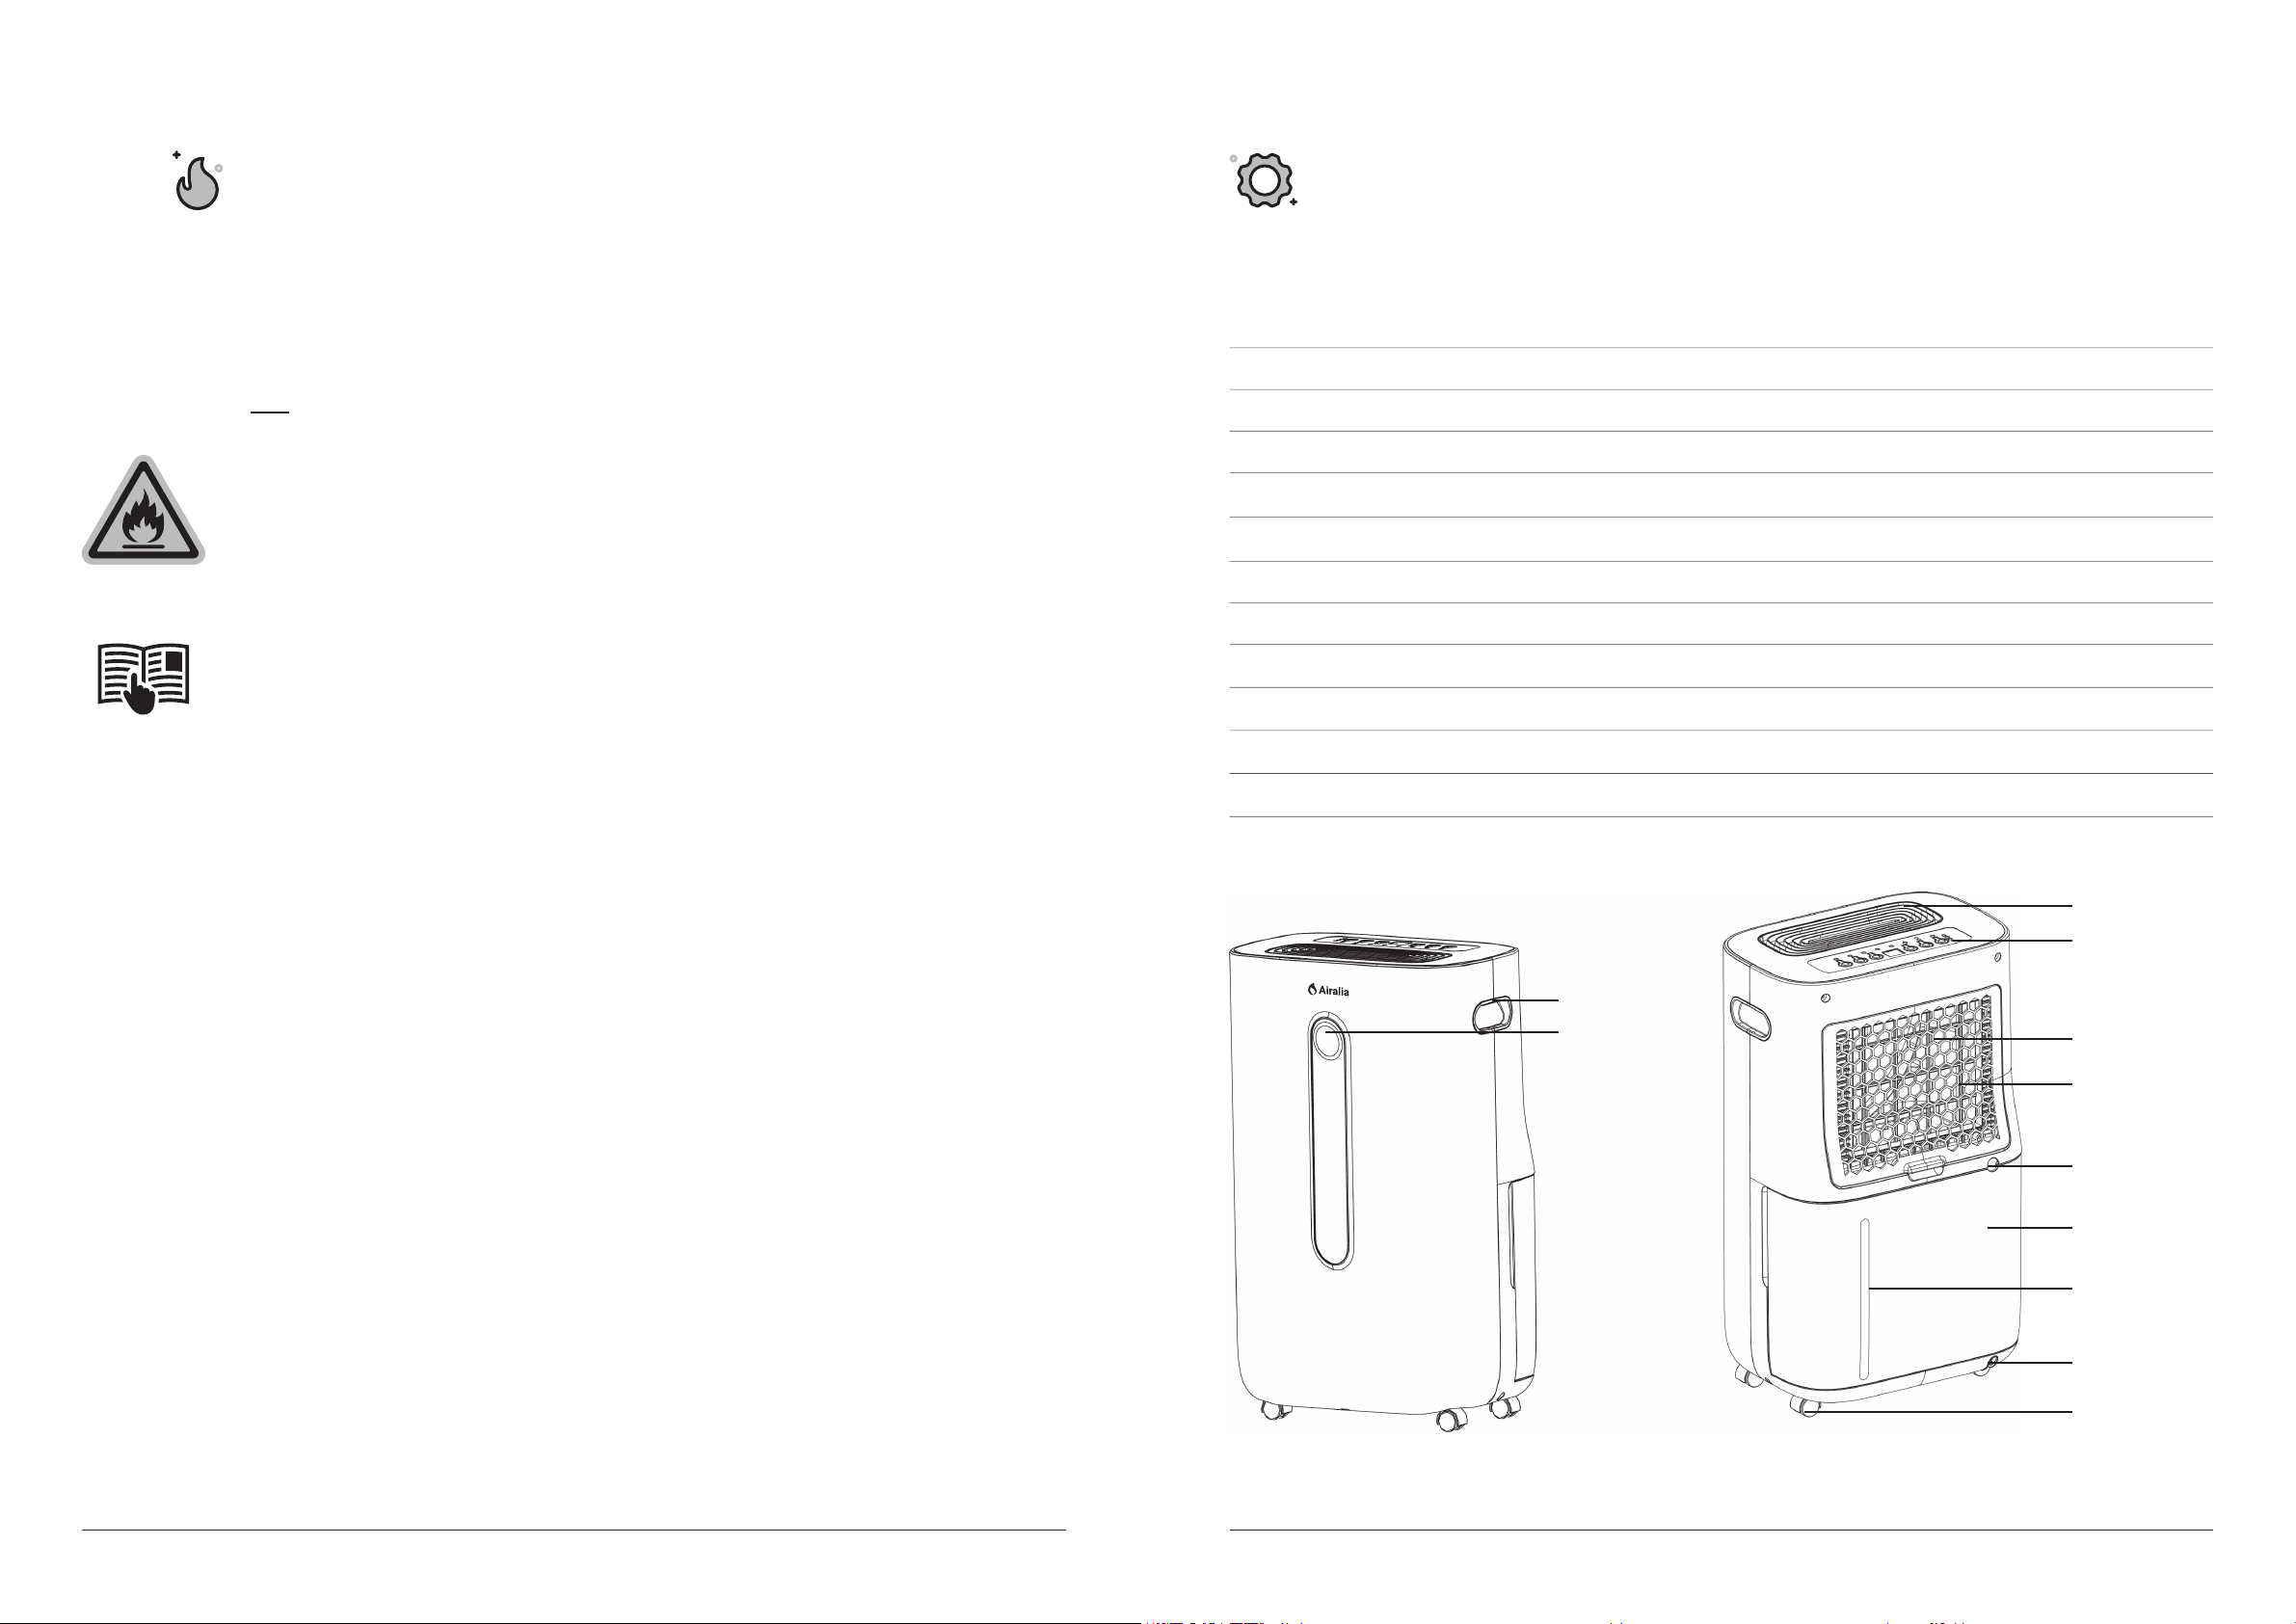
21 Technische daten & teilebeschreibung.
22 Verwendung und betrieb.
24 Entleeren des wassers.
26 Reinigung des luftentfeuchters.
28 Abtaubetrieb.
28 Nützliche informationen / tipps.
Vielen dank
Vielen Dank, dass Sie sich für diesen
Luftentfeuchter von Airalia entschieden haben.
Bevor Sie Ihren
Luftentfeuchter in Betrieb
nehmen, lesen Sie bitte
sorgfältig diese
Betriebsanleitung durch
und bewahren Sie sie zum
Nachlesen auf.
• Wenn der Luftentfeuchter an andere Benutzer weitergegeben wird, sollten Sie ihm
diese Anleitung beilegen.
Vor der inbetriebnahme
• Entfernen Sie vor der Inbetriebnahme alle Verpackungsmaterialien und überprüfen Sie
den Zustand des Luftentfeuchters. Nehmen Sie den Luftentfeuchter nicht in Betrieb,
wenn er Anzeichen von Beschädigung aufweist.
• Überprüfen Sie vor der Inbetriebnahme immer den Zustand des Netzkabels. Wenn
das Versorgungskabel beschädigt ist, muss es durch den Hersteller oder einen
qualifizierten Techniker ersetzt werden.
• Bewahren Sie die Verpackungsmaterialien (Plastiktüten, Styropor) außerhalb der
Reichweite von Kindern auf.
Anschluss und trennung des luftentfeuchters
• Stellen Sie sicher, dass die Netzversorgung den elektrischen Spezifikationen auf dem
Typenschild (Spannung, Frequenz und Leistung) entspricht. Stellen Sie sicher, dass der
Stecker des Luftentfeuchters in die Steckdose passt.
• Dieser Luftentfeuchter muss von einer geerdeten Steckdose versorgt werden.
• Um eine Überlastung des Stromkreises zu vermeiden, betreiben Sie keine anderen
Geräte mit hoher Leistung am selben Stromkreis wie diesen Luftentfeuchter.
• Um den Luftentfeuchter von der Stromversorgung zu trennen, ziehen Sie stets nur an
dem Netzstecker selbst.
• Ziehen Sie nicht am Netzkabel, um den Stecker aus der Steckdose zu entfernen.
Bewegen, tragen oder hängen Sie den Luftentfeuchter niemals mit dem Netzkabel.
• Vergewissern Sie sich, dass das Netzkabel vor dem Gebrauch vollständig abgewickelt
ist, und achten Sie darauf, dass es nicht mit irgendeinem Teil des Luftentfeuchters in
Berührung steht.
• Um den Luftentfeuchter vollständig vom Stromnetz zu trennen, müssen Sie den
Netzstecker aus der Steckdose ziehen.
• Verwenden Sie keine Verlängerungskabel oder -leitungen mit diesem Luftentfeuchter,
da diese überhitzen und ein Brandrisiko darstellen können.
• Dieser Luftentfeuchter ist nicht für den Betrieb über eine externe Zeitschaltuhr oder ein
separates Fernbedienungssystem ausgelegt.

18 19
EN DE SP FR IT EN DE SP FR IT
20L Luftentfeuchter | Modell AIR-DH20 20L Luftentfeuchter | Modell AIR-DH20
• Verdecken Sie das Netzkabel nicht, z. B. mit Teppichboden, Teppichen oder Läufern.
• Verlegen Sie das Netzkabel nicht in Bereichen, in denen es eine Stolperfalle darstellen kann.
• Verlegen Sie das Netzkabel nicht an einem nassen, feuchten oder heißen Ort.
• Das Netzkabel darf nicht geknickt oder gequetscht werden. Wickeln Sie das Netzkabel
nicht um den Luftentfeuchter.
Standort und transport des luftentfeuchters
• Halten Sie den Luftentfeuchter während des Transports aufrecht. Warten Sie nach dem
Transport mindestens eine Stunde, bevor Sie ihn einschalten.
• Stellen Sie sicher, dass der Luftentfeuchter aus der Steckdose gezogen ist, bevor Sie
ihn transportieren.
• Verwenden Sie den Luftentfeuchter nicht in der Nähe von brennbaren Stoffen (z. B.
Benzin, Alkohol, Farben, Gase), Druckbehältern (z. B. Spraydosen) oder Wärmequellen
(z. B. Öfen, Heizungen).
• Verwenden Sie den Luftentfeuchter nicht auf schrägen Flächen. Halten Sie ihn immer
in aufrechter Position, um Undichtigkeiten oder Gefahren zu vermeiden.
• Halten Sie den Luftentfeuchter mindestens 40 cm von umgebenden Wänden und
Gegenständen entfernt.
• Legen Sie den Dauerabflussschlauch nicht ins Freie, wenn die Temperatur unter 0°C liegt.
Reinigung, wartung und lagerung
• Schalten Sie den Luftentfeuchter im Falle eines Fehlers oder einer Störung aus und
wenden Sie sich an den Verkäufer oder Hersteller.
• Versuchen Sie nicht, elektrische oder mechanische Teile des Luftentfeuchters selbst
oder mit Hilfe von nicht autorisiertem Personal zu reparieren oder einzustellen. Das ist
gefährlich und führt zum Erlöschen der Garantie.
• Befolgen Sie bei der Reinigung des Luftentfeuchters stets die Empfehlungen des
Herstellers.
• Stellen Sie vor jeder Reinigung oder Wartung sicher, dass der Luftentfeuchter vom
Stromnetz getrennt und der Wassertank leer ist.
• Verwenden Sie keine ätzenden, lösungsmittelhaltigen oder scheuernden
Reinigungsmittel, da diese den Luftentfeuchter beschädigen können. Tauchen Sie den
Luftentfeuchter niemals in Wasser ein.
• Verwenden Sie den Luftentfeuchter nicht ohne Luftfilter. Reinigen Sie den Luftfilter
regelmäßig.
• Ziehen Sie vor dem Entleeren des Wassertanks immer den Netzstecker des
Luftentfeuchters.
• Entfernen Sie den Wassertank nicht, während der Luftentfeuchter in Betrieb ist. Das
kann zu Flüssigkeitsaustritt aus dem Gerät führen.
• Entleeren Sie den Wassertank immer, bevor Sie den Luftentfeuchter zur Aufbewahrung
wegstellen.
• Das Wasser, das sich im Luftentfeuchter ansammelt, ist kein Trinkwasser und muss
entsorgt werden.
Betrieb
• Stecken Sie keine Gegenstände in den Lufteinlass oder -auslass oder andere
Öffnungen des Luftentfeuchters. Dadurch kann das Gerät beschädigt und/oder ein
elektrischer Schlag oder ein Brand verursacht werden.
• Lassen Sie kein Wasser oder andere Flüssigkeiten in das Innere des Geräts, da dies
eine Feuer- und/oder elektrische Gefahr darstellen könnte.
• Bedienen Sie den Luftentfeuchter nicht mit nassen Händen oder Füßen.
• Stellen Sie keine Gegenstände auf dem Luftentfeuchter ab.
• Decken Sie den Luftentfeuchter nicht ab, während er in Betrieb ist.
• Beschleunigen Sie den Abtauvorgang des Luftentfeuchters nicht.
Recycling und entsorgung
• Die für diesen Luftentfeuchter verwendeten Verpackungsmaterialien können recycelt
werden. Bitte entsorgen Sie die Verpackung umweltfreundlich. Erkundigen Sie sich bei
Ihrer örtlichen Gemeindeverwaltung nach den Einzelheiten.
• Entsorgen Sie den Luftentfeuchter nicht mit dem normalen Hausmüll,
sondern über eine zugelassene Entsorgungsstelle oder bei Ihrer kommunalen
Abfallentsorgungseinrichtung. Wenden Sie sich im Zweifelsfall an Ihr
Entsorgungszentrum oder Ihre örtliche Gemeindeverwaltung.

20 21
EN DE SP FR IT EN DE SP FR IT
20L Luftentfeuchter | Modell AIR-DH20 20L Luftentfeuchter | Modell AIR-DH20
Vorsicht,
Feuergefahr
Spezifische informationen zum
kältemittel R290-gas
Lesen Sie alle folgenden Warnhinweise gründlich durch
• Dieser Luftentfeuchter enthält 60 g des Kältemittels R290.
• Der Luftentfeuchter muss in einem Bereich ohne ständige Zündquellen (z.B. offene
Flammen, betriebsbereite Gas- oder Elektrogeräte) aufgestellt werden.
• Nicht beschädigen und nicht verbrennen.
• Beachten Sie, dass das Kältemittelgas R290 geruchlos ist.
• Der Luftentfeuchter muss in einem Bereich von mehr als 4m2aufgestellt, betrieben
und gelagert werden.
• Wenn der Luftentfeuchter in einem unbelüfteten Bereich aufgestellt, betrieben
oder gelagert wird, muss der Raum so gestaltet sein, dass eine Ansammlung von
Kältemittel, die zu Feuer- oder Explosionsgefahr aufgrund der Entzündung des
Kältemittels durch elektrische Heizungen, Öfen oder andere Zündquellen führen kann,
verhindert wird.
• Der Luftentfeuchter muss so gelagert werden, dass mechanisches Versagen
vermieden wird.
• Personen, die den Kältemittelkreislauf betreiben oder daran arbeiten, müssen über
die entsprechende, von einer akkreditierten Organisation ausgestellte Qualifikation
verfügen, welche die Kompetenz im Umgang mit Kältemitteln gemäß einer
spezifischen, von den Verbänden der Branche anerkannten Begutachtung sicherstellt.
• Reparaturen müssen auf Grundlage der Empfehlungen des Herstellers durchgeführt
werden. Wartungs- und Reparaturarbeiten, die die Hilfe anderer qualifizierter Personen
erfordern, müssen unter Aufsicht einer Person durchgeführt werden, die auf den
Umgang mit brennbaren Kältemitteln spezialisiert ist.
• Beschädigen Sie den Kältemittelkreislauf nicht.
Feuchtig-
keits-
azzeige
Griff
Vorderseite Rückseite
Bedienfeld
Abluft
Luftfilter
Lufteinlass
Wasserablauf zur
kontinuierlichen
Entieerung
Wassertank
Wasser stands-
anzeige
Netzkabel und
-stecket
Räder
Technische daten &
teilebeschreibung
Modell-Nr. AIR-DH20
Größe 565 x 340 x 240 mm
Nettogewicht 14 kg
Stromzufuhr AC220V - 240V ~ 50Hz
Eingangsleistung 420W
Entfeuchtungskapazität ca. 20 L pro Tag bei 30°C; 80%
Kapazität des Wassertanks 6,5 L
Betriebstemperatur 5 – 32°C
Kältemittelgas R290/60g
Hygrometer Ja
Ventilatordrehzahl 2 Drehzahlen (Hoch/Niedrig)
Luftfilter Ja

22 23
EN DE SP FR IT EN DE SP FR IT
20L Luftentfeuchter | Modell AIR-DH20 20L Luftentfeuchter | Modell AIR-DH20
Verwendung und betrieb
Bedienfeld
A - Netztaste: Drücken Sie diese Taste, um den Luftentfeuchter EIN oder AUS zu schalten. Wenn der
Luftentfeuchter eingeschaltet ist, zeigt das Display (S) die aktuelle relative Luftfeuchtigkeit in Prozent an.
B - Luftfeuchtigkeitsregler: Drücken Sie + oder –, um die gewünschte relative Luftfeuchtigkeit
(RF) zwischen 30 % und 80 % in 5 %-Schritten im normalen Entfeuchtungsmodus einzustellen. Der
Luftentfeuchter schaltet sich aus, wenn der Raum die Ziel-RF% erreicht.
C - Zeitschaltuhr: Mit dieser Funktion schalten Sie den Luftentfeuchter automatisch für einen
ausgewählten Zeitraum (zwischen 1 und 24 Stunden) ein oder aus. Der gewählte Zeitraum wird auf dem
Display (S) angezeigt.
Auto-AUSSCHALTEN: Drücken Sie die Zeitschaltuhr-Steuertaste, während der Luftentfeuchter
eingeschaltet ist.
Der Anzeigebildschirm blinkt. Drücken Sie + oder –, um auf dem Anzeigebildschirm die Anzahl der Stunden
auszuwählen, die der Luftentfeuchter laufen soll, bevor er sich ausschaltet. Wenn Sie die gewünschte Zeit
eingegeben haben, warten Sie 5 Sekunden, bis die Zeitschaltuhr-Kontrolllampe (M) zur Bestätigung, dass
die Zeitschaltuhr eingestellt ist, leuchtet.
Auto-EINSCHALTEN: Drücken Sie die Zeitschaltuhr-Steuertaste, während der Luftentfeuchter
ausgeschaltet ist.
Das Display blinkt. Drücken Sie + oder –, um auf dem Anzeigebildschirm die Anzahl der Stunden
auszuwählen, bevor der Luftentfeuchter laufen soll. Wenn Sie die gewünschte Zeit eingegeben haben,
warten Sie 5 Sekunden, bis die Zeitschaltuhr-Kontrolllampe (M) zur Bestätigung, dass die Zeitschaltuhr
eingestellt ist, leuchtet.
E D C S B A
RQPONMLKJ
F
G
H
I
Sie können jetzt die Drehzahl des Ventilators des Luftentfeuchters (über die Taste D) und den Modus (über die
Taste E) einstellen. Wenn Sie nichts wählen, wird die vorherige Drehzahl- und Feuchtigkeitseinstellung verwendet.
Um die Zeitschaltuhrfunktion nach dem Einstellen zu deaktivieren, drücken Sie zweimal auf die
Zeitschaltuhr-Steuertaste.
D - Ventilatordrehzahl: Verwenden Sie diese Funktion, um die Extraktionsleistung des Luftentfeuchters im
Normalmodus oder im Lüftungsbetrieb hoch oder niedrig zu stellen.
E - Modus: Verwenden Sie diese Funktion, um zwischen den folgenden Betriebsarten zu wechseln:
F - Wäschemodus-Anzeige: Zeigt Wäschemodus an.
G - Normalmodus-Anzeige: Zeigt Normalmodus an.
H - Lüftungsbetrieb-Anzeige: Zeigt Lüftungsbetrieb an.
I - Automatik-Betrieb-Anzeige: Zeigt Automatik-Betrieb an.
J - Abtauanzeige: Zeigt an, dass das Gerät abtaut (weitere Informationen finden Sie im Abschnitt “Abtaubetrieb“).
K/L - Ventilatordrehzahl: Zeigt die Leistung der Ventilatordrehzahl des Luftentfeuchters an.
Niedrig | Hoch
M - Zeitschaltuhr-Anzeige: Zeigt an, dass die Zeitschaltuhr eingestellt ist.
N - Temperaturanzeige: Halten Sie die Taste + (B) 5 Sekunden lang gedrückt, bis die Temperaturanzeige
aufleuchtet (°C). Dadurch wird die aktuelle Raumtemperatur auf dem Display (S) angezeigt.
O - Luftfeuchtigkeitsanzeige: Zeigt an, wenn eine relative Ziel-Luftfeuchtigkeit in % eingestellt ist.
Lüftungsbetrieb
In diesem Modus wird die Luft im Raum
über den Rückluftfilter gefiltert und mit der
gewählten Drehzahl (über Taste D) wieder in
den Raum zurückgeführt. In diesem Modus
wird die Entfeuchtungsfunktion nicht genutzt,
es läuft nur der Ventilator.
Wäschemodus
Verwenden Sie diesen Modus, um Kleidung
schneller zu trocknen. Der Luftentfeuchter
ist kontinuierlich mit maximaler
Entfeuchtungsleistung in Betrieb. Die
Einstellfunktionen für Drehzahl und
Luftfeuchtigkeit sind in diesem Modus deaktiviert.
Automatik-Betrieb
In diesem Modus ist die relative Ziel-
Luftfeuchtigkeit auf 55 % festgelegt und die
Drehzahl des Ventilators automatisch geregelt:
• Die Ventilatordrehzahl wird automatisch hoch
eingestellt, wenn die relative Luftfeuchtigkeit
im Raum höher als 70 % ist, bis sie auf 67 %
gesenkt wurde.
• Die Ventilatordrehzahl wird automatisch
niedrig eingestellt, wenn die relative
Luftfeuchtigkeit des Raums niedriger als 67 %
ist, bis sie 55 % erreicht.
Normalmodus
Verwenden Sie diesen Modus, um die
Ventilatordrehzahl (über Taste D) und
die relative Ziel-Luftfeuchtigkeit (über
Taste B) manuell einzustellen. Der
Luftentfeuchter schaltet sich aus, wenn
der Raum die Ziel-RF% erreicht.

24 25
EN DE SP FR IT EN DE SP FR IT
20L Luftentfeuchter | Modell AIR-DH20 20L Luftentfeuchter | Modell AIR-DH20
Feuchtigkeits-
anzeige
P - Ziel-Luftfeuchtigkeitsanzeige: Zeigt an, wenn der Zielwert der relativen Luftfeuchtigkeit % erreicht ist.
Q - Anzeige für vollen Wassertank: Zeigt an, wenn der Wassertank des Luftentfeuchters voll ist, entfernt
wurde oder falsch eingesetzt ist.
R - Stromversorgungs-Anzeige: Zeigt an, wenn der Luftentfeuchter eingeschaltet ist.
S - Anzeige-Display: Zeigt Informationen zum Betrieb des Luftentfeuchters an (relative Ziel-
Luftfeuchtigkeit %, aktuelle relative Raum-Luftfeuchtigkeit %, Zeitschaltuhr-Einstellungen, Raumtemperatur)
Kindersicherung: Die Bedienelemente des Luftentfeuchters können zur Sicherheit von Kindern gesperrt
werden. Halten Sie die Zeitschaltuhr-Steuerungstaste 5 Sekunden lang gedrückt, um das Bedienfeld zu
sperren und zu entsperren.
Luftfeuchtigkeitsanzeige: Zeigt die aktuelle relative Luftfeuchtigkeit mit drei verschiedenen Farben an:
Rot Die aktuelle relative Luftfeuchtigkeit liegt über 70%.
Grün Die aktuelle relative Luftfeuchtigkeit liegt zwischen 50% - 70%.
Blau Die aktuelle relative Luftfeuchtigkeit liegt unter 50%.
Entleeren des wassers
Entleeren des im wassertank gesammelten wassers
Das Kondensatwasser des Luftentfeuchters wird im Wassertank gesammelt.
Wenn der Wassertank voll ist, stoppt der Luftentfeuchter automatisch und die Anzeige
“Tank voll“ (Q) leuchtet auf dem Bedienfeld, begleitet von einem Piepton. Führen Sie die
folgenden Schritte aus, um den Wassertank zu entleeren:
Schritt 1: Schalten Sie den Luftentfeuchter durch Drücken der Netztaste (A) aus.
Schritt 2: Der Wassertank ist auf der Rückseite des Luftentfeuchters. Ziehen Sie ihn
vorsichtig heraus.
Rückseite des
Luftentfeuchters
Wassertank
Griff
Kontinuierliche externe wasserentleerung
Es wird empfohlen, die Dauerentleerungsfunktion zu verwenden, wenn das Gerät über
einen längeren Zeitraum verwendet wird und der Wassertank nicht regelmäßig geleert
werden kann. Führen Sie die folgenden Schritte aus, um diese Funktion zu verwenden:
Schritt 1: Schalten Sie den Luftentfeuchter durch Drücken der Netztaste (A) aus.
Schritt 2: Der Wassertank befindet sich auf der Rückseite des Luftentfeuchters. Ziehen
Sie den Wassertank vorsichtig heraus.
Schritt 3: Der Wasserablauf zur kontinuierlichen Entleerung befindet sich auf der
Rückseite des Luftentfeuchters.
Schritt 4: Stecken Sie den Schlauch in den Ablaufstutzen und achten Sie auf korrekten
Sitz des Schlauches.
Schritt 3: Benutzen Sie den Griff des Wassertanks, um ihn in ein Waschbecken oder eine
Badewanne zu entleeren.
Schritt 4: Setzen Sie den leeren Wassertank wieder in den Luftentfeuchter ein und
achten Sie dabei auf die richtige Position. Eine falsche Ausrichtung des Tanks verhindert,
dass der Luftentfeuchter wieder anläuft, und die Anzeige „Tank voll“ leuchtet weiter.
Entfernen Sie niemals den Schwimmer, der sich im Inneren des Wassertanks befindet.
Er wird vom Luftentfeuchter verwendet, um die Entfeuchtung automatisch zu stoppen,
wenn der Wassertank voll ist.

26 27
EN DE SP FR IT EN DE SP FR IT
20L Luftentfeuchter | Modell AIR-DH20 20L Luftentfeuchter | Modell AIR-DH20
Reinigung des luftentfeuchters
WARNUNG: Schalten Sie den Luftentfeuchter immer aus und ziehen Sie den Netzstecker
aus der Steckdose, bevor Sie Reinigungs- oder Wartungsarbeiten durchführen.
Reinigung des geräts
Reinigen Sie die Oberflächen des Luftentfeuchters mit einem weichen Tuch. Verwenden
Sie niemals ätzende, lösungsmittelhaltige oder scheuernde Reinigungsmittel, da dies
den Luftentfeuchter beschädigen kann.
Sie können einen Staubsauger mit Bürstenaufsatz verwenden, um die Ansaug- und
Abluftgitter vorsichtig zu reinigen.
Wasserablauf zur
kontinuierlichen
Entleerung
Schritt 5: Setzen Sie den leeren Wassertank wieder in den Luftentfeuchter ein und
achten Sie dabei auf die richtige Position. Eine falsche Ausrichtung des Tanks verhindert,
dass der Luftentfeuchter wieder anläuft, und die Anzeige „Tank voll“ leuchtet weiter.
Schritt 6: Positionieren Sie das andere Ende des Schlauchs in ein Waschbecken oder
einen Abfluss. Achten Sie darauf, dass das Wasser im Schlauch abfließen kann, indem
Sie den Schlauch frei von Knicken oder Krümmungen und in einem Winkel nach unten
verlegen. Sie können jetzt den Luftentfeuchter einschalten.
Wasserschlauch
zur kontinuierlichen
Entleerung
Luft-/Staubfilter
Filtergehäusedeckel
Reinigung des wassertanks
Reinigen Sie den Wassertank des Luftentfeuchters alle 2 bis 3 Wochen, um eine
Ansammlung von Schmutz und das Wachstum von Schimmel, Mehltau und Bakterien
zu vermeiden.
Gießen Sie dazu eine Mischung aus sauberem Wasser und milder Seife in den Tank.
Schwenken Sie das Wasser um und leeren Sie den Tank. Spülen Sie den Tank gründlich,
bevor Sie ihn wiedereinsetzen.
Reinigung des filters
Reinigen Sie den Luft-/Staubfilter des Luftentfeuchters alle zwei Wochen. Ein
verschmutzter Filter kann die Effizienz des Luftentfeuchters verringern. Um den Filter zu
reinigen, gehen Sie wie folgt vor:
Schritt 1: Entfernen Sie den Filtergehäusedeckel vom Luftentfeuchter. Dieser befindet
sich auf der Rückseite des Geräts.
Schritt 2: Ziehen Sie den Nylonfilter vorsichtig aus dem Filtergehäusedeckel.
Schritt 3: Verwenden Sie ein feuchtes Tuch oder einen Staubsauger mit Bürstenaufsatz,
um den Staub vorsichtig aus dem Filter zu entfernen.
Schritt 4: Wenn der Filter zu stark verschmutzt ist, kann er mit kaltem Wasser abgespült
und anschließend vollständig getrocknet werden, bevor er wieder-eingesetzt wird.

29
EN DE SP FR IT
Deshumidificador 20L | Modelo AIR-DH2028
EN DE SP FR IT
20L Luftentfeuchter | Modell AIR-DH20
Abtaubetrieb
An den internen Spulen des Geräts kann sich Eis bilden. Wenn dies geschieht, wird die
Entfeuchtungsfunktion automatisch gestoppt und der Ventilator des Geräts läuft weiter,
bis das Eis geschmolzen ist. Das dauert nur ein paar Minuten, und sobald die internen
Spulen abgetaut sind, wird der Entfeuchtungsbetrieb wieder aufgenommen.
Während des Abtaubetriebs leuchtet die Abtauanzeige (J) auf dem Bedienfeld auf.
Schalten Sie den Luftentfeuchter nicht aus, während das Gerät abtaut.
Nützliche informationen / tipps
• Dieser Luftentfeuchter ist mit einer Sicherheitsfunktion ausgestattet, die verhindert,
dass Betreiber den Kompressor zu häufig ein- und ausschalten. Diese Funktion
verzögert die Entfeuchtungsfunktion, bis das Gerät für 3 Minuten eingeschaltet ist.
• Immer wenn der Luftentfeuchter eingeschaltet wird, verwendet er die vor dem letzten
Ausschalten gewählten Einstellungen.
• Im Fall eines Stromausfalls während des Betriebs des Luftentfeuchters, startet der
Luftentfeuchter nach Wiederherstellung der Stromversorgung automatisch, wobei alle
vor dem Ausfall gewählten Einstellungen beibehalten werden.
• Luftentfeuchter mit Verdichtern erzeugen während des Entfeuchtungsvorgangs
Wärme. Die Temperatur der Luft, die aus der Abluftöffnung austritt, hängt von der
Raumumgebung und dem Verdichterbetrieb ab. Die Temperaturschwankungen sind
dabei normal.
Deshumidificador 20L | Modelo AIR-DH20
Manual de instrucciones
Instruction manual
Bedienungsanleitung
Manual de instrucciones
Manuel d’utilisation
Manuale di istruzioni
EN
DE
SP
FR
IT

30 31
EN DE SP FR IT EN DE SP FR IT
Deshumidificador 20L | Modelo AIR-DH20 Deshumidificador 20L | Modelo AIR-DH20
Advertencias de seguridad importantes
Introducción
• Utilice este deshumidificador únicamente tal y como se describe en este manual.
Cualquier otro uso no recomendado por el fabricante puede provocar situaciones
peligrosas, incluyendo, entre otras, incendios y lesiones graves por descarga eléctrica y
quemaduras.
• El fabricante no se hace responsable de los daños ocasionados por no seguir estas
instrucciones.
• Este deshumidificador no está diseñado para ser usado por personas (incluyendo
niños) con capacidades físicas, sensoriales o mentales reducidas, o con falta de
experiencia o conocimiento, a menos que una persona responsable de su seguridad
les supervise o informe adecuadamente sobre el uso de este deshumidificador.
• Este deshumidificador está diseñado exclusivamente para un uso doméstico en
interiores y no debe ser utilizado al aire libre o para otros fines.
• No deje nunca desatendido el deshumidificador mientras esté en uso.
• No deje nunca a niños o mascotas solos o sin vigilancia en el área donde el
deshumidificador está en uso. No permita bajo ningún concepto que los niños jueguen
con este dispositivo.
• Si el deshumidificador se transfiere a otros usuarios, debe ir siempre acompañado de
estas instrucciones.
30 Advertencias de seguridad importantes.
34 Información específica sobre el gas refrigerante R290.
35 Especificaciones técnicas y descripción de las piezas.
36 Uso y funcionamiento.
38 Drenaje del agua.
40 Limpieza del deshumidificador.
42 Operación de descongelación.
42 Información / consejos útiles.
Gracias
Gracias por adquirir este deshumidificador Airalia.
Antes utilizar este
deshumidificador, por
favor, lea este manual
de instrucciones con
detenimiento y guárdelo
para futuras consultas.
Antes de usar
• Antes de ponerlo en funcionamiento retire todos los materiales de embalaje y
compruebe el estado del deshumidificador. No use el deshumidificador si presenta
signos de estar dañado.
• Antes de su uso verifique siempre que el cable de alimentación se encuentra en buen
estado. Si el cable de alimentación está dañado, entonces debe ser reemplazado por el
fabricante o un técnico cualificado.
• Mantenga los materiales de embalaje (bolsas de plástico, espuma de poliestireno)
fuera del alcance de los niños.
Conexión y desconexión del deshumidificador
• Asegúrese de que la red de alimentación cumple con las especificaciones eléctricas
(tensión, frecuencia y potencia) indicadas en la etiqueta de clasificación del deshumidificador.
Asegúrese de que el enchufe sea el adecuado para la clavija del deshumidificador.
• Este deshumidificador se debe conectar a un enchufe con toma de tierra.
• Para evitar sobrecargar el circuito en el que está conectado el deshumidificador, no
utilice otro dispositivo que consuma mucha potencia en ese mismo circuito.
• Enchufe y desenchufe el deshumidificador utilizando siempre la propia clavija eléctrica.
• No tire del cable de alimentación para desconectar la clavija del enchufe. Así mismo, nunca
mueva, transporte o cuelgue el deshumidificador utilizando el cable de alimentación.
• Asegúrese de que el cable de red está completamente extendido antes de su uso y no
permita que entre en contacto con ninguna parte del deshumidificador.
• Para desconectar por completo el deshumidificador de la red eléctrica debe
desconectarlo del enchufe.
• No utilice cables de extensión con este deshumidificador, ya que pueden
sobrecalentarse y provocar un riesgo de incendio.
• Este deshumidificador no está diseñado para usarse con un temporizador externo o un
sistema de control remoto independiente.
• No cubra el cable de alimentación, por ejemplo debajo de alfombras, tapetes ni cintas.
• No coloque el cable de alimentación en zonas donde pueda suponer un riesgo por tropiezos.
• No coloque el cable de alimentación en un lugar mojado, húmedo o caliente.
• No corte ni pliegue el cable de alimentación. No enrolle el cable de alimentación
alrededor del deshumidificador.

32 33
EN DE SP FR IT EN DE SP FR IT
Deshumidificador 20L | Modelo AIR-DH20 Deshumidificador 20L | Modelo AIR-DH20
Transporte y ubicación del deshumidificador
• Mantenga el deshumidificador en posición vertical durante su transporte. Después de
transportar el deshumidificador espere al menos una hora antes de encenderlo.
• Asegúrese de que el deshumidificador está desconectado del enchufe eléctrico antes
de moverlo.
• No utilice el deshumidificador cerca de sustancias inflamables (por ejemplo, gasolina,
alcohol, pinturas o gases), recipientes a presión (por ejemplo, botes con aerosoles) o
fuentes de calor (por ejemplo, hornos o calentadores).
• No utilice el deshumidificador en superficies inclinadas. Manténgalo siempre en
posición vertical para evitar que se produzcan fugas o situaciones peligrosas.
• Mantenga el deshumidificador al menos a 40cm de distancia respecto a los objetos y
paredes circundantes.
• No coloque el tubo de drenaje continuo en el exterior cuando las temperaturas sean
inferiores a 0°C.
Limpieza, mantenimiento y almacenamiento
• En caso de avería o mal funcionamiento, apague el deshumidificador y póngase en
contacto con el vendedor o el fabricante.
• No intente reparar o ajustar ningún tipo de elemento eléctrico o mecánico del
deshumidificador usted mismo ni con la ayuda de personal no autorizado. Hacerlo es
peligroso y anula su garantía.
• Cuando limpie el deshumidificador siga siempre las recomendaciones del fabricante.
• Antes de cada sesión de mantenimiento o limpieza asegúrese de que el deshumidificador
está desconectado de la red eléctrica y el depósito de agua está vacío.
• No utilice limpiadores corrosivos, a base de disolventes o abrasivos, ya que pueden
dañar el deshumidificador. No sumerja nunca el deshumidificador en agua.
• No utilice el deshumidificador sin el filtro de aire. Limpie el filtro de aire con frecuencia.
• Desenchufe siempre el deshumidificador antes de vaciar el depósito de agua.
• No retire el depósito de agua mientras el deshumidificador esté en uso. Esto puede
hacer que tenga fugas.
• Vacíe siempre el depósito de agua antes de retirar el deshumidificador para
almacenarlo.
• El agua que se acumula en el deshumidificador no es potable y, por tanto, debe
desecharse.
Uso
• No introduzca ni permita que entren objetos en las aberturas o rejillas de ventilación
del deshumidificador. Esto puede dañar el equipo o provocar descargas eléctricas o
incendios.
• No deje que entre agua u otros líquidos en el interior del equipo, ya que esto podría
generar un riesgo eléctrico o de incendio.
• No utilice el deshumidificador con las manos o los pies mojados.
• No coloque nada encima del deshumidificador.
• No cubra el deshumidificador mientras está en uso.
• No utilice ningún tipo de método para acelerar el proceso de descongelación del
deshumidificador.
Reciclaje y eliminación
• Los materiales de embalaje utilizados en este deshumidificador se pueden reciclar. Por
favor, deshágase de los materiales de embalaje de una forma respetuosa con el medio
ambiente. Consulte con su ayuntamiento para obtener más detalles.
• No tire el deshumidificador junto con la basura doméstica sino a través de un centro
de recogida de residuos autorizado o en el correspondiente punto limpio de su
localidad. En caso de duda, póngase en contacto con el centro de recogida de basuras
y residuos de su localidad o con su ayuntamiento.

34 35
EN DE SP FR IT EN DE SP FR IT
Deshumidificador 20L | Modelo AIR-DH20 Deshumidificador 20L | Modelo AIR-DH20
Precaución,
riesgo de incendio
Información específica
sobre el gas refrigerante R290
Lea atentamente todas las siguientes advertencias
• Este deshumidificador contiene 60g de gas refrigerante R290.
• El deshumidificador debe colocarse en un área sin fuentes continuas de combustión
(por ejemplo: llamas abiertas, aparatos eléctricos o de gas en funcionamiento).
• No realice perforaciones ni queme nada.
• Tenga en cuenta que el gas refrigerante R290 es inodoro.
• El deshumidificador se debe instalar, utilizar y almacenar en un área mayor de 4m2.
• Si el deshumidificador se instala, utiliza o almacena en un área no ventilada, la
habitación debe estar diseñada para evitar la acumulación de fugas de refrigerante que
podrían provocar un incendio o una explosión debido a la combustión de refrigerante
causada por calentadores eléctricos, estufas u otras fuentes de combustión.
• El deshumidificador se debe almacenar de manera que evite cualquier fallo mecánico.
• Las personas que operen o trabajen sobre el circuito refrigerante deben tener la
certificación apropiada concedida por una organización acreditada que garantice la
competencia en la manipulación de refrigerantes según una evaluación específica
reconocida por las correspondientes asociaciones industriales.
• Las reparaciones deben realizarse en base a las recomendaciones del fabricante.
El mantenimiento y las reparaciones que requieran la asistencia de otro personal
cualificado deben realizarse bajo la supervisión de una persona especializada en el uso
de refrigerantes inflamables.
• No perfore ninguna parte del circuito refrigerante.
Indicador
luminoso de
humedad
Asa
Parte frontal Parte trasera
Control Panel
Salida de aire
Filtro de aire
Entrada de aire
Salida para drenaje
continuo de agua
Depósito de agua
Indicador de
nivel de agua
Cable alimentación
y clavija
Ruedas
Especificaciones técnicas y
descripción de las piezas
Núm. de modelo AIR-DH20
Tamaño 565 x 340 x 240mm
Peso neto 14 kg
Fuente de alimentación CA 220V - 240V ~ 50Hz
Potencia de entrada 420W
Capacidad de deshumidificación Aprox. 20 litros al día a 30°C, 80%
Capacidad del depósito de agua 6,5 l
Temperatura de funcionamiento 5 – 32°C
Gas refrigerante R290 / 60g
Higrómetro Sí
Velocidad del ventilador 2 velocidades (alta/baja)
Filtro de aire Sí

36 37
EN DE SP FR IT EN DE SP FR IT
Deshumidificador 20L | Modelo AIR-DH20 Deshumidificador 20L | Modelo AIR-DH20
Uso y funcionamiento
Panel de control
A - Botón de encendido: Pulse este botón para encender (ON) o apagar (OFF) el deshumidificador.
Cuando el deshumidificador está encendido, la pantalla de visualización (S) muestra el porcentaje actual
de humedad relativa.
B - Ajuste del control de la humedad: Pulse + o - para establecer el nivel preferido de humedad
relativa (RH) entre 30% y 80% en incrementos del 5% durante el modo de deshumidificación normal. El
deshumidificador se apagará cuando la habitación alcance la humedad relativa (RH%) objetivo.
C - Control del temporizador: Utilice esta función para encender o apagar automáticamente el
deshumidificador durante un período de tiempo seleccionado (entre 1 y 24 horas). El período seleccionado
se muestra en la pantalla (S).
Temporizador de apagado automático: Pulse el botón de control del temporizador mientras el
deshumidificador está encendido.
La pantalla parpadeará. Pulse + o - para seleccionar en la pantalla el número de horas que desea que el
deshumidificador esté funcionando antes de apagarse. Una vez introducido el tiempo deseado, espere 5
segundos y la luz indicadora del temporizador (M) se iluminará para confirmar que el temporizador está
configurado.
Temporizador de encendido automático: Pulse el botón de control del temporizador mientras el
deshumidificador está apagado.
La pantalla parpadeará. Pulse + o - para seleccionar en la pantalla el número de horas que desea que
transcurran antes de que el deshumidificador empiece a funcionar. Una vez introducido el tiempo
deseado, espere 5 segundos y la luz indicadora del temporizador (M) se iluminará para confirmar que el
temporizador está configurado.
E D C S B A
RQPONMLKJ
F
G
H
I
A continuación ya puede ajustar la velocidad del ventilador del deshumidificador (mediante el botón D) y el
modo (mediante el botón E). Si no se selecciona nada se utilizará el ajuste previo de velocidad y modo.
Para desactivar la función del temporizador después haberlo establecido, pulse dos veces el botón de
control del temporizador.
D - Velocidad del ventilador: Utilice esta función para ajustar la potencia de extracción del
deshumidificador a una de las dos opciones disponibles (alta o baja) en el modo normal o ventilación.
E - Modo: Utilice esta función para cambiar entre los siguientes modos de funcionamiento:
F - Indicador de Modo Secado de Ropa: Indica si el Modo Secado de Ropa está seleccionado.
G - Indicador de Modo Normal: Indica si el Modo Normal está seleccionado.
H - Indicador de Modo Ventilación: Indica si el Modo Ventilación está seleccionado.
I - Indicador de Modo Automáticos: Indica si el Modo Automático está seleccionado.
J - Indicador de descongelación: Indica si la unidad está descongelando (consulte la sección sobre
descongelación para obtener más información)
K/L - Indicador de velocidad del ventilador: Indica la potencia de la velocidad del ventilador del deshumidificador.
Baja | Alta
M - Indicador del temporizador: Indica si el temporizador está establecido.
N - Indicador de temperatura: Mantenga pulsado el botón + (B) durante 5 segundos hasta que la luz del
indicador de temperatura muestre (°C). Esto mostrará la temperatura actual de la estancia en la pantalla (S).
O - Indicador de humedad: Indica si se ha establecido un % de humedad relativa objetivo.
Modo Ventilación
En este modo el aire de la habitación se filtra a través
del filtro de aire y se devuelve a la habitación a la
velocidad seleccionada (mediante el botón D). Este
modo no utiliza la función de deshumidificación, tan
solo hace girar el ventilador.
Modo Secado de Ropa
Utilice este modo para secar la ropa más
rápidamente. El deshumidificador funciona
de forma continua a su máxima capacidad
de deshumidificación. En este modo las
funciones para ajustar la velocidad y el
control de la humedad están desactivadas.
Modo Automático
En este modo, la humedad relativa objetivo se
fija en el 55% y la velocidad del ventilador se
controla de forma automática:
• La velocidad del ventilador se ajusta
automáticamente a «Alta» cuando la
humedad relativa de la habitación es superior
al 70% y hasta que se reduce al 67%.
• La velocidad del ventilador se ajusta
automáticamente a «Baja» cuando la
humedad relativa de la habitación es inferior a
67% y hasta que llega a 55%.
Modo Normal
Utilice este modo para ajustar
manualmente la velocidad del ventilador
(mediante el botón D) y la humedad
relativa objetivo (mediante el botón B).
El deshumidificador se apagará cuando
la habitación alcance la humedad relativa
(RH%) objetivo.

38 39
EN DE SP FR IT EN DE SP FR IT
Deshumidificador 20L | Modelo AIR-DH20 Deshumidificador 20L | Modelo AIR-DH20
Indicador
luminoso de
humedad
P - Indicador de humedad objetivo: Indica si se ha alcanzado el % de humedad relativa objetivo.
Q - Indicador de depósito de agua lleno: Indica si el depósito de agua del deshumidificador está lleno, si
se ha retirado o si está colocado incorrectamente.
R - Indicador de encendido: Indica si el deshumidificador está encendido.
S - Pantalla: Muestra información relacionada con el funcionamiento del deshumidificador (% de humedad
relativa objetivo, % humedad relativa ambiente actual, ajustes del temporizador, temperatura ambiente).
Bloqueo infantil: Los controles del deshumidificador se pueden bloquear por la seguridad de los niños.
Mantenga pulsado el botón del Control del Temporizador (C) durante 5 segundos para bloquear y
desbloquear el panel de control.
Luz indicadora de humedad: Indica el porcentaje de humedad relativa actual con tres colores diferentes:
Luz roja La humedad relativa actual está por encima del 70%.
Luz verde La humedad relativa actual está entre el 50% y el 70%.
Luz azul La humedad relativa actual está por debajo del 50%.
Drenaje del agua
Drenaje del agua acumulada en el depósito de agua
El agua condensada por el deshumidificador se acumula directamente en el depósito de agua.
Cuando el depósito de agua está lleno, el deshumidificador se detiene automáticamente
y el indicador «depósito de agua lleno» (Q) se enciende en el panel de control a la vez
que emite un pitido. Siga estos pasos para vaciar el depósito de agua:
Paso 1: Apague el deshumidificador pulsando el botón de encendido (A).
Paso 2: Localice el depósito de agua en la parte posterior del deshumidificador y tire
suavemente para sacar dicho depósito.
Paso 3: Utilice el asa del depósito de agua para vaciarlo en un lavabo, un fregadero o en una bañera.
Parte trasera del
deshumidificador
Depósito
de agua
Asa
Drenaje externo continuo del agua
Se recomienda utilizar la función de drenaje continuo cuando el equipo se va a utilizar
durante largos periodos de tiempo y el depósito de agua no se puede vaciar con
frecuencia. Siga los pasos indicados a continuación para utilizar esta función:
Paso 1: Apague el deshumidificador pulsando el botón de encendido (A).
Paso 2: Localice el depósito de agua en la parte posterior del deshumidificador y tire
suavemente para sacarlo.
Paso 3: Localice la salida del drenaje continuo de agua en la parte posterior del
deshumidificador.
Paso 4: Inserte el tubo en la salida del drenaje continuo de agua y asegúrese de que
está conectado correctamente.
Paso 4: Coloque de nuevo el depósito de agua vacío en el deshumidificador
asegurándose de que esté correctamente colocado. Cualquier desalineación del
depósito evitará que el deshumidificador comience a funcionar de nuevo y el indicador
«depósito de agua lleno» seguirá iluminado.
No quite el flotador de palanca situado en el interior del depósito de agua.
El deshumidificador lo utiliza para detener el proceso de deshumidificación
automáticamente cuando el depósito de agua está lleno.
Table of contents
Languages:
Popular Dehumidifier manuals by other brands

Gardner Denver
Gardner Denver RNC25 instruction manual

FRIULAIR
FRIULAIR ACT ES 20-500 User Maintenance Manual and Spare parts

Ivation
Ivation IVACDEH15P user guide

Aprilaire
Aprilaire 1850F Installation and operating manual

DEWTEQ
DEWTEQ DHD2000WP User manual and technical specifications

Danby
Danby DDR6012R Owner's use and care guide