manuals.online logo
Brands
  1. Home
  2. •
  3. Brands
  4. •
  5. AirArtDeco
  6. •
  7. Fan
  8. •
  9. AirArtDeco RT-30 User manual

AirArtDeco RT-30 User manual

INSTRUCTION MANUAL
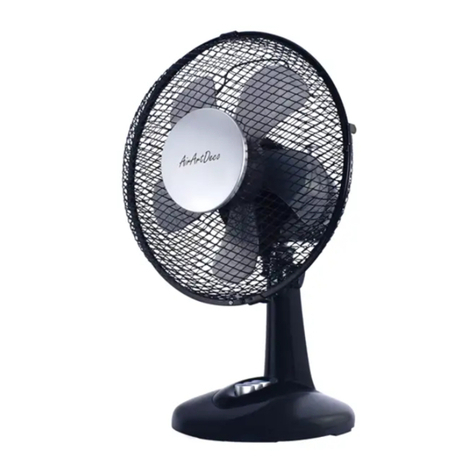
30CM DESK FAN
MODEL NO. RT-30
AC220-240V 50Hz 40W
BEFORE OPERATING THIS PRODUCT, READ, UNDERSTAND, AND
FOLLOW THESE INSTRUCTIONS.
BEFORE FIRST USE
Read and follow all the instructions in this “Use And Care” manual even if you feel you are familiar
with the products, and find a place to keep it handy for future reference.
Your attention is drawn particularly to the sections concerning “IMPORTANT SAFEGUARDS”
IMPORTANT SAFEGUARDS
PLEASE READ ALL INSTRUCTIONS CAREFULLY BEFORE USING THE PRODUCT.
When using the electrical appliance, the following basic safety precautions should always be
followed.
WARNING- to reduce the risk of fire, electric shock or injury to persons or property:
Always operate the product from a power source of the same voltage, frequency and
rating as indicated on the product identification plate.
Do not use this fan with any solid state speed control device to reduce the risk of electric
shock.
The appliance is not intended for use by persons (including children) with reduced physical,
sensory, mental capabilities or lack of experience and knowledge, unless they have been
given supervision or instructions concerning use of the appliance by a person responsible
by their safety.
Children should be supervised to ensure that they do not play with the appliance.
Do not leave the fan running unattended.
Do not operate the product if it is dropped, damaged or showing signs of product
malfunction. Do not operate the product with a damaged plug or cord. Return the complete
product to the place of purchase for inspection, refund or replacement.
If it is not working properly, contact a qualified electrician or service centre for examination
and repair, never try to dismantle it by yourself.
Do not immerse or expose the product or flexible cord to rain, moisture or any other liquid.
This product should not be used in the immediate vicinity of water, such as bathtubs,
washbowls, swimming pools etc. where the likelihood of immersion or splashing could
occur.
Never install the unit where it could be subject to:
Heat sources such as radiators, heat registers, stoves or other products that produce
heat
Direct sunlight
Mechanical vibration or shock
Excessive dust
Lack of ventilation, such as a cabinet or bookcase
Uneven surface
Switch off and unplug from outlet when the product is not in use, before assembling or
disassembling parts and before cleaning. Fully assemble the fan before switching on.
Avoid contact with moving parts. Do not insert any body parts (e.g. finger) or objects
through the grill when the fan is operating.
Do not cover the grille, or operate in close proximity to curtains, etc.
This product is intended for normal domestic/household use only.
Always disconnect the fan when moving it from one location to another.
The use of attachments or accessories not recommended or sold by the product distributor
may cause personal or property hazards or injuries.
Be sure fan is on a stable surface when operating to avoid overturning.
Do not immerse in water.
If the supply cord is damaged,it must be replaced by the manufacturer or its service
agent,or similarly qualified person,in order to avoid a hazard.I
READ AND SAVE THESE INSTRUCTIONS FOR FUTURE REFERENCE
.
FEATURES OF THIS PRODUCT
1
Front grill
2
Fan blade locker
3
Fan blade
4
Rear grill locker
5
Rear grill
6
Pedestal
7
Base
8
Screw
PRODUCT ASSEMBLY
BASE ASSEMBLY
Put the foot base on flat ground
Fix the shaft of the fan to the base foot, and then fix the shaft and foot base by
screws.Push the blade along motor shaft.
This fan is supplied with a moulded surround which must be fitted to the base of the fan
before the fan is used.
The moulded base surround is supplied with the off retaining screws (taped to the inside of
the surround)
Remove the bag containing the screws and position the surround on the moulded retaining
clips on the base and snap into place. Ensure that the surround has clipped firmly into
position onto the fan base and screw the retaining screws into the holes across the
middle of the base. Do not over-tighten these screws
HOW TO ASSEMBLE THE FAN
To assemble the safety grille and blade assembly, remove the spinner (by turning it
clockwise), then the locking nut (by turning it anticlockwise) from the motor spindle.
Place the back safety grille into position. Ensure the safety grille fits onto the locating lugs
(Fig. 1). If this is done correctly, the safety grille’s carry handle will be at the top.
Fix the safety grille into position by replacing the locking nut tightly by hand (Fig. 1). Do not
force the locking nut.
The groove in the centre of the fan blade aligns with a T-bar on the motor spindle to ensure
correct positioning.
Fix the blade into place by gently hand tightening the spinner(Fig.2) anticlockwise onto the
end of the motor spindle. The spinner is self-tightening do not force it.
Lift out all locking clips on the front safety grille(Fig 3).
Place the safety grille into position and secure it by fastening the clips over the outer rim.
The screw and nut at the bottom of the grille must be fitted (Fig. 4).
Fig.1 Locking lugs & locking nut
Locking nut
Fig. 2 Spinner tighten anti-clockwise
OPERATION OF THE PRODUCT
CAUTION:
Select a suitable location for the fan. Always choose a
safe location in accordance to the safety
recommendations outlined.
When placing a fan on a table or shelf, always ensure
a: Cluch
b: The adjustable knob
that the power cord does not hang where it can accidentally be pulled and that the unit
cannot accidentally fall.
Do not hang or mount the fan on a wall or ceiling.
Remove the cable tie and unravel the cord set before operation.
Loose the tilt adjustable ring knob under the assembly of fan and motor, tilt up or down until
the assembly locate into the desired position, then secure the screw by fastening it(Fig.5).
To blow air in one direction and stop oscillation, allow the Desk Fan to move into the
desired position and pull the clutch knob up. To return to a normal oscillating function, press
the clutch knob down.
1. On / Off and Speed Control
The ON/Off and Speed is controlled by the Button Switch.
0- The Fan is switched Off
1- The Fan operates at the lowest speed
2- The Fan operates at the middle speed
3- The Fan operates at the highest speed
2. Angle Adjustment
Switch off the fan. Slightly loosen the Adjusting Screw by turning it anti-clockwise. Adjust the fan
to the desired angle and then tighten the Adjusting Screw by turning it clockwise.
CLEANING
Switch off and unplug from the power supply before assembling or disassembling and
cleaning.
Keep the air vents at the rear of the main body free from dust or fluff– use a vacuum
cleaner to remove these when necessary. Do not probe any opening to remove fluff.
Fan component parts should be cleaned using mild soap and a damp cloth or sponge. Do
not allow any water or other liquid to enter the motor housing.
Thoroughly remove soap film with clean water.
CAUTION: Do not use harsh detergents, chemical cleaners or solvents as they may
damage the surface finish of the fan components.

Other AirArtDeco Fan manuals

AirArtDeco AADRT-23/RT-23 User manual

AirArtDeco

AirArtDeco AADRT-23/RT-23 User manual

AirArtDeco AADQ-401 User manual

AirArtDeco

AirArtDeco AADQ-401 User manual

AirArtDeco FT-15RT1 User manual

AirArtDeco

AirArtDeco FT-15RT1 User manual

AirArtDeco QT-U608 User manual

AirArtDeco

AirArtDeco QT-U608 User manual

Popular Fan manuals by other brands

Beper VE.301H use instructions

Beper

Beper VE.301H use instructions

Hunter 22375 Installation and operation manual

Hunter

Hunter 22375 Installation and operation manual

NuTone QTXEN080FLT installation guide

NuTone

NuTone QTXEN080FLT installation guide

Faro Barcelona Lantau installation guide

Faro Barcelona

Faro Barcelona Lantau installation guide

Hunter 90600 owner's guide

Hunter

Hunter 90600 owner's guide

Hunter 20181 Owner's guide and installation manual

Hunter

Hunter 20181 Owner's guide and installation manual

Craftmade Ellington GD52ABZ5 installation guide

Craftmade

Craftmade Ellington GD52ABZ5 installation guide

Schuller 175180D installation guide

Schuller

Schuller 175180D installation guide

STIEBEL ELTRON LWZ 130 Enthalpie Operation and installation

STIEBEL ELTRON

STIEBEL ELTRON LWZ 130 Enthalpie Operation and installation

Windmere C-201 Use and care book

Windmere

Windmere C-201 Use and care book

Manrose PURO DCT4565 quick start guide

Manrose

Manrose PURO DCT4565 quick start guide

Gallet Lestre instruction manual

Gallet

Gallet Lestre instruction manual

Airflow CE100D installation instructions

Airflow

Airflow CE100D installation instructions

Cresta CFP410 instruction manual

Cresta

Cresta CFP410 instruction manual

Delta Electronics BFB1012H Dimensions and installation information

Delta Electronics

Delta Electronics BFB1012H Dimensions and installation information

Helios GigaBox GBW T120 Series Installation and operating instructions

Helios

Helios GigaBox GBW T120 Series Installation and operating instructions

Airflow LA HABRA owner's manual

Airflow

Airflow LA HABRA owner's manual

Sulion RIAN manual

Sulion

Sulion RIAN manual

manuals.online logo
manuals.online logoBrands
  • About & Mission
  • Contact us
  • Privacy Policy
  • Terms and Conditions

Copyright 2025 Manuals.Online. All Rights Reserved.