Aircatglobal VirtualFly RUDDO User manual

© 2022 Virtual Fly, SL
All trademarks and brand names are
trademarks or registered trademarks of their
respective owners. All rights reserved.
RUDDO & RUDDO+
USER’S MANUAL
Rev. 2.0 - March 2022
1. IN THE BOX
A) RUDDO/RUDDO+
B) USB Cable
C) Lashing Strap
D) Velcro Strip with adhesive back
E) Extra Springs
C. Maria Aurèlia Capmany, 21
P.I. La Fàbrica – 08297 Castellgalí (Spain)
Phone: (+34) 938 333 301
https://www.virtual-fly.com/
For support, contact us at
support@virtual-fly.com
B
C
E
D
2x
1x
1x
1x
2x
4x
A

RUDDO & RUDDO+ | User’s manual
2
PC
Velcro strips
2. HARDWARE SETUP
2.1 SECURING & CONNECTING TO PC
Place the RUDDO/RUDDO+ on the floor in front of the chair in
the desired position. We recommend it to be in contact with a
wall, as displayed in the diagram below.
Use the provided Velcro strips (D) to secure it to the floor. If
you prefer, you can screw it to the floor (screws not included).
If your chair has wheels or moves, you can use the lashing
strap (C) to minimize its movement, as displayed below.
Connect the USB cable (B) between the RUDDO/RUDDO+ and
the computer where the flight simulation software is running.

RUDDO & RUDDO+ | User’s manual 3
2.2 CHANGING BRAKING AND RUDDER
CONTROL HARDNESS
Your RUDDO/RUDDO+ oers the possibility to adapt the
brakes and rudder pedals hardness to match your preference.
2.2.1 Brake hardness
As you can see in the diagram below, the rear part of each
pedal has one or two springs that oer resistance when the
brakes are pressed. You can use one (for softer braking) or two
(for harder braking) springs depending on your preferences.
Follow the next steps to add/remove one spring to change
the braking resistance from your RUDDO/RUDDO+.
A 3mm Allen key (not included) is needed to change the
springs.
1. Unscrew one of the screws
from the rear part of the pedal.
2. Add or remove the spring
(E) depending on your
preferences.
3. Screw the removed screw
back into its original position.
4. Repeat the process with the
other pedal.

RUDDO & RUDDO+ | User’s manual
4
2.2.2 Rudder hardness
To adjust the hardness of the rudder pedals, you can add or
remove springs located under the RUDDO/RUDDO+’s cover.
You have four possible configurations to choose from, all
displayed in Step 4.
Follow the following steps to add/remove springs:
1. Unscrew every indicated screw subjecting the RUDDO/
RUDDO+’s cover, as displayed in the diagram below.
2. Carefully remove the cover.
A 2mm Allen key (not included) is needed to remove the
black cover of the device.

RUDDO & RUDDO+ | User’s manual 5
4. There can be a total of 8 springs placed in 4 guides. Add
or remove springs (E) based on your hardness preference.
Below, you can see the four dierent configurations, where
configuration 4 provides the strongest rudder pedal feel and
configuration 1 the softest.
5. Screw the axis back in using the screwdriver.
6. Secure the cover back to its original position using the
screws removed in the first step.
3. Remove the white axis displayed below.
A flat head screwdriver (not included) is needed to
remove the white axis of the device.

RUDDO & RUDDO+ | User’s manual
6
3. SOFTWARE SETUP
The RUDDO/RUDDO+ interacts with any computer as a
joystick (HID), so it is compatible with any flight simulation
software. Below, you have 2 options for setting up your
RUDDO/RUDDO+ with the most popular flight simulation
software: MSFS, Prepar3D, and X-Plane 11.
OPTION A: Using VFHub (Windows Only) - Recommended
VFHub is the software developed by Virtual Fly to simplify
setting up our products. Thus, it is the recommended software
to set up your RUDDO/RUDDO+. With VFHub, you can fly
your favorite flight simulation software without worrying about
configuring your Virtual Fly flight controls.
You can download the latest VFHub version from this link:
https://www.virtual-fly.com/setup-support. The VFHub installer
takes care of installing VFHub and all the required modules.
VFHub is compatible with MSFS, Prepar3DV4-V5 and X-Plane 11.
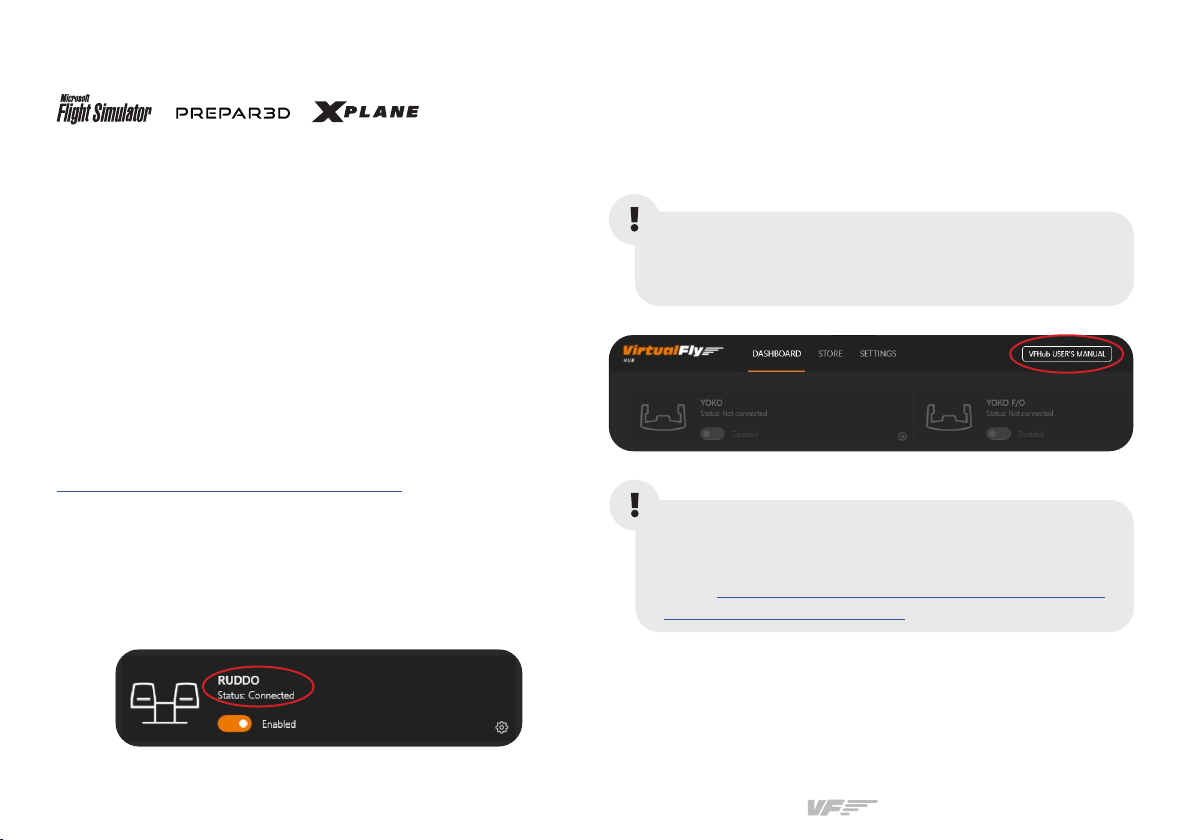
After installing VFHub, make sure your RUDDO/RUDDO+ is
connected to your computer. Run VFHub, and verify that the
RUDDO status displayed in the Dashboard is “Connected”:
VFHub takes care of making your RUDDO/RUDDO+ work
with MSFS, Prepar3DV4-V5 and X-Plane 11, so it must always be
running when you use the RUDDO/RUDDO+.
If your device is a RUDDO non-PLUS version,make sure
to calibrate the device in VFHub. For more details, check
the USER’s MANUAL button in the VFHub software:
Make sure to set up a blank profile to the RUDDO/
RUDDO+ in the controls or joystick menu of the
simulation software. You can find the detailed steps
in: https://downloads.virtual-fly.com/docs/vub/latest/
setting_up_a_blank_profile.pdf.

RUDDO & RUDDO+ | User’s manual 7
OPTION B: In-game Configuration
Below, you have a general scheme to set up your RUDDO/
RUDDO+ with the most popular flight simulation software:
MSFS, Prepar3D, and X-Plane 11.
MSFS
If you own a RUDDO PLUS version, your device is ready to be
used in MSFS. If you own a RUDDO non-PLUS version, open
MSFS and got to the options menu. Select the controls menu,
chose the RUDDO from the device list, and assign the axes
as you please.
Prepar3D
Open Prepar3D and go to the “Options” menu. Locate the
“Key Assignments” and “Axis Assignments” and select the
“RUDDO/RUDDO+” from the Controller list. Assign the axes
as you please. Calibrate the device following the instructions
inside “Control Calibration”.
X-Plane 11
You will only need to calibrate your RUDDO/RUDDO+
inside X-Plane 11, since axes are automatically assigned.
Open X-Plane 11 and go to the Settings\Joystick sub-menu,
select the RUDDO/RUDDO+ from the device list and follow
calibration steps for your device.
If you want to customize how your RUDDO/RUDDO+
works, select the device’s options button ( ) in VFHub’s
Dashboard. For detailed instructions on all the tuning and
customization possibilities, check the USER’s MANUAL
button in the VFHub software.
If you own a RUDDO non-PLUS version, you must
calibrate your device using Windows Calibration.
Make sure the “Enable Controllers” option inside
Options/Controls is enabled.
This manual suits for next models
1
Table of contents