AirSelfie AIR PRIX User manual

USER MANUAL
AIR PIX


Welcome to a new era in
personal photography.
Congratulations on choosing a better way to take selfie photos and video
with your new AIR PIX from AirSelfie. This manual will help you get the most
out of your AirSelfie experience. We recommend that you read through it in
its entirety before taking your AIR PIX on its first flight.
This English manual is available for download on our website SUPPORT
section at: www.airselfiecamera/airpixum. Manuals in the languages of most
of our distribution areas will be available on our website soon. You will also find
answers to most of your questions about your new AIR PIX on the SUPPORT
page on the website or contact us at: support@aireselfiecamera.com
Congratulations! 1

4
6
8
9
10
12
13
14
15
16
20
Component Overview
App Download
Charging
Powering Up
Pairing AIR PIX & Smartphone
Calibration
App User Interface
Flying Your AIR PIX
Flight Modes
Manual Flight Mode
Auto-Fly Mode
Index 2

Index 3
23
24
26
32
33
35
38
40
44
47
48
360˚ Auto-Fly Mode
App-Free Auto-Fly Mode
App-Free Gesture Control Mode
Auto-Safe Landing
Gallery
In-App Image Editing
Social Media Sharing
General Information
General Information: Helpful Hints & Warranty
Disposal
FCC Compliance

Component Overview 4
Charging
Indicator
Light
Camera
FRONT VIEW
Function
Indicator
Light
Micro
SD Card
Visual
Sensor

Component Overview 5
REAR VIEW
USB Port
Power
Micro
SD Card

AirSelfie App Download 6
The universal AirSelfie App features “One-Touch” intuitive simplicity
and works with all AirSelfie aerial cameras except for AirSelfie2. iOS
users can find it on The App Store and Android users can download it
from Google Play for free.
Compatible with iOS 10 to iOS 13 Compatible with Android 5 through 9
AIR PIX owners should download the AirSelfie app
with the solid white icon as shown here, not the
AirSelfie2 app with the gray icon. AirSelfie2 owners
will still use the AirSelfie2 app.

AirSelfie App 7
Control-Camera Screen
Image Editing Suite
Instant Sharing

1
2
3
Charging & Data Transfer 8
Your AIR PIX comes with a partial charge, so you are good to fly right
out of the box. The average flight time of a full charge is 6+ minutes.
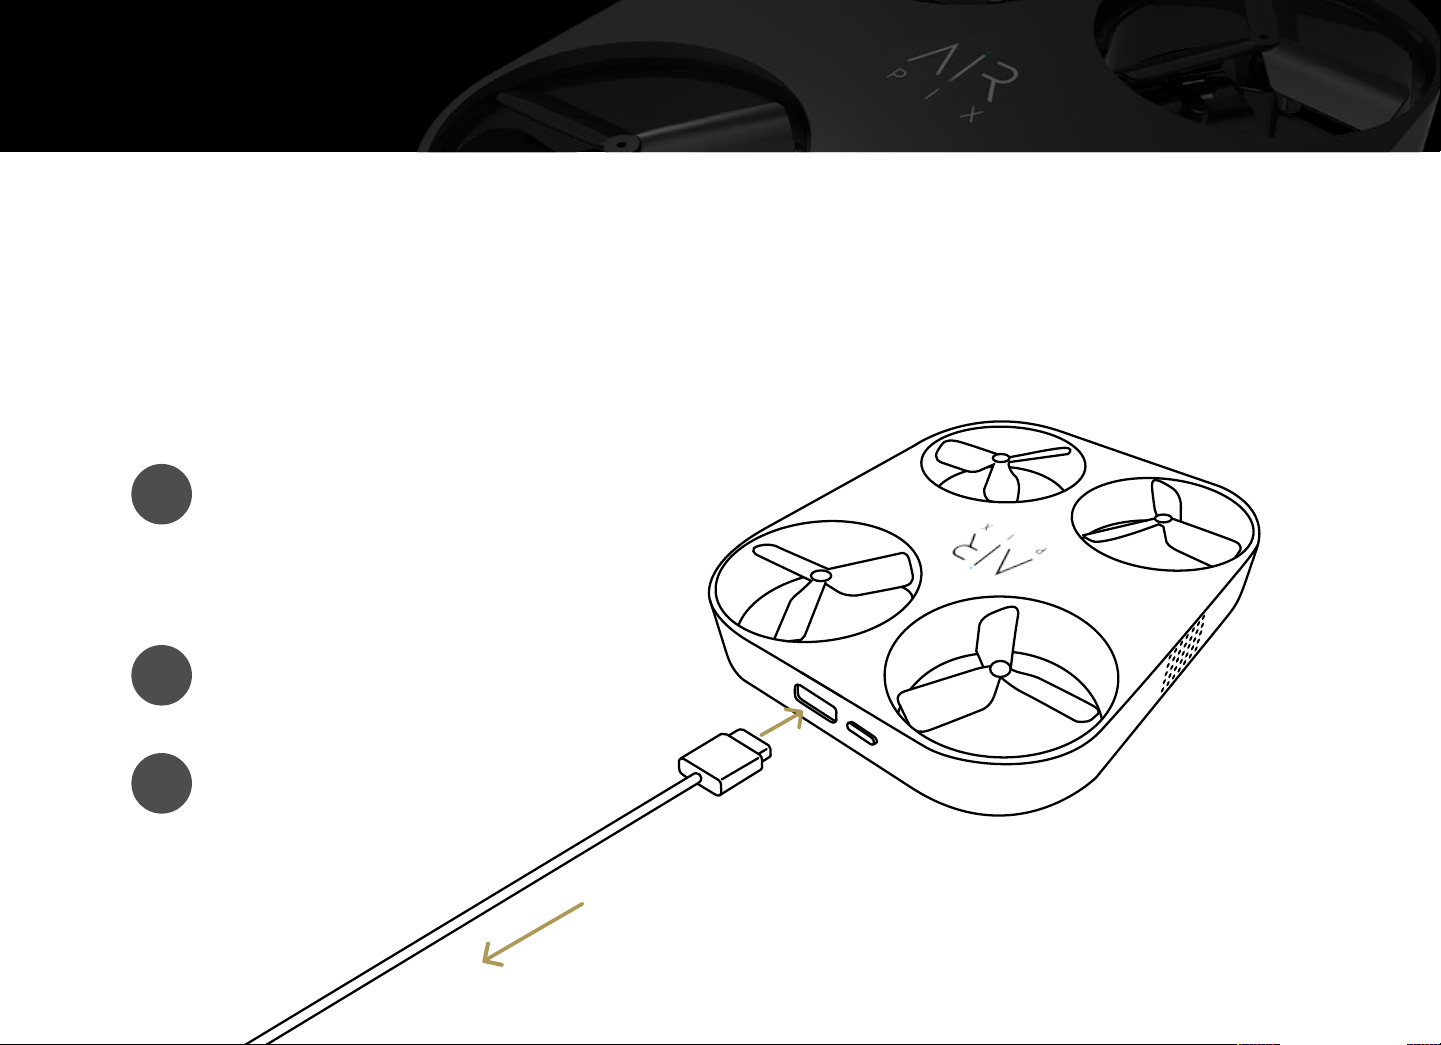
It’s easy to recharge the aerial camera’s battery
when necessary using the USB-C cable
that came with your AIR PIX.
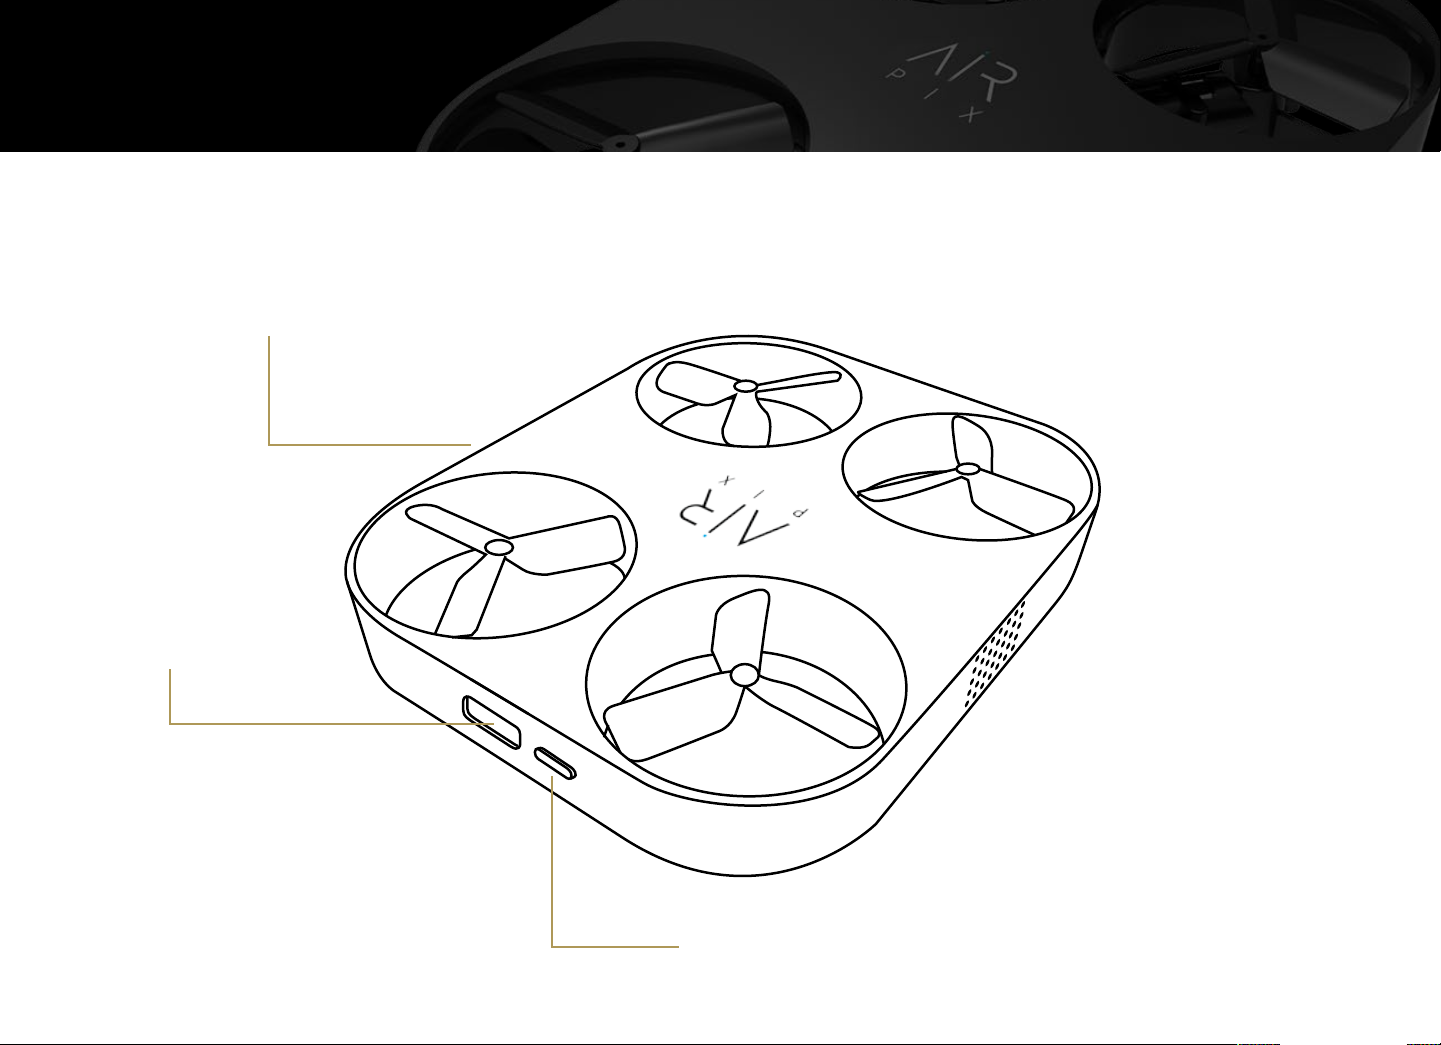
Turn off the device and plug the
USB-C cable into the port on
the side of the device next
to the Power button.
To power supply
or computer
The red Battery Indicator
Light will turn on.
When the battery is fully
charged the red light
will turn off.

Powering Up 9
To turn your AIR PIX on press and hold
the Power Button on the side of the
device next to the USB port down
for a second or two.
The blue Function Indicator
Light will flash rapidly when
your AIR PIX is powered up.

Your AIR PIX connects to your smartphone through a 2.4GHz wi-fi connection.
Pairing AIR PIX & Smartphone 10
1Press
SELECT AN
AIRSELFIE
2Select
AIR PIX
from the menu
3Press
CONNECT
4Press
Open Settings

11
5In the Settings
app select
Wi-Fi
6Select
Airpix-XXXX
Each AIR PIX has
its own ID
7Check wi-fi
has been
connected
When completed
return to the
AirSelfie app.
iPhone iOS screens
shown. Android will
appear differently.
The rapidly flashing
blue Function Indicator
Light will now be
glowing solid.
Airpix-XXXX
Airpix-XXXX
Pairing AIR PIX & Smartphone

On some devices you will need to Calibrate during the initial connection.
Calibration 12
Note: On occasion
it may be necessary
to recalibrate your
AIR PIX to ensure
the most stable
flight possible.
1Press
CALIBRATE
2With the device
horizontal press
CALIBRATE
3When calibration
is confirmed
press DONE

The AirSelfie app has 3 main areas that can be accessed by pressing
the icons on the bottom of the screen on the Home and Gallery pages
or the Back Arrow in the upper left corner of the Control-Camera screen.
Home Screen Control-Camera Screen Gallery Screen
App User Interface 13
Ready to fly

• It is highly recommended that you take your first AIR PIX flight indoors.
• Your AIR PIX uses visual positioning technology for optimal-optical
hovering performance. For maximum stability, it is advised to fly the
device over flat and multi-colored surfaces.
• Ensure there is sufficient lighting whenever using the device indoors
• Flying the device over surfaces that absorb sound, such as rugs and
carpets could have an impact on the operating condition.
Indoor Flight Recommendations:
• Do not operate in bad weather conditions (rain, snow, wind, etc.).
• Do not fly over crowded areas or motor traffic.
• Fly AIR PIX in plain sight and away from obstruction or water.
• Your AIR PIX has a maximum flight range of 60’ (18.2m).
Outdoor Flight Recommendations:
Flying Your AIR PIX 14

Flight Modes 15
There are 4 ways to fly your AIR PIX. In the AirSelfie app go
to the Camera screen and scroll left or right along the bottom
to line up the mode you would like to fly in with the gold arrow.
You can also fly without being connected to your smartphone:
Manual Mode: Pilot using the gyroscope in your phone and
simple swipes of the app joystick.
Auto-Fly Mode: At the touch of a button AIR PIX launches,
flies a few feet away, finds you, takes a selfie or video and
comes back to you all on its own.
App-Free Auto-Fly Mode: AIR PIX launches, flies a few feet away
and takes a selfie before returning to land in your hand.
App-Free Gesture Control Mode: Launch AIR PIX and then
pilot it and take photos or video using simple hand gestures
and movements.
Camera Screen
360˚ Mode: AIR PIX launches, flies a few feet away and rotates
as it hovers and takes photos or video and then flies back to you.

Manual Flight Mode 16
The Manual flight mode’s main
screen is called the Control-Camera
Screen because this where you can
control the flight movements and
take pictures or video with your
AIR PIX.
Back to Home
Joystick
Capture Me
Camera Trigger
Screen Format
Photo or
Video Toggle
Launch & Land
Flight Status &
Video Timer
Ready to fly
Flight Mode
Indoor/Outdoor
Settings

Ready to fly
LAUNCHING IN MANUAL MODE
Select either the Indoor or Outdoor setting.
Note that this screen is currently indicating
that the device is in Outdoor mode.
Tip: AIR PIX will use battery life faster in the
Outdoor setting as the propellers work harder
to keep the device stable in the outdoors.
Hold AIR PIX in your outstretched arm flat on your
palm with the logo up and the camera facing you.
Hold your phone horizontally flat in your other hand.
This is important because your phone’s gyroscope
controls flight direction.
1
2
2
3You’ll see yourself in the Viewfinder Window on the
top of the Camera screen. Simply press the gold
Launch Button on the lower right side of the View-
finder Window and your AIR PIX will take flight.
Tip: Press this same button to land.
17Manual Flight Mode
Ready to fly
3

DIRECTION:
AIR PIX uses the gyroscope in your phone for flight direction. Keeping your
thumb on the joystick tilt your phone in the direction you want your it to fly:
Tilt right to go right
Tip up for backward
Tilt left to go left
PILOTING IN MANUAL MODE
Manual Flight Mode 18
Dip down for forward
Other manuals for AIR PRIX
1
This manual suits for next models
1
Table of contents