AIS SLR350Ni User manual

USER MANUAL SLR350Ni
INTELLIGENT AIS RECEIVER
with WiFi
SKU 001-10
47
SLR350Ni
-MA-v05r04
2017
-12-19
ENGLISH


SLR350Ni
3
Contents
1SLR350Ni INTELLIGENT AIS RECEIVER with WiFi................................... 5
2DOCUMENT............................................................................................. 6
2.1 About This Manual .............................................................................................6
3NOTICE.................................................................................................... 7
3.1 Copyright............................................................................................................7
4GENERAL NOTICES ................................................................................ 8
5INTRODUCTION ...................................................................................... 9
5.1 Parts List............................................................................................................. 9
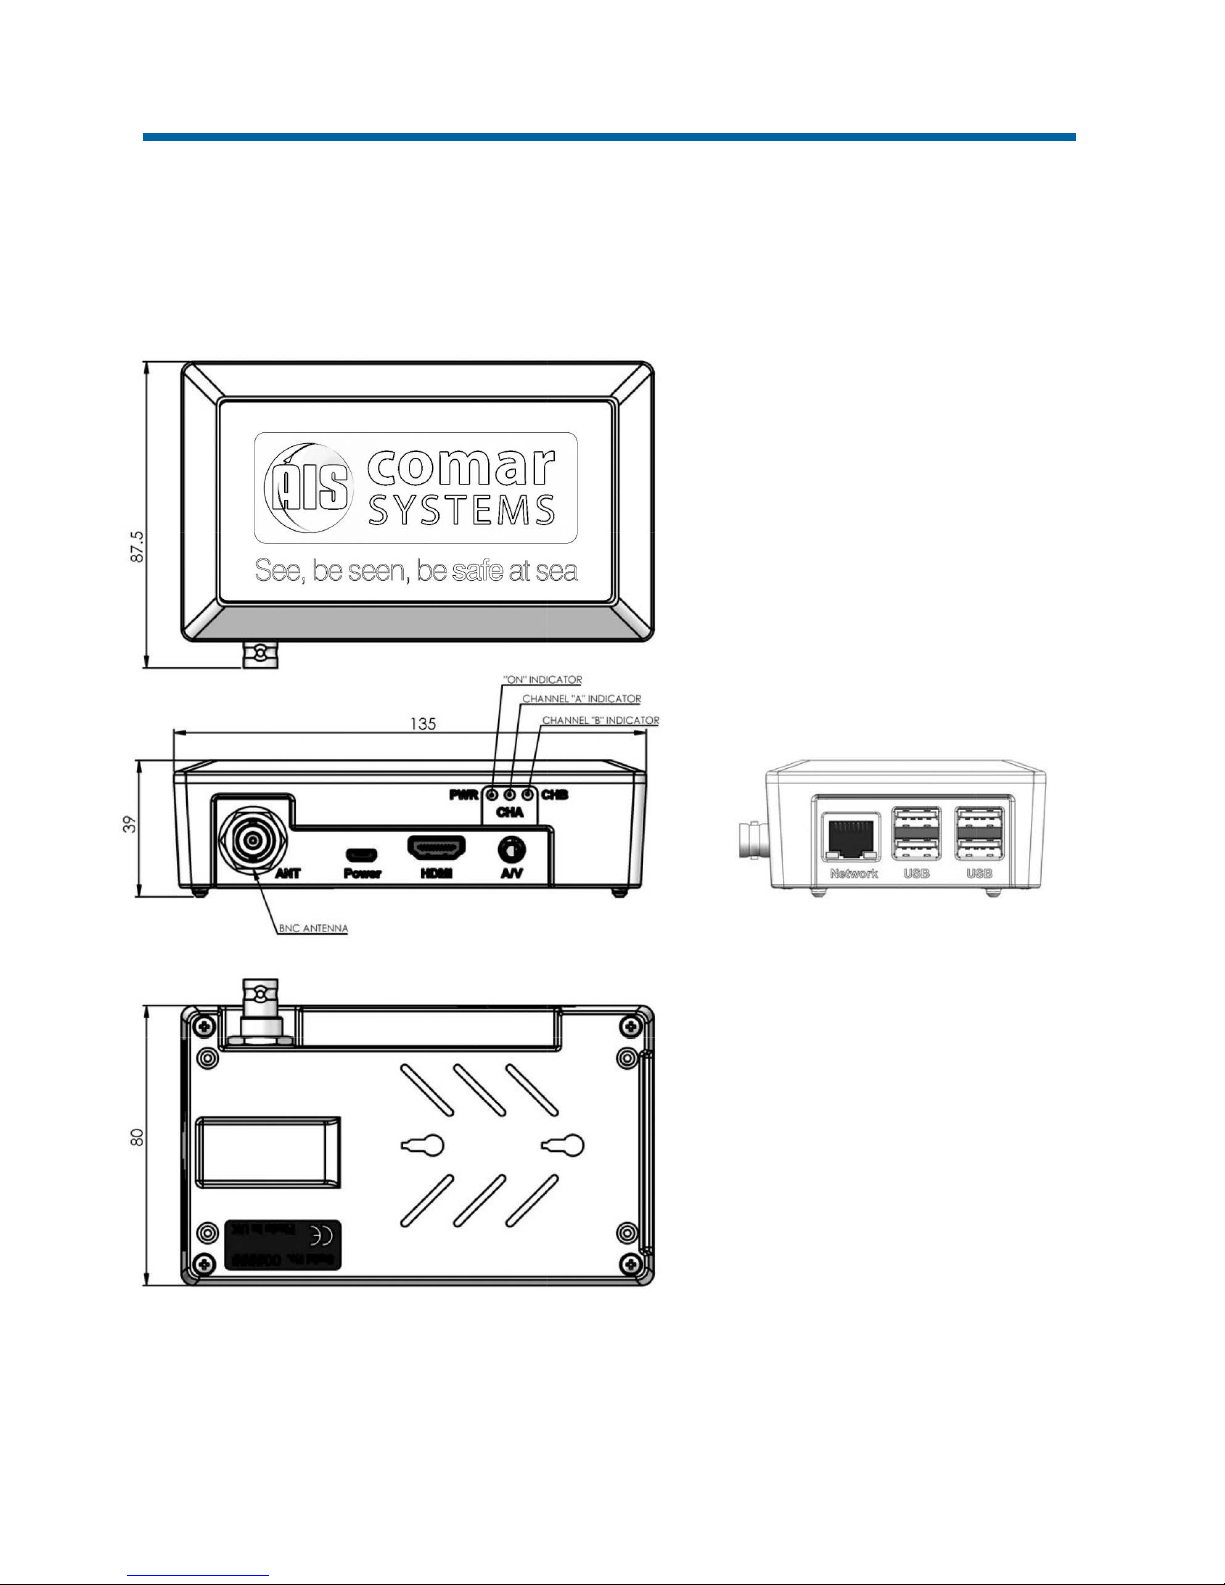
6MAJOR DIMENSIONS............................................................................ 10
7INSTALLATION....................................................................................... 11
7.1 Mounting ..........................................................................................................11
7.2 Power Supply ...................................................................................................11
7.3 Antenna Installation.......................................................................................... 11
8CONFIGURATION.................................................................................. 12
8.1 Installing Open Source Software...................................................................... 12
8.2 Requirements................................................................................................... 12
8.3 Installing the Raspbian OS...............................................................................13
8.4 Enabling the Serial Port.................................................................................... 13
8.4.1 Setting and testing the serial port to receive AIS data ........................ 15
8.5 Installing OpenCPN..........................................................................................16
8.5.1 Option 1: A complete installation including the Raspbian OS ............ 16
8.5.2 Option 2: Installing OpenCPN after installing the Raspbian OS ......... 16
8.5.3 Configure the OpenCPN ..................................................................... 17
8.5.4 Option 3: Installing OpenCPN with all available plugins ..................... 18
9FAULT FINDING..................................................................................... 19
9.1 Power LED not illuminating .............................................................................. 19
9.2 Channel Indicators A & B do not flash ............................................................. 19
10 SPECIFICATION..................................................................................... 20
10.1 Physical ............................................................................................................ 20
10.2 Electrical and Electronic................................................................................... 20
10.3 Operational.......................................................................................................20
10.4 Approvals .........................................................................................................21
10.5 Environmental .................................................................................................. 21
10.6 Additional Information ......................................................................................21

SLR350Ni
4
11 SAFETY AND SECURITY ........................................................................22
12 LIMITED WARRANTY..............................................................................22
13 APPENDIX 1 – Background to AIS..........................................................23

SLR350Ni
5
1SLR350Ni INTELLIGENT AIS RECEIVER with WiFi

SLR350Ni
6
2DOCUMENT
2.1 About This Manual
This Manual provides installation, operating Instructions and fault-finding procedures for the
equipment to which it relates.
This manual may also be made available in electronic Portable Document Format (PDF). In PDF
format, the following categories are all enabled as active hyperlink references: (1) The titles of each
section; (2) document cross-references; (3) the table of contents.
This document may therefore be navigated quickly and effectively by using a mouse or other pointing
device to activate each of these hyperlinks. This is a printer friendly document, designed to be
printed 2-sided as a booklet with A5 pages on A4 stock paper.
Document name: Date: Details: Author:
SLR350Ni-MA-v05r04 2017-12-19 First Released JS, AA

SLR350Ni
7
3NOTICE
3.1 Copyright
The copyright and all rights of a like nature in respect of this publication in any part of the world are
the property of COMAR SYSTEMS LTD. (COMAR).
No part of this document may be reproduced or transmitted in any form or by any means, whether
electronic, mechanical, photocopying, recording or otherwise, nor stored in any information retrieval
system of any kind, nor used for tendering or manufacturing, nor communicated to any other person
without the written permission of COMAR.
The recipient of this document, as its registered holder, must exercise due diligence in ensuring that
the above conditions are observed (Errors and Omissions Excepted).
Any enquires relating to this document or its contents should be addressed, in writing, in the first
instance to COMAR SYSTEMS LTD.
COMAR SYSTEMS
Vittlefields Technology Centre
Forest Road
NEWPORT
Isle of Wight
PO30 4LY
UNITED KINGDOM
tel:
+44 (0)1983 828900
email:
sales@comarsystems.com
web:
www.comarsystems.com
COMAR SYSTEMS
reserves the right to make changes to its products and specifications without notice

SLR350Ni
8
4GENERAL NOTICES
SAFETY: Make sure the power supply is switched off before you make any electrical
connections to the unit.
INSTALLATION: This equipment must be installed in accordance with the instructions
provided in this manual. Failure to do so could result in poor performance, personal injury
and/or damage to your vessel and/or connected equipment.
CABLES: The supplied cables should only be cut, shortened or lengthened by an
appropriate supplier.
In accordance with a policy of continual development and product improvement, hardware and
software may be upgraded from time to time, and future versions of equipment may therefore not
correspond exactly with this manual.
When necessary, upgrades to the product will be accompanied by updates or addenda to this
manual. Information contained in this manual is liable to change without notice.
Comar Systems Ltd. disclaims any liability for consequences arising from omissions or inaccuracies
in this manual and any other documentation provided with this product.

SLR350Ni
9
5INTRODUCTION
The SLR350Ni from Comar Systems is a compact, dual channel synthesized VHF AIS Receiver
equipped with Ethernet, WiFi and USB Interfaces for land-based, shore side monitoring. It is
designed to receive and decode all AIS transmissions from vessels fitted with Class ‘A’ or ‘B’ AIS
transceivers, Aids to Navigation, and SART.
The SLR350Ni is based on the popular Raspberry Pi™31mini-computer and is optimised for coastal
monitoring of AIS equipped marine traffic. The SLR350Ni is primarily intended for developers to
implement within their own AIS monitoring networks. With compatible plotting software - for example,
OpenCPN2- AIS data can be received from vessels within range of the antenna and displayed on a
monitor in a visual representation.
●Before operating the unit you should familiarise yourself with this user manual
●The SLR350Ni is intended to be developed continually, therefore this manual should be
considered as a guide
5.1 Parts List
On delivery, carefully inspect the contents of the packing case. Note any damage or any missing
items. Ensure that the correct parts are included for your application.
1For the latest information on Raspberry Pi™computers and operating systems please refer to
raspberrypi.org
2OpenCPN: Open source Chart Plotter Navigation software. For the latest information on
OpenCPN software please refer to opencpn.org
Item: Description: No.
included:
COMAR
SKU Number:
1 SLR350Ni AIS Receiver - Unit 1 001-1047
2 Universal Power Supply 1 004-7128

SLR350Ni
10
6MAJOR DIMENSIONS
All dimensions mm:

SLR350Ni
11
7INSTALLATION
7.1 Mounting
Before starting installation select a suitable location. The SLR350Ni from COMAR SYSTEMS is
intended to be used indoors as part of a land-based installation. It should be installed in a cool, dry
place away from excessive vibration and shocks and can be mounted to a suitable bulkhead or
shelf.
7.2 Power Supply
Fit the universal power supply3with the correct adaptor for your local power. Connect the Antenna
& Ethernet cables first. Lastly, connect the power cable by plugging the micro-USB power jack into
the micro-USB socket on the side of the SLR350Ni, see section 6 MAJOR DIMENSIONS. Provided
that the unit is configured correctly, the receiver will immediately begin the boot process. Refer to
section 8 CONFIGURATION.
7.3 Antenna Installation
A VHF antenna for receiving AIS signals is not included in this package. The minimum requirements
of an antenna suitable for AIS are:
●Marine VHF band reception (for maximum performance, centred at 162 MHz)
●Having a gain of 3 dB or more
●Omnidirectional
Shore based reception is governed by local terrain, however an open view to the sea with an antenna
mounted in the clear, at a height of approximately 20 metres will achieve a reception range of 25
nautical miles or more. A higher gain antenna can be used on shore to further increase the coverage.
COMAR SYSTEMS has a range of antennas available; we recommend the AIS-GPA unit with ground
plane for use with the SLR350Ni.
●The higher the antenna is located, the greater the range.
●Mount the antenna with a relatively clear view of the horizon. Large obstructions that might shade
the antenna should be avoided.Try to maintain a short RF cable run, preferably 10 m or less for
the RG-58 cable type or 20 m for the RG-213 type.
●Normally an omni-directional antenna is recommended; however a directional antenna such as
a 3 element Yagi can be used to greatly increase performance in one particular direction.
●In order to protect the antenna installation from the elements and avoid water ingress, please
apply waterproof sealant to both the RF connector and at the point where the sub-assemblies
connect to the main body.
3In the unlikely event of power supply failure it is possible to use any micro-USB plug pack
capable of delivering 1.2 A of power, e.g. a phone or a tablet charger.

SLR350Ni
12
8CONFIGURATION
This manual is intended to instruct in the installation of open source software on the Comar
SLR350Ni. Third party proprietary networked implementations of the SLR350Ni are outside the
scope of this manual. The micro computer embedded in the SLR350Ni is a Raspberry Pi 3™ unit.
8.1 Installing Open Source Software
The SLR350Ni is shipped without software and can be installed with any operating system that works
on the Raspberry Pi 3™ micro computer. Full information and additional details can be found on the
Raspberry Foundation website: https://www.raspberrypi.org/
The SLR350Ni can run a number of operating systems and these are listed and explained on the
official Raspberry Foundation website. Comar Systems recommend using Raspbian, the official
operating system (OS) for the Raspberry Pi, which is a Linux based OS. The following information
is based on the assumption that you will be using Raspbian. It is an open source operating system
and can be freely downloadable from the internet.
The examples in this section are based on the Raspbian OS. This section describes examples of
how to download and install software to receive data from the SLR350Ni in two stages:
1. To be able to view the data as a NMEA feed
2. To install OpenCPN charting software to view the position of vessels in a charting
application
OpenCPN is an open source application. Refer to the OpenCPN website: opencpn.org
8.2 Requirements
You will need the following:
1. The Comar SLR350Ni and power supply
2. A MicroSD data storage card. Comar recommends a high quality branded card of at least
8 GB capacity
3. USB Mouse and keyboard or USB Bluetooth
4. A monitor with an HDMI4connection
5. A connection to the internet, either using Wi-Fi or ethernet via the RJ45 port. Comar
always recommends using a direct cable connection via the RJ45 port while installing the
system software
6. A VHF antenna to connect to the BNC connection of the SLR350Ni. Comar recommends
the AIS-GPA antenna for receiving AIS data transmitted from marine traffic
7. A computer (PC or Mac) connected to the internet
4High-Definition Multimedia Interface

SLR350Ni
13
8.3 Installing the Raspbian OS
Raspbian is the official Operating System for the Raspberry Pi Foundation. You have two options to
install Raspbian on an SD card:
1. The New Out Of Box Software (NOOBS)option
2. Installing an SD image directly
We recommend the NOOBS option.
•To install the Raspbian OS, follow this easy guide for both options:
https://www.raspberrypi.org/learning/software-guide/quickstart/
There are two versions of the operating system:
1. A full operating system with graphical user interface and networking
2. A ‘lite’ version with no graphical user interface and reduced functionality.
The instructions below are based on installing the full GUI version of Raspbian.
Once you have installed the operating system you will want to get access to the AIS data from the
inbuilt AIS receiver. The AIS data is a NMEA stream on the internal serial port and once set up it
can be viewed, stored or transferred to an application or other device.
To use the AIS receiver you have to enable the serial port and set the communication parameters.
This applies to all uses of the SLR350Ni; see below.
8.4 Enabling the Serial Port
In the later Jessie5releases the GPIO serial port is disabled by default. In order to enable it, you will
need to edit config.txt using the terminal emulator on the toolbar, as follows:
Once you have Raspbian running on Raspberry Pi, go to Menu →Accessories →Terminal, and
type:
sudo nano /boot/config.txt
A text editor will open. Move the cursor to the end of the file and add this line:
enable_uart=1
This will also lock the cpu core frequency for you so there’s nothing else you need to do.
(The full command for locking the CPU core frequency is: core_freq=250 which you add to the same
file as well).
core_freq=250
Save the file by pressing Ctrl+X, say Yes and press enter. Reboot for the changes to take effect.
5May 2016

SLR350Ni
14
Now type:
sudo reboot
This will restart the system.
Once the SLR350Ni is back up and running, check the status of the serial port.
Go to Menu →Accessories →Terminal, and type:
$ ls –l /dev
•NOTE: Use lower case ‘L’ not ‘1’ or any other character
You should see the serial port ttyS0 with the alias of serial0 displayed part way down the list:
The next step is to disable the remote console which by default uses the internal serial port ttyS0
which is also the same serial port the AIS receiver uses in the SLR350Ni. To do this, type:
$ sudo systemctl disable serial-getty@ttyS0.service
You also need to remove the console from the cmdline.txt. You edit this with the following line:
$ sudo nano /boot/cmdline.txt
You will then see a response similar to this:
dwc_otg.lpm_enable=0 console=serial0,115200 console=tty1 root=/dev/mmcblk0p2
rootfstype=ext4 elevator=deadline fsck.repair=yes root wait
Remove the text:
console=serial0,115200
The code should now look something like this:
dwc_otg.lpm_enable=0 console=tty1 root=/dev/mmcblk0p2 rootfstype=ext4 elevator=deadline
fsck.repair=yes root wait
Save the file by pressing Ctrl+X, use option Yes and press Enter. Reboot for changes to take effect.
$ sudo reboot
Finally you need to set the speed and enable the port ttyS0 for the AIS stream.

SLR350Ni
15
8.4.1 Setting and testing the serial port to receive AIS data
First, set the serial port to the Baud rate of 38400:
$ stty –F /dev/ttyS0 38400
Make sure that the AIS antenna is connected. You should now be receiving AIS data on the internal
serial port. Check that the red LEDs on the side of the SLR350Ni are flashing; these indicate data
being received.
To check that the data sentences being received are formatted correctly you will need to examine
the data. This can be done either on the screen or by redirecting it to a file as follows:
$ cat /dev/ttyS0 > ./test.txt
This command line will put all the data received into a file named ./test.txt which can then be viewed:
$ more ./test.txt
You will see something like this formatted AIS data:
If strange characters are displayed or data sentences are not formatted correctly then the Baud rate
settings may need checking for the serial port. In this case, repeat the procedure for setting up the
serial port.

SLR350Ni
16
8.5 Installing OpenCPN
OpenCPN works on Raspberry Pi 3™ model which is embedded in the Comar SLR350Ni. There are
three options for installing OpenCPN:
8.5.1 Option 1: A complete installation including the Raspbian OS
If you feel lazy you can use OpenPlotter, a complete marine Operating System for Raspberry Pi with
the Raspbian OS, OpenCPN and plugins installed and extra tools ready to use. OpenPlotter can be
installed with ‘NOOBS’ (New Out Of Box Software) by following this online guide:
https://sailoog.gitbooks.io/openplotter-documentation/content/en/getting_started.html
8.5.2 Option 2: Installing OpenCPN after installing the Raspbian OS
You can install OpenCPN by adding an Ubuntu PPA (Personal Packages Archives) to your system's
Software Sources. To do this, first install the Rapsbian OS as described previously and enable the
serial port, checking that AIS data is being received on the serial port, as described previously. Then
add OpenCPN in the next steps.
Once you have Raspbian running on Raspberry Pi, go to: Menu →Accessories →Terminal, and
type:
$ sudo nano /etc/apt/sources.list
A text editor will open. Move the cursor to the end and add this line:
$ deb http://ppa.launchpad.net/opencpn/opencpn/ubuntu/ trusty main
Save the file pressing Ctrl+X, say Yes and press enter. Now type:
$ sudo apt-key adv --keyserver keyserver.ubuntu.com --recv-keys C865EB40
and press enter. Now be sure you have an Internet connection and type:
$ sudo apt-get update
The Software sources will be updated and finally you will have to type:
$ sudo apt-get install opencpn
Confirm install with Yand hit enter.

SLR350Ni
17
8.5.3 Configure the OpenCPN
Start OpenCPN from the GUI.
On the menu -> option -> connections
Add a connection ->Serial
Set Baud Rate 38400
Select Port /dev/ttyS0
Click the Apply button and the setup is complete.

SLR350Ni
18
8.5.4 Option 3: Installing OpenCPN with all available plugins
Once you have Raspbian running on Raspberry Pi, go to Menu →Accessories →Terminal, and
type:
$ sudo apt-get install opencpn*
If you get an error doing this, you will have to install the plugins individually by typing:
$ sudo apt-get install opencpn-plugin-watchdog
$ sudo apt-get install opencpn-plugin-statusbar
If a new version of OpenCPN is released, just type:
$ sudo apt-get update
$ sudo apt-get install opencpn
You should now be up and running with the SLR350Ni displaying NMEA data either from the serial
port or on a visual chart plot.

SLR350Ni
19
9FAULT FINDING
9.1 Power LED not illuminating
Check the power supply and that the unit is connected to a 5 V dc power source capable of providing
an operating current of 1.2 A minimum
Check that the micro-USB cable is correctly connected and that the cable and socket are not
damaged.
9.2 Channel Indicators A & B do not flash
Check that the VHF antenna is correctly connected
Check that the antenna is correctly positioned, i.e. at a direct line of sight to nearby vessels
Check that the antenna body and cable connectors are free of corrosion and moisture

SLR350Ni
20
10 SPECIFICATION
10.1 Physical
Weight: 600 g
Dimensions: L 130 x W 105 x H 46 mm
Mounting: 2 holes in chassis back
Connections:
Power: Micro USB
Antenna: BNC Connector (50Ωantenna impedance)
Ethernet: RJ45
USB: Type ‘B’ x4
Finish: Black plastic
10.2 Electrical and Electronic
Power supply: 5 V dc nominal
Operating Current: 900 mA (minimum) to 1200 mA (typical)
Onboard micro computer: Raspberry Pi 3™ (see footnote)6
10.3 Operational
Output Format: ITU / NMEA 0183
Output Message: VDM
AIS Receiver Frequency Range: Channel A 161.975 MHz
Channel B 162.025 MHz
Channel Spacing: 25 KHz
Sensitivity: > -112dBm @ 20% MER
Demodulation: GMSK
3x LED Indicators:
Green: Power
Red: Channel A Receiving
Red: Channel B Receiving
WiFi Band: 2.4 GHz (802.11n)
WiFi Security: WPA, WPA-PSK, WPA2 & WPS
Network: Must be DHCP enabled
6For the latest information and specifications on Raspberry Pi™micro computers and operating
systems please refer to raspberrypi.org
Table of contents