manuals.online logo
Brands
  1. Home
  2. •
  3. Brands
  4. •
  5. AK Pro Technology
  6. •
  7. Dj Equipment
  8. •
  9. AK Pro Technology Robot Light V1 User manual

AK Pro Technology Robot Light V1 User manual

Robot Light V1
User Manual
2
3
Please read over this manual before operating the light.
Introduction
Unpacking: Thank you for purchasing the Robot Light V1. Every Robot Light V1 has been
thoroughly tested and has been shipped in perfect operating condition. Carefully check the
shipping carton for damage that may have occurred during shipping. If the carton appears to
be damaged, carefully inspect your fixture for any damage and be sure all accessories
which are necessary to operate the unit have arrived intactly. In the case damage has been
found or parts are missing, please contact the manufacturer or your dealer for further
instructions. Do not return this unit to your dealer without first contacting.
Introduction: The Robot Light V1 is a DMX intelligent LED light. This light is light and
compact which makes it a great piece for mobile DJ and clubs.
Warning! To prevent or reduce the risk of electrical shock or fire, do not expose this unit to
rain or moisture.
4
Caution! There are no user serviceable parts inside this unit. Do not attempt any repairs by
yourself, otherwise it will void your manufactures warranty. In the unlikely event your unit
may require service please contact the manufacturer or your dealer.
PLEASE recycle the shipping carton whenever possible.
General Instructions
To optimize the performance of this product, please read these operating instructions
carefully to familiarize you with the basic operations of this unit. These instructions contain
important safety information regarding the use and maintenance of this unit. Please keep
this manual with the unit, for future reference.
Features
Moving Head LED Beam/Wash
Battery Powered & Wireless DMX
Wireless Remote distance: 0-1000m
Battery last life: Serves 3-18 hours (All Leds on, Auto running mode)
Color: CREE LEDs RGBW / Red, Green, Blue, White (Optional: 5in1/6in1/7in1)
Display: 1.77 TFT
Voltage: AC100-240V, 50-60HZ
Total power consumption: 65w
Beam angle: Φ52 mm, 39° Fresnel lens.
Spotlight and floodlight lens can be optional
With casters and quick lock on the base, can be moved easily.
X:Endless Rotating Scanning
Y:Manual Adjustment
DMX Channels : 10/12/14CH
Dimensions: 1) 18.5*18.5*99CM [H(MIN)=99CM];2)18.5*18.5*220CM
[H(MAX)=220CM]。
Weight: 15.9KG
Safety Precautions
●To reduce the risk of electrical shock or fire, do not expose this unit to rain or moisture.
●Do not spill water or other liquids into or on to your unit.
●Be sure that the local power outlet matches the required voltage of your unit.
●Do not attempt to operate this unit if the power cord has been frayed or broken. Do not
attempt to remove or break off the ground prong from the electrical cord. This prong is used
to reduce the risk of electrical shock and fire in case of an internal short circuit.
●Disconnect from main power before making any type of connection.
●Do not remove the cover under any conditions. There are no user serviceable parts
inside.
5
●Never operate this unit when it’s cover is removed.
●Never plug this unit in to a dimmer pack.
●Always be sure to mount this unit in an area that will allow proper ventilation. Allow about
6” (15cm) between this device and a wall.
●Do not attempt to operate this unit, if it is damaged.
●This unit is intended for indoor use only, using this product outdoors will void all
warranties.
●During a long period of non-use, disconnect the unit’s main power.
●Always mount this unit in safe and stable matter.
●Power-supply cords should be routed so that they are not likely to be walked on or
pinched by items placed upon or against them, paying particular attention to the point they
exit from the unit.
●Cleaning -The fixture should be cleaned only as recommended by the manufacturer. See
“Cleaning” for details.
●Heat -The appliance should be situated away from heat sources such as radiators, heat
registers, stoves, and other appliances (including amplifiers) that produce heat.
●The fixture should be serviced by qualified service personnel when:
A. The power-supply cord or the plug has been damaged.
B. Objects have fallen, or liquid has been spilled into the appliance.
C. The appliance has been exposed to rain or water.
D. The appliance does not appear to operate normally or exhibits a marked change in
performance
●Fuse standard is 2A/250V
●Grounded using yellow/green line
●The ambient temperature must always be under +35° C
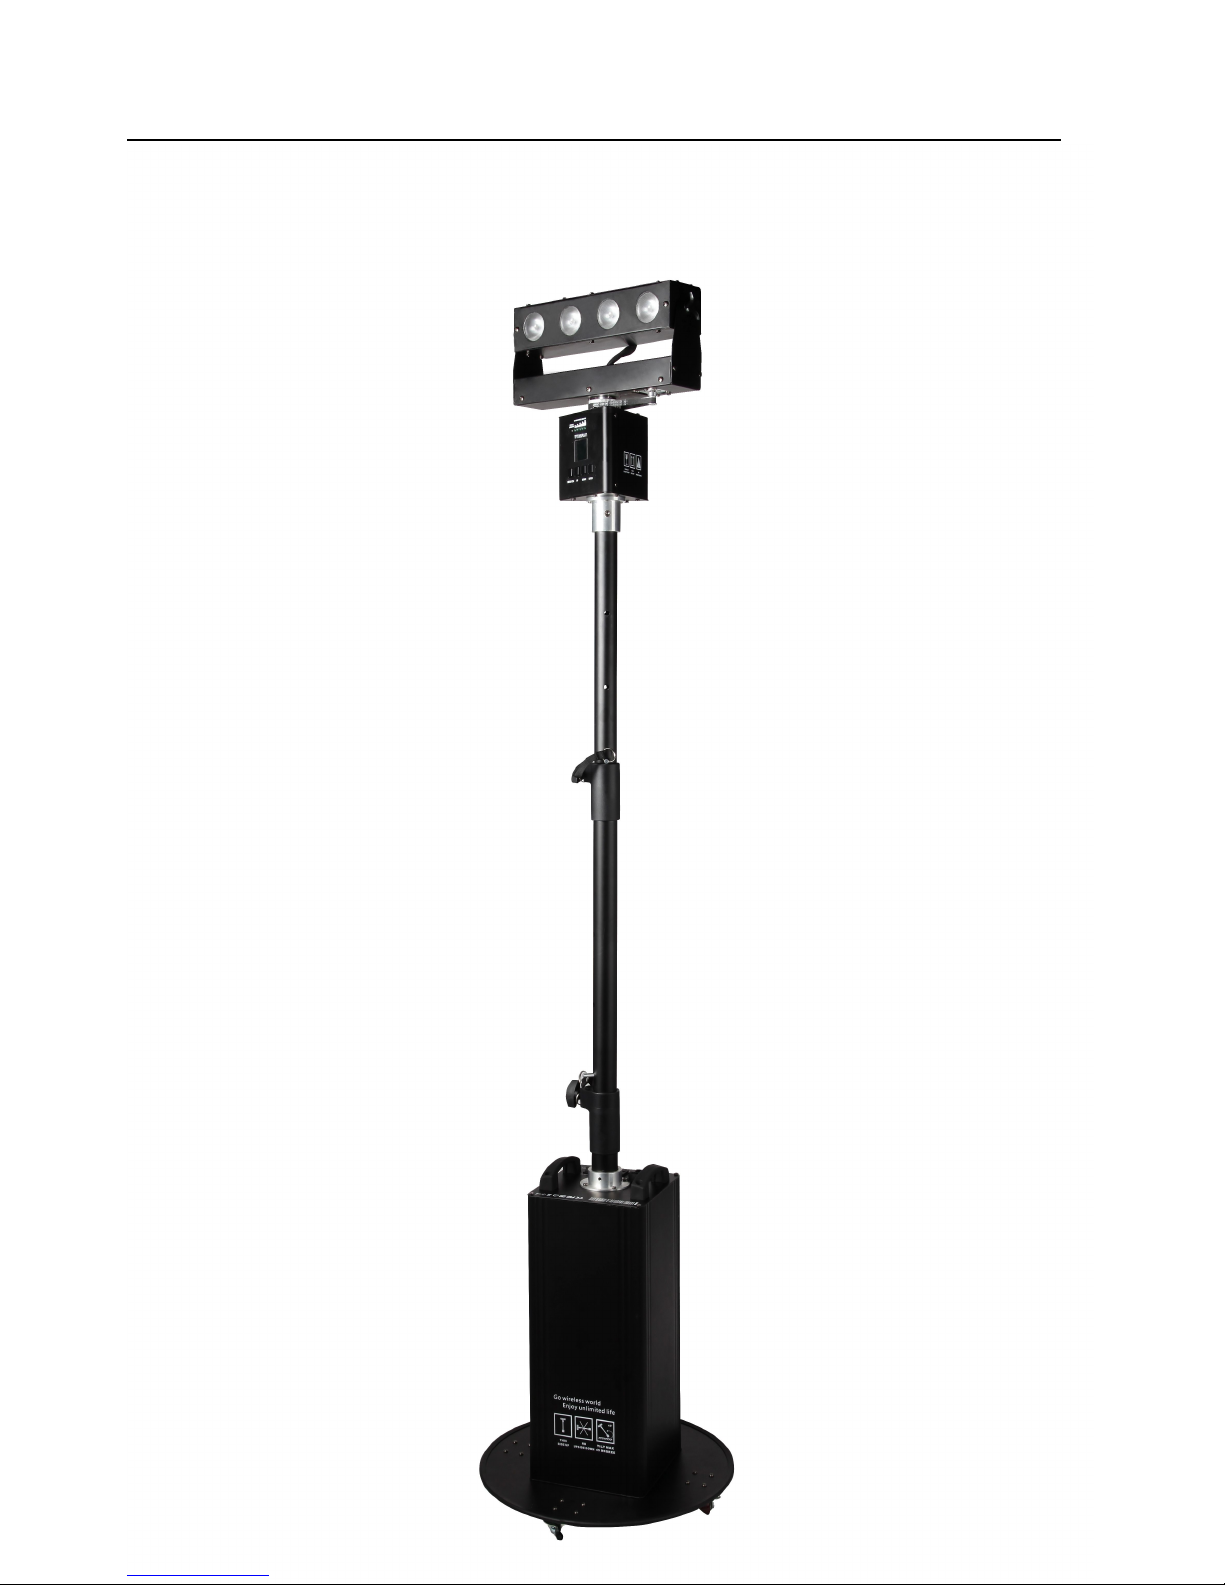
Set Up
Power Supply: Before plugging your unit in, be sure the source voltage in your area
matches the required voltage of your Robot Light V1. The Robot Light V1 is workable in
95-240V/50~60Hz. Because line voltage may vary from venue to venue, you should be sure
your unit voltage matches the wall outlet voltage before attempting to operate you fixture.
DMX Linking: To ensure proper DMX data transmission, when using several DMX fixtures,
try to use the shortest cable path possible. The order in which fixtures are connected in a
DMX line does not influence the DMX addressing. For example, a fixture assigned a DMX
address of 1 may be placed anywhere in a DMX line, at the beginning, at the end, or
anywhere in the middle. When a fixture is assigned a DMX address of 1, the DMX controller
knows to send DATA assigned to address 1 to that unit, no matter where it is located in the
DMX chain.
Operating Instructions
Operating Modes: You can use the Robot Light V1 in 6 ways:
6
DMX control-This function will allow you to control each individual fixtures traits with a
standard DMX 512 controller
Infrared Remote-This unit can be remotely controlled by an infrared remote controller.
Sound Active-The unit will be activated by the sound signal
Master/Slave-Set at the Master Mode, the unit can control other units set at the Slave
Mode
Endless Rotating Horizontal Motor
Marquee Charge Indicator
DMX Mode: Operating through a DMX controller gives users freedom to create their own
programs tailored to their own individual needs. This function also allows you to use your
fixtures as pattern changing lights.
1. This function will allow you to control each individual fixture’s traits with a standard DMX
512 controller.
2. The The Robot Light V1 uses 10 / 12/14 CH channels to operate. Please see “DMX
Values and Functions” for the DMX traits.
3. To run your fixture in DMX mode, plug in the fixture via the XLR connections to any
standard DMX controller. Set your desired DMX address following the set up specifications
that come with your DMX controller .
4. The unit can automatically recognize the DMX signal once the DMX connection is done.
DMX Values and Functions
Mode
Channel
Values
10CH
1CH
RED
000-255
2CH
GREEN
000-255
3CH
BLUE
000-255
7
4CH
WHITE
000-255
5CH
Motor
000-255
6CH
Motor forward
000-255
7CH
Motor reversal
000-255
8CH
Auto
Off
000-015
Auto1
016-025
Auto2
026-050
Auto3
051-075
Auto4
076-100
Auto5
101-125
Auto6
126-150
Auto7
151-175
Auto8
176-200
Auto9
201-255
12CH
1CH
ALL
000-255
2CH
RED
000-255
3CH
GREEN
000-255
4CH
BLUE
000-255
5CH
WHITE
000-255
6CH
Motor
000-255
7CH
Gradual (speed)
000-255(From slow
to fast)
14CH
1CH
ALL
000-255
2CH
RED
000-255
3CH
GREEN
000-255
4CH
BLUE
000-255
5CH
WHITE
000-255
8
6CH
Motor
000-255
7CH
Strobe
000-255
Touch Buttons
There are four touch buttons under the LED display: Menu, Down, Up, Enter. Normally, the
LED will display the current DMX address code of the fixture. At this time, press Menu to
choose the function you want to set up. Press and hold Up or Down to fast scrolling within
the menu options. When an option is flashing the LED display, press Enter to confirm and
Menu to exit.
1. Press the MENU button and UP button or DOWN button until A001 is displayed, then
press ENTER
2.
Channel Set
Value
0-255
Channel
10CH
12CH
14CH
Master Slave
MAST
SLAV
Operation mode
Auto
000-010
Fade
001-010
Sound
001-002
Color adjustment
Red
000-255
Green
000-255
Blue
000-255
White
000-255
Function set
Motor
000-255
Wireless
0FF/ON
ID
000-015
9
IR
0FF/ON
Language Set
Chinese
English
System Set
Version
TRPRO-LB44IN1V.1-00
ON/OFF
00H00M00S
Running time
00000Hour00Minute
Power
001-100%
Temperature
Operation mode
Infrared remote control
To control the fixture you must aim the controller at the front of the fixture .
To used the remote control, you must first activate the fixture’s infrared receiver,
To activate the fixture’s infrared receiver you should press the button MAST on the remote
control. When the display screen shows “yes” which means the light is on master mode,
press “Slav” to chose the slave mode.
10
Cleaning
Due to fog residue, smoke, and dust cleaning the internal and external optical lenses must
be carried out periodically to optimize light output.
11
1. Use normal glass cleaner and a soft cloth to wipe down the outside casing.
2. Clean the external optics with glass cleaner and a soft cloth every 20 days.
3. Always be sure to dry all parts completely before plugging the unit back in.
Cleaning frequency depends on the environment in which the fixture operates (i.e. smoke,
fog residue, dust, dew).
Trouble Shooting
Listed below are a few common problems the user may encounter, with solutions.
Unit does not respond to DMX:
1. Check whether the DMX cables are connected properly and wired correctly (pin 3 is “hot”;
on some other DMX devices pin 2 may be ‘hot’). Also, check whether all cables are
connected to the right connectors; it does matter which way the inputs and outputs are
connected.
Unit does not respond to sound:
1. Quiet or high pitched sounds will not activate the unit. If problems are not resolved,
contact your dealer for service.
After-sales Policy (worldwide):
All our product against defects in materials and workmanship for a period of ONE (1) YEAR
from the date you received the goods.
If a defect exists:
(1) 7 Day Policy:
Contact us, send pictures or video to show the problem within 7 days from the date received
the goods. Send us back the defected products within 30 days, we will pay the shipping fee.
Once we have received the defected light, we will replace a new one for you, product &
shipping free of charge.
Over 7 days, consider to the following (2) policy applicable.
(2) 18 months Warranty:
Contact us, send pictures or video to show the problem, send us back the defected products,
customer bear the shipping cost. Once we have received the defected light, we will send out
immediately a new light to replace it, Product and shipping free of charges.
(3) Lifetime after-sale service and technical support.
You may connect 5 of the Robot Light V1 at most each time. The above policy is
not valid if customers connect them to any other high power equipments without
consulting with manufacture first.
12
All our products have special mark on the fixture body. Customers are not
allowed to open the fixtures. The above policy is not valid if customers open the
fixtures by themselves without informing us first. Then customers can only get
technical support only from us.
Note: All information is subject to change without prior notice.
2016-04-o1

This manual suits for next models

1

Popular Dj Equipment manuals by other brands

Maverick MK3 WASH Quick reference guide

Maverick

Maverick MK3 WASH Quick reference guide

PIONEER DJ DJM-A9 instruction manual

PIONEER DJ

PIONEER DJ DJM-A9 instruction manual

ETC High End Systems SolaWash 1000 user manual

ETC

ETC High End Systems SolaWash 1000 user manual

American DJ Barrel Flex User instructions

American DJ

American DJ Barrel Flex User instructions

thomann Stairville All FX Bar user manual

thomann

thomann Stairville All FX Bar user manual

JB-Lighting Varyscan 3 Special 250MSD user manual

JB-Lighting

JB-Lighting Varyscan 3 Special 250MSD user manual

Ovation E-260WW Quick reference guide

Ovation

Ovation E-260WW Quick reference guide

Chauvet Arena 3000 user manual

Chauvet

Chauvet Arena 3000 user manual

auna Dr. Bang LED user manual

auna

auna Dr. Bang LED user manual

Strand ACCLAIM LED CYC user manual

Strand

Strand ACCLAIM LED CYC user manual

PR Lighting LED Studio 3201D product manual

PR Lighting

PR Lighting LED Studio 3201D product manual

Luxibel B EXPO500TW user manual

Luxibel

Luxibel B EXPO500TW user manual

Ibiza COMBI-LAS user manual

Ibiza

Ibiza COMBI-LAS user manual

Viking VK200Z user manual

Viking

Viking VK200Z user manual

TECshow Cubex 360 user manual

TECshow

TECshow Cubex 360 user manual

Beamz PS40Z SPOT ZOOM quick start guide

Beamz

Beamz PS40Z SPOT ZOOM quick start guide

Chauvet Professional COLORado Batten 72X user manual

Chauvet Professional

Chauvet Professional COLORado Batten 72X user manual

Numark NS6 Service manual

Numark

Numark NS6 Service manual

manuals.online logo
manuals.online logoBrands
  • About & Mission
  • Contact us
  • Privacy Policy
  • Terms and Conditions

Copyright 2025 Manuals.Online. All Rights Reserved.