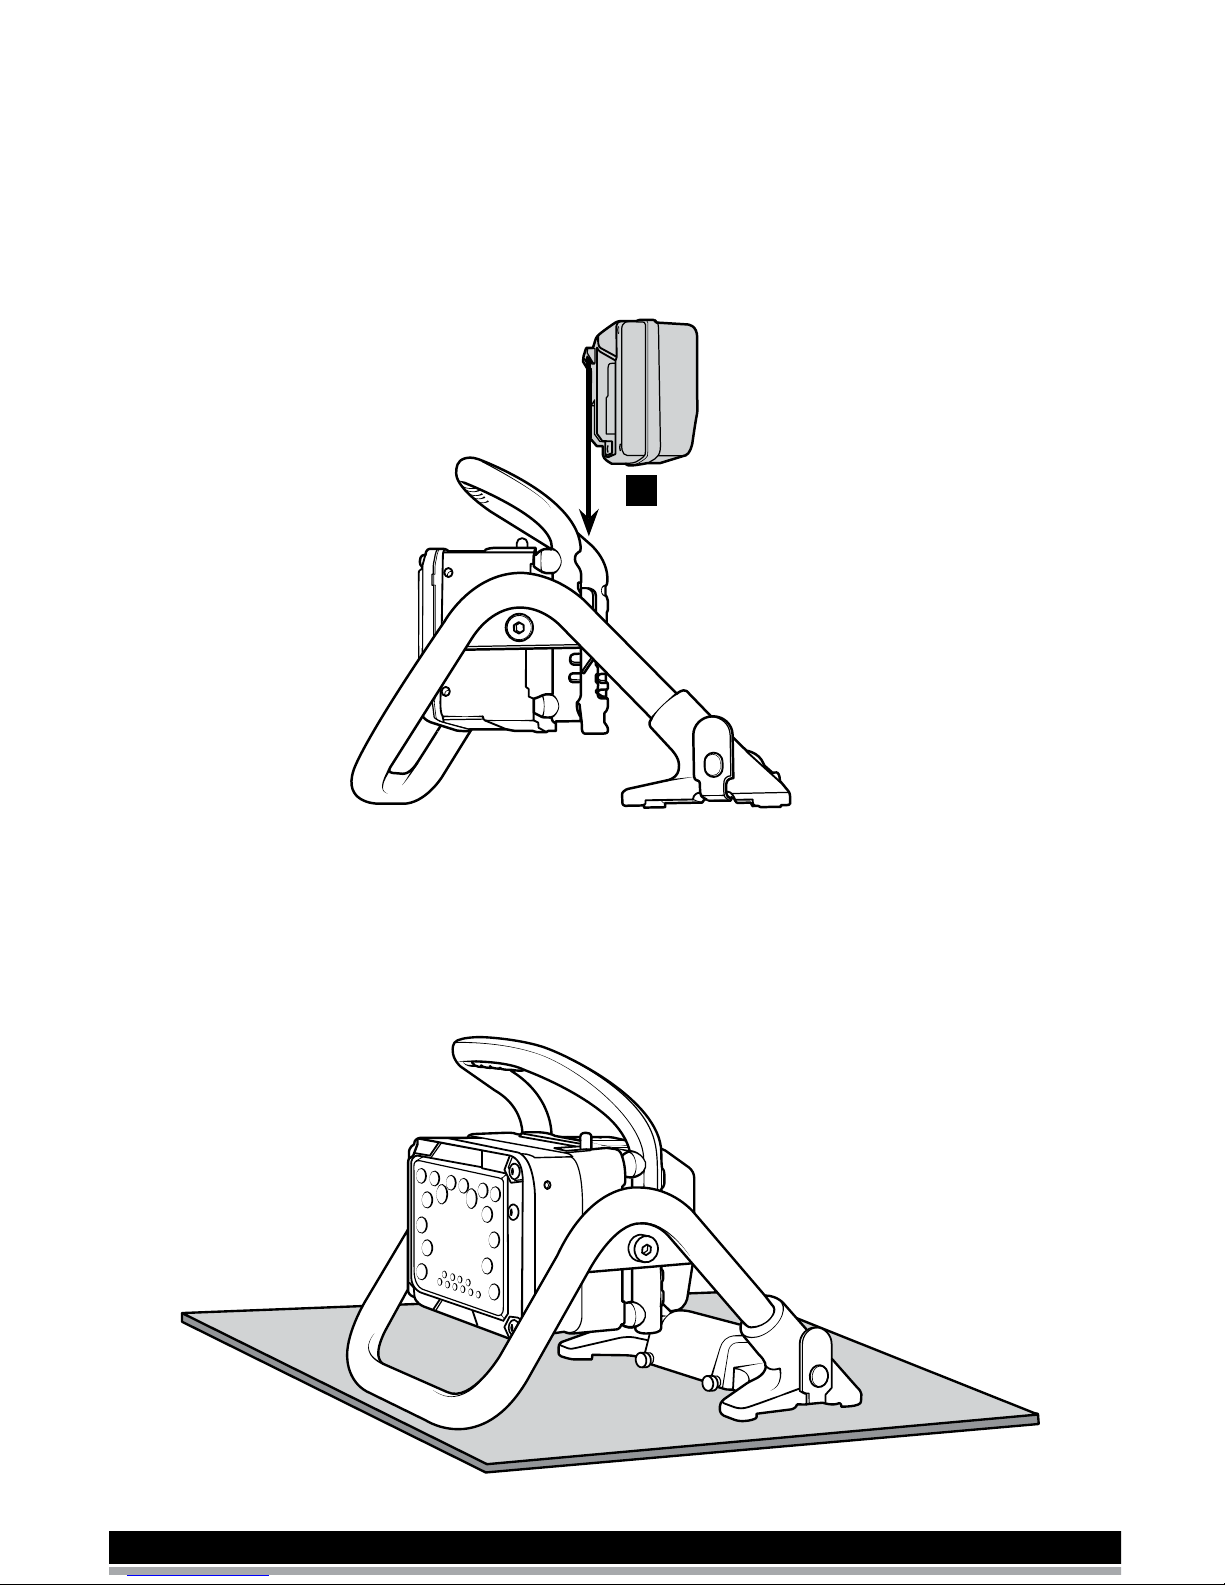
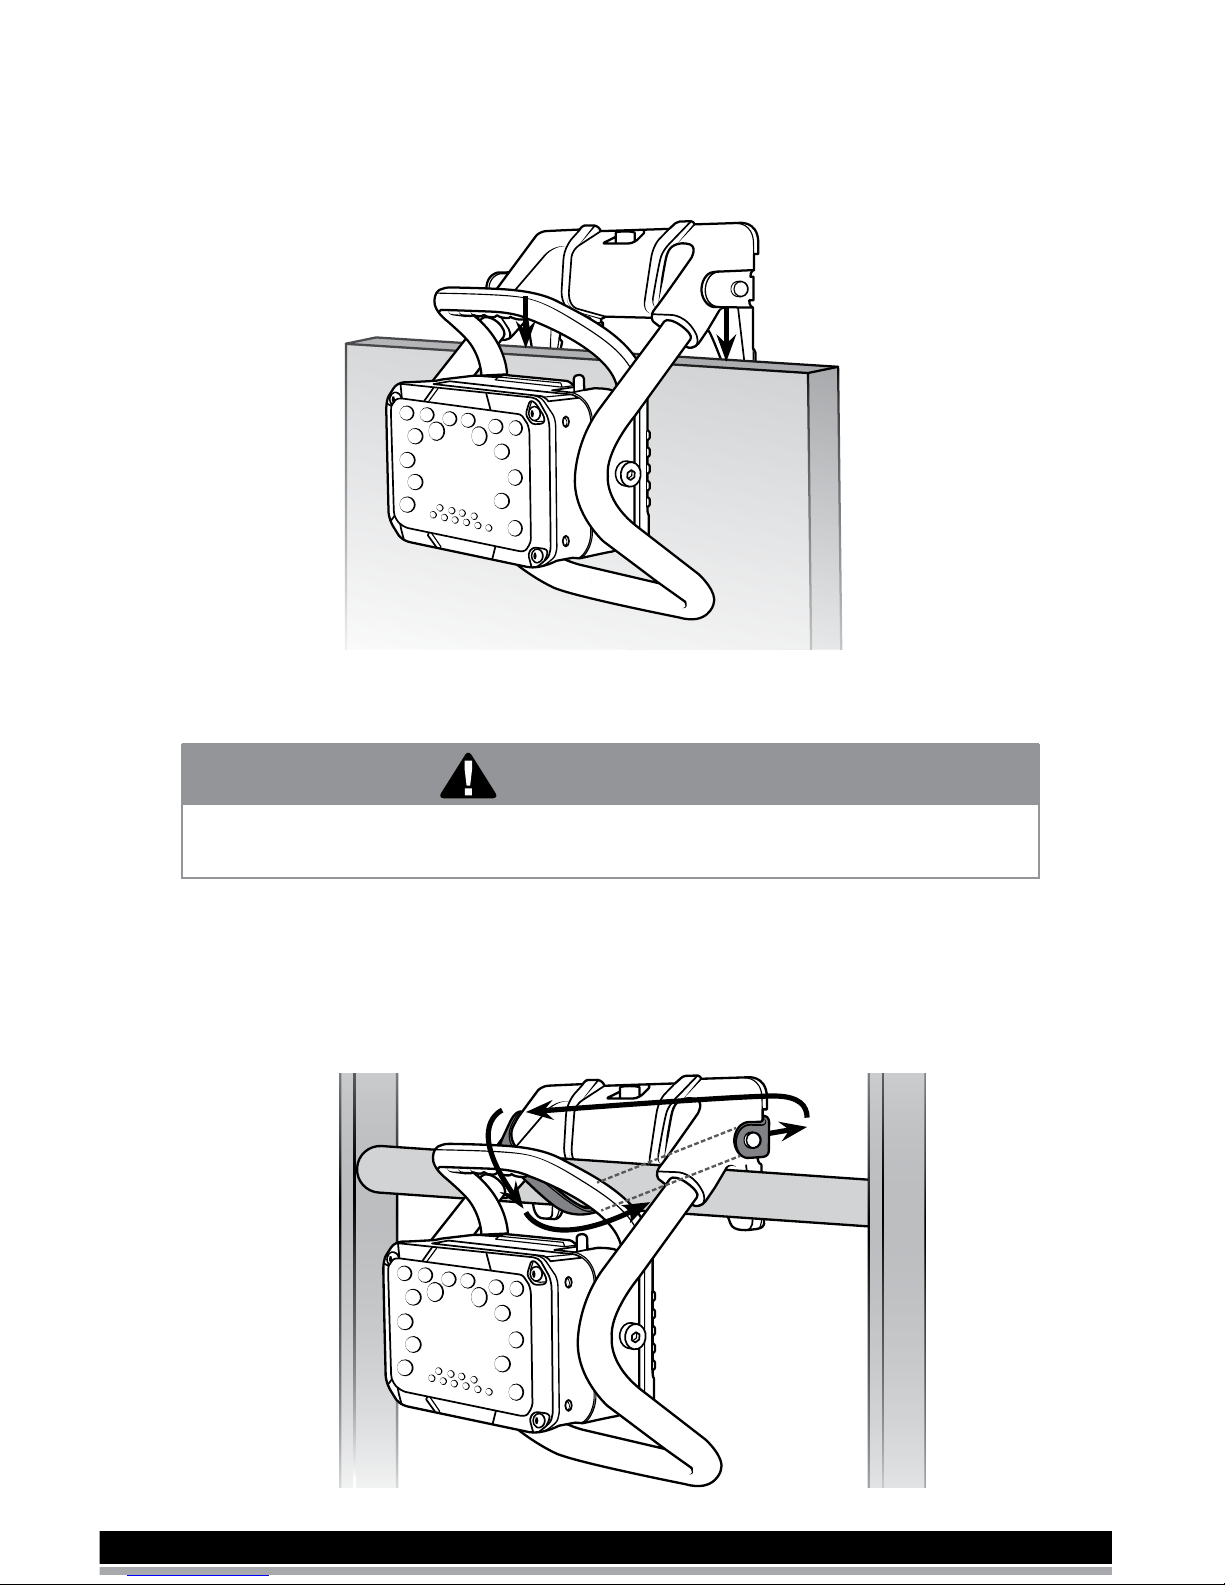
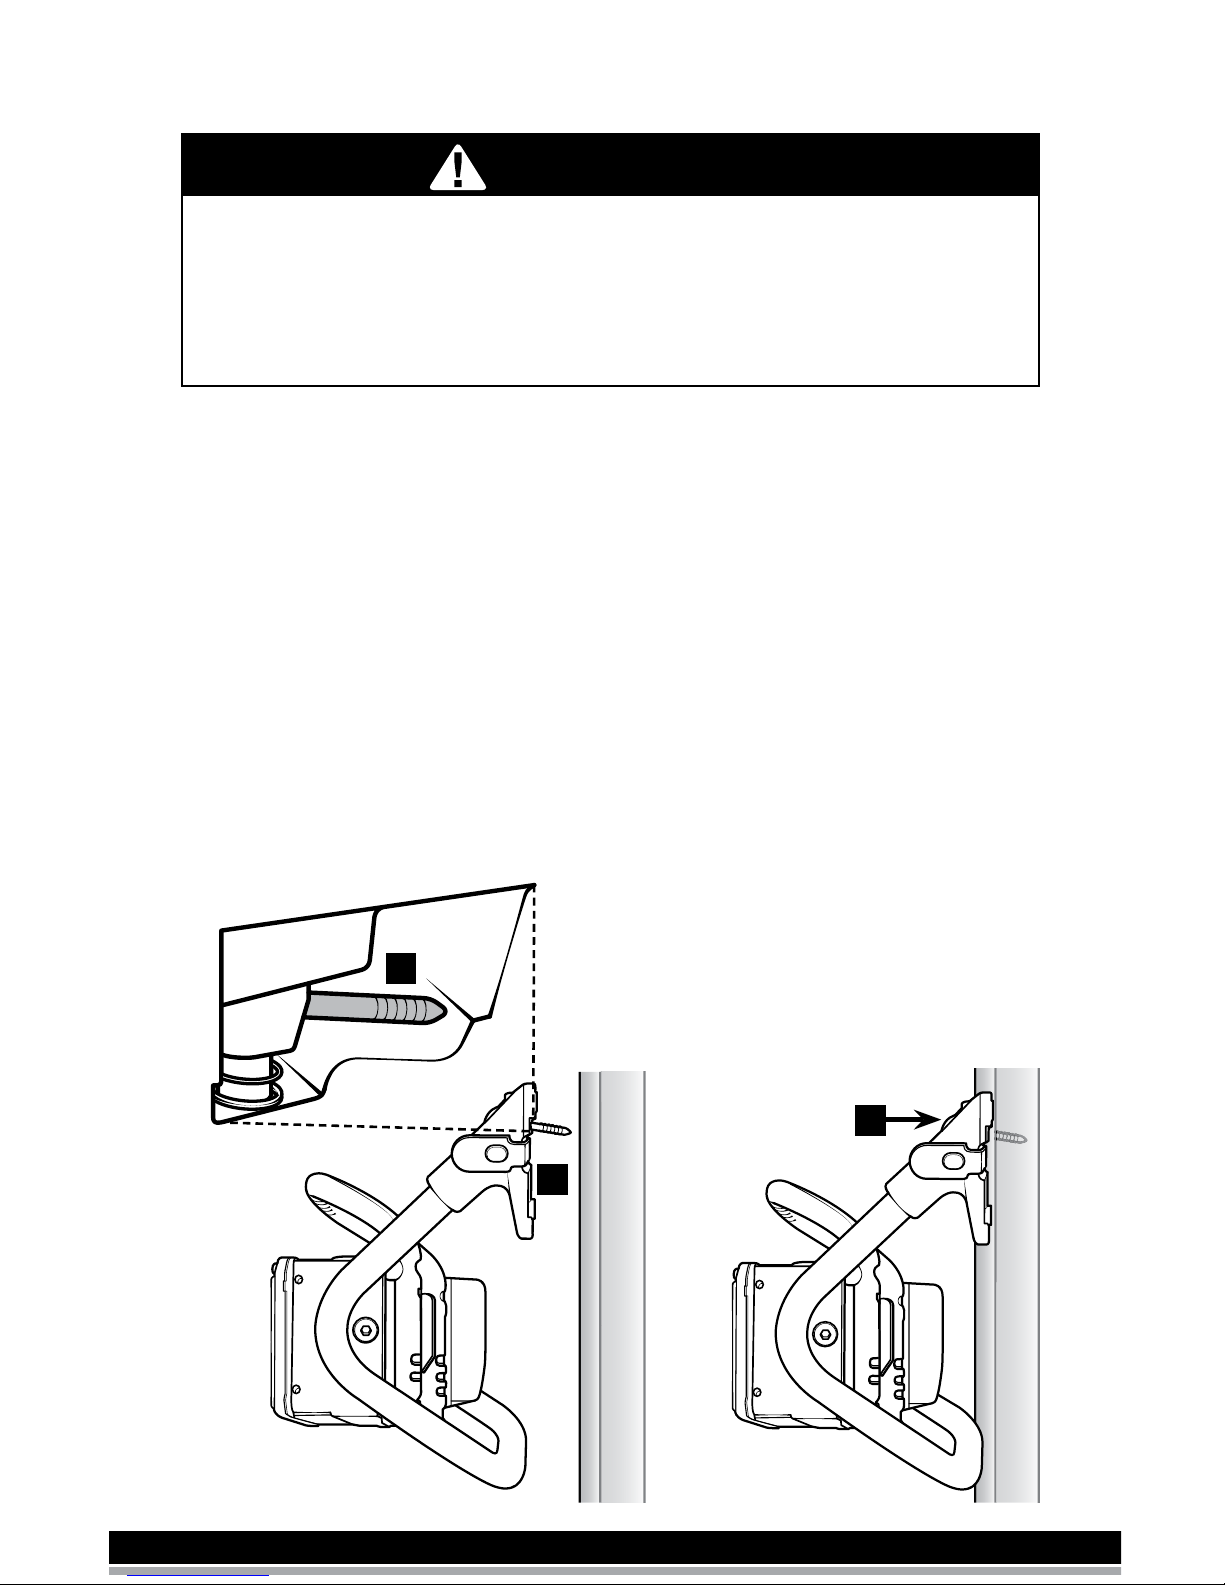
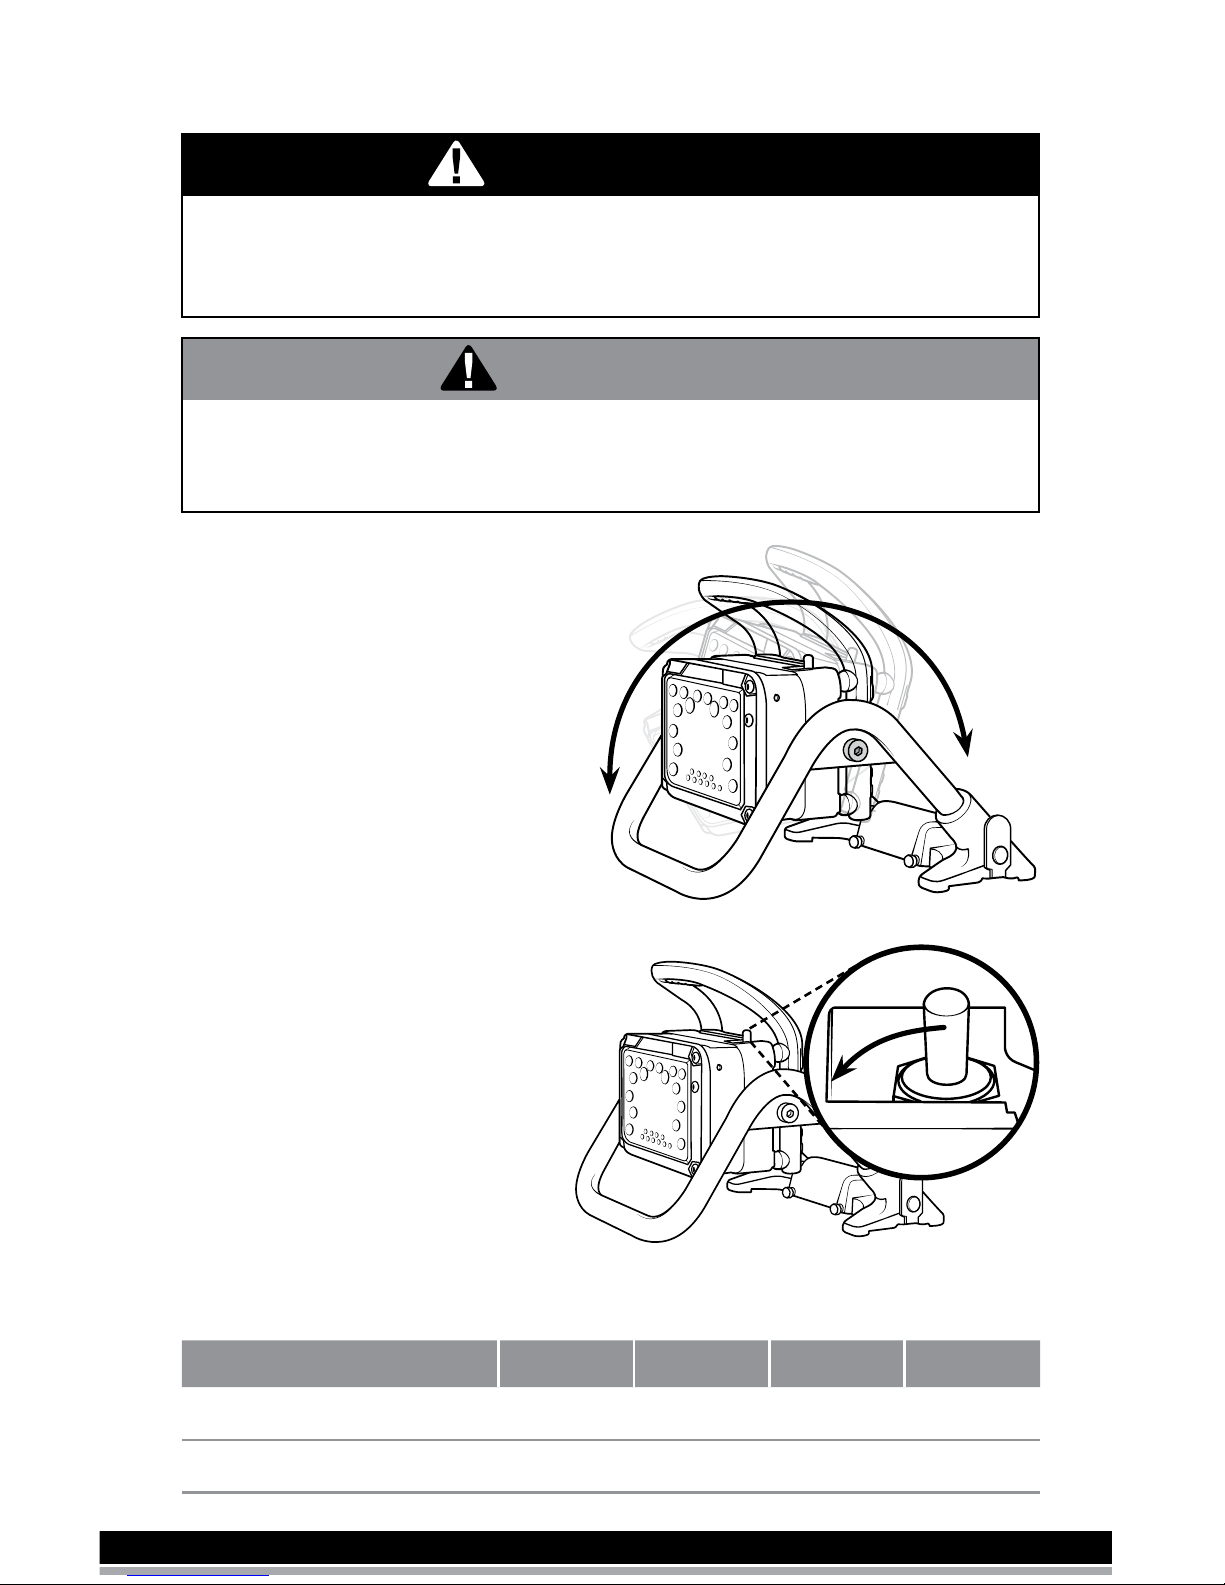
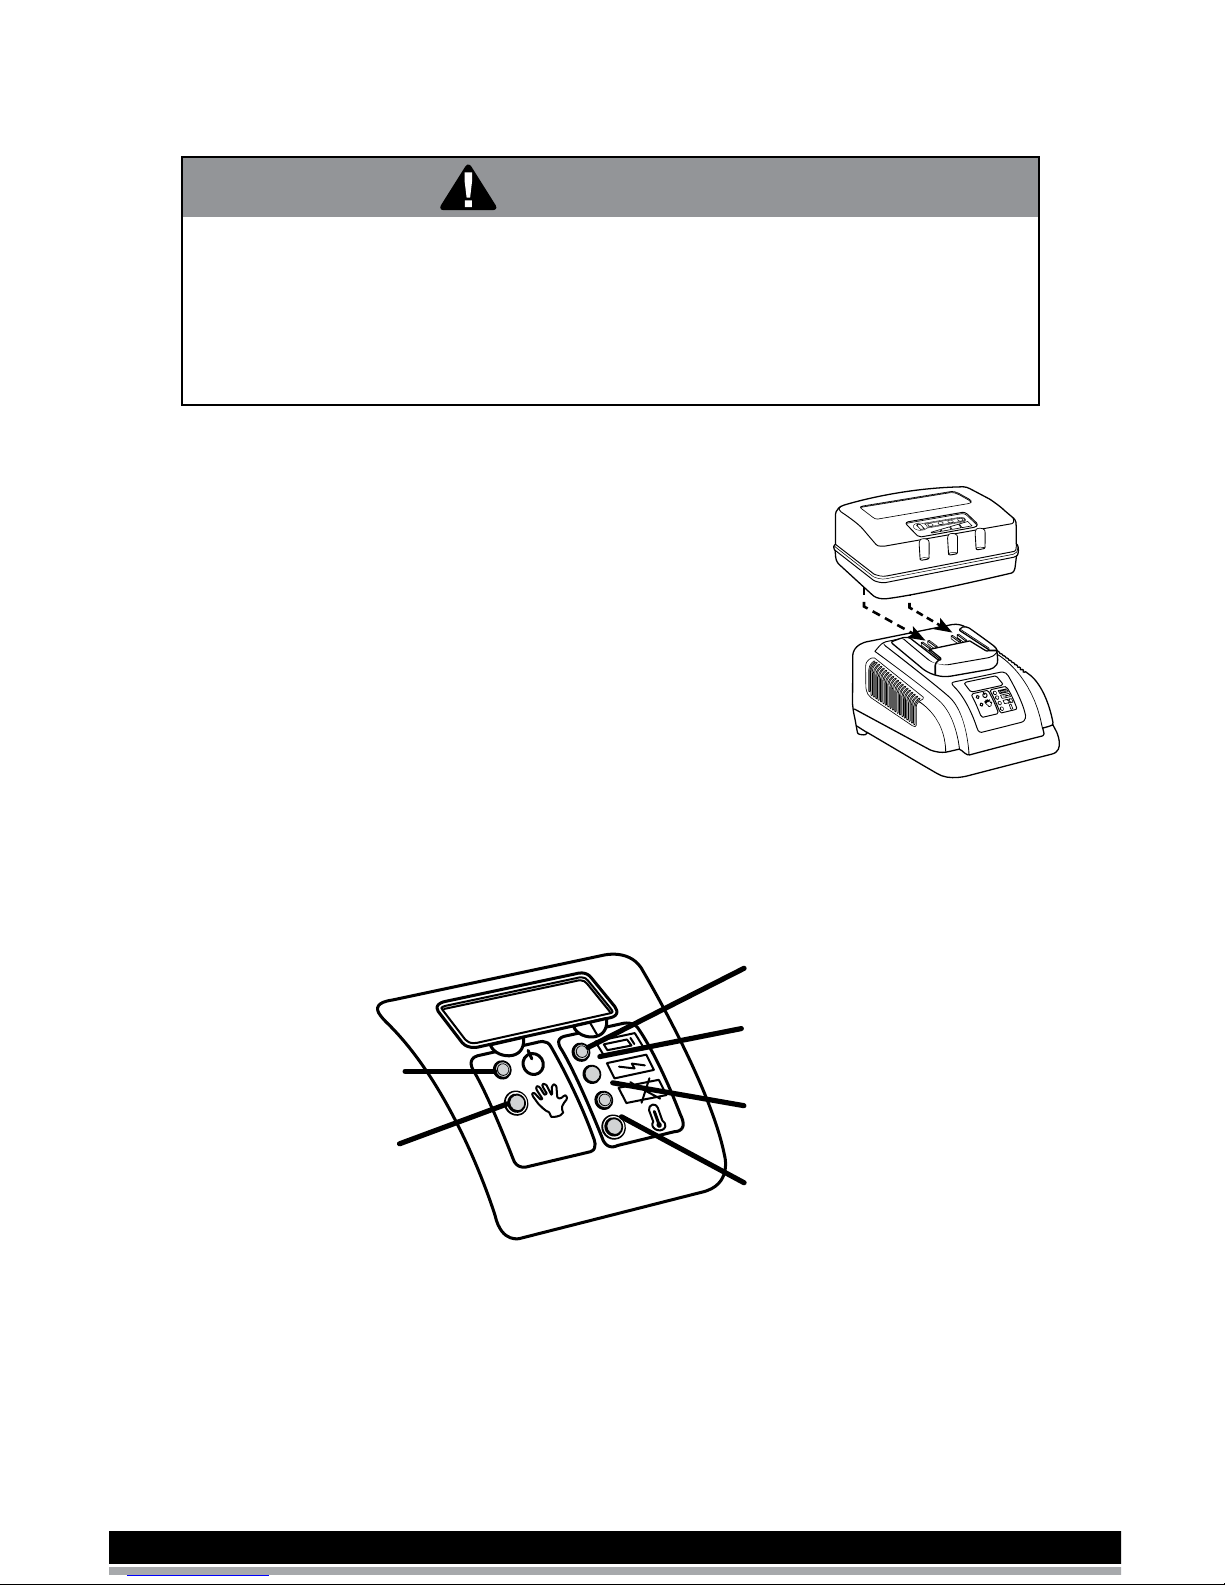
Akron Revel Scout Manual

Revel Scout® Scene Light
Operating and Maintenance Instructions
343 Venture Blvd. Wooster, OH 44691 • Akronbrass.com

2
• READ AND UNDERSTAND ALL INSTRUCTIONS. Failure to follow
all instructions could result in electrical shock, re and/or serious
injury.
• The light head gets hot during use. To reduce the risk of burns, do not
touch the light head while hot.
• Avoid dangerous environments. Do not charge battery pack in wet or
damp locations. Do not use battery pack or charger in the presence of
gaseous fumes, dust or ammable materials as sparks could be generated
while inserting or removing battery from charger and possibly cause a re.
• Do not burn, incinerate, crush, drop or otherwise damage battery pack.
Battery packs may explode if burned, incinerated or crushed. Replace
damaged battery pack immediately and dispose of battery pack according
to federal, state or local requirement.
WARNING!
Introduction
Thank you for purchasing the Revel Scout LED Scene Light. The Revel Scout is a
tactical LED scene light designed to increase the safety of both reghters and
emergency responders. With versatile mounting options and a removable,
rechargeable battery, the portable Revel Scout revolutionizes the operational
ease of re scene lighting.
The Revel Scout combines a spot and ood light pattern of 14,000 lumens in
a 12 lb. package, and evenly illuminates both entire exterior scenes and
interior spaces.
This manual includes the basic instructions for installation, operation and
maintenance of the Revel Scout LED Scene Light.
Safety Warnings
IMPORTANT! Please read these instructions carefully. They contain important
information regarding safety, operation, maintenance and storage of this
product. Use this product correctly and with care for the purpose for which it
is intended. Failure to do so may cause damage, or personal injury, and could
invalidate the warranty. Retain these instructions for future reference.
Note: a WARNING indicates a hazardous situation which if not avoided
COULD result in death or serious injury.

3
• When unplugging charger, pull on plug and not on cord to reduce the risk of
damage to the plug and cord. Never carry charger by cord.
• Do not operate charger with a damaged cord. Replace immediately
if damaged.
• Keep away from heat, oil and sharp objects.
• Do not remove or discard labels from product. These contain important
information.
• Store the battery and charger in a cool, dry place. Do not store battery
where temperatures may exceed 122F [50C] such as in a vehicle during
summer or direct sunlight.
• At the end of the batteries useful life, consult your local authorities for
proper battery disposal.
CAUTION!
• Use only the charger supplied by the manufacturer to recharge batteries.
A charger that may be suitable for one type of battery may create a risk
of re when used with another battery.
• Use scene light only with specically designated battery pack. Use of any
other batteries may create a risk of re.
• When battery pack is not in use, keep it away from metal objects like:
paper clips, coins, keys, or other small metal objects that can make a
connection from one terminal to another. Shorting the battery
terminals together may cause sparks, burns, or a re.
• Charge in a well ventilated area. Do not block vents on charger.
Note: a CAUTION indicates a potentially hazardous situation which if not
avoided may result in minor or moderate injury.
Note: a Notice addresses practices not related to personal injury.
Notice

4
Use
Deploying The Light
1. Fully charge the battery before the rst use of the light (see Charging the
Battery).
2. Slide the battery down onto the light until you hear a click.
There are four deployment positions.
Placing on at surface
The light has a wide base and low center of gravity, making it ideal for
positioning on a wide vaiety of surfaces.
2

5
Hanging on an object
Hang the light on a vertical surface (such as a door) by hooking the extensions
on the feet of the light over the surface.
Strapping to an object
CAUTION!
To strap the light over an object (such as ladder rung, round objects), hook
the extensions on the feet of the light over the object. Pull out the rubber
strap (located on the bottom of the feet) and wrap the rubber strap around
the surface and reattach the strap to the tab.
The rubber strap is not load bearing and must never be used to support the
weight of the unit. It is to be used as a securing strap only.

6
Spiking to a Vertical Surface
WARNING!
Driving the spike into live electrical wires could result in electrical shock,
serious injury or death. Always check if there are live electrical wires in the
area before driving the spike into the surface. Always wear appropriate
personal protection equipment (i.e.: eye protection, gloves) before driving
the spike into the surface.
Note: The spike is intended to be driven into residential grade drywall and is
not rated to be driven into any other material. Do not attempt to drive spike
into a solid surface such as plywood or concrete as this may result in damage
to the unit.
To mount the light to a vertical wall using the spike:
1. Locate the spike compartment on the bottom of the light base.
2. Rotate the spike out into the fully extended and in a locked position.
3. Drive the spike into the drywall surface.
To stow the spike:
4. Press the button on the base of the light.
5. Fold spike back into the stowed position.
2
1
3

7
Adjusting the Angle of the Light
To adjust the angle of the light,
rotate the head to the desired
position. The unit includes an
internal friction brake that will
hold the light in place. The screws
on the side of the light should not
be loosened.
Switching the Light
Output Modes
To adjust the Light Modes:
Rotate the mode switch towards
the front of the light, and toggle
through the modes.
Light Modes High Medium Low Spot
Light output (lumens) 14,000 8,000 2,000 6,000
Average run time (hours) 1.2 3 7 3.5
WARNING!
The surface of the light becomes hot when turned on and could result in
burns or serious injury when touched with bare skin. Always let the light cool
down or wear personal protective equipment when handling a hot light.
CAUTION!
When adjusting the light head ngers may be pinched between the light
head and the base that may result in minor or moderate injury. Always keep
ngers clear from getting caught between the light head and the base.
Turning on the Light
Turn the light on using the switch
on the top of the light. Do not
place objects directly in front of
lens. Damage to the lens can
occur from over heating.

8
Charging the Battery
CAUTION!
Using an unapproved charger or batteries may cause a re and result in
minor or moderate injuries. Always use an approved charger provided by
Akron Brass to charge batteries.
Immersing the battery or charger in liquid may result in minor or moderate
injuries. Never immerse the battery or charger in liquid.
Low Battery Warning
When the Revel Scout is powered on and the battery is
low, the light will ash to indicate a low battery condition.
It will ash quickly four times, pause for 30 seconds and
ash another four times. After the second set of ashes it
will adjust the brightness to the medium setting to
conserve battery and extend runtime. It will continue to
ash every 30 seconds until a new battery is installed or
the battery discharges and the light turns OFF.
To charge the battery:
1. Connect the charger to a power source.
2. Place the battery in the charger.
Optional Charger Installation
The charger can be mounted to a horizontal surface.
Follow these steps to install the charger:
1. Position the charger in the desired location.
2. Attach the mounting hardware to the bottom of the charger.
3. Attach the charger to a horizontal surface using the mounting hardware.
Solid Red:
Power On
Blinking Red:
Stop: Charger Fault
Solid Green:
Battery Charging
Blinking Green:
Battery Fully Charged
Solid Red:
Battery Fault
Blinking Red:
Temperature Out of Range
The Status Lights will indicate the following:

9
Maintenance
WARNING!
Conducting maintenance to the light or charger when connected to a live
electrical source may result in serious injury or death. Always unplug the
light and charger before conducting maintenance. Always remove the
battery from the charger when conducting maintenance.
Due to the inherent long life that comes with using LED’s, there is very little
maintenance required. When the light requires cleaning, wipe down with a
mild soap and water mixture only. Do not use industrial strength or other
chemical cleaners as this may damage the light.
Conducting repairs to the light, batteries, or charger may void the product warranty.
Never disassemble the light, battery pack or charger. If repairs are needed, contact
Akron Brass at: 43 Venture Blvd. Wooster, OH 44691 • Akronbrass.com
For a complete list of available replacement parts go to www.akronbrass.com
Product Specications
Revel Scout Scene Light
Model: Revel Scout
Battery Type: Lithium-Ion
Battery Voltage: 28V
Weight: 12 lbs (5.4 kg)
IP Rating: IP66
Operating temperature: -40º F to +122º F (-40º C to +50º C)
Storage Temperature: -40º F to +122º F (-40º C to +50º C)
Revel Scout Battery
Model: 50AH-RSB
Battery Type: Lithium-Ion
Battery Voltage: 28V
Battery IP Rating: IP66
Battery Weight: 3 lbs [1.4 kg]
Operating temperature: -20º F to +130º F (-28º C to +55ºC)
Storage Temperature: -20º F to +120º F (-28º C to +45º C)
Charging Temperature: 32º F to +120º F (0º C to +45ºC)
Charging Time: 75 minutes

10
Part
Number
Input
Volts
Input
Amps
Output
Volts
Output
Amps
1224-RSBC 12VDC/24VDC 5.8A/2.9A 28VDC 1.8A
120-RSBC 120VAC 1.25A 28VDC 4A
240-RSBC 240VAC 0.63A 28VDC 4A
Warranty
REVEL SCOUT ASSEMBLY:
WARRANTY AND DISCLAIMER: We warrant the Revel Scout for a period of six (6)
years* after purchase against defects in materials or workmanship. Akron Brass will
repair or replace product which fails to satisfy this warranty. Repair or replacement
shall be at the discretion of Akron Brass. Products must be promptly returned to Akron
Brass for warranty service. We will not be responsible for: wear and tear; any improper
installation, use, maintenance or storage; negligence of the owner or user; repair or
modication after delivery; damage; failure to follow our instructions or
recommendations; or anything else beyond our control. WE MAKE NO WARRANTIES,
EXPRESS OR IMPLIED, OTHER THAN THOSE INCLUDED IN THIS WARRANTY
STATEMENT, AND WE DISCLAIM ANY IMPLIED WARRANTY OF MERCHANTABILITY OR
FITNESS FOR ANY PARTICULAR PURPOSE. Further, we will not be responsible for any
consequential, incidental or indirect damages (including, but not limited to, any loss of
prots) from any cause whatsoever. No person has authority to change this warranty.
REVEL SCOUT BATTERY AND CHARGER:
WARRANTY AND DISCLAIMER: We warrant the Revel Scout Battery and Charger for a
period of one (1) year after purchase against defects in materials or workmanship.
Akron Brass will repair or replace product which fails to satisfy this warranty. Repair or
replacement shall be at the discretion of Akron Brass. Products must be promptly
returned to Akron Brass for warranty service. We will not be responsible for: wear and
tear; any improper installation, use, maintenance or storage; negligence of the owner or
user; repair or modication after delivery; damage; failure to follow our instructions or
recommendations; or anything else beyond our control. WE MAKE NO WARRANTIES,
EXPRESS OR IMPLIED, OTHER THAN THOSE INCLUDED IN THIS WARRANTY
STATEMENT, AND WE DISCLAIM ANY IMPLIED WARRANTY OF MERCHANTABILITY OR
FITNESS FOR ANY PARTICULAR PURPOSE. Further, we will not be responsible for any
consequential, incidental or indirect damages (including, but not limited to, any loss of
prots) from any cause whatsoever. No person has authority to change this warranty.
Rev. 7/17
Revel Scout Battery Charger Specications
Table of contents