Alcatel 5049W User manual

BC
For more informaon on using this phone or for frequently asked quesons, please visit www.alcatelonetouch.us.

1 2
About this Manual...................................................
Thank you for choosing Alcatel 5049W. In order to keep your device in its best condition, please read this manual
and keep it for future reference.
CJA29MBGMAAA
Table of Contents
About this Manual................................................... ..........................................................1
1 Getting Started............................................................................................................4
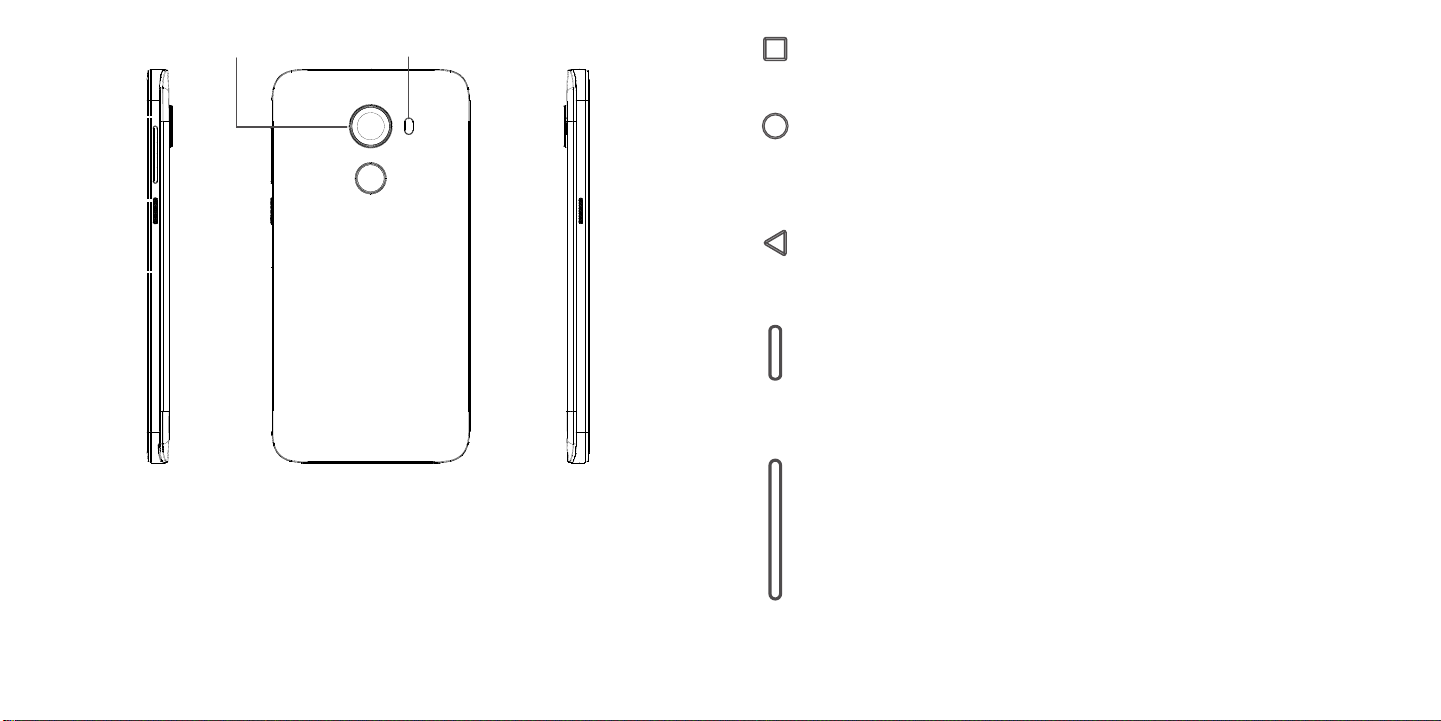
1.1 Overview ..................................................................................................................................................................... 4
1.2 Setup............................................................................................................................................................................ 7
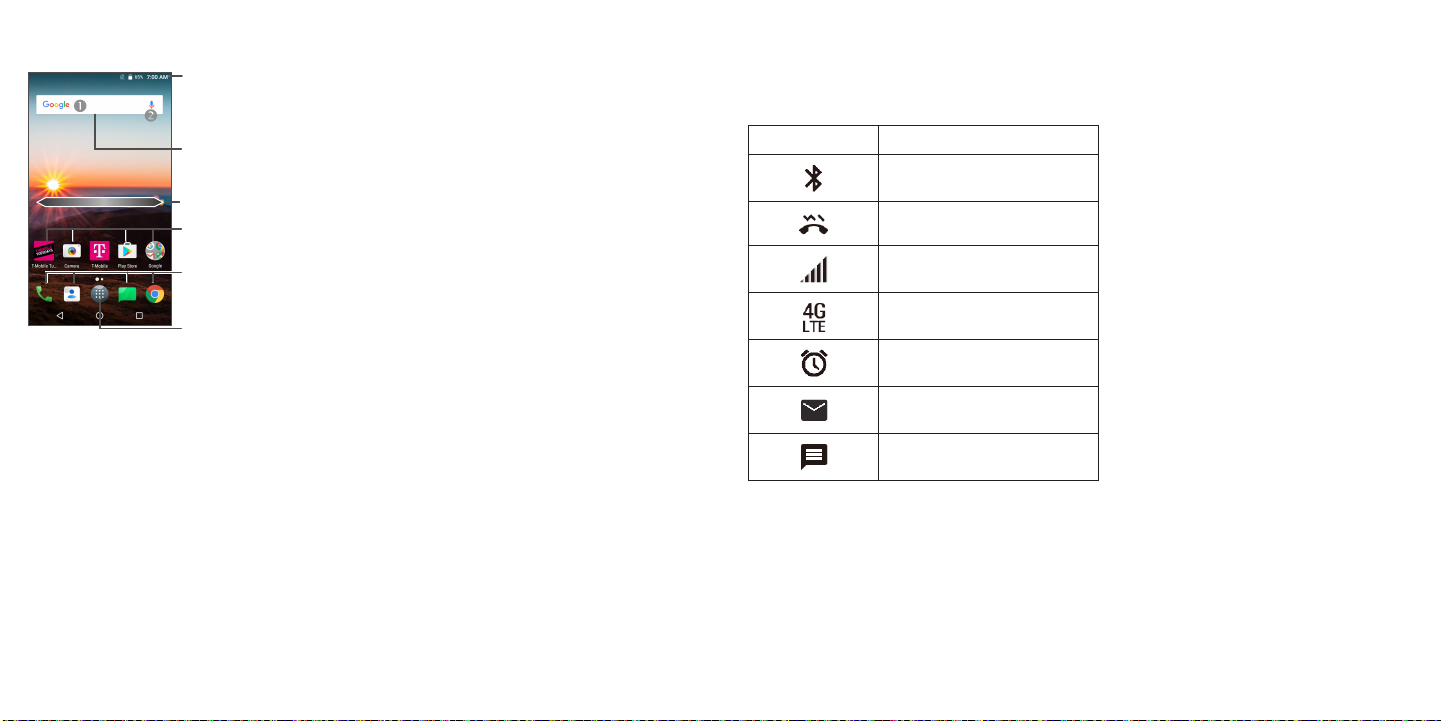
1.3 Home Screen.............................................................................................................................................................. 9
1.4 Status Bar..................................................................................................................................................................10
2 About Your Phone...................................................................................................... 11
2.1 Power On/Off ..........................................................................................................................................................11
2.2 Battery .......................................................................................................................................................................12
3 Application............................................................................................................... 13
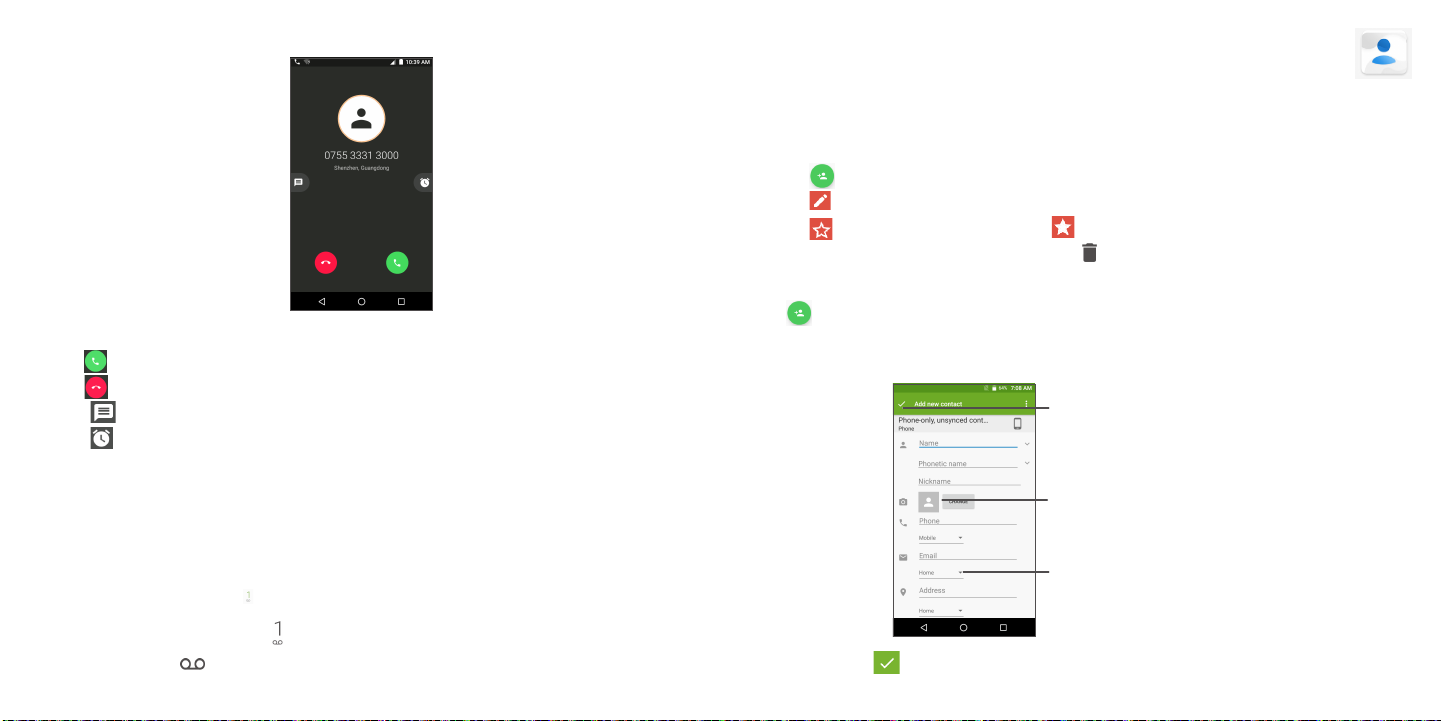
3.1 Call .............................................................................................................................................................................13
3.2 Contacts ....................................................................................................................................................................16
3.3 Messages ..................................................................................................................................................................19
3.4 Email ..........................................................................................................................................................................21
3.5 Chrome...................................................................................................................................................................... 23
3.6 Calendar.................................................................................................................................................................... 23
3.7 Camera......................................................................................................................................................................25
3.8 Gallery........................................................................................................................................................................26
3.9 Clock .........................................................................................................................................................................28
3.10 Music..........................................................................................................................................................................30
4 Personalize Your Phone.............................................................................................. 31
4.1 Language ..................................................................................................................................................................31
4.2 Date & time ...............................................................................................................................................................31
4.3 Sound ........................................................................................................................................................................32
4.4 Wallpaper, brightness and screen timeout ........................................................................................................ 32

3 4
5 Security.................................................................................................................... 33
5.1 Screen lock...............................................................................................................................................................33
5.2 SIM security .............................................................................................................................................................33
5.3 Anti-Theft...................................................................................................................................................................33
6 Account ................................................................................................................... 34
6.1 Software Update......................................................................................................................................................34
7 Safety and Use................................................. ......................................................... 35
8 Warranty .................................................................................................................. 51
9 Troubleshooting........................................................................................................ 52
1 Getting Started................................................
1.1 Overview
Power key
Back button Recent Apps button
Home button
Volume key
LED indicator
Headset connector
Micro-USB Connector
P/L sensor
Front camera

5 6
Camera Camera Flash/Flashlight Recent Apps button
• Touch to open a card view of applications you've worked with recently.
Home button
• From any application or screen, touch to return to the Home screen.
• Long press to turn on Google Now. You can get help such as getting directions and restaurant
information based on the content detected on the screen.
Back button
• Touch to go back to the previous screen, or close a dialog box, options menu, the Notification panel,
etc.
Power key
• Press: Lock the screen/Light up the screen.
• Press and hold: Show the popup menu to select from Power off/Restart/Airplane mode.
• Press and hold the Power key and Volume key to make a screenshot.
• Press and hold the Power key for at least 10 seconds to force reboot.
Volume Keys
• In call mode, adjusts the earpiece or headset volume.
• In Music/Video/Streaming mode, adjusts the media volume.
• In general mode, adjusts the ringtone volume.
• Mutes the ringtone of an incoming call.
• In camera preview mode, press Volume key to take a photo or press and hold to make burst shot.

7 8
1.2 Setup
Setup your phone for the first time
The first time you power on the phone, you should set the following options:
• Touch to select the phone's language, then touch .
• Select an enabled Wi-Fi, then touch NEXT, otherwise touch SKIP.
• Set up date and time if needed, then touch NEXT.
• Enter the name to allow the phone to personalize some applications, then touch NEXT.
• Set up the screen lock to make your phone more secure, otherwise touch SKIP.
• Set up Google Services by marking the corresponding checkboxes, touch MORE to learn more about Google
Services, then touch NEXT.
Even if no SIM card is installed, your phone will still power on and you will be able to connect to a Wi-Fi network and
use some of the phone's features.
Note: Even if no SIM card is installed, your phone will still power on and you will be able to connect to a Wi-Fi network
and use some of the phone's features.
Installing back cover
Inserting Nano SIM card or microSD
You must insert your Nano SIM card to make phone calls using your network.
• To insert a SIM or MicroSD card into the card slot with the gold-colored contacts facing down.
Your phone only supports Nano SIM card. Do not attempt to insert other SIM types like Mini or Micro cards,
otherwise you may damage your phone.

9 10
1.3 Home Screen
Enter the applications list.
Status bar
•Status/Notification indicators
•Touch and drag down to open the Notification panel.
Swipe left or right to view more screens
Touch an icon to open an
application, folder, etc.
Favorite tray applications
•Enter the application.
•Long press to move or remove applications.
Search bar
Enter text search screen.
Enter voice search screen.
1.4 Status Bar
From the status bar, you can view both phone status (to the right side) and notification information (to the left side).
Here is a list of the icons you might see and their meanings:
Icon Status
Bluetooth® active
Vibrate
Network (full signal)
4G LTE data service
Alarm set
New E-Mail
New message

11 12
2 About Your Phone ............................................
2.1 Power On/Off
Hold down the Power key until the phone powers on, unlock your phone (Slide, PIN, password, pattern) if necessary,
once unlocked, Home screen is displayed.
If you don't know your PIN code or if you have forgotten it, contact your service provider. Do not store PIN code within
your phone, instead store PIN in a location that is accessible without using phone.
Hold down the Power key from the Home screen until the phone options appear, select Power off.
Charging
Insert the small end of the charging cable into the charge port, and plug the charger into an electrical outlet.
2.2 Battery
To optimize your battery life, you may do the following:
Turn on power saving mode
• Go to Settings > Battery > Battery saver
• Turn on the switch to enable battery saving mode.
Lower screen brightness
• Go to Settings > Display > Brightness level
• Lower the brightness by sliding to the left.
Screen timeout
• Go to Settings > Display > Sleep
• Select the screen timeout duration.

13 14
3 Application .....................................................
3.1 Call....................................................................................................
Making a call
To make a call, touch .
View the contact’s detailed
information. You can also
edit, delete, share the
contact, or send a message
to the contact.
Call the
previewed
number
Show the dial pad
Call log
Contacts
Display
suggested
numbers
Long press to
access voicemail
Enter the desired number from the dial pad and touch to place the call or select a contact from or
by sliding or touching tabs, then to make the call. Or touch to make video call.
The number you entered can be saved to Contacts by touching Create new contact.
If you make a mistake, you can delete the incorrect digits by touching .
To hang up a call, touch .
International call
To dial an international call, long press to enter “+”, then enter the international country prefix followed by the full
phone number and touch .
Emergency call
If your phone has network coverage, dial the emergency number and touch to make an emergency call. This
works even without a SIM card and without typing the PIN code.

15 16
Answering or rejecting a call
When you receive a call:
• Slide up to answer;
• Slide up to reject;
• Touch to reject the call by sending a preset message.
• Touch to set the reminder to call back.
To mute an incoming call, press the Volume key, or turn the phone over (when the Settings >Gesture >Turn over
to mute option is activated).
Voicemail
Your voicemail is provided by your network to avoid missing calls. It works like an answering machine that you can
consult at any time.
To access your voicemail, long press .
To set your voicemail number: Long press , then go to ADD NUMBER >Voicemail >Setup >Voicemail number.
If you receive a voicemail, appears in the Status bar. Open the Notification panel and touch New voicemail.
3.2 Contacts ..........................................................................................
Contacts enables quick and easy access to the contact you want to reach.
You can view and create contacts on your phone and synchronize them with your Gmail contacts or other
applications on the web or on your phone.
• Touch in the contact list to create a new contact.
• Touch in the contact details screen to edit.
• Touch to add the contact to favorites; touch to remove a contact from favorites.
• Long press the contact you want to delete, then touch .
Adding a contact
Touch in the contact list to create a new contact.
You are required to enter the contact's name and other contact information. By scrolling up and down the screen,
you can move from one field to another.
Select a picture or take a
photo for the contact
When finished, touch the
icon to save
Touch to open available labels
When finished, touch to save.

17 18
To exit without saving, you can touch and then touch Discard changes.
Editing your contacts
Touch in the contact details screen to edit.
When finished, touch to save.
Add to/remove from Favorites(1)
Touch a contact to view details then touch to add the contact to favorites.
Touch the star to remove a contact from favorites.
Deleting a contact
• Long press the contact you want to delete, then touch and confirm to delete.
(1) Only phone contacts can be added to Favorites.
• Touch to select all contacts, then touch and confirm to delete all contacts.
The contact you have deleted will also be removed from other applications on the phone or web the next
time you synchronize your phone.
Sharing a contact
You can share a single contact with others by sending the contact's vCard to them via Email, Messages, and
Bluetooth.
Select a contact you want to share, touch and then select Share.
Available options
From the contact list, you may also make further settings by touching .
Settings
• Call history Visit missed calls, outgoing calls and incoming calls.
• Group Add contacts into groups or manage groups.
• Contacts to display Choose contacts to display.
• Import/Export Import or export contacts between phone, SIM card, microSD card and phone
storage, etc.
• Clear frequects Clear frequently contacted list.
• Block numbers Add numbers here so that you won't receive the calls or texts from them.
• Merge contacts Select duplicate contacts to merge.
• Settings Change settings related to call, voicemail, display, etc.

19 20
3.3 Messages.........................................................................................
Use the messaging to send and receive text (SMS) and multimedia (MMS) messages.
Creating a message
On the message list screen, touch to write text/multimedia messages.
Send the text message
Insert emoticons
Add recipients
For saved contacts, touch the photo to open the Quick contact panel to communicate with the contact. For
unsaved contacts, touch to add the number to your Contacts.
Sending a text message
• Enter the name or the phone number of the recipient in the To bar or touch to add recipients.
• Touch the Send message bar to enter the text of the message.
• Touch to insert emoticons.
• When finished, touch to send the text message.
An SMS message of more than 160 characters will be charged as several SMS. A counter will be on the right of the
text box to remind you how many characters are allowed to be entered in one message.
Specific letters (accented) will also increase the size of the SMS, this may cause multiple SMS to be sent to
your recipient.
Sending a multimedia message
MMS enables you to send video clips, images, photos, animations, slides and sounds to other compatible mobiles
and e-mail addresses.
• Enter the recipient's phone number in the To bar.
• Touch the Send message bar to enter the text of the message.
• Touch to open the options menu, select Add subject to insert a subject. Touch to attach a picture, video,
audio or contact..
• When finished, touch to send the multimedia message.
Managing messages
When receiving a message, will appear in the Status bar as a notification. Drag down the Status bar to open the
Notification panel, touch the new message to open and read it. You can also access the Messaging application and
touch the message to open it.
Messages are displayed as conversation.
Touch a message to enter the message composing screen:
• Touch to call the number.
• Touch to save the number to contacts or view the contact details if the number has been saved.
• To reply to a message, enter the text, or touch to insert quick text, contact etc., when finished, touch .
• If you long press a message, the following options will be available: delete , turn off notification , add
number to contacts , deselect the message , etc., touch to make further operations.

21 22
3.4 Email ...............................................................................................
Setting up the Email
To set up your email account, touch from the Home screen, then select Email.
An email wizard will guide you through the steps to set up an email account.
• Enter the email address and password of the account you want to set up.
• Touch Next. If the account you entered is not provided by your service provider in the phone, you will be
prompted to go to the email account settings screen to enter settings manually. Alternatively, you can touch
Manual setup to directly enter the incoming and outgoing settings for the email account you are setting up.
• Enter the account name and display name in outgoing emails.
• To add another email account, you can touch on the upper left corner and select Settings. And then touch
Add account.
Sending an email
• Touch from the Inbox screen.
• Enter recipient(s) email address(es) in the To field.
• If necessary, touch Cc/Bcc to add a copy or a blind carbon copy to the message.
• Enter the subject and the content of the message.
• Touch to add an attachment.
• If you do not want to send the mail right away, you can touch and Save draft or touch the Back key to save
a copy.
• Touch to send.
If you do not want to send or save the email, you can touch and then select Discard.
To add a signature to your emails, touch and select Settings, then choose the account where you want to create
or modify the signature, touch Signature to edit.
Note: If you are seeing a “password incorrect” error when setting up your Gmail Account in Email app, please
review the following options:
Option 1. Generate an App password
An App password is a 16-digit passcode that gives an app or device permission to access your Google Account. If
you use 2-Step-Verification and are seeing a “password incorrect” error when trying to access your Google Account,
an App password may solve the problem.
Steps to generate an App password:
• Visit your App passwords page https://myaccount.google.com/security/signinoptions/two-step-verification. You
may be asked to sign in to your Google Account.
• At the bottom, click Select app and choose the app you’re using.
• Click Select device and choose the device you’re using.
• Select Generate.
• Follow the instructions to enter the App password (the 16-character code in the yellow bar) on your device.
• Select Done.
• Once you are finished, you won’t see that App password code again. However, you will see a list of apps and
devices you’ve created App passwords for.
If generate an app password does not fix “Password incorrect” issue, please proceed to Option 2 or Option 3.
Option 2. Change your settings to allow less secure apps
• Go to the "Less secure apps" https://www.google.com/settings/security/lesssecureapps section in My Account.
• Next to "Access for less secure apps," select Turn on.
• You can now setup your email using your username and password. If you continue to see a “password incorrect”
error, please proceed to Option 3.
Option 3. Access Gmail through browser
If you don’t want to change your security settings, please follow steps to access your Gmail:
• From the home page, press the OK button and press on the Browser. Enter https://www.google.com/gmail/ on
the browser URL tab.
• Enter your username and password to log in.

23 24
3.5 Chrome .............................................................................................
Using Browser, you can enjoy surfing the Web.
To access this function, touch from the Home screen and select Browser.
3.6 Calendar .........................................................................................
You can use Calendar to keep track of important meetings, appointments, etc.
To access the function, touch from the Home screen, then touch Calendar.
Viewing calenders
You can display the Calendar in Day, Week, Month view.
Day view
Schedule view
Week view
Month
view
3-day view
Creating a new event
You can add new events from any Calendar view.
• Touch .
• Fill in all required information for this new event. If it is a whole-day event, you can turn on of All-day.
• Invite guests to the event. Enter the email addresses of the guests you want to invite with commas to separate.
The guests will receive an invitation from Calendar and Email.
• When finished, touch SAVE from the top of the screen.
To quickly create an event from the Week view screens, touch an empty spot to select a target area which will then
turn , and touch the icon to create the new event.
Before you can add an event, you must add at least one Calendar account and make a calendar visible.
Deleting or editing an event
• To delete or edit an event, touch the event to enter its details screen, touch to edit the event.
• Touch and Delete to remove the event.
Event reminder
If a reminder is set for an event, the upcoming event icon will appear in the Status bar as a notification when
the reminder time arrives.
• Touch and drag down the Status bar to open the Notification panel.
• Touch an event name to view the Calendar notification list.

25 26
3.7 Camera ............................................................................................
Accessing the camera
Touch from the Home screen and then touch Camera. If the phone is locked, press the Power key and then
swipe the camera icon to the left to open the camera.
Taking a picture
• Position the object or landscape in the viewfinder, touch the screen to focus if necessary
• Touch to take the picture which will be automatically saved. You can also long press to take burst shots.
Making a video
• Slide the screen to the left to enter VIDEO mode.
• Touch on the bottom right of the screen to start video recording.
• You can also touch to take a picture during video recording.
•Touch to stop recording. The video will be automatically saved.
Open settings
Touch the screen to set a focus.
Pinch/spread two fingers
together/apartto zoom out/in
Switch between
front/back camera
Take a picture
View the photos or videos you
have taken
Select flash mode
Slide left or right to change
the camera mode to Vedio,
Pano, Auto, etc.
Touch to turn on/off HDR. Touch to set countdown
seconds.
Further operations when viewing a picture/video you have taken
• Touch from camera screen to view the photos or videos you have taken.
• Touch then Gmail, Bluetooth, MMS, etc to share the photo or video.
• Touch to edit.
• Touch to add the picture to favourite.
• Touch to delete.
3.8 Gallery .............................................................................................
To view a picture/play a video
Pictures and videos are displayed by moments and albums in Gallery.
• All pictures and videos are divided by moments, and by albums. Touch an album to view pictures and videos
spread on the screen.
• Touch the picture/video directly to view or play.
• Slide up/down to view previous or next pictures/videos.
Working with photos
You can work with pictures by rotating or cropping them, sharing them with friends, setting them as a contact photo
or wallpaper, etc.
• Locate the picture you want to work on, and touch the picture in the full-screen picture view.
• Touch to share the picture, or to delete the picture. Touch and select Set as... to set the picture as
Contact photo or Wallpaper.
• Touch to set picture to Favorites, then the picture also can find in Favorites album. Touch again to remove
from Favorites.

27 28
Touch from full-screen picture view, more options will display for you to choose from.
Set effects such as Punch, Vintage, B/W, Bleach, etc.
Add a border.
Crop, Straighten, Rotate, Mirror or Draw the picture.
Adjust the picture colour.
Batch operation
The Gallery provides a multi-select function, so that you can work with pictures/videos in batches.
• On Moments or Albums screen , touch and touch Select items/Select albums to activate batch operation
mode (you can also long press one album/picture).
• Touch videos/pictures you want to work with.
• Touch to delete selected files. Touch to share selected files.
3.9 Clock ...............................................................................................
To access clock, touch from the Home screen, then touch Clock.
Setting world clocks
Touch on the clock screen.
Touch to add a time zone.
Setting alarms
Touch on the clock screen.
Turn on to enable existing alarm, or touch to add a new alarm, the following options will appear:
• Time Touch to set the alarm time.
• Repeat Touch to select the days when you want the alarm to work.
• Ringtone Touch to select a ringtone for the alarm.
• Vibrate Select to activate vibration.
• Label Touch to set a name for the alarm.
Touch an existing alarm to enter editing mode.
Touch then touch to delete the selected alarm.
Setting countdowns
Touch on the clock screen.
• Enter time in the sequence of second, minute and hour.
• Touch to activate Countdown.

29 30
• Touch to set the countdown time in panel.
• Touch to deactivate Countdown.
• Touch to delete current countdown label.
Setting timers
Touch on the clock screen.
• Touch to start the timer.
• Touch to show a list of records according to the updated time.
• Touch to halt the total and lap times. These will only restart after is touched.
• Touch to delete the record.
• Touch to share.
3.10 Music...............................................................................................
You can play music files stored on your phone or microSD card. Music files can be downloaded from your computer
to the phone using a USB cable.
To play a music file, touch from the Home screen, then touch Music.
Playing music
Touch a song to play.
Go back.
Search for a song.
Access more functions.
Play the previous or next song.
Play or pause.
While playing songs with Music, the operation of pause, play or skip is still available even if the screen is
locked.

31 32
4 Personalize Your Phone....................................
4.1 Language
Your device can be operated using English and Spanish language.
Changing phone language:
• Go to Settings > Language & input > languages.
• Touch and hold beside the desired language, drag it to the top of the list.
4.2 Date & time
Go to Settings > Date & time.
Automatic date & time
Turn on to use the network-provided date and time.
Automatic time zone
Turn on to use the network-provided time zone.
Set date
Touch to open a dialog where you can manually set the phone’s date.
Set time
Touch to open a dialog where you can manually set the phone’s time.
Select time zone
Touch to open a dialog where you can set the phone’s time zone.
Use 24-hour format
Turn on to display the time using the 24-hour clock format.
4.3 Sound
Adjusting volume:
• Press the Up/Down button that is located on the right side of the device to adjust the Ringtone & Notification
volume.
• You can also go to Settings > Sound to adjust the volume for media, ringtone, notification and alarm.
Adjusting tones
• Go to Settings > Sound.
• You may select ringtones for phone, notification, alarm as well as other sounds.
Adjusting other sounds
All other sounds that are related to Dial Pad, Camera and Sent Message can be adjusted to by doing the following:
• Go to Settings > Sound > Other Sounds.
4.4 Wallpaper, brightness and screen timeout
Adjusting Wallpapers
• Go to Settings > Display > Wallpaper
• Touch Wallpapers to select from pre-loaded wallpapers.
• Touch Gallery to select from images that are stored on your device.
• Touch Camera to take a picture for the wallpaper you would like to use/store.
• Touch Live Wallpapers to select from live photos that are stored on your device.
Adjusting brightness
• Go to Settings > Display > Brightness level.
• Select desired brightness by sliding .
Adjusting screen timeout
• Go to Settings > Display > Sleep.
• Select the screen timeout duration.

33 34
5 Security..........................................................
5.1 Screen lock
Screen lock allows you to set a 4-digit password which protects your phone from intrusions. Whoever turns on your
phone will be prompted to enter a password in order to access your device.
5.2 SIM security
A SIM PIN prevents access to the SIM card cellular data networks. When it's enabled, any device containing the SIM
card will request the PIN upon restart. A SIM PIN is not the same as the lock code used to unlock the device.
5.3 Anti-Theft
Only after KaiOS Account log in could anti-theft be enabled.
6 Account .........................................................
6.1 Software Update
To access Software Updates, follow the steps below:
• Connect your device to a Wi-Fi network and make sure it has a strong data connection.
• Ensure your battery is fully charged before starting the software update. Your device’s current battery level can
be found on your device under Settings > Battery.
• Go to Settings >About phone >System updates.
• Touch and the phone will search for the latest software.
• If you want to update the system, touch the button, and when that’s finished, touch to complete the
upgrade.
• Now your phone will have the latest version of the software.

35 36
7 Safety and Use.................................................
We recommend that you read this chapter carefully before using your phone. The manufacturer disclaims any liability
for damage, which may result as a consequence of improper use or use contrary to the instructions contained herein.
EXPOSURE TO RADIO FREQUENCY SIGNALS
Your wireless handheld portable telephone is a low power radio transmitter and receiver. When it is ON,
it receives and also sends out radio frequency (RF) signals. In August 1996, the Federal Communications
Commissions (FCC) adopted RF exposure guidelines with safety levels for handheld wireless
phones. Those guidelines are consistent with the safety standards previously set by both U.S.
and international standards bodies:
ANSI C95.1 (1992) *
NCRP Report 86 (1986) *
ICNIRP (1996) *
Those standards were based on comprehensive and periodic evaluations of the relevant scientific literature. For
example, over 120 scientists, engineers, and physicians from universities, government health agencies, and industry
reviewed the available body of research to develop the ANSI Standard (C951).
The design of your phone complies with the FCC guidelines (and those standards).
1: American National Standards Institute.
2: National Council on Radiation Protection and Measurements.
3: International Commission on Nonionizing Radiation Protection.
ANTENNA SAFETY
Use only the supplied or an approved replacement antenna. Unauthorized antennas, modifications, or attachments
could impair call quality, damage the phone, or result in violation of FCC regulations. Please contact your local dealer
for replacement antenna.
Do not use the phone with a damaged antenna. If a damaged antenna comes into contact with the skin, a minor burn
may result. Please contact your local dealer for replacement antenna.
DRIVING SAFETY
Talking on the phone while driving is extremely dangerous and is illegal in some states. Remember, safety comes
first. Check the laws and regulations on the use of phones in the areas where you drive. Always obey them. Also, if
using your phone while driving, please:
• Give full attention to driving. Driving safely is your first responsibility.
• Use hands-free operation, if available.
• Pull off the road and park before making or answering a call, if driving conditions so require.
If you must use the phone while driving, please use one-touch, speed dialing, and auto answer modes.
An airbag inflates with great force. DO NOT place objects, including both installed or portable wireless equipment,
in the area over the airbag or in the air bag deployment area. If in-vehicle wireless equipment is improperly installed
and the air bag inflates, serious injury could result.
WARNING: Failure to follow these instructions may lead to serious personal injury and possible property damage.
ELECTRONIC DEVICES
Your wireless handheld portable telephone is a low power radio transmitter and receiver. When it is ON, it receives
and also sends out radio frequency (RF) signals. Most modern electronic equipment is shielded from RF energy.
However, certain electronic equipment may not be shielded against the RF signals from your wireless phone.
Therefore, use of your phone must be restricted in certain situations.
PACEMAKERS
The Health Industry Manufacturers Association recommends that a minimum separation of six (6”) inches
be maintained between a handheld wireless phone and a pacemaker to avoid potential interference with the
pacemaker. These recommendations are consistent with the independent research by and recommendations of
Wireless Technology Research. Persons with pacemakers:
• ALWAYS keep the phone more than six inches from your pacemaker when the phone is turned on.
• Do not carry the phone in a breast pocket.
• Use the ear opposite the pacemaker to minimize the potential for interference.
• If you have any reason to suspect that interference is taking place, turn your phone OFF immediately.
HEARING AIDS
Some digital wireless phones may interfere with some hearing aids. In the event of such interference, you may want
to consult your service provider (or call the customer service line to discuss alternatives).
OTHER MEDICAL DEVICES
If you use any other personal medical device, consult the manufacturer of your device to determine if they are
adequately shielded from external RF energy.

37 38
Your physician may be able to assist you in obtaining this information. Turn your phone OFF in healthcare facilities
when any regulations posted in these areas instruct you to do so. Hospitals or healthcare facilities may be using
equipment that could be sensitive to external RF energy.
VEHICLES
RF signals may affect improperly installed or inadequately shielded electronic systems in motor vehicles. Check
with the manufacturer or its representative regarding your vehicle. You should also consult the manufacturer of any
equipment that has been added to your vehicle.
POSTED FACILITIES
Turn your phone OFF where posted notices so require.
OTHER SAFETY GUIDELINES
AIRCRAFT
FCC regulations prohibit using your phone while in the air. Turn your phone OFF before boarding an aircraft. Always
request and obtain prior consent and approval of an authorized airline representative before using your phone
aboard an aircraft.
Always follow the instructions of the airline representative whenever using your phone aboard an aircraft, to prevent
any possible interference with airborne electronic equipment.
BLASTING AREAS
To avoid interfering with blasting operations, turn your phone OFF when in a “blasting area” or in areas posted: “Turn
off two-way radio.” Obey all signs and instructions.
POTENTIALLY EXPLOSIVE ATMOSPHERES
Turn your phone OFF when in any area with a potentially explosive atmosphere and obey all signs and instructions.
Sparks in such areas could cause an explosion or fire resulting in bodily injury or even death.
Areas with a potentially explosive atmosphere are often, but not always, clearly marked. They include fueling areas
such as gas stations; below deck on boats; fuel or chemical transfer or storage facilities; vehicles using liquefied
petroleum gas (such as propane or butane); areas where the air contains chemicals or particles, such as grain, dust,
or metal powders; and any other area where you would normally be advised to turn off your vehicle’s engine.
PRECAUTIONS
Your Handheld Portable Telephone is a high quality piece of equipment. Before operating, read all instructions and
cautionary markings on (1) USB AC Adapter (2) Battery.
Failure to follow the directions below could result in serious bodily injury and/or property damage due to battery
liquid leakage, fire or rupture.
• DO NOT use this equipment in an extreme environment where high temperature or high humidity exists.
• DO NOT abuse the equipment. Avoid striking, shaking or shocking. When not using, lay down the unit to avoid
possible damage due to instability.
• DO NOT expose this equipment to rain or spilled beverages.
• DO NOT use unauthorized accessories.
• DO NOT disassemble the phone or its accessories. If service or repair is required, return unit to an authorized
cellular service center. If unit is disassembled, the risk of electric shock or fire may result.
• DO NOT short-circuit the battery terminals with metal items etc.
SAFETY INFORMATION FOR FCC RF EXPOSURE
WARNING! READ THIS INFORMATION BEFORE USING
CAUTIONS
In August 1996 the Federal Communications Commission (FCC) of the United States with its action in Report and
Order FCC 96-326 adopted an updated safety standard for human exposure to radio frequency electromagnetic
energy emitted by FCC regulated transmitters. Those guidelines are consistent with the safety standard previously
set by both U.S. and international standards bodies.
The design of this phone complies with the FCC guidelines and these international standards.
BODY-WORN OPERATION
This device was tested for typical body-worn operations with the back of the phone kept 1 cm. from the body.
To maintain compliance requirements, use only belt-clips, holsters or similar accessories that maintain a 1 cm
separation distance between the user's Body and the back of the phone, including the antenna.
The use of belt-clips, holsters and similar accessories should not contain metallic components in its assembly. The
use of accessories that do not satisfy these requirements may not comply with FCC RF exposure requirements, and
should be avoided.
For more information about RF exposure, please visit the FCC website at http://www.fcc.gov
SAR INFORMATION
THIS MODEL PHONE MEETS THE GOVERNMENT’S REQUIREMENTS FOR
EXPOSURE TO RADIO WAVES.
Table of contents
Other Alcatel Mobile Phone manuals