Alcorn Mcbride RidePlayer User manual

RidePlayer User’s Guide
September 14, 2018
THE ULTIMATE ON-BOARD AUDIO AND SHOW CONTROL SOLUTION

2
September 14, 2018
TABLE OF CONTENTS
TABLE OF CONTENTS................................................................................................................2
WELCOME! ....................................................................................................................................4
PRODUCT FEATURES .................................................................................................................5
SHOW CONTROL FEATURES ........................................................................................................................................ 5
AUDIO FEATURES ........................................................................................................................................................... 5
SYNCHRONIZATION FEATURES.................................................................................................................................... 6
PHYSICAL FEATURES....................................................................................................................................................... 6
TECHNICAL SUPPORT ...............................................................................................................7
GETTING STARTED.....................................................................................................................8
WIRING AND CONNECTIVITY...................................................................................................................................... 8
NETWORK CONFIGURATION .................................................................................................................................... 10
CONTROLLING WITH WINSCRIPT LIVE .................................................................................................................... 12
HARDWARE INFORMATION...................................................................................................14
OVERVIEW ..................................................................................................................................................................... 14
DISPLAY AND NAVIGATION BUTTONS ..................................................................................................................... 14
INDICATOR LEDS......................................................................................................................................................... 19
CONNECTORS .............................................................................................................................................................. 22
SYNCHRONIZATION ................................................................................................................30
PHASE-LOCKED CLOCKS............................................................................................................................................. 30
PRECISE TRIGGERING ................................................................................................................................................... 31
SYSTEM ARCHITECTURE............................................................................................................................................... 33
SYNC CONFIGURATION .............................................................................................................................................. 34
NETWORK AUDIO PASS-THROUGH ....................................................................................36
RIDEAMP INTEGRATION .........................................................................................................40
MOUNTING .................................................................................................................................41
SPECIFICATIONS .......................................................................................................................42

3
September 14, 2018
CONTROL ..................................................................................................................................................................... 42
AUDIO............................................................................................................................................................................ 42
SYNCHRONIZATION .................................................................................................................................................... 43
PHYSICAL ....................................................................................................................................................................... 43
BLOCK DIAGRAM.......................................................................................................................44
ACCESSORIES .............................................................................................................................45
DEVELOPMENT KIT....................................................................................................................................................... 45
CONNECTOR KIT......................................................................................................................................................... 45
M12 X-CODED ETHERNET CABLE ............................................................................................................................ 45
M12àRJ45 ETHERNET ADAPTER.............................................................................................................................. 45
POWER SUPPLY ............................................................................................................................................................. 45
PRODUCT PHOTOS...................................................................................................................46

4
September 14, 2018
WELCOME!
Congratulations on your shiny new Alcorn McBride RidePlayer!
We carefully designed this product to be the perfect solution for the unique challenges of on-board (vehicle-based)
audio and show control systems for themed attractions.
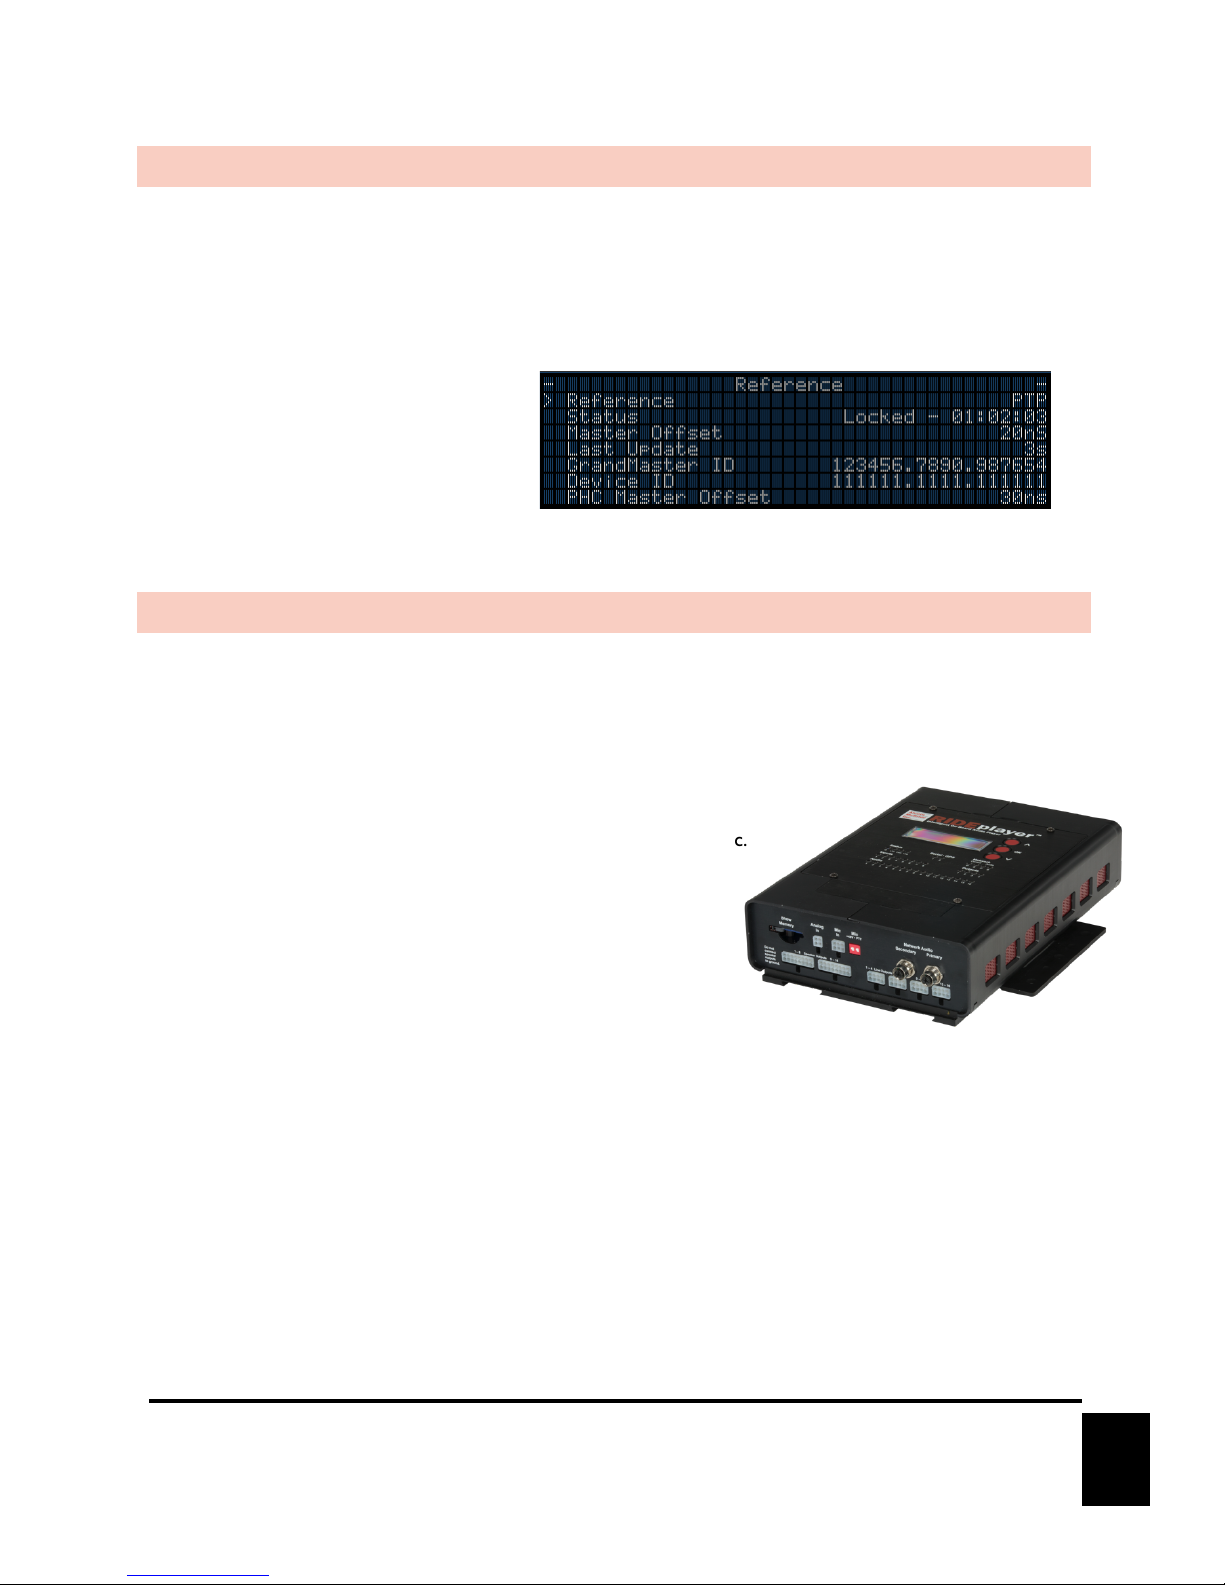
Many would agree that the most significant of those challenges is the ability to synchronize on-board audio with
off-board audio, video, lighting, animatronics, etc. RidePlayer accomplishes this by incorporating Alcorn McBride
SyncCoreätechnology, which leverages several methods to ensure extremely precise synchronization with other
show system components. These industry-standard methods include PTP (IEEE-1588), NTP, GPS, SMPTE LTC,
and Video Genlock. When used in conjunction with other SyncCoreäproducts like the V16X, it’s easy to
synchronize even the most complex attractions.
Another important requirement of on-board systems is the ability to trigger and monitor sub-systems like
animation controllers, PLCs, RFID scanners, and other miscellaneous equipment. Once again, RidePlayer steps up
to the plate by integrating the power of Alcorn McBride’s industry-standard show control core into the same
hardware platform.This enables it to interface to just about any device including PLCs, animation controllers,
sensors, lighting systems, video servers, and our ShowTouch panels. It also empowers the user with full scripting,
logic, and timeline capabilities to handle those pesky curveballs that crop up during installation.
Of course, the primary purpose of this device is to provide high-quality audio playback, so it has a wide-range of
features to suit that task well. It is capable of sourcing up to 16 outputs of 24-bit 48kHz uncompressed audio.
This powerful audio engine provides playback of up to 64 simultaneous tracks with the ability to route, crossfade,
and mix those tracks to any of the 16 outputs. This polyphonic capability allows any combination of discrete
playback of tracks like background music, vocals, and sound effects all mixed on a single audio output. Each audio
output is also equipped with powerful DSP capabilities that enable you to tune audio characteristics on-site.
Audio distribution options are plentiful. This product offers up to 16 individual 25W amplified outputs or up to 8
bridged 50W outputs; which makes it perfectly suited to drive high-range and mid-range speakers as well as some
bass transducers (i.e. ButtKickers). The 16 line level outputs can be used to feed high-powered external analog
amplifiers to drive larger speakers like subwoofers. For a clean all-digital signal path and intelligent monitoring of
amplifiers like our RideAmp companion product, the 16x16 AES67/Dante Network Audio interface is a no-brainer.
Content production and workflow are also critical to building great rides. Using the built-in 16x16 AES67/Dante
interface, media designers can patch in their source (i.e. ProTools rig, etc.) to preview content on the actual on-
board audio system without having to load a single file. Once satisfied with the mix, WAV files can be easily
exported to the product via network for normal operation.
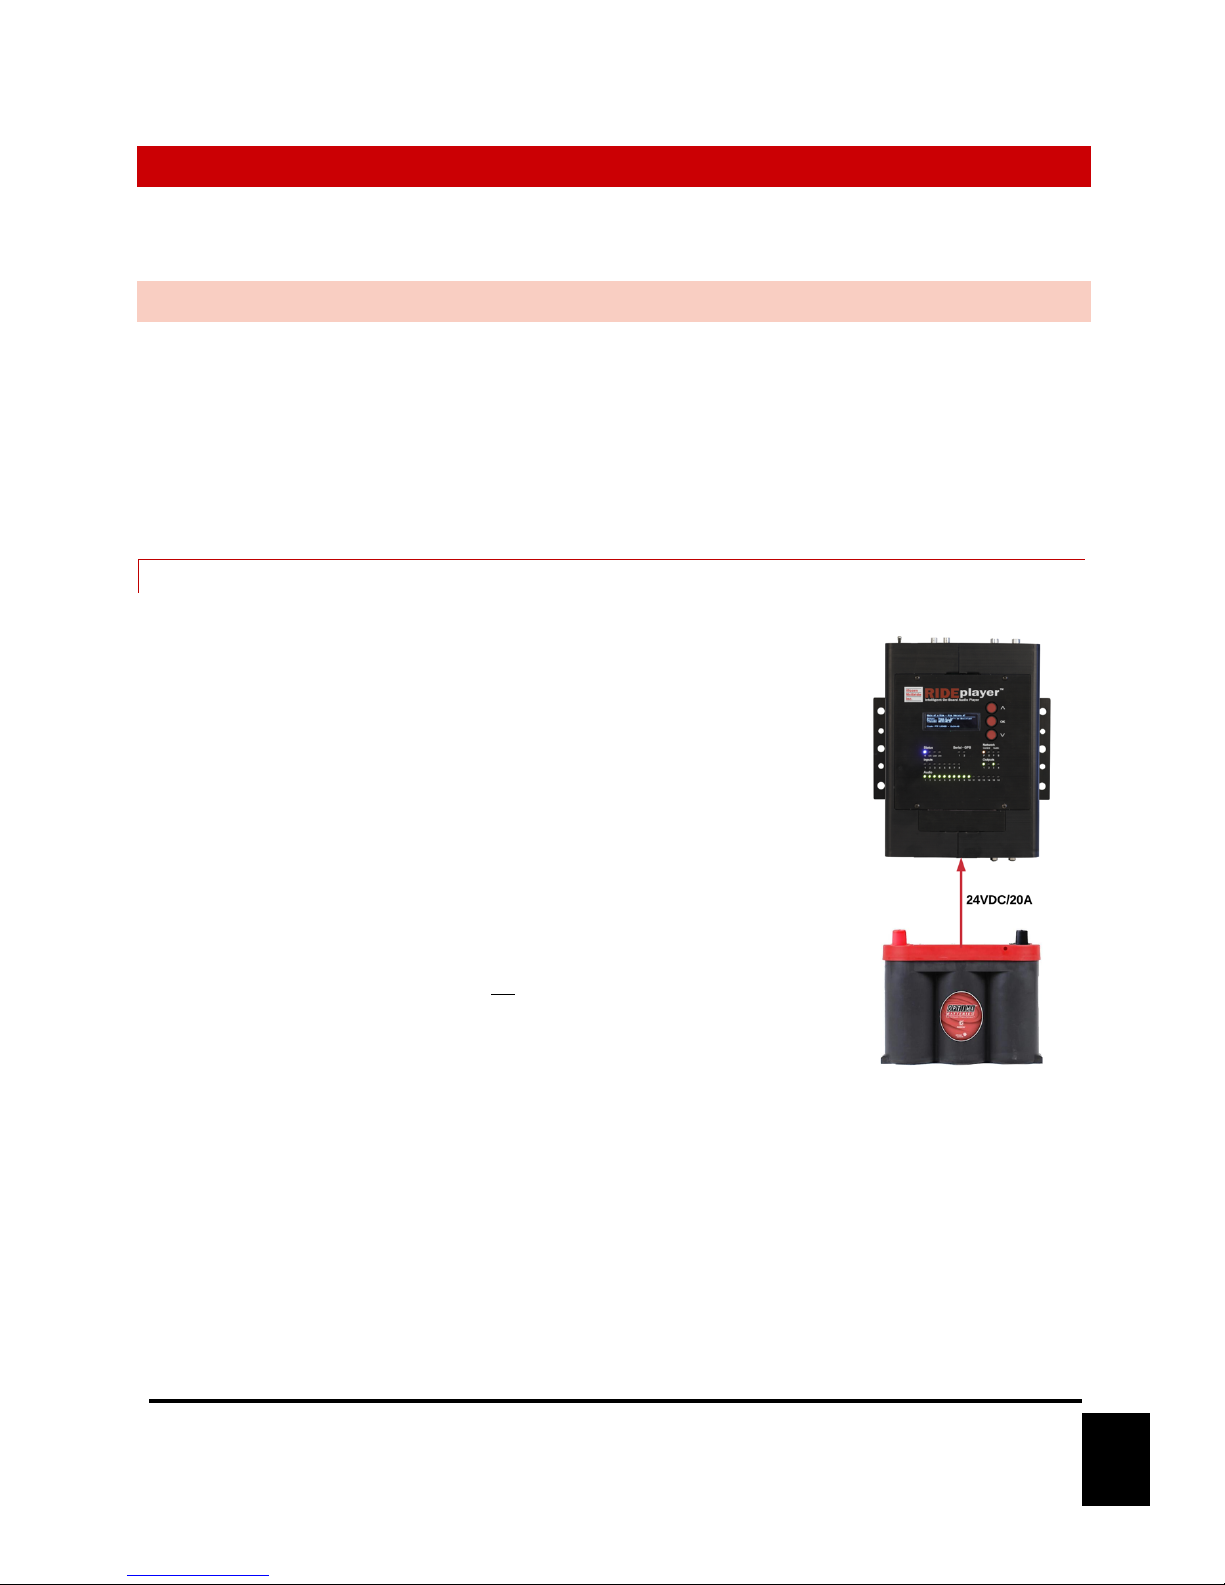
Special care has been taken to ensure that this design is rugged enough to handle on-board applications like tour
vehicles, dark ride vehicles, parade floats, and even high-vibration vehicles like coasters.
This product leverages 32 years of experience designing products specifically for themed entertainment
applications. In true Alcorn McBride fashion, the solid-state and rugged design will ensure years of 24/7
maintenance free operation which is essential to zero downtime for attractions. At Alcorn McBride, it is our
passion to engineer solutions that are uniquely suited for themed entertainment.We hope that you love using this
product as much as we enjoyed designing it!

5
September 14, 2018
PRODUCT FEATURES
SHOW CONTROL FEATURES
RidePlayer is fully-equipped with the powerful and flexible Alcorn McBride ControlCoreä. This technology
provides the ability to control and monitor other components commonly deployed on vehicle systems such as
PLCs, RFID scanners, GPS antennas, animation controllers, and DSP systems; all without requiring additional
components to be added to the vehicle.
The control feature set is as follows:
• Alcorn McBride Show Control Core
o Timeline Programming
o ShowTouch Integration
o Advanced Scripting
o Device Control (PLCs, RFID, Animatronics, AV, etc.)
• 2 x Network Control Ports (Isolated)
• 8 x CC/Voltage Inputs
• 4 x CC Outputs /w Self-Healing Polymer Fuse
• 2 x RS-232/RS-422 Serial Ports
o Serial, GPS, DMX
• Power Supply Voltage Monitoring
• Analog Voltage Sense Input
AUDIO FEATURES
This product is equipped with an incredibly powerful audio playback system that includes many advanced features
designed to eliminate the need for external components like DSPs, amplifiers, multiple audio players, etc. These
features enable high-quality surround sound effects to enhance the guest experience and make integration and
content production a breeze.
The audio features are:
• 24-bit 48kHz WAV files
• 16 x Audio Outputs
o 16 x 25W Amplified Outputs (Bridge to 50W)
o 16 x Line Outputs
o DSP with 9-band parametric EQ, high and low pass filters; time delay.
• 16x16 AES67/Dante Network Audio interface
o Input audio from a production workstation
o Output audio to provide clean digital audio to external amplifiers
• Up to 64 Simultaneous Tracks /w Dynamic Routing, Mixing, and Crossfade
• Remote Content Update via Ethernet

6
September 14, 2018
SYNCHRONIZATION FEATURES
RidePlayer is equipped with the Alcorn McBride SyncCoreäsystem to provide for extremely precise
synchronization between the on-board and off-board systems. This technology uses several industry-standard
methods to maintain a very precise clock between RidePlayer and other SyncCoreäenabled products like the
V16X.
Synchronization features include:
• PTP (IEEE-1588)
• NTP
• GPS /w PPS Clock Input
• SMPTE LTC
• Genlock
PHYSICAL FEATURES
This product’s rugged solid-state design enables it to endure the harsh environments of coaster and dark ride
applications. It offers flexible mounting options, industrial-grade connectors, DC power input, and a rock-solid
chassis design.
Physical features include:
• Vibration/impact resistant design
o Coasters, Dark Rides, Parade Floats, Parking Trams, etc.
• Rugged Locking Molex connectors
• M12 X-Coded Ethernet Connectors
• Dimensions – 9.5”W x 13.1”L x 3.3”H – Surface Mount
• Weight – 11 Lbs.
• 9-28VDC Power Input /w software monitoring
• 42x8 OLED Character Display /w navigation wheel (top)
• 16 bi-color playback status LEDs (top)
• Removable 128GB M.2 SSD Drive for storage of WAV files (accessible from top)
• Removable SD Card for storage of scripts and panels (accessible from end)

7
September 14, 2018
TECHNICAL SUPPORT
Now that we’ve tantalized you with all of the wonderful things this product can do, I’ll bet you’re chomping at the
bit to flip all the switches and push all the buttons. Not so fast! Before we get to the fun stuff, we just want to
take a moment to remind you that we are here to help. Chances are that you’re building something really cool
and we want you to have access to the resources and support you need to be successful.
To start, you’ll find a wealth of information on our website. This includes Application Notes that give you detailed
documentation and examples for how this product is used in common types of themed entertainment projects.
You’ll also find the latest downloads for software, firmware, drawings, 3D models, cutsheets, and other helpful
resources on our Support page. The Knowledge Base is especially handy for common questions and helpful
troubleshooting tips. And last, but certainly not least, you always have our friendly and mildly entertaining staff
available by email or telephone.
Application Notes
http://www.alcorn.com/applications
Support Resources
http://www.alcorn.com/support
Knowledge Base (FAQ)
https://alcornmcbride.zendesk.com/hc/en-us
Email Support
Telephone Support
(407) 296-5800 (Mon-Fri 9am-6pm EST)

8
September 14, 2018
GETTING STARTED
Alright, time to roll up your sleeves and get to work! This section will guide you through basic concepts that will
help you get on your way with RidePlayer.
WIRING AND CONNECTIVITY
A few connections are required to experience the core functionality of RidePlayer. If you’re the DIY-type that’s
comfortable with purchasing and crimping your own connectors and pins, you’ll be happy to know that this
product uses industry-standard connectors which are documented in detail in the Hardware Information
section of this User’s Guide. For those looking for the path of least resistance, we strongly encourage you to
order a RidePlayer Development Kit covered in the Accessories section of this document. This kit provides a
full set of pre-fabricated connectors and a power supply, so you spend less time crimping and get right to bench
testing your RidePlayer.
POWER
Our engineers are working around the clock to eliminate the need for those pesky
Electrons. However, until they inevitably succeed, RidePlayer needs power to
work properly.
You’ll want to start by connecting RidePlayer’s power input to a 24VDC power
source like a battery, super-capacitor, or bench supply. If you intend to use the
built-in amplifiers, we recommend a 24VDC/20A power source. If you plan to only
use the line outputs or network audio interface, a 24VDC/3A source will do the
job.
Once you have connected the power source, RidePlayer can be powered up by
simply flipping the circuit breaker switch UP to the ON position. HEY!!! What are
you doing?!? We didn’t actually say to power up yet, but you went ahead and did it
anyway didn’t you?!?! <Head Slap> Alright… clearly you’re excited so I guess we’ll
cut you some slack, but could you at least try to follow instructions next time?

9
September 14, 2018
CONTROL NETWORK
While RidePlayer sure looks pretty when you power it up, network
connectivity is required to actually make it do magical things. The goal here
is to interface RidePlayer to your Windows or macOS computer running
our WinScript Live software. This application empowers you to configure,
program, and load audio content to the unit over the network connection.
To make this connection, you’ll need an Ethernet cable with an M12 X-Code
connector on at least one end. The other end can be either RJ45 or M12
depending on your computer or network switch. For convenience, the
RidePlayer Development Kit includes several M12àRJ45 adapter cables.
These cables are also available for individual purchase from Alcorn McBride.
Using the M12 cable, you’ll want to connect the Primary Control port of
RidePlayer to your network switch or computer. Aside from the vibration-
resistant M12 connector, this is no different than connecting to any other
network device. When the unit is powered on, you will see a link indicator
illuminate on RidePlayer’s top panel to indicate a good network connection.
SPEAKER OUTPUT
In order to make great sound, we’re going to have to move some air! To do this,
we recommend at least one 4Wor 8Wunpowered speaker with a 25W (or
higher) power rating.
The next step is pretty simple. Connect the positive (+) terminal of Speaker
Output 1 to the positive (+) input of the speaker. Connect the negative (-)
terminal of Speaker Output 1 to the (-) terminal of the speaker. Rinse and repeat
for any other speakers that you wish to connect.

10
September 14, 2018
NETWORK CONFIGURATION
Now that we’re good to go with connections, we just need to do a little bit of configuration before we can
connect your computer to RidePlayer. Before we get started, it’s helpful to know that RidePlayer ships with the
following default IP address configuration:
If you’re at ease in the world of networking, you can easily adjust these settings for RidePlayer to operate on an
existing network. For more information on how to access the network configuration menu, see the Display and
Navigation Buttons section of this User’s Guide.
For those that just wish to connect a computer directly to RidePlayer, the easiest way is to set your computer to a
static IP address that is compatible with RidePlayer’s default network settings. For example, this configuration
would work nicely for your computer:
CONFIGURING STATIC IP - WINDOWS 10
1. Right-click on the Windows icon in the bottom-left and select Network Connections
2. Select Change adapter options
3. Right-click on the network interface that is connected to RidePlayer and select Properties
4. Select Internet Protocol Version 4 (TCP/IPv4) from the list of items and click the Properties
button below.
RidePlayer Primary Control Port
Control IP
192.168.0.253
Media IP
192.168.0.254
Subnet Mask
255.255.255.0
Computer Ethernet Port
IP
192.168.0.100
Subnet Mask
255.255.255.0

11
September 14, 2018
5. Select Use the following IP address, enter the IP address as 192.168.0.100, and enter the Subnet
Mask as 255.255.255.0 as indicated in the screenshot below:
6. Click the Ok button to apply the static IP address.
CONFIGURING STATIC IP – OS X
1. Click on the network icon in the OS X menu bar and select Open Network Preferences.
2. Select the network interface that is connected to RidePlayer from the available interfaces on the left.
3. Configure the network interface Manually, specify an IP address of 192.168.0.100, and a Subnet Mask
of 255.255.255.0 as indicated in the screenshot below.
4. Click Apply to enable the new static IP configuration

12
September 14, 2018
CONTROLLING WITH WINSCRIPT LIVE
At this point, everything should be wired up, configured, and ready to go. The next step is to connect to the
RidePlayer using our WinScript Live software. Once connected, you will have access to transfer media content,
configure, and control the RidePlayer unit.
Before we can get started, you’ll want to make sure to install the latest version of WinScript Live on your
Windows or macOS computer. This software can be downloaded for free from our website at www.alcorn.com.
Once the software is installed, follow these instructions to play a test clip from your RidePlayer:
1. Launch WinScript Live and click the Connect button on the splash screen
2. Your RidePlayer unit should automatically appear in the connection list. Click it once to select, and then
click the OK button to connect.
3. Select Retrieve and click OK.WinScript Live will then load the project currently stored on the
RidePlayer.
4. Double-click on the Media Files resource listed on the left-hand side of WinScript Live. This will display
the audio files currently loaded on the RidePlayer. By default, RidePlayer includes a single test clip named
1KTONE.WAV.
5. Click on the 1KTONE.WAV entry to select, select Audio 1 as the current output, and then click the
Play icon. The test clip will start playing a 1kHz sine wave on Audio Output 1. Notice how the top-
panel status indicator for the audio output illuminates green to indicate playback is in progress.

13
September 14, 2018
6. Double-click on the Audio Outputs resource listed on the left-hand side of WinScript Live. In this
screen, you can adjust the gain level of the audio outputs using the on-screen controls. You can also see
level indicators for each channel when playback is in progress.
7. Congratulations! You are in control of your RidePlayer unit. There are many places you can go from
here, but here are some helpful suggestions:
o Feel free to load your own WAV files by simply dragging-and-dropping them to the Media Files
screen. Once they have been added to the list, you can click on the Sync button to transfer
them to the unit. You can also right-click on the file and click Send Media File.
o Much of RidePlayer’s capabilities require the use of its powerful show control engine. This
includes advanced scripting capability, timeline features, and device control. To learn more, the
detailed documentation of our show control platform is built right into the WinScript Live
software. If you are new to Alcorn McBride show control, we also strongly encourage you to
access the training content included with WinScript Live using the Examples screen and/or sign
up for our next training class.
o Visit our Applications page at www.alcorn.com to access more detailed examples on application-
specific topics.

14
September 14, 2018
HARDWARE INFORMATION
OVERVIEW
RidePlayer has quite an assortment of dedicated hardware for the purpose of configuration, status monitoring, and
interfacing to other hardware. This section covers these features in more detail.
DISPLAY AND NAVIGATION BUTTONS
The top panel of RidePlayer features an 8-line by 42-character OLED
status display. This display is primarily used to share application-specific
information (i.e. “Location: Scene 2”) from the show control script.
However, this display also offers a full menu system that can be
accessed using the navigation buttons located adjacent to the display.
MAIN MENU
This menu provides access to the following sub-menus:
• Audio – View Audio settings and control Gain and Mute
• Control – Monitor show control performance and script status
• Sync – View sync configuration and monitor sync status
• Network –Configure control and audio network interfaces
• System – Configure and monitor generic system status

15
September 14, 2018
AUDIO MENU
• Mute All – Mute/Unmute all audio outputs
• Sample Rate – View current audio sample rate (44.1KHz or 48.0KHz)
• Output Volume – Set volume level of individual output (-128dBà0dB)
• Output Mute – Mute/Unmute individual output
SHOW CONTROL MENU
• Script – View currently active show control script
o Select to access a screen to view full script name and load different scripts
• CPU Load – View current load of show control processor
• Serial Mode – View mode of operation for multi-purpose serial port
SYNC MENU
• Sync Source – View sync clock reference (Internal, PTP, NTP, GPS, SMPTE LTC, Genlock)
• Frame Rate – View operating frame rate of show control core
• PTP Master – View state of PTP clock distribution (No/Yes)
• NTP Server – View state of NTP Server clock distribution (No/Yes – IP)
• Genlock Out – View sync format of Genlock output (Enabled – Format)
• LTC Out – View operating frame rate of SMPTE LTC interface
• Status – Access screen with detailed status information about the sync system

16
September 14, 2018
SYNC STATUS
• Reference– View clock reference (Internal, PTP, NTP, GPS, SMPTE LTC, Genlock)
• Status – View lock status (Locked/Not Locked – HH:MM:SS)
• Master Offset – View estimated offset (in nS) from Clock Reference
• Last Update – View how long it has been since the last update with the Clock Reference (Seconds)
• Detailed Info – The screen items that follow will depend on which reference is being used:
o Internal – No additional information
o PTP
§ GrandMaster ID – None, or XXXXXX.XXXX.XXXXXX
§ Device ID - XXXXXX.XXXX.XXXXXX
§ PHC Master Offset – In nS
§ Mean Path Delay – In nS
o NTP
§ Server Address
o GPS
§ PPS – Active (1Hz, 5Hz, etc.)
o SMPTE LTC – No additional information
o Genlock
§ Genlock Input – Format of Genlock input signal (i.e.1080p60Hz)
NETWORK MENU
• Primary Control – View Status and Configure the ‘Primary Control’ port
• Secondary Control – View Status and Configure the ‘Secondary Control’ port
• Primary Audio – View Status and Configure the AES67/Dante ‘Primary Audio’ port
• Secondary Audio – View Status and Configure the AES67/Dante ‘Secondary Audio’ port

17
September 14, 2018
CONTROL NETWORK MENU
• DHCP – Enable/Disable DHCP network configuration
• Control IP – View/Configure Show Control IP address
• Media/Sync IP – Media/Sync IP address (Primary Only - Used for NTP/PTP sync and media file transfer)
• Subnet Mask – View/Configure subnet mask
• Gateway – View/Configure gateway IP address
• DNS – View/Configure DNS address
• Control MAC – View MAC address for Show Control Ethernet interface
• Media/Sync MAC – View MAC address for Media/Sync Ethernet interface
• Link – Current link status of network port
AUDIO NETWORK MENU
• Device Name – View/Configure current Dante/AES67 Device Name
• DHCP – Enable/Disable DHCP network configuration
• IP – View/Configure IP address
• Subnet Mask – View/Configure subnet mask
• Gateway – View/Configure gateway IP address
• DNS – View/Configure DNS address
• MAC – View MAC address
• Link – Current link status of network port

18
September 14, 2018
SYSTEM MENU
• Device ID – Shows the user-assigned name of the RidePlayer unit (i.e. “RV1”)
• Version – Firmware version of unit
• Build – Build revision of firmware
• Status – View status info such as temperature, fan speed, input voltage, etc.
• Format SSD – Erase and Format internal SSD media
• Reset Settings – Reset all configuration data (i.e. network, device name, etc.) to factory defaults
• Reboot – Reboot RidePlayer and re-launch script

19
September 14, 2018
INDICATOR LEDS
The top-panel of RidePlayer has a full set of indicator LEDs to provide
an overall status of different features of the device.
STATUS
Power – ON whenever power is applied to the unit and the circuit breaker is switched on
LTC – ON whenever SMPTE LTC is being actively generated or read
Lock – ON whenever the sync system is locked to the configured reference
Live – ON whenever WinScript Live is connected to the device
SERIAL - GPS
These indicators blink to indicate activity on either the GPS serial port, or the multi-purpose serial port.
NETWORK
These indicators display both network link and activity for all of the Control and Network Audio ethernet ports.
LED State
Description
OFF
No network link
SOLID ORANGE
Network link active – No network activity detected
BLINKING ORANGE
Network link active – Network activity detected

20
September 14, 2018
INPUTS
These indicators display the activation state of the 8 digital inputs.
LED State
Description
OFF
Inactive – No contact closure detected or voltage input is <9VDC
GREEN
Active – Contact closure detected or voltage input is 9-24VDC
OUTPUTS
These indicators display the activation state of the 4 dry-contact relay outputs. Keep in mind that these are
normally-open (NO) relays, so the contacts are closed when the output is in an ‘Active’ state.
LED State
Description
OFF
Inactive – Relay contact is OPEN
GREEN
Active – Relay contact is CLOSED
Table of contents
Other Alcorn Mcbride Turntable manuals