Alcorn Mcbride BinloopX User manual

BinloopX User’s Guide
March 26, 2021
MULTI-CHANNEL SYNCHRONOUS A/V PLATFORM

2
March 26, 2021
TABLE OF CONTENTS
TABLE OF CONTENTS .............................................................................................................. 2
WELCOME! ................................................................................................................................... 5
PRODUCT FEATURES................................................................................................................ 6
SHOW CONTROL FEATURES.................................................................................................................................... 6
SYNCHRONIZATION FEATURES................................................................................................................................ 6
PHYSICAL FEATURES.................................................................................................................................................. 7
AUDIO AND VIDEO FEATURES ................................................................................................................................. 7
TECHNICAL SUPPORT .............................................................................................................. 8
GETTING STARTED.................................................................................................................... 9
A/V MODULE INSTALLATION................................................................................................................................... 9
WIRING AND CONNECTIVITY ...............................................................................................................................10
NETWORK CONFIGURATION................................................................................................................................11
CREATING A BINLOOPXPROJECT.........................................................................................................................13
PLAY A TEST CLIP....................................................................................................................................................15
HARDWARE INFORMATION.................................................................................................. 19
OVERVIEW ...............................................................................................................................................................19
DISPLAY AND NAVIGATION WHEEL .....................................................................................................................20
INDICATOR LEDS....................................................................................................................................................24
CONNECTORS.........................................................................................................................................................25
SYNCHRONIZATION ............................................................................................................... 30
PHASE-LOCKED CLOCKS ........................................................................................................................................30
PRECISE TRIGGERING ..............................................................................................................................................31
SYSTEM ARCHITECTURE..........................................................................................................................................33
SYNC CONFIGURATION .........................................................................................................................................34
BLOCK DIAGRAM ..................................................................................................................... 36

3
March 26, 2021
SPECIFICATIONS ...................................................................................................................... 37
A/V MODULES............................................................................................................................ 38
BX-16A –AUDIO PLAYBACK MODULE................................................................................................................39
CONFIGURING NETWORK AUDIO ...................................................................................... 42
CONNECTING THE AUDIO NETWORK.................................................................................................................42
CONFIGURING NETWORK AUDIO ADDRESSES....................................................................................................43
CONFIGURING NETWORK AUDIO SETTINGS.......................................................................................................44
ROUTING AUDIO OUTPUTS ..................................................................................................................................44
MOUNTING ................................................................................................................................ 45
ACCESSORIES............................................................................................................................ 46
POWER SUPPLY........................................................................................................................................................46
POWER SUPPLY MODULE .......................................................................................................................................46
PRODUCT PHOTOS ................................................................................................................. 47

4
March 26, 2021
Copyright ©1996-2021 Alcorn McBride, Inc. All rights reserved.
Every effort has been made to assure the accuracy of the information contained in this manual, and the reliability of
the Alcorn McBride BinloopX hardware and software. Errors can sometimes go undetected, however. If you find
one, please bring it to our attention so that we can correct it for others. Alcorn McBride welcomes comments and
suggestions on the content and layout of its documentation.
Applications described herein are for illustrative purposes only. Alcorn McBride Inc. assumes no responsibility or
liability for the use of these products, and makes no representation or warranty that the use of these products for
specific applications will be suitable without further testing or modification. Alcorn McBride products are not
intended for use in applications where a malfunction can reasonably be expected to result in personal injury.
Customers using or selling Alcorn McBride products for use in such applications do so at their own risk, and agree
to fully indemnify Alcorn McBride for any damages resulting from such improper use or sale. Alcorn McBride Inc.
reserves the right to make changes to these products, without notice, in order to improve their design or
performance. The unit requires installation into a suitable fire enclosure in the final assembly.
BinloopX™ is a trademark of Alcorn McBride Inc., all rights reserved.
This unit has been tested and found to comply with the following:
FCC 47 CFR Part 15B:2017, ISED ICES-003: Issue 06 (2016)
EN 55032 Class A Conducted and Radiated Emissions
EN 55035, EN 61000-3-2, and EN61000-3-3 Immunity
Caution, shock hazard, disconnect all power sources before servicing.
Note: This equipment has been tested and found to comply with the limits for a Class A digital device, pursuant to
part 15 of the FCC Rules. These limits are designed to provide reasonable protection against harmful interference
when the equipment is operated in a commercial environment. This equipment generates, uses, and can radiate
radio frequency energy and, if not installed and used in accordance with the instruction manual, may cause harmful
interference to radio communications. Operation of this equipment in a residential area is likely to cause harmful
interference in which case the user will be required to correct the interference at his own expense.

5
March 26, 2021
WELCOME!
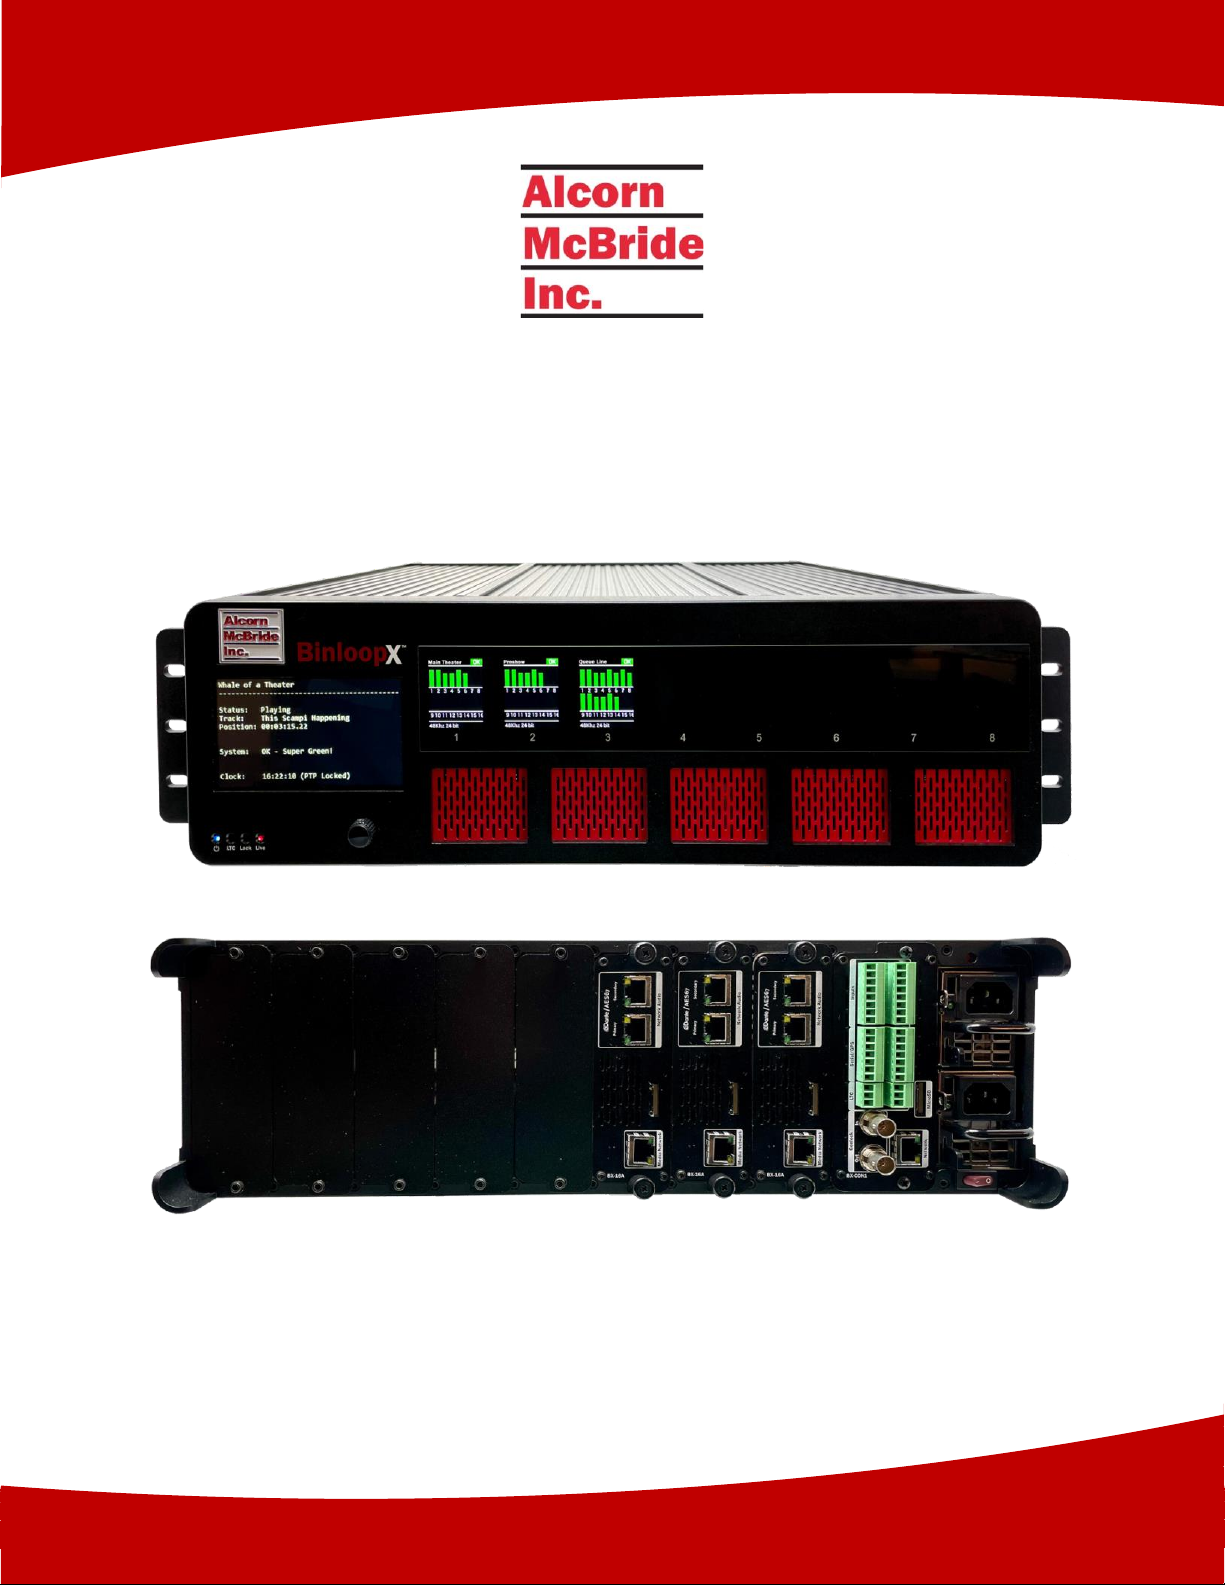
Congratulations on your brand-new Alcorn McBride BinloopX!
BinloopX is designed to serve as a scalable and synchronous A/V playback platform that can be configured to suit
the needs of any themed attraction. Since these needs can vary widely, the BinloopX offers a scalable 8-slot frame
that can be outfitted with up to 8 high-quality audio or video playback modules.
Each audio module is capable of sourcing up to 16 outputs of 24-bit 48kHz uncompressed audio. This includes 64
tracks of playback with the ability to route, mix, and crossfade between tracks on any of the available outputs.
This allows for discrete playback of separate tracks like background music, vocals, and sound effects all mixed on a
single audio output. Each output is also equipped with DSP capabilities like 7-band parametric EQ, Low-Pass, High-
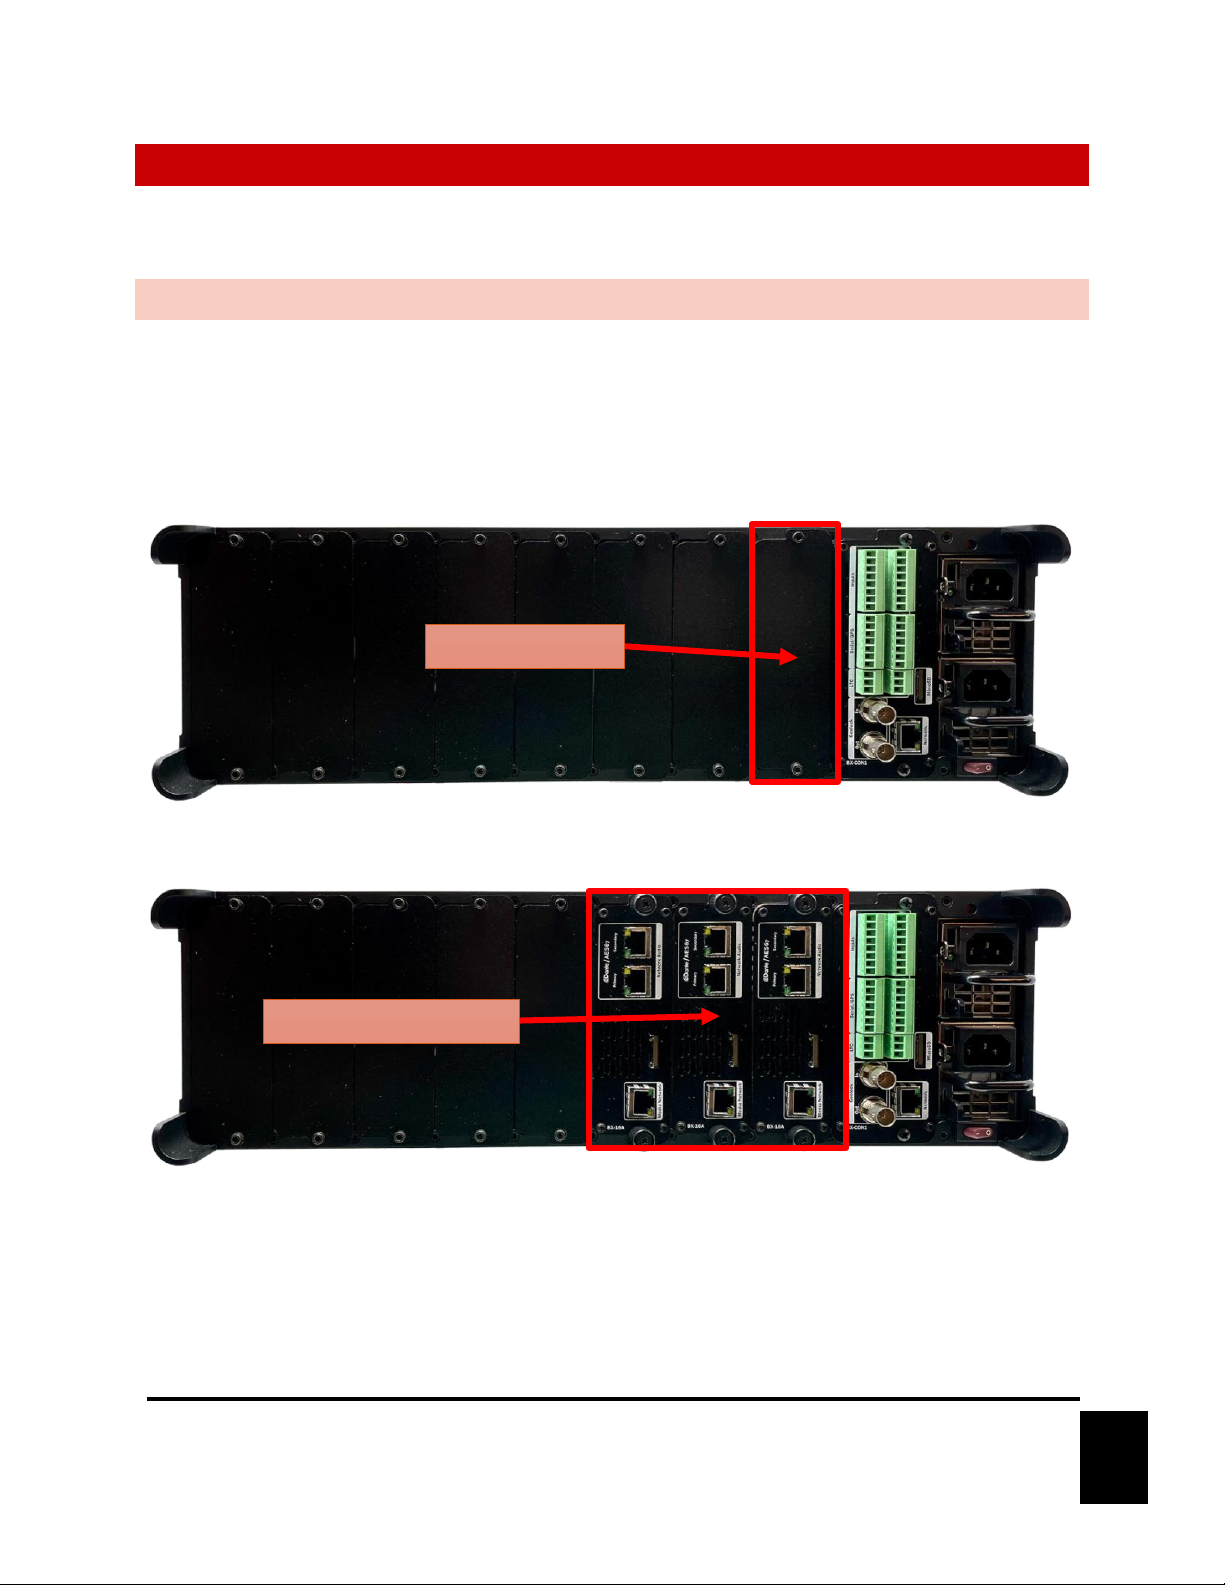
Pass, and several other filter options. Distribution is a piece of cake with the redundant 16x16 AES67/Dante
network audio interface.
Any combination of A/V modules can be installed within any of the 8 A/V module slots of the BinloopX. This
means a single chassis can be scaled to provide anywhere between 16 to 128 discrete audio outputs. Need more?
Multiple BinloopX chassis can be easily combined and synchronized using the power of SyncCore and our V16X
show controller.
No matter how great the quality is, A/V playback alone is far from being the only important feature for themed
attractions. With show elements like audio, video, lighting, animatronics, special effects, and ride control;
synchronization is typically the biggest obstacle for any type of ride-based attraction. To tackle this challenge,
BinloopX incorporates Alcorn McBride SyncCore technology which uses multiple methods to ensure extremely
precise synchronization with other show system components. These industry-standard methods include PTP
(IEEE-1588/CIP Sync), NTP, GPS, SMPTE LTC, and Video Genlock. When used in conjunction with other
SyncCore enabled products like RidePlayer and V16X, synchronizing even the most complex attractions is a
breeze.
All of this powerful technology is intuitively managed and configured using our license-free WinScript Live
software. This software empowers you to create timelines to easily synchronize A/V playback with other show
elements. Whether you’re using digital input triggers, SMPTE LTC, ShowTouch panels, or our V16X show
controller, the flexibility of WinScript allows you to take complete control of your A/V experience.
This product leverages 33 years of experience designing products specifically for themed entertainment
applications. In true Alcorn McBride fashion, the solid-state and rugged design will ensure years of 24/7
maintenance free operation which is essential to zero downtime for attractions. At Alcorn McBride, it is our
passion to engineer solutions that are uniquely suited for themed entertainment. We hope that you love using this
product as much as we enjoyed designing it!

6
March 26, 2021
PRODUCT FEATURES
SHOW CONTROL FEATURES
This product features the very powerful and flexible Alcorn McBride X-Series ControlCore. This enables the
BinloopX to leverage the flexibility of timelines, triggers, advanced scripting capabilities, and touch-panel control.
This also provides you with the capability to trigger A/V playback from standard control interfaces like digital
inputs, serial, Ethernet, or SMPTE LTC.
The show control feature set includes:
•Alcorn McBride X-Series ControlCore
oAdvanced Scripted Control
oTimeline Programming
oShowTouch Integration
oMedia File Management
•Integrated 4.3” Touchscreen
•1 x 1Gbps Network Control Port
•8 x CC/Voltage inputs
•1 x RS-232/RS-422 Serial Port
•1 x SMPTE LTC In/Out Interface
•Power Supply Monitoring
SYNCHRONIZATION FEATURES
BinloopX is equipped with the Alcorn McBride SyncCore system to provide for extremely precise synchronization
between the on-board and off-board systems. This technology uses several industry-standard methods to maintain
a very precise clock between BinloopX and other SyncCore enabled products like the V16X and RidePlayer.
The supported synchronization methods include:
•PTP (IEEE-1588)
•NTP
•GPS /w PPS Clock Input
•SMPTE LTC
•Genlock

7
March 26, 2021
PHYSICAL FEATURES
This product’s solid-state purpose-built design allows it to endure the heavy use that comes with running high-
profile attractions. It offers 3U rack mounting, industrial-grade connectors, redundant power supply, and a rock-
solid chassis design.
Physical features include:
•Rugged Purpose-Built Design
•3U 19” Rack Mount
•Redundant Power Supply
•Monitored Cooling System
•8 A/V Module Slots - See A/V Modules section for available options
AUDIO AND VIDEO FEATURES
I’m terribly sorry to give you the run-around, but the audio and video capabilities of the BinloopX depend on
which wonderful A/V Modules you choose to install in the BinloopX. These modules (and their capabilities) are
listed in the A/V Modules section of this manual.

8
March 26, 2021
TECHNICAL SUPPORT
Now that we’ve tantalized you with all of the wonderful things this product can do, I’ll bet you’re chomping at the
bit to flip all the switches and push all the buttons. Not so fast! Before we get to the fun stuff, we just want to
take a moment to remind you that we are here to help. Chances are that you’re building something really cool
and we want you to have access to the resources and support you need to be successful.
To start, you’ll find a wealth of information on our website. This includes Application Notes that give you detailed
documentation and examples for how this product is used in common types of themed entertainment projects.
You’ll also find the latest downloads for software, firmware, drawings, 3D models, cutsheets, and other helpful
resources on our Support page. The Knowledge Base is especially handy for common questions and helpful
troubleshooting tips. And last, but certainly not least, you always have our friendly and mildly entertaining staff
available by email or telephone.
Training
https://www.alcorn.com/training
Application Notes
https://www.alcorn.com/applications
Support Resources
https://www.alcorn.com/support
Knowledge Base (FAQ)
https://alcornmcbride.zendesk.com/hc/en-us
Email Support
support@alcorn.com
Telephone Support
(407) 296-5800 (Mon-Fri 9am-6pm EST)

9
March 26, 2021
GETTING STARTED
Alright, time to roll up your sleeves and get to work! This section will guide you through basic concepts that will
help you get on your way with BinloopX.
A/V MODULE INSTALLATION
The BinloopX is a modular platform with 8 A/V module slots. If you order your BinloopX pre-configured, we
install these modules for you at the factory. However, if you order these components separately (perhaps at a
later time to expand the capabilities of a BinloopX), you will need to install these modules yourself.
Thankfully, this process is extremely easy. First, you need to remove two screws from the cover plate of an
empty slot. This will expose the slot so that a new A/V module can be inserted.
Next, insert the new A/V module into the empty slot and then tighten the thumb screws to secure the module.
Once you have installed the A/V modules you wish to use, proceed to the next section to properly connect your
BinloopX.
Empty A/V Slot
Installed A/V Modules

10
March 26, 2021
WIRING AND CONNECTIVITY
A few connections are required to experience the core functionality of BinloopX.
POWER
Our engineers are working around the clock to eliminate the need for those pesky Electrons. However, until they
inevitably succeed, BinloopX needs power to work properly.
You’ll want to start by connecting the BinloopX power
supply to a 110-240VAC power source. This product has a
redundant power supply so, while it will work just fine with
only one power connection, it is recommended that you
connect both power supply inputs. Otherwise, the power
supply will emit an intentionally obnoxious BEEEEEEP and
quickly drive you mad.
Once you have connected the power source, BinloopX can
be powered up by simply flipping the power switch to the
ON position.
HEY!!! What are you doing?!? We didn’t actually say to power up yet, but you went ahead and did it anyway
didn’t you?!?! <Head Slap> Alright… clearly you’re excited so I guess we’ll cut you some slack, but could you at
least TRY to follow instructions next time?
NETWORK
While BinloopX sure looks pretty when you power it up, network
connectivity is required to actually make it do magical things. The goal here is
to interface BinloopX to your Windows or macOS computer running our
WinScript Live software. This application empowers you to configure,
program, and load media content to the unit over the network connection.
To make this connection, you’ll use need a standard RJ45 Ethernet patch
cable. You’ll want to connect the main Network port of BinloopX to your
network switch or computer. When the unit is powered on, you will see a
link indicator illuminate on the ethernet port to indicate a good network
connection.

11
March 26, 2021
NETWORK CONFIGURATION
Now that we’re good to go with connections, we just need to do a little bit of configuration before we can
connect your computer to BinloopX. Before we get started, it’s helpful to know that BinloopX ships with the
following default IP address configuration:
If you’re at ease in the world of networking, you can easily adjust these settings for BinloopX to operate on an
existing network. For more information on how to access the network configuration menu, see the Display and
Navigation Wheel section of this User’s Guide.
For those that just wish to connect a computer directly to BinloopX, the easiest way is to set your computer to a
static IP address that is compatible with BinloopX’s default network settings. For example, this configuration
would work nicely for your computer:
CONFIGURING STATIC IP - WINDOWS 10
1. Right-click on the Windows icon in the bottom-left and select Network Connections
2. Select Change adapter options
3. Right-click on the network interface that is connected to RidePlayer and select Properties
4. Select Internet Protocol Version 4 (TCP/IPv4) from the list of items and click the Properties
button below.
BinloopX Network Port
IP Address
192.168.0.254
Subnet Mask
255.255.255.0
Computer Network Port
IP Address
192.168.0.100
Subnet Mask
255.255.255.0

12
March 26, 2021
5. Select Use the following IP address, enter the IP address as 192.168.0.100, and enter the Subnet
Mask as 255.255.255.0 as indicated in the screenshot below:
6. Click the Ok button to apply the static IP address.
CONFIGURING STATIC IP –OS X
1. Click on the network icon in the OS X menu bar and select Open Network Preferences.
2. Select the network interface that is connected to RidePlayer from the available interfaces on the left.
3. Configure the network interface Manually, specify an IP address of 192.168.0.100, and a Subnet Mask
of 255.255.255.0 as indicated in the screenshot below.
4. Click Apply to enable the new static IP configuration

13
March 26, 2021
CREATING A BINLOOPX PROJECT
At this point, everything should be wired up, configured, and ready to go. The next step is to create a new script
and then connect to the BinloopX using our WinScript Live software. Once connected, you will have access to
transfer media content, configure, and control the BinloopX unit.
Before we can get started, you’ll want to make sure to install the latest version of WinScript Live on your
Windows or macOS computer. This software can be downloaded for free from our website at www.alcorn.com.
Once the software is installed, follow these instructions to create a project for your BinloopX:
1. Go ahead and power on the BinloopX using the power switch.
2. Launch WinScript Live and click the New button on the splash screen
3. Select BinloopX and then enter a device Name in the properties below (i.e. “BinloopX-
WhaleTheater”).
4. Click Next to proceed to the Module Type screen.

14
March 26, 2021
5. Now, we need to configure which modules are installed within your BinloopX. Use the dropdown below
each A/V Module Slot to select the modules you have installed. Click Next to proceed to the Module
Properties screen.
Alternatively, you can automatically scan your BinloopX using the Retrieve Module Types button. This method
will scan your network interface for the BinloopX, request its current module configuration, and automatically
select the correct modules for each slot.
6. This screen can be used to name the modules you have installed and configure their Media Network ports
if you intend to use them.
The name you enter
here will be shown on
the front-panel status
display for this module.
7. Click Finish to create the project. Now is a great time to Save the project.

15
March 26, 2021
PLAY A TEST CLIP
Regardless of what kind of A/V playback module you have installed, test clips will be preloaded. Let’s learn how to
play one of these test clips!
1. First, let’s get connected to the BinloopX by clicking the Connect button located in the Menu bar at the
top of WinScript.
2. Next, let’s create a new sequence by clicking the New button in the Sequence list. Enter ‘TestClip’ as
the sequence name and select Timeline as the sequence type.
3. Click OK to create the sequence.

16
March 26, 2021
4. Using the Resources section on the left of WinScript Live, browse to the Media Files of an A/V
module. When connected to the BinloopX, the available test clips will appear when you expand this
resource.
5. Click-and-hold a test clip and drag it onto the Sequence timeline that you just created. Once you release
this clip on the timeline, it will be automatically added to the timeline and plotted based on the length of
the clip.
6. Next, we need to configure the playback of this clip in a little more detail. Go ahead and double-click on
the clip within the timeline to enter the Edit Event screen.

17
March 26, 2021
7. As you can see, dragging this clip to the timeline has automatically created a Media Play event. Click
Next to proceed to the next screen.
8. This screen will already be pre-filled with the test clip you dragged onto the timeline. Other options will
likely be included on this screen for more advanced playback features. For example, the audio playback
module allows you to fade in clips or trim the end of the clip. For this getting start guide, there’s no need
to change anything here. Just click Next to proceed.
9. The next screen allows you to specify which output to play the clip. For this example, the audio playback
module has 16 outputs to choose from. I’ve chosen to play this clip from outputs 1, 2, and 3. Feel free to
select whichever outputs you wish and click Finish.

18
March 26, 2021
10. Now, click the Start button to start the sequence.
11. The test clip will play along with the sequence. To confirm, view the front-panel display of the A/V
module that is playing and you should see activity:
12. At this point, audio and/or video is available on the corresponding A/V outputs. Viewing video will
require you to connect a display device to one of the outputs of the video module. Listening to audio will
require you to route the network audio outputs to an audio device.

19
March 26, 2021
HARDWARE INFORMATION
OVERVIEW
The BinloopX chassis includes a built-in 110-240VAC redundant power supply, 4.3” TFT status display, navigation
wheel, status LEDs, BC-CON1 controller module, and 8 A/V module slots.
Menu Wheel
Status LEDs
4.3” Main Status Display
(8) 1.8” A/V Module Status Displays
(8) A/V Module Slots
Genlock In/Out
LTC In/Out
Ethernet Port
Digital Inputs
Serial/GPS
STFU Button
Power Inputs
Power Switch

20
March 26, 2021
DISPLAY AND NAVIGATION WHEEL
The front panel of BinloopX features a 12-line by 43-character TFT status
display. This display is primarily used to share application-specific
information (i.e. “Status: Playing”) from the show control script. However,
this display also offers a full menu system that can be accessed by pushing
the navigation wheel located just below the display.
Below, you will find a description of the menu items that are available from
this interface.
MAIN MENU
This menu provides access to the following sub-menus:
•System –Configure and monitor generic system status
•Real-Time Clock –Configure and monitor real-time clock
•Network –Configure network interface
•Password –Configure front-panel lockout password
•Script –Monitor show control performance and script status
•Sync –Monitor sync system status
•LTC/SMPTE –Monitor the SMPTE LTC status
Table of contents
Other Alcorn Mcbride Turntable manuals