3
ATTENTION
Lisezlesréglesetlesinstructionspourunfonctionnementsécuritaire.
AVERTISSEMENTS
1. Anderéduirelerisqued’incendieoud’electrocution,n’utilisezpasceventilateuravecaucundisposiliftransistorisé
de côntrllle de vilesse.
2. Cetappareilpossédeunechepolarisée(unelameestpluslargequel’autre).Anderéduirelerisqued’électrocution,cette
cheestconçuepours’insérerseulementd’unefaçondansuneprisepolarisée.SiIachenes’insèrepascomplètement
dansIaprise,inversezIache.Siellenes’insèretoujourspas,veuillezappelerunélectricianqualié.N’essayezpasde
neutralisercettecaractéristiquedesécurité.
3. Catappareiln’estpasconçupourêtreutilisépardesenfants.
4. Ne laissez pas fonctionner le ventilateur sans surveillance.
FONCTIONNEMENT SÉCURITAIRE:
1. Leventilateurdoitêtreutiliséselonsonvoltagenominal.
2. Branchezseulementdanslaprisequ’aprèsavoircomplètementassembléleventilateur.
3. N’insérezjamaislessdoigts,outoutautreàtraverslegrillagelorsqueleventilateur.
4. Débranchezleventilateurdelapriselorsqu’iln’estpasutilisé,qu’ilestdéplacéd’unendroitàunautre,avantd’installer
ou d’enlever des pièces et avant le nettoyage.
5. Ne laissez pas ventilateur fonctionner sans surveillance.
6. Tenez les enfants éloignés de l’appareil.
7. Ceproduitestdestinéàunusagedomestiqueuniquementetnonàdesnscommerciales,industriellesouune
utilisation en extérieur.
8. Pouréviterchocélectrique,neplacezpasdeventilateurenfenetre,nel’immergerpasdeventilateuroudecordon
dansdel’eauouvaporiserdesliquides.
9. Nepasfairefonctionnerleventilateurenprésencedevapeursinammablesouexplosives.
10. Neplacezpasleventilateuroutoutpièceàproximitéd’uneammenue,appareildecaissonouautreappareildechauffage.
11. Pourdéconnecter,tenezlachedecordonetretirez-ladelaprisemurale.Nejamaistirezsurlecordon.
12. Nepasmontezaumurouauplafond.
13. Nepasfairefonctionnersilecarterduventilateurestretiréoud’endommage.
9
1234
56
7
10
8
12
11
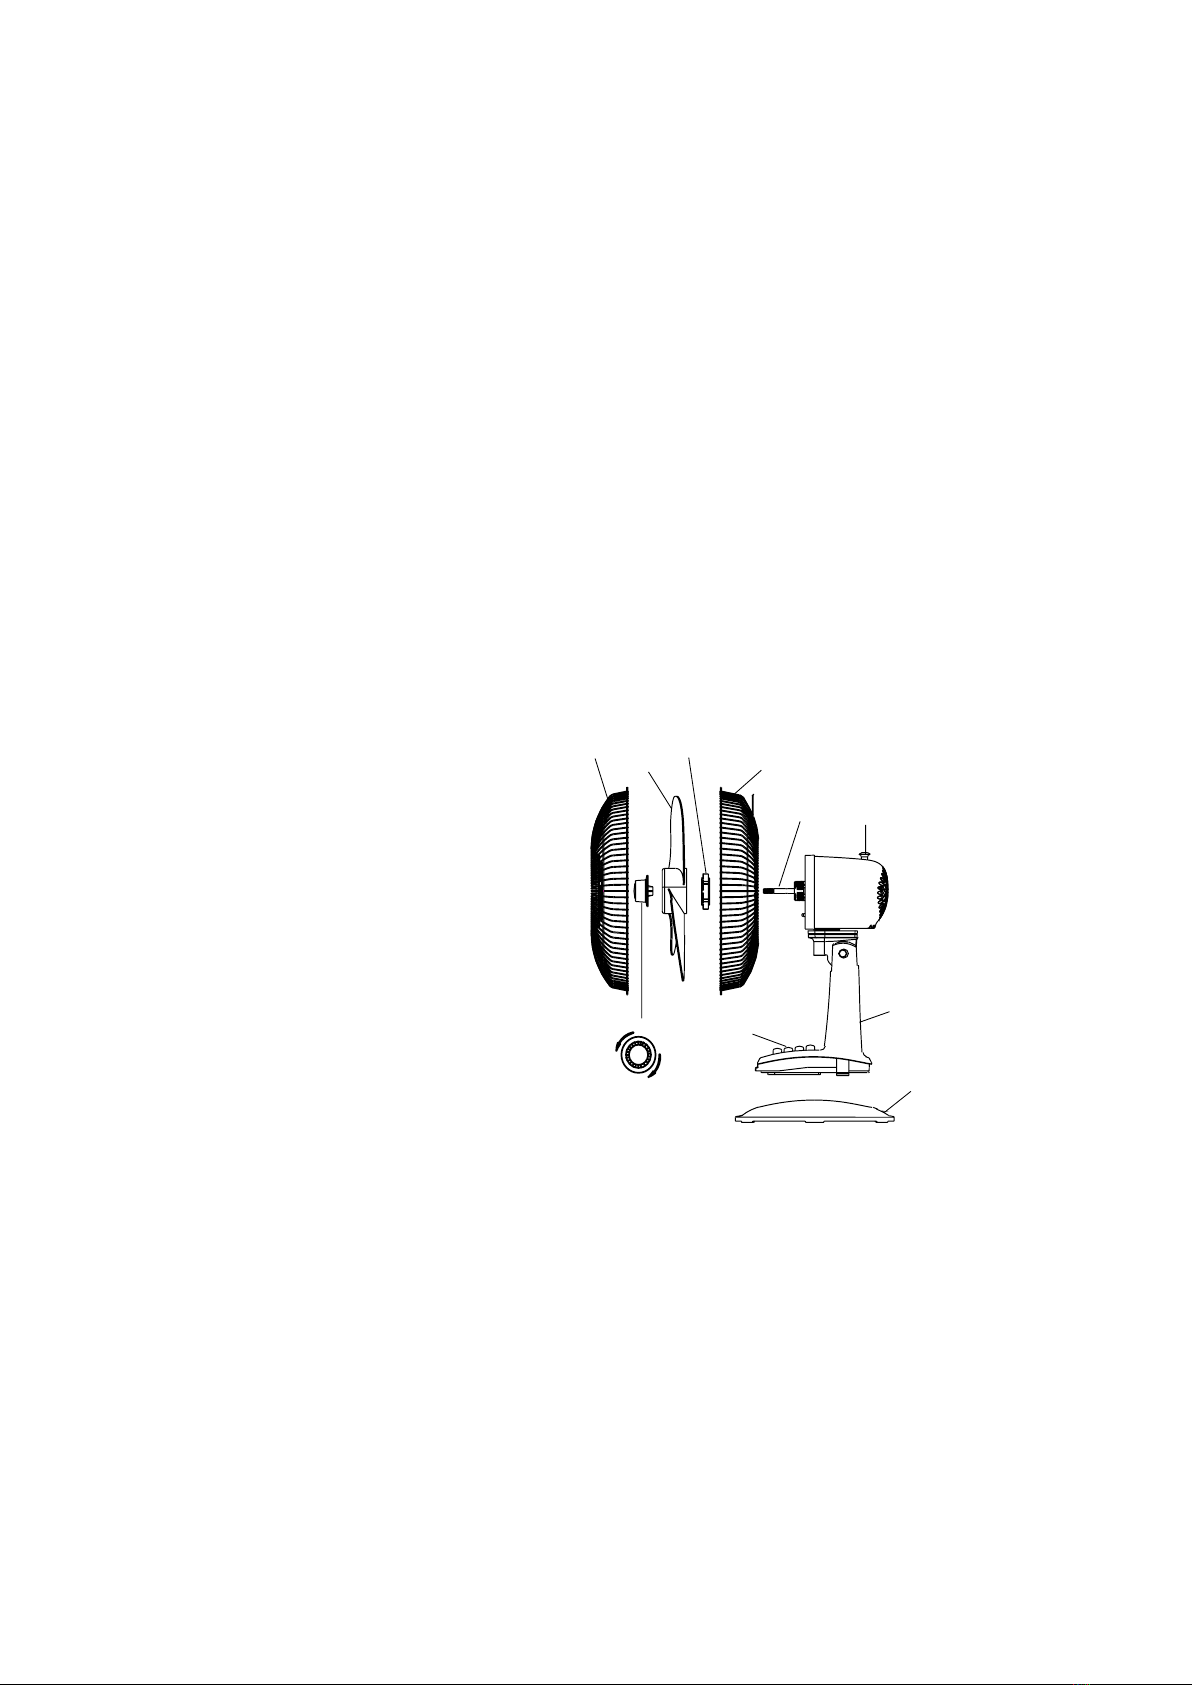
1. Grille avant
2. Hélice
3. Écroudeplastique
4. Grille arrière
5. Arbredumoteur
6. Bouton d’oscillation
7. Boîtier du ventilateur
8. Cône
9. Socle
10. Boutons de vitesse
11. Serrer
12. Desserer
NOMENCLATURE DES PIÈCES
ASSEMBLAGE DU PIED
1. Desserrer la vis du socle du ventilateur.
2. Alignerl’ongletdeverrouillagesurlepiedetcliquerenplace.
3. Serrerlavisdusoclepourxerleventilateurausocle.
ASSEMBLAGE DE L’HÉLICE ET DES GRILLES
1. Prendrelaleusehorsdesonemballageetretirezl’écrouenplastiqueenletournantdanslesensantihoraire.
2. Placerlagrillearrièresurlatêteduventilateur,lapoignéeverslehaut.
3. Visserl’écroudeplastiqueàfondandexerlagrillesurlatêteduventilateur.
4. Glisserl’héliceduventilateursurl’arbremoteurjusqu’àcequelatigederetenues’insèredansl’encochedel’hélice.
5. Visserlecônedanslesensanti-horairesurl’arbredumoteur.
6. Installerlagrilleavantetjoindrelesdeuxgrillesàl’aidedesagrafes.
7. Déposeretmettreaurebutlemanchonenplastiquesurl’arbre.