Alera ALE-FAN363 User manual

11-15/1
36” OSCILLATING TOWER FAN
36” VENTILADOR DE TORRE OSCILANTE
91.4 cm VENTILATEUR TOUR OSCILLANT
Model: ALE-FAN363
OPERATING INSTRUCTIONS
Please read and save these instructions
GUIDE D’UTILSATION
Prière de lire et de conserver ces instructions
INSTRUCCIONES DE OPERACIÓN
Lea y conserve este instructivo.

1
CAUTION
Read Rules and Instructions for Safe Operation
WARNINGS
1. Toreducetheriskofreorelectricshock,donotusethisfanwithanysolid-statespeedcontroldevice.
2. Thisappliancehasapolarizedplug(onebladeiswiderthantheother).Toreducetheriskofelectricshock,thisplug
isintendedtotinapolarizedoutletonlyoneway.Iftheplugdoesnottfullyintheoutlet,reversetheplug.Ifitstill
doesnott,contactaqualiedelectrician.Donotattempttodefeatthissafetyfeature.
3. This appliance is not intended for use by children.
4. Do not leave the fan running unattended.
SAFETY WARNINGS
1. Fan should be used under rated voltage.
2. Connectpoweronlyafterthefanisfullyassembled.
3. Neverinsertngersoranyotherobjectthroughthegrillwhenfanisrunning.
4. Unplugfromoutletwhennotinuse,whenmovingfanfromonelocationtoanother,beforeputtingonortakingoff
parts before cleaning.
5. Do not leave the fan running unattended.
6. Keepchildrenawayfromtheappliance.
7. ThisproductisintendedforhouseholduseONLYandnotforcommercial,industrialoroutdooruse.
8. Toprotectagainstelectricalshock,donotplacefaninwindows,immerseunitorcordinwaterorspraywithliquids.
9. Donotoperatethefaninthepresenceofexplosiveorammablefumes.
10. Donotplacethefanoranypartsnearanopename,cookingorotherheatingappliance.
11. Todisconnect,griptheplugandpullitfromthewalloutlet.Neveryankthecord.
12. Donothangormountfanonwallorceiling.
13. Donotoperateifthefanhousingisremovedordamaged.
1. Body
2. Front base
3. Rear base
4. Base clip
5. Powercord
PARTS NAME
ASSEMBLY INSTRUCTIONS
1. Pullpowercord(5)outslightly.
2. Connectfront(2)andrearbase(3)
3. Attachfan(1)tobaseasshowninthediagram.
4. Secure(1)withbaseclip(4)asshown.
OPERATING INSTRUCTIONS
Icon Function Detail
Power Press this key to turn the fan on/off
Speed setting Pressthiskeytodesiredfanspeed,
1=Low,2=Medium,3=High
Windmode Pressthiskeytodesiredwindmodeinthesequenceof
NORMAL–BREEZE( )–SLEEP( )
Timer Pressthiskeyrepeatedlytosetthetimerofwindsending
from1hourto8hours
Oscillating Press this key to start or stop the fan oscillation
1
2
3
4
5

2
INSERT BATTERIES
1. Pressdownonthebatterycompartmentcoverandslideitout.
2. Insertthebatteries,makingsurethatthepositiveterminalsarefacingtheproper
directionmarkedinsidethebatterycompartment.
3. Close the cover by sliding it in.
Note:
1) Use2“AAA”batteries(NOTINCLUDED).
2) Donotmixoldandnewbatteries.
3) Donotmixalkaline,standard(carbon-line)orrechargeable(nickel-cadmium)batteries.
USER SERVICING INSTRUCTIONS
a) Grasptheplugandremovefromelectricalsocket.Donotunplugbypullingon
the cord.
b) Toopenthefusecover,slidetheaccesscoverontopoftheplugtowardstheblades.
c) Removetheoldfusecarefully.Pushthefusefromtheothersideorturnfuseholder
overtoremovefuse.
d) Topreventriskofre,replaceonlywith2.5Amp,125Voltfuse.
e) Toclosethefusecover,slidetheaccesscoverbackontopoftheplug.
Notice:
1. Donotuseexcessiveforcewheninstallingthefuse.Thismaycausedamages.
2. Iftheunitdoesnotoperate,verifycorrectratingofthefuseandinstallationintheproperposition.
CLEANING/ MAINTENANCE INSTRUCTIONS:
WARNING: To avoid electrical shock and personal injury, always unplug from electrical outlet before cleaning/ maintenance.
1. Donotallowwatertodriponorenterthefan/motorhousing.
2. Onlyuseasoftclothwithmildsoapsolutionforcleaning
3. Donotuseanyofthefollowingcleanser:gasoline,thinner,oranyotherammablechemicals.
TROUBLESHOOTING
Problem Possible Cause Corrective Action
Thefanwillnotoperate.
The fan isn’t plugged in
and/or the electrical outlet
isn’tworkingproperly.
Makesurethefanispluggedinand/ortheelectricaloutletis
workingproperly.
Thefanwillnotoperate. Obstructions stop the fan
fromworking.
Checkforobstructions.Ifyoundanobstruction,turnthefanoff.
Unplugthefanandcarefullyremovetheobstruction.Plugthe
fan in and turn it on again by referring to the operating
instructions.
ELECTRICAL RATINGS
120VoltsAC,98Amps,60Hz
SERVICE & SUPPORT
Ifyouexperienceaproblemorhavequestionsregardingthisproduct,pleasecontactcustomerserviceat1-800-733-4000
Remote
Battery
Cover

3
ATTENTION
Lisezlesréglesetlesinstructionspourunfonctionnementsécuritaire.
AVERTISSEMENTS
1. Anderéduirelerisqued’incendieoud’electrocution,n’utilisezpasceventilateuravecaucundisposiliftransistorisé
de côntrllle de vilesse.
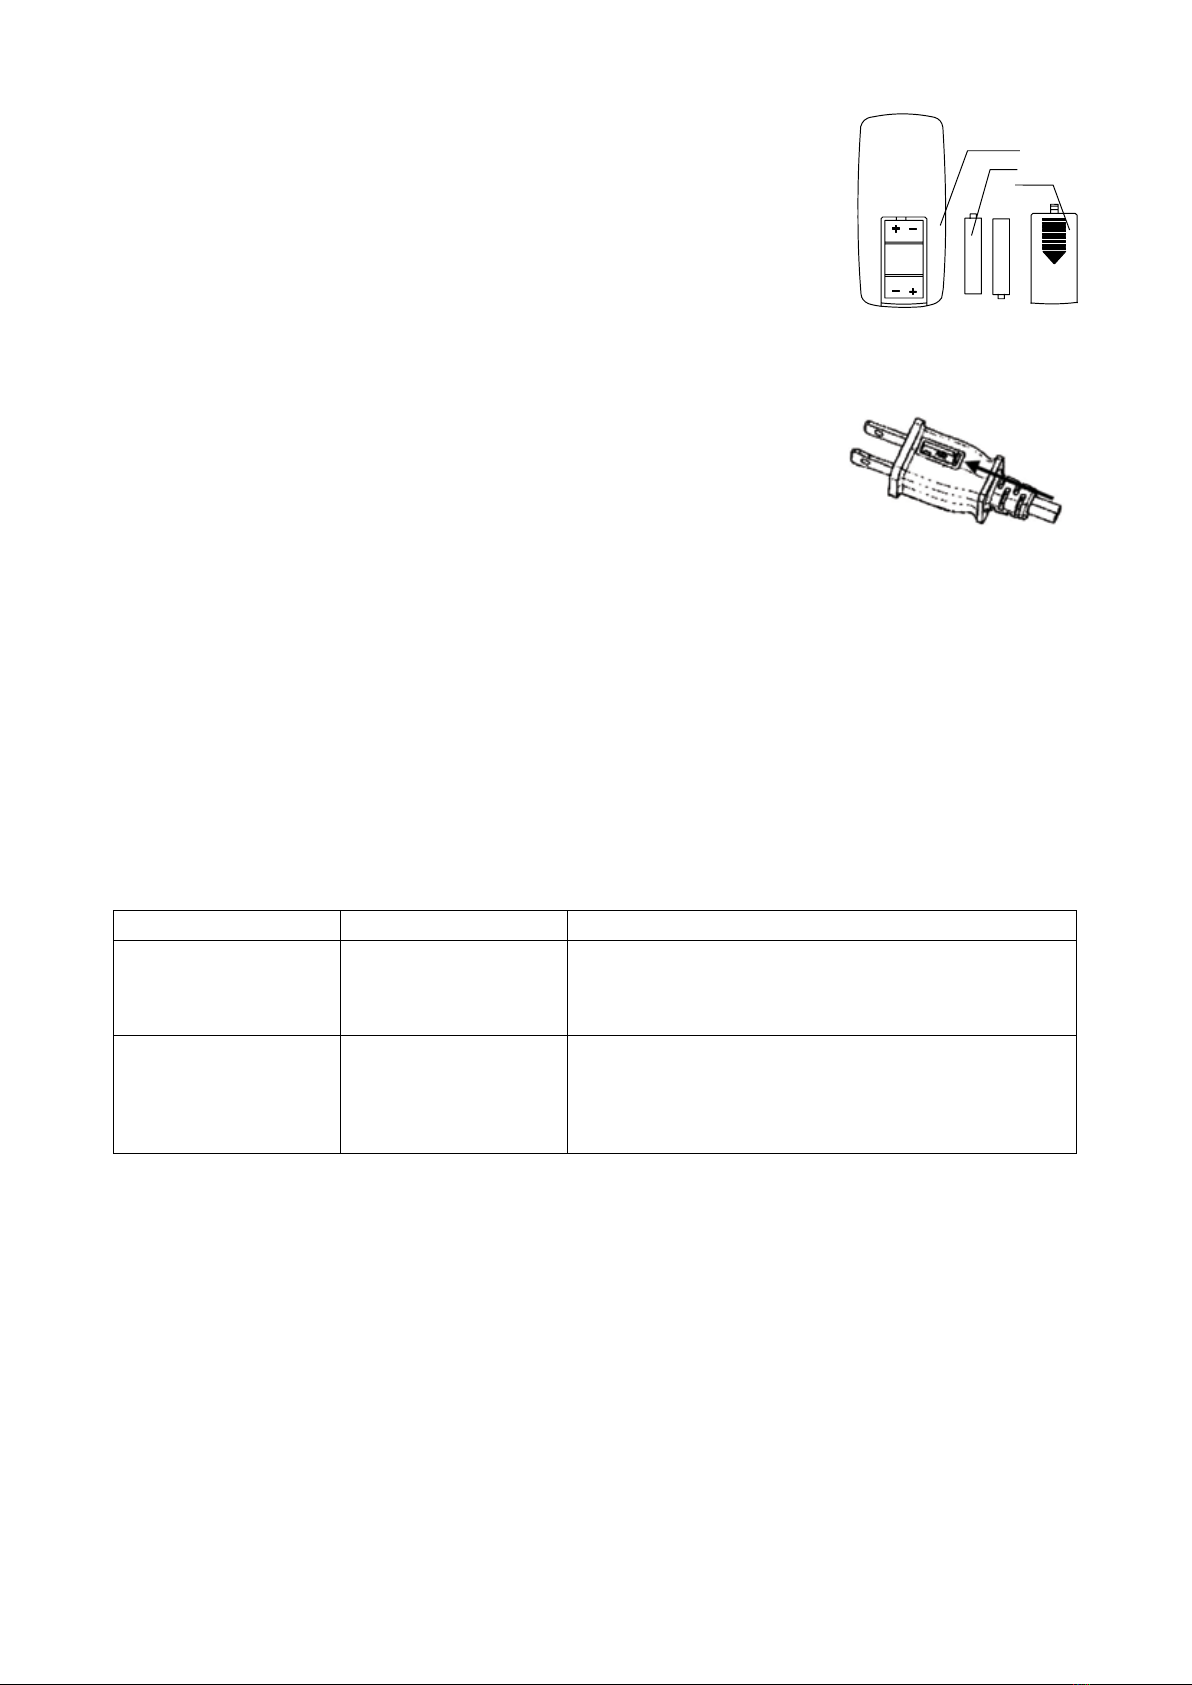
2. Cetappareilpossédeunechepolarisée(unelameestpluslargequel’autre).Anderéduirelerisqued’électrocution,cette
cheestconçuepours’insérerseulementd’unefaçondansuneprisepolarisée.SiIachenes’insèrepascomplètement
dansIaprise,inversezIache.Siellenes’insèretoujourspas,veuillezappelerunélectricianqualié.N’essayezpasde
neutralisercettecaractéristiquedesécurité.
3. Catappareiln’estpasconçupourêtreutilisépardesenfants.
4. Ne laissez pas fonctionner le ventilateur sans surveillance.
FONCTIONNEMENT SÉCURITAIRE:
1. Leventilateurdoitêtreutiliséselonsonvoltagenominal.
2. Branchezseulementdanslaprisequ’aprèsavoircomplètementassembléleventilateur.
3. N’insérezjamaislessdoigts,outoutautreàtraverslegrillagelorsqueleventilateur.
4. Débranchezleventilateurdelapriselorsqu’iln’estpasutilisé,qu’ilestdéplacéd’unendroitàunautre,avantd’installer
ou d’enlever des pièces et avant le nettoyage.
5. Ne laissez pas ventilateur fonctionner sans surveillance.
6. Tenez les enfants éloignés de l’appareil.
7. Ceproduitestdestinéàunusagedomestiqueuniquementetnonàdesnscommerciales,industriellesouune
utilisation en extérieur.
8. Pouréviterchocélectrique,neplacezpasdeventilateurenfenetre,nel’immergerpasdeventilateuroudecordon
dansdel’eauouvaporiserdesliquides.
9. Nepasfairefonctionnerleventilateurenprésencedevapeursinammablesouexplosives.
10. Neplacezpasleventilateuroutoutpièceàproximitéd’uneammenue,appareildecaissonouautreappareildechauffage.
11. Pourdéconnecter,tenezlachedecordonetretirez-ladelaprisemurale.Nejamaistirezsurlecordon.
12. Nepasmontezaumurouauplafond.
13. Nepasfairefonctionnersilecarterduventilateurestretiréoud’endommage.
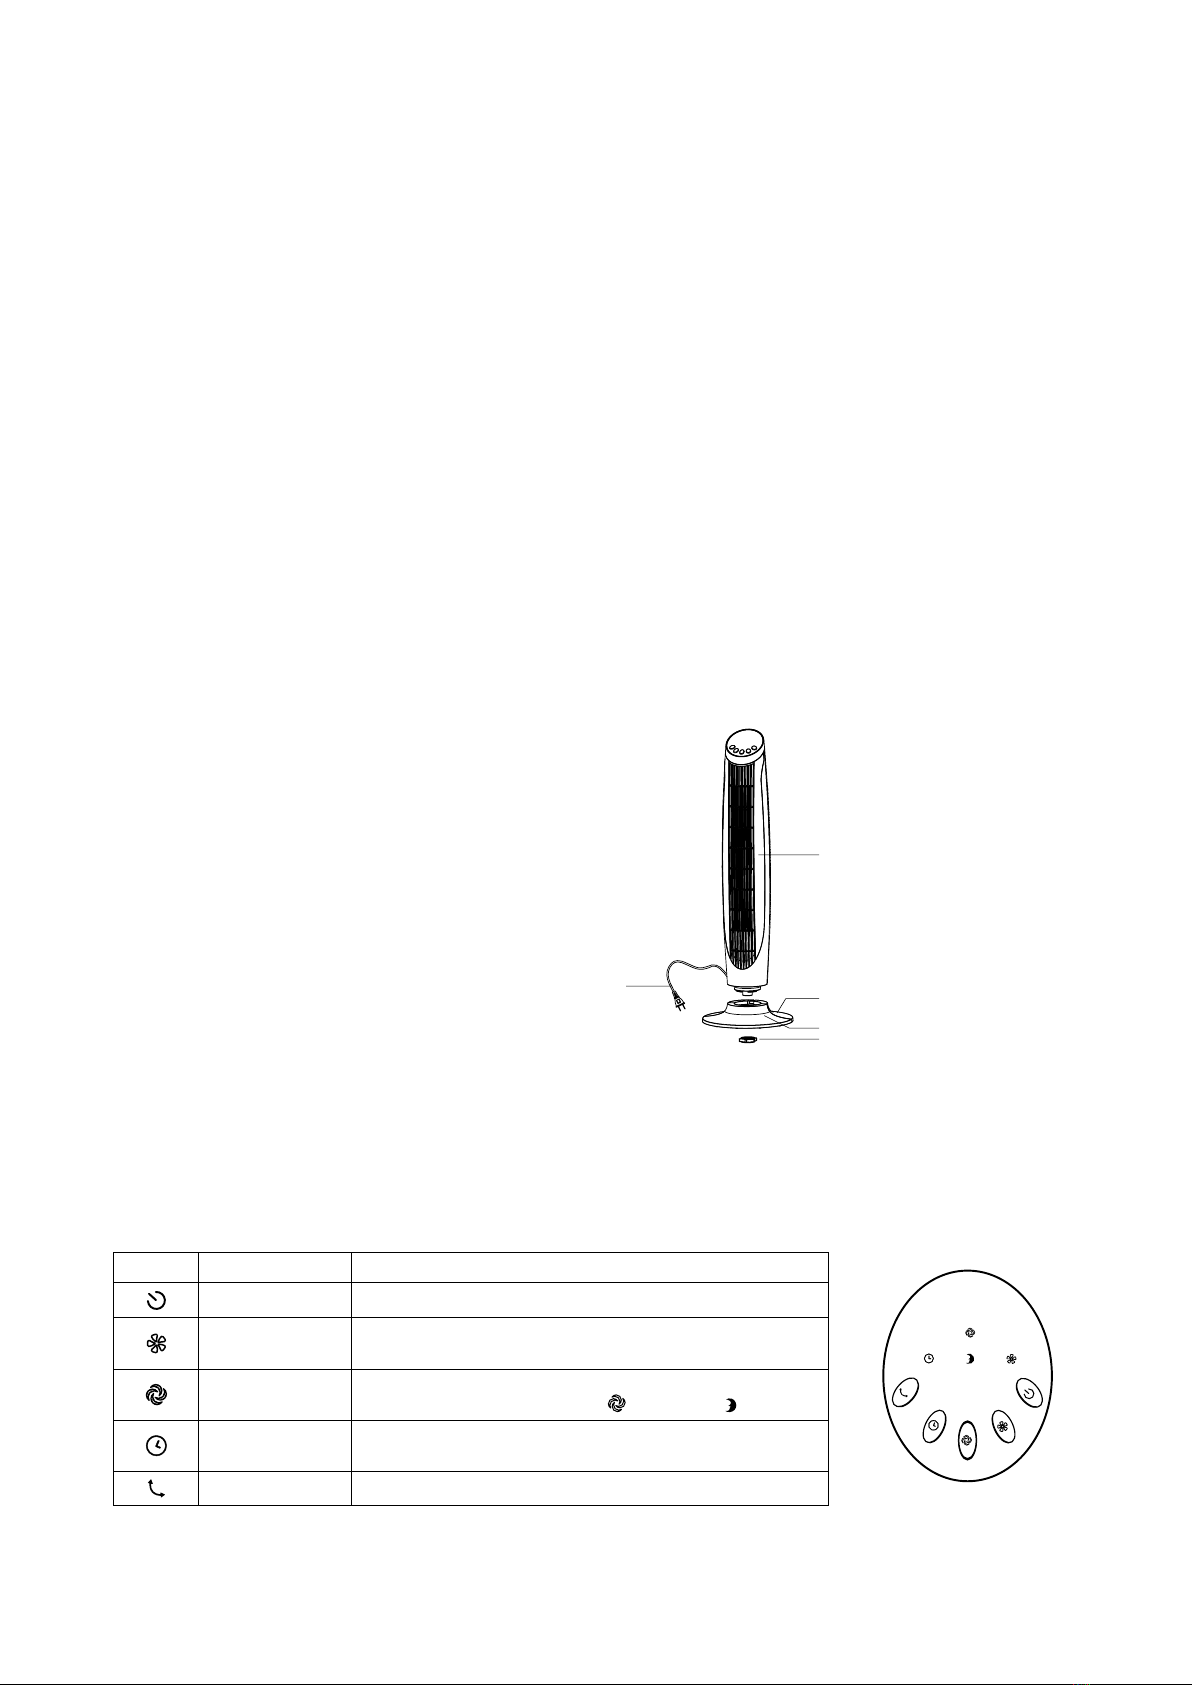
1. Corps
2. Socle avant
3. Socle arrière
4. Fixation du socle
5. Cordond’alimentation
NOMENCLATURE DES PIÈCES
INSTRUCTIONS D’ASSEMBLAGE
1. Tirezsurlecordond’alimentation(5)pourlesortirlégèrement.
2. Brancher base avant et base arrière.
3. Installezleventilateur(1)ausoclecommeillustrédansleschéma..
4. Fixez(1)avecclipdebase(4)commeillustré.
MODE D’EMPLOI
Icône Fonction Détaillée
Alimentation Appuyezsurcettetouchepourallumerouéteindreleventilateur
Réglage de la
vitesse
Appuyezsurcettetouchepourréglerleventilateursurlavitessedésirée,
1=Faible,2=Moyenne,3=Élevée
Modedevent Appuyezsurcettetouchepourchoisirlemodedeventdésiré
danslaséquencedeNORMALE-BRISE( )–NUIT( )
Minuterie Appuyezsurcettetouchedemanièrerépétéepourréglerla
duréeduventde1heureà8heures
Oscillation Appuyezsurcettetouchepourdémarrerouarrêterl’oscillation
du ventilateur
1
2
3
4
5

4
INSERTION DES PILES
1. Appuyezsurlecouvercleducompartimentàpilesetglissez-lepourlesortir.
2. Insérezlespilesenveillantàcequelesbornespositivessoientorientéesdansla
bonnedirectionconformémentauxmarquesàl’intérieurducompartimentàpiles.
3. Glissezlecouverclepourlefermer.
Remarques :
1) Requiert2piles«AAA»(NONCOMPRISES)
2) Nemélangezdespilesneuvesavecdespilesusées.
3) Nemélangezpasdespilesalcalines(gammecarbone)avecdespiles
rechargeables(nickel-cadmium).
INSTRUCTIONS D’ENTRETIEN DESTINÉES À L’UTILISATEUR
a) BienprendreIacheetIaretirerdeIaprise.Nejamaisdébrancherentirantsurlecordon.
b) Ouvrirlecouvercledufusible.Faireglisserpourl’ouvrirlecouvercledonnantaccès
aufusible,situésurledessusdeIachedebranchementendirectiondespales.
c) Retirerlefusibleenusantdeprécaution.Pousserlefusibledel’autrecôtéou
tourner le porte-fusible pour retirer le fusible.
d) Risqued’incendie.Neremplacerlefusiblequeparunfusiblede2,5ampères,125volts.
e) Fermerlecouvercledufusible.Faireglisserpourlefermerlecouvercled’accèsau
fusiblesurledessusdeIachedebranchement.
Remarque:
1. Nepasutiliseruneforceexcessivelorsdel’installationdufusible.Celapeutcauserdesdommages.
2. Sil’uniténefonctionnepas,vérierlecorrectcalibredufusibleetl’installationdanslacorrecteposition.
INSTRUCTIONS DE NETTOYAGE/ENTRETIEN:
MISE EN GARDE: An d’éviter l’électrocution et les blessures personnelles, débranchez toujours l’appareil de la prise
de courant avant d’effectuer le nettoyage/ entretien.
1. Assurez-vousdenepaslaisserdel’eaus’égoutteroupénétreràl’intérieurduboîtierdumoteur.
2. Assurez-vousd’utiliserunlingedouximbibéd’unesolutionfaibledesavon.
3. N’utilisezaucundesproduitssuivantscommenettoyant:essence,diluantoutousautresproduitschimiquesinammables.
DÉPANNAGE
Problème Cause possible Mesure corrective
Le ventilateur ne
fonctionne pas.
Le ventilateur n’est pas
branché et/ou la prise de
courantnemarchepas
correctement.
Vériezqueleventilateurestbranchéetquelaprisede
courantmarchecorrectement.
Le ventilateur ne
fonctionne pas.
Des obstructions
empêchentleventilateur
de fonctionner
Recherchezlesobstructions.Sivoustrouvezuneobstruction,
éteignez le ventilateur. Débranchez le ventilateur et retirez
soigneusementl’obstruction.Branchezleventilateuret
rallumez-leconformémentaumoded’emploi.
CARACTÉRISTIQUES ÉLECTRIQUES
120VoltsAC,98Amps,60Hz
ENTRETIEN ET SUPPORT
Sivousrencontrezunproblèmeouavezdesquestionsconcernantceproduit,veuillezcontacterleserviceclientèleau
1-800-733-4000
Télécommandeà
distance
Batterie
Couvercle

5
PRECAUCIÓN
Lealasinstruccionesyreglasparaunaoperaciόnsegura.
ADVERTENCIAS
1. Parareducirelriesgodeincendioochequeeléctrico,noutiliceesteventiladorconotrosaparatosdecontrol
estático de velocidad.
2. Esteelectrodomésticotieneunenchufepolarizado(unaterminalesmásanchaqueIaotra).Parareducirelriesgo
dechequeeléctrico,sόlohayunaformadeconectarloauntomacorrientepolarizado.Sielenchufenoseajusta
perfectamentealtomacorriente,inviertaelenchufe.Siaúnasínoseajusta,acudaconunelectricistacalicado.
Nointentealterarestacaracterísticadeseguridad.
3. Este aparato no está diseñado para su uso por niños.
4. Nodejeelventiladorenfuncionamientosinatenciόn.
REGLAS PARA UNA OPERACIÓN SEGURA
1. Elventiladordeberáutilizarseconformeallvoltajenominal.
2. Conectealsuministroeléctricoúnlcamentedespuésdehaberensambladoporcompletoelventilador.
3. Jamásinsertelosdedosocualquierotroobjetoatravésdelarejillamientraselventiladorestéenfuncionamiento.
4. Desconéctelocuandonoestéenuso,almoverlodeunlugaraotro,antesdecolocartoretirarcualquieradesus
partes,yantesdesulimpieza.
5. Nodejeelventiladorenfuncionamientosinatenciόn.
6. Mantengaalosniñosalejadosdelaparato.
7. Esteproductoestádiseñadoparausodomésticosolamenteynoparacomercial,industrialoalairelibre.
8. Paraprotegersecontraunchoqueeléctrico,nocoloqueelventiladorenventanas,sumerlalaunidadnicableen
aguaorociarlaconlíquidos.
9. Noaccionaelventiladorenpresenciadevaporesexplosivosoinammables.
10. Nocoloqueelventiladorocualquierpartecercadeunallamaabierta,cocinauotroaparatodecalefacción.
11. Paradesconectar,sujeteelenchufeytiredelapared.Nuncatiredelcable.
12. Nocuelguedelventiladorentechoomontajeloenpared.
13. Noutilicesilacarcasadelventiladorestáremovidaodañada.
1. Estructura
2. Base delantera
3. Base posterior
4. Presilla de la base
5. Cable de corriente
PARTES
INSTRUCCIONES DE ENSAMBLAJE
1. Halaelcable(5)ligeramentehaciaafuera.
2. Conectalabasedelantera(2)conlabaseposterior(3).
3. Insertaelventiladora(1)enlabasecomolomuestraeldiagrama.
4. Fija(1)conlapresilladelabase(4)comosemuestra.
INSTRUCCIONES DE USO
Icono Función Detalle
Encendido Oprimeestebotónparaencender/apagarelventilador
Control de
velocidad
Estebotóncontrolalavelocidaddelventilador
1=Baja,2=Media,3=Alta
Modode
ventilación
Controlaelmododeventilaciónenla
secuenciadeNORMAL–BRISA( )–DORMIR( )
Temporizador Oprimevariasvecesparacongurareltemporizadordel
ventilador de 1 hasta 8 horas
Oscilación Arrancaodetienelaoscilacióndelventilador
1
2
3
4
5

6
INTRODUCIR LAS BATERÍAS
1. Presionalacubiertadelcompartimentodebateríasydeslízalahaciaafuera.
2. Alintroducirlasbaterías,vericaquelosterminalespositivosesténcolocadosenla
direccióncorrecta,segúnlasmarcasdentrodelcompartimientodebaterías
3. Desliza la cubierta para cerrarla.
Notas:
1) Usa2baterías“AAA”(NOINCLUIDAS).
2) Nomezclesbateríasgastadasconlasnuevas.
3) Nomezclesbateríasalcalinas,estándar(carbón)orecargables(níquel-cadmio)
INSTRUCCIONES DE SERVICIO DEL USUARIO:
a) Agarreelenchucheyretírelodeltomacorrienteuotrodispositivodetomacorriente.
No lo desenchufe tirando el cable.
b) Abralatapadefusibles.Deslicelacubiertadelaccesoalosfusiblesencimadela
partesuperiordelaclavijahacialashojas.
c) Retireelfusibleconcuidado.Presioneelfusibledelotroladoodévueltaal
portafusiblesparaquitarelfusible.
d) Riesgodeincendio.Reemplaceelfusiblesóloporunfusiblede2,5amperios,
125voltios(proporcionadoconelproducto).
e) Cierrelatapadefusibles.Deslicelacubiertadeaccesodefusibleshastacerrarencimadelapartesuperiordelaclavija.
Nota:
1. No use fuerza excesiva al instalar el fusible. Esto puede causar daños.
2. Silaunidadnofunciona,vericarlacorrectavaloracióndelacajadefusiblesylainstalaciónenlaposiciónadecuada.
INSTRUCCIONES DE LIMPIEZA O MANTENIMIENTO:
ADVERTENCIA: Para evitar un choque eléctrico o lesiones personales, siempre desconecte el aparato del suministro
eléctrico antes de su limpieza o mantenimiento.
1. Nopermitaquecaigaoentreaguaalinteriordelventilador.
2. Asegúresedeutilizaruntraposuaveyhumedecidoconunasoluciόnconjabόnsuave.
3. Noutilicelosiguienteslíquidosparalalimpiezadelaparato:gasolina,diluyenteocualquierotroquimicoinamable.
SOLUCIÓN DE PROBLEMAS
Problema Causa Posible Acción Correctiva
El ventilador no enciende.
El ventilador no está
enchufado y/o el
tomacorrientenofunciona
debidamente.
Vericaqueelventiladorestéenchufadoy/oqueeltomacorriente
funcionedebidamente.
El ventilador no enciende.
Unaobstrucciónevitaqueel
ventiladorfuncione.Verica
quenohayaobstrucciones.
Sihayalguna,apagael
ventilador.
Desenchufaelventiladory,concuidado,eliminalaobstrucción.
Enchufaelventiladoryenciéndelodenuevo,
segúnlasinstruccionesdeuso.
CLASIFICACIONES ELÉCTRICAS
120voltiosAC,98amperios,60Hz
SERVICIO Y SOPORTE
Enelcasodeunagarantíadereclamación,póngaseencontactoconservicioalclientea1-800-733-4000.
Controlremoto
Bateria
Tapa
Table of contents
Languages:
Other Alera Fan manuals
Popular Fan manuals by other brands

Quorum
Quorum The Axel 82524 Series installation instructions

Maico
Maico ER EC RF17 Installation and operating instructions

Kalorik
Kalorik TKG VT 1021 manual

Orava
Orava Mini SF-10 instruction manual

enervent
enervent eWind Pelican installation instructions

Fanimation
Fanimation INFLUENCER FP3075 Series manual

Home Decorators Collection
Home Decorators Collection HIGHSTONE 56040 Use and care guide

Chore-Time
Chore-Time TURBO MV1864P Installation & operator's manual

cecotec
cecotec FORCE SILENCE 1600 WOODY SMART instruction manual

Keysight Technologies
Keysight Technologies E4470AZ installation guide

Coopers of Stortford
Coopers of Stortford 11552 Instructions for use

Sulion
Sulion RUBIK manual