all-clad 5Qt User manual

All-Clad 5Qt. GourmetSlow cooker with All-in-one browning
Mijoteuse gourmet All-Clad 4,7 L (5 QT) tout en un avec brunissage
All-Clad 5Qt (4,7 L) Olla de cocción lenta toda en una sola con dorado
Owner’s Guide - Model No. 9100021341
Guide d’utilisation - Modèle no9100021341
Guía del usuario - Modelo No. 9100021341
Read and save these instructions - Lisez et conservez ces instructions - Lea y conserve estas instrucciones
www.all-clad.com

2
TABLE OF CONTENTS
IMPORTANT SAFEGUARDS......................................................................................................................... p. 3
DESCRIPTION OF PARTS.............................................................................................................................. p. 6
BEFORE FIRST USE.......................................................................................................................................... p. 7
GENERAL USAGE ............................................................................................................................................ p. 7
SLOW COOKING .............................................................................................................................................. p. 8
BROWNING......................................................................................................................................................... p. 9
RICE COOKING................................................................................................................................................. p. 10
STEAMING.......................................................................................................................................................... p. 12
HOW TO CLEAN YOUR SLOW COOKER............................................................................................... p. 15
WHAT TO DO IF YOUR SLOW COOKER ISNOTWORKING PROPERLY ................................ p. 16
RECIPES................................................................................................................................................................ p. 18
MANUFACTURER’S LIMITED WARRANTY .......................................................................................... p. 22

3
EN
IMPORTANT SAFEGUARDS
When using electrical appliances, basic safety precautions should always be followed including the following:
1. Read all instructions.
2. Do not touch hot surfaces. Use handles or knobs; always use oven mitts.
3. To protect against electric shock do not immerse cord, plug, or this appliance in question in water or other liquid.
4. Close supervision is necessary when any appliance is used by or near children.
5. Unplug from outlet when not in use and before cleaning. Allow to cool before adding or removing parts, and
before cleaning the appliance.
6. Do not operate any appliance with a damaged cord or plug or after the appliance malfunctions, or has been
damaged in any other manner. Return appliance to the nearest authorized service facility for examination, repair
or adjustment.
7. e use of accessory attachments not recommended by the appliance manufacturer may cause injuries.
8. Do not use outdoors.
9. Do not let the cord hang over edge of table or counter, or touch hot surfaces.
10.Do not place on or near a hot gas or electric burner, or in a heated oven.
11.Extreme caution must be used when moving an appliance containing hot oil or other liquids.
12.Always attach plug to appliance rst, then plug cord in the wall outlet. To disconnect, turn any control to OFF,
then remove plug from wall outlet.
13.Do not use appliance for other than intended use.
14.Intended for countertop use only.
15.WARNING: Spilled food can cause serious burns. Keep appliance and cord away from children. Never drape
cord over edge of counter, never use outlet below counter, and never use with an extension cord.
16.Always cook with the lid on, for the recommended time.
17.Follow recommended cooking times and temperatures.

4
18.Do not use the slow cooker insert for food storage.
19.Do not reheat foods in your slow cooker.
20.Do not set the heated insert on a nished wood table or any other type of surface that may burn or melt.
21.Do not use the lid or the removable insert in the microwave.
22.Do not heat the slow cooker when it is empty.
23.Always use protective pads when moving your heated slow cooker.
SAVE THESE INSTRUCTIONS
SHORT CORD INSTRUCTIONS
• A short power-supply cord is used to reduce the risk resulting from it being grabbed by children, becoming
entangled in, or tripping over a longer cord.
FOR HOUSEHOLD USE ONLY
DISPOSING OF YOUR APPLIANCE
Your appliance contains many materials which can be recycled.
Take it to a local civic collection point.

5
EN
CONGRATULATIONS ON YOUR
PURCHASE
All-Clad Metalcrafters created the original collection of professional cookware made with a patented metal bonding
process which eliminates uneven heating, an accomplishment that led to All-Clad becoming the product chosen
for the kitchens of more four-star restaurants than any other. Still the only complete line of cookware made by an
American company with materials produced in its own mill, All-Clad has revolutionized the art of cooking since its
introduction.
With numerous professional cookware collections featuring a variety of bonded metals and nishes, from high grade
aluminum and stainless steel to copper, All-Clad combines professional design with high performance for all tastes
and cooking styles.
e All-Clad cooking experience now extends to a focused selection of small electrical appliances, each designed
without compromise to make a noticeable dierence in both use and performance. Cooking connoisseurs now have
a wonderful opportunity to complete their kitchen with electrics by All-Clad, the undisputed original.
All-Clad Metalcrafters has an ongoing policy of research and development and may modify its products without
prior notice.
6
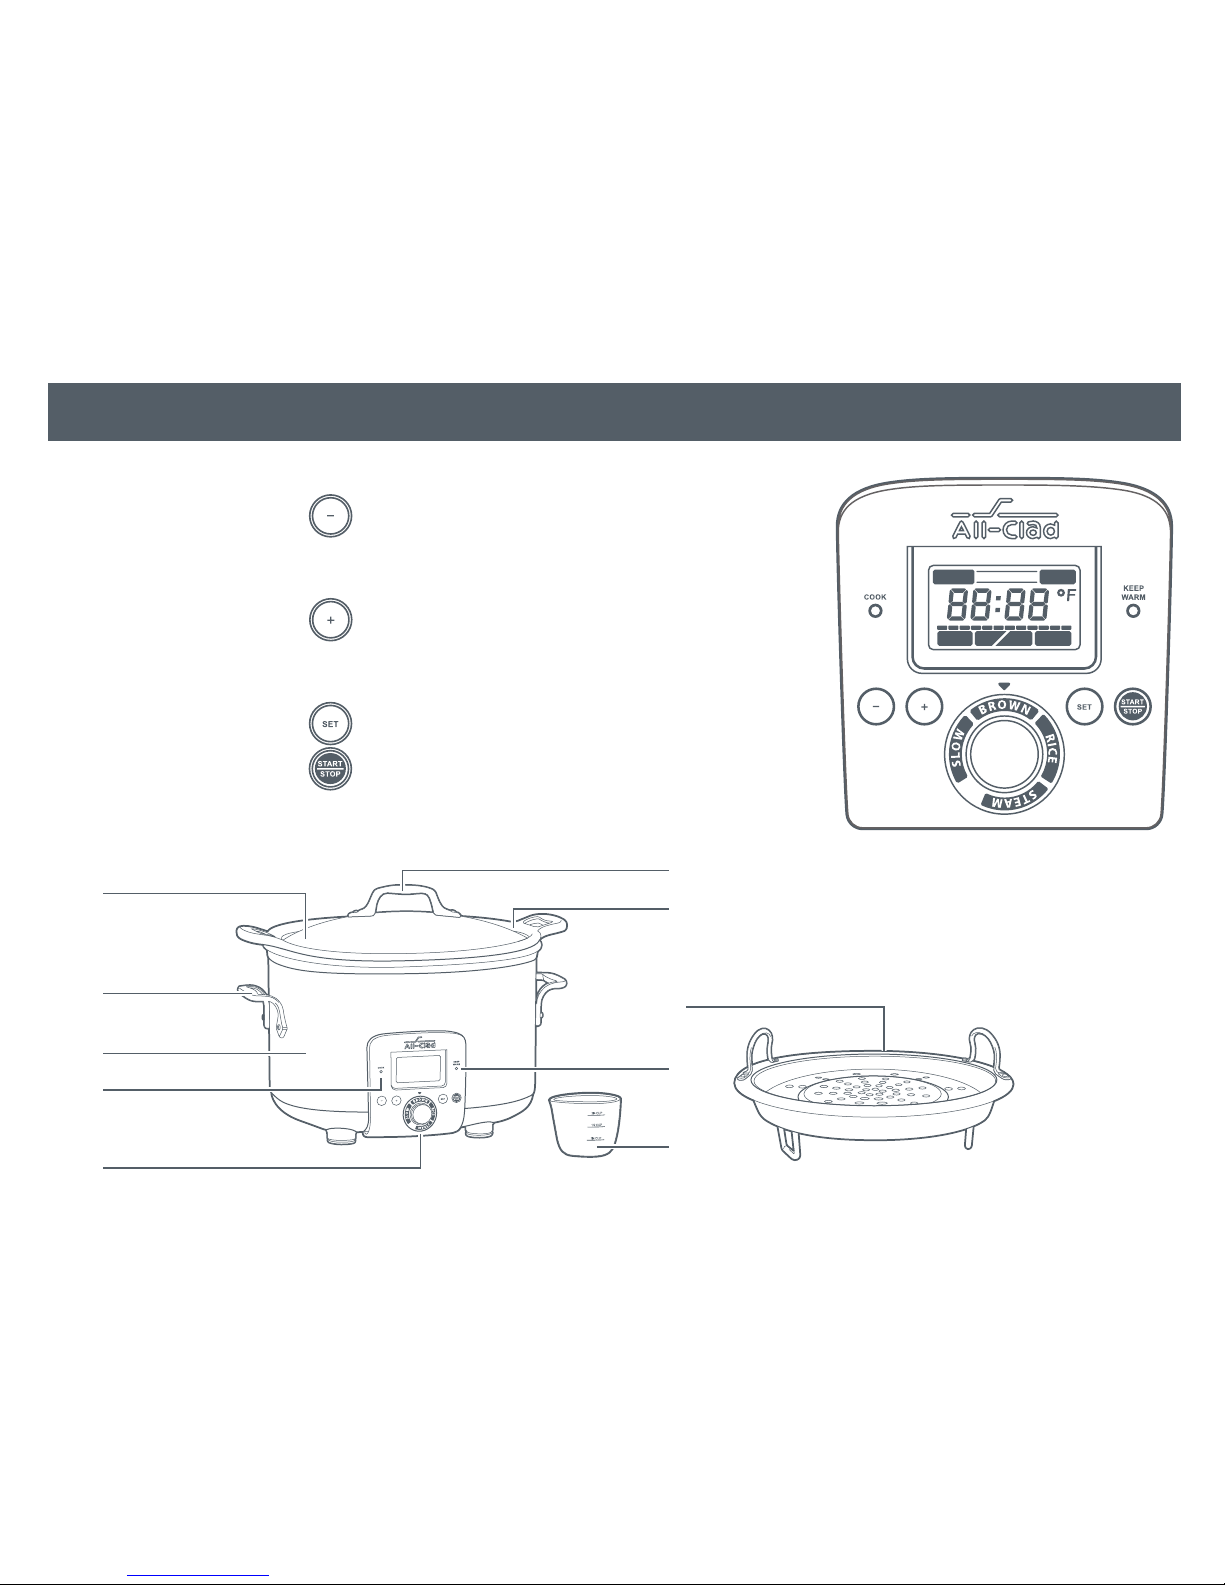
DESCRIPTION OF PARTS
a. Glass lid
b. Stainless steel lid
handle
c. Stainless steel body
handles
d. Aluminum insert
e. Stainless steel
housing
f. “Cook” light
g. Control panel
h. “Keep Warm” light
i. Rice measuring cup
j. Steam basket
TEMP
LOW HIGH
HI LO
PREHEATING
TIME
Function display
: To decrease the displayed value (time/
temperature) and to change mode for the
slow cooking function
: To increase the displayed value (time/
temperature) and to change mode for the
slow cooking function
: To access settings
: To start/stop cooking
ROTARY SWITCH : to select the functions:
slow / brown / rice / steam
ab
d
h
j
i
c
e
f
g

7
EN
BEFORE FIRST USE
GENERAL USAGE
• Remove all packaging, stickers and various accessories on the inside and outside of the appliance.
• Before using your slow cooker for the rst time, wipe the metal housing with a clean, damp cloth.
• Wash the insert and glass lid in hot soapy water, then rinse and dry.
• Plug in the slow cooker. It is now ready for operation.
• Never immerse the electric base in water.
• Never leave uncooked food at room temperature in the slow cooker. Store ingredients in containers in the fridge
beforehand.
• Don’t put the removable insert in the fridge.
IMPORTANT: Product housing can become very hot during cooking. Take care not to touch it without heat
protections, and keep children away from the product while in operation.
• Do not ll the slow cooker insert more than MAX level.
• Always use oven gloves when removing the hot insert or the hot steam basket from the slow cooker.
• Take care not to block the air vents of the product during use. e product must be used on a at and hard surface.
• During the initial use of this appliance, some slight smoke and/or odor may be detected. is is normal and will
stop after a few uses.
• Never heat the insert when it is empty. Never preheat the base.
• Do not immerse / wash the glass lid when it is still hot.
• Never use the product for deep frying.
• Take care to avoid possible oil splatter which can occur when adding food to hot oil.
• IMPORTANT : TAKING CARE OF YOUR NONSTICK COATING. TO PREVENT SCRATCHES
ON THE NONSTICK SURFACE OF THIS PRODUCT, DO NOT USE METAL UTENSILS.

8
ALUMINUM INSERT
• Do not put the aluminum insert in the oven.
• e removable insert can be used on a gas or electric burner, but must never be used on an induction plate.
• NEVER USE METAL UTENSILS WITH THE INSERT AS IT CAN DAMAGE THE NONSTICK
COATING.
• Do not cut food directly in the insert.
COOKING
• Plug the product in.
• e screen will light up.
• During cooking or KEEP WARM (any menu) – e display will be ON ;
• In other cases: If no action is taken within 10s, the display turns o. After 5 minutes without any action, the
product switches into standby mode.
• In order to get out from standby mode press any button or turn the rotary switch and the screen will light up.
• Turn the rotary switch in order to select your function (slow, rice, brown, steam).
SLOW COOKING
• Turn the rotary switch to select the SLOW function. Press or to choose the mode between LOW,
HI/LO or HIGH.
• Press to enter the chosen menu.
If LOW mode or HIGH mode is chosen :
• Enter the cooking time by pressing or
• en press to start the cooking.
If HI/LO mode is chosen (this mode is used to start the cooking on HIGH and then switches to LOW automatically):
• Enter the cooking time for HI by pressing or

9
EN
BROWNING
• Press and enter the cooking time for LO by pressing or
• Press button to start the cooking.
While cooking you can change the cooking time:
• Press and change the cooking time for HI by or
• en press to enter the cooking time for LO with or .
• Press to exit from settings, and continue cooking.
When the cooking cycle is complete, the slow cooker will automatically switch to the KEEP WARM mode.
eKEEP WARM light will light up.
• e KEEP WARM mode can be used for up to 6 hours. For dense recipes, it is recommended to stir during the
KEEP WARM mode.
• After 6 hours of KEEP WARM, the slow cooker will shut o.
• Turn the rotary switch to select the BROWN function.
• Set the temperature by pressing or .
• en program the time: press again and adjust the time with or .
• Press button to begin preheating. PREHEATING will ash during heat up.
• When selected temperature is reached, the appliance will beep. You can then add ingredients to the insert.
• Start browning at your convenience. You can then press button to stop cooking. Or switch to another
function by using the rotary switch.
• If a time was programmed, the cooking will automatically stop at the end of the cooking time. e slow cooker
will shut o.
Note: if no time was set, the product will stop automatically after 60 minutes of cooking.

10
• e graduated markings on the inside of the insert are given in cups, these are used for measuring the amount
of water needed when cooking rice.
• e plastic cup provided with your appliance is for measuring rice and the table states the quantity of rice
required for the number of servings. 1 measuring cup of rice weighs about 5 oz.
• e maximum quantity of water + rice should not exceed the 8 cups mark inside the insert.
• Place the appliance on a at, stable, heat-resistant work surface away from water splashes and any other sources
of heat.
• Measure the rice using the plastic measuring cup provided and rinse thoroughly in cold water before cooking.
• Pour the rice into the insert. en ll with cold water up to the corresponding “CUP” mark in the insert.
Note: Always add the rice rst otherwise you will have too much water.
• Close the lid.
• Turn rotary switch on “RICE” position.
• Press button to start cooking.
• During cooking, the product displays “Rice” and the progression bar is shown as it cooks.
• When the cooking cycle is complete, the slow cooker will automatically switch to the KEEP WARM mode.
eKEEP WARM light will light up.
• e KEEP WARM mode can be used for up to 6 hours.
• After 6 hours of KEEP WARM, the slow cooker will shut o.
RICE COOKING

11
EN
e product calculates automatically the exact cooking time depending on the quantity of water and ingredients
placed in the insert (see cooking table below for guidance).
• For best results, we recommend using ordinary rice rather than “easy cook” type of rice which tends to give a
stickier rice and may stick to the base of the insert.
e cooking times given in the following table are only approximate and for your guidance.
Recommendations for best results:
• Measure out the rice and rinse it thoroughly under running water in a sieve for a long time (except for risotto rice
which should not be rinsed). en place the rice in the insert together with the corresponding amount of water.
• Make sure that the rice is well distributed around the whole surface of the insert, in order to allow even cooking.
• Add salt to taste.
• Water may be substituted for stock. If using stock, there is the risk of rice browning a bit on the bottom.
• Do not open the lid during cooking as steam will escape and this will aect the cooking time and the taste.
Measuring cups of
white rice Weight of white rice
(oz) Water level in the
insert ( + the rice) Serves Approximate
cooking time
4 21 4 cup mark 5-6 29 min
6 32 6 cup mark 8-10 33 min
8 42 8 cup mark 13-14 34 min

12
IMPORTANT: Do not use the steam basket without water in the bowl or for other function than steaming.
• Fill water in the bowl : the maximum amount of water in the bowl should not exceed the “STEAM” mark in
the bowl.
• Add the ingredients in the steam basket.
• Place the steam basket in the bowl.
• Close the lid.
• Turn the rotary switch to select the STEAM function.
• Enter the cooking time by pressing or
• en press to start cooking.
While cooking you can change the cooking time :
• Press and change the cooking time by or
• Press to exit from settings, and continue cooking.
• When the cooking cycle is complete, the product will automatically switch to the KEEP WARM mode.
eKEEP WARM light will light up.
• e KEEP WARM can be used for up to 60 minutes.
• After 60 minutes of KEEP WARM, the product will shut o.
e cooking times given in the following table are only approximate and for your guidance.
STEAMING

13
EN
MEAT - POULTRY
Food Type Quantity Cooking time
Chicken breast (boneless) Fresh Whole 12 oz 20-25 min
Small pieces 16 oz 15-20 min
Turkey cutlet in 21 oz 20-25 min
Hot dogs Fresh 10 pcs 10-15 min
FISH - SHELLFISH
Food Type Quantity (oz) Cooking time
in sh llets (cod, haddock, sole, salmon…) Fresh 16 15-20 min
Frozen 13 25-30 min
Fish steaks (cod, haddock, sole, salmon…) Fresh 14 20-25 min
Whole sh (trout, salmon trout, sea bass) Fresh 21 25-30 min
Mussels Fresh 35 20-25 min
Prawns (raw) Fresh 7 10-15 min
Scallops Fresh 4 15-20 min

14
VEGETABLES
Food Type Quantity Cooking time Recommendations
Artichoke Fresh 2 pcs 55-60 min
Potatoes Fresh 21 oz 25-30 min Sliced or cubed. Small new
potatoes can be cooked whole
Asparagus Fresh 21 oz 15-20 min
Broccoli Fresh 18 oz 20-25 min Small orets
Frozen 18 oz 30-35 min
Mushrooms Fresh 18 oz 20-25 min Whole
Cauliower Fresh 1 medium 25-30 min Small orets
Carrots Fresh 18 oz 20-25 min inly sliced
Corn on the cob Fresh 18 oz 45-50 min
Green beans Fresh 18 oz 30-35 min Whole
Sweet peppers Fresh 11 oz 15-20 min Cut in wide strips
Peas Fresh 14 oz 25-30 min Shelled
Frozen 14 oz 35-40 min
FRUIT
Food Type Quantity Cooking time Recommendations
Pears Fresh 4 20-25 min Steam whole or halved
Bananas Fresh 4 15-20 min Whole
Apples Fresh 5 35-40 min Quartered

15
EN
HOW TO CLEAN YOUR SLOW COOKER
Make sure your slow cooker is unplugged, and has cooled down, before cleaning the unit.
NOTE
• Never submerge heating unit in water or any other liquid.
• Do not use scouring pads or hard abrasive powder to clean.
TO CLEAN THE METAL HOUSING
• e outside shell may be cleaned with a soft cloth and warm soapy water, then wiped dry.
• e use of abrasive cleaners is not recommended and may damage your slow cooker’s housing.
TO CLEAN THE INSERT, GLASS LID AND STEAM BASKET
• e glass lid and steam basket go safely into the dishwasher, or may be washed in hot, soapy water.
e removable insert does not go safely into the dishwasher. It can be washed in hot, soapy water.
• Do not use abrasive cleaning compounds.
• A cloth, sponge or rubber spatula will usually remove most residue. To remove water spots and other stains, use
a non-abrasive cleaner.
ALUMINUM INSERT
• e discoloration which may occur after extensive use does not cause any problems and does not aect cooking
results.
• We guarantee that the insert coating complies with the legislation relating to materials in contact with foodstus.

16
WHAT TO DO IF YOUR SLOW COOKER
IS NOT WORKING PROPERLY
Problems Possible causes Solutions
My slow cooker does not work.
What do I do? Plugging issue. Check that the slow cooker is
correctly plugged in. If need be,
unplug it and plug it back in again.
Check that your power outlet is
working.
I plugged in my appliance but it
switched itself o. e product switched into standby
mode. Press any button once to leave
standby mode. If nothing happens,
unplug the product then wait 2
minutes and plug it in again.
I unplugged my appliance because I
made a setting mistake, but when I
plug it in again, the cooking program
could not be changed.
e product was not unplugged long
enough. e cooking setting saved
in memory was not reset.
Unplug the product for at least
2 minutes before plugging it in
again.
Display issue Condensation inside the display
panel due to intensive cleaning. Let the product dry over night. If
problem appears again, take the
appliance to an approved Service
Center.

17
EN
Problems Possible causes Solutions
e food does not cook as quickly as
it used to. Lid missing or badly positionned.
Food parts too big. Startagaincookingwith lid correctly
positionned. Increase cooking time.
e function panel displays F2 Temperature sensor is damaged. Take the appliance to an approved
Service Center for repair.
e function panel displays F1. e insert is missing Put the insert inside the appliance,
then unplug and re-plug the
appliance and nally restart the
program. If panel still displays F1,
take the appliance to an approved
Service Center for repair.

18
RECIPES
Cuban Braised Pork Shoulder with Citrus, Cilantro, Red Onion and Garlic
Serves 6
Cooking Time: Slow cooking, LOW, 4 H
Ingreedients:
4 pounds pork shoulder, skin on, bone out, trussed
6 cloves garlic, peeled and minced
1 teaspoon kosher salt
½ cup olive oil
2 cups chopped cilantro leaves and stems
1 teaspoon orange zest
¼ cup orange juice
1 teaspoon lime zest
2 tablespoons lime juice
1 teaspoon lemon zest
2 tablespoons lemon juice
1 teaspoon cumin seed, toasted and ground
8 allspice berries, toasted and ground
1 pinch of crushed red chili akes
2 tablespoons chopped fresh oregano leaves
freshly ground black pepper to taste
2 tablespoons vegetable oil
2 medium red onions, peeled and thinly sliced
½ cup dry sherry
4 cups chicken stock
• Place the pork in a large zip-lock bag and set aside.
• In a blender, combine the garlic, ½ teaspoon of salt, olive oil, cilantro, citrus zests, citrus juices, cumin, allspice
berries, chili akes, black pepper and oregano. Pulse to blend. Reserve half of the sauce/marinade, and pour the
other half into the zip-lock bag with the pork. Seal bag and marinate in refrigerator for 6-12 hours.
• Set the slow cooker to BROWN for 10 minutes.
• Remove pork from the zip-lock bag, wipe away excess marinade. Season pork with remaining salt. Add the
vegetable oil to slow cooker. When the oil is hot, add the pork and sear for 5 minutes on each of its four sides.
Remove pork to a sheet pan to rest.
• Add the onions to the slow cooker and sauté for 3 minutes. Next add the sherry and the chicken stock, then add
the pork back to the slow cooker and cover. Set the appliance on SLOW COOK, “LOW” for 4 hours.
• Remove pork from the appliance and let rest for 15 minutes. Slice pork and serve with the remaining sauce/
marinade.

19
EN
Red Wine Poached Pears with Almonds, Whipped Ricotta with Honey and Lemon
• Set the appliance on SLOW COOK, HIGH for 2h15 minutes.
• In the slow cooker, combine the wine, water, sugar, rosemary, bay leaves, star anise, and orange zests. Bring to
just below a boil for about 15min.
• In the meantime, peal the pears with a peeler. Using a melon baller, turn out the core of each pear from the
bottom. Place the peeled and cored pears in the slow cooker and close the lid. Slow coook for 2 hours on HIGH.
• Remove the pears from the cooker and let cool. Strain the poaching liquid into a pot and reduce over high heat
to ½ cup of syrup.
• Place the ricotta in a food processor and turn on. Drizzle in the honey and the lemon zest, and then thin with
the milk.
• Arrange six plates on the counter and dollop 1/6 of the ricotta onto the center of each. Nestle in a poached pear
on each plate, shower with almonds, drizzle with some of the reduced poaching liquid, then serve.
Serves 6
Cookting time: Slow cook, HIGH, 2H15
Ingredients:
6 pears
4 cups good quality red wine
2 cups water
1 cup granulated white sugar
3 sprigs fresh rosemary
2 bay leaves
2 star anise pieces
1 strip orange zest
2 cups fresh ricotta
¼ cup clover honey
1 strip of lemon zest
½ cup whole milk
1 cup ground almonds

20
Spring Pea and Mascarpone Risotto
Serves 8
Cooking Time: Rice mode, about 25 minutes
Ingredients:
2 cups small spring peas, shelled
2 teaspoons kosher salt
3 cups chicken stock
2 teaspoons olive oil
2 minced shallots
1 ½ cup Arborio risotto rice
½ cup white wine
2 tablespoons fresh parsley, chopped nely
1 tablespoon unsalted butter
½ cup mascarpone cheese
2 cups nely grated parmesan
• Bring 2 quarts of water to a rapid boil. Add 1 teaspoon of the salt. Prepare an ice bath to cool the peas when they
come out of the blanching water. Pour the peas into the boiling water and cook for 1 minute. Remove the peas
with a small strainer and plunge into the ice water. When fully cool, strain the peas and set aside.
• Take 1 cup of the peas and puree in a blender with ½ cup of the chicken stock. Set aside.
• Set the slow cooker on RICE and let it heat up. Add the olive oil. When the oil shimmers add the shallot and
cook until translucent, about 4 minutes. Add rice and toast for 1 minute until the rst layer of starch exudes
from each grain and the rice becomes nicely glossy. Deglaze the rice with the white wine and cook down for 4
minutes. Add 1 cup of stock to moisten down the rice, stirring constantly. Gradually add more stock, ½ cup at a
time. After about 15 minutes of adding stock gradually and stirring constantly, taste the risotto. If it’s still rock
solid on the interior, continue adding stock and cook it a bit longer. If it has a great, crisp interior bite and seems
just moments away from being done, then continue with the recipe. e consistency should be softer than you
imagine, as the risotto will continue to rm up on once you plate it up.
• Once the risotto is ready, add the blanched peas, pea puree, parsley, butter, mascarpone, and parmesan. Stir
vigorously to emulsify those ingredients into the risotto. Season with the remaining salt to your taste, and serve
immediately.
Table of contents
Languages:
Other all-clad Slow Cooker manuals


