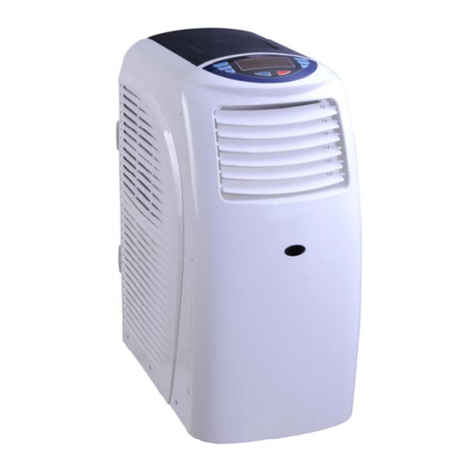
All Seasons Hire Coolbreeze 27E User manual

Coolbreeze 27E 2011 Page 1 of 4
© Allseasons Hire
Coolbreeze 27E
At Allseasons Hire we take your health and safety very seriously. Please read
these operating instructions carefully before attempting to use the equipment.
If you have any concerns or queries please call us for advice FREE on 0800-
0828001
OPERATING INSTRUCTIONS
Important information
oAlways transport, store and operate this equipment in an upright position. DO NOT
LAY UNIT DOWN!
oEnsure the machine and power socket are switched OFF before plugging into the
power supply
oNever operate the unit in very cold conditions - it works properly only at temperatures
doors/windows and operate the fan only, to circulate the air to reduce the temperature.
Running the unit above this temperature will cause permanent damage!
NOTE the compressor will not operate below approximately 21ºC as power will not be supplied
to the time-delay device.
If problems are experienced, call us FREE on 0800-0828001 Maintenance
should only be attempted by competent personnel in accordance with the
instructions or supplier guidelines.
IMPORTANT!
Failure to follow these instructions could damage this equipment.
Please ensure you have read and understood these instructions fully
BEFORE attempting to operate the equipmentFailure to follow these instructions could damage this equipment.
Please ensure you have read and understood these instructions fully
BEFORE attempting to operate the equipment

Coolbreeze 27E 2011 Page 2 of 4
© Allseasons Hire
GENERAL SAFETY
oNever place anything on top of the unit and never obstruct its air vents. Leave a 300
mm gap all round the unit to let the air circulate.
oAlways switch OFF and unplug the equipment when not in use.
oAlways transport, store and operate this equipment in an upright position.
ELECTRICAL SAFETY
oThis air conditioner plugs into a 1 phase 220-240V (nominal 230V) 50Hz 13 amp power
supply.
oExtension leads should be; correctly rated for the inductive load, fully unwound,
loosely coiled and never run through water or over sharp edges.
oTo reduce the risk of electric shock, use a suitable RCD (residual current device).
oNever pull the equipment by its flex.
oEnsure the machine and power socket are switched OFF before plugging into the
power supply.
Set up and operation
oNever operate the unit in very cold conditions - it works properly only at temperatures
doors/windows and operate the fan only, to circulate the air to reduce the temperature.
oWhen setting up or restarting, allow the unit to stand/settle for 15 minutes before
switching on.
oSet the unit up on a firm, level surface and do not site the unit close to any surface
sensitive to heat, cold or moisture.
oFit the exhaust hose onto the top air outlet of the unit, and then extend it to the chosen
discharge point, keeping the hose run as short and straight as possible, sloping up or
down. Never operate the unit if the hose is kinked, sagging or punctured.
oEnsure the water drain tank is correctly fitted and is empty, then plug the unit into its
power supply and switch the supply ON.
oEnsuring the power supply light is on; press the fan button to start the fans.
oTo increase the air flow, press the fan speed rocker switch to either medium or high fan
speed.
oIf chilled air is required, first press cooling button & then turn the thermostat knob
FULLY ANTICLOCKWISE. In this position, the unit will not operate below approximately
21ºC.
oDo not force the knob past the stop point, you will damage the switchgear.
oThe unit is fitted with a time-delay device which will prevent the compressor from
starting for approximately 5 minutes.
oThe unit will now be running, allow a minimum of 10 minutes for it to begin cooling.
oIf chilled air needs to be directed to a particular area, adjust the grill Louvre blades on
the front of the unit.

Coolbreeze 27E 2011 Page 3 of 4
© Allseasons Hire
Usage and care
oNever use an air conditioner except for its intended purpose.
oKeep the equipment clean & especially the coil faces. Blow out the coils with
compressed air.
oRegularly check the water drain tank (every 3-4 hours). On the control panel is a light
which will illuminate when the tank is full. The unit will also turn itself off. Switch the
fan & cooling buttons to OFF.
oBefore removing the tank, leave the unit for at least 5 minutes to allow any
accumulated moisture to drain down into the tank. Removing the tank without doing
this first, WILL cause water to drain into the machine, where it will leak out onto the
floor, appearing as though the machine has a fault.
oFollowing this simple instruction will prevent carpet/general flooring water staining.
oTo empty, open the access door (located on the lower right hand side of the unit) then
simply slide the tank out, empty then replace. The unit can then be switched on via the
fan & cooling buttons.
oAlways check the tank is empty prior to switching on the unit. Never remove the tank
whilst unit in operation!
Storage
oSwitch the unit OFF and unplug from its power supply, then empty the water tank.
oRemove the exhaust discharge hose & ensure the unit is stored upright.

Coolbreeze 27E 2011 Page 4 of 4
© Allseasons Hire
Troubleshooting
PROBLEM
LIKELY CAUSE
SOLUTION
UNIT FAILS TO OPERATE
POWER FAILURE
‘TANK FULL’ LIGHT ON
CHECK ‘POWER ON’ LIGHT IS LIT
CHECK UNIT IS PLUGGED IN TO
POWER SUPPLY
CHECK PLUG FUSE FOR FAILURE
& CORRECT 13 AMP RATING
CHECK BUILDING RING CIRCUIT IS
NOT OVERLOADED
EMPTY WATER TANK
POOR COOLING PERFORMANCE
COOLING NOT SELECTED
THERMOSTAT KNOB NOT TURNED
FULLY CLOCKWISE
COILS DIRTY OR (WHERE FITTED)
FILTERS DIRTY
EXHAUST HOSE TOO LONG,
KINKED, OUTLET
RESTRICTED/BLOCKED,
RESULTING IN HEAT NOT BEING
REMOVED FROM THE FRIDGE
CIRCUIT CAUSING CIRCUIT
TEMPERATURE TO RISE &
COOLING PERFORMANCE TO FALL
AIR INLET GRILLS OBSTRUCTED
FAN SPEED ON LOW SETTING
PRESS GREEN COOLING BUTTON
TURN KNOB FULLY CLOCKWISE,
COMPRESSOR HAS 4 MINUTE
DELAY BEFORE IT STARTS &
COOLING WILL BEGIN TO
COMMENCE AFTER APPROX 10
MINUTES
BLOW COMPRESSED AIR
THROUGH COILS TO CLEAN
WASH OR REPLACE FILTERS
ENSURE ONLY THE QUOTED
MAXIMUM LENGTH DUCT IS USED
& THAT IT IS STRAIGHT, KEPT
TAUT & EXITS PROPERLY TO
OUTSIDE
REMOVE OBSTRUCTION
TURN FAN SPEED TO MED OR
HIGH
WATER LEAKAGE
CLOGGED DRAIN TUBE
WATER TANK MISSING
TANK FULL AUTO CUT OUT NOT
WORKING CORRECTLY
HOSE NOT LOCATED IN TANK
CORRECTLY
REMOVE BLOCKAGE
REPLACE TANK
CHECK TANK FLOAT OPERATES
FREELY
DEPRESS MICROSWITCH LEVER
ARM, UNIT SHOULD STOP & ‘TANK
FULL’ LIGHT SHOULD BE LIT
ENSURE HOSE IS LOCATED INTO
TANK
COMPRESSOR STOPS RUNNING
INPUT VOLTAGE TOO LOW
WATER TANK FULL
AS FOR POOR PERFORMANCE
CHECK LINE VOLTAGE
CHECK THAT TANK IS NOT FULL
Table of contents
Other All Seasons Hire Air Conditioner manuals
Popular Air Conditioner manuals by other brands
Samsung
Samsung UH140GAMC installation manual

Daikin
Daikin VRV FXMA200AXVMB Installation and operation manual
Webasto
Webasto BlueCool Classic Series installation instructions
Truma
Truma Frostair 1700 Operating and installation instructions
Toyotomi
Toyotomi TID-1800HP Type A user guide
Friedrich
Friedrich Vert-I-Pak A-Series Installation & operation manual

