Allen Sports ast200 User manual

INSTRUCTIONAL
OWNER’S MANUALp1
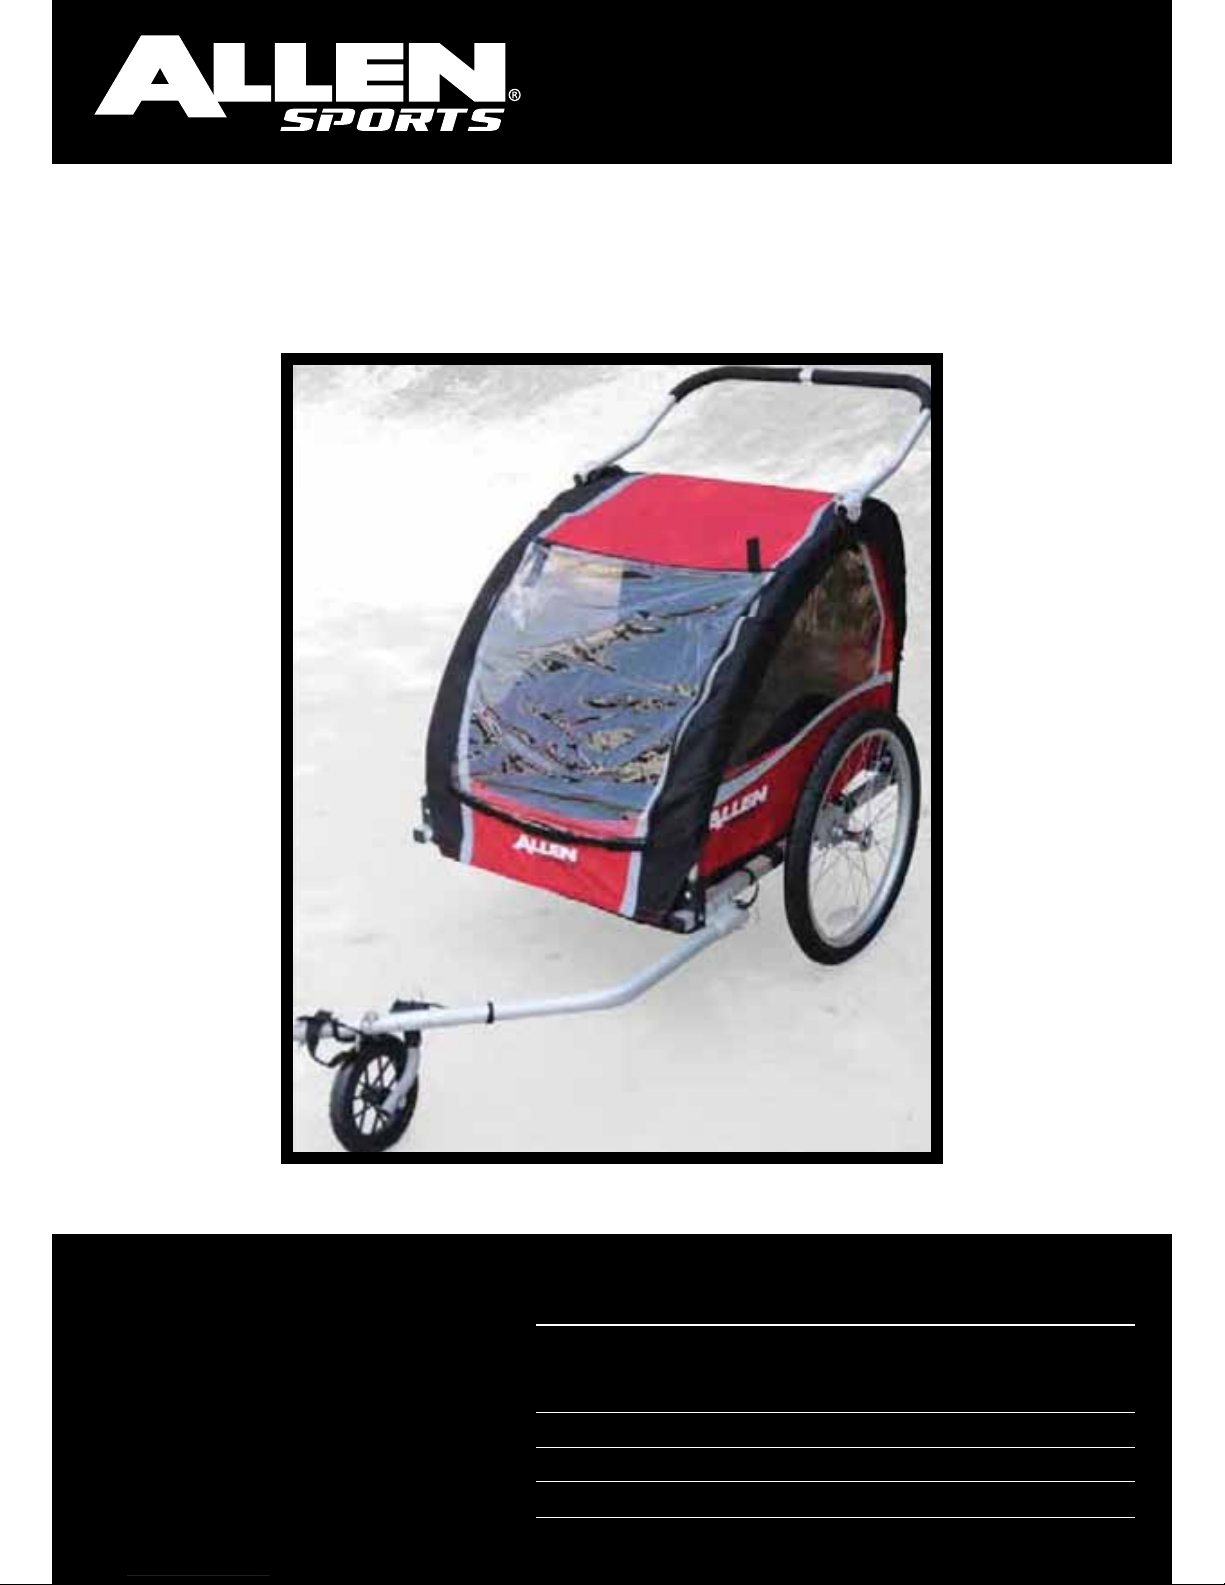
MODEL AST200 BIKE TRAILER
Owner’s Manual should be kept for future reference
WARNING
WARNING
WARNING
WARNING
1. Completely read and understand Owner’s Manual before assembling or operating this product.
2. This product should be assembled by an adult
IMPORTANT SAFETY INFORMATION
WARNING #1:
• Failuretofollowthesewarningsandassemblyinstructionscouldresultinseriousinjuryordeath!
• Immediatelydiscardallplasticbagsandplasticwrappingmaterials!
• Maximumweightcapacityforthistraileristwo(2)childrenat100pounds,maxpayload!
• Neverusethistrailer/strollerifitbecomesdamaged!
• Toavoidseriousinjury,childrenshouldalwaysweartheseatbeltandtheshoulderstraps!
• Donotinstallacarseatoranyotherseatingdevicenotapprovedbythemanufacturerinsidethetrailer!
• AreectorthatcomplieswithCPSCregulationsmustbevisibleontherearoftrailer.
• Neverleavechildrenunattendedinoraroundthisproduct!
• Neverallowchildrentoassemble,fold,ordisassemblethisunit!
• Accessoriesorparcelsplacedintrailer/strollermaycauseittobecomeunstable!
• Notforusewithchildrenunder12monthsold!Childrenmustbeabletosupporttheirownheads!
• Beforeriding,checkthatallpartsareassembledaccordingtothemanufacturerinstructions!
Also,ensurethatthetrailerdoesnotinterferewithbraking,pedaling,orsteeringofthebicycle!
• Donotallowanyofthechild’sbody,clothing,shoelaces,ortoystocomeintocontactwithmovingparts!
• Makenomodicationstothetrailer!
• Tiresshouldbeinatedto25-35PSIformaximumcomfort!Checktirepressurebeforeeachuse!
• Useafootpumporhandpumptoinatetires!Pressurizedairhosescancauseoverination!
• Periodicallyre-checkallfastenerstomakesuretheyaretight!
• Cleantraileronlywithsoapandwater.Donotusesolvents!
TOWING TIPS:
• Makesureyourbikebrakesworkproperly!Brakingdistanceisincreasedwhenpullingatrailer!
• Thistraileriswide!Allowextraclearancenearcurbs,signs,parkedcars,andotherobstacles!
• Abicyclewithtrailerattachedrequiresawideturningradius!Donotturnsharply!
• Childrenmustwearanapprovedsafetyhelmetwhenusingthisproductintrailermode!
• Neverremoveprotectivecanopywhenpullingchildreninthetrailer!
• Alwaysusethesafetyagwhenpullingthistrailer!
• Donotrideovercurbs!Avoidbumpsandholes!Alwayssignalyourturns!
• Useextracautionwhenturningonunevenpavement,andgoingdownhill!
• Notforuseathighspeeds!Donotexceed10MPH!
• NEVERusethistraileratnight!
• Installarearviewmirroronyourbiketocheckonchildrenintrailer!
• Dresschildrenappropriatelytopreventthemfromgettingchilledoroverheatedwhileriding!
Protectagainstwind-chillincoldtemperatures,andprovideadequateventilationandhydrationduring
warmertemperatures.
SAFETY TOWING TIPS
INSTRUCTIONAL
OWNER’S MANUALp2
FULLY ASSEMBLED TRAILER
QUANTITY DESCRIPTION
1 Framew/Canopy,SlingSeatwith5point
safetyharness,towbar,towbarcoupler
and rear wheel bracket attached
2 20” Rear wheels
1 Safetyflag
1 SwivelFrontWheel
1 JoggerBar
PARTS LIST

INSTRUCTIONAL
OWNER’S MANUALp3
TRAILER ASSEMBLY & OPERATING INSTRUCTIONS
STEP 1:
STEP 2:
STEP3:
STEP 4:
NOTE:
WARNING!: Thespring-releasepinsmustbeengagedforsafeoperationofthetrailer.FailuretoAssemble
properlymayresultininjury.Ifthespring-releasepinsdonotengageproperly,DONOTUSE.
Callthecustomerservicenumberasindicatedintheattachedliteratureforassemblyassistance.
Removethetrailerfromtheboxandcheckcontentsagainstthepartslist.
NOTE(S):1.Laythetraileronthegroundwiththeblackfabricsidedown.
2.SetWalkingKitaside,asyouwillinstallthislater.
3.DonotremovethewhitefoamfromthewheelaxlesuntilSTEP4
Raisethetwosideframepanelsofthetrailer.Removethewheels,topcover,andagfromthetrailerseatingarea.
Settheseaside,youwillinstalllater.
Raisethecrossbarintoplaceuntiltheholeonthesideframepanelandtheholeinthecrossbararelinedup.
Inserttheknobthroughthesideframepanelandintothecrossbar.Tightentheknob.
Knobwillbeattachedtotrailerframewithlanyard
WHEELINSTALLATION
WARNING! Removethefoamfromthewheelaxlesanddiscardimmediately.Donotremovewashers.
STEP 1:
STEP 2:
STEP3:
STEP 4:
NOTE:
Liftthetrailerbacksotherightsideisup,andlocatetherightwheel.
Installthewheelaxlebyslidingtheaxlecompletelythroughthebracket
intheframeasshown.
InserttheQuickReleasePin(tetheredtothetrailerframenearthewheelbracket)
throughtheholeintheaxleandlockthecliptosecurethepin.
Repeatfortheleftwheel.Whencomplete,giveeachofthewheelsatugtobesure
thattheyaresecure.
Wheelsmustbeproperlyinstalledwithquickreleasepinsclosedandsnapped
shut.IfQRpinsarenotcorrectlyattached,wheelsmayfalloff.DonotuseifQR
pinsaremissing,oriftheclosureisdamagedormissing.
WARNING!: Checkwheelsperiodicallyduringandbeforeeachusetobesurethattheyhavenot
becomeloose.FailuretodosocouldresultinSERIOUSINJURYtoyouortrailer’soccupants.

INSTRUCTIONAL
OWNER’S MANUALp4
WARNING!: Checkthispinperiodicallyduringandbeforeeachusetobesurethatithasnotbecomeloose.
FailuretodosocouldresultinSERIOUSINJURYtoyouortrailer’soccupants.
TOW ARM INSTALLATION
STEP 1:
STEP 2:
STEP3:
Locatethehitcharm,andpositionontheleftsideofthetrailerasshown.Thehitcharmisheldinplacebyaspringpin
andaquickreleasepin.
Depressthespingpinandinsertthehitcharmintothebracketontheframeasshowntotheright.
Oncethespringpinlocksinplaceintheholeinthebracket,LocatetheQRpin,locatedonthetrailerframe,thenInsertthe
pinthroughthebracketandintotheholeinthetowarm.Thepinshouldgocompletelythroughthetowarmandbracket.
Oncethepinisthrough,ipthesafetyclaspoverandontothepin.Givethepinatugtobesureitissecure.
ATTACHINGTHEFOURSEASONCOVER
WARNING!: Neverusethetrailerwithoutthefourseasoncover.Thefrontwindoworbugscreenmustbe
attachedtoprotectchildrenfromyingobjects.
STEP 2:
STEP3:
STEP 4:
STEP5:
NOTE:
STEP 1:
WraptheVelcrobackedxingstrapsandsecurethecoveraroundtheframe.
Positionthefour-seasoncoveroverthetrailerwhereroll-upwindowis
facingtowardsthefrontsideofthetrailer.(Fig.12).
SecuretheVelcromaterialatthebottomfrontofthecovertothe
matchingVelcromaterialonthelowerfrontfabricpanel.
Connecttheslidereleasebucklesafxedtotherearcornersofthecover
tothematchingbucklessewntherearsideofthetrailercabin(Fig13).
ConnecttheelasticcordsontherearcovertotheD-Ringswhichare
locatedonthebottomcabincorners
Thefour-seasoncoverisdesignedtokeeppassengersandcargodry
andwarmininclementweather.Italsoprotectsthepassengersfrom
yingdebris.Thefour-seasoncovercanberolleduptoallowforadded
ventilationinhotweather.Velcroclosureskeepthefour-seasoncover
inplacewhenrolledup.
FIGURE12.
FIGURE13.
INSTRUCTIONAL
OWNER’S MANUALp5
SAFETY FLAG INSTALLATION
STEP 1: Assembletheagandinserttheendintothesmallsleeveonthesideofthetrailerskin.
ReattachtheVelcrotosecurethecover.
NOTE: Flagshouldberemovedbeforeattemptingtofoldtrailer
WARNING!: Thisagismeantforuseonlywiththetrailer.Thisagisnotatoy.Donotletyourchildplay
withthisagatanytime.Failuretocomplywiththiswarningcouldresultinseriousinjury
ofyourchild.
WARNING!: Yourtrailerisdesignedtoattachtomostfull-sizedbicycles.Thetrailer’shitchmustbe
attachedtotherearaxleofthebike.Donotusetrailerifthehitchcannotbesecurely
attachedtorearaxle.Itisrecommendedthatthebicycle(s)towhichthetrailerwillbe
attachedundergoasafetycheckbyaqualiedbicyclemechanicbeforeattachingtrailer.
Thistrailershouldneverbeusedwithelectricbicycles,oranymotorcycleoranymotorizedvehicle
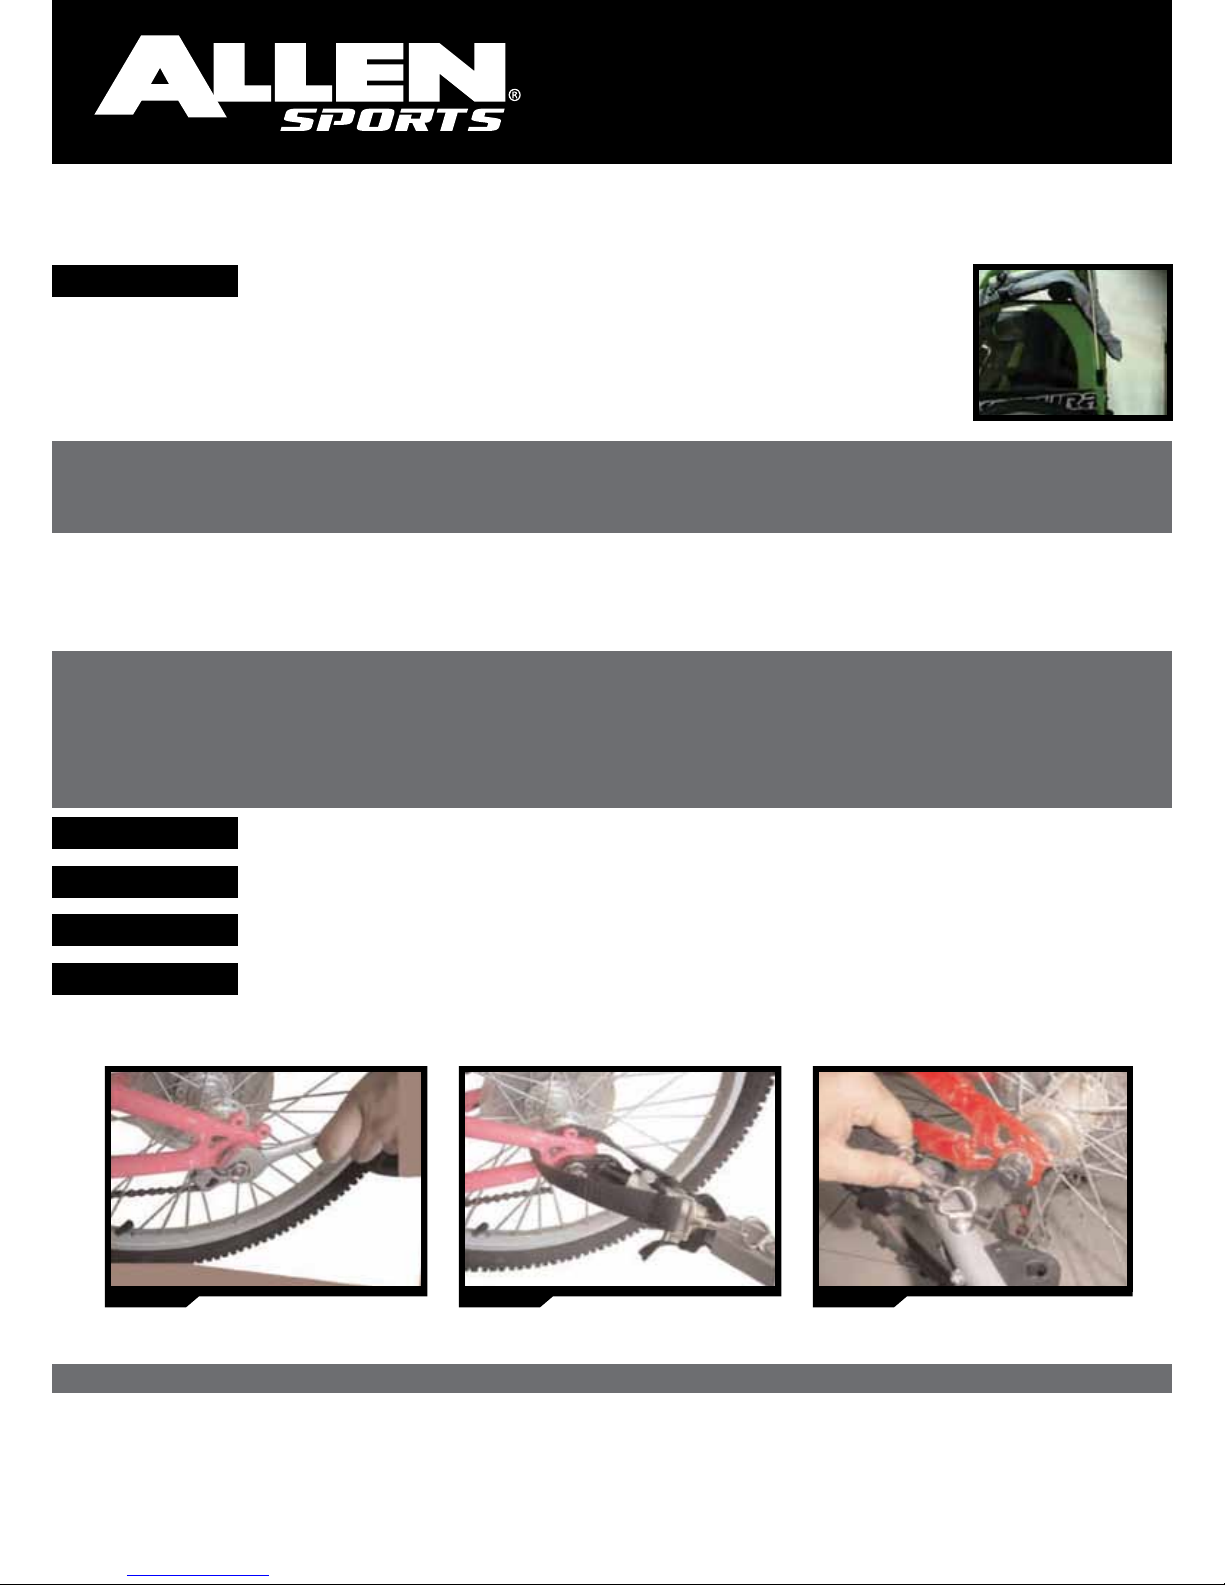
ATTACHINGTRAILERTOBICYCLE
STEP 2:
STEP3:
STEP 4:
STEP 1:
Positionhitchoverleftrearaxleofbicycleframe(Fig15).
LoosenLEFTsiderearaxletoallowthetrailer’shitchtoattachtoframe.
Tightenaxlenutsecurely,testingtoseethathitchisunabletopullloose(Fig16).
LoopSafetyStraparoundframeandsecuretoD-ringonhitcharm(Fig17).
WARNING!: Safetystrapmustattachtothebikeframewhenusingthisproductintrailermode.
FIGURE15. FIGURE16. FIGURE17.

INSTRUCTIONAL
OWNER’S MANUALp6
SECURINGCHILDWITH5-POINTSAFETYHARNESS
WARNING! Toavoidseriousinjury,childrenshouldalwaysweartheseatbelt,shoulderstrap,andahelmet!
STEP 1:
STEP 1:
STEP 2:
NOTE:
NOTE:
STEP 2:
UndothelapbeltbuckleandseatthechildintheCENTERofthetrailer.Bucklethelapbelt[A]overthe
child’slap,andpullthestrapuntilthebeltistight.
UndothelapbeltbuckleandseatthechildrenintheLeft&Rightseatsofthetrailer.Bucklethelapbelt
[A]overeachchild’slap,andpullthestrapuntilthebeltistight.
FORONECHILD:
ONECHILD: TWOCHILDREN:
FORTWOCHILDREN:
Placethetwocentershoulderstraps[C]overthechild’sshoulders,andclipbothstrapsinto“D”
Ring[D]ofthecentercrotchstrap.Adjustshoulderstrapheightofthechild,thenpullthestraps
untiltheyaresnug.
Cliptheoutershoulderstraponeithersideintothe“D”Ringoftheoutercrotchstrapdirectlybelow.
Thiswillkeepthestrapsthatarenotinuseoutoftheway.
Placethetwocentershoulderstraps[B]overeachchild’sshoulders,andclipbothstrapsinto“D”Ring[C]
ofthecentercrotchstrap.Adjustshoulderstrapheightofthestrapsuntiltheyaresnug-youshouldbe
abletottwoaverageadultngersbetweenthebeltandthechild.
Thebuckleshouldbecenteredinyourchild’sabdomen.HooktheshoulderstrapstotheD-ringsonthe
buckleandadjusttheladderlockssotheytsnugly.
WARNING!: Adjustthestrapssothatthecrotchstrapandshoulderstrapsmeetatthechild’sstomachlevel,
NOTatthechestlevel!
STEP 2:
STEP3:
STEP 4:
STEP 1:
RemoveQRSnapfromhitchconnection
RemoveSafetystrapbyreleasingD-Ring
Pulltrailerarmawayfromblackhitch
BlackHitchattachedtoaxlecanremainonthebicycleforeasyreattachmentofthetrailer.
REMOVALOFTRAILER

INSTRUCTIONAL
OWNER’S MANUALp7
TRAILER MAINTENANCE
Yourtrailerwillgiveyoumanyyearsofservicewithminimalcare.Toensuresafeanddependable
operation,werecommendthefollowingregularmaintenance.Beforeeachride:
STEP 2:
STEP3:
STEP 4:
STEP5:
STEP 1:
Makesurethatwheelsarefullysecureontheframe.Wheelsmustbefullyinsertedtolockinplace.
Checkallfastenerstomakesurethattheyaretight,andtightenorreplaceasneeded.
Checktiresforwearandproperinationaslistedonthetiresidewall.Useonlyhand-operated
pumptoavoidtiredamage.Under-oroverinationcanresultinunsafehandling.
Doublecheckhitchattachment,makingsurethatQRPinislocked,andthatsafetystrapisinplace.
Checkharnessstrapforwear,andmadesurethatbuckleslockproperly.
ANNUALLY: Onceayear,orsoonerifneeded,havethetrailerinspectedbyaqualiedbicycle
mechanicforsignsofwearorneededadjustment.
ASNEEDED: Trailercanbecleanedwithamilddetergentandwater.Donotremoveseatorcover
forwashing.Donotuseharshchemicalsorwater,astheymaydamagefabricsor
theframematerialsorsurfaces.
FOLDING FOR STORAGE AND TRANSPORT
STEP 2:
STEP3:
STEP 4:
STEP5:
STEP6:
STEP7:
STEP 8:
STEP 9:
NOTE:
STEP 1:
Unclipthetowbarsafetystrapfromthe“D”ring,andremovepintoremovehitchfromframe.
Removechildrenandallcargofrominsidethepassengercompartment.
Cliptheendofthestrapbackontothetowbar“D”ring.
Removetheagandpoleandseparatethethreesections.
Removethequick-releasepinsformthestubaxlesoftherearwheels.
Removethequick-releasepinfromthetowbarbracketatthefrontcornerofthetrailer.
Foldthetowbarbackunderthetrailer,andreplacethequick-releasepinthrough
thetowbarandU-channel
Placewheelsandaginsidethepassengercompartment,andclosethefrontcover.
Folduppercabinasshownatside:
a.Remove4-seasonRaincover
b.RemoveQRpinfrombothsides.
c.Foldframedownasshown.
d.Foldinuntiltrailerisat
Storetrailerinacool,dryenvironment,awayfromdirectsunlight.Afterextendedperiodsofstorage,
checktiresforwearorcracking,andfabricandstrappingforsignsofwear.Afterextendedperiodsof
storage,itisrecommendedthatthetrailerisinspectedbyaqualiedbicyclemechanicpriortouse.
Warranty:
IFYOURPRODUCTREQUIRESWARRANTYSERVICE,PLEASEDONOT
RETURNITTORETAILSTORE.PLEASECONTACT:
ALLEN SPORTS USA
(800)722-5536~CUSTOMERSER[email protected]
Pleasenotethatallreturnsandexchangesaresubjecttothereturnpolicy
oftheretailerwheretheproductwasoriginallypurchased
R.A.ALLENCO.,INC.-505BEACHLANDBLVD.-STE.5-VEROBEACH,FL
32963
ProductdesignedinUSA,MadeinNingbo,China

WARRANTY
IFYOURPRODUCTREQUIRESWARRANTYSERVICE,PLEASEDONOTRETURNITTORETAILSTORE.
PLEASE CONTACT:
ALLEN SPORTS USA
(800)722-5536~CUSTOMERSER[email protected]
Pleasenotethatallreturnsandexchangesaresubjecttothereturnpolicyoftheretailerwhere
theproductwasoriginallypurchased
R.A.ALLENCO.,INC.-505BEACHLANDBLVD.-STE.5-VEROBEACH,FL32963
ProductdesignedinUSA,MadeinNingbo,China
Table of contents
Other Allen Sports Utility Vehicle manuals

Popular Utility Vehicle manuals by other brands


FARMA
FARMA CT 3 Instruction book

Anderson Manufacturing
Anderson Manufacturing Dump Series D5TLP specification

FEATHERLITE TRAILERS
FEATHERLITE TRAILERS Horse Trailer owner's manual

Grillo
Grillo CLIMBER 9.18 Operator's manual

Clam
Clam POLAR TRAILER LG 900 manual

Linhai
Linhai Landboss LH800U-2D Owner's/operator's manual