ALLUXITY Media One User manual

Page 1
QUICK GUIDE
MEDIA ONE

Page 2
Using the Media One as a Media Server
Connect the Media One to your internal network
- Power Cable
- Ethernet cable (connected to your internal network or a separate router for control)
- Output cables, Balanced or Unbalanced (WARNING. Connect only one output at any given time!).
When connected properly, power ON your Media One.
- The screen will say BOOTING, PLEASE WAIT. When the Media One is ready to use, the booting screen will
be replaced with the ‘Now Playing’ interface.
Once the Media One is powered ON, you can now start to transfer music.
1. Press the start/hit the Windows icon on your keyboard
On MAC press Command+Kor go to GO - Connect to server
2. Type: \\IP of the server, and hit enter – example is: \\10.0.0.2 or
\\192.168.0.123
3. Open the Upload folder and copy your music directly to this folder.
The Media One will now upload the music to the HD’s.

Page 3
Media center inferface
Alluxity control interface is what you’d use to operate the server + attached Alluxity amplifiers. The inter-
face shows you all music on the on server and lets you browse between your music. You have a setting op-
tion where you can adjust Sample rate, Bit Depth, Active output (of the motherboard, don’t change) and see
IP, Serial number, software version and User Interface version.
NOTE: If you’re using a Windows based tablet/phone and would like to get the media center interface, type
<ip>/m2 in your browser and bookmark it or save as a shortcut.
Overview - Homepage
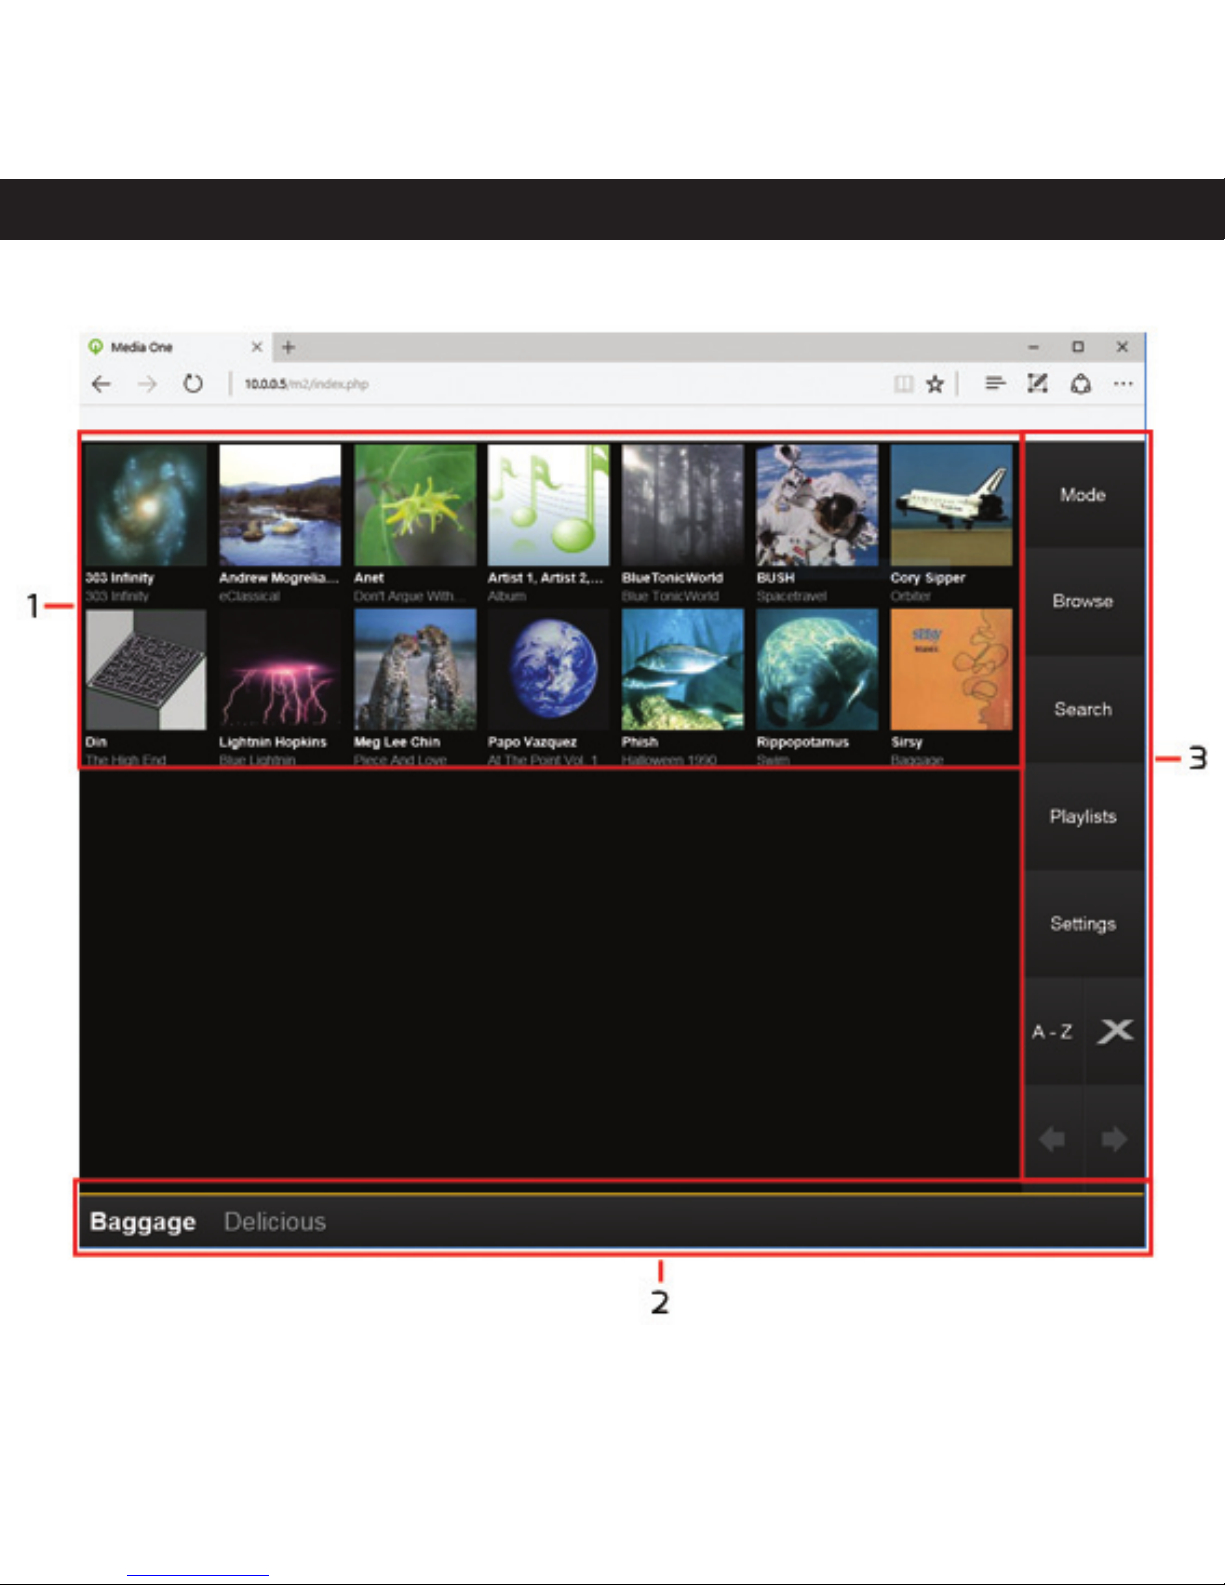
There are quite a few things to notice in this interface. Lets start with the overview:
1. This section shows the albums either as Covers or as listed - You can switch between the two ways of
showing by pressing Mode in the top right side.
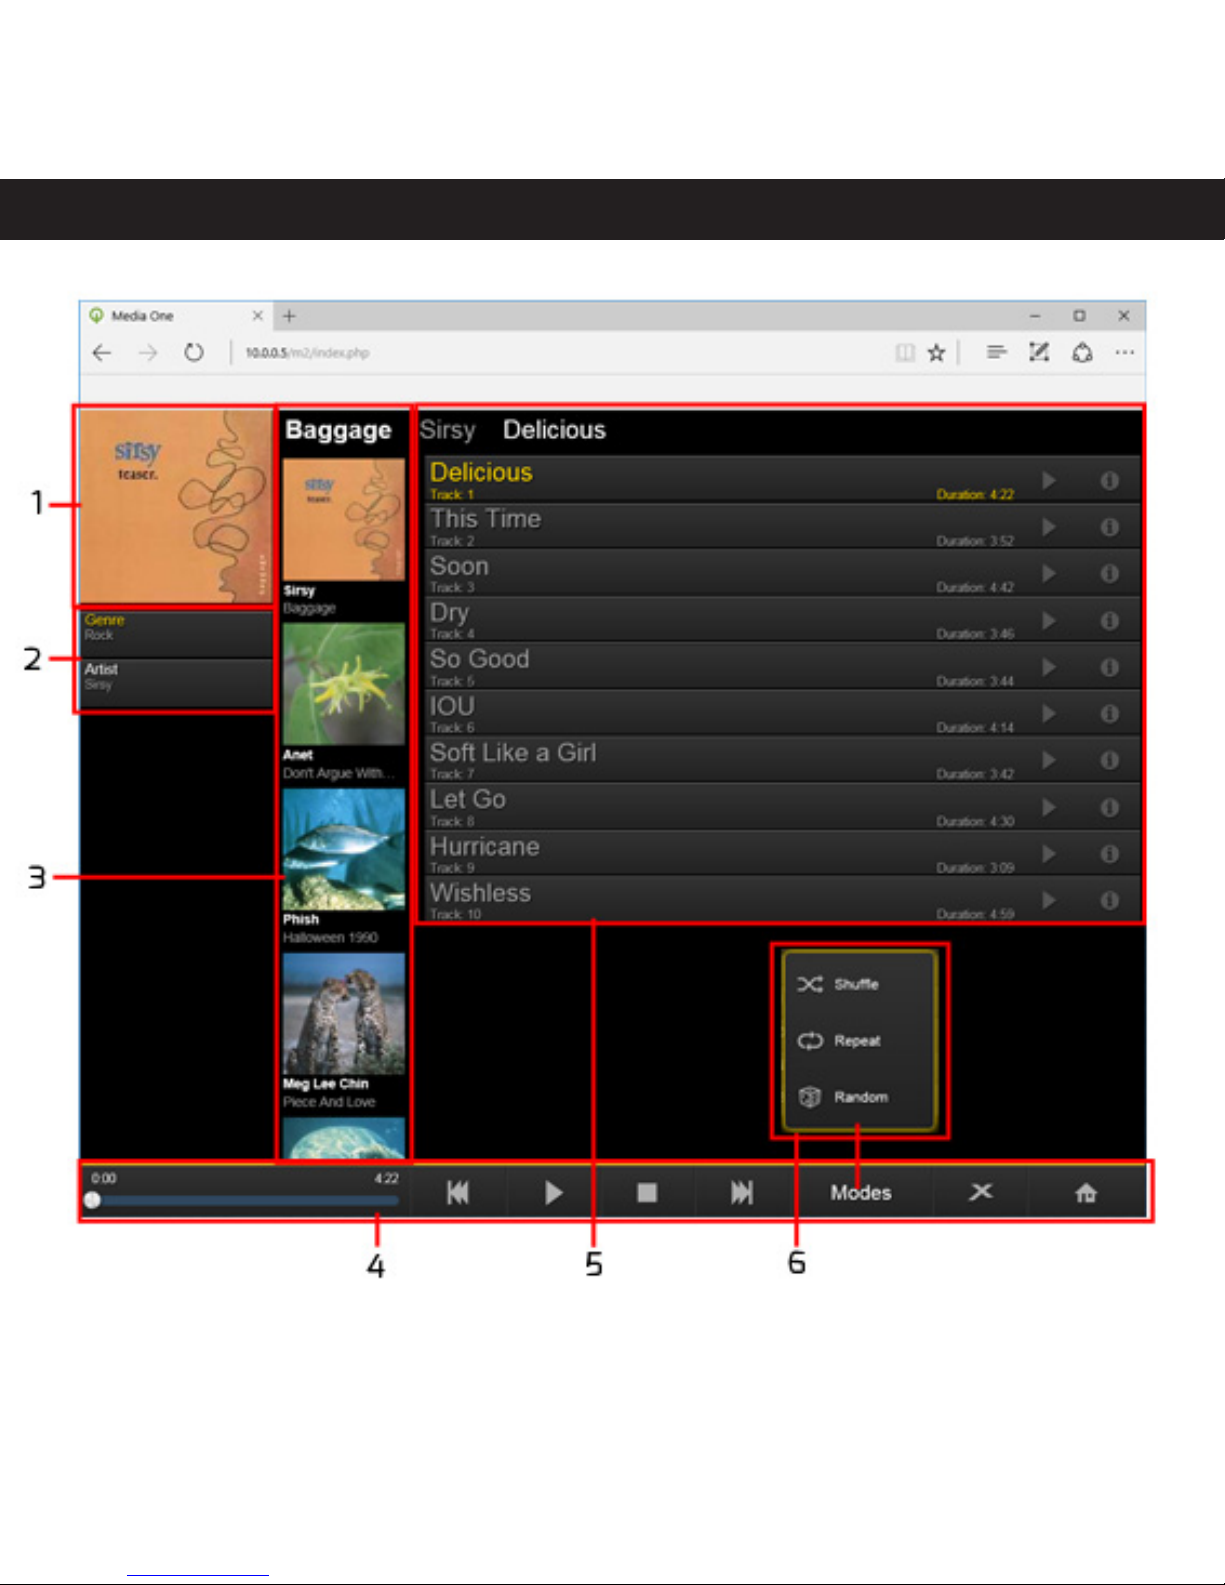
2. This bar at the bottom shows what is currently playing. Pressing this will get you to the “Now playing”
section showed on page 15.
3. This is the menubar. There are quite a few options to be aware of here:
Mode - switches between seeing covers or tradition listing.
Browse - Lets you browse your music. Standard view is Covers by artists
Search - Searches for Trackname, Album, Artist etc. simoustainly.
Playlist - Takes you to your playlists. Here you can manage and play your playlists.
Settings - Shows System status and gives you a few possibilities for audio setup. We dont advice to
change any settings - use track values when possible for maximum performance.
A-Z - Gives you the opportunity to show your Covers that starts with a letter.
X- Displays the Alluxity control window. To get back from that Window, press Home/House icon.

Page 4

Page 5
Overview - Album page
There are a few features to be aware of in this interface. Lets first take a look at the overall features:
1. Album cover - Press the cover to start playing the whole album.
2. Genre or Artist - Toggles between the “Similar music/artist” in #3.
3. Similar music/artist - Shows similar music/artist to the current music playing. This is usefull for finding
forgotten music or to discover stored music.
4. Menu bar - Access functions as forwarding a track, previos/next track, play, plause, modes, Alluxity
control menu and Home (Home = back).
5. Tracks on Album/Playlist.
6. Modes - Used to set the server to:
Shuffle the music
Repeat an album or track
Randomly start yo play your whole library
Usefull features to be aware of are:
• You can fastforward in a song by pressing the Timer Bar and then either drag the pointer or press a
certain place.
• You get a variety of options when you press the little Right Arrow on a song. The arrow is located on the
left side og a song next to the Duration.
• Track information can be found by pressing the (I) next to the Right Arrow.

Page 6

Page 7
Playlist - how to make one
You can create a playlist when you try and Add a song to a playlist and just press Create new:
1. Go to an Album and Press the Right Arrow icon on the song you’d want in a new playlist.
2. Press Add to Playlist and press New Playlist and name your new Playlist.
NOTE: Pressing Mode on the Main Screen will allow you to add a whole Album to a Playlist.

Page 8
Using the Media One as a DAC
1. Connect Media One to your setup.
- Power Cable
- Ethernet cable (connected to your internal network or a separate router for control)
- Output cables, Balanced or Unbalanced (WARNING. Connect only one output at any given time!).
2. Connect your source correctly.
3. Power On the Media One.
4. Press the “Setup” icon and choose the correct input.
NOTE: It’s important to know, that when you use the Media One as a DAC, the mother-
board will be turned ON. It is not possible to turn off the motherboard and use the inter-
nal DAC board seperately.

Page 9
Setting up a NAS
1. Connect to the Media One with a PC to get the PC web interface
2. Click the Settings button at the bottom of the page
3. In the dropdown menu, go to the NAS Storage menu
4. Enter the IP Address of the NAS server or locate it and enter Username + Password if required.
5. Choose whether you’d want Read & Write or Read Only (Read Media Access!)
6. Press Submit
The music stored on the NAS should be viewable shortly
There are a few settings you need to be aware of:
Media Access : allows you to modify files on your NAS AND the Media One will re-arrange all files on your
NAS for optimal performance. This can take a while and try not to reboot the Media One before this process
is finished. If the Media One is rebooted before this process is finished, the software will start with Initial Dis-
covery which is a feature that checks all files and continues to rearrange the files on the NAS before boot-
ing up properly. To cancel the process after starting, use a PC, enter the <IP of the server>/tools (example:
192.168.10.125/tools), and locate Initial Discovery. Press it and toggle the Initial Discovery off.
Store New Media Files
If this function is set to YES on one of your NAS (only one NAS at a time), then whenever you copy music to
your Media One the music will be stored on the selected NAS. Basically this is a safety function as most NAS
are fault-tolerate using RAID erray of drives and the Media One has a single drive*. The NAS protects the
media from drive failure if it’s set up with RAID.
Other manuals for Media One
1