Alpes Inox ARGENTO E 193 User manual

INSTRUCTIONS MANUAL
LIVRET D'INSTRUCTIONS
COLLEZIONE “ARGENTO - E 193 ”
EXHAUST HOODS WITH EXTENDIBLE FILTER
HOTTES ASPIRANTES AVEC FILTRE
EXTENSIBLE
GB
FR

2

3
INDEX
Important directions ............................................. page 4
Technical features
The range ............................................................. page 5
Control panel ........................................................... " 6
Extendible filter ....................................................... " 6
Movable deflector panel .......................................... " 6
Lighting lamps ......................................................... " 7
Powered exhaust fan with rotating stator ................ " 7
Cleaning and maintenance
Filter cleaning ....................................................... page 8
Replacement of lighting lamps ................................ " 11
Adjustment of deflector panel ................................. " 12
Instructions for technician
Installation ............................................................ page 13
Connection to the mains ......................................... " 13
Fastening (to wall unit or to wall)............................. " 14
Size of the exhaust hole .......................................... " 15
Reintegration air ...................................................... " 16
Exhaust air flow ....................................................... " 16
Removal of control panel ........................................ " 17
Electric diagram of exhaust hoods with extendible
filter and one powered exhaust fan ......................... " 18
Electric diagram of exhaust hoods with extendible
filter and two powered exhaust fans ....................... " 19
Technical label .................................................... page 20
TABLE DES MATIERES
Avertissements importants ................................... page 4
Caractéristiques techniques et de construction
La gamme ............................................................ page 5
Bandeau de commande .......................................... " 6
Filtre extensible ....................................................... " 6
Déflecteur orientable ............................................... " 6
Lampes d’éclairage ................................................. " 7
Motoaspirateur à stator tournant ............................. " 7
Nettoyage et entretien
Nettoyage des filtres ............................................ page 8
Remplacement lampes d’éclairage ......................... " 11
Réglage du deflecteur ............................................. " 12
Instructions pour le technicien
Installation ............................................................ page 13
Branchement électrique .......................................... " 13
Fixation (au meuble ou au mur) .............................. " 14
Mesure du trou de décharge ................................... " 15
Air de compensation ............................................... " 16
Flux de l'air aspiré ................................................... " 16
Intervention sur le bandeau de commande ............. " 17
Schéma électrique hottes aspirantes avec
filtre extensible à un motoaspirateur ....................... " 18
Schéma électrique hottes aspirantes avec
filtre extensible à deux motoaspirateurs.................. " 19
Etiquette technique ............................................ page 20

4
IMPORTANT DIRECTIONS
Before using the appliance, carefully read this manual and keep
it in a safe place for further reference.
When opening the package, check that the appliance is not dam-
aged.
Keep wrapping out of children’s reach.
Installation and adjustments must be carried out by specialized
personnel only.
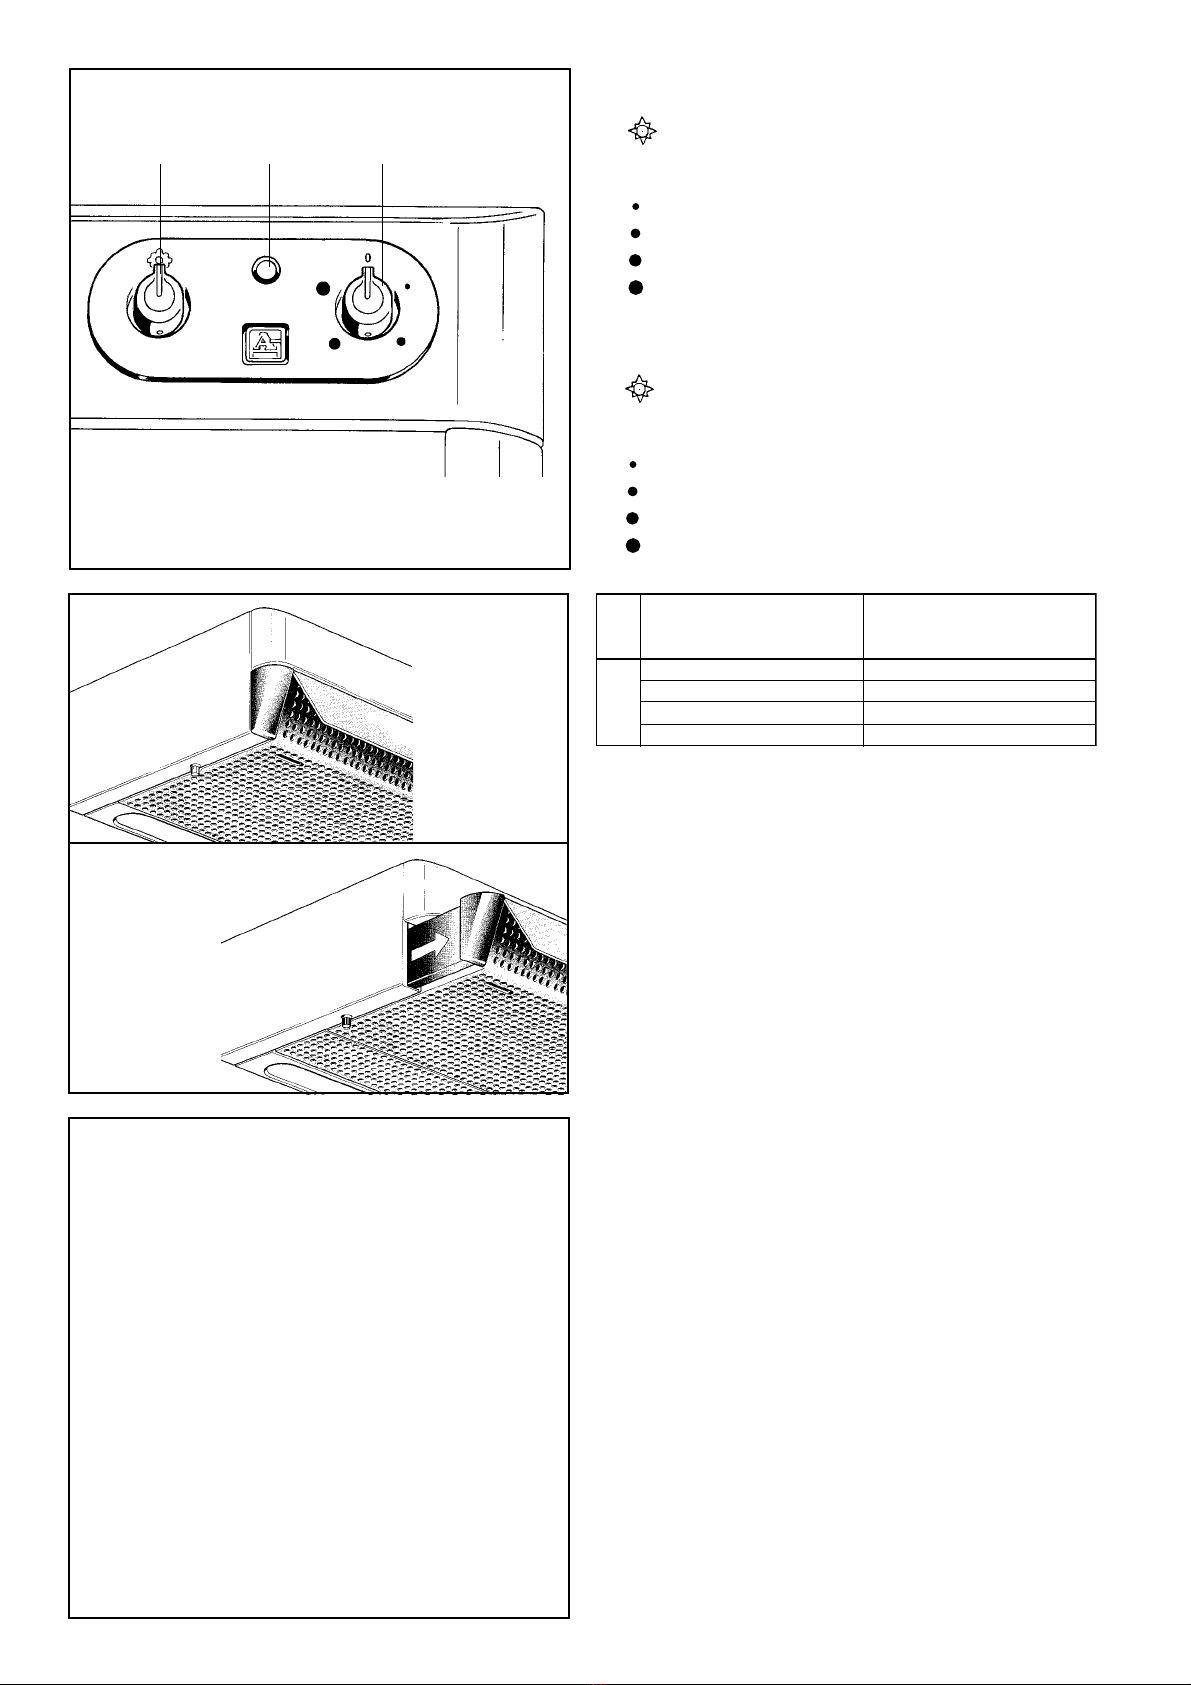
Do not prepare flambé dishes under the hood.
This appliance must be used for the sole purpose, for which it
has been designed and manufactured. Do not alter any of the
technical features.
When the appliance is connected to the mains, it is important to
observe these simple safety regulations:
-never touch the appliance with wet feet or hands
-never work the appliance bare feet
-never allow children or unapt people to use the appliance
-do not pull electric cord
-do not clean the appliance before having previously discon-
nected it from electric grid
To ensure the maximum efficiency of the hood, it should operate
in a room with the doors and windows closed, so that the ex-
haust/air cleaning action is limited to the kitchen area. We also
recommend that you start the appliance at least 8-10 minutes
prior to cooking and leave it on for 15-20 minutes after.
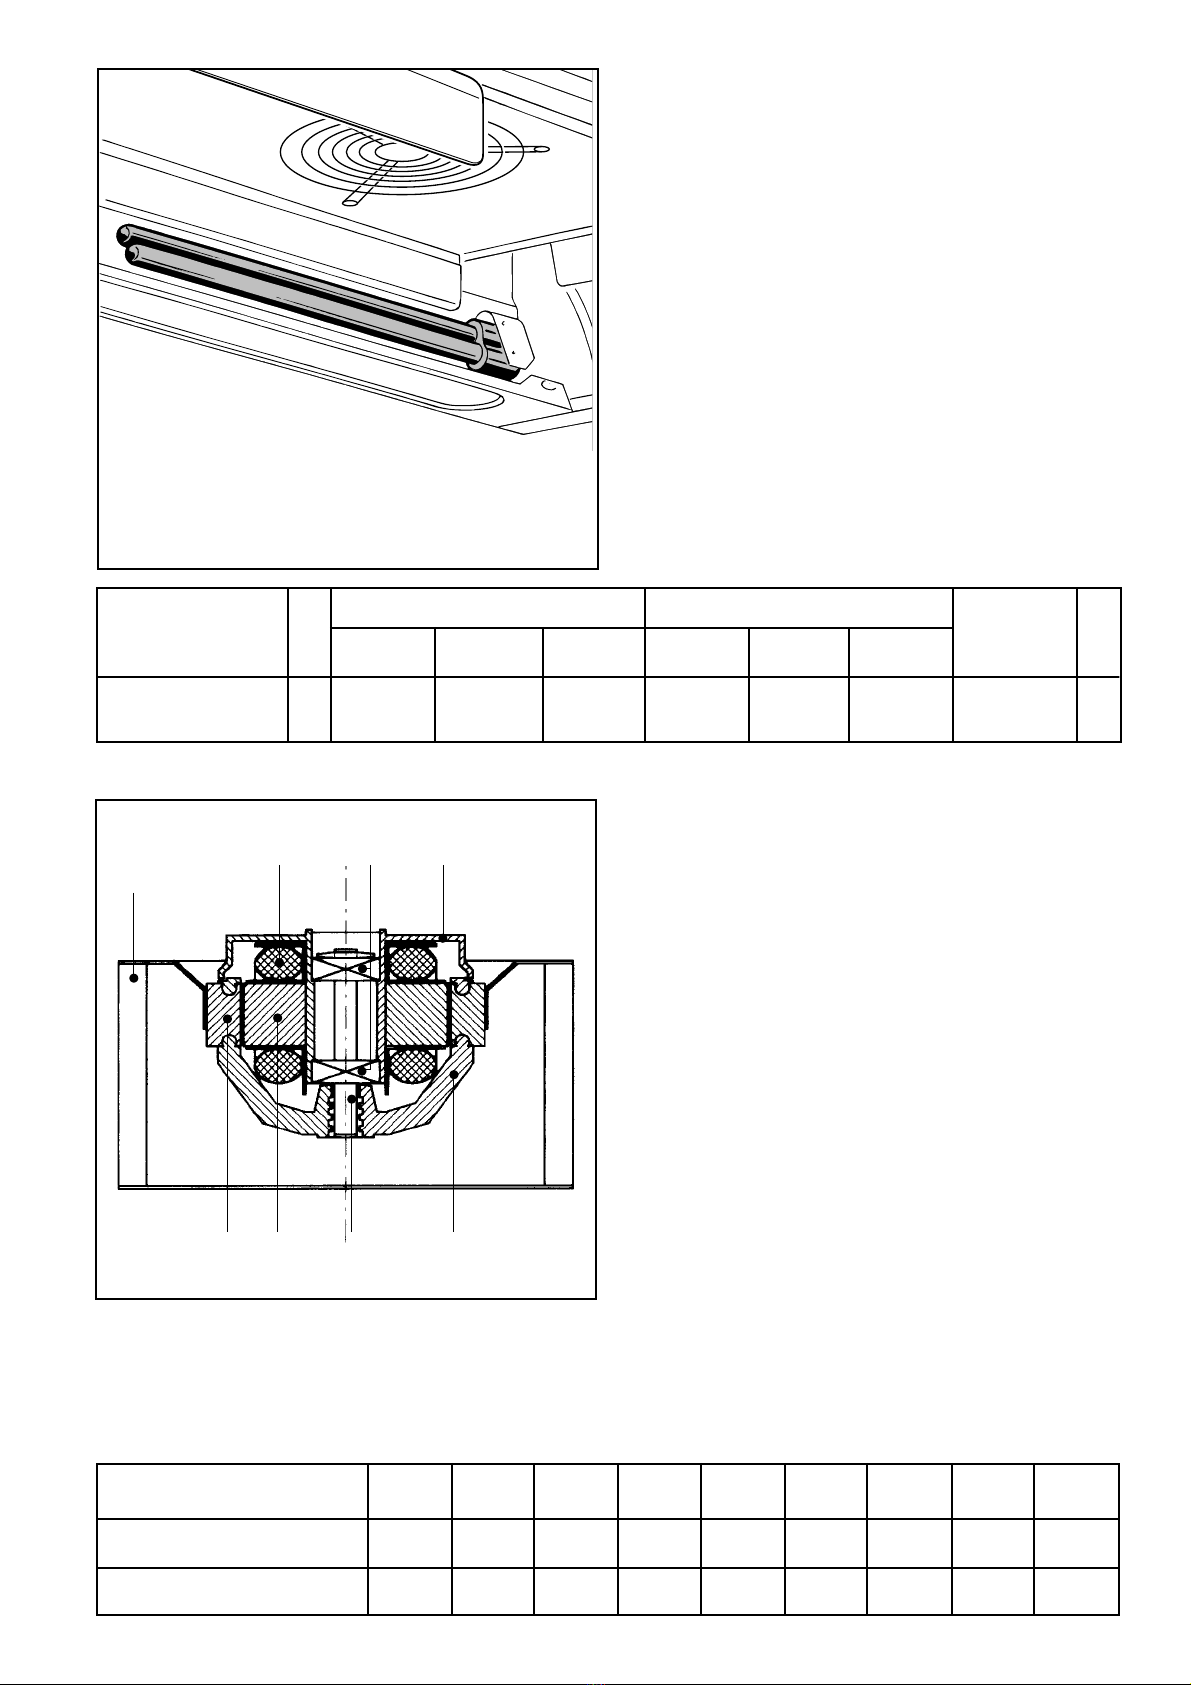
Fire hazard in case the cleaning should not be done according
to the manufacturer's instructions.
The air collected must not be conveyed in a duct used for the
discharge of fumes originating from kitchen appliances with an
energy supply other than electricity.
The adequate ventilation of the room must be provided for when-
ever the hood and any appliances supplied by energy other than
electrical power are utilized simultaneously.
Make sure to comply with all government regulations as regards
the elimination of the exhaust fumes.
AVERTISSEMENTS IMPORTANTS
Avant d’utiliser l’appareil, lisez attentivement ce manuel et con-
servez-le dans un endroit accessible pour toute consultation ul-
térieure.
Au moment de l’ouverture de l’emballage, assurez-vous que l’ap-
pareil soit intact.
Ne laissez pas à la portée des enfants les éléments de l’embal-
lage car ceux-ci peuvent représenter un danger potentiel.
L’installation et les divers réglages et mises au point doivent
être effectués exclusivement par des techniciens spécialisés.
Ne pas préparer d'aliments flambés sous la hotte.
Cet appareil doit être utilisé exclusivement pour l’usage pour
lequel il a été projeté et construit. N’en modifier sous aucun pré-
texte les caractéristiques techniques.
Quand l’appareil est branché au réseau électrique, il est impor-
tant de respecter ces simples normes de sécurité :
-ne touchez pas l’appareil avec les mains ou les pieds mouillés
ou humides
-n’utilisez pas l’appareil avec les pieds nus
-ne permettez pas aux enfants ou aux personnes inaptes d’uti-
liser l’appareil
-ne tirez pas sur le câble électrique
-n’effectuez pas d’opérations de nettoyage avant d’avoir dé-
branché l’appareil du réseau d’alimentation
La hotte doit fonctionner avec les portes et les fenêtres fermées
de manière que l’action d’aspiration soit limitée à la cuisine où
l’appareil doit exercer au mieux sa fonction ; il est conseillé
d’autre part de la mettre en fonction au moins 8-10 minutes avant
de commencer les opérations de cuisson et de la laisser allu-
mée pendant encore 15-20 minutes après avoir fini de cuisiner.
Risque d'incendie si le nettoyage n'est pas effectué suivant les
instructions du constructeur.
L'air aspiré ne doit pas être convoyé dans un conduit utilisé pour
l'évacuation des fumées d'appareils alimentés avec une autre
énergie que l'éléctricité.
Il faut prévoir une aération adéquate du local quand la hotte et
des appareils alimentés avec une autre énergie que l'électricité
sont utilisés en même temps.
Respecter scrupuleusement les prescriptions données par les
autorités compétentes en ce qui concerne le conduit d'évacua-
tion de l'air.
The manufacturer is not liable for improper use of the
appliance or for damages deriving from the inefficient or
non-connection to the earthing system.
Le constructeur décline toute responsabilité en cas
d’utilisation incorrecte ou impropre de l’appareil et en cas
de détériorations causées par l’absence ou le non
fonctionnement du branchement à l’installation de terre.

5
CARACTERISTIQUES
TECHNIQUES ET DE CONSTRUCTION
LA GAMME
La gamme comprend des modèles à un ou deux motoaspira-
teurs à stator tournant dans la version aspirante.
Toute la structure de la hotte est construite en acier inox au
nickel chrome 19/10. Le satinage “argent” particulier, le rende-
ment élevé, la consommation réduite, le faible niveau de bruit
et le système filtrant extensible constituent les principales ca-
ractéristiques.
EXHAUST HOOD WITH EXTENDIBLE FILTER AND ONE POWERED FAN,
WITH ROTATING STATOR
HOTTE ASPIRANTE AVEC FILTRE EXTENSIBLE AVEC UN
MOTOASPIRATEUR A STATOR TOURNANT
EXHAUST HOOD WITH EXTENDIBLE FILTER AND TWO POWERED
FANS, WITH ROTATING STATOR
HOTTE ASPIRANTE AVEC FILTRE EXTENSIBLE AVEC DEUX
MOTOASPIRATEURS A STATOR TOURNANT
80
90
100
CFE-A 80/2
TECHNICAL FEATURES
THE RANGE
The range includes models having one or two motor powered
fans with rotating stator in the exhaust model.
The whole structure of the hood is made in nickel chromium
19/10 stainless steel. The “silver” satin finish, the high perform-
ance, the minimum consumption, the silent running and the ex-
tendible filter are this system’s main features.
CFE-A 90/2
CFE-A 100/2
60
70
CFE-A 60/1
CFE-A 70/1 40
9
13.5
22 513
4.2 4.2
==
22
9
5
20
13
4.2 4.2
Ø 11.7 Ø 13.8
==
40
35 5
57
8.58.5
17

6
CONTROL PANEL
1- Lighting lamp knob
2-Orange indicator light: switching on of powered fan
3-Powered fan switching on knob:
1st speed V 160 ~
2nd speed V 180 ~
3rd speed V 200 ~
4th speed V 230 ~
BANDEAU DE COMMANDE
1- Bouton d’allumage de la lampe d’éclairage
2-Voyant orangé: motoaspirateur allumé
3-Bouton d’allumage du motoaspirateur:
aspiration 1
re
vitesse V 160
~
aspiration 2
e
vitesse V 180
~
aspiration 3
e
vitesse V 200
~
aspiration 4
e
vitesse V 230
~
123
EXTENDIBLE FILTER
The whole filtering unit can be extended outwards in order to
cover the whole surface of the cooker underneath. When not in
use it returns flush with the wall units.
FILTRE EXTENSIBLE
Toute la surface filtrante est extensible de manière à couvrir
toute la profondeur de la table de cuisson située au-dessous.
Après utilisation, le système filtrant s’aligne avec le bord infé-
rieur des éléments muraux.
MOVABLE DEFLECTOR PANEL
Allows to increase furthermore the suction surface in order to
obtain a major absorption of the fumes in correspondence to the
cooker underneath.
DEFLECTEUR ORIENTABLE
Permet d’augmenter encore davantage la surface d’aspiration
en obtenant l’absorption maximum des vapeurs provenant de la
table de cuisson située au-dessous.
HOODS WITH ONE POWERED FAN
HOTTES A 1 MOTOASPIRATEUR
HOODS WITH TWO POWERED FANS
HOTTES A 2 MOTOASPIRATEURS
Mc/h
175 350
250 500
325 650
400 800

7
TECHNICAL DATA
DONNEES TECHNIQUES V
W Lumen
LIGHT TONE
TONALITE LUM. I.R.C.
CFE-A 60/1
CFE-A 70/1
CFE-A 80/2
CFE-A 90/2 CFE-A 100/2 CFE-A 60/1
CFE-A 70/1
CFE-A 80/2
CFE-A 90/2 CFE-A 100/2
Lighting lamp
Lampe d'éclairage 230
~
36 2x24=48 2x36=72 2900 2x1800=3600 2x2900=5800 84 extra white
84 blanche extra 86
LIGHTING LAMPS
The two fluorescent side lamps consume 80% less energy and
last 8 times more than normal incandescent lamps.
LAMPES D’ECLAIRAGE
Par rapport aux lampes à incandescence normales, les deux
lampes latérales fluorescentes consomment 80% d’énergie en
moins et durent 8 fois plus.
POWERED FAN WITH ROTATING STATOR
1- Impeller with high efficiency blades
2- Winding with enamelled wire treated with hot bi-component
impregnation for resistance against relative high humidity
percentage
3- Roller bearings: long life guaranteed
4- Die-casted aluminium stator
5- Lamellar rotor pack
6- Lamellar stator pack. The large diameter of the magnetic
gap allows a high output which results in low inputs
7- Steel shaft
8- Die-casted aluminium rotor
MOTOASPIRATEUR A STATOR TOURNANT
1- hélice avec pales à haut rendement
2- enroulement avec fil émaillé et traité avec imprégnation de
deux composants à chaud, pour résister à de forts pour-
centages d’humidité relative
3- roulements à bille: garantie d’une longue durée
4- stator en aluminium moulé sous pression
5- paquet lamellaire rotorique
6- paquet lamellaire statorique. Le grand diamètre de l’entrefer
permet un rendement élevé qui se traduit en absorptions
faibles
7- arbre en acier
8- rotor en aluminium moulé sous pression
3
2
1
8
4
6
57
TECHNICAL DATA
DONNEES TECHNIQUES VHzMc/h U/min W A uF dbA Pst.(Pa)
System C/W one powered fan
Sistème à 1 motoaspirateur 230 ~50 400 1600 100 0,44 2 53.5 450
System C/W two powered fans
Sistème à 2 motoaspirateurs 230 ~50 800 1600 200 0,88 2÷2 53.5 450

8
Fig.
1
Fig.
2
CLEANING AND MAINTENANCE
Before carrying out any servicing operations, make sure
that the power is switched off and that the plug is discon-
nected from the mains to avoid personal injury.
All parts in stainless steel will remain like new if cleaned with a
sponge and a detergent solution (such as Jif) or any other solu-
tion for the cleaning of stainless steel, rinsed thoroughly and
wiped dry. Periodically clean using alcohol.
Do not use abrasive substances such as scouring pads or de-
tergents containing caustic soda.
NETTOYAGE ET ENTRETIEN
Pour des raisons de sécurité, avant toute opération s’assu-
rer que l’appareil soit débranché.
Toutes les parties en acier inox conserveront leur aspect d’ori-
gine si on prend soin de les laver en utilisant une éponge imbi-
bée d’une légère solution détergente ou de produits spécifiques
pour nettoyer l’acier (Cif par ex.), de les rincer et de les sécher;
périodiquement, les passer avec un chiffon imbibé d’alcool. Evi-
ter absolument les substances abrasives comme les pailles de
fer de même que les substances caustiques.
FILTER CLEANING
NETTOYAGE DES FILTRES
The filtering system should be cleaned every 60 working hours
by soaking the stainless steel mesh prefilter in a solution con-
taining water and non-corrosive degreasing detergent for about
15-20 minutes. Rinse and dry thoroughly.
Le système filtrant devra être lavé toutes les 60 heures de tra-
vail en plongeant pendant 15-20 minutes le préfiltre et le filtre
en maille d’acier inox dans une solution d’eau et de détergent
dégraissant et non corrosif. Les rincer ensuite soigneusement
et les sécher.
Loosen the two side screws (fig. 1).
Dévisser les deux vis latérales (fig. 1).
Pull the filter outwards using both hands until it is completely
removed (fig. 2).
Tirer le filtre vers l'extérieur avec les deux mains jusqu'à son
extraction complète (fig. 2).

9
Fig.
4
Fig.
5
Fig.
3
Loosen with the help of a screwdriver, the two screws mounted
on the side (fig. 3).
Avec un tournevis, dévisser les deux vis situées sur le côté (fig.
3).
Remove the upper cover of the extendible filter (fig. 4).
Enlever le couverture supérieure du filtre extensible (fig. 4).
Remove the filter catches (fig. 5).
Enlever les bloque-filtres (fig. 5).

10
Fig.
7
Fig.
8
Fig.
6
The polyurethane foam filter must be replaced every 60 working
hours (fig. 6).
Le microfiltre en mousse polyuréthanne doit être remplacé tou-
tes les 60 heures de fonctionnement (fig. 6).
The stainless steel microstretched mesh filters must be disman-
tled and washed every 60 working hours (fig. 7 and 8).
Les filtres en tôle micro-déployée d’acier inox doivent être dé-
montés et lavés après environ 60 heures de fonctionnement
(fig. 7 et 8).

11
REPLACEMENT OF LIGHTING LAMPS
Loosen the two side screws, pull the filtering system out com-
pletely with both hands, and then act as shown in the drawings
(fig. 9 - 10 - 11). Make sure that the new lamps have the same
characteristics as the previous ones.
REMPLACEMENT LAMPES D'ECLAIRAGE
Dévisser les vis supérieures latérales pour enlever le bandeau
frontal de la hotte ensvite, procéder en suivant les dessins (fig.
9 - 10 - 11). S'assurer que les lampes neuves ont les mêmes
caractéristiques que les précédentes.
1
2
Fig.
10
Fig.
9
3
Fig.
11

12
ADJUSTMENT OF DEFLECTOR PANEL
If the deflector should become loose after a time, just pull the
filter out with your hands (fig. 13) and tighten the screws located
at the two inner ends of the deflector (fig. 14) using a Phillips
screwdriver.
REGLAGE DU DEFLECTEUR
Si le déflecteur devait se desserrer avec le temps, il suffit de
tirer le filtre vers l’extérieur avec les deux mains (fig. 13) et d’agir
avec un tournevis cruciforme sur les vis situées aux deux extré-
mités internes du déflecteur (fig. 14).
Fig.
13
Fig.
12
Fig
.
14

13
;;
;;
;;
;;
;;
;;
;;
yy
yy
yy
yy
yy
yy
yy
;;yy
;y
;y
;y
;;yy
;y
;y
;y
;;yy
;y
;y
;y
;y
;y
;;yy
;y
;;yy
;y
Fig.
15
INSTRUCTIONS FOR TECHNICIAN
INSTRUCTIONS POUR LE TECHNICIEN
INSTALLATION
Unpack, removing all the wrapping and protecting material.
Check that the package contains all the literature and neces-
sary accessories: the guarantee (to be filled out and returned to
the manufacturer), the instructions, four threaded pins with cap
nuts and washers (to fasten the hood to the wall cabinet), the
metal brackets, the dowels and the screws on equipments (to
fasten the hood onto the wall).
INSTALLATION
Déballer la hotte en éliminant avec attention tous les matériaux
constituant l’emballage de protection.
Contrôler que l’emballage contient bien tous les documents et
les accessoires complémentaires; la garantie (à remplir et à ren-
voyer au constructeur), les instructions, quatre goujons filetés
munis d’écrous borgnes et de rondelles (pour fixer la hotte à
l’élément haut), les pattes en métal, les chevilles et les vis four-
nies (pour fixer la hotte au mur).
6590
155 125
280
CONNECTION TO THE MAINS
This appliance is equipped with a three-pole HAR H05 VV-F
sec. 3x1 mm2type power cord with die-casted three-pole plug in
compliance with BS 1363/A standard, for 230 V ~ - 50 Hz A.C.
operation. The hood must be earthed. The earth wire is yellow-
green (fig. 15). In case the cord is damaged or needs to be
replaced make sure to replace it with one of the same type.
The earth wire must be 2 cm longer than the phase and neutral
wires.
BRANCHEMENT ELECTRIQUE
Cet appareil est munie d’un câble d’alimentation tripolaire type
HAR H05 RR-F section 3x1 mm2- L = 1,60 m, prévues pour le
fonctionnement avec courant alternatif à la tension de 230 V ~ -
50 Hz. Conformément aux normes en vigueur, il est obligatoire
d'effectuer toujours une mise à la terre efficace. Le conducteur
de mise à la terre est identifié par la couleur jaune-vert (fig. 15).
En cas d’endommagement du câble ou en cas de remplace-
ment, utiliser un câble ayant des caractéristiques identiques. Il
faut en outre que le câble de mise à la terre soit plus long d’en-
viron 2 cm par rapport aux conducteurs de phase et neutre.
La table de cuisson est fournie avec les fiches de 10 A et de 10-
16 A type Schuko.
STANDARD MINIMUM HEIGHT OF THE KITCHEN CEILING
HAUTEUR MINIMUM REGLEMENTAIRE LOCAL CUISINE
Neutral
Neutre
Earth (yellow-green)
Terre (jaune-vert)
MINIMUM SAFETY
DISTANCE
DISTANCE MINIMUM DE
SECURITE
Measures given in cm
Mesures exprimées en cm

14
FASTENING (TO WALL UNIT OR TO WALL)
FIXATION (AU MEUBLE OU AU MUR)
The recommended distance between the hob and the prefilter
may vary from a minimum of 65 cm to a maximum of 75 cm.
The hood must be secured to the wall using the metal brackets:
fasten these to the wall using the small blocks and screws (fig.
16). A washer and fastening screw are provided for each bracket,
to prevent any loosening caused by the pressure exerted during
cleaning.
La distance conseillée entre le plan de cuisson et le préfiltre va
de 65 cm à un maximum de 75 cm.
La hotte doit être fixée au mur à l’aide des pattes en métal blo-
quées au mur avec les chevilles et les vis fournies (fig. 16).
Chaque patte est fournie avec une rondelle et une vis de ser-
rage pour éviter les sorties pouvant dériver des pressions du-
rant les opérations de nettoyage.
The appliance can also be installed on the wall cabinet: holes
must be drilled corresponding to the holes on the hood for the
four screws.These must be tightened at the top of the hood and
locked by the corresponding cap nuts (fig. 17). Also when using
this system we recommend anchoring the hood to the wall.
L’appareil peut également être fixé à l’élément haut, qui doit être
percé au niveau des trous des quatre vis ; ces dernières devront
être vissées dans la partie supérieure de la hotte puis bloquées
par les écrous borgnes (fig. 17). Même si l’on adopte cette solu-
tion, il est préférable de fixer la hotte aussi au mur.
By operating on the two inner adjustment screws it is possible to
achieve a perfect parallelism between the hob and the hood
(fig. 18).
On peut réaliser un parallélisme parfait entre la table de cuisson
et la hotte en agissant sur les deux vis de réglage situées à
l’intérieur (fig. 18).
Fig.
17
Fig.
18
Fig.
16

15
2- Wall discharge (fig. 20)
Evacuation à travers le mur (fig. 20)
Hood with one powered fan
Hotte à un motoaspirateur
Hood with two powered fans
Hotte à deux motoaspirateurs
SIZE OF THE EXHAUST HOLE
MESURE DU TROU DE DECHARGE
1- Flue discharge (fig. 19)
Evacuation dans un carneau (fig. 19)
Hood with one powered fan
Hotte à un motoaspirateur
Hood with two powered fans
Hotte à deux motoaspirateurs
12
18
3
18
12
25
16
14
20
25
16
3
20
14
Fig
.
20
Fig
.
19

16
Fig
.
23
;;
;;
;;
;;
;;
@@
@@
@@
@@
@@
;;
;;
;;
;;
;;
@@
@@
@@
@@
@@
;;
;;
;;
;;
;;
@@
@@
@@
@@
@@
;;
;;
;;
;;
;;
@@
@@
@@
@@
@@
;;
;;
;;
;;
;;
@@
@@
@@
@@
@@
;;
;;
;;
;;
;;
@@
@@
@@
@@
@@
;;
;;
;;
;;
;;
@@
@@
@@
@@
@@
;;
;;
;;
;;
;;
@@
@@
@@
@@
@@
;;
;;
;;
;;
;;
@@
@@
@@
@@
@@
;;
;;
;;
;;
;;
@@
@@
@@
@@
@@
;;
;;
;;
;;
;;
@@
@@
@@
@@
@@
;;
;;
;;
;;
;;
@@
@@
@@
@@
@@
;;
;;
;;
;;
;;
@@
@@
@@
@@
@@
;;
;;
;;
;;
;;
@@
@@
@@
@@
@@
;;
;;
;;
;;
;;
@@
@@
@@
@@
@@
;;
;;
;;
;;
;;
@@
@@
@@
@@
@@
;;
;;
;;
;;
;;
@@
@@
@@
@@
@@
;;
;;
;;
;;
;;
@@
@@
@@
@@
@@
;;
;;
;;
;;
;;
@@
@@
@@
@@
@@
;;
;;
;;
;;
;;
@@
@@
@@
@@
@@
;;
;;
;;
;;
;;
@@
@@
@@
@@
@@
;;
;;
;;
;;
;;
@@
@@
@@
@@
@@
;;
;;
;;
;;
;;
@@
@@
@@
@@
@@
;;
;;
;;
;;
;;
@@
@@
@@
@@
@@
;;
;;
;;
;;
;;
@@
@@
@@
@@
@@
;;
;;
;;
;;
;;
@@
@@
@@
@@
@@
;;
;;
;;
;;
;;
@@
@@
@@
@@
@@
;;
;;
;;
;;
;;
@@
@@
@@
@@
@@
;;
;;
;;
;;
;;
@@
@@
@@
@@
@@
;;
;;
;;
;;
;;
@@
@@
@@
@@
@@
;;
;;
;;
;;
;;
@@
@@
@@
@@
@@
;;
;;
;;
;;
;;
@@
@@
@@
@@
@@
;;
;;
;;
;;
;;
@@
@@
@@
@@
@@
;;
;;
;;
;;
;;
;;
;;
;;
;;
;;
@@
@@
@@
@@
@@
;;
;;
;;
;;
;;
@@
@@
@@
@@
@@
;;
;;
;;
;;
;;
@@
@@
@@
@@
@@
;;
;;
;;
;;
;;
@@
@@
@@
@@
@@
;;
;;
;;
;;
;;
@@
@@
@@
@@
@@
;;
;;
;;
;;
;;
@@
@@
@@
@@
@@
;;
;;
;;
;;
;;
@@
@@
@@
@@
@@
;;
;;
;;
;;
;;
@@
@@
@@
@@
@@
;;
;;
;;
;;
;;
@@
@@
@@
@@
@@
;;
;;
;;
;;
;;
@@
@@
@@
@@
@@
;;
;;
;;
;;
;;
@@
@@
@@
@@
@@
;;
;;
;;
;;
;;
@@
@@
@@
@@
@@
;;
;;
;;
;;
;;
@@
@@
@@
@@
@@
;;
;;
;;
;;
;;
@@
@@
@@
@@
@@
;;
;;
;;
;;
;;
@@
@@
@@
@@
@@
;;
;;
;;
;;
;;
@@
@@
@@
@@
@@
;;
;;
;;
;;
;;
@@
@@
@@
@@
@@
;;
;;
;;
;;
;;
@@
@@
@@
@@
@@
;;
;;
;;
;;
;;
@@
@@
@@
@@
@@
;;
;;
;;
;;
;;
@@
@@
@@
@@
@@
;;
;;
;;
;;
;;
@@
@@
@@
@@
@@
;;
;;
;;
;;
;;
@@
@@
@@
@@
@@
;;
;;
;;
;;
;;
@@
@@
@@
@@
@@
;;
;;
;;
;;
;;
@@
@@
@@
@@
@@
;;
;;
;;
;;
;;
@@
@@
@@
@@
@@
;;
;;
;;
;;
;;
@@
@@
@@
@@
@@
;;
;;
;;
;;
;;
@@
@@
@@
@@
@@
;;
;;
;;
;;
;;
@@
@@
@@
@@
@@
;;
;;
;;
;;
;;
@@
@@
@@
@@
@@
;;
;;
;;
;;
;;
@@
@@
@@
@@
@@
;;
;;
;;
;;
;;
@@
@@
@@
@@
@@
;;
;;
;;
;;
;;
@@
@@
@@
@@
@@
;;
;;
;;
;;
;;
@@
@@
@@
@@
@@
;;
;;
;;
;;
;;
;;
;;
;;
;;
;;
@@
@@
@@
@@
@@
;;
;;
;;
;;
;;
@@
@@
@@
@@
@@
;;
;;
;;
;;
;;
@@
@@
@@
@@
@@
;;
;;
;;
;;
;;
@@
@@
@@
@@
@@
;;
;;
;;
;;
;;
@@
@@
@@
@@
@@
;;
;;
;;
;;
;;
@@
@@
@@
@@
@@
;;
;;
;;
;;
;;
@@
@@
@@
@@
@@
;;
;;
;;
;;
;;
@@
@@
@@
@@
@@
;;
;;
;;
;;
;;
@@
@@
@@
@@
@@
;;
;;
;;
;;
;;
@@
@@
@@
@@
@@
;;
;;
;;
;;
;;
@@
@@
@@
@@
@@
;;
;;
;;
;;
;;
@@
@@
@@
@@
@@
;;
;;
;;
;;
;;
@@
@@
@@
@@
@@
;;
;;
;;
;;
;;
@@
@@
@@
@@
@@
;;
;;
;;
;;
;;
@@
@@
@@
@@
@@
;;
;;
;;
;;
;;
@@
@@
@@
@@
@@
;;
;;
;;
;;
;;
@@
@@
@@
@@
@@
;;
;;
;;
;;
;;
@@
@@
@@
@@
@@
;;
;;
;;
;;
;;
@@
@@
@@
@@
@@
;;
;;
;;
;;
;;
@@
@@
@@
@@
@@
;;
;;
;;
;;
;;
@@
@@
@@
@@
@@
;;
;;
;;
;;
;;
@@
@@
@@
@@
@@
;;
;;
;;
;;
;;
@@
@@
@@
@@
@@
;;
;;
;;
;;
;;
@@
@@
@@
@@
@@
;;
;;
;;
;;
;;
@@
@@
@@
@@
@@
;;
;;
;;
;;
;;
@@
@@
@@
@@
@@
;;
;;
;;
;;
;;
@@
@@
@@
@@
@@
;;
;;
;;
;;
;;
@@
@@
@@
@@
@@
;;
;;
;;
;;
;;
@@
@@
@@
@@
@@
;;
;;
;;
;;
;;
@@
@@
@@
@@
@@
;;
;;
;;
;;
;;
@@
@@
@@
@@
@@
;;
;;
;;
;;
;;
@@
@@
@@
@@
@@
;;
;;
;;
;;
;;
@@
@@
@@
@@
@@
;;
;;
;;
;;
;;
;;
;;
;;
;;
;;
@@
@@
@@
@@
@@
;;
;;
;;
;;
;;
@@
@@
@@
@@
@@
;;
;;
;;
;;
;;
@@
@@
@@
@@
@@
;;
;;
;;
;;
;;
@@
@@
@@
@@
@@
;;
;;
;;
;;
;;
@@
@@
@@
@@
@@
;;
;;
;;
;;
;;
@@
@@
@@
@@
@@
;;
;;
;;
;;
;;
@@
@@
@@
@@
@@
;;
;;
;;
;;
;;
@@
@@
@@
@@
@@
;;
;;
;;
;;
;;
@@
@@
@@
@@
@@
;;
;;
;;
;;
;;
@@
@@
@@
@@
@@
;;
;;
;;
;;
;;
@@
@@
@@
@@
@@
;;
;;
;;
;;
;;
@@
@@
@@
@@
@@
;;
;;
;;
;;
;;
@@
@@
@@
@@
@@
;;
;;
;;
;;
;;
@@
@@
@@
@@
@@
;;
;;
;;
;;
;;
@@
@@
@@
@@
@@
;;
;;
;;
;;
;;
@@
@@
@@
@@
@@
;;
;;
;;
;;
;;
@@
@@
@@
@@
@@
;;
;;
;;
;;
;;
@@
@@
@@
@@
@@
;;
;;
;;
;;
;;
@@
@@
@@
@@
@@
;;
;;
;;
;;
;;
@@
@@
@@
@@
@@
;;
;;
;;
;;
;;
@@
@@
@@
@@
@@
;;
;;
;;
;;
;;
@@
@@
@@
@@
@@
;;
;;
;;
;;
;;
@@
@@
@@
@@
@@
;;
;;
;;
;;
;;
@@
@@
@@
@@
@@
;;
;;
;;
;;
;;
@@
@@
@@
@@
@@
;;
;;
;;
;;
;;
@@
@@
@@
@@
@@
;;
;;
;;
;;
;;
@@
@@
@@
@@
@@
;;
;;
;;
;;
;;
@@
@@
@@
@@
@@
;;
;;
;;
;;
;;
@@
@@
@@
@@
@@
;;
;;
;;
;;
;;
@@
@@
@@
@@
@@
;;
;;
;;
;;
;;
@@
@@
@@
@@
@@
;;
;;
;;
;;
;;
@@
@@
@@
@@
@@
;;
;;
;;
;;
;;
@@
@@
@@
@@
@@
;;
;;
;;
;;
;;
NO NO
SI SI
SI NO
NO
Fig.
21
Fig.
22
REINTEGRATION AIR
The air sucked by the hood must be replaced with the same
quantity of external air drawn from a nearby room (where no
open fires are burning) or from outdoors, and delivered to the
kitchen where air is lacking. The vents required for air delivery
through the wall or door must be located as close to the ceiling
as possible (for instance, on the wall opposite the exhaust sys-
tem). In this case we recommended the installation on the wall
of the special ventilation fixture for the delivery of the restoration
air (fig. 21).
AIR DE COMPENSATION
L'air aspiré par la hotte doit être compensé par de l'air extérieur
dans la même proportion et doit être puisé d'une pièce voisine
(sans feux ouverts) ou de l'extérieur et introduit la cuisine où il y
a déficit d'air. Les prises nécessaires pour l'arrivée d'air à tra-
vers le mur ou la porte devront se trouver le plus près possible
du plafond, par exemple dans le mur se trouvant en face du
système aspirant. Il est conseillé dans ce cas d'appliquer au
mur l'élément de ventilation spécial pour l'arrivée d'air de com-
pensation (fig. 21).
EXHAUST AIR FLOW
Never connect the air discharge to a flue conveying other ex-
haust gases.
The exhaust ducts should be as short as possible and have the
least possible number of elbows. The air must flow without any
obstacles (fig. 22).
The elbows should not have any sharp edges which could lead
to the formation of vortices or interrupt the air flow (fig. 23); they
should form gentle bends. Any reduction in diameter should also
be avoided as it would cause the same problems. For safety
reasons and to avoid fire spread, all ducts and elbows must
comply with class B1 specifications in conformity with DIN 4102,
part. 1. Class 1, non flammable, flexible metal ducts are prefer-
able.
FLUX DE L'AIR ASPIRE
Ne jamais raccorder le conduit d'évacuation à un conduit de
cheminée dans lequel sont convoyés d'autres gaz brûlés.
Les conduits d'évacuation doivent être les plus courts possibles
et avec le plus petit nombre de coudes. L'air doit y circuler libre-
ment et sans obstacles (fig. 22).
Les coudes ne doivent pas présenter d'arêtes vives qui pour-
raient causer la formation de tourbillons et l'interruption du flux
d'air (fig. 23), mais former des courbes douces. Les réductions
de diamètre peuvent causer elles aussi les mêmes inconvé-
nients.
Pour des raisons de sécurité et de prévention des incendies,
tous les tuyaux et les coudes doivent correspondre aux spécifi-
cations de la classe B1 selon les normes DIN 4102, partie 1.
Choisir de préférence des tuyaux flexibles métalliques apparte-
nant à la classe 1 et donc non inflammables.
YES/
OUI
NO/
NON
NO/
NON
NO/
NON
NO/
NON
YES/
OUI
YES/
OUI

17
REMOVAL OF CONTROL PANEL
Loosen the grub screw underneath the knobs in order to re-
move them (fig. 24).
Loosen the upper and inferiors side screws and remove the front
cover of the hood (fig. 25 - 26).
INTERVENTION SUR LE BANDEAU DE COM-
MANDE
Dévisser le goujon de blocage situé sous les poignées pour
pouvoir les enlever (fig. 24).
Dévisser les vis supérieures et inférieures latérales pour enle-
ver le bandeau frontal de la hotte (fig. 25 - 26).
1
Fig.
24
Fig.
25
2
Fig.
26

18
ELECTRIC DIAGRAM OF EXHAUST HOODS WITH EXTENDIBLE FILTER AND ONE POWERED EXHAUST
FAN
SCHEMA ELECTRIQUE HOTTES ASPIRANTES AVEC FILTRE EXTENSIBLE A UN MOTOASPIRATEUR
LEGENDE
IL : interrupteur lampe d'éclairage
SA: voyant orangé
CV: commutateur de vitesse
MO: porte-bornes art. PA 299
CA: câble d'alimentation section 3x1
LI : lampe éclairage 36 W pour CFE-A 60/70
T:transformateur
C:condensateur
ST : interrupteur de démarrage
R:ballast
MS:porte-bornes de support pour interrupteur de démarrage ballasts
MT: motoaspirateur 100 W
KEY
IL : lighting lamp switch
SA: orange indicator light
CV: speed switch
MO: terminal board art. PA 299
CA: power supply cord-cross section 3x1
LI : lighting lamp 36 W for CFE-A 60/70
T:transformer
C:capacitor
ST : starter
R:reactor
MS: reactors starter support terminal board
MT: motor powered exhaust fan 100 W
LI
MS
ST R
C
T
MT
CA
MO
IL SA CV

19
ELECTRIC DIAGRAM OF EXHAUST HOODS WITH EXTENDIBLE FILTER ANDTWO POWERED EXHAUST
FANS
SCHEMA ELECTRIQUE HOTTES ASPIRANTES AVEC FILTRE EXTENSIBLE A DEUX MOTOASPIRATEURS
LEGENDE
IL : interrupteur lampe d'éclairage
SA: voyant orangé
CV: commutateur de vitesse
MO: porte-bornes art. PA 299
CA: câble d'alimentation section 3x1
LI : lampe éclairage 2x24 W pour CFE-A 80/90 et
2x36 W pour CFE-A 100
R:ballasts
ST : interrupteur de démarrage
MS:porte-bornes de support pour interrupteur de démarrage ballasts
C:condensateur
MC: porte-bornes de support pour condensateur
T:transformateur
MT: motoaspirateurs 2x100 W
KEY
IL : lighting lamp switch
SA: orange indicator light
CV: speed switch
MO: terminal board art. PA 299
CA: power supply cord-cross section 3x1
LI : lighting lamp 2x24 W for CFE-A 80/90 and
2x36 W for CFE-A 100
R:reactors
ST : starter
MS: reactors starter support terminal board
C:capacitor
MC: capacitor support terminal board
T:transformer
MT: motor powered exhaust fans 2x100 W
LILI
RST
ST
R
MS
MT MT
C
MC
T
CA
MO
IL SA CV

s.p.a.
Via Monte Pertica, 5 - 36061 Bassano del Grappa (VI) Italia - Telefono 0424 /513500 r.a. - Telefax 0424 /36634
R
The manufacturer refuses all responsibility for possible imprecisions contained in this booklet, due to misprints or clerical errors, for
damages to things or people, in case all the accident prevention norms useful to the normal and regular operation of the electric
system are not complied with. The same is true for any assembly, installation and use which is not carried out in conformity with its
respective directions and instructions. Moreover, it reserves the right to bring about any technical-functional and design change or
improvement, without any previous notice and with the utmost operational freedom.
Le Constructeur décline toute responsabilité pour les inexactitudes contenues dans opuscule et imputables à des erreurs d’impri-
merie ou de transcription, pour les dommages aux choses ou aux personnes en cas de non observation de toutes les normes de
prévention, des accidents nécessaires au service normal et au fonctionnement de l’installation électrique, ainsi que pour les mon-
tages, les installations et l’utilisation non conformes aux indications et aux instructions données; il se réserve en outre le droit
d’apporter sans préavis et en toute liberté les variantes ou améliorations d’ordre fonctionnel, technique et esthétique qu’il jugera
opportunes.
TECHNICAL LABEL
ETIQUETTE TECHNIQUE
BS 82
Progetto Grafico & Fotocomposizione Bassano del Grappa (VI) Tel. 0424 / 50.09.78 -Disegni dello Studio DZ -SP
TECHNOLAB
TECHNOLAB
TECHNOLAB
Other manuals for ARGENTO E 193
4
This manual suits for next models
5
Table of contents
Other Alpes Inox Ventilation Hood manuals