Alphasonik Flagship Series User manual

Owner's Manual
Series
Subwoofers
FW1032 / FW1232 / FW1532 / FW1832
ALPHASONIK
R

ALPHASONIK WAS FOUNDED IN 1976 WITH ONE MISSION, TO
BRING STATE OF THE ART PERFORMANCE TO THE AUDIO
ENTHUSIAST.
In those early years we pioneered such ground-breaking technologies
as amplier fan cooling and high voltage signal transfer which remain a
benchmark in high-end audio.
Today, the new Alphasonik is committed to pushing the envelope with
regard to technology, quality and value. Our electronics feature audiphile
parts and circuit topology designed to let the full musical experience
come through, loud and clear. Our loudspeakers employ the latest high
quality materials and processes such as carbon reinforced woven glass
and titanium vapor deposition to deliver your music with tremedous im-
pact, dynamics and resolution.
We stand behind our quality products with one of the best warranties
in consumer electronics. Compare Alphasonik audio products against
anything the competition has to oer. We’re condent you will come to
one conclusion...

Table of Content.........................................................................2
Introduction.................................................................................3
Features and Specications....................................................4-5
Building an Enclosure............................................................6-10
Subwoofer Parameters.............................................................11
Troubleshooting........................................................................12
Warning / Disclaimer.................................................................13
Warranty...................................................................................14
T
A
B
L
E
O
F
C
O
N
T
E
N
T
2

Thank you for purchasing this Alphasonik product. This
manual contains important information about instalation, set-up
procedures and integrating your new Alphasonik product into your
audio setup. With proper care and installation, your new product will
provide you with many years of high performance listening enjoyment.
We recommend having an Authorized Alphasonik Dealer install your
new product for optimal performance and to take
advantage of our warranty program. Before installing your new
product, please read through the manual to fully understand the
application.
Before making any electrical connections, make sure that
you disconnect the cables to prevent the possibility of short circuits or
damage to your electronic equipment.
3
I
N
T
R
O
D
U
C
T
I
O
N

NON-PRESSED RIGID PAPER CONE
All Alphasonik FLAGSHIP Series subwoofers use our environmentally treated
non-pressed paper cone – the most natural sounding material in the industry.
Our paper cones reduce distortion when needed at lower frequency levels.
POLY-COTTON SPIDER WITH SPIRAL WOVEN COOPER TENSILE LEADS
The FLAGSHIP series incorporates an extemely durable poly-cotton spider
that is resilient from fatigue while still having robust response rates. The Tinsel
Leads are woven into the spider for optimal performance.
FW1032
10” FLAGSHIP SERIES SUBWOOFER
Cast Aluminum Basket
Paper Reinforced Cone
High Tensile Strength Two-Layer Surround for Enhanced Control
Poly-Cotton Damper w/ Spiral-Woven Leads
53 oz. Magnet
Rated at 400 Watts RMS / 800 Watts MAX
95dB Eciency
Frequency Response of 55Hz to 2000Hz
Single 8-ohm 2.5” Kapton®Voice Coils
Push Down Nickel Plated Terminals
Mounting Dimensions -
Depth: 116mm / 4.56”
Through Hole: 230mm / 9.06”
Diameter: 261mm / 10.28”
Net Weight: 11 lbs.
FW1232
12” FLAGSHIP SERIES SUBWOOFER
Cast Aluminum Basket
Paper Reinforced Cone
High Tensile Strength Two-Layer Surround for Enhanced Control
Poly-Cotton Damper w/ Spiral-Woven Leads
61 oz. Magnet
Rated at 500 Watts RMS / 1000 Watts MAX
101dB Eciency
Frequency Response of 50Hz to 2000Hz
Single 8-ohm 2.5” Glas Fibre Voice Coils
Push Down Nickel Plated Terminals
Mounting Dimensions -
Depth: 135mm / 5.31”
Through Hole: 282mm / 11.10”
Diameter: 315mm / 12.4”
Net Weight: 18 lbs.
F
E
A
T
U
R
E
S
A
N
D
S
P
E
C
I
F
I
C
A
T
I
O
N
S
4

5
FW1532
15” FLAGSHIP SERIES SUBWOOFER
Cast Aluminum Basket
Paper Reinforced Cone
High Tensile Strength Two-Layer Surround for Enhanced Control
Poly-Cotton Damper w/ Spiral-Woven Leads
76 oz. Magnet
Rated at 700 Watts RMS / 1400 Watts MAX
98.5dB Eciency
Frequency Response of 40Hz to 2000Hz
Single 8-ohm 3” Glas Fibre Voice Coils
Push Down Nickel Plated Terminals
Mounting Dimensions -
Depth: 169mm / 6.65”
Through Hole: 354mm / 13.94”
Diameter: 393mm / 15.47”
Net Weight: 18.5 lbs.
FW1832
18” FLAGSHIP SERIES SUBWOOFER
Cast Aluminum Basket
Paper Reinforced Cone
High Tensile Strength Two-Layer Surround for Enhanced Control
Poly-Cotton Damper w/ Spiral-Woven Leads
125 oz. Magnet
Rated at 1500 Watts RMS / 3000 Watts MAX
97dB Eciency
Frequency Response of 35Hz to 1000Hz
Single 8-ohm 4” Glas Fibre Voice Coils
Push Down Nickel Plated Terminals
Mounting Dimensions -
Depth: 209mm / 8.23”
Through Hole: 354mm / 16.61”
Diameter: 460mm / 18.11”
Net Weight: 32 lbs.
F
E
A
T
U
R
E
S
A
N
D
S
P
E
C
I
F
I
C
A
T
I
O
N
S

Now that you know about subwoofer specications it’s time to learn about build-
ing subwoofer boxes. If you’ve done any woodworking you shouldn’t have much
trouble when building a subwoofer enclosure. One of the main dierences will
probably be the material used in building subwoofer boxes as compared to
other woodworking projects. When building a custom subwoofer box you will
want to use minimal MDF (medium density berboard).
TOOLS REQUIRED TO BUILD AN ENCLOSURE
Safety goggles
Table saw or circular saw
Powered screw gun
Router or jig saw
Variety of sizes of drill bits
Wood glue
Silicone
Wood screws
To ensure your safety while building an enclosure, please read all manuals for
the power tools you will be using, as they will include valuable information on
handling the tools and safety tips.
B
U
I
L
D
I
N
G
A
N
E
N
C
L
O
S
U
R
E
6

B
U
I
L
D
I
N
G
A
N
E
N
C
L
O
S
U
R
E
7
If you’re planning to build your own enclosure and you wonder what type of
enclosure best suits your needs this page will help you choose the correct
enclosure. There are many dierent types of enclosures. The two most
common used enclosures are sealed and vented enclosures. This page will
show the advantages and disadvantages of the two enclosures.
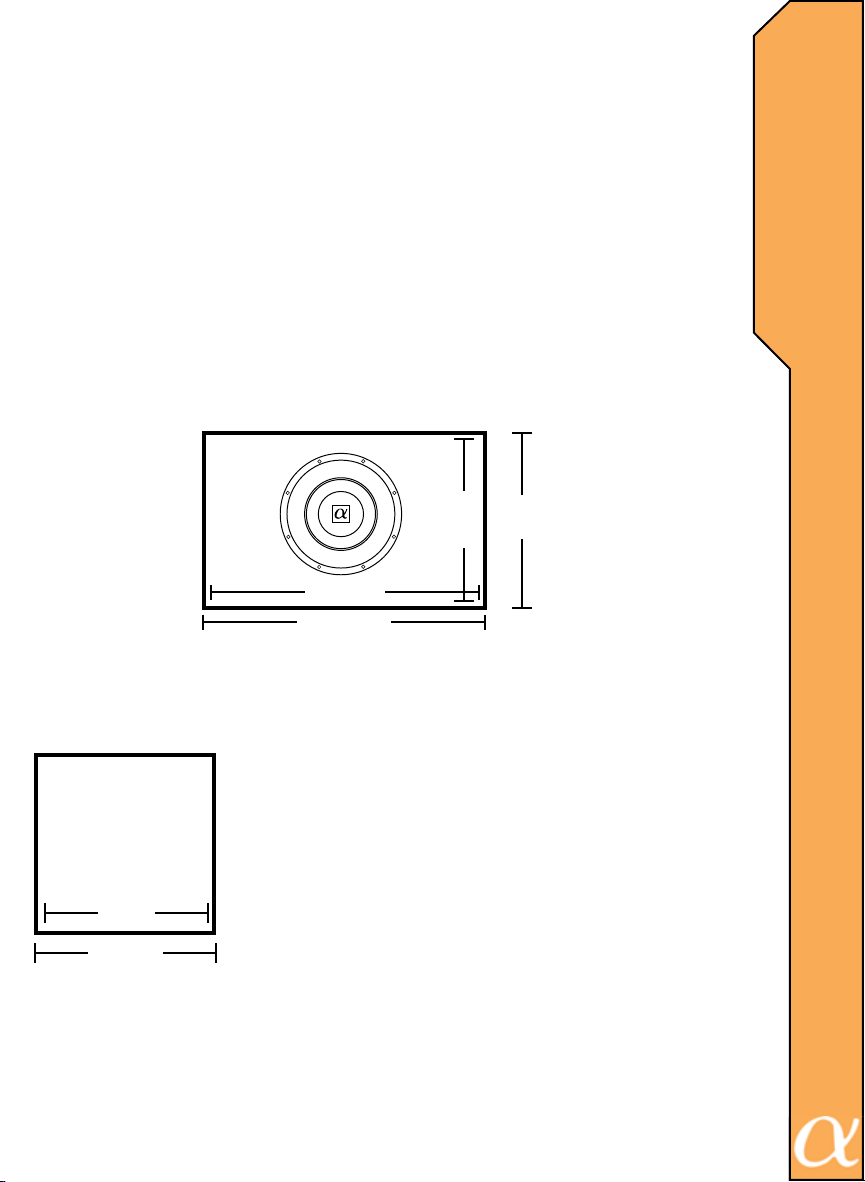
Advantages of a sealed enclosure
*High power handling capability
*Great transient response
*Tolerant of minor enclosure size variation
*Easy to construct
*Smooth rollo (12dB/octave)
Disadvantages of a sealed enclosure
*Requires a woofer with a long excursion for better low bass frequency
response.
*Can have lower sensitivity than ported enclosures.
*When using high power and small enclosures, the woofer is not in an ideal
cooling environment.
*Less low bass as compared to a properly tuned vented enclosure above
the ported tuning frequency.
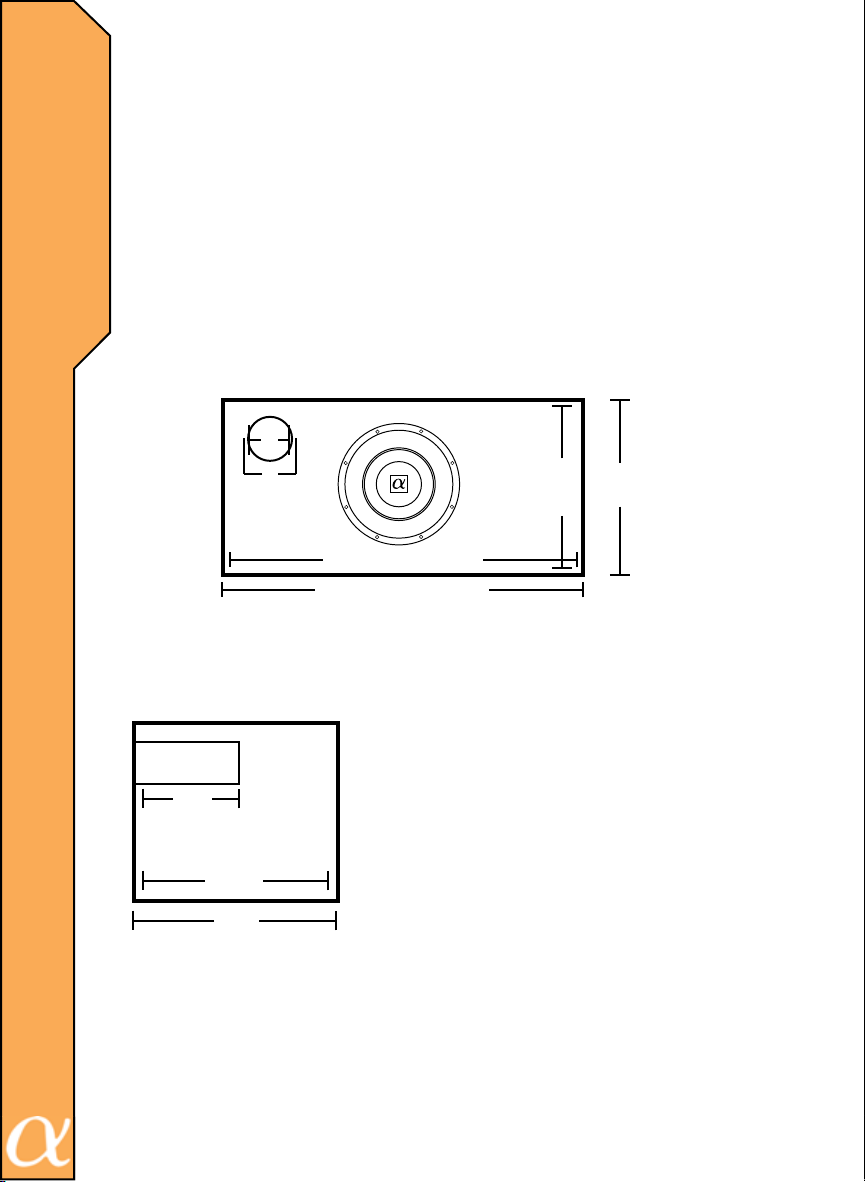
Advantages of a vented enclosure
*Increased output around vented tuning
*Higher power handling above the port tuning frequency
*Extended frequency response
*Magnet is in a good cooling environment
*Handles higher bass frequencies with less distortion
Disadvantages of a vented enclosure
*Vented enclosure transient response is not as good as sealed boxes be-
cause of the resonant eect of the vent tuning
*Midrange sound coming from inside the enclosure through the vent
can produce unpleasant sound coloration.
*Loss of cone movement control below vent tuning, which can result in high
distortion and mechanical failure of the driver.
*Lower power handling below the port tuning frequency.

Calculating speaker enclosure volume is a five step procedure.
(Make sure you do not forget to subtract the thickness of the wood that you
have selected to use to build your enclosure.)
Complete formula should look like this
Height x Width x Depth / 1728 =__________
Below are illustrated versions of all the steps that you should take.
(FOR EXAMPLE ONLY)
Step One
Step Three
Step Two
Side View
13.5"
19.5"
13.5"
13.5-1.5+12
13.5-1.5=12
The wood that we are using is 0.75" thick
The 1.5 that you see in the formula is the thickness
of the wood.
Calculating thickness of wood:
Measure how thick the wood is then multiply by two.
The reason that you are multiplying by two is each
side of the enclosure.
Left + Right=1.5
Top + Bottom=1.5
Front + Back=1.5
1.5 cu. ft. is the results for this enclosure
12"
12"
18"
B
U
I
L
D
I
N
G
A
N
E
N
C
L
O
S
U
R
E
8
Step One: Measure Height
Step Two: Measure Width
Step Three: Measure Depth
Step Four: Height x Width x Depth
Step Five: Divide the results that were in step four by 1728
12” x 12” x 12”= (1728 / 1728 = 1.0 cu ft.)
cu ft.
0.75 x 2=1.50
18 x 2 x 12=2592
2592 / 1728=1.5

B
U
I
L
D
I
N
G
A
N
E
N
C
L
O
S
U
R
E
9
Calculating speaker enclosure volume is a five step procedure.
(Make sure you do not forget to subtract the thickness of the wood and
port displacement that you used.)
Step One
Step Three
Step Two
Side View
15"
23"
13.5"
23-1.5=21.5
15-1.5=13.5
The wood that we are using is 0.75" thick
The 1.5 that you see in the formula is the thickness
of the wood.
To calculate the thickness of the wood.
Left + Right=1.5
Top + Bottom=1.5
Front + Back=1.5
2.01 cu. ft. is the result for this enclosure.
Formula to calculate port displacement
3.14 x Radius x Radius x Depth=
________ / 1728=port displacement
3.14 x 2.25 x 2.25 x7=111.27 sq. in.
111.27 / 1728=.06 is the displacement of the port
2.01 - 0.06=1.95 cu.ft. is the final result for this
enclosure.
13.5"
7"
12"
21.5"
4"
4.5"
21.5 x 13.5 x 12=3483
3483 / 1728=2.01
Step One: Measure Height
Step Two: Measure Width
Step Three: Measure Depth
Step Four: Height x Width x Depth
Step Five: Divide the results that were in step four by 1728
12” x 12” x 12”= (1728 / 1728 = 1.0 cu ft.)
Complete formula should look like this
Height x Width x Depth / 1728 = ___________
Below are illustrated versions of all the steps that you should take.
(FOR EXAMPLE ONLY)
0.75 X 2 = 1.50

Circle Port
Slot Port
Converting a round port to a slot port.
Calculate the area of the round port(s) being used, then use the square
root function of your calculator to get the interior dimensions of an
equivalent suare port. The length (or depth) of the slot port will be the
same as that of the round port.
To calculate area: ( Area is a two dimensional measurement )
Circle =3.14 x Radius x Radius
4" Port
2" 2"
2 x 2 x 3.14=12.6
12.6"
4"
1" 12.6 x 1=12.6
10
B
U
I
L
D
I
N
G
A
N
E
N
C
L
O
S
U
R
E

11
S
U
B
W
O
O
F
E
R
P
A
R
A
M
E
T
E
R
S
Model #
FW1032 FW1232 FW1532 FW1832
Fs 58 49 42 37
Qts 0.356 0.36 0.256 0.392
Qes 0.383 0.37 0.267 0.403
Qms 5.036 8.23 6.06 14.4
Vas (liters) 33.39 66.6 199 301
Vas (Cu. Ft.) 1.17 2.35 7.03 10.6
Re 6.2 6.2 5.2 5.1
Rms 2.8 2.3 3.4 2.3
Xmax +/- (mm) 3 5 5 7
Le 1.1 1.1 1.3 1.6
Sd 0.035 0.052 0.084 0.123
SPL 95 97 97 98
EBP 151 257 157 117
Mmd 38.4 52.6 81.2 160
Freq. Resp. 55Hz-2000Hz
50-2000Hz
40-2000Hz 35-1000Hz
Depth (mm) 116mm 135mm 169mm 209mm
Depth (Inches) 4.56" 5.31" 6.65" 8.23"
Bolt Hole Diameter (mm) 246mm 296mm 374mm 440mm
Bolt Hole Diameter (inches) 9.69" 11.65" 14.72" 17.32"
Through Hole (mm) 230mm 282mm 354mm 422mm
Through Hole (Inches) 9.1" 11.10" 13.94" 16.61"
Diameter (mm) 261 315mm 393mm 460mm
Diameter (Inches) 10.28" 12.40" 15.47" 18.11"
Displacement
Minimum Sealed N/R N/R N/R N/R
Sensitivity/dB
Maximum Sealed N/R N/R N/R N/R
Sensitivity/dB
Minimum Vented
Internal Volume (Cubic Feet) 0.657 1.29 1.61 4
Port Dia/Inches 3 (x2) 4 (x2) 4 (x2) 6 (x2)
Port Length/Inches 9.25 9.125 3.32 13.75
(-3dB) 73 Hz 68 Hz 81 Hz 55 Hz
Tuning Freq. 70 Hz 64 Hz 75 Hz 45 Hz
Port Displacement 0.0888 0.1498 0.0546 0.488
Maximum Vented
Internal Volume (Cubic Feet) 1 1.73 2 6
Port Dia/Inches 4 (x2) 4 (x2) 4 (x2) 6 (x2)
Port Length/Inches 12 7.88 2.72 10
(-3dB) 63 Hz 56 Hz 74 Hz 47 Hz
Tuning Freq. 66 Hz 58 Hz 70 Hz 40 Hz
Port Displacement 0.197 0.1294 0.0446 0.356
9/17
FLAGSHIP Series
Mounting Dimensions
Sealed Enclosures
Vented Enclosures

15
T
R
O
U
B
L
E
S
H
O
O
T
I
N
G

Do not use the equipment unmounted. Do not mount the
system so that wire connections are unprotected or are
subjected to pinching or damage from nearby objects.
Conrm that your source unit and other equipment are turned o
while connecting the input terminals. If you need to replace the
power fuse, replace it only with a fuse identical to the provided
fuse. Using a fuse of dierent type or rating may result in
damage to the system, which is not covered by the
manufacturer’s warranty. Do not install any product where it may
be subjected to excessive heat, moisture and dust or where it
may be repeatedly kicked, brushed or bumped. Make absolutely
sure that the terminals for the products are connected to the
proper inputs and outputs from the music source.
W
A
R
N
I
N
G
A
N
D
D
I
S
C
L
A
I
M
E
R
16

17
Alphasonik, Inc. warrants this product against all defects in material and
workmanship for a period of one (1) year from the date of original purchase
provided it was purchased from an Authorized Alphasonik. Dealer.
The conditions of this warranty and the extent of the responsibility of
Alphasonik, under this warranty are as follows:
1. DATED PROOF OF PURCHASE IS REQUIRED FOR
WARRANTY SERVICE OF THIS PRODUCT. Information about Alphasonik
authorized warranty service may also be obtained at www.alphasonik.com.
2. This warranty will become void if service is performed by any
one other than an approved Alphasonik. Warranty Service Center.
3. This warranty does not apply to any product which has been
subjected to misuse, neglect or accident, or which has had the warranty
seal broken, serial number altered, defaced or removed, or which has been
connected, installed adjusted or repaired other than in accordance with the
instructions furnished by Alphasonik.
4. The sole responsibility of Alphasonik under this warranty shall be
limited to the repair or replacement thereof, at the sole discretion of
Alphasonik.
5. If it becomes necessary to send the product or any defective part
to Alphasonik or an authorized service station, the product must be shipped
in its original or equivalent carton, fully insured, with shipping charges
prepaid. Alphasonik will not assume any responsibility for any loss or
damage incurred in shipping.
6. This warranty is not transferable and protects the original pur-
chaser provided they reside and made their purchase in the United States.
International consumers may contact their local retailer or distributor for war-
ranty information.
7. ALL IMPLIED WARRANTIES, EXCEPT TO THE EXTENT
PROHIBITED BY APPLICABLE LAW, SHALL HAVE NO GREATER
DURATION THAN THE WARRANTY PERIOD SET FORTH ABOVE.
UNDER NO CIRCUMSTANCES SHALL ALPHASONIK BE LIABLE FOR
ANY LOSS OR DAMAGE, DIRECT OR CONSEQUENTIAL, ARISING OUT
OF THE USE OR INABILITY TO USE THE PRODUCT. BECAUSE SOME
STATES DO NOT ALLOW LIMITATIONS ON HOW LONG AN IMPLIED
WARRANTY LASTS OR EXCLUSIONS OR LIMITATIONS OF INCIDENTAL
OR CONSEQUENTIAL DAMAGES, THE ABOVE LIMITATIONS OR
EXCLUSIONS MAY NOT APPLY TO YOU.
9. THIS WARRANTY GIVES YOU SPECIFIC LEGAL RIGHTS AND
YOU MAY ALSO HAVE OTHER RIGHTS THAT VARY FROM STATE TO
STATE.
W
A
R
R
A
N
T
Y

www.alphasonik.com
This manual suits for next models
4
Table of contents
Other Alphasonik Subwoofer manuals

Alphasonik
Alphasonik TREIS 300 Series User manual

Alphasonik
Alphasonik APP122 User manual

Alphasonik
Alphasonik ALPHA 800 PSW810E User manual

Alphasonik
Alphasonik HYPER 200 Series User manual

Alphasonik
Alphasonik VENUM 800 Series User manual

Alphasonik
Alphasonik ALPHA 300 SERIES PSW310X User manual

Alphasonik
Alphasonik ALPHA 400 PSW410E User manual

Alphasonik
Alphasonik DYNAMIS 500 Series User manual

Alphasonik
Alphasonik ALPHA 100 PSW110E User manual

Alphasonik
Alphasonik ALPHA PSW610E User manual