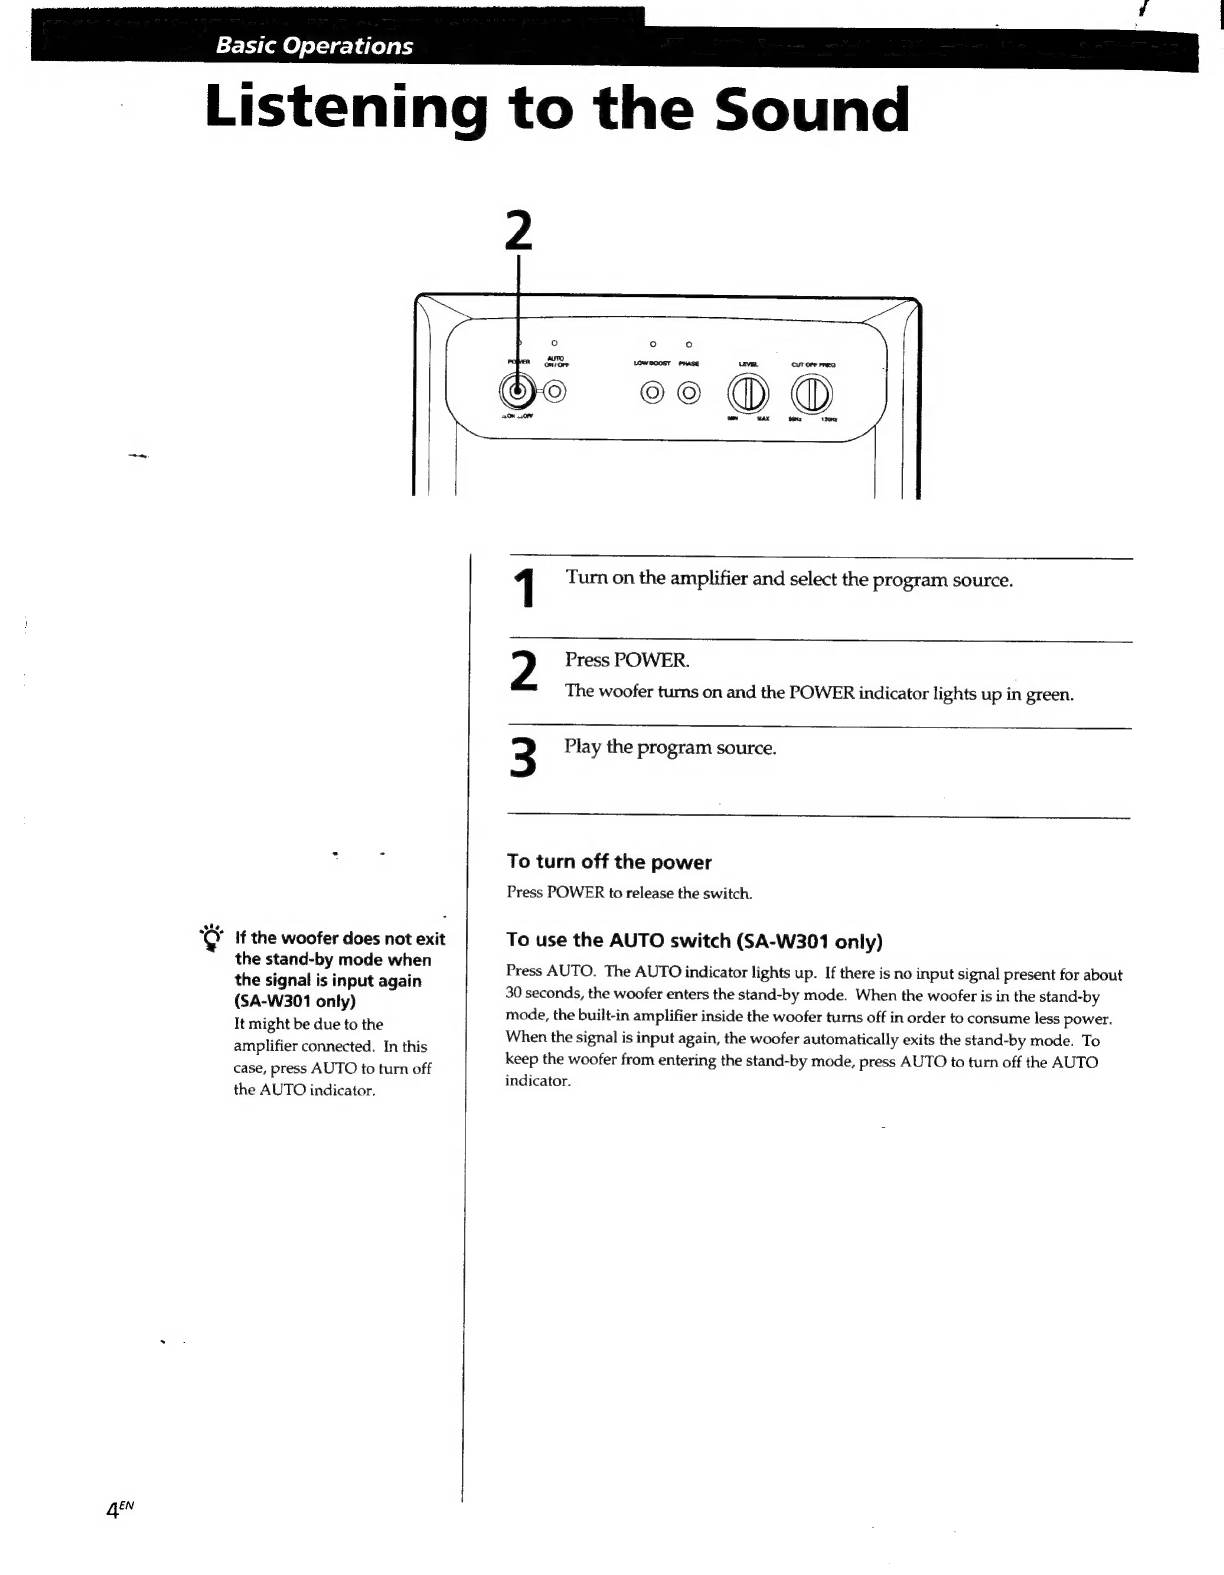
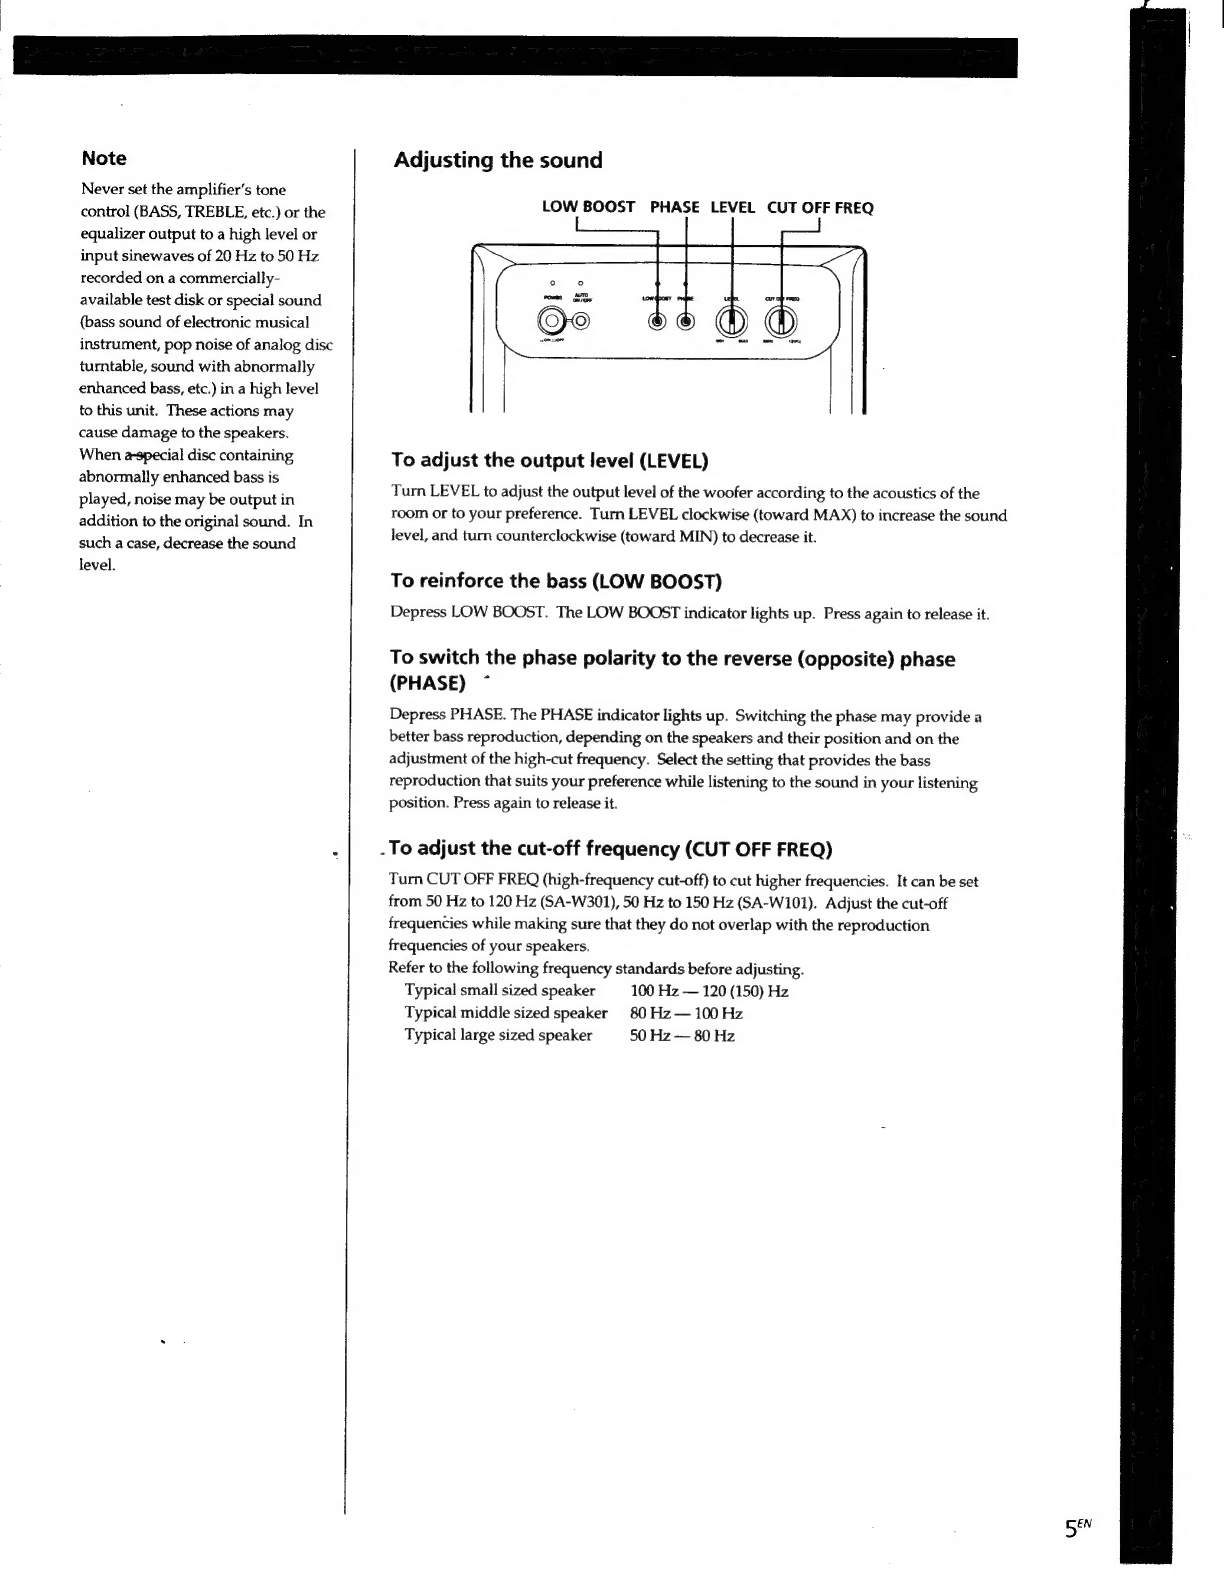
Sony SA-W301 User manual

4
Ss
O
N
Y.
3-800-354-21
(1)
|
®
:
Active
Super
Woofer
Operating
Instructions
Mode
d’emploi
SA-W301
SA-W101
©
1995
by
Sony
Corporation

DEN
To
prevent
fire
or
shock
hazard,
do
not
expose
the
unit
to
rain
or
moisture.
CAUTION:
TO
REDUCE
THE
RISK
OF
ELECTRIC
SHOCK,
DO
NOT
REMOVE
COVER
(OR
BACH,
NO
USER-SERVICEABLE
PARTS
INSIDE.
REFER
SERVICING
TO
QUALIFIED
SERVICE
PERSONNEL.
This
symbol
is
intended
to
alert
the
user
to
the
presence
of
uninsulated
“dangerous
voltage”
within
the
product’s
enclosure
that
may
be
of
sufficient
magnitude
to
constitute
a
risk
of
electric
shock
to
persons.
A
This
symbol
is
intended
to
alert
the
user
to
the
presence
of
important
operating
and
maintenance
(Servicing)
instructions
in
the
literature
accompanying
the
appliance.
Owner's
Record
The
model
number
and
serial
numbers
are
located
at
the
rear.
Record
these
numbers
in
the
spaces
provided
below.
Refer
to
these
numbers
whenever
you
call
upon
your
Sony
dealer
regarding
this
product.
Model
No.
Serial
No.
CAUTION
You
are
cautioned
that
any
changes
or
modifications
not
expressly
approved
in
this
manual
could
void
your
authority
to
operate
this
equipment.
CAUTION
Use
of
this
appliance
with
some
systems
may
present
a
shock
or
fire
hazard.
Do
not
use
with
any
units
which
have
the
following
marking
located
near
output.
WARNING:
HAZARDOUS
ENERGY!
CAUTION
TO
PREVENT
ELECTRIC
SHOCK,
DO
NOT
USE
THIS
POLARIZED
AC
PLUG
WITH
AN
EXTENSION
CORD,
RECEPTACLE
OR
OTHER
OUTLET
UNLESS
THE
BLADES
CAN
BE
FULLY
INSERTED
TO
PREVENT
BLAD
EXPOSURE.
For
the
customers
in
the
USA
For
detailed
safety
precautions,
see
the
leaflet
“IMPORTANT
SAFEGUARDS”
included
with
this
manual
in
the
vinly
bag.

————
Welcome!
Thank
you
for
purchasing
the
Sony
Active
Super
Woofer.
Before
operating
this
woofer,
please
read
this
manual
thoroughly
and
retain
it
for
future
reference.
About
This
Manual
The
instructions
in
this
manual
are
for
models
SA-W301
and
SA-W101.
Check
your
model
number
by
looking
at
the
rear
panel
of
your
woofer.
In
this
manual,
the
SA-W301
is
the
model
used
for
illustration
purposes.
Any
difference
in
operation
is
clearly
indicated
in
the
text,
for
example,
“SA-W301
only”.
Type
of
differences
ee
W301 wi01
Feature
AUTO
switch
e
Convention
The
following
icon
is
used
in
this
manual:
s}X~
Indicates
hints
and
tips
for
making
-
the
task
easier.
TABLE
OF
CONTENTS
Listening
to
the
Sound
4
Getting
Started
Unpacking
6
Installation
6
Hooking
Up
the
System
7
Additional
Information
Precautions
10
Troubleshooting
10
Specifications
11
3m"

Basic
Operations
Listening
to
the
Sound
xe)
If
the
woofer
does
not
exit
the
stand-by
mode
when
the
signal
is
input
again
(SA-W301
only)
It
might
be
due
to
the
amplifier
connected.
In
this
case,
press
AUTO
to
turn
off
the
AUTO
indicator.
GEN
1
Turn
on
the
amplifier
and
select
the
program
source.
2
Press
POWER.
The
woofer
turns
on
and
the
POWER
indicator
lights
up
in
green.
3
Play
the
program
source.
To
turn
off
the
power
Press
POWER
to
release
the
switch.
To
use
the
AUTO
switch
(SA-W301
only)
Press
AUTO.
The
AUTO
indicator
lights
up.
If
there
is
no
input
signal
present
for
about
30
seconds,
the
woofer
enters
the
stand-by
mode.
When
the
woofer
is
in
the
stand-by
mode,
the
built-in
amplifier
inside
the
woofer
turns
off
in
order
to
consume
less
power.
When
the
signal
is
input
again,
the
woofer
automatically
exits
the
stand-by
mode.
To
keep
the
woofer
from
entering
the
stand-by
mode,
press
AUTO
to
turn
off
the
AUTO
indicator.

Note
Never
set
the
amplifier’s
tone
control
(BASS,
TREBLE,
etc.)
or
the
equalizer
output
to
a
high
level
or
input
sinewaves
of
20
Hz
to
50
Hz
recorded
on
a
commercially-
available
test
disk
or
special
sound
(bass
sound
of
electronic
musica]
instrument,
pop
noise
of
analog
disc
turntable,
sound
with
abnormally
enhanced
bass,
etc.)
in
a
high
level
to
this
unit.
These
actions
may
cause
damage
to
the
speakers.
When
a-special
disc
containing
abnormally
enhanced
bass
is
played,
noise
may
be
output
in
addition
to
the
original
sound.
In
such
a
case,
decrease
the
sound
level.
Adjusting
the
sound
LOW
BOOST
PHASE
LEVEL
CUT
OFF
FREQ
To
adjust
the
output
Jevel
(LEVEL)
Turn
LEVEL
to
adjust
the
output
level
of
the
woofer
according
to
the
acoustics
of
the
room
or
to
your
preference.
Turn
LEVEL
clockwise
(toward
MAX)
to
increase
the
sound
level,
and
turn
counterclockwise
(toward
MIN)
to
decrease
it.
To
reinforce
the
bass
(LOW
BOOST)
Depress
LOW
BOOST.
The
LOW
BOOST
indicator
lights
up.
Press
again
to
release
it.
To
switch
the
phase
polarity
to
the
reverse
(opposite)
phase
(PHASE)
~
Depress
PHASE.
The
PHASE
indicator
lights
up.
Switching
the
phase
may
provide
a
better
bass
reproduction,
depending
on
the
speakers
and
their
position
and
on
the
adjustment
of
the
high-cut
frequency.
Select
the
setting
that
provides
the
bass
reproduction
that
suits
your
preference
while
listening
to
the
sound
in
your
listening
position.
Press
again
to
release
it.
.
To
adjust
the
cut-off
frequency
(CUT
OFF
FREQ)
Turn
CUT
OFF
FREQ
(high-frequency
cut-off)
to
cut
higher
frequencies.
It
can
be
set
from
50
Hz
to
120
Hz
(SA-W301),
50
Hz
to
150
Hz
(SA-W101).
Adjust
the
cut-off
frequencies
while
making
sure
that
they
do
not
overlap
with
the
reproduction
frequencies
of
your
speakers.
Refer
to
the
following
frequency
standards
before
adjusting.
Typical
smail
sized
speaker
100
Hz
—
120
(150)
Hz
Typical
middle
sized
speaker
80
Hz—
100
Hz
Typical
large
sized
speaker
50
Hz
—
80
Hz
BEN

6f*
feTTa
diate
myc
acae)
Unpacking
Check
that
you
received
the
following
items:
¢
Audio
connecting
cord
(1)
¢
Speaker
cord
(2)
0
a
RS
ee
a
Installation
Install
the
woofer
wherever
you
like
because
with
the
bass
sound
range
reproduced
from
the
woofer
(below
150
Hz),
human
hearing
cannot
detect
the
direction
and
position
in
which
the
sound
is
being
produced.
Also,
since
the
feeling
of
stereo
is
lost
with
bass
frequencies,
a
single
woofer
is
enough
for
reproducing
the
bass
of
stereo
channels.
To
obtain
a
better
bass
reproduction,
we
recommend
that
you
install
the
woofer
on
a
solid
floor
where
resonance
is
unlikely
to
occur.
Notes
¢
Always
install
the
woofer
vertically,
keeping
a
few
centimeters
from
away
the
wall.
¢
Do
not
place
an
object
on
the
woofer
or
sit
on
it.
¢
If
the
woofer
is
installed
in
the
center
of
a
room,
the
bass
could
be
extreamely
weakened.
This
is
due
to
the
influence
of
the
standing
wave
of
the
room.
If
this
happened,
move
the
woofer
away
from
the
center
of
a
room
or
eliminate
the
cause
of
the
standing
wave,
by
installing
a
bookshelf
on
the
wall,
etc.

|
Getting
Started
Hooking
Up
the
System
Overview
Use
either
the
INPUT
1
jack
or
the
INPUT
2
terminals
of
the
woofer
when
you
connect
the
amplifier.
¢
If
your
amplifier
has
one
of
the
following
types
of
output
jacks,
connect
the
INPUT
1
jack
and
the
amplifier's
jack
using
the
supplied
audio
connecting
cord.
—
PRE
OUT
jacks
—
MONO
OUT
jack
—
SUB
WOOFER
output
jack(s)
—
SUPER
WOOFER
output
jack(s)
¢
If
your
amplifier
does
not
have
the
above
mentioned
output
jacks,
connect
the
speaker
terminals
of
the
amplifier
to
the
INPUT
2
terminals
instead.
Use
either
INPUT
1
or
INPUT
2
for
the
connection.
Using
both
may
result
in
a
malfunction.
(NPUT1
INPUT2
SPEAKER
Before
you
get
started
¢
Turn
off
the
power
of
the
amplifier
and
the
woofer
before
making
any
connection.
¢
Use
the
audio
connecting
cords
that
are
supplied
to
the
respective
equipment.
If
there
are
not
enough
audio
connecting
cords
to
make
the
necessary
connections,
you
need
to
purchase
some
optional
audio
connecting
cords.
¢
When
connecting
an
audio
connecting
cord,
be
sure
to
match
the
color-coded
cord
to
the
appropriate
jacks on
the
components:
Red
(right)
to
Red
and
White
(left)
to
White.
*
Be
sure
to
make
connections
firmly
to
avoid
noise.
*
Connect
the
AC
power
cord
from
the
woofer
to
a
wall
outlet.
*
You
cannot
connect
the
CENTER
output
jack
for
use
with
Dolby
Pro
Logic
function
to
the
woofer.
Bass
sound
is
not
output
with
some
Dolby
Pro
Logic
modes.
7s

oo
.
Getting
Started
Using
the
Single
Set
of
Speaker
Terminals
Using
the
Double
(A+B)
Sets
of
Speaker
Terminals
What
cords
will
|
need?
Speaker
cord
(supplied)
(1
for
each
speaker)
What
cords
will
|
need?
Speaker
cord
(supplied)
(1
for
each
speaker)
——
>=
Twist
the
stripped
ends
of
the
cord
about
2/3
inch
(15
mm).
Twist
the
stripped
ends
of
the
cord
about
2/3
inch
(15
mm).
Be
sure
to
match
the
speaker
cord
to
the
appropriate
terminal
;
on
the
componentes:
+
to
+
and
—
to
-.
If
the
cords
are
Hookups
reversed,
the
sound
will
be
distorted
and
will
lack
bass.
1
Connect
the
amplifier
and
the
speaker
system.
It
is
useful
to
decide
that
the
speaker
cord
marked
with
a
line
is
Connect
the
speakers
to
your
amplifier’s
speaker
==
always
the
positive
(+)
and
should
be
connected
to
the
positive
terminals
(A).
(+)
terminal
to
avoid
any
improper
connections.
Amplifier
SPEAKER(A}
Hookups
1
Connect
the
amplifier.
.
Connect
the
INPUT
2
terminals
of
the
woofer
to
the
amplifier’s
speaker
terminals
with
the
speaker
cords.
Be
sure
to
connect
both
L
and
R
channels.
See
“Using
the
PRE
OUT
jacks”
instead
when
you
use
INPUT
1
jacks.
Amplifier
SPEAKER
PO
OO
2
Connect
the
amplifier.
Connect
the
amplifier’s
speaker
terminals
(B)
to
the
INPUT
2
terminals
of
the
woofer
using
speaker
cords
(supplied).
See
“Using
the
PRE
OUT
jacks”
instead
when
you
use
INPUT
1
jacks.
This
woofer
Amplifier
SPEAKER(8)
C0
00
2
Connect
the
speaker
system.
Connect
the
speakers
to
the
speaker
terminals
of
the
woofer.
This
woofer
SPEAKER
me
In
in)
ll
+
When
using
the
double
(A
+B)
sets
of
speakers,
make
Speaker
(L)
sure
that
you
select
the
“A
+B”
position
with
your
amplifier.
Speaker
(R)
Note
When
you
are
using
speaker
terminal
(A)
only
(front
speaker
only)
or
when
the
power
of
the
amplifier
is
turned
off,
turn
down
the
volume
or
turn
off
the
power
of
the
woofer
otherwise,
hum
noise
may
be
heard.
gi

Using
the
PRE
OUT
Jacks
(Without
Jumper
Pins)
What
cords
will
|
need?
Audio
connecting
cord
(supplied)
(1)
White
ro)
(L)
Red
©
(R)
Hookups
Connect
the
INPUT
1
jack
of
the
woofer
to
PRE
OUT
jacks
(without
jumper
pins)
of
the
amplifier
with
the
supplied
audio
connecting
cord.
This
woofer
INPUT
1
@ @
®®
=
Amplifier
PRE
OUT
¢
What
is
a
jumper
pin?
Some
amplifiers’
PRE
OUT
jacks
are
equipped
with
the
jumper
pins.
You
cannot
connect
the
woofer
to
such
an
amplifier.
Jumper
pins
To
connect
to
the
amplifier‘s
MONO
OUT
jack
Connect
the
woofer
to
the
amplifier’s
MONO
OUT
jack
in
the
same
way
as
you
would
connect
the
woofer
to
the
PRE
OUT
jack(s)
using
the
supplied
audio
connecting
cord.
In
this
case,
use
only
one
of
the
two
(L
or
R)
jacks.
(Connect
L
to
L
or
R
to
R)
To
connect
to
the
amplifier’s
SUB
WOOFER
or
SUPER
WOOFER
output
jack(s)
Connect
the
woofer
to
the
amplifier’s
SUB
WOOFER
output
jack(s)
or
SUPER
WOOFER
output
jack(s)
in
the
same
way
as
you
would
connect
the
woofer
to
the
PRE
OUT
jack(s)
using
the
supplied
audio
connecting
cord.
|
Getting
Started
Notes
¢
If
the
output
level
of
your
amplifier
is
not
large
enough,
the
sound
may
not
be
loud
enough.
In
this
case,
connect
the
speaker
terminals
of
the
amplifier
directly
to
the
INPUT2
terminals
of
the
woofer.
¢
The
SUB
WOOFER
output
jack(s)
or
SUPER
WOOFER
output
jack(s)
on an
amplifier
usually
have
built-in
high-cut
(low-pass)
filters.
If
the
woofer
is
connected
to
such
jacks,
the
AUTO
switch
on
the
woofer
may
not
function
properly.
In
this
case,
use
the
woofer
with
the
AUTO
switch
turned
off
(SA-W301
only).
(See
page
4.)
¢
If
you
are
connecting
the
woofer
to
an
amplifier
equipped
only
with
a
single
jack
(such
as
a
MONO
OUT
jack,
SUB
WCOEER
output
jack
or
SUPER
WOOFER
output
jack
etc),
connect
one
of
the
L
(left)
or
the
R
(right)
plugs
of
the
supplied
audio
connecting
cord
to
such
a
jack
and
the
other
Lor
R
plug
to
the
corresponding
jack
(L
or
R)
on
the
woofer.
In
this
case,
make
sure
that
you
use
only
one
of
the
two
(L
or
R)
jacks
on
the
woofer.
Do
not
mix
the
plugs
(L
and
R)
as
no
audio
signal
will
be
output.
Connecting
the
AC
power
cord
Connect
the
AC
power
cord
from
the
woofer
and
from
your
amplifier
to
a
wall
outlet.
Qf

10
Additional
Information
—SESESEe——————E——X__———
Precautions
On
safety
¢
Before
operating
the
woofer,
be
sure
that
the
operating
voltage
of
your
woofer
is
identical
with
that
of
your
local
power
supply.
Unplug
the
woofer
from
the
wall
outlet
if
it
is
not
to
be
used
for
an
extended
period
of
time.
To
disconnect
the
cord,
pull
the
cord
by
grasping
the
plug.
Never
pull
the
cord
itself.
Should
any
liquid
or
solid
object
fall
into
the
woofer,
unplug
the
woofer
and
have
the
woofer
checked
by
qualified
personnel
before
operating
it
any
further.
¢
The
woofer
is
not
disconnected
from
the
AC
power
source
(mains)
as
long
as
it
is
connected
to
the
wall
outlet,
even
if
the
woofer
itself
has
been
turned
off.
When
turning
on
or
off
an
amplifier
or
other
equipment
Lower
the
volume
of
the
amplifier
to
minimum.
To
avoid
damaging
the
woofer
¢
Be
careful
in
setting
the
volume
control
of
the
amplifier
to
avoid
an
excessive
input
power.
*
Do
not
attempt
to
open
the
enclosuer
or
remold
speaker
units
and
networks.
In
case
color
irregularity
is
observed
on
the
nearby
TV
screen
With
the
magnetically
shielded
type
of
the
speaker
system,
the
speakers
can
be
installed
near
a
TV
set.
However,
color
irregularity
may
still
be
observed
on
the
TV
screen
depending
on
the
type
of
your
FV
set.
-
If
color
irregularity
is
observed...
-+Turn
off
the
TV
set
once,
then
tur
it
on
after
15
to
30
minutes.
:
lf
color
irregularity
is
observed
again...
~+Place
the
speakers
further
apart
from
the
TV
set.
When
howling
occurs
Relocate
the
speaker
or
turn
down
the
volume
of
the
amplifier.
On
installation
¢
Do
not
install
the
woofer
near
heat
sources
such
as
radiators
or
air
ducts,
or
in
a
place
subject
to
direct
sunlight,
excessive
dust,
mechanical
vibration
or
shock.
*
Good
ventilation
is
essential
to
prevent
internal
heat
build-
up
in
the
woofer.
Place
the
woofer
in
a
location
with
adequate
air
circulation.
Do
not
place
the
woofer
on
a
soft
surface
or
too
close
to
a
wall
as
this
may
obstruct
the
ventilation
hole
on
the
back.
On
cleaning
the
cabinet
Clean
the
cabinet
with
a
soft
cloth
lightly
moistened
with
-
water.
Do
not
use
any
type
of
abrasive
pad,
scouring
powder
or
solvent
such
as
alcohol
or
benzine.
If
you
have
any
questions
or
problems
concerning
your
woofer
that
is
not
covered
in
this
manual,
please
consult
your
nearest
Sony
dealer.
ss
|
Troubleshooting
If
you
experience
any
of
the
following
difficulties
while
using
the
woofer,
use
this
troubleshooting
guide
to
help
you
remedy
the
problem.
Should
any
problem
persist,
consult
your
nearest
Sony
dealer.
There's
no
sound.
=>
Check
that
this
woofer
and
components
are
connected
correctly
and
securely.
=>
Rotate
LEVEL
clockwise
to
turn
the
volume
up.
=>
Ifthe
INPUT
1
jack
and
the
amplifier's
SUB
WOOEFER
output
jack
are
connected,
set
AUTO
to
OFF
(SA-W301
only).
The
sound
has
suddenly
stopped.
=>
The
speaker
cords
may
have
short-circuited.
Connect
the
cords
properly.
The
sound
is
distorted.
=>
The
input
signal
is
imperfect.
=
The
input
signal
level
is
too
high.
The
stereo
images
of
the
musical
instruments
are
unclear
and
the
bass
is
lacking.
=>
The
+
and
~
speaker
terminals
on
the
amplifier
and
the
woofer
have
been
incorrectly
connected.
Reconnect
them
with
the
correct
polarity.
Severe
hum
or
noise
is
heard.
=>
Connect
the
ground
wire
of
the
turntable
properly.
=>
The
contacts
between
the
plugs
of
the
connecting
cords
and
the
corresponding
jacks
have
not
been
made
properly.
Connect
the
plugs
firmly.
=>
The
audio
system
is
picking
up
some
noise
from
a
TV
set.
Move
the
audio
system
away
from
the
TV
set
or
tum
the
TV
set
off.

|
Additional
information
A
Ea
A
eS
Supplied
accessories
Specifications
Audio
connecting
cord
(2
phono
plugs
-
2
phono
plugs)
(1)
Speaker
cord
(2)
Audio
power
specifications
POWER
OUTPUT
AND
TOTAL
HARMONIC
:
Aas
;
'
DISTORTION
Design
and
specifications
are
subject
to
change
without
notice.
SA-W301:
With
5-ohm
loads,
both
cannels
driven,
from
20-20,000
Hz;
rated
60
watts
per
channel
minimum
RMS
power,
with
no
more
than
0.8
%
total
harmonic
distortion
from
250
milliwatts
to
rated
output.
SA-W101:
With
5
ohm
loads,
from
20
—
20,000
Hz;
rated
40
watts
per
channel
minimum
RMS
power,
with
no
more
than
0.8
%
total
harmonic
distortion
from
250
milliwatts
to
rated
output.
System
Type
Active
Super
Woofer
(magnetically
shielded
design)
Speaker
unit
Woofer:
16
cm
(6
5/4,
inches),
cone
type
Practical
maximum
output
75
W
(SA-W301)
60
W
(SA-W101)
Reproduction
frequency
range
20
Hz
-
120
Hz
(SA-W301)
20
Hz
-
150
Hz
(SA-W101)
High
frequency
cut-off
frequency
50
Hz
-—
120
Hz
(SA-W301)
-
50
Hz
-
150
Hz
(SA-W101)
Phase
switch
NOR
(normal),
REV
(reverse)
Low
boost
switch
ON,
OFF
Inputs
Input
jacks
INPUT
1:
Input
pin
jack
INPUT
2:
Input
terminals
General
Power
requirements
U.S.A.
and
Canada:
120
V
AC,
60
Hz
Power
consumption
70
W
(SA-W301)
60
W
(SA-W101)
Dimensions
Approx.
205
x
580
x
400
mm
(w/h/d)
(8'/,
x
22’/,
x
15°/,
inches)
(SA-W301)
Approx.
205
x
500
x
350
mm
(w/h/d)
+
-(8'/,
x
19°/,
x
13”/,
inches)
(SA-W101)
Mass
16
kg
(35
Ib
4
oz)
(SA-W301)
12.5
kg
(27
Ib
9
oz)
(SA-W101)
118

AVERTISSEMENT
Afin
d’éviter
tout
risque
d’incendie
ou
d’électrocution,
ne
pas
exposer
cet
appareil
a
la
pluie
ou
a
I’‘humidite.
ATTENTION
POUR
PREVENIR
LES
CHOCS
ELECTRIQUES,
NE
PAS
UTILISER
CETTE
FICHE
POLARISEE
AVEC
UN
PROLONGATEUR,
UNE
PRISE
DE
COURANT
OU
UNE
AUTRE
SORTIE
DE
COURANT,
SAUF
SI
LES
LAMES
PEUVENT
ETRE
INSEREES
A
FOND
SANS
EN
LAISSER
AUCUNE
PARTIE
A
DECOUVERT.
?F

=
a
aes
Bienvenue
!
Merci
pour
I’achat
de
ce
caisson
de grave
amplifié
Sony.
Avant
de
mettre
ce
caisson
en
service,
veuillez
lire
attentivement
le
mode
d’emploi
et
le
garder
pour
toute
référence
future.
——EEER——
ee
Au
sujet
de
ce
mode
d‘emploi
Les
instructions
de
ce
mode
d’emploi
sont
destinées
aux
SA-W301
et
SA-W101.
Vérifiez
le
numéro
de
votre
modéle
au
dos
du
caisson.
Nous
avons
utilisé
dans
ce
mode
d’emploi
le
SA-W301
pour
les
illustrations.
Toute
différence
de
fonctionnement
entre
les
deux
modéles
est
clairement
indiquée
dans
le
texte,
par
exemple,
“SA-W301
uniquement”.
Type
de
différences
ees.
W301
W101
Caracte’ristique
Commutateur
AUTO
:
Convention
Le
symbole
suivant
est
utilisé
dans
ce
mode
d’emploi:
~~
Indique
des
conseils
ou
méthodes
qui
facilitent
une
manipulation.
TABLE
DES
MATIERES
Pour
écouter
le
son
4
Préparatifs
Déballage
6
Installation
6
Raccordement
du
systéme
7
Informations
complémentaires
Précautions
10
Guide
de
dépannage
11
Spécifications
11
3

Fonctionnement
de
base
Pour
ecouter
le
son
Key
Si
le
caisson
de
grave
reste
en
mode
de
veille
bien
que
le
signal
soit
de
nouveau
fourni
(SA-W301
uniquement)
Cela
peut
provenir
de
l’amplificateur
raccordé.
Dans
ce
cas,
appuyez
sur
AUTO
pour
éteindre
l’indicateur
AUTO.
Af
1
Allumez
l’amplificateur
et
sélectionnez
la
source
de
programme.
2
Appuyez
sur
POWER.
Le
caisson
est
mis
sous
tension
et
l’‘indicateur
POWER
s’allume
en
vert.
3
Reproduisez
la
source
de
programme.
Pour
mettre
hors
tension
Appuyez
sur
POWER
pour
libérer
I’interrupteur.
Pour
utiliser
le
commutateur
AUTO
(SA-W301
uniquement)
Appuyez
sur
AUTO.
L’indicateur
AUTO
s’allume.
S’il
n’y
a
aucun
signal
d’entrée
pendant
30
secondes,
le
caisson
entre
en
mode
de
veille
et
l’amplificateur
intégré
s’éteint
pour
économiser
de
|’électricité.
Quand
le
signal
est
de
nouveau
fourni,
le
caisson
quitte
automatiquement
le
mode
de
veille.
Pour
empécher
le
caisson
de
se
mettre
en
veille,
appuyez
sur
AUTO
pour
éteindre
I’indicateur
AUTO.

Fonctionnement
de
base
Remarque
Ne
réglez
jamais
le
timbre
(BASS,
TREBLE,
etc.)
de
l'amplificateur
ou
la
sortie
de
l’égaliseur
sur
un
niveau
élevé.
Ne
laissez
jamais
entrer
a
niveau
élevé
des
ondes
sinusoidales
de
20
Hz
4
50
Hz
enregistrées
sur
un
disque
d’essai
vendu
dans
le
commerce
ou
un
bruit
spécial
(son
grave
d’un
instrument
de
musique
électronique,
bruit
d’éclatement
d’une
platine
tourne-disque,
son
avec
des
graves
excessivement
accentuésretc.).
Car
les
enceintes
pourraient
étre
endommagées.
La
lecture
d’un
disque
qui
contient
des
graves
excessivement
accentués
peut
produire
des
bruits
en
plus
du
son
d’origine.
Dans
ce
cas,
diminuez
le
niveau
sonore.
Réglage
de
la
fréquence
de
coupure
(CUT
OFF
FREQ)
Réglage
du
son
LOW
BOOST
PHASE
LEVEL
CUT
OFF
FREQ
Pour
ajuster
le
niveau
de
sortie
(LEVEL)
Tournez
LEVEL
pour
ajuster
le
niveau
de
sortie
du
caisson
en
fonction
de
l’acoustique
de
la
piéce
ou
selon
vos
préférences.
Tournez
la
commande
vers
la
droite
(vers
MAX)
pour
augmenter
le
niveau
sonore
et
vers
la
gauche
(vers
MIN)
pour
le
réduire.
Pour
renforcer
le
grave
(LOW
BOOST)
Appuyez
sur
LOW
BOOST.
L’indicateur
LOW
BOOST
s’allume.
Appuyez
de
nouveau
pour
libérer
la
fonction.
Pour
inverser
la
polarité
de
la
phase
(PHASE)
Appuyez
sur
PHASE.
L’indicateur
PHASE
s’allume.
Vous
obtiendrez
éventuellement
un
meilleur
grave
en
inversant
la
polarité,
mais
cela
dépend
des
enceintes,
de
leur
emplacement
et
du
réglage
de
la
fréquence
de
coupure.
Choisissez
le
réglage
qui
reproduit
au
mieux
le
son
grave
a
votre
avis,
quand
vous
écoutez
de
votre
fauteuil.
Appuyez
de
nouveau
pour
libérer
la
fonction.
Tournez
CUT
OFF
FREQ
(coupure
haute
fréquence)
pour
couper
les
hautes
fréquences.
Vous
pouvez
régler
la
fréquence
de
50
Hz
4
120
Hz
(SA-W301)
et
50
Hz
a
150
Hz
(SA-
W101).
Ajustez
les
fréquences
de
coupure
de
sorte
qu’elles
ne
chevauchent
pas
celles
reproduites
par
!’amplificateur.
Référez-vous
aux
normes
suivantes
pour
faire
le
réglage.
Enceinte
classique
de
petite
dimension
100
Hz
—
120
(150)
Hz
80
Hz
—
100
Hz
50
Hz
—
80
Hz
Enceinte
classique
de
moyenne
dimension
Enceinte
classique
de
grande
dimension
of

Préparatifs
Déballage
installation
Vérifiez
si
les
éléments
suivants
se
trouvent
bien
dans
Vous
pourez
installer
le
caisson
ott
vous
voulez
car
la
l’emballage:
plage
de
grave
qu'il
reproduit
(en
dessous
de
150
Hz)
¢
Cordon
de
liaison
audio
(1)
ne
permet
pas
a
l’oreille
humaine
de
distinguer
la
¢
Cordon
d’enceinte
(2)
direction
et
la
position
de
la
sortie
du
son.
En
outre,
comme
I'effet
stéréo
n’est
pas
perceptible
avec
les
basses
fréquences,
un
seul
caisson
est
suffisant
pour
reproduire
les
basses
fréquences
des
canaux
stéréo.
Pour
améliorier
la
reproduction
du
grave,
nous
vous
conseillons
d’installer
le
caisson
sur
un
sol
stable,
ne
provoquant
pas
de
résonance.
Remarques
*
Installez
toujours
le
caisson
4
la
verticale
et
4
plusieurs
centimétres
du
mur.
¢
Ne
pas
poser
d’objet
sur
le
caisson
ni
s‘asseoir
dessus.
©
Sile
caisson
est
installé
au
centre
d’une
piéce,
le
son
grave
est
extrémement
affaibli.
Ce
phénoméme
est
di
aux
ondes
j
stationnaires
de
la
piéce.
Le
cas
échéant
éloignez
le
caisson
du
centre
de
la
piéce,
ou
éliminez
la
cause
des
ondes
stationnaires,
en
installant,
par
exemple,
une
étagére.
6°

|
| |
Préparatifs
i
|
Raccordement
du
systéme
Apercu
Utilisez
la
prise
INPUT
1
ou
les
bornes
INPUT
2
du
caisson
quand
vous
raccordez
l’amplificateur.
*
Si
l’amplificateur
est
équipé
d’une
des
prises
de
sortie
suivantes,
reliez
la
prise
INPUT
1
et
la
prise
de
V'amplificateur
avec
le
cordon
de
liaison
audio
fourni.
—
Prises
PRE
OUT
—
Prise
MONO
OUT
—
Prise(s)
de
sortie
SUB
WOOFER
—
Prise(s)
de
sortie
SUPER
WOOFER
Si
l’amplificateur
n’offre
aucune
des
prises
de
sortie
indiquées,
reliez
les
bornes
d’enceintes
de
l’amplificateur
aux
bornes
INPUT
2.
Utilisez
INPUT
1
ou
INPUT
2
pour
la
liaison.
Si
vous
utilisez
les
deux,
vous
risquez
des
problémes
de
fonctionnement.
INPUT1
INPUT2
SPEAKER
Avant
de
commencer
¢
Eteignez
l’amplificateur
et
le
caisson
de
grave
avant
de
les
relier.
Utilisez
les
cordons
audio
fournis
avec
les
différents
appareils.
Si
vous
n’avez
pas
assez
de
cordons
pour
faire
les
liaisons
nécessaires,
vous
devrez
acheter
des
cordons
de
liaison
audio
en
option.
©
Quand
vous
raccordez
un
cordon
de
liaison
audio,
veillez
a
faire
correspondre
les
couleurs
des
prises
et
des
fiches
des
appareils:
Les
fiches
rouges
(droite)
dans
les
prises
rouges
et
les
fiches
blanches
(gauche)
dans
les
prises
blanches.
Veillez
a
insérer
a
fond
les
fiches
dans
les
prises
pour
éviter
toute
source
de
bruit.
Branchez
le
cordon
d’alimentation
secteur
du
caisson
a
la
prise
murale.
*
Vous
ne
pouvez
pas
relier
la
prise
de
sortie
CENTER
a
ce
caisson
pour
utiliser
la
fonction
Dolby
Pro
Logic.
Le
son
grave
n'est
pas
fourni
par
certains
modes
Dolby
Pro
Logic.
7

.
Préparatifs
Utilisation
d'un
seul
jeu
de
bornes
d’enceintes
Cordons
nécessaires
Cordons
d’enceintes
fournis
(1
pour
chaque
enceinte)
Torsadez
|’extrémité
du
cordon
aprés
l’avoir
dénudée
sur
15
mm
environ.
Veillez
a
brancher
les
cordons
d’enceintes
dans
les
bornes
appropriées:
+
sur
+
et—sur-—.
Si
les
cordons
sont
inversés,
le
son
sera
déformé
et
les
basses
feront
défaut.
Il
est
pratique
de
prendre
par
exemple
le
cordon
rayé
pour
la
<S
liaison
aux
bornes
positives
(+).
Vous
ne
risquez
pas
ainsi
de
faire
de
mauvaises
liaisons.
Raccordements
1
Raccordez
l’amplificateur.
Raccordez
les
bornes
INPUT
2
du
caisson
aux
bornes
d’‘enceintes
de
l’amplificateur
avec
les
cordons
d’enceintes.
Veillez
4
raccorder
les
canaux
gauche
(L)
et
droit
(R).
Voir
“Utilisation
des
prises
PRE
OUT”
quand
vous
utilisez
les
prises
INPUT
1.
Amplificateur
SPEAKER
QO
OO
2
Raccordez
la
paire
d’enceintes.
Raccordez
les
enceintes
aux
bornes
d’enceintes
du
caisson
de
grave.
Caisson
de
grave
SPEAKER
.
Enceinte
droite
(R)
Enceinte
gauche
(L
3
Utilisation
des
deux
jeux
de
bornes
d’enceintes
(A
+
B)
Cordons
nécessaires
Cordons
d’enceintes
fournis
(1
pour
chaque
enceinte)
Torsadez
l’extrémité
du
cordon
aprés
l’avoir
dénudée
sur
15
mm
environ.
.
Raccordements
1
Raccordez
I’amplificateur
et
une
paire
d’enceintes.
Raccordez
les
enceintes
aux
bornes
d’enceintes
de
l’'amplificateur
(A).
Amplificateur
SPEAKER(A)
QOD
29
Enceinte
gauche
(L)
Enceinte
droite
(R)
2
Raccordez
l’amplificateur.
Raccordez
les
bornes
(B)
d’enceintes
de
l‘amplificateur
aux
bornes
INPUT
2
du
caisson
de
grave
avec
les
cordons
d’enceintes
fournis.
Voir
“Utilisation
des
prises
PRE
OUT”
quand
vous
utilisez
les
prises
INPUT
1.
Amplificateur
SPEAKER(B)
CO
CO
me
4
in
Aly
om
Quand
vous
utilisez
les
deux
jeux
de
prises
(A
+
B),
veillez
4
sélectionner
la
position
“A
+
B”
sur
l’amplificateur.
Remarque
Quand
vous
utilisez
les
bornes
d’enceintes
A
seulement
(enceintes
avant
seulement)
ou
quand
I’amplificateur
est
éteint,
réduisez
le
volume
ou
éteignez
le
caisson
sinon
vous
entendrez
un
bourdonnement.

Utilisation
des
prises
PRE
OUT
(sans
broche
coupe-circuit)
Cordons
nécessaires
Cordon
de
liaison
audio
(fourni)
(1)
Blanc
wu
®
Rouge
(R)
Raccordements
Reliez
la
prise
INPUT
1
du
caisson
de
grave
aux
prises
PRE
OUT
(sans
broche
coupe-circuit)
de
Il’amplificateur
avec
le
cordon
de
liaison
audio
fourni.
Caisson
de
grave
INPUT
1
@
@
®®
Ey
Amplificateur
PRE
OUT
¢
Qu’est-ce
qu'une
broche
coupe-circuit
?
Les
prises
PRE
OUT
de
certains
amplificateurs
sont
équipées
de
broches
coupe-circuit.
Il
n’est
pas
possible
de
raccorder
le
caisson
a
ce
type
d’amplificateur.
*
=
Broche
coupe-circuit
Raccordement
4
la
prise
MONO
OUT
de
I’amplificateur
Reliez
le
caisson
de
grave
a
la
prise
MONO
OUT
de
l’‘amplificateur,
comme
a
la
(aux)
prise(s)
PRE
OUT,
avec
le
cordon
de
liaison
audio
fourni.
Dans
ce
cas,
utilisez
une
seule
des
deux
prises,
la
gauche
ou
la
droite.
(Raccordez
La
LouRa
R.)
Raccordement
a
la
(aux)
prise(s)
SUB
WOOFER
de
l'amplificateur
ou
a
la
(aux)
prises
de
sortie
SUPER
WOOFER
Reliez
le
caisson
a
la
(aux)
prises
de
sortie
SUB
WOOFER
de
l'amplificateur
ou
a
la
(aux)
prises
de
sortie
SUPER
WOOFER,
comme
aux
prises
PRE
OUT,
avec
le
cordon
de
liaison
audio
fourni.
Préparatifs
Remarques
*
Si
le
niveau
de
sortie
de
l’amplificateur
n‘est
pas
suffisant,
le
son
peut
ne
pas
étre
assez
puissant.
Dans
ce
cas,
reliez
les
bornes
d’enceintes
de
l’amplificateur
directement
aux
bornes
INPUT
2
du
caisson.
¢
Laou
les
prises
de
sortie
SUB
WOOFER
et
la
ou
les
prises
de
sortie
SUPER
WOOFER
de
I’amplificateur
ont
normalement
des
filtres
passe-haut
(passe-bas)
intégrés.
Si
le
caisson
est
raccordé
a
ces
prises,
le
commutateur
AUTO
du
caisson
de
grave
risque
de
ne
pas
fonctionner
comme
il
faut.
Vous
devez
donc
désactiver
le
commutateur
AUTO
du
caisson
(SA-W301
uniquement).
(Voir
page
4.)
¢
Si
vous
raccordez
le
caisson
4
un
amplificateur
équipé
d’un
seule
prise
(prise
MONO
OUT,
prise
de
sortie
SUB
WOOEER
ou
prise
SUPER
WOOFER),
branchez
l’une
des
fiches
gauche
(L)
ou
droite
(R)
du
cordon
de
liaison
audio
fourni
sur
cette
prise
et
l'autre
fiche
gauche
ou
droite
sur
la
prise
correspondante
(gauche
ou
droite)
du
caisson
de
grave.
Dans
ce
cas,
veillez
4
n‘utiliser
qu’une
seule
des
deux
prises
(gauche
ou
droite).
Ne
pas
inverser
les
fiches
(gauche
ou
droite)
sinon
aucun
son
ne
sera
audible.
Raccordement
du
cordon
d‘alimentation
secteur
Branchez
le
cordon
d’alimentation
secteur
du
caisson
de
grave
et
de
l’amplificateur
sur
une
prise
murale.
of

10°
Informations
complémentaires
ESS
a
ee
eee)
Precautions
Sécurité
¢
Avant
d’utiliser
le
caisson
de
grave,
vérifiez
que
sa
tension
de
fonctionnement
est
identique
4
celle
du
secteur
local.
¢
Si
vous
prévoyez
de
ne
pas
utiliser
le
caisson
pendant
longtemps,
débranchez-le
de
la
prise
murale.
Pour
débrancher
le
cordon
d’alimentation
secteur,
tirez
sur
la
fiche.
Ne
jamais
tirer
sur
le
cordon
proprement
dit.
¢
Si
un
liquide
ou
un
solide
tombait
dans
le
coffret,
débranchez
le
caisson
et
faites-le
contréler
par
un
technicien
qualifié
avant
de
le
remettre
en
service.
*
Le
caisson
n’est
pas
déconnecté
de
la
source
d’alimentation
secteur
tant
qu’il
est
branché
sur
la
prise
murale,
méme
s'il
a
été
mis
hors
tension.
Avant
d'allumer
ou
d‘éteindre
l‘amplificateur
ou
un
autre
appareil
N’oubliez
pas
de
baisser
complétement
le
volume.
Pour
éviter
d’‘endommager
le
caisson
de
grave
¢
Réglez
avec
soin
le
volume
de
l’amplificateur
pour
éviter
toute
entrée
de
son
excessive.
*
Ne
pas
essayer
d’ouvrir
le
coffret
ou
de
modifier
les
haut-
parleurs
et
les
circuits.
Si
vous
observez
des
anomalies
de
couleurs
sur
I’écran
du
téléviseur
installé
4
proximité
du
caisson
Normalement
les
enceintes
ont
un
blindage
magnétique
et
peuvent
étre
installées
prés
d’un
téléviseur,
mais
il
est
possible
d’observer
des
anontalies
dé
couleurs
avec
certains
types
de
téléviseur.
Si
vous
observez
des
anomalies
de
couleurs...
—
Eteignez
le
téléviseur,
puis
rallumez-le
15
4
30
minutes
plus
tard.
S‘il
n'y
a
aucun
changement...
—+Eloignez
les
enceintes
du
téléviseur.
En
cas
de
rétroaction
acoustique
Changez
l’emplacement
des
enceintes
ou
baissez
le
volume
de
l’amplificateur.
Installation
¢
Ne
pas
installer
le
caisson
de
grave
prés
d’une
source
de
chaleur,
comme
un
radiateur
ou
une
bouche
d’air
chaud,
dans
un
endroit
en
plein
soleil
ou
exposé
a
de
la
poussiére,
des
vibrations
ou
des
chocs
mécaniques.
¢
Une
bonne
ventilation
est
essentielle
pour
éviter
une
surchauffe
interne
du
caisson.
Installez
le
caisson
dans
un
endroit
ow
la
circulation
d’air
est
suffisante.
Ne
pas
l’installer
sur
une
surface
molle
ou
trop
prés
d’un
mur
pour
ne
pas
boucher
I’orifice
de
ventilation
a
I’arriére
du
caisson.
Nettoyage
du
coffret
Nettoyez
le
coffret
avec
un
chiffon
doux
légérement
imprégné
d'eau.
Ne
pas
utiliser
de
tampons
abrasifs,
poudre
a
récurer
ou
diluant,
comme
I’alcool
ou
la
benzine.
Pour
toute
question
ou
probléme
au
sujet
du
caisson
de
grave,
veuillez
contacter
votre
revendeur
Sony
le
plus
proche.
This manual suits for next models
1
Table of contents
Languages:
Other Sony Subwoofer manuals

Sony
Sony SA-VE522 User manual

Sony
Sony XS-GTX100LW Marketing User manual

Sony
Sony XS-TL1 User manual

Sony
Sony SA-WM40 User manual

Sony
Sony XS-L123P5B User manual

Sony
Sony XS-L1090P5 Marketing Product guide

Sony
Sony XS-LE30 User manual

Sony
Sony SA-WP890 User manual

Sony
Sony XS-L835 Product guide

Sony
Sony SA-W441 User manual