Altius DGDVD21CE User manual

dvd
headrest
User MaNUaL
ModeL No: dgdvd21ce

2
WeLcoMe
We hope you enjoy your purchase!
ALTIUS products are carefully designed and produced to the highest standards
of performance and safety, backed by our comprehensive 1 Year Warranty.
This user manual will provide all the information required for you to setup and
use your new product.

3
Welcome 2
Product Overview 4
Installation 6
Remote Control 10
Operation 13
Troubleshooting 17
Specifications 18
Compliance and Responsible Disposal 19
coNteNts

4 | PRODUCT OVERVIEW
A. DVD Headrest
B. Wireless 2-in-1 Game Console Remote
C. AAA batteries
D. Installation Tubes
E. AV Cable Bundle
F. 12V Car Power Adaptor
G. Set of Earphones
H. User Manual
I. Warranty Card
J. General Safety Warnings
What’s iN the box:
ProdUct overvieW

PRODUCT OVERVIEW | 5
bUttoNs aNd FUNctioNs
1
2
3
4
6
8
7
9 10 11
5
1. / : Move to the previous/next chapter or
track.
2. : Press to play or pause. Press and hold to
return.
3. : Press to go into the quick screen setting menu.
Press and hold to enter the system settings menu.
In menus, , , and work as navigation
keys.
4. : Press to turn on the unit when the unit is
off. Press and hold to turn off the unit when the unit
is on. Press to switch between AV and DVD mode.
5. / : Press to increase or decrease the audio
volume.
6. DVD Tray Open/Close Button : Press to open the
DVD disc compartment.
7. Remote Sensor
8. DC Power Input : You can connect the supplied car
adaptor to this socket and the car’s cigarette lighter
socket.
9. SD Card Slot : Insert a SD card for media playback.
10. USB Port : Insert a USB for media playback.
11. Headphones Port : Connect to your earphones
(included).
5V 500mA
DC 12V 1.5A

6 | INSTALLATION
iNstaLLatioN
There are two ways to install this headrest in your vehicle: you can
do it yourself, or you have it professionally installed by an auto
specialist.
NOTE: The shape and the size of the headrest may not be suitable
in all cars. Please check the dimensions before installing.
Install it yourself
1. Remove the original headrest of your car.
2. From the 6 pairs of installation tubes (16/14/13.8/12.7/12.5/12
mm in diameter) included in the product, select the correct pair
for the poles of your car’s headrest.
3. Adjust the space between the two poles of the headrest, and
install the headrest in position and adjust its height as required.
4. Run the radio antenna and AV cable through the seat’s pole.
5. Insert the car power adaptor into the car lighter port of your
car.
6. Connect the DC connector of the car power adaptor (included)
into the DC in port of the headrest DVD player.
12V DC In
12V Car Adaptor Port

INSTALLATION | 7
Video out
L out
R out
L in
R in
Video in
Video out (Yellow)
Audio out (Red/R)
Audio out (White/L)
Video in (Yellow)
Audio in (White/L)
Audio in (Red/R)
Professional installation (auto specialist only)
1. Remove the original headrest.
2. From the 6 pairs of installation tubes (16/14/13.8/12.7/12.5/12 mm in diameter) included in the product, select the
correct pair for the poles of your car’s headrest.
3. Adjust the space between the two poles of the headrest and install the headrest into position. Adjust its height as
required.
4. Run the radio antenna and AV cable through the seat’s pole, then connect the AV cable bundle (included) to the
car’s AV system (see diagram below).
5. Connect the DC connector of the car power adaptor (included) into the DC In port of the headrest DVD player.

8 | INSTALLATION
A head restraint is designed to limit the movement of the head and provide support in an
accident. A properly adjusted head restraint will help to protect you against whiplash, and
potentially save you from a long-term injury.
How to adjust your head restraint
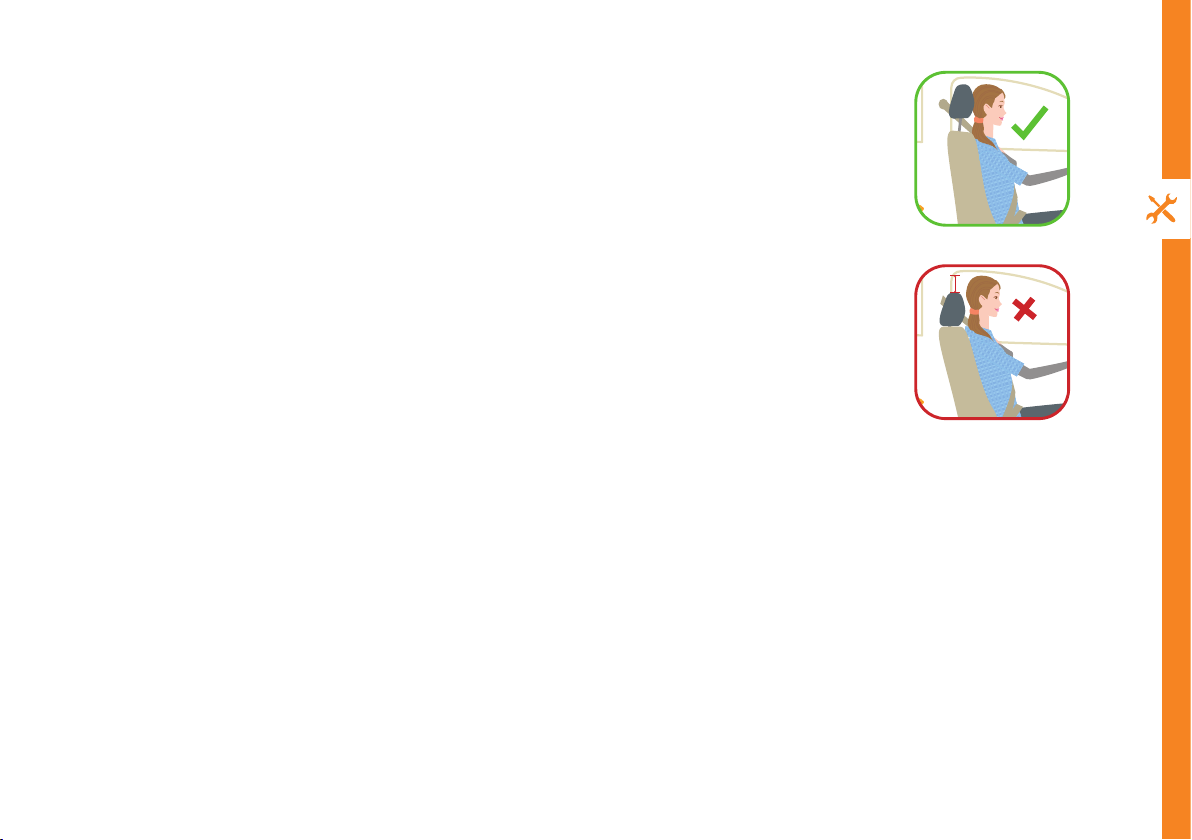
Picture 1: This picture shows a well-adjusted head restraint, which will reduce the risk of
suering a whiplash injury.
The seat back angle is relatively upright, and this allows the head restraint to be positioned
close to the back of the head.
The top of the head restraint is level with the top of the occupant’s head, which will also
help to prevent injury.
Picture 2: This picture shows a poorly adjusted head restraint.
Even though the top of the head restraint is level with the top of the occupants head, a
large gap exists between the back of the occupant’s head and the head restraint.
This gap – which is marked in the picture – means that the head can move and tilt further
back, increasing the risk of injury.
Picture 1: A well adjusted head restraint
Picture 2: A poorly adjusted head restraint
PLaceMeNt aNd PositioN

INSTALLATION | 9
Credit: ROSPA, Road Safety Factsheet: Head Restraints
Picture 3: A well adjusted head restraint
Picture 4: A poorly adjusted head restraint
Picture 3: This picture shows another example of a properly adjusted head restraint.
As in Picture 1, the two main points to note are that the head restraint is as high as the
top of the occupant’s head, and the restraint is close to the back of the head.
Picture 4: This picture is an example of a poorly adjusted head restraint.
The picture shows the distance between the top of the occupant’s head and the top of
the head restraint, which would increase the risk of an injury.
The head restraint should be moved higher, as shown in picture 3.

10 | REMOTE CONTROL
setUP
Insert two AAA size batteries (not included) according
to the polarity markings (+ / -) inside the compartment.
Make sure the batteries are correctly aligned and
properly pushed into place.
PrecaUtioNs WheN UsiNg batteries
• Do not use old and new batteries together.
• Do not use different types of batteries (e.g.
Manganese and Alkaline batteries) together.
• Remove the batteries from the remote if you do not
intend to use it for a long time.
• When discarding used batteries, follow any
guidelines for recycling and disposal of batteries
that apply in your local area.
• Keep batteries away from children and pets.
• Never throw batteries into a fire or expose them to
extreme heat.
reMote coNtroL
1
2
3
Illustration is for reference only and may not match the actual
remote of the product.

REMOTE CONTROL | 11
UsiNg the reMote coNtroL
To use the remote, point it towards the remote sensor at the
front of the headrest.
The remote has a range of up to about 3 metres from the
headrest at an angle of up to 30 degrees to either side of the
sensor, as illustrated below.
reMote hiNts aNd tiPs
• Point the remote control directly
towards the sensor.
• Make sure no obstacles are blocking
its path. The remote control will not
operate if its path is blocked.
• Handle the remote control with care.
Do not drop, apply shock or step on the
remote control. Do not spill water on
the unit.
• If you do not intend to use the remote
control for an extended period of
time (more than a month), remove the
battery to prevent possible damage
from battery leakage and corrosion.
Sensor
Location
SELECT
PBC
MENU TITLE
MUTE
PROG
TFT
MENU
DISP
ENTER
REPEAT
1234
567 8
9 0 10+
ANGLE SETUP USB/SD
VOL+
VOL-
START
ZOOM
DVD
SUBTITLE AUDIO
SLOW
RETURN
AV

12 | REMOTE CONTROL
SELECT
PBC
MENU TITLE
MUTE
PROG
TFT
MENU
DISP
ENTER
REPEAT
1234
567 8
9 0 10+
ANGLE SETUP USB/SD
VOL+
VOL-
START
ZOOM
DVD
SUBTITLE AUDIO
SLOW
RETURN
AV
GAME PLAY BUTTONS
: Turn the unit on/off
PBC/MENU: Set PBC menu function on/
off/select panel setting
DISP : Display the DVD playback
information
TFT/MENU : Display the screen setting
menu
REPEAT : Switch between repeat one/
repeat all/repeat off
ANGLE : Change the angle of the
camera on DVD mode
SETUP : Display the system setup menu
: Play/pause playback
: Rewind
: Stop playback
: Skip to the previous title/chapter/
track
DVD/AV : Select the playback source
SUBTITLE : Select the subtitle
TITLE : Go to the title menu
MUTE : Mute sound
PROG : Program a playlist with track
numbers
/ / / : Navigate the system
menu
ENTER : Confirm a selection
USB/SD : Select between DVD/SD card/
USB
VOL+ / VOL - : Increase/decrease
volume
: Fast forward
: Skip to the next title/chapter/track
NUMBER BUTTONS : Numerical input
to directly access a specific chapter or
track
ZOOM : Zoom in on screen in AV mode
SLOW : Play in slow motion
AUDIO : DVD mode: select multi
language sound. CD/VCD/SD Card/USB:
Select audio channel
GAME PLAY BUTTONS

OPERATION | 13
oPeratioN
Power ON/OFF
• Press the POWER button on the remote control or the unit to turn it on.
• Press the POWER button on the remote (or press and hold the power button on the unit) again to turn the unit o.
Loading a disc
1. Press the DVD/AV button or the USB/SD button to select the DVD mode.
2. Press and hold the OPEN button on the unit and lift up the screen frame.
3. Place a disc on the tray securely with the printed side outward.
4. Close the screen frame and playback will start automatically.
haNdLiNg discs
• In order to keep discs clean, hold the
edge or the hole of a disc. Do not
touch the surface.
• Do not place plaster, tape or any
material on the surface of a disc.
• Keep discs away from direct sunlight
or heat source.
• If a disc is dirty, clean it with a soft
cloth before using it.
• Do not use chemical detergent to
clean discs.
Playing a disc
• When a disc is inserted, the playback starts automatically.
• Use the button, the button, and the and buttons to
control the playback.
• Use the VOL+/VOL- buttons to control the audio volume.
NOTE: If the FM or IR function is turned on in the audio settings
menu, the volume control will be disabled; turn o the FM and IR
function.
• Use the number pad to move to the numbered chapter or track.
• When playing a VCD 2.0 version, press the PBC button to use PBC
function of the VCD.

14 | OPERATION
PLayiNg coNteNt FroM a Usb/sd card
1) Insert a USB memory stick or SD card into the corresponding port on the unit.
2) The USB/SD memory is detected and the USB playback mode starts automatically. If it does not go to USB playback
mode automatically, press the USB/SD button and select DVD/SD/USB using the navigation buttons and press ENTER
to switch to USB/SD mode.
3) Select the le you wish to play using the navigation buttons on the remote control and press ENTER to conrm.
4) When viewing a JPEG image, the navigation buttons can be used to rotate the image.
To go to the media selection menu, press stop twice.
Note: This USB port is for PLAYBACK ONLY. Attempts to charge smart devices
(e.g. phones, tablets) via this port could damage them.

OPERATION | 15
System Setup
TV system: Select the TV system. AUTO is recommended.
Last memory: Turn ON or OFF the Power Resume function.
TV Type: TV type to change the screen ratio between 4:3 PS, 4:3 LB
and 16:9.
Password: Set the password for Rating. You can use the password
“4711” to unlock if you forget your password. You can change the
password after the lock icon appears as an open lock. When the
icon is an open lock, enter a 4-digit password and press ENTER to
conrm the change.
Rating: Set the playable DVD rating (only available when the
password is unlocked).
Default: Press the and ENTER buttons to restore to factory
default settings.
Language Setup
OSD language: Change the OSD language.
Audio language: Change the default Audio language.
Subtitle language: Change the default subtitle language.
Menu language: Change the menu language.
systeM MeNU
Press the SETUP button to display the system menu. Use the navigation buttons and the ENTER button to select items
in the menu and change the settings.

16 | OPERATION
Audio Setup
Key: Change sound pitch.
FM: Send the sound to your car FM radio via FM transmitter settings.
IR: Transmit the sound to IR earphones.
Downmix: Set the 5.1 Channel DVD downmix to 2 channel sound
output. You can select Stereo, LT/RT (left total/right total).
Note: When set to FM or IR, all the sound will transmit through FM
or IR; the built-in speaker and headphone port will have no sound
output.
Video Setup
Brightness: Change brightness of display.
Contrast: Change contrast of display.
Hue: Change hue of display.
Saturation: Change saturation of display.
Sharpness: Change sharpness of display.
Rotate: Flip the menu upside-down.
Game function
You can play games on the entertainment system. You can download games from the internet (.nes format)
and copy them onto an SD card or USB disk (not included).
1) Insert an SD card or USB with your games saved on it.
2) Playback starts automatically.
3) Use the game control pad on the remote to control the game play.
4) Press the RETURN button to go back to the menu.

TROUBLESHOOTING | 17
troUbLeshootiNg
ProbLeM soLUtioN
No power • Ensure connection to power is correct and secure.
• Position your car key in ‘ACC’ to supply power.
No sound
• Make sure the audio is not muted.
• Check the the volume level is not set too low.
• In the setup menu, make sure that FM mode and IR mode are set to o.
No image
• Select the correct mode (DVD/AV/USB/SD).
• Adjust the brightness and contrast in the menu.
• Some high resolution jpg format images may not be supported.
‘No disc’ error message
• Make sure you load the disc with its printed side facing outwards.
• Check the disc for damage or scratches.
• Check the region code and the format.
Screen size is wrong • Set the TV system correctly in the menu.
File can’t be played • Check whether the le format is supported.
• Also, even if supported, les with high resolution or high bit rates may not be playable by this unit.
Remote control not
working
• Remove any object between the remote control and the sensor on the unit.
• Aim the remote directly at the sensor on the unit.
• Make sure the batteries are installed correctly.
• Try replacing the batteries with new ones.
System has frozen • Disconnect from power and re-start the unit.

18 | SPECIFICATIONS
For Technical and Warranty Support
1300 886 649
www.tempo.org
Distributed by Tempo (Aust) Pty Ltd,
PO Box 6056, Frenchs Forest DC 2086
sPeciFicatioNs
Compatible
Formats
DVD / SVCD / VCD / Game CD /
JPEG / CD-R / CD-RW
Display 7” (diagonal) colour LCD
Output Ports RCA Audio and Video Out (cable)
3.5mm Headphone Out
Inputs USB port, SD/card slot, AV In
(from internal cable)
Video System Auto / PAL / NTSC
USB/SD Card Max 32GB, FAT32 format
Power Supply DC 12V, 1.5A
USB Output DC 5V, 500mA
Product Weight 1.2kg
Product
Dimensions
280 (L) x 150 (W) x 200 (H) mm
(without poles)
Pole Height 150mm
Compatible with all DVD regions
in PAL or NTSC format
PAL NTSC

SPECIFICATIONS | 19
coMPLiaNce aNd resPoNsibLe disPosaL
Compliance
This product complies with the Australian Safety
Standard AS/NZS 62368.1 to ensure the safety of the
product.
Packaging
The packaging of your product has been
selected from environmentally friendly
materials and can usually be recycled. Please ensure
these are disposed of correctly. Plastic wrapping can
be a suffocation hazard for babies and young children,
please ensure all packaging materials are out of
reach and are safely disposed of. Please recycle these
materials rather than throwing them away.
Product
At the end of its working life, do not throw this product
out with your household rubbish. An environmentally
friendly method of disposal will ensure that valuable
raw materials can be recycled. Electrical and electronic
items contain materials and substances which, if
handled or disposed of incorrectly, could potentially be
hazardous to the environment and human health.

cUstoMer heLPLiNe aU:
1300 886 649
distribUted by:
teMPo (aUst) Pty Ltd,
Po box 6056,
FreNchs Forest
dc 2086
Table of contents