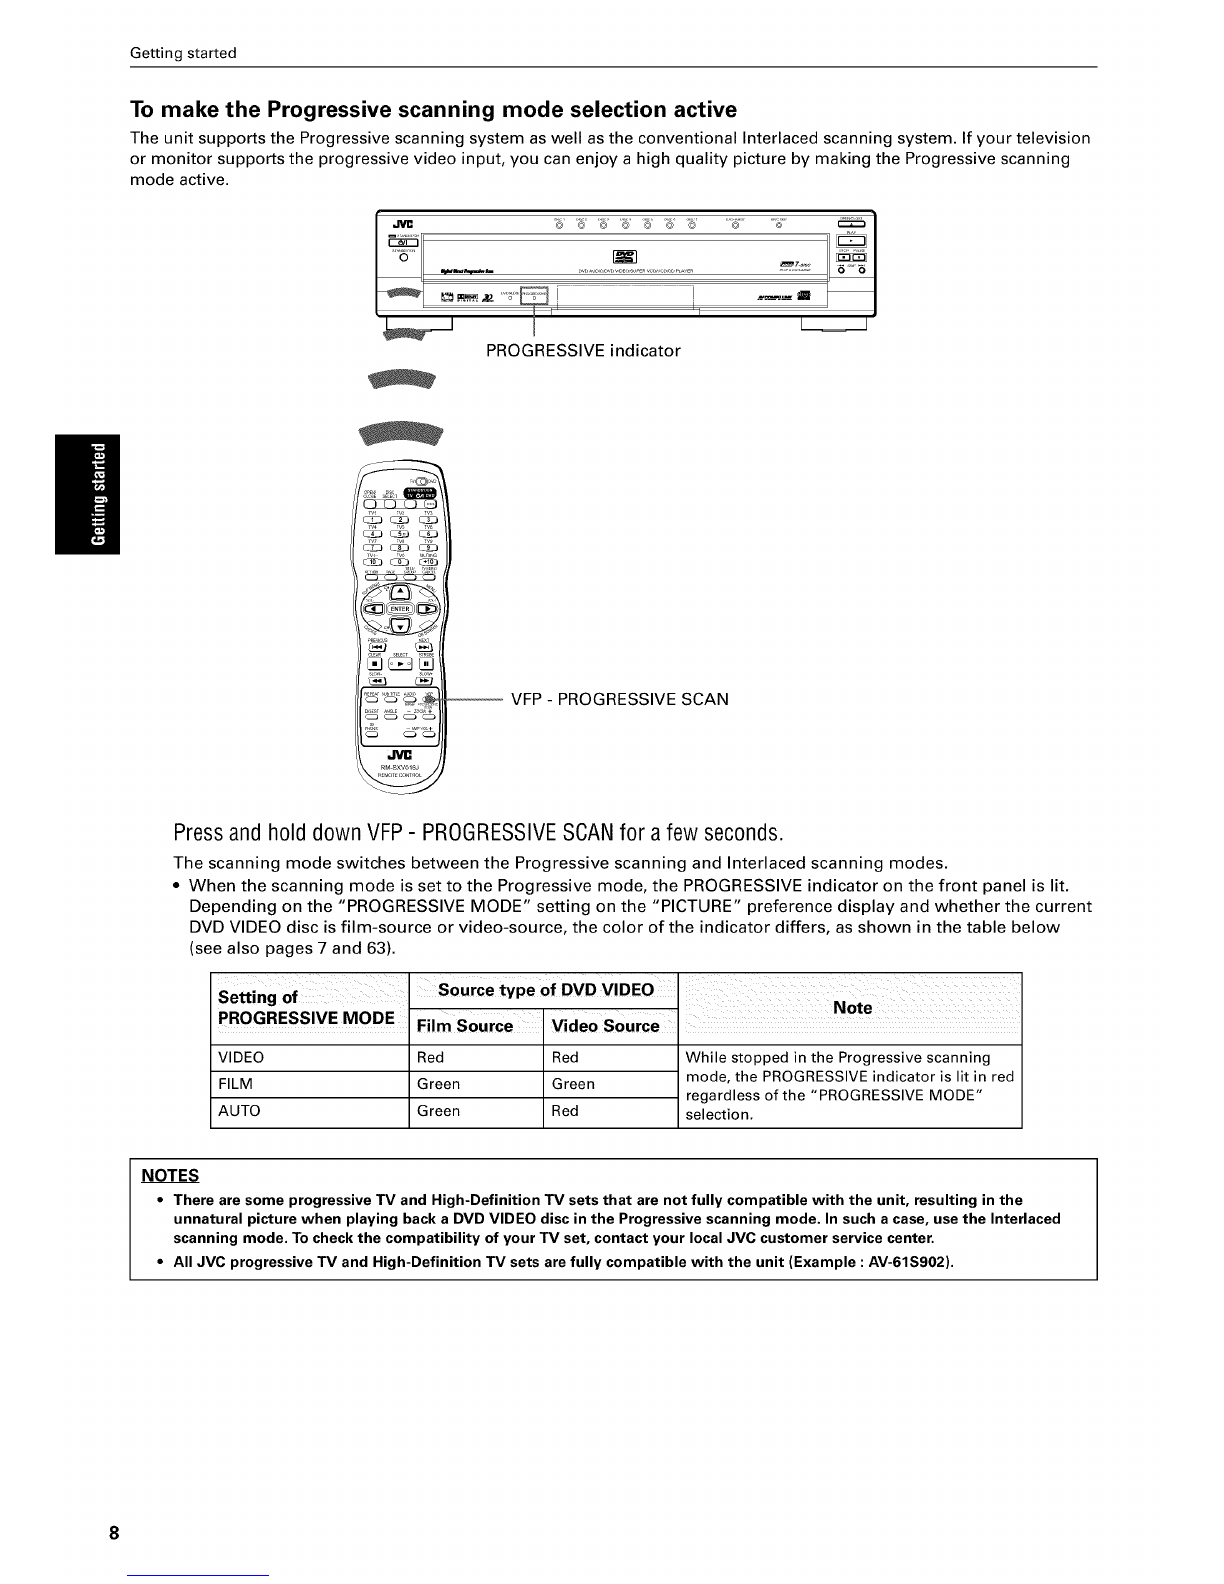
JVC XV-FA900BK User manual

JVC
DVD AUDIO/VIDEO PLAYER
XV-FA900BWXV-FA902SL
ave '_ "6' '_ _'_ '_ "6..... 6_.... ?'
i i n
==_ '_ ''_"" '_" I I ....
I I
'1 __ I I __ I
.......
Bni-_-_l [=Z_I =,,-,'_n.. ,_v
AUDK)/_DEO D |Q|T A L 3D-P_'IONIC SURROUND _Jl=Nff _PVEVIE- qlM hEEVEI
INSTRUCTIONS
For Customer Use:
Enter below the Model No. and Serial No.
which are located on the rear, bottom or
side of the cabinet. Retain this information
for future reference.
Model No.
Serial No
LET0220-001A[J]

Warnings, Cautions and Others
Mises en garde, precautions et indications diverses
CAUTION: TO REDUCE THE RISK OF ELECTRIC SHOCK.
DO NOT REMOVE COVER (OR BACK)
NO USER SERVICEABLE PARTS INSIDE.
REFER SERVICING TO QUALIFIED SERVICE PERSONNEL.
The lightning flash with arrowhead symbol,
within an equilateral triangle is intended
toalert the user to the presence of
uninsulated "dangerous voltage" within the
product's enclosure that may be of sufficient
magnitude to constitute a risk of electric
shock to persons.
The exclamation point within an equilateral
triangle is intended to alert the user to the
presence of important operating and
maintenance (servicing) instructions in the
literature accompanying the appliance.
For U.S.A.
This equipment has been tested and found to comply with the
limits for a Class B digital device, pursuant to part 15 of the FCC
Rules. These limits are designed to provide reasonable protection
against harmful interference in a residential installation.
This equipment generates, uses and can radiate radio frequency
energy and, if not installed and used in accordance with the
instructions, may cause harmful interference to radio
communications. However, there is no guarantee that
interference will not occur in a particular installation. If this
equipment does cause harmful interference to radio or television
reception, which can be determined by turning the equipment off
and on, the user is encouraged to try to correct the interference by
one or more of the following measures:
Reorient or relocate the receiving antenna.
Increase the separation between the equipment and receiver.
Connect the equipment into an outlet on a circuit different from
that to which the receiver is connected.
Consult the dealer or an experienced radio/TV technician for help.
WARNING: TO REDUCE THE RISK OF FIRE
OR ELECTRIC SHOCK, DO NOT EXPOSE
THIS APPLIANCE TO RAIN OR MOISTURE.
CAUTION
To reduce the risk of electrical shocks, fire, etc.:
1. Do not remove screws, covers or cabinet.
2. Do not expose this appliance to rain or moisture.
ATTENTION
Afin d'eviter tout risque d'electrocution, d'incendie, etc.:
1. Ne pas enlever les vis ni les panneaux et ne pas ouvrir le coffret
de I'appareil.
2. Ne pas exposer I'appareil ala pluie ni aI'humidite.
Caution -- STANDBY/ON _/I button!
Disconnect the mains plug to shut the power off completely (the
STANDBY/ON lamp goes off). The STANDBY/ON (,_/I button in
any position does not disconnect the mains line.
• When the unit ison standby, the STANDBY/ON lamp lights red.
• When the unit is turned on, the STANDBY/ON lamp lights
green.
The power can be remote controlled.
Attention -- Commutateur STANDBY/ON VII !
Deconnectez la prise d'alimentation secteur pour mettre I'appareil
completement hors tension (le temoin STANDBY/ON (,_/I
s'eteint). L'interrupteur STANDBY/ON (,_/I , sur n'importe quelle
position, ne peut pas deconnecter I'appareil du secteur.
• Quand I'appareil est en mode de veille, le temoin STANDBY/
ON est allume en rouge.
• Quand I'appareil est sous tension, le temoin STANDBY/ON est
allume en vert.
L'alimentation peut 6tre telecommandee.
IMPORTANT FOR LASER PRODUCTS
IMPORTANT POUR LES PRODUITS LASER
1. CLASS 1 LASER PRODUCT
2. DANGER: Visible laser radiation when open and interlock
failed or defeated. Avoid direct exposure to beam.
3. CAUTION: Do not open the top cover. There are no user
service-able parts inside the Unit; leave all servicing to
qualified service personnel.
1. PRODUIT LASER CLASSE 1
2. ATTENTION: Radiation laser visible quand I'appareil est
ouvert ou que le verrouillage est en panne ou desactive. Eviter
une exposition directe au rayon.
3. ATTENTION: Ne pas ouvrir le couvercle du dessus. II n'y a
aucune piece utilisable a I'interieur. Laisser a un personnel
qualifie le soin de reparer votre appareil.
For Canada/pour le Canada
CAUTION: TO PREVENT ELECTRIC SHOCK, MATCH WIDE
BLADE OF PLUG TO WIDE SLOT, FULLY INSERT
ATTENTION: POUR EVITER LES CHOCS ELECTRIQUES,
INTRODUIRE LA LAME LA PLUS LARGE DE LA FICHE DANS
LA BORNE CORRESPONDANTE DE LA PRISE ET POUSSER
JUSQUAU FOND
For Canada/pour le Canada
THIS DIGITAL APPARATUS DOES NOT EXCEED THE CLASS
B LIMITS FOR RADIO NOISE EMISSIONS FROM DIGITAL
APPARATUS AS SET OUT IN THE INTERFERENCE-CAUSING
EQUIPMENT STANDARD ENTITLED "DIGITAL APPARATUS",
ICES-003 OF THE DEPARTMENT OF COMMUNICATIONS.
CET APPAREIL NUMERIQUE RESPECTE LES LIMITES DE
BRUITS RADIOELECTRIQUES APPLICABLES AUX
APPAREILS NUMERIQUES DE CLASSE B PRESCRITES
DANS LA NORME SUR LE MATERIEL BROUILLEUR:
"APPAREILS NUMERIQUES", NMB-003 EDICTEE PAR LE
MINISTRE DES COMMUNICATIONS.
CAUTION
•Do not block the ventilation openings or holes.
(If the ventilation openings or holes are blocked by a newspaper or
cloth, etc., the heat may not be able to get out.)
•Do not place any naked flame sources, such as lighted candles,
on the apparatus.
•When discarding batteries, environmental problems must be
considered and local rules or laws governing the disposal of these
batteries must be followed strictly.
•Do not expose this apparatus to rain, moisture, dripping or
splashing and that no objects filled with liquids, such as vases,
shall be placed on the apparatus.
ATTENTION
•Ne bloquez pas les orifices ou les trous de ventilation.
(Si les orifices ou les trous de ventilation sont bloques par un
journal un tissu, etc., la chaleur peut ne pas 6tre evacuee
correctement de I'appareil.)
•Ne placez aucune source de flamme nue, telle qu'une bougie, sur
I'appareil.
•Lors de la mise au rebut des piles, veuillez prendre en
consideration les problemes de I'environnement et suivre
strictement les regles et les lois locales sur la mise au rebut des
piles.
•N'exposez pas cet appareil a la pluie, a I'humidite, a un
egouttement ou a des eclaboussures et ne placez pas des objets
remplis de liquide, tels qu'un vase, sur I'appareil.

Table of Contents
Page 2
Supplied accessories .......................................................... 2
Notes on handling .............................................................. 3
Important cautions ................................................................... 3
Safety precautions ................................................................... 3
About discs ......................................................................... 4
Playable disc types ................................................................... 4
Non-playable discs ................................................................... 4
Audio formats ........................................................................... 4
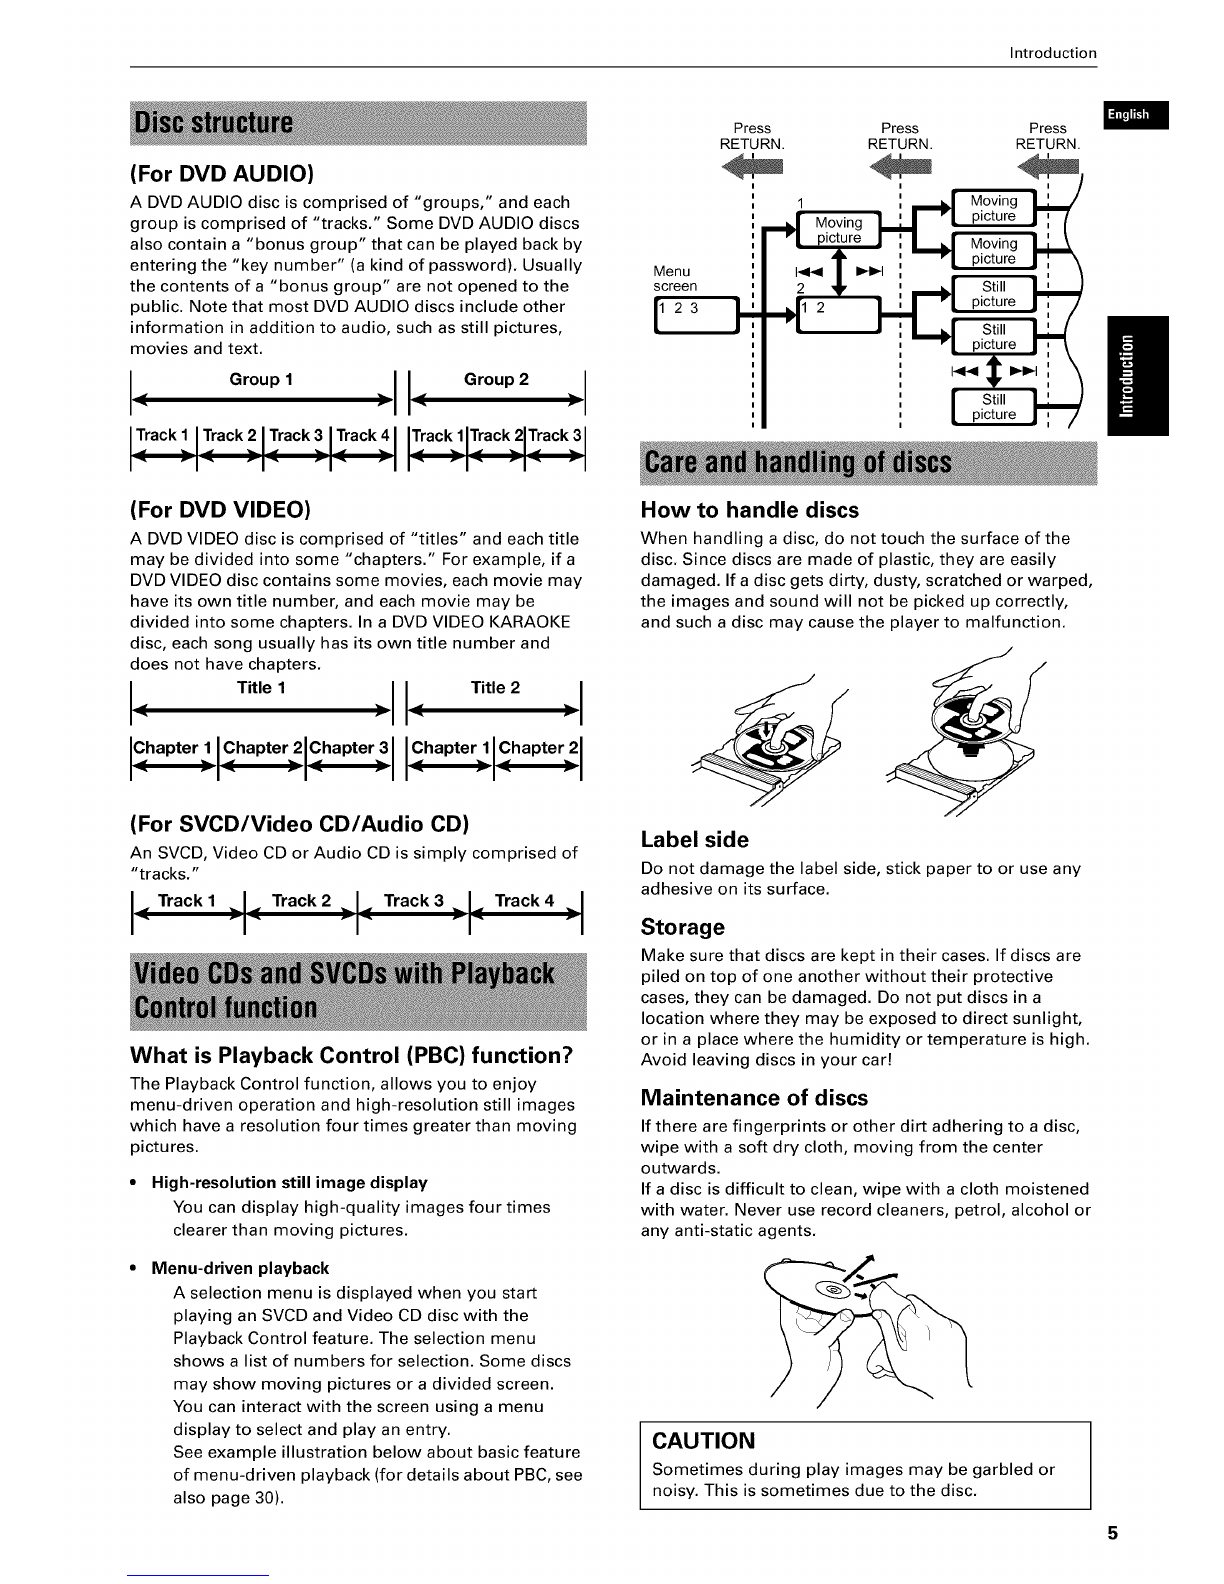
Disc structure ............................................................................ 5
Video CDs and SVCDs with Playback Control function ........ 5
Care and handling of discs ...................................................... 5
Connections ........................................................................ 6
Before making any connections ............................................. 6
To connect to a TV ................................................................... 6
To connect to a stereo audio amplifier/receiver .................... 9
To connect to an amplifier/receiver equipped with
5.1-channel inputs ................................................................. 9
To connect to a digital audio device ..................................... 10
To connect the power cord ................................................... 11
Using the remote control unit ......................................... 12
To install batteries in the remote control unit ..................... 12
Remote sensor ....................................................................... 12
To use the remote control unit for TV operation ................. 13
To control the volume of a JVC's amplifier or receiver ...... 13
Page 14
Before operation ............................................................... 14
Turning on/off the unit ........................................................... 14
The initial setup before using the unit ................................. 15
Basic playback .................................................................. 17
Inserting and removing discs ................................................ 17
To start playback .................................................................... 19
To stop playback completely ................................................ 20
To stop playback temporarily ............................................... 20
To change discs during playback [EXCHANGE .................. 20
To move back the playback position while DVD VIDEO
playback [One touch replay function] ............................... 21
Resuming playback .......................................................... 22
To memorize the interrupted position ................................. 22
To resume playback ............................................................... 23
To locate the beginning of the scene or song ............... 24
To locate a desired selection using 1_141or I_ ................... 24
To locate a desired selection using the numeric buttons...25
Variable speed playback .................................................. 26
To advance or reverse playback rapidly while monitoring ...... 26
To advance a still picture frame-by-frame ........................... 26
To play back in slow-motion ................................................. 26
Other convenient functions ............................................. 27
To check the playback status ................................................ 27
To change the brightness of the display window ............... 28
Playing from a specific position on a disc ...................... 30
To locate a desired scene from the DVD menu ................... 30
To locate a desired scene from the menu of the
SVCD/Video CD with PBC................................................... 30
To specify adesired title/group ............................................ 31
To locate a desired position in the current title, group or
track [Time search] ............................................................. 31
To locate a desired scene from the display [DIGEST] ......... 32
To select astill picture on a DVD AUDIO disc [PAGE] ........ 33
To play back abonus group of a DVD AUDIO disc ............. 34
Changing the playback order .......................................... 35
To play back in the desired order [Program playback] ....... 35
To play back in random order [Random playback] ............. 36
Repeat playback ............................................................... 37
To repeat the current selection or all tracks
[Repeat playback] ................................................................ 37
To repeat a desired part [A-B repeat playback] ................... 38
Changing the language, sound and scene angle .......... 39
To select the subtitle language [SUB TITLE] ....................... 39
To change the audio language or sound [AUDIO] .............. 40
To select a scene angle of DVD VIDEO [ANGLE] ................. 41
Special picture playback and picture/sound effect ...... 42
To display continuous still pictures [STROBE] .................... 42
To zoom in/out pictures [ZOOM] .......................................... 43
To adjust the picture character [VFP] ................................... 43
To simulate surround sound [3D PHONIC] .......................... 44
Checking the sampling frequency and bit rate ............. 45
Menu bar functions ......................................................... 46
To bring upthe menu bar ..................................................... 46
Basic operation procedure .................................................... 46
Menu bar functions for DVD AUDIO .................................... 47
Menu bar functions for DVD VIDEO ..................................... 48
Menu bar functions for SVCD/Video CD/Audio CD ............. 49
Page 51
About MP3 disc ................................................................ 51
Operations ........................................................................ 51
Basic operations ..................................................................... 51
Selecting the desired Group and Track ................................ 52
Direct selection ....................................................................... 53
Repeat playback ..................................................................... 53
Checking the sampling frequency and bit rate .................... 54
About JPEG disc .............................................................. 55
Basic operations .............................................................. 56
To see adesired picture ........................................................ 56
To zoom in/out the picture [ZOOM] ..................................... 57
To see pictures continuously [slide show mode] ......... 57
To play back pictures from the beginning of the disc ......... 57
Selecting the start point of the slide show .......................... 58
Repeat function ...................................................................... 59
tlt'h_lii!LLd]mi_i_iil_tl,']_iilii, t,'aa Page 60
Selecting preferences ...................................................... 60
About the Preference display ................................................ 30
How to set preferences .......................................................... 30
LANGUAGE page ................................................................... 31
PICTURE page ........................................................................ 33
AUDIO page ............................................................................ 34
SPK.SETTING page ................................................................ 36
OTHERS page ......................................................................... 37
Making fine tuning for your speakers ............................ 68
To set the speaker sizes ......................................................... 38
To set the delay time ............................................................. 38
To set the speaker level ......................................................... 39
Limiting playback by children ........................................ 70
To set Parental Lock for the first time [PARENTAL LOCK] ...... 70
To change the settings [PARENTAL LOCK] ......................... 71
To temporarily release the Parental Lock
[PARENTAL LOCK] .............................................................. 72
Names of parts and controls .......................................... 73
Front panel .............................................................................73
Display window ......................................................................73
Rearpanel ...............................................................................73
Remote control unit ...............................................................74
AV COMPU LINK remote control system ...................... 75
Connection and setup ............................................................75
Operation................................................................................75
Troubleshooting .............................................................. 76
Frequently Asked Questions .......................................... 78
Specifications ................................................................... 79
Appendix A: Country/Area code list for Parental Lock ..... 80
Appendix B: Glossary ...................................................... 81
Appendix C: Index ............................................................ 83

Supplied accessories
• Audio/video cable (Yellow/White/Red) (x 1)
• Component video cable (Red/Green/Blue) (x 1)
• Audio cable (White/Red) (x 2)
• R6P(SUM-3)/AA(15F) battery (x 2)
• AC power cord (x 1)
• Remote Control Unit (x 1)
• AV compulink cable (x 1)
2

Introduction
Notes on handling
Installation of the unit
•Select a place which is level, dry and neither too hot
nor too cold (between 5°C and 35°C, 41°F and 95°F).
• Leave sufficient distance between the unit and the TV.
• Do not use the unit in a place subject to vibrations.
Power cord
• Do not handle the power cord with wet hands!
• A small amount of power (2.7 W) is always consumed
while the power cord is connected to the wall outlet.
•When unplugging the unit from the wall outlet, always
pull the plug, not the power cord.
To prevent malfunction of the unit
• There are no user-serviceable parts inside. If anything
goes wrong, unplug the power cord and consult your
dealer.
• Do not insert any metallic object into the unit.
• Do not use any non-standard shape disc available on
the market, because it may damage the unit.
• Do not use a disc with tape, seals, or paste on it,
because damage to the unit may result.
Note about copyright laws
• Please check the copyright laws in your country before
recording from DVD AUDIO, DVD VIDEO, SVCD, Video
CD, Audio CD, MP3 and JPEG discs. Recording of
copyrighted material may infringe copyright laws.
Note about the copyguard system
• The DVD VIDEO disc is protected by the copyguard
system. When you connect the unit to your VCR (or
integrated TV/Video system), the copyguard system
activates and the picture may not be played back
correctly.
Avoid moisture, water and dust
Do not place the unit in moist or dusty places.
Avoid high temperatures
Do not expose the unit to direct sunlight or place it
nearby a heating device.
When you are away
When you are away on travel or otherwise for an
extended period of time, remove the plug from the wall
outlet.
Do not insert foreign objects into the unit
Do not insert wires, hairpins, coins, etc. into the unit.
Do not block the vents
Blocking the vents may damage the unit.
Care of the cabinet
When cleaning the unit, use a soft cloth and follow the
relevant instructions on the use of chemically-coated
cloths. Do not use benzene, thinner or other organic
solvents and disinfectants. These may cause
deformation or discoloring.
If water gets inside the unit
Turn off the power and remove the plug from the wall
outlet, then call the store where you made your
purchase. Using the unit in this state may cause a fire or
electrical shock.
This product incorporates copyright protection technology that is protected by method claims of certain U.S. patents
and other intellectual property rights owned by Macrovision Corporation and other rights owners. Use of this
copyright protection technology must be authorized by Macrovision Corporation, and is intended for home and
other limited viewing uses only unless otherwise authorized by Macrovision Corporation. Reverse engineering or
disassembly is prohibited.
Manufactured under license from Dolby Laboratories. "Dolby," "MLP Lossless" and the double-D symbol are
trademarks of Dolby Laboratories.
Confidential unpublished works.
Copyright 1992-1998 Dolby Laboratories. All rights reserved.
Manufactured under license from Digital Theater Systems, Inc. US Pat. No. 5,451,942, 5,956,674, 5,974,380,
5,978,762, and other world-wide patents issued and pending. "DTS " and "DTS Digital Surround" are registered
trademarks of Digital Theater Systems, Inc. Copyright 1996, 2000 Digital Theater Systems, Inc. All Rights Reserved.

Introduction
About discs
Playable disc types are as follows:
DVD AUDIO DVDVIDEO SVCD
Video CD AudioCD
VideoCDIID= ,
The DVD Logo is a trademark.
• CD-R and CD-RW discs recorded with the SVCD, Video
CD, Audio CD, MP3 or JPEG format can be played back,
though some may not be played back because of the
disc characteristics or recording conditions.
Note that unfinalized discs cannot be played back.
• DVD-R discs recorded with the DVD VIDEO format can
be played back, though some may not be played back
because of the disc characteristics or recording
conditions.
Note that unfinalized disc cannot be played back.
• DVD VIDEO players and DVD VIDEO discs have their
own Region Code numbers. This unit can play back
only DVD VIDEO discs whose Region Code numbers
include "1."
Examples of playable DVD VIDEO discs:
This unit accommodates the NTSC system, also can play
back discs recorded with PAL system whose Region
Code numbers include "1."
Note that the PAL video signal on disc is converted to an
NTSC signal and output.
There are some audio formats recorded on discs as
shown below.
Linear PCM
Uncompressed digital audio, the same format used on
CDs and most studio masters.
DVD AUDIO supports up to six channels at sample
rates of 48/96/192 kHz (also 44.1/88.2/176.4 kHz) and
sample sizes of 16/20/24 bits.
DVD VIDEO supports two channels at sampling rates
of 48/96 kHz and quantization of 16/20/24 bits.
Audio CD/Video CD is limited to two channels,
44.1 kHz at 16 bits.
Dolby Digital
A surround audio format configured with six
channels. Because the "LFE (Low-Frequency Effect for
sub-woofer, etc.)" channel, one of the six channels, is
an auxiliary channel, this format is called "5.1-channel
system."
Not all Dolby Digital discs contain six (5.1) channel
information.
DTS (Digital Theater Systems)
A surround audio format configured with six (5.1)
channels, which is the same as Dolby Digital. Because
the compression ratio is lower than Dolby Digital, it
provides wider dynamic range and better separation.
Not all DTS discs contain six (5.1) channel
information.
MLP (Meridian Lossless Packing)
A format for DVD AUDIO with the compression ratio
of about 2:1 while allowing the PCM signal to be
completely recreated by the MLP decoder (required in
all DVD AUDIO players). It supports up to 192kHz/24-
bit.
Non-playable disc types are as follows:
DVD-ROM, DVD-RAM, DVD-RW, DVD+RW, CD-ROM,
PHOTO CD, CD-EXTRA, CD-G, CD-TEXT, SACD,
MIX-MODE CD
• Playing back discs listed as "Non-playable discs"
above may generate noise and damage speakers.
• This unit can play back audio signals recorded in CD-G,
CD-EXTRA, CD-TEXT and MIX-MODE CD discs.
The associated indicator lights up in the display window
when playing back a disc.
Indicator* I Audio format
LPCM Linear PCM
DOLBYDIGITAL Dolby Digital
DTS DTS (Digital Theater Systems)
* When playing back a DVD AUDIO disc recorded by
MLP (Meridian Lossless Packing; a Iossless audio
compression system that can completely recreate the
PCM signal), no indicator lights up in the display
window.
Note that, with some formats and/or depending on the
unit's "DIGITAL AUDIO OUTPUT" setting, digital audio
signals are not always output from the unit's DIGITAL
OUT jacks as are recorded on the disc.
See "DIGITAL AUDIO OUTPUT" on page 64 for details.
4

Introduction
(For DVD AUDIO)
A DVD AUDIO disc is comprised of "groups," and each
group is comprised of "tracks." Some DVD AUDIO discs
also contain a "bonus group" that can be played back by
entering the "key number" (a kind of password). Usually
the contents of a "bonus group" are not opened to the
public. Note that most DVD AUDIO discs include other
information in addition to audio, such as still pictures,
movies and text.
Group 1
I, ,11-oroup
ITrackllTrack21Track l!rack£1==,= =,= _ack,=ll_ack_21_ack3,_ . _ .
(For DVD VIDEO)
A DVD VIDEO disc is comprised of "titles" and each title
may be divided into some "chapters." For example, if a
DVD VIDEO disc contains some movies, each movie may
have its own title number, and each movie may be
divided into some chapters. In a DVD VIDEO KARAOKE
disc, each song usually has its own title number and
does not have chapters.
I, it,e, '11" it,e"1
IChapterlIChapter lChapter lIChapterJIChapter l
(For SVCD/Video CD/Audio CD)
An SVCD, Video CD or Audio CD is simply comprised of
"tracks."
I"Track1 -'-_1" Track2 _1" Track3_l" Track4I-I- -I-
What is Playback Control (PBC) function?
The Playback Control function, allows you to enjoy
menu-driven operation and high-resolution still images
which have a resolution four times greater than moving
pictures.
•High-resolution still image display
You can display high-quality images four times
clearer than moving pictures.
Menu-driven playback
A selection menu is displayed when you start
playing an SVCD and Video CD disc with the
Playback Control feature. The selection menu
shows a list of numbers for selection. Some discs
may show moving pictures or a divided screen.
You can interact with the screen using a menu
display to select and play an entry.
See example illustration below about basic feature
of menu-driven playback (for details about PBC, see
also page 30).
Menu
screen
Press Press Press
RETURN. RETURN. RETURN.
1Moving
How to handle discs
When handling a disc, do not touch the surface of the
disc. Since discs are made of plastic, they are easily
damaged. If a disc gets dirty, dusty, scratched or warped,
the images and sound will not be picked up correctly,
and such a disc may cause the player to malfunction.
Label side
Do not damage the label side, stick paper to or use any
adhesive on its surface.
Storage
Make sure that discs are kept in their cases. If discs are
piled on top of one another without their protective
cases, they can be damaged. Do not put discs in a
location where they may be exposed to direct sunlight,
or in aplace where the humidity or temperature is high.
Avoid leaving discs in your car!
Maintenance of discs
If there are fingerprints or other dirt adhering to a disc,
wipe with a soft dry cloth, moving from the center
outwards.
If a disc is difficult to clean, wipe with a cloth moistened
with water. Never use record cleaners, petrol, alcohol or
any anti-static agents.
CAUTION
Sometimes during play images may be garbled or
noisy. This is sometimes due to the disc.

Connections
*Before using the unit, you have to connect the unit to a TV and/or amplifier.
•Do not connect the AC power cord until all other connections have been made.
•Connect VIDEO OUT of the unit directly to the video input of your TV. Connecting VIDEO OUT of the unit to a TV via a
VCR may cause a monitor problem when playing back a copy-protected disc, You may also have a monitor problem
when connecting the unit to an integrated W/Video system, TV
The unit
Connect directly I
NOTES
•In the following description, "TV" may be substituted with "monitor" or "projector."
•Terminal names used for other components may be different from those used in the following description.
Connection to a conventional TV
You can enjoy playback by simply connecting the unit to a TV.
Connect the unit to a TV equipped with stereo audio input and video input jacks using the supplied audio/video cable.
The unit
RedL_ Yellow
White I
TV
• Yellow I_
Audio/video cable (supplied)
, °
Wh,teL__ I.,o._"°'°
Red I
Connection to a TV equipped with an S-video jack
If your TV has an S-VIDEO input, you can get better picture quality by connecting it with the S-VIDEO output of the unit
using the S-video cable instead of connecting the video input of the TV to the VIDEO jack of the unit.
The unit
Red_Whitt S-video cable (not supplied)
Audio cable (s_upplied)
TV
_S-VIDEO
WhiteI .1 1v'°'°
NOTES
•When the scanning mode is set to the Progressive mode, you cannot see any picture using these connections above. To see the
picture using the Progressive mode, see pages 7, 8.
•Set "ANALOG OUT" in the "AUDIO" preferencedisplayto "2-CH STEREO"(see page65).
6

Getting started
Connection to a TV equipped with component jacks
You can enjoy high picture quality by connecting the unit's COMPONENT VIDEO OUT jacks to the COMPONENT VIDEO IN
jacks of your TV with the video cables.
Green _ Red
Red White
The unit Component video cable (supplied)
Audio cable (supplied)
•Connect "Y" to "Y," "PB" to "PB"(CB), "PR" to "PR"(CR) correctly.
Blue
TV Green_- -_Red
White vloEo
Red I
The unit supports the Progressive scanning system as well as the conventional Interlaced scanning system.
If your television or monitor equipped with component jacks support the progressive video input, you can enjoy a high
quality picture by making the Progressive scanning mode active.
NOTES
•When the scanning mode is set to the Progressive mode, the PROGRESSIVE indicator on the front panel is lit. The color of the
indicator differs depending on the "PROGRESSIVE MODE" setting on the "PICTURE" preference display and the status of the
unit (see pages 8 and 63).
•When connecting to a TV using the VIDEO or S-VIDEO jack, make sure that the PROGRESSIVE indicator on the front panel is
not lit. If it is lit, the VIDEO and S-VIDEO outputs do not feed the correct signals. To turn off the PROGRESSIVE indicator, make
the Progressive scanning mode inactive by following the procedure described on page 8.
•When the component video input jacks on the TV is of the BNC type, use an adapter to convert a pin jack to a BNC jack
(optional).
•Set "ANALOG OUT" in the "AUDIO" preference display to "2-CH STEREO" (see page 65).
•If your TV has a monaural audio input instead of stereo, you need to use an optional audio cable which converts stereo audio
output to monaural.
•To improve audio sound quality, connect the AUDIO OUT jacks to your separate audio equipment (see pages 9, 10).
•If your TV has an AV COMPU LINK terminal, you can use the AV COMPU LINK function. See "AV COMPU LINK remote control
system" on page 75 for details.
About SCANNING MODE
To display video on the television (monitor) screen, the conventional scanning method is called "Interlaced scanning."
With this method, only half of the horizontal lines are displayed at a time. So two fields complete a single picture
(frame); i.e., the first field, containing all the odd-numbered lines, is displayed followed by the second field, containing
all the even-numbered lines.
On the other hand, the Progressive scanning system scans all horizontal lines at a time, so you can double the number
of pictures compared with the interlaced scanning, resulting in flicker-free, high-density picture.
To enjoy the progressive scanned video, a monitor (or TV or projector) to be connected to the unit must have the
Progressive inputs.
Depending on the material source format, DVD VIDEO discs can be classified into two types; film source and video
source (note that some DVD VIDEO discs contain both film source and video source). Film sources are recorded as 24-
frame-per-second information, while (NTSC) video sources are recorded as 30-frame-per-second (60-field-per-second
interlaced) information.
When the unit plays back a film source material, uninterlaced progressive output signals are created using the original
information. When a video source material is played back, the unit interleaves lines between the interlaced lines on
each to create the interpolated picture and outputs as the progressive signal.

Getting started
To make the Progressive scanning mode selection active
The unit supports the Progressive scanning system as well as the conventional Interlaced scanning system. If your television
or monitor supports the progressive video input, you can enjoy a high quality picture by making the Progressive scanning
mode active.
I
PROGRESSIVE indicator
!
II
C__3c3.3c_3
Tv4 _w ,w
C_.3 C_3 _.3
Tv, _w ,w
C_3C_3C_3
-- VFP - PROGRESSIVE SCAN
Press and hold down VFP - PROGRESSIVESCANfor a few seconds.
The scanning mode switches between the Progressive scanning and Interlaced scanning modes.
•When the scanning mode is set to the Progressive mode, the PROGRESSIVE indicator on the front panel is lit.
Depending on the "PROGRESSIVE MODE" setting on the "PICTURE" preference display and whether the current
DVD VIDEO disc is film-source or video-source, the color of the indicator differs, as shown in the table below
(see also pages 7 and 63).
PROGRESSIVE MODE
VIDEO
FILM
AUTO
Red Red
Green Green
Green Red
While stopped in the Progressive scanning
mode, the PROGRESSIVE indicator is lit in red
regardless of the "PROGRESSIVE MODE"
selection.
NOTES
•There are some progressive TV and High-Definition TV sets that are not fully compatible with the unit, resulting in the
unnatural picture when playing back a DVDVIDEO discin the Progressivescanning mode. In sucha case,usethe Interlaced
scanning mode. Tocheckthe compatibility of yourTV set, contact your localJVC customer service center.
•All JVC progressiveTV and High-Definition TV sets arefully compatible with the unit (Example :AV-61S902).
8

Getting started
You can enjoy high-quality audio by connecting the unit's audio output to your amplifier or receiver.
Connect the unit's AUDIO OUT (FRONT LEFT/FRONT RIGHT) jacks to any line-level inputs (such as AUX, DVD, CD, etc.) of
an audio amplifier or receiver.
The unit
._White
Red _[ Audio cable (supplied)
Amplifier or receiver
White I.
Red [-
NOTES
•When using the unit with a stereo amplifier or receiver, set "ANALOG OUT" in the "AUDIO" preference display to "2-OH
STEREO" (see page 65).
•If your stereoamplifier or receiverhasan AV COMPU LINK terminal, you can usethe AV COMPU LINKfunction. See "AV
COMPU LINKremote control system" on page75 for details
The unit supports the linear PCM multichannel format of DVD AUDIO and can feed multichannel audio output signals
from the six analog AUDIO OUT jacks.
It is also equipped with the DTS and Dolby digital decoders. So you can enjoy any type of the high quality surround
sounds by connecting the unit to an amplifier/receiver equipped with the 5.1-channel inputs.
Connect the unit's analog AUDIO OUT jacks to the analog 5.1-channel inputs of an amplifier or receiver using the
supplied audio cables.
The unit
Amplifier or receiver
l; ,udio videoI
cable
(supplied) Yellow Red
,J White
Audio cable Red
(supplied) White _
Audio cable Red
(supplied)
FRONT AUDIO IN
LEFT
RIGHT
REAR
LEFT
RIGHT
CENTER
SUBWOOFER
• Be sure to connect correctly between corresponding terminals. The order of the 5.1-channel terminals depend on units.
NOTE
•When using the 5.1-channel outputs of the unit, set the "ANALOG OUT" in the "AUDIO" preference display to "MULTI
CHANNEL" (see page65). If you select"EXPERT" in the "SPK.SETTING" preferencedisplay,you cancontrol the audio output
balance ofthe speakers (see page 66).

Getting started
You can enhance the sound quality by connecting either of the unit's DIGITAL OUT jacks to the digital input of an
amplifier, etc. by using an optical or a coaxial digital cable (optional). The digital audio signal from a disc is directly
transferred. If you connect the unit to a Dolby Digital or DTS decoder or an amplifier with a built-in decoder by using an
optional digital cable, you can enjoy high-quality surround sound.
For digital connection, connect the unit's DIGITAL OUT (OPTICAL or COAXIAL) to the digital input of digital audio device
using an optical or a coaxial digital cable.
The unit
PC_JSTREAI
The OPTICAL jack is protected by the hinged cover.
To connect the optical cable to the jack, press the cover with the plug and connect it
to the jack inside in the correct direction.
Coaxial digital cable (not supplied)
!
Optical digital cable (not supplied) Digital equipment
WhiteAudio cable (supplied)
J.
Red
Note that the DIGITAL OUT jacks on the unit have been designed and equipped exclusively for enjoying the digital
surround sound playback through the unit. It is not recommended to use the jacks for digital dubbing. When recording
the sounds (DVD AUDIO, DVD VIDEO, SVCD, Video CD, or Audio CD) played back on the unit, record them through the
analog jacks (in this case, set "ANALOG OUT" in the "AUDIO" preference display to "2-CH STEREO") (see page 65).
NOTES
•When youconnectthe unit's DIGITALOUT to adigital audio device, before using, set "DIGITALAUDIO OUTPUT" in the
"AUDIO" preferencedisplay correctlyaccordingto the connectedaudio device. If "DIGITAL AUDIO OUTPUT" isnotset correctly,
loud noisemay be generated from speakers, causing damage to them. See "DIGITALAUDIO OUTPUT" on page64.
•When you connectthe unit's DIGITALOUT to a Dolby Digital or DTS decoder (or amplifier with a built-in decoder) to enjoy
surround sound,the unit's "D. RANGECOMPRESSION" setting in the "AUDIO" preferencedisplay is invalid.Make appropriate
surround audio settings on the decoder.
•If your digital audio device hasan AV COMPU LINKterminal, you canusethe AV COMPU LINKfunction. See "AV COMPU LINK
remote control system" on page75 for details.
10

Getting started
When all the audio/video connections have been made, insert the smaller plug of the supplied AC power cord to the
unit's _ AC IN connector, then insert the other end to the wall outlet. Make sure that plugs are inserted firmly. The
STANDBY/ON indicator lights in red.
Note that the shape of the smaller plug of the AC power cord is not perfectly symmetrical as illustrated below.
Warning
• Disconnect the power cord if you are not going to use the unit for a long time.
• Disconnect the power cord before cleaning the unit.
• Disconnect the power cord before moving the unit.
• Do not connect or disconnect the power cord with wet hands.
• Do not pull the power cord when disconnecting it, as this may damage the cord and cause fire, electric shock, or other
accidents.
_Caution
• Do not alter, twist or pull the power cord, or put anything heavy on it, which may cause fire, electric shock, or other
accidents.
• To prevent any accidents or damage caused by an unsuitable AC power cord, only use the supplied power cord. If the
cord is damaged, contact a dealer and get another power cord.
11

Getting started
Using the remote control unit
Using the remote control unit, you can operate not only all the functions of the unit but also basic functions of your TV
and amplifier/receiver.
The battery compartment is located on the back of the
remote control unit.
1Press down on the point shown by
the arrow at the top of the
compartment cover, and pull up
the cover to open the
compartment.
f
2Place the two supplied R6P (SUM-
3)/AA(15F) batteries in the remote
control unit according to the
polarity markings ('+" and "-")
inside the compartment and on the
batteries.
3Place the cover over the
compartment, and press down
lightly.
The batteries will last about six months with normal use.
If the functions of the remote control unit become erratic,
replace the batteries. See below for more information.
Precautions for the safe use of batteries
Observe the following precautions for the safe use of
batteries. If they are used improperly their lives will be
shortened, they may burst or their contents may leak.
Precaution
•Remove the batteries from the remote control unit if
it is not going to be used for a long period of time.
•Remove dead batteries and dispose of them
properly.
•Never leave dead batteries lying around, take them
apart, mix them with other refuse, or throw them
into an incinerator.
•Never touch liquid that has leaked out of a battery.
•Do not mix new and old batteries, or batteries of
different types, when replacing them.
•Operate the remote control unit while pointing it
toward the remote sensor on the unit.
• The remote control unit can be used within a range of
about 5 meters from the remote sensor. If you operate
the remote control unit from a diagonal position,
controllable distance may be shorter.
Remote sensor
1
_z .....
i i I I L_
C_3 C&3 C_3
C!3 _ _L3
C2J C_3 C_3
•If the remote sensor on the unit is exposed to the
sunshine or strong light, you may not be able to control
the unit from the remote control unit.
12

Getting started
You can operate your TV from the remote control unit.
Setting the remote control signal for
operating your TV
TV STANDBY/ON_
O/I
ENTER --
_J cz_
_zJ
JVC
TV - DVD switch
-- Numeric buttons
-- TV/VIDEO -
CANCEL
1Set the TV - DVD switch to "TV."
2Hold down TV/VIDEO - CANCEL until step 4 is done.
3Enter the manufacturer code of your TV listed below
by using the numeric buttons (0 to 9).
Example for a JVC TV:
To enter the manufacturer code "01 ": Press "0" then
" 1."
4Press ENTER.
Manufacturer code list
Manufacturer
AIWA
BEIJING
CCE
CHANGHONG
DAEWOO
FERGUSON
FINLUX
FUNAI
GRADIENTE
GRUNDIG
HITACHI
ITT
JINXING
JVC
KONKA
LG (GOLDSTAR)
MAGNAVOX
MITSUBISHI
No'..............
36
22
02
34
17,37
27
30
32
15, 20
19
lO
28
38
01, 23,
24, 25
4O
18
O2
03
Manufacturer
MIVAR
NEC
NOBLEX
NOKIA
PANASONIC
PEONY
PHILCO
PHILIPS
RCA
SAMSUNG
SANYO
SEARS
SHARP
SONY
TCL
THOMSON
TOSHIBA
ZENITH
29
20
22
31
04,11
34, 38, 39
10, 17, 21
02
05
12, 33, 34,
35
13, 16
13
O6
O7
41
26
08,14
09
5 Release TV/VIDEO - CANCEL.
6Try to operate the TV by pressing
TV STANDBY/ON 0/I.
If your TV turns on or off, you have successfully set
the control signal.
The following buttons can be used for operating the
TV.
To use A/_' (CH+, CH-), </I_(VOL-, VOL+), TV/VlDEO -
CANCEL and numeric buttons for TV control, set the
TV - DVD switch to "TV."
TVMDEO
CANCEL
Turns the TV on or off.
Switches the TV input mode between TV
and VIDEO.
Selects the TV channels directly.
*For some TVs, pressing "+10" functions
as the "100+," while "10" functions as
the ENTER button if your TV requires
pressing the ENTER button after
selecting a channel number.
Mutes the TV sound.MUT]NG
Changes the TV channels.
VOL- VOL+
_Adjusts the TV volume.
NOTE
• If there is more than one code listed for the
manufacturer code of your TV, try them one by one until
you succeed.
You can control the volume of a JVC's amplifier or
receiver by using the AMP VOL +/- buttons on the
remote control unit.
--AMPVOL
+/-
Pressing the + button raises the audio volume of the
amplifier or receiver, while pressing the - button lowers
the volume.
13

In the following description, we assume that the buttons on the remote control unit are mainly used, however, you may
use the corresponding buttons on the front panel if available.
NOTE Make sure that the TV - DVD switch on the remote control unit is setto "DVD" when using the A/_'/
_/_ and numeric buttons for controlling the unit.
Before operation
Press DVD STANDBY/ON _)/I on the remote control unit or press STANDBY/ON (b/I on the front panel.
When the unit turns on, the STANDBY/ON indicator on the front panel, which illuminates in red during standby, lights in
green and each DISC indicator (1 to 7) shows the current status of whether a disc is set or not in the corresponding disc
tray.
C_3 C_3 C/.3
TV, _V8 ,W
cz_) _ cz3
5d _4 5d
DVD
STANDBY/ON (.b/I
STA NDBY/O N
(b/I
STANDBY/ON indicator
I_ _ 5 '_' 5 '6 _ 5
i i iI
• The first time you turn on the unit after connecting the power cord, the DISC 1 to 7 indicators are illuminated until the unit detects
that no disc is set in the corresponding disc tray. Once detecting the status, the unit memorizes it unless you unplug the power
cord, so the DISC 1 to 7 indicators show the status of corresponding disc trays correctly.
• You can turn on the unit by pressing the I_ button. In this case, the behavior of the unit after pressing the I_ button is the same as
pressing this button while the power is on.
• When any disc is on the disc tray, you can turn on the unit using the DISC 1 to 7 buttons corresponding to the loaded disc number.
The behavior of the unit after pressing these buttons is the same as pressing them while the power is on.
• You can turn on the unit by pressing the __OPEN/CLOSE button on the front panel. In this case, the disc tray carousel opens.
The opening display shown right appears on the TV screen.
The following message may appear at the bottom of the opening display
depending on the condition.
•NOW READING:The unit is reading the disc information.
• REGION CODE ERROR!:
The region code of the DVD VIDEO disc does not
match the unit. The disc cannot be played back.
• OPEN: The disc tray carousel is opening.
• CLOSE: The disc tray carousel is closing.
• NO DISC: No disc is loaded.
• RESUME STOP: The resume mode is set to "DISC RESUME."
Message area
NOTE
•Even if you press DVD STANDBY/ON _/I on the remote control unit or STANDBY/ON _/I on the front panel to turn off the unit,
the unit is not disconnected from the AC power source as long as it is connected to the wall outlet. This state is called the
standby mode. In this state, the unit consumes a very small amount of power.
14

Basic operations
We recommend you to set the display language, TV monitor type, analog audio output and digital output before using
the unit, depending on circumstances, by following the procedure below.
See "Changing the initial settings" on and after page 60 for details about each setting item.
ENTER
CHOICE --
1 Pressand hold down CHOICEfor afew
seconds to bring up the first page of the DVD
PLAYERSET UPdisplay.
The pull-down menu of the "ON SCREEN
LANGUAGE" is already open.
2
3
I M_u_GU_GE
t................... I I
ON SCREEN LANGUAGE selection
Use A/v to select a desired language.
You can select the on-screen language for the
preference displays, etc. from among English,
Spanish and French.
Press ENTER.
The second page is shown, in which the pull-down
menu of the "MONITOR TYPE" is already open.
0vDPLAYERSETU_
MONITOR TYPE selection
,v, Tv, _v,
C_3 C_3 C!3
,w Tv_ _v_
CZ_3 C__3 C__3
4
5
6
-- A/V
Use A/v to select a desired monitor type.
You can select the monitor type according to your TV.
• For the normal (conventional) TV, select "4:3 LB"
or "4:3 PS."
• For the wide-screen TV, select "16:9 AUTO" or
"16:9 NORMAL."
See page 63 for details about each mode.
Press ENTER.
The third (final) page is shown, in which the pull-
down menu of the "ANALOG OUT" is already
open. 1
ANALOG OUT selection
Use A/v to select a desired analog output
signal type.
You must set this item correctly when you play back
a DVD VIDEO disc recorded with surround
multichannel audio.
• When connecting with a surround decoder, select
"2-CH DOLBY SURROUND."
• When connecting with a stereo amplifier/receiver
or television set, select "2-CH STEREO."
• When connecting the unit's 5.1 channel audio
outputs to an amplifier equipped with 5.1-channel
input, select "MULTI CHANNEL."
See page 65 for details.
15

Basic operations
7Press ENTER.
The pull-down menu of the "DIGITAL AUDIO
OUTPUT" appears.
8
9
Dr0
DIGITAL AUDIO OUTPUT selection
UseA/v to selecta desireddigital output
signaltype.
You must set this item correctly when you connect
the unit to an external surround decoder or D/A
convertor (including an amplifier/receiver with
built-in surround decoder or D/A convertor).
(If you do not connect the unit to such a device, you
do not have to set this item.)
•When connecting with a Dolby Digital decoder,
select "DOLBY DIGITAL/PCM."
• When connecting with a DTS or MPEG
Multichannel decoder, select "STREAM/PCM."
• When connecting with other digital devices,
select "PCM ONLY."
See page 64 for details.
PressENTER.
The TV screen returns to show the opening display.
NOTES
• This setting may not be necessary except when turning
on the power after purchasing the unit.
•You can also set these items, as well as other
preferences, by pressing CHOICE briefly to bring up the
preference display. See "Changing the initial settings"
on and after page 60 for details.
16

Basic operations
Basic playback
This section describes basic operations for playback of DVD AUDIO, DVD VIDEO, SVCD, Video CD and Audio CD discs.
For MP3 and JPEG disc playback, see the separate chapter on and after pages 51 and 55.
DISC SELECT --
OPEN/CLOSE --
i--
Tv4 T,,, ,w -- Numeric
buttons
,II
JYC
DISC 1-7 buttons/indicators
J
E's 's s 's 's_B f'
!
II
= ............
.... T
i
DiJsctray carousel
DVD AUDIO indicator
DISC SKIP
--AOPEN(CLOSE
L
_i II
EXCHANGE button/indicator
Up to 7 discs can be set on the disc tray carousel.
1 Press_A0PEN/CLOSEto openthe disc tray carousel.
You can access to two of seven trays.
• From the second time, the carousel opens with the previously played disc on the front-left tray.
2 PressDISCSKIPto selectaccessibletrays if required.
Each press of the button rotates the carousel clockwise by an amount for accessing the next two trays.
17

Basicoperations
3 Placeone or two discs in the disc tray(s). With the label side up
• To insert an 8-cm
disc, place it in the
inner recess.
4 Repeat steps 2 and 3 if you wish to set one or more discs to other disc trays.
5Press A 0PEN/CLOSE to close the carousel.
The carousel closes and the DISC 1 to 7 indicators corresponding to the loaded disc numbers are turned on.
The disc set in the front-left tray when the carousel closes is loaded for playback. If no disc is set in the front-left tray
when the carousel closes, the unit rotates the carousel clockwise until it finds a disc for loading.
The unit reads the disc information and the opening display appears on the TV screen (see page 14).
When a DVD AUDIO disc is loaded, the DVD AUDIO indicator lights in blue.
Ifa menu isshown on the TV screen
When inserting a DVD AUDIO, DVD VIDEO, SVCD, or Video CD disc, a menu display may be automatically shown on
the TV screen (see pages 30, 31). From a menu, you can select a desired item to be played back by following the
procedure below.
(for DVD AUDIO/DVD VIDEO)
1Use A/_'/_/_ to select a desired item.
2Press ENTER.
The unit starts playback of the selected item.
(for SVCD/Video CD)
Use the numeric buttons to select a desired item.
The unit starts playback of the selected item.
NOTES
•Do not load a non-playable disc.For details about playable and non-playable disc types, see page 4.
•When loading a discon the tray, be sureto position the discinside the recess.Otherwise, the disc may be damaged when the
carouselis closed,or the disc may not be removedfrom the unit.
•Do not use anystabilizer when playing back a disc.
•With some DVD VIDEO discs,the unit starts playbackautomatically after insertingthe disc.
•If you inserta DVD VIDEO discwhose region codedoes not matchthe unit, "REGION CODEERROR!" is shown in the opening
display.Fordetail about the region code, see page 4.
18
This manual suits for next models
1
Table of contents
Other JVC DVD Player manuals