Ambient Weather RC-8365 User manual

Version 1.0 ©Copyright 2018, Ambient LLC. All Rights Reserved. Page 1
Ambient Weather RC-8365 ClearView Radio Controlled
Projection Clock with Indoor and Outdoor Temperature
User Manual
Table of Contents
1. Introduction.....................................................................................................................................1
2. Warnings .........................................................................................................................................2
3. Getting Started ................................................................................................................................2
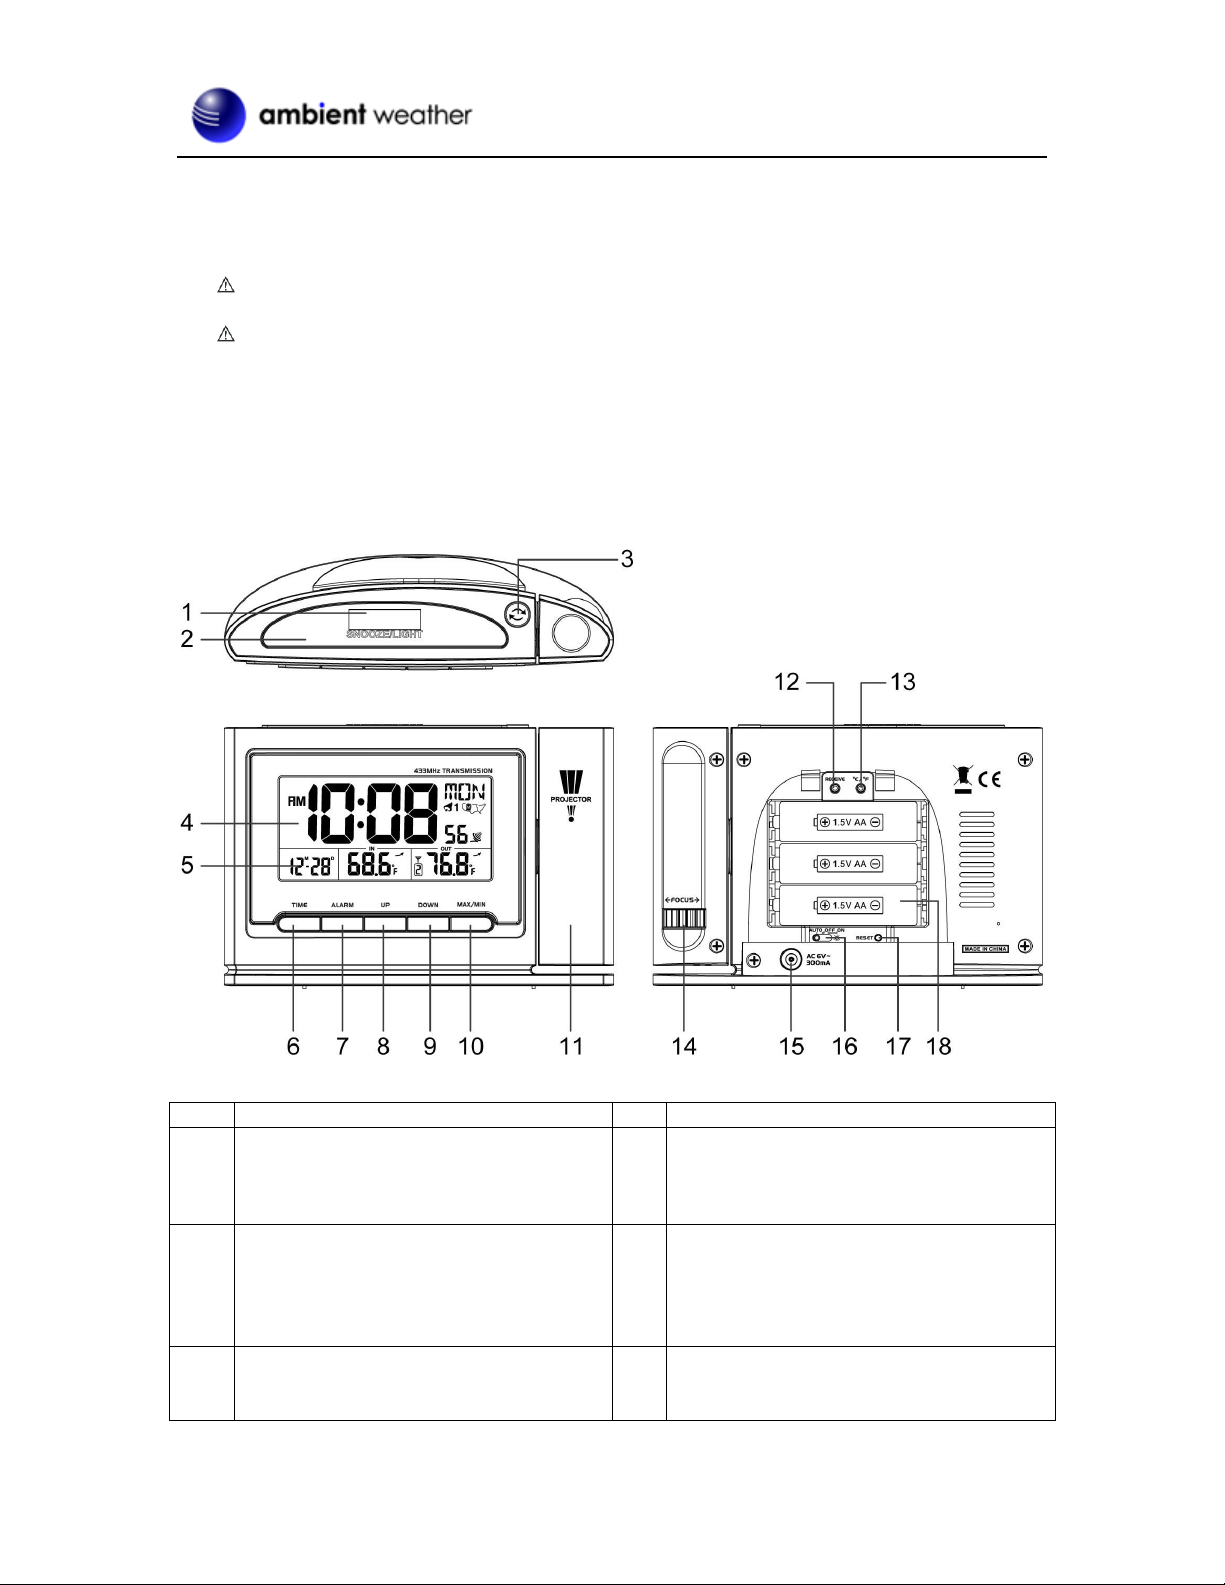
3.1 Product Features.....................................................................................................................2
3.1.1 Display Clock.....................................................................................................................2
3.2 Parts List.................................................................................................................................4
3.3 Powering Up...........................................................................................................................4
3.3.1 Radio Controlled Clock (RCC)..........................................................................................5
3.2 Siting the Wireless Transmitter Outside.................................................................................5
4. Clock Display..................................................................................................................................6
5. Settings............................................................................................................................................6
5.1 Set Time, Date, Time Zone, DST, and Language Settings.....................................................6
5.1.1 Daylight Savings Time.......................................................................................................7
5.2 Alarm Settings........................................................................................................................7
5.2.1 Using theAlarm and Snooze Functions.............................................................................7
5.2.2 Setting the Pre-Alarm.........................................................................................................8
5.3 Projector and Backlight..........................................................................................................8
5.3.1 Using the Projector and Backlight .....................................................................................8
5.3.2 Projector Backlight Rotation..............................................................................................8
5.3.3 Adjusting Backlight Focus.................................................................................................8
5.4 Console Low Battery Indictor................................................................................................8
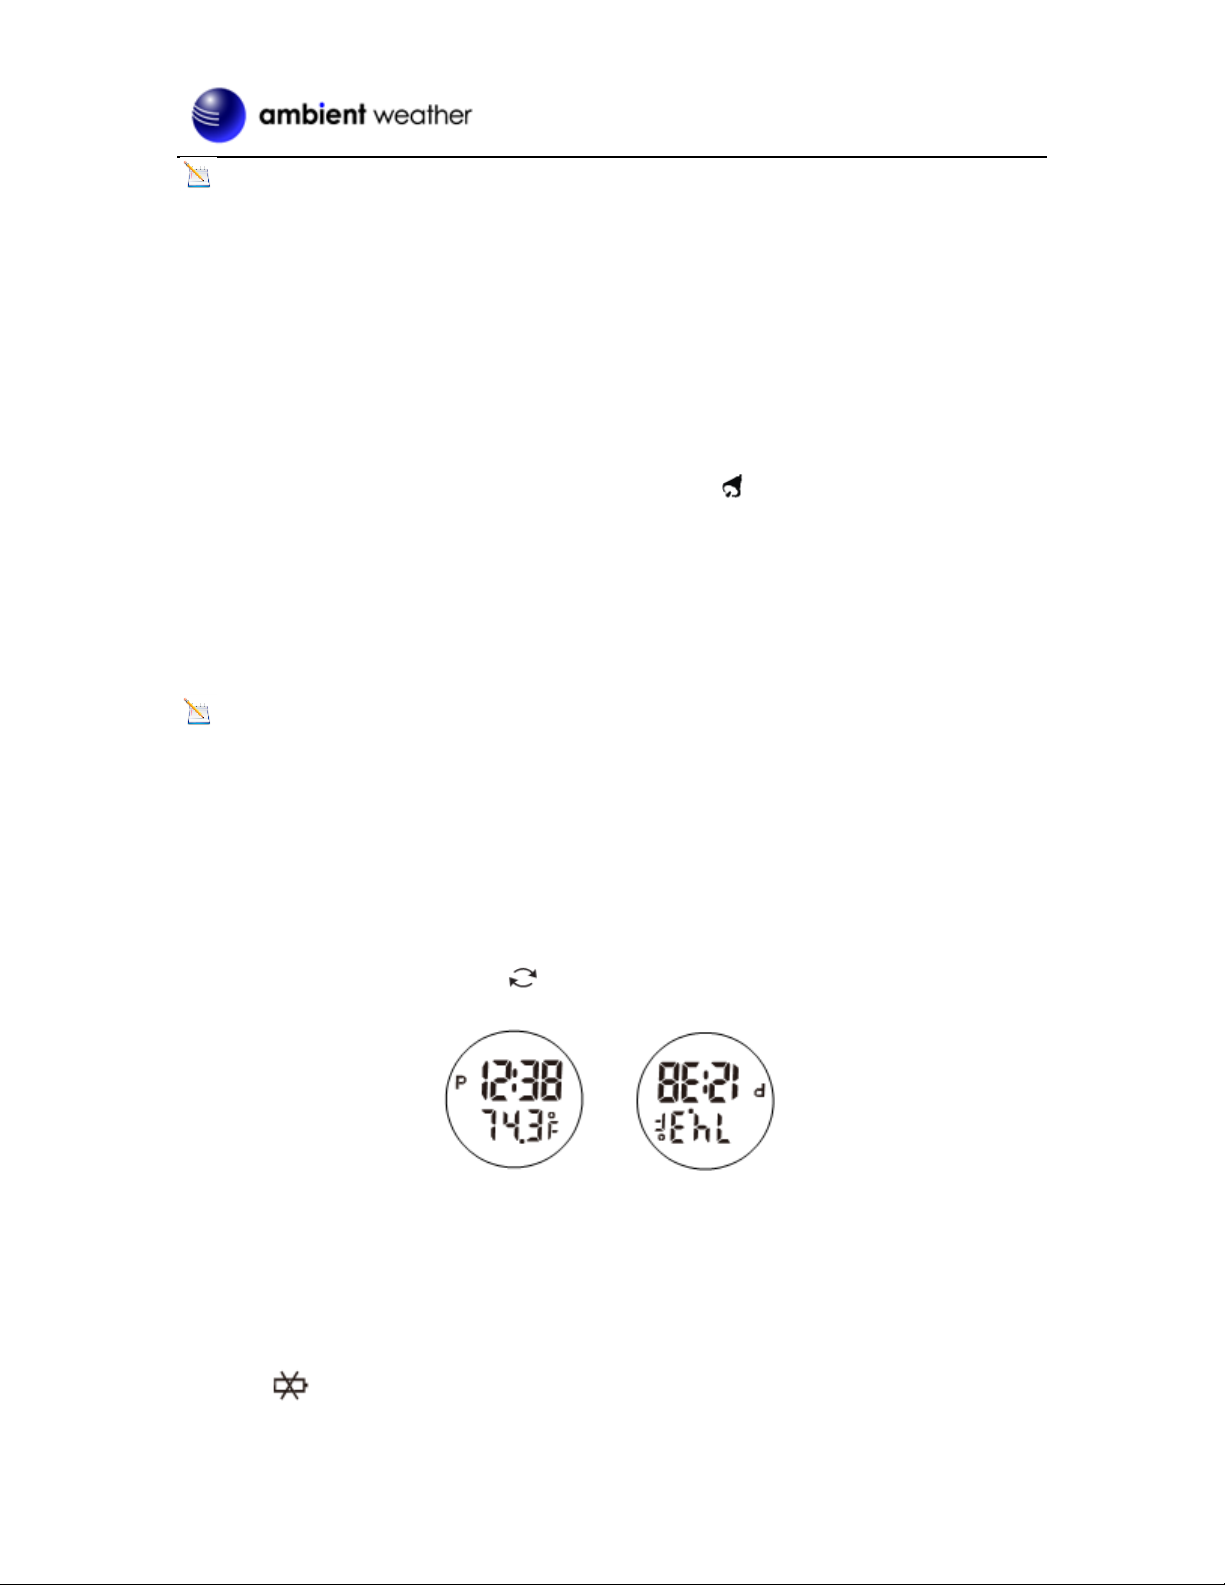
5.5 Wireless Sensor Display.........................................................................................................9
5.6 Wireless Sensor Low Battery Indictor....................................................................................9
5.7 Viewing the Wireless Sensor Channels..................................................................................9
5.8 Resyncing the Wireless Sensor...............................................................................................9
5.9 Adding Multiple Wireless Sensors.........................................................................................9
5.10 Min and Max Records............................................................................................................9
6. Specifications................................................................................................................................10
6.1 Wireless Specifications ........................................................................................................10
6.2 Measurement Specifications.................................................................................................10
6.2 Power Consumption....................................................................................................................10
7. Troubleshooting Guide.................................................................................................................. 11
8. Accessories ...................................................................................................................................12
9. Liability Disclaimer ......................................................................................................................12
10. FCC Statement..........................................................................................................................13
11. Warranty Information ...............................................................................................................13
1. Introduction
Thank you for your purchase of the Ambient Weather RC-8365 ClearView Projection Clock with

Version 1.0 ©Copyright 2018, Ambient LLC. All Rights Reserved. Page 2
Indoor and Outdoor Temperature. The following user guide provides step by step instructions for
installation, operation and troubleshooting.
2. Warnings
Warning. Never look directly into the time and temperature projector. This can cause
temporary blindness.
Warning. Only use approved AC adapter.
3. Getting Started
3.1Product Features
3.1.1 Display Clock
Figure 1
No
Description
No
Description
1
NIGHT LIGHT SENSOR
- The night light will turn on
automatically when dark and the feature
is activated.
10
MAX/MIN Button
Press to display the min and max values
since reset.
2
SNOOZE/LIGHT Button
- Turn on the projector and backlight for 5
seconds.
- Stop the current alarm when sounding
and enter into snooze mode.
11
PROJECTOR
- Projects the time and indoor/outdoor
temperature (automatically scrolls between
indoor and outdoor temperature every 5
seconds).
3
REVERSE Button
- Press to reverse the projected time and
temperature.
12
RECEIVE Button
- Press to immediately search for RCC
signal (most effective at night when there

Version 1.0 ©Copyright 2018, Ambient LLC. All Rights Reserved. Page 3
No
Description
No
Description
is less inteference).
4
TIME WINDOW
- Displays time and day of the week.
- Displays time zone
13
°F/°C Button
- Press to switch between °F and °C units
of measure.
5
DATEAND TEMPERATURE
WINDOW
- Displays indoor/outdoor temperature,
alarm time and the date
14
FOCUS Knob
-Adjust the focus of the projected time and
temperature.
6
TIME Button
- Press to switch between Month/Date and
alarm time mode.
- Press and hold for 2 seconds to enter
time set mode.
- In time set mode, press to step through
the different time and date settings.
15
DC POWER JACK
7
ALARM button
- In normal time display mode, press to
turn on/off ALM1 &ALM2.
- InALM1 / ALM2 mode, press to turn
on/off alarm and pre-alarm function.
- Press to stop the current alarm when the
alarm is ringing and turn off the alarm
and snooze function.
- In alarm time mode, press and hold for 2
seconds to enter alarm time setting mode.
- In alarm time setting mode, press to step
through the different time and date
settings.
16
BACKLIGHT [AUTO / OFF / ON] slide
switch
- Slide to “AUTO” to activate auto
night-light function.
- Slide to “OFF” to turn off auto night-light
function.
- Slide to “ON” to continuously display the
backlight (only if connected with the AC
adaptor).
8
UPButton
- In set mode, press to increase the values.
- In normal time display mode, press to
switch between Channels 1, 2 and 3.
17
RESET Button
- Press to reset all values to default values.
- In case of malfunction, the unit can be
reset.
9
DOWN Button
- In set mode, press to decrease the
values.
- In normal time mode, press to switch
between 12/24 hour format.
18
BATTERY COMPARTMENT
-Accommodates 3 xAA batteries (alkaline
recommended).

Version 1.0 ©Copyright 2018, Ambient LLC. All Rights Reserved. Page 4
Figure 2
No
Description
No
Description
1
Transmitter LED (flashes when the remote
is transmitting)
5
Wall hanger
2
Reset button (press reset to restart the
transmitter)
6
Battery cover
3
Transmitter channel (assign the transmitter
to 1,2 or 3, default = 1)
7
Table stand
4
2 x AA batteries
Note: The RC-8365 supports three wireless channels. If you have one sensor, leave the transmitter
channel at Channel 1. If you have more than one sensor, refer to Section 5.9.
3.2 Parts List
QTY
Item
1
Clock
Frame Dimensions (LxWxH): 5.25" Lx 1.5"D x 3.5"H
1
Wireless Transmitter (LxWxH): 4.0” L x 2.5” W x 1.5” D
1
UL Rated AC Adapter
1
User Manual
3.3 Powering Up
Note: The power up sequence must be performed in the order shown in this section (remote
transmitter FIRST, Display Clock SECOND) to avoid the Clock synchronization time out.
The Transmitter:
1. Remove the battery door on the back of the transmitter and insert 2 new AA batteries,
according to the polarity information marked on the battery compartment, and replace the
battery door, as shown in Figure 2. Place the transmitter about 5 feet from the clock.
The Clock:
1. Plug the AC adaptor into the DC jack of the clock.
2. Remove the battery door on the bottom of the clock and insert 3 new AA batteries, according
to the polarity information marked on the battery compartment, and replace the battery door.
3. Once the batteries are inserted, all of the LCD segments will light up briefly before entering
the sensor search mode.
4. The RCC clock will clock 2:00am and will attempt to synchronize with the RCC (good

Version 1.0 ©Copyright 2018, Ambient LLC. All Rights Reserved. Page 5
reception typically only occurs in the night due to solar and other interference during the day).
The clock will automatically search for the time signal at 2:00, 8:00, 14:00 (2pm) and 20:00
(8pm).
5. Once the wireless transmitter has synced up to the clock, you can place the sensor outside.
Note: If no display is present after powering up the clock, press the reset button on the back of the
clock with an open ended paper clip or sharp tool.
3.3.1 Radio Controlled Clock (RCC)
3.3.1.1 Note about RCC
The radio controlled time may take several days to set and usually occurs at night when there is no
solar or other interference. If it does set, but the time is off by increments of 1, 2 or 3 hours, the time
zone was not set properly (Reference Section 5.1).
Be patient. Wait at least one week before contacting Ambient Weather. The RCC is a shortwave signal
originating near Fort Collins, Colorado, and travels thousands of miles by bouncing off the ionosphere.
The signal is better at night due to solar interference during the daytime. The farther you are from
Colorado, the weaker the signal. Urban environments can also affect the signal strength.
3.1.1.2 RCC Operation
Eight seconds after power up, the clock begin radio controlled clock (RCC) reception and the RCC
search icon will turn on. The RCC will continue to search for six minutes. It will try again
every two hours.
RCC Icon
Description
RCC Icon
Description
No signal
Acceptable signal
Weak signal (flashes between
two icons). Cannot be
interpreted.
Excellent signal
Figure 3
If the time is incorrect by increments of an hour (time zone was not set properly), or does not change on
your radio controlled clock (RCC), please reference Section 7, Troubleshooting Guide.
3.2 Siting the Wireless Transmitter Outside
It is recommended you place the remote sensor in a shaded area.
Direct sunlight and radiant heat sources will result in inaccurate temperature readings. Although the
sensor is weatherproof, it is best to mount in a well-protected area, such as an eve. Do not place in
standing water or snow.
Wireless signals are impacted by distance, interference (other wireless devices, wireless phones,
wireless routers, TVs and computer monitors), and transmission barriers, such as walls. In general,
wireless signals will not penetrate solid metal and earth (down a hill, for example).

Version 1.0 ©Copyright 2018, Ambient LLC. All Rights Reserved. Page 6
The following is a table of reception loss vs. the transmission medium. Each “wall” or obstruction
decreases the transmission range by the factor shown below.
Medium
RF Signal Strength Reduction
Glass (untreated)
5-15%
Plastics
10-15%
Wood
10-40%
Brick
10-40%
Concrete
40-80%
Metal
90-100%
4. Clock Display
No
Description
No
Description
1
Time
7
Outdoor Temperature
2
Date or Alarm1 Time or Alarm2 Time
8
Outdoor Temperature Rising or Falling
3
Indoor Temperature
9
Radio Controlled Clock (RCC) Reception
4
Indoor Temperature Rising or Falling
10
Alarm 1 or Alarm 2
5
Channel Number (default = 1) and
Reception Icon (on when searching, flashes
when updates)
11
Time Zone
6
Outdoor Temperature Reception
12
Day of Week
Figure 4
5. Settings
5.1 Set Time, Date, Time Zone, DST, and Language Settings
While in normal time mode, perform the following operations to set date, time and language:

Version 1.0 ©Copyright 2018, Ambient LLC. All Rights Reserved. Page 7
Command
Mode
Settings
[TIME] + 2
seconds
Time Zone
The Time Zone Map will flash. Press the
UP key to select your time zone.
Note: There are four time zones to select
from: P=Pacific, M=Mountain, C=Central,
E=Eastern.
[TIME]
Year
Press [UP] to increase, [DOWN] to decrease.
[TIME]
Month
Press [UP] to increase, [DOWN] to decrease.
[TIME]
Day
Press [UP] to increase, [DOWN] to decrease.
[TIME]
DST (Daylight Savings Time)
Press [UP] to turn DST On or Off (Arizona only)
[TIME]
Hour
Press [UP] to increase, [DOWN] to decrease.
[TIME]
Minute
Press [UP] to increase, [DOWN] to decrease.
[TIME]
Second
Press [UP] to reset to 0.
[TIME]
Language
Press [UP] to change between GB (English), FR
(French), DE (German), ES (Spanish) and IT
(Italian).
[TIME]
Exit Time and Date Settings
[TIME] + 2 seconds means press and hold the TIME button for two seconds.
[TIME] means press but do not hold the TIME button.
Figure 5
5.1.1 Daylight Savings Time
The clock has been programmed to automatically switch when daylight saving time is in effect. Your
clock will display “DST”. If you live in Arizona, make sure you turn off the DST referenced in
Section 5.1.
5.2 Alarm Settings
While in normal time mode, press the TIME button once to set ALARM1. Press the TIME button
again to set ALARM2. Once ALARM1 or ALARM2 are displayed in the date field (see Figure 4, No.
10), perform the following:
Command
Mode
Settings
[ALARM] + 2
seconds
Enter Alarm Settings
Alarm Hour
Press [UP] to increase, [DOWN] to decrease.
[ALARM]
Alarm Minute
Press [UP] to increase, [DOWN] to decrease.
[ALARM]
Exit Alarm Settings
[ALARM] + 2 seconds means press and hold the ALARM button for two seconds.
[ALARM] means press but do not hold the ALARM button.
Figure 6
5.2.1 Using the Alarm and Snooze Functions
1. Set the alarm time as described in Section 5.2.
2. Press theALARM button once to turn onALARM1 1.
3. Press theALARM button again to turn on ALARM2 2.
4. Press theALARM button again to turn on 1 and 2.
5. Press theALARM button again to turn off 1 and 2.

Version 1.0 ©Copyright 2018, Ambient LLC. All Rights Reserved. Page 8
Note: Press the ALARM button to turn off the alarm. If no button is pressed during the alarm
period, the alarm will turn off automatically in two minutes. To temporarily silence the alarm, press
the SNOOZE/LIGHT button on the top of the clock. The alarm bell icon will keep flashing.
Once the snooze function is turned on, the 4-step crescendo alarm will sound every five minutes. Press
the ALARM button to silence the alarm.
5.2.2 Setting the Pre-Alarm
The purpose of the pre-alarm is to allow extra time for preparation when the temperature is below
26 °F (-3 °C). To set the pre-alarm:
1. Press the TIME button to display the ALARM1 or ALARM2 time.
2. Press theALARM button once to turn on the ALARM .
3. Press the ALARM button again to turn on the pre-alarm. The icon LO will appear next to the
alarm time.
4. Press theALARM button again to turn off both the alarm and pre-alarm.
5.3Projector and Backlight
5.3.1 Using the Projector and Backlight
Note: The projector and backlight are temporary when operating on batteries only, to save
battery life.
1. When the clock is powered by the battery. Press the SNOOZE/LIGHT button to turn on the
projector and backlight for 5 seconds.
2. When the clock is powered by the AC adapter, the projector is always on.
5.3.2 Projector Backlight Rotation
1. Press SNOOZE/LIGHT button to turn on the projector and backlight if currently off.
2. Press the REVERSE button to reverse the projected data 180 degrees.
Figure 7
5.3.3 Adjusting Backlight Focus
Adjust the focus of the projected data by rotating the focus knob on the projector.
5.4 Console Low Battery Indictor
When the battery is full, no battery icon will be displayed. When the battery is low, the low battery
indicator will be displayed. Replace with 3 new AA size batteries. Pay attention to the
polarity.

Version 1.0 ©Copyright 2018, Ambient LLC. All Rights Reserved. Page 9
5.5 Wireless Sensor Display
No
Description
No
Description
1
Low Battery Indicator
4
Temperature Channel Number
2
Temperature
5
Channel Number (default = 1) and
Reception Icon (on when searching, flashes
when updates)
3
Temperature Units of Measure (°F or °C)
Figure 8
5.6Wireless Sensor Low Battery Indictor
When the battery is full, no battery icon will be displayed. When the battery is low, the low battery
indicator will be displayed. Replace with 2 new AA size batteries. Pay attention to the
polarity.
5.7Viewing the Wireless Sensor Channels
In normal time mode, press the UP button to view wireless channels 1, 2 and 3.
To automatically scroll through channels 1, 2, and 3, press and hold the UP button for 2 seconds (the
beep will sound). The wireless channels will scroll on the screen every 5 seconds.
5.8 Resyncing the Wireless Sensor
If you lose synchronization from the remote wireless sensor for an extended period of time or you
replace the batteries in the wireless sensor, you may need to reset the console. To reset the console,
disconnect from AC power and remove the batteries for 10 seconds, then reinsert the batteries and
reconnectAC power. Alternately, you can press the reset button on the back of the console.
5.9Adding Multiple Wireless Sensors
If you introduce additional sensors into the system, you will need to reset the console.
1.Set the Channel number on the wireless sensor per Figure 2. Power down and up the
sensor after you have changed the channel number for the change to take effect.
2. Reset the console. To reset the console, disconnect from AC power and remove the
batteries for 10 seconds, then reinsert the batteries and reconnect AC power.
Alternately, you can press the reset button on the back of the console.
5.10 Min and Max Records
Select the appropriate channel to view the min and max records as outlined in 5.7.

Version 1.0 ©Copyright 2018, Ambient LLC. All Rights Reserved. Page 10
3.Press the MAX/MIN button once to view the maximum values:
4.Press the MAX/MIN button again to view the minimum values:
5. Press and hold the MAX/MIN button for three seconds (the console will beep) to
clear the min and max values.
6. Specifications
6.1 Wireless Specifications
Line of sight wireless transmission (in open air): 150 feet
Frequency: 433 MHz
Update Rate: 60 seconds
6.2 Measurement Specifications
The following table provides specifications for the measured parameters.
Measurement
Range
Accuracy
Resolution
Indoor Temperature
32 to 140 °F
± 2 °F
0.1 °F
Outdoor Temperature
-4 to 140 °F alkaline
batteries
-40 to 140 °F LiIon e2
Energizer batteries
± 2 °F
0.1 °F
6.2 Power Consumption
Clock: 3 x AAAlkaline batteries recommended.
Wireless Transmitter: 2 x AA Alkaline batteries recommended, LiIon e2 Energizer for cold
weather.

Version 1.0 ©Copyright 2018, Ambient LLC. All Rights Reserved. Page 11
7. Troubleshooting Guide
If your question is not answered here, you can contact us as follows:
1. Email Support: support@ambientweather.com
2. Live Chat Support: www.ambientweather.com/chat.html (M-F 8am to 4pm Arizona Time)
3. Technical Support: 480-346-3380 (M-F 8am to 4pm Arizona Time)
Problem
Solution
Radio controlled clock does not update.
Be patient. Wait at least one week before
contacting Ambient Weather. The RCC is a
shortwave signal originating near Fort Collins,
Colorado, and travels thousands of miles by
bouncing off the ionosphere. The signal is better
at night due to solar interference during the
daytime. The farther you are from Colorado, the
weaker the signal. Urban environments can also
affect the signal strength.
Locate the console at night near a window or
outer wall, and away from other radiating
sources, like wireless routers or TVs. This will
insure the best reception possible.
If running on battery power only, test and
replace the batteries in the clock if
required. Low batteries are often the cause for
weak reception.
Avoid placing the clock on a solid metal plate.
Avoid closed in areas. Closed in areas such as
airports, basements, or industrial buildings are
not recommended.
Press the reset button on the back of the clock.
The clock is off by increments of an hour.
Check your Time Zone Setting. Make sure your
time zone is set properly in the clock settings.

Version 1.0 ©Copyright 2018, Ambient LLC. All Rights Reserved. Page 12
Problem
Solution
The wireless sensor communication has
been lost or is intermittent or will not sync
up.
Make sure the transmitter is powered up and the
LED is flashing about once per minute. For cold
weather environments, install lithium batteries.If
the transmitter is not flashing, replace the
batteries.
Reset the console by disconnecting fromAC
power, removing one battery from the clock,
wait 10 seconds, and reinsert the battery.
The maximum line of sight communication
range is 150’. Move the sensor closer to the
clock.
If the sensor assembly is too close (less than
5-10’), move the sensor away from the clock.
Make sure the remote sensors are not
transmitting through solid metal (acts as an RF
shield), or earth barrier (down a hill).
Move the clock away from electrical noise
generating devices, such as computers, TVs and
other wireless transmitters or receivers.
Move the remote sensor to a higher location.
Move the remote sensor to a closer location.
Radio Frequency (RF) Sensors cannot transmit
through metal barriers (example, aluminum
siding) or multiple, thick walls.
The clock does not respond to commands.
Press the reset button on the back of the clock
with an open ended paper clip or sharp tool.
The projection is fuzzy
Adjust the focus setting.
8. Accessories
Accessory
Description
TX-8300
Additional wireless sensor.
9. Liability Disclaimer
Please help in the preservation of the environment and return used batteries to an authorized depot.
The electrical and electronic wastes contain hazardous substances. Disposal of electronic waste in
wild country and/or in unauthorized grounds strongly damages the environment.
Reading the “User manual” is highly recommended. The manufacturer and supplier cannot accept any
responsibility for any incorrect readings and any consequences that occur should an inaccurate reading
take place.
This product is designed for use in the home only as indication of weather conditions. This product is
not to be used for medical purposes or for public information.
The specifications of this product may change without prior notice.

Version 1.0 ©Copyright 2018, Ambient LLC. All Rights Reserved. Page 13
This product is not a toy. Keep out of the reach of children.
No part of this manual may be reproduced without written authorization of the manufacturer.
Ambient, LLC WILL NOT ASSUME LIABILITY FOR INCIDENTAL, CONSEQUENTIAL,
PUNITIVE, OR OTHER SIMILAR DAMAGES ASSOCIATED WITH THE OPERATION OR
MALFUNCTION OF THIS PRODUCT.
10.FCC Statement
Statement according to FCC part 15.19:
This device complies with part 15 of the FCC rules. Operation is subject to the following two
conditions:
1. This device may not cause harmful interference.
2. This device must accept any interference received, including interference that may cause
undesired operation.
Statement according to FCC part 15.21:
Modifications not expressly approved by this company could void the user's authority to operate the
equipment.
Statement according to FCC part 15.105:
NOTE: This equipment has been tested and found to comply with the limits for a Class B digital
device, pursuant to Part 15 of the FCC Rules. These limits are designed to provide reasonable
protection against harmful interference in a residential installation. This equipment generates, uses and
can radiate radio frequency energy and, if not installed and used in accordance with the instructions,
may cause harmful interference to radio communications.
However, there is no guarantee that interference will not occur in a particular installation. If this
equipment does cause harmful interference to radio or television reception, which can be determined
by turning the equipment off and on, the user is encouraged to try to correct the interference by one or
more of the following measures:
•Reorient or relocate the receiving antenna.
•Increase the separation between the equipment and receiver.
•Connect the equipment into an outlet on a circuit different from that to which the receiver is
connected.
•Consult the dealer or an experienced radio/TV technician for help.
11. Warranty Information
Ambient, LLC provides a 1-year limited warranty on this product against manufacturing defects in
materials and workmanship.
This limited warranty begins on the original date of purchase, is valid only on products purchased and
only to the original purchaser of this product. To receive warranty service, the purchaser must contact
Ambient, LLC for problem determination and service procedures.
Warranty service can only be performed by a Ambient, LLC. The original dated bill of sale must be
presented upon request as proof of purchase toAmbient, LLC.
Your Ambient, LLC warranty covers all defects in material and workmanship with the following
specified exceptions: (1) damage caused by accident, unreasonable use or neglect (lack of reasonable
and necessary maintenance); (2) damage resulting from failure to follow instructions contained in your
owner’s manual; (3) damage resulting from the performance of repairs or alterations by someone other

Version 1.0 ©Copyright 2018, Ambient LLC. All Rights Reserved. Page 14
than an authorized Ambient, LLC authorized service center; (4) units used for other than home use (5)
applications and uses that this product was not intended (6) the products inability to receive a signal
due to any source of interference or metal obstructions and (7) extreme acts of nature, such as
lightning strikes or floods.
This warranty covers only actual defects within the product itself, and does not cover the cost of
installation or removal from a fixed installation, normal set-up or adjustments, claims based on
misrepresentation by the seller or performance variations resulting from installation-related
circumstances.
Table of contents
Other Ambient Weather Clock Radio manuals