Amcrest IP8M-2454EW User manual

Amcrest IP8M-2454EW/ IP8M-2454EB
8MP UltraHD 4K Motorized Lens Camera
User Manual
Version 1.0.4
Revised December 20th, 2018

2
Contents
Welcome ...........................................................................................................................................................................3
Important Security Warning..............................................................................................................................................3
Important Safeguards and Warnings.................................................................................................................................3
1 Features and Specifications............................................................................................................................................4
1.1 Overview...................................................................................................................................................................4
1.2 Features ....................................................................................................................................................................4
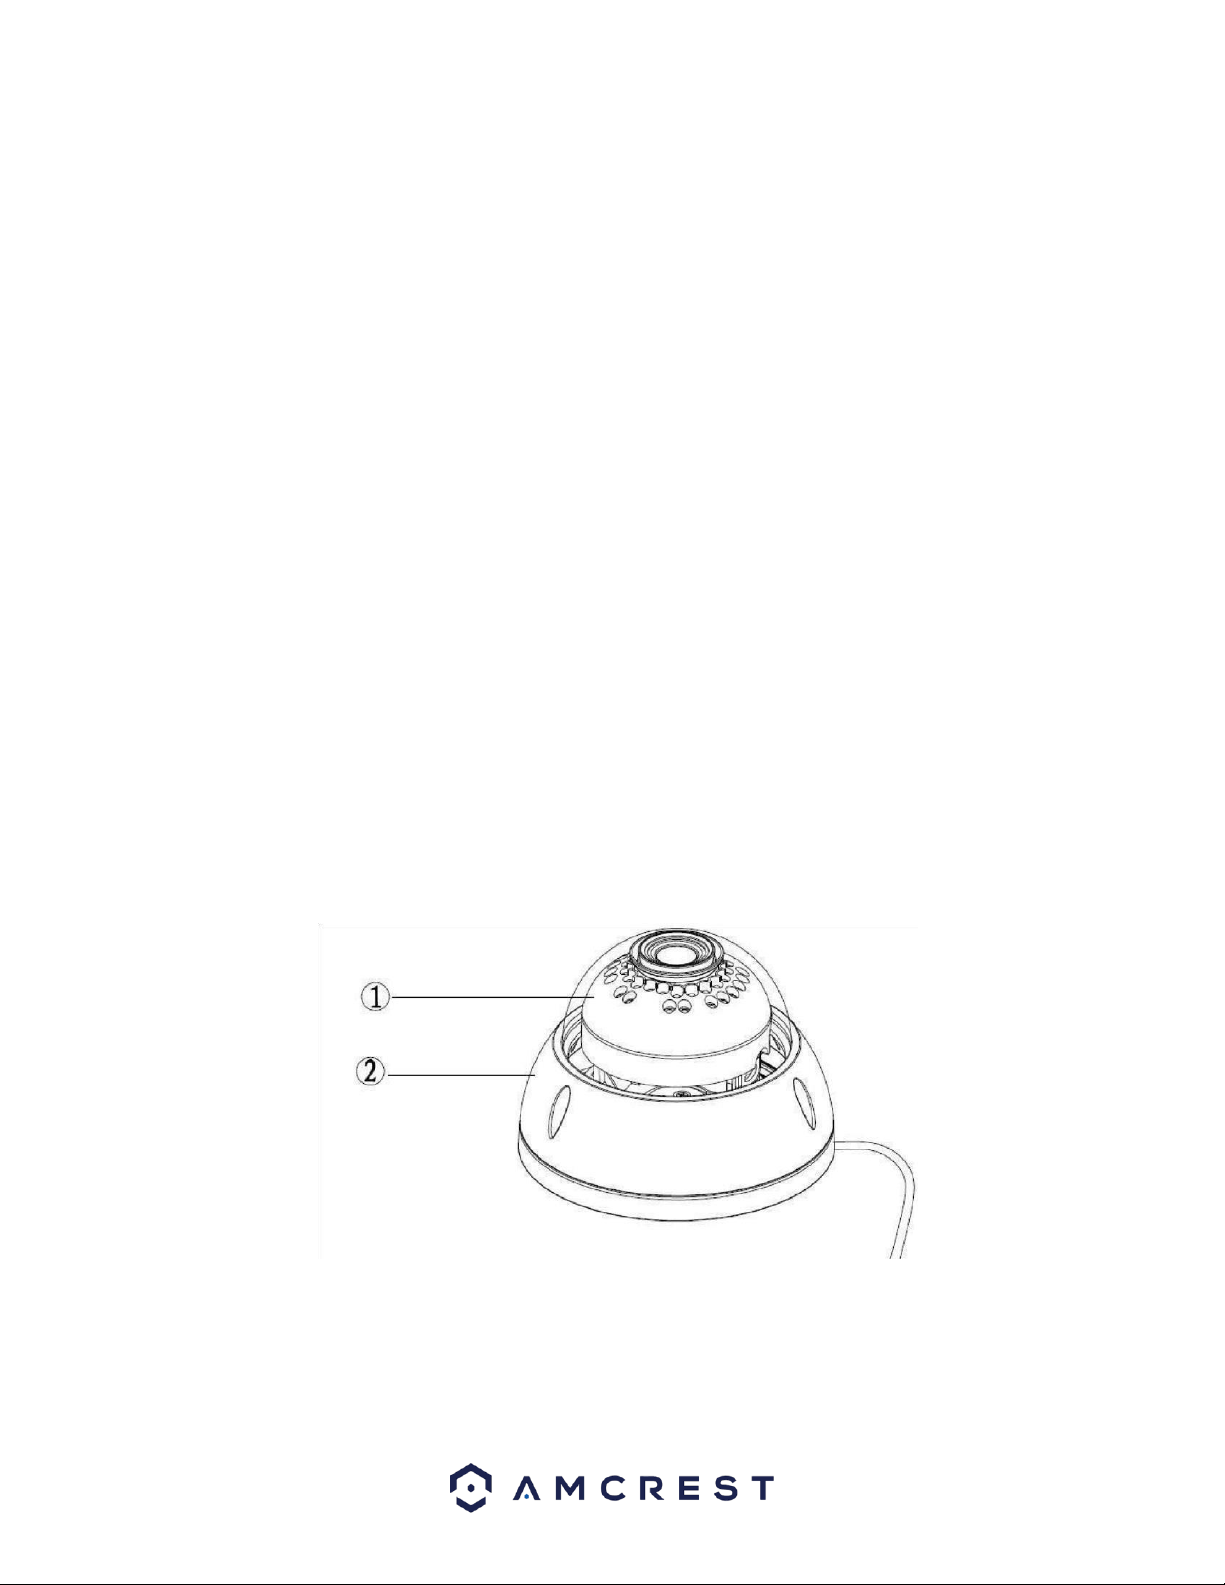
2 Device Overview.............................................................................................................................................................5
3 Connection & Installation...............................................................................................................................................6
3.1 Connection Guide .....................................................................................................................................................6
3.2 Installation Guide......................................................................................................................................................6
3.3 MicroSD Card Installation Guide...............................................................................................................................7
3.4 Basic Wiring Overview ..............................................................................................................................................8
4 Camera Access Setup......................................................................................................................................................9
4.1 Default Username and Password .............................................................................................................................9
4.2 How to Setup the Camera.........................................................................................................................................9
4.3 App Setup ...............................................................................................................................................................10
4.4 Desktop Access Setup.............................................................................................................................................15
4.5 Amcrest Cloud Desktop Setup ................................................................................................................................16
4.6 Web Access Setup (AmcrestView.com) ..................................................................................................................16
4.7 Remote Web Access Setup .....................................................................................................................................17
5 Operation and Interface ...............................................................................................................................................19
5.2 Playback..................................................................................................................................................................21
5.4 Setup.......................................................................................................................................................................23
5.5 Alarm ......................................................................................................................................................................69
6. FAQs/Troubleshooting ................................................................................................................................................70
Glossary of Terms............................................................................................................................................................71
FCC Statement.................................................................................................................................................................73
IC Warning Statement .....................................................................................................................................................73
Appendix A: Toxic or Hazardous Materials or Elements .................................................................................................74

3
Welcome
Thank you for purchasing an Amcrest camera!
Here you can find information about your camera’s features and functions, as well as information to aid in
troubleshooting.
Many of the setup and installation sections below have corresponding videos on YouTube
To access the setup videos, please go to http://amcrest.com/videos
For access to the quick start guide and other support information, go to http://amcrest.com/support
To contact Amcrest support, please do one of the following:
Visit http://amcrest.com/contacts and use the email form.
Call Amcrest Support using one of the following numbers:
Toll Free: (888) 212-7538
International Callers (Outside of US): +1-713-893-8956
USA: +1-713-893-8956
Canada: 437-888-0177
UK: 203-769-2757
Important Security Warning
To keep your Amcrest camera secure and prevent unauthorized access, please make sure
to follow the steps below:
•Always make sure that your camera has the latest firmware as listed on
www.amcrest.com/firmware
•Never use the default password for your camera. Always ensure that your
password is at least 810 characters long and contains a combination of
lowercase characters, uppercase characters as well as numbers.
Important Safeguards and Warnings
1.Electrical Safety
All installation and operation should conform to your local electrical safety codes.
The product must be grounded to reduce the risk of electric shock.
We assume no liability or responsibility for any fires or electrical shock caused by improper handling or installation.
2.Transportation Security
Heavy stress, violent vibrations, and excess moisture should not occur during transportation, storage, and installation
of the device.

4
3.Installation
Handle the device with care. Keep the device right side up.
Do not apply power to the camera before completing installation.
Do not place objects on top of the camera.
4.Repair Professionals
All the examination and repair work should be done by qualified service engineers.
We are not liable for any problems caused by unauthorized modifications or user-attempted repair.
5.Environment
The camera should be kept in a cool, dry place away from direct sunlight, flammable materials, explosive substances,
etc.
This product should be transported, stored, and used only in the specified environments as stated above. Do not aim
the camera at a strong light source, as it may cause overexposure of the picture, and may affect the longevity of the
camera’s sensors.
Ensure that the camera is in a well-ventilated area to prevent overheating.
6. Operation and Maintenance
Do not touch the camera sensor or lens directly.
To clean dust or dirt from the lens, use an air blower or a microfiber cloth.
7. Accessories
Be sure to use only the accessories recommended by manufacturer.
Before installation, please open the package and check to ensure that all the components are present. Contact the
retailer that you purchased from, or Amcrest directly if anything is broken or missing in the package.
1 Features and Specifications
1.1 Overview
Amcrest cameras are an excellent digital surveillance product that can be useful to a wide variety of users. The camera
connects to any router and uses an internet connection to allow the user to access all of its functionality from many
internet connected devices. It’s easy to use and can be set up in a relatively small amount of time. It has various
functions such as recording, playback, and monitoring functionality and it synchronizes audio and video by default.
This camera adopts a high-quality design to achieve high levels of reliability and security. It can be configured to work
locally, as well as on a network. The camera works using a POE connection and interfaces with most networks through
the Ethernet port of your router.
1.2 Features
This camera has the following features:

5
•Network Access
This camera connects to a wide variety of routers to connect to the internet. Once setup, the camera can be accessed
remotely from a wide variety of internet connected devices, including PCs, iPhones, iPads, Android tablets, and
Android phones.
•Cloud Storage Functionality
This camera can record video and audio streams to the Amcrest Cloud service to enable long-term storage for
recordings. Amcrest Cloud also allows the user to easily find and download recorded video for playback from any
internet connected PC or Mac computer.
•Auxiliary Functions
This camera has the ability to connect an external microphone as well as an external speaker. Each external device is
sold separately. The connections for these devices can be found on the dongle wire piece attached to the camera. For
more information on these features, please refer to section 3.4 Basic Wiring Overview.
•Advanced Network Protocol Support
This camera is UPnP compatible, and includes functionality for use with PPPoE, DDNS, and other protocols to allow
remote and local connection with a large variety of network hardware.
Note: There may be slight differences in functionality due to the existence of different product series.
IMPORTANT: Due to specific hardware limitations within your camera it is important to note that these devices will
not be able to automatically pan/tilt or pivot in either the app or via the web UI on a computer. For this reason, it is
imperative to make sure to mount the cameras properly and position them as efficiently as you can to the areas you
wish to monitor. All positioning actions to the camera will have to be performed manually.
2 Device Overview
The image below shows the structure of the camera:
The images below show the dimensions for the camera. The measurements are in millimeters (mm):

6
To access the reset button and to adjust the camera angle, use a Torx/Hex wrench to open the camera assembly by
removing the 3 screws.
For reference, a Torx/Hex screwdriver tip looks like this:
3 Connection & Installation
This section provides information about the connection and installation of the Amcrest IP4M-1028E camera.
3.1 Connection Guide
The camera initially should be connected via the following method:
Once connected to a PC or mobile device you will be able to configure the device to your network. For more
information.
3.2 Installation Guide
To install the camera on a ceiling or wall, please reference the below diagram as well as the steps:
Note: Prior to installation, please ensure that the installation environment can support at least 3x the weight of the
camera + bracket.

7
Note: Due to specific hardware limitations within your camera it is important to note that these devices will not be
able to automatically pan/tilt or pivot in either the app or via the web UI on a computer. For this reason, it is
imperative to make sure to mount the cameras properly and position them as efficiently as you can to the areas you
wish to monitor. All positioning actions to the camera will have to be performed manually.
To install the camera onto a wall, follow the steps below:
1. Use a Torx/Hex wrench (included) to open the dome enclosure by unfastening the three inner hex screws on
enclosure.
2. Place the installation sticker on the wall or ceiling surface that you wish to mount your camera.
3. Using the X’s on the installation sticker, drill 3 holes to allow for the insertion of the included expansion bolts.
4. If the camera’s cable will be exiting through the wall or ceiling surface, please be sure to drill an exit hole and pull the
cable through.
5. If the camera’s cable will be exiting through the side of the camera, route the cable through the U-shaped channel on
the side of the enclosure.
6. Align the camera with the installation sticker, then line up the 3 screw holes in the camera pedestal to the three plastic
expansion bolts on the installation surface. Put the three included screws through the camera then insert them into
the expansion bolts firmly.
7. Adjust the camera in the position that you want it to be in, then reattach the dome body to the base of the camera.
Note: Range of lens: vertical (0°~+65°), horizontal (0°~+355°). When adjusting the camera into position, please
ensure that the camera’s enclosure does not block the image or cause reflection of
IR light.
3.3 MicroSD Card Installation Guide
To Install a microSD card into your camera, please refer to the step by step guide below:

8
Note: You will need to access the camera’s motherboard to insert the microSD card.
1. Remove the lens cover for the camera with the supplied wrench tool to access the motherboard.
2. Locate the provided microSD card slot on the motherboard and slide the clasp back to open.
3. Place the microSD card, into the provided microSD card slot gold pins down and close the clasp.
4. Slide the clasp forward to secure the microSD card to the pins and secure the clasp.
3.4 Basic Wiring Overview
On your device you will notice a pre-attached wire pigtail containing 5 wiring connections. These connections contain
a power adapter connection, an Ethernet connection, audio wires (I/O), and alarm wiring. This device comes equipped
with audio capabilities, the audio wiring is featured in the wire pigtail attached to this device. There are no built-in
speakers or microphones on this device. All audio for this device will be provided using external third-party devices
such as microphones and speakers.
Power
The camera will require a basic 12V DC power adapter. This wire also has an optional
grounding (EARTH) wire for additional grounding of the unit.
Ethernet Port
This connection is used to transmit data from the router to the device via an Ethernet cable.
AUDIO IN
This connection allows for the connection of a single channel, external RCA microphone to be
utilized for this device. This can also be useful when setting up two-way audio for your
system.

9
AUDIO OUT
This connection allows for the utilization of a single channel, RCA speaker.
ALARM
This connection provides alarm in and alarm out features to an external alarm or security
system. The basic overview of these wires are as follows: 1Yellow: ALARM_IN1, 2Orange
ALARM_OUT1, 3Gray Alarm_GND (Ground)
4 Camera Access Setup
This section of the guide will provide the user with information on how to setup access to the camera through any of
the following methods.
4.1 Default Username and Password
To login to the system for the first time, use one of the following default username/password combinations. Once
you’ve successfully logged in, it is highly recommended to change the password for security reasons.
Username: admin
Password: admin
Note: Logging in for the first time will prompt the user to change the password to the admin account.
4.2 How to Setup the Camera
To make your experience with your Amcrest camera easy and simple, we've provided multiple ways to set up, view,
and operate your camera depending on your needs. Please follow the instructions on this page to set up your camera
in the way that works best for you.
4.2.1 Setting up Your Camera for the First Time
If you are setting up your camera for the first time, or you are setting up your camera for mobile viewing, please follow
the instructions as outlined on section 4.3. Using the Amcrest Cloud app or Amcrest View app on your smartphone or
tablet, you can view your camera live from anywhere, and access features such as taking snapshots, creating
recordings, and more.
4.2.1 For Configuring Advanced Settings on Your Camera
If you would like to configure your camera to enable advanced features such as motion direction, e-mail alerts, FTP,
image adjustments, scheduling and more, please follow the instructions as outlined on section 4.4 (Desktop Access).
4.2.3 For Cloud Storage and Playback
Amcrest Cloud is our optional cloud storage and playback service which allows you to access recorded footage from
any device. We offer 4 hours of free storage for your first camera. Please follow the instructions as outlined on section
4.5 (Cloud Access) to sign up for our Amcrest Cloud service and get 4 hours of free storage.

10
4.2.4 For Quick Web Access to Your Cameras
AmcrestView.com is a web portal that allows you to view your cameras and recordings quickly and easily from
anywhere in the world using a web browser. Use AmcrestView.com if you need to simply check-in at a moment's
notice. If you would like to use AmcrestView.com, please follow the instructions outlined on section 4.6 (Web Access).
4.3 App Setup
Amcrest cameras can be used on your mobile device using the following apps:
•Amcrest Cloud
•Amcrest View Pro
Both apps are free and available in the App Store and Google Play store. Please note, each app requires an iOS 6.0 or
later version. Android will require a 3.0 or later version OS to run these apps.
For purposes of this guide, we will use iOS, though both apps. The App Interface may differ slightly from the
screenshots below as updates are released. Below, you'll find instructions on how to set up your camera up on the
Amcrest cloud app as well as the Amcrest View Pro app.
4.3.1. Amcrest Cloud App Setup
Amcrest Cloud allows you to access your device from anywhere in the world. Please note, you will need an Amcrest
Cloud account to proceed with Amcrest Cloud app setup. You can register for a cloud account in the Amcrest Cloud
app or from the Amcrest Cloud website at amcrestcloud.com
•Please make sure your camera is plugged into a power source and your Ethernet cable is connected from the camera
to your router.
•Make sure your camera and mobile device are on the same network during setup.
•To ensure the camera connects to the cloud, a reboot of your camera is recommended.
To add your camera onto the Amcrest Cloud app, follow these steps:
1. Download and open the Amcrest Cloud app from the App Store or Play Store.
Note: Connect your mobile device to the same network that your camera is on.
2. Register for an Amcrest Cloud account. To register click on Sign Up and fill out the form to complete registration.

11
3. Tap on Add Camera
4. Give your camera a name (Ex. Garage, Living Room,
Kitchen, etc.) and tap Next to continue.
5. Scan the QR code on the back/side/bottom of
the camera or manually enter the camera’s serial
number into the Enter camera S/N (serial number)
field. Press Next to continue.
6. If you are adding a new camera that does not have a
set password the app will automatically detect that a
new camera is being added. Tap OK to proceed.

12
7. Set a new password for your camera. The password
must be between 8 to 32 characters long and contain
only letters and numbers. When you have finished
setting the password for your camera, enter the
password again in the Confirm Camera Password
section. Tap Next to continue.
8. Confirm and adjust any needed settings for your
camera. When all settings have been confirmed, tap
Finish.
For more information about the Amcrest Cloud app and its features, visit amcrest.com/support
4.3.2. Amcrest View Pro Setup
To add your PoE camera to the Amcrest View Pro app follow these steps:
•Make sure your camera is plugged into a power source and your Ethernet cable is connected from the camera to your
router.
•Make sure your camera and mobile device are on the same network during setup.
1. Download and open the Amcrest View Pro app from the App Store or Play Store.

13
2. Open the app and tap on the + symbol in the
middle of the screen to begin adding your PoE
device.
3. Tap on Add Device to add a new device to your
app.
4. Tap on PoE Camera
5. Next, select a connection type. Since we will be
setting up a basic P2P connection with the device,
tap on "P2P Connection" to continue.

14
6. Scan the QR code on the back/side/bottom of
the camera or manually enter the camera’s serial
number into the Enter camera S/N (serial number)
field. Press Next to continue.
7. Give the camera a name (e.g. Garage, Kitchen,
Living Room, etc.) and provide the username and
password for your camera. The default username and
will be admin. Tap Start Live View to continue.
Note: You can tap on the icon to verify the
password.
Note: Android users, tap on Scan QR Code to access the QR code reader.
8. The app will prompt you to change the password.
Enter a password between 8 and 32 characters and
confirm the password. Press OK to continue.
9. Your camera is now set up and ready for use on the
Amcrest View Pro app. For more information about
Amcrest View Pro and its functionalities visit
amcrest.com/support
For more information about Amcrest View Pro and its functionalities visit amcrest.com/support

15
4.4 Desktop Access Setup
Access your camera and all its features and settings on your local network using Internet Explorer, Firefox, or Safari on
Windows or Mac.
This method of accessing the camera’s interface is necessary to setup remote access. Ensure that the following items
are completed:
Note: Make sure the camera and the PC are on the same network before proceeding.
Use one of the following web browsers: Safari, Internet Explorer, or Google Chrome extension.
To easily connect to the camera’s interface, install and run the Amcrest IP Config tool.You can download the IP Config
software from www.amcrest.com under the “Support” tab, Apps & Software. The IP Config tool’s interface looks like
the below image:
After launching the IP Config tool, click the Refresh button to bring up the cameras on the network.
Double click the camera’s line item to login and connect to the camera. Once logged in, click the icon to open the
camera’s interface in a web browser.

16
Log in to the camera using your login credentials (default username and password are both “admin”). If this is your
first-time logging into the camera, you will be prompted to change your password. Please select a password that is at
least 8 characters long, and one that uses a combination of uppercase letters, lowercase letters, and numbers.
When opening the camera’s interface, the browser may prompt you to install a plugin. The plugins are necessary for
using the camera’s interface. Click install to download the plugin, and then click on the plugin installation file to install
the plugin. If the browser prompts you to allow the plugin to work on the computer, hit Allow to ensure the plugin can
run successfully.
The camera is now successfully set up for live viewing!
For quick and easy remote access on your PC or Mac, please use amcrestcloud.com (section 4.5) or amcrestview.com
(section 4.6).
To setup advanced remote access via UPnP/DDNS or Port Forwarding see section 4.7.1 and 4.7.2.
For additional assistance, please contact us at www.amcrest.com or give us a call at 1-888-212-7538.
Step by step video tutorials available at http://www.amcrest.com/videos
4.5 Amcrest Cloud Desktop Setup
Amcrest cameras can sync with Amcrest Cloud; a service that stores recorded video streams to enable long-term
storage. Amcrest Cloud also allows the user to easily find and download recorded video for playback from any internet
connected PC or Mac computer.
For more information on how to setup your camera on Amcrest Cloud on the web, visit amcrest.com/cloudwebsetup
or follow the steps provided below:
1. Connect the camera to power and wait 30 seconds for the camera to start-up and initialize.
2. Using a web browser on your PC or Mac, visit www.amcrest.com/cloud and register for a cloud account. Once
registered, click the “Add Camera” button. Select “Amcrest”, give the camera a name, and enter the camera’s SN
(located on the bottom of the camera), then click “Next”.
3. On the settings page, you can adjust optional preferences for your camera. Once settings have been adjusted, click
“Finish”. Your camera is now successfully set up for cloud access and storage.
4. View your camera live or watch recorded clips using the menu button on the top of the page. You can also use the
Amcrest Cloud app on iOS and Android to add more cameras, play recordings, and view your camera live, from
anywhere. For more information visit amcrest.com/support
5. For additional assistance, please contact us at www.amcrest.com or give us a call at 1-888-212-7538. Step by step
video tutorials available at http://www.amcrest.com/videos
4.6 Web Access Setup (AmcrestView.com)
1. Connect the camera to power and wait 30 seconds for the camera to start-up and initialize.
2. Using Internet Explorer or Safari, go to www.AmcrestView.com and register an account. You will be required to
activate your account by e-mail (double-check your spam folder).
3. Once activated, download and install the plugin for your web browser. The installation of the plugin will require all
web browsers to close.
4. Log in to your account. To add a camera, click the “Add Device” button. Give the camera a name, enter the UID (found
on the bottom of your camera), then enter the login details for the camera. The default username and password for
the camera is admin.
5. Once added, the camera should appear in the device list. Click the icon next to the camera’s UID to open the live
viewing and playback interface.

17
6. The device is now successfully setup for live viewing and playback!
7. For additional assistance, please contact us at www.amcrest.com or give us a call at 1-888-212-7538. Step by step
video tutorials available at www.amcrest.com/videos
4.7 Remote Web Access Setup
There are two main methods for setting up remote access: UPnP/DDNS, and Port Forwarding.
4.7.1 UPnP/DDNS Remote Web Access Setup
Using Universal Plug and Play (UPnP) and Dynamic Domain Name Server (DDNS) functionality is the easiest way to
setup stable remote access. For this method, your router should support the uPnP networking protocol and the
protocol should be enabled. Please refer to your router manufacturer’s documentation to learn how to enable uPnP
on your router.
Below is a step-by-step walkthrough that details how to setup Amcrest cameras for Remote Web Access using UPnP
and DDNS:
1. Login to your camera’s web interface, open the main menu then go to Setup -> Network.
2. Using the left hand menu, go to the Connection menu, and write down the HTTP port. It is recommended to ensure
the port number is at least 5 digits long to prevent any port conflicts. If need be, change the port to a 5 digit number
that is less than 65535, note the number down, and click save before proceeding to the next step.
3. The system will prompt you to reset the camera. Click OK and wait for the camera to restart.
4. Restarting the camera may cause the device to use another IP address. Use the included IP Config tool to find the IP
address as detailed in section 4.4.
5. Login to your camera, open the main menu then go to Setup -> Network.
6. Click the Connections menu item on the left hand menu and ensure that the HTTP port has changed.
7. Click the DDNS menu item on the left hand menu, pick Amcrest DDNS from the drop down box, click the checkbox
next to Server Type, and then click the Save button on the bottom right.
8. To set a custom DDNS name, fill out the Domain Name field and click Save.
9. Write down the entire Domain Name field, including the white text that says .AmcrestDDNS.com
10. Click the UPnP menu item on the left hand menu and click the enable checkbox at the top.
11. While in the UPnP menu, double click the HTTP port, and change both the internal and external HTTP ports to match
the number that was used in step 2.
12. Uncheck the last 4 checkboxes in the PAT table on the UPnP menu.
13. Click apply, then exit this menu to go back to the main menu, then re-enter the UPnP menu, and ensure the UPnP
status says, “Mapping Successful”.
14. Open a web browser and enter in the DDNS domain name address from step 9, enter in a colon, then type the port
number from step 4 on to the end.
a. For example, if the DDNS domain name is http://abc123456789.AmcrestDDNS.com and your HTTP Port is 33333,
the URL would be http://abc123456789.AmcrestDDNS.com:33333
15. The browser may prompt you to install a plugin. Click install to download the plugin, and then click on the plugin
installation file to install the plugin.
16. If the browser prompts you to allow the plugin to work on the computer, hit Allow to ensure the plugin can run
successfully.
17. Enter in login details into the username and password fields and click login.
If the process above is not working, please contact Amcrest Support via one of the following options:

18
Visit http://amcrest.com/contacts and use the email form
Call Amcrest Support using one of the following numbers:
Toll Free: (888) 212-7538
International Callers (Outside of US): +1-713-893-8956
USA: (888) 212-7538
Canada: 437-888-0177
UK: 203-769-2757
4.7.2 Port Forwarding Remote Web Access Setup
Port Forwarding is an alternative method to setting up remote access for Amcrest cameras. This method should only
be used if the UPnP/DDNS Remote Access method did not work.
Below is a step-by-step walkthrough that details how to setup the camera for Remote Web Access using Port
Forwarding:
1. Login to your camera, open the main menu then go to Setup -> Network.
2. Open the TCP/IP settings screen.
3. By default, the camera has the mode set to DHCP. Ensure that DHCP is selected. The IP Address, Subnet Mask, Default
Gateway, Preferred DNS, and Alternate DNS should all be 0s if DHCP is selected.
4. Click Save to save these settings. This should now open the main menu.
5. From the main menu, go to Setup -> Network.
6. On the TCP/IP settings screen, the IP Address, Subnet Mask, Default Gateway, Preferred DNS, and Alternate DNS
should all be populated.
7. Click the radio button next to Static, to change the mode to Static.
8. Write down the IP Address that is currently in the IP address field.
9. Click the Save button.
10. Using the left hand menu, go to the Connection menu, and write down the TCP, UDP, and HTTP port number. It is
recommended to ensure that these port numbers are at least 5 digits long to prevent any port conflicts. If need be,
change each of these port numbers to a 5 digit number that is less than 65535, note the numbers down, and click save
before proceeding to the next step.
11. Go to http://www.canyouseeme.org/ and check to ensure each of the port numbers specified in step 10 is open.
12. Write down the manufacturer name, brand, and model name for the router that the camera is connected to, and then
proceed to http://www.portforward.com on your web browser.
13. Open the port forwarding guide section on the left hand side menu.
14. Find the router brand name in the list and click it.
15. Find the router model number and click it.
16. Click the Default Guide link near the middle of the page.
17. This guide will help you take the step necessary to port forward on the router. Follow these steps, and then return to
the camera.
18. Login to your camera, open the main menu then go to Setup -> Network.
19. Click the DDNS menu item on the left hand menu, pick QUICK DDNS from the drop down box, click the checkbox next
to Server Type, and then click the Save button on the bottom right.
20. To set a custom DDNS name, fill out the Domain Name field and click Save.
21. Write down the entire Domain Name field, including the white text that says .AmcrestDDNS.com

19
22. Open a web browser and enter in the DDNS domain name address from step 21, enter in a colon, then type the HTTP
port number from step 10 on to the end.
a. For example, if the DDNS domain name is http://abc123456789.AmcrestDDNS.com and your HTTP Port is 33333,
the URL would be http://abc123456789.AmcrestDDNS.com:33333
23. Enter in login details into the username and password fields and click login.
If the process above is not working, please contact Amcrest Support via one of the following options:
Visit http://amcrest.com/contacts and use the email form
Call Amcrest Support using one of the following numbers Toll Free: (888) 212-7538
International Callers (Outside of US): +1-713-893-8956
USA: (888) 212-7538
Canada: 437-888- 0177
UK: 203-769-2757
5 Operation and Interface
This section of the manual details the camera’s interface, as well as all the operations the camera can perform.
The live view tab allows the user to see a live video feed from the camera. The live view tab has four main sections:
Section 1: This bar allows the user to select which stream type and which protocol they want to choose.

20
Section 2: The functions bar allows the user to perform different camera functions while in live mode. See the table
below for an explanation of the different functions available:
Button
Function Name
Function Description
Optical/Digital Zoom
Click this button to activate the zone selection function. This allows the user to
use the mouse to select a zone to zoom in on.
Snapshot
Click this button to take a screenshot of the live feed. The picture is saved at
the path specified in Setup -> Camera -> Video -> Path.
Triple Snapshot
Click this button to take 1 screenshot per second for 3 seconds. The pictures
are saved at the path specified in Setup -> Camera -> Video ->
Path.
Manual Record
Click this button to manually record video. The video is saved at the path
specified in Setup -> Camera -> Video -> Path.
Audio
Click this button to enable or disable audio output from the camera. This
feature allows the user to listen in on the audio the camera’s microphone is
picking up.
Talk
Click this button to activate the talk feature on the camera. Used primarily to
activate microphone feature on the camera. Note: The camera does not
have built-in microphones or speakers. To use 2-way audio, you will need to
attach an external RCA device to the dongle wires on the device.
Section 3: This bar allows the user to change video settings for the live playback screen. See the below table for an
explanation of the video settings:
Button
Function Name
Function Description
Image Adjustment
This button opens the image adjustment toolbar, which allows the user to
adjust brightness, contrast, saturation, and hue for the live feed’s picture.
Adapt/Original Size
This button allows the user to switch between displaying the original size of
the stream in its set resolution, or to adapt to the size of the monitor display
the feed is being viewed on.
Full Screen
This button allows the user to make the live feed go into full screen mode.
Double click the mouse or click the ESC button to exit full screen mode.
This manual suits for next models
1
Table of contents