Amitek SW10 Service manual

SW10 - SW20
Manuale d’installazione uso e manutenzione
Installation, operating and service instructions
Manuel d’installation, utilisation et entretien
Handbuch zur Installation, Bedienung und Wartung
AMITEK SRL - Via Santo Marino, 250 - 47824 Poggio Torriana (RN) Italy
MADE IN ITALY
Ed. 07/2021

I
AVVERTENZE GENERALI
Leggere attentamente le avvertenze contenute nel presente libretto. Conservate questo libretto per ogni ulteriore
consultazione dei vari operatori. Prima di collegare l’apparecchiatura accertarsi che i dati riportati sulla targhetta
tecnica (Fig.1) siano corrispondenti a quelli della rete di distribuzione elettrica. Prima di effettuare qualsiasi
operazione isolare l’apparecchiatura dalla rete di distribuzione elettrica.
L’istallazione deve essere effettuata da personale professionalmente qualificato secondo le istruzioni del costruttore
e le norme in vigore.
Il produttore declina ogni responsabilità per:
eventuali danni che derivino dalla non osservanza delle istruzioni per l’istallazione e l’uso, o da utilizzo non
conforme dell’apparecchio;
possibili inesattezze contenute nel presente libretto imputabili ad errori di trascrizione o stampa.
Il produttore si riserva il diritto di apportare al prodotto quelle modifiche che ritiene utili, senza modificare le
caratteristiche essenziali.
DATI TECNICI
SW10
SW20
Dimensioni mm
280x350x290h
560x350x290h
Potenza W
1000
2000
Alimentazione
230/1N/50-60
230/1N/50-60
Peso netto Kg
5,30
11,40
INSTALLAZIONE
La targhetta di identificazione e tecnica è installata sul retro dell’apparecchiatura (Fig.1).
Togliere la pellicola protettiva.
NORME DI SICUREZZA ELETTRICA. Rispettare queste norme fondamentali:
corrispondenza fra la tensione di rete e quella specificata sulla targhetta tecnica;
collegamento ad una presa di messa a terra a norma;
collegamento di un sistema equipotenziale.
COLLEGAMENTO ELETTRICO: Deve essere eseguito solo da personale competente e nel rispetto delle norme. Il
cavo di alimentazione deve essere posizionato in modo che in nessun punto raggiunga una temperatura
superiore ai 50 °C oltre a quella ambiente. Prima di effettuare l’allacciamento, accertarsi che la presa o
l’interruttore usati nell’allacciamento siano facilmente raggiungibili con l’apparecchiatura installata.
ATTENZIONE: il costruttore declina ogni responsabilità se queste norme antinfortunistiche non vengono
rispettate.
ISTRUZIONI PER L’USO
L’apparecchio è destinato all’uso collettivo e deve essere utilizzato da personale addestrato all’uso.
Prima di mettere in funzione l’apparecchiatura per la prima volta, pulirla attentamente dai grassi industriali.
Prima di mettere in funzione l’apparecchiatura, versare dell’acqua nel contenitore dei wurstel.
ACCENSIONE
Inserire la spina nella presa di corrente ed accendere l’interruttore principale (C, Fig.2).
Ruotare la manopola del termostato (A, Fig.2) fino ad indicare la temperatura desiderata. La spia di
riscaldamento (B, Fig.2) si accenderà e si spegnerà al raggiungimento della temperatura fissata.
A questo punto la macchina è pronta per essere utilizzata.
SPEGNIMENTO
Ruotare la manopola del termostato (A, Fig.2) nella posizione “0”, ed accertarsi che la spia luminosa (B, Fig.2)
sia spenta. Spegnere l’interruttore principale (C, Fig.2).
ATTENZIONE: se la spina rimane inserita l’apparecchio è comunque sotto tensione.

MANUTENZIONE E PULIZIA
Prima di effettuare qualunque operazione di pulizia disinserire l’apparecchio dalla rete elettrica ed aspettare che sia
totalmente raffreddato.
Pulire utilizzando un panno umido con un prodotto detergente non abrasivo o specifico per l’acciaio.
ISTRUZIONI DI SICUREZZA GENERALE
Se il cavo di alimentazione è danneggiato, farlo sostituire da personale qualificato.
Non toccare l’apparecchiatura con le mani bagnate.
Proteggere l’apparecchiatura da condizioni temporali avverse (pioggia o luce solare intensa).
Disconnettere l’apparecchiatura dopo l’utilizzo o prima della pulizia.
Tenere l’apparecchiatura lontano dalla portata dei bambini.
Fig.1
Fig.2

EN
GENERAL INSTRUCTION
Read carefully the instructions given in this booklet. Before connecting the appliance, make sure that the data shown
on the technical plate (Fig.1) corresponds with that of the mains power supply. Before carrying out any operation,
insulate the appliance from the mains power supply. The installation must he carried out by professionally trained
personnel in accordance with the instructions of the manufacturer and current regulations.
The Manufacturer declines all responsibility for:
any damage resulting from ignoring the instructions for installation and use or from irregular use of the
appliance;
any inaccuracies contained in this booklet due to copying or printing errors.
The Manufacturer reserves the right to make alterations thought useful to the product, without changing its basic
characteristics.
TECHNICAL DATA
SW10
SW20
Dimensions mm
280x350x290h
560x350x290h
Power W
1000
2000
Power supply
230/1N/50-60
230/1N/50-60
Net weight Kg
5,30
11,40
INSTALLTION INSTRUCTIONS
The identifying and technical plate is fixed to the back of the appliance (Fig.1).
Remove the protective film from parts before using the appliance.
ELECTRICAL SAFETY RULES. Please observe these essential rules:
the mains voltage and that on the technical plate must be the same;
connection must be to a regulation earthed socket;
connection must be to an equipotential system.
ELECTRICAL CONNECTIONS: must be carried out by trained personnel in accordance with electrical norms. The
power cable must be positioned so that no part of it reaches a temperature by 50 °C. Before installation make
sure that the socket or switch used can be easily reached when the appliance is in place.
CAUTION: the manufacturer declines all responsibility if these safety rules are not observed.
INSTRUCTION FOR USE
The appliance is intended for collective use and must be used by properly trained personnel.
Before switching on the machine for the first time, thoroughly clean off the industrial oils.
Before switching on the machine, pour water into the sausage container.
STARTING UP
Put the plug into the power socket and turn on the main switch (C, Fig.2).
Turn the thermostat (A, Fig.2) until the temperature setting required is reached. The heating light (B, Fig.2) will
come on and will go off when the set temperature is reached.
Now the appliance is ready to be used.
TURNING OFF
Put the thermostat (A, Fig.2) into position “0”, and check that the light (B, Fig.2) to go off. Turn off the main
switch (C, Fig.2).
NOTE: if the plug remains inserted the appliance is still live.
MAINTENANCE AND CLEANING
Disconnect the appliance and wait until it has cooled down before cleaning it.
Clean using a damp cloth with a non-abrasive cleaning product or a product made specifically for cleaning stainless
steel.

SAFETY INSTRUCTIONS
If the cable is damaged it must be replaced at once by qualified personnel.
Do not touch the appliance with wet hands.
Protect the appliance from harsh weather conditions (rain or strong sunlight).
Disconnect the appliance after each time it is used or when it is cleaned.
Keep it out of the reach of children.
Fig.1
Fig.2

F
PRECAUTION D’EMPLOI
Lire attentivement les instructions contenues dans ce manuel. Avant de brancher l’appareil, contrôler que les
données reportées sur la plaquette technique (Fig.1) correspondent à celles du réseau de distribution électrique.
Avant de commencer n’importe quelle opération, débrancher l’appareil du réseau électrique.
L’installation doit être effectuée par du personnel spécialisé et conformément aux instructions du constructeur et
aux normes en vigueur.
Le fabricant décline toute responsabilité en cas de :
dommages éventuels découlant du non-respect des instructions d’installation ou d’emploi ou bien d’une
utilisation non-conforme de l’appareil ;
inexactitudes éventuelles liées à des erreurs de transcription ou d’impression.
Le fabricant se réserve le droit d’apporter à l’appareil toutes les modifications qu’il retiendra utiles, sans que les
caractéristiques essentielles ne soient pour autant modifiées.
INFORMATIONS TECHNIQUES
SW10
SW20
Dimension mm
280x350x290h
560x350x290h
Puissance W
1000
2000
Branchement
230/1N/50-60
230/1N/50-60
Poids net Kg
5,30
11,40
INSTALLATION
La plaquette d’identification et de données techniques est placée au dos de l’appareil (Fig.1).
Retirer la pellicule de protection.
NORMES DE SECURITE ELECTRIQUES. Respecter les normes fondamentales suivantes :
correspondance entre la tension du réseau et la tension indiquée sur la plaquette des données
techniques;
branchement à un prise de terre a norme;
branchement â un système équipotentiel.
BRANCHEMENT: Le branchement électrique doit être effectué impérativement par du personnel spécialisé et
dans le respect des normes CEE. Le câble d’alimentation doit être placé de façon à ce qu’il n’atteigne à aucun
endroit une température supérieure à 50 °C de plus que la température ambiante. Avant d’effectuer les
branchements, contrôlez que la prise ou que l’interrupteur utilisés pour le branchement soient facilement
accessibles une fois l’appareil installé.
ATTENTION : le constructeur décline toute responsabilité en cas de non-respect de ces normes de sécurité.
MODE D’EMPLOI
L’appareil est destiné à un usage en collectivité et doit être utilisé par du personnel formé pour son utilisation.
Avant de mettre l’appareil en fonctionnement pour la première fois, nettoyer avec soin l’appareil des
éventuelles graisses industrielles.
Avant de mettre l’appareil en fonctionnement, versez l’eau dans la cuve des saucisses.
ALLUMAGE
Introduire la prise de l’appareil dans la prise de courant et tournez l’interrupteur principal (C, Fig.2).
Faire pivoter le thermostat (A, Fig.2) jusqu’à le placer sur la température souhaitée. Le témoin lumineux
s’allumera (B, Fig.2) et ne s’éteindra qu’une fois atteinte la température programmée.
A ce point, l’appareil est prêt à l’emploi.
ECTINCTION
Placer le thermostat (A, Fig.2) en position “0”, et contrôler que le témoin (B, Fig.2) s’éteint. Éteignez
l’interrupteur principal (C, Fig.2)
ATTENTION: Si la prise reste branchée, l’appareil reste sous tension.

ENTRETIEN ET NETTOYAGE
Avant chaque nettoyage éteignez l’appareil et laissez le refroidir.
Pour le nettoyage, utilisez un chiffon humide avec un nettoyant doux ou un produit spécifiquement adapté au
nettoyage de l’inox.
SÉCURITÉ GÉNERAL
Un câble de courant endommagé doit être changé tout de suite par quelqu’un de compétent.
Ne touchez pas l’appareil avec mains ou pieds mouillés.
Protégez l’appareil des rayons du soleil et de la pluie.
Avant chaque nettoyage éteignez l’appareil.
Tenez les enfantes loin de l’appareil branché.
Fig.1
Fig.2

D
GEBRAUCHS- UND BEDIENUNGSANLEITUNG
Wir bitten Sie, diese Bedienungsanleitung sorgfältig zu lesen und gut auf zubewahren, damit Sie bei evtl.
Rückfragen jederzeit darin nachschlagen können. Bevor Sie das Gerät anschließen, vergewissern Sie sich, dass die
auf dem Typenschild aufgeführten technischen Angaben mit Spannung und Frequenz Ihres Stromnetzes
übereinstimmen (Abb.1).
Die Installation darf nur von entsprechend ausgebildeten Fachleuten nach Anweisungen des Herstellers und auf
Grundlage der gültigen gesetzlichen Vorschriften durchgeführt werden.
Der Hersteller lehnt jede Haftung ab, für:
evtl. Schäden, die durch Nichteinhaltung der Anweisungen entstehen bzw. beinicht gerechtem Einsatz des
Gerätes;
mögliche in dieser Anweisung enthaltene Druckfehler.
Der Hersteller behält sich das Recht vor, nützliche Änderungen an dem Produkt vorzunehmen, ohne damit die
wesentlichen Eigenschaften des Gerätes zu verändern.
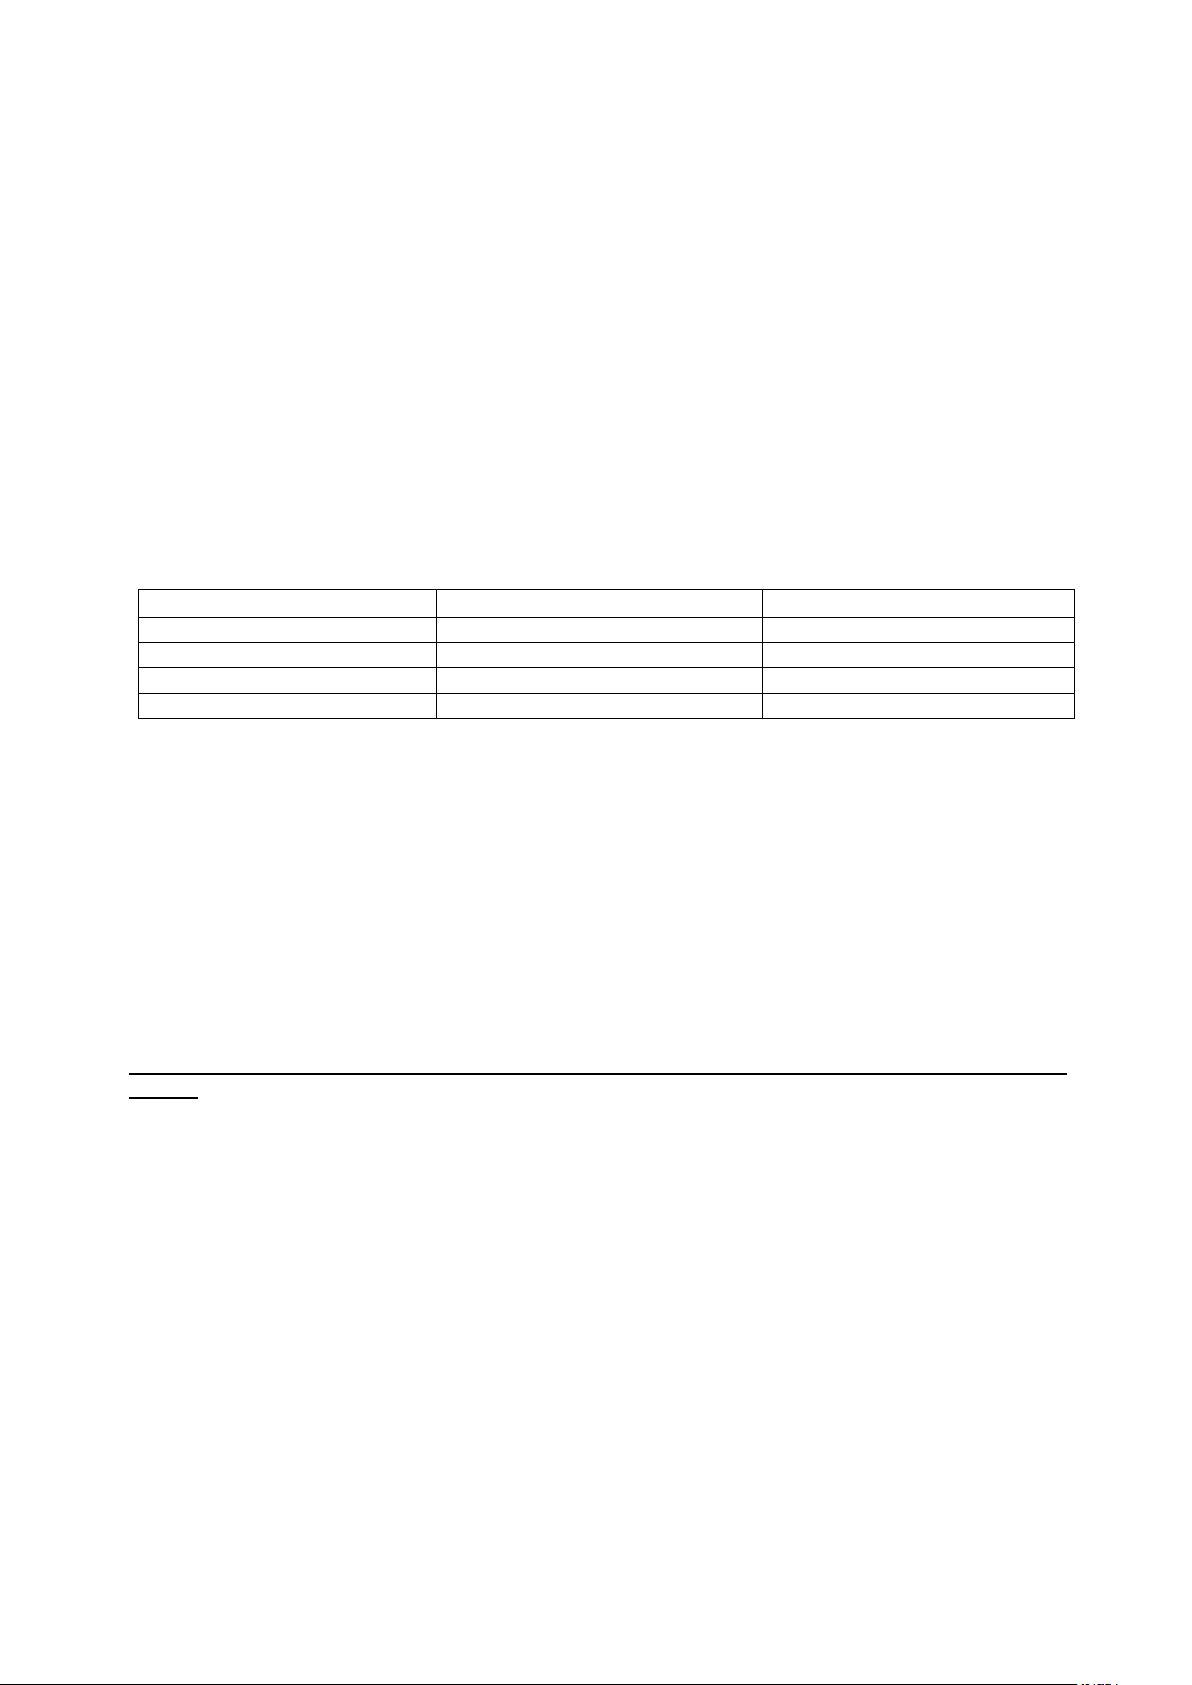
TECNISCHE DATEN
SW10
SW20
Abmessungen mm
280x350x290h
560x350x290h
Leistung W
1000
2000
Stromversorgung
230/1N/50-60
230/1N/50-60
Nettogewicht Kg
5,30
11,40
INSTALLATIONSANWEISUGEN
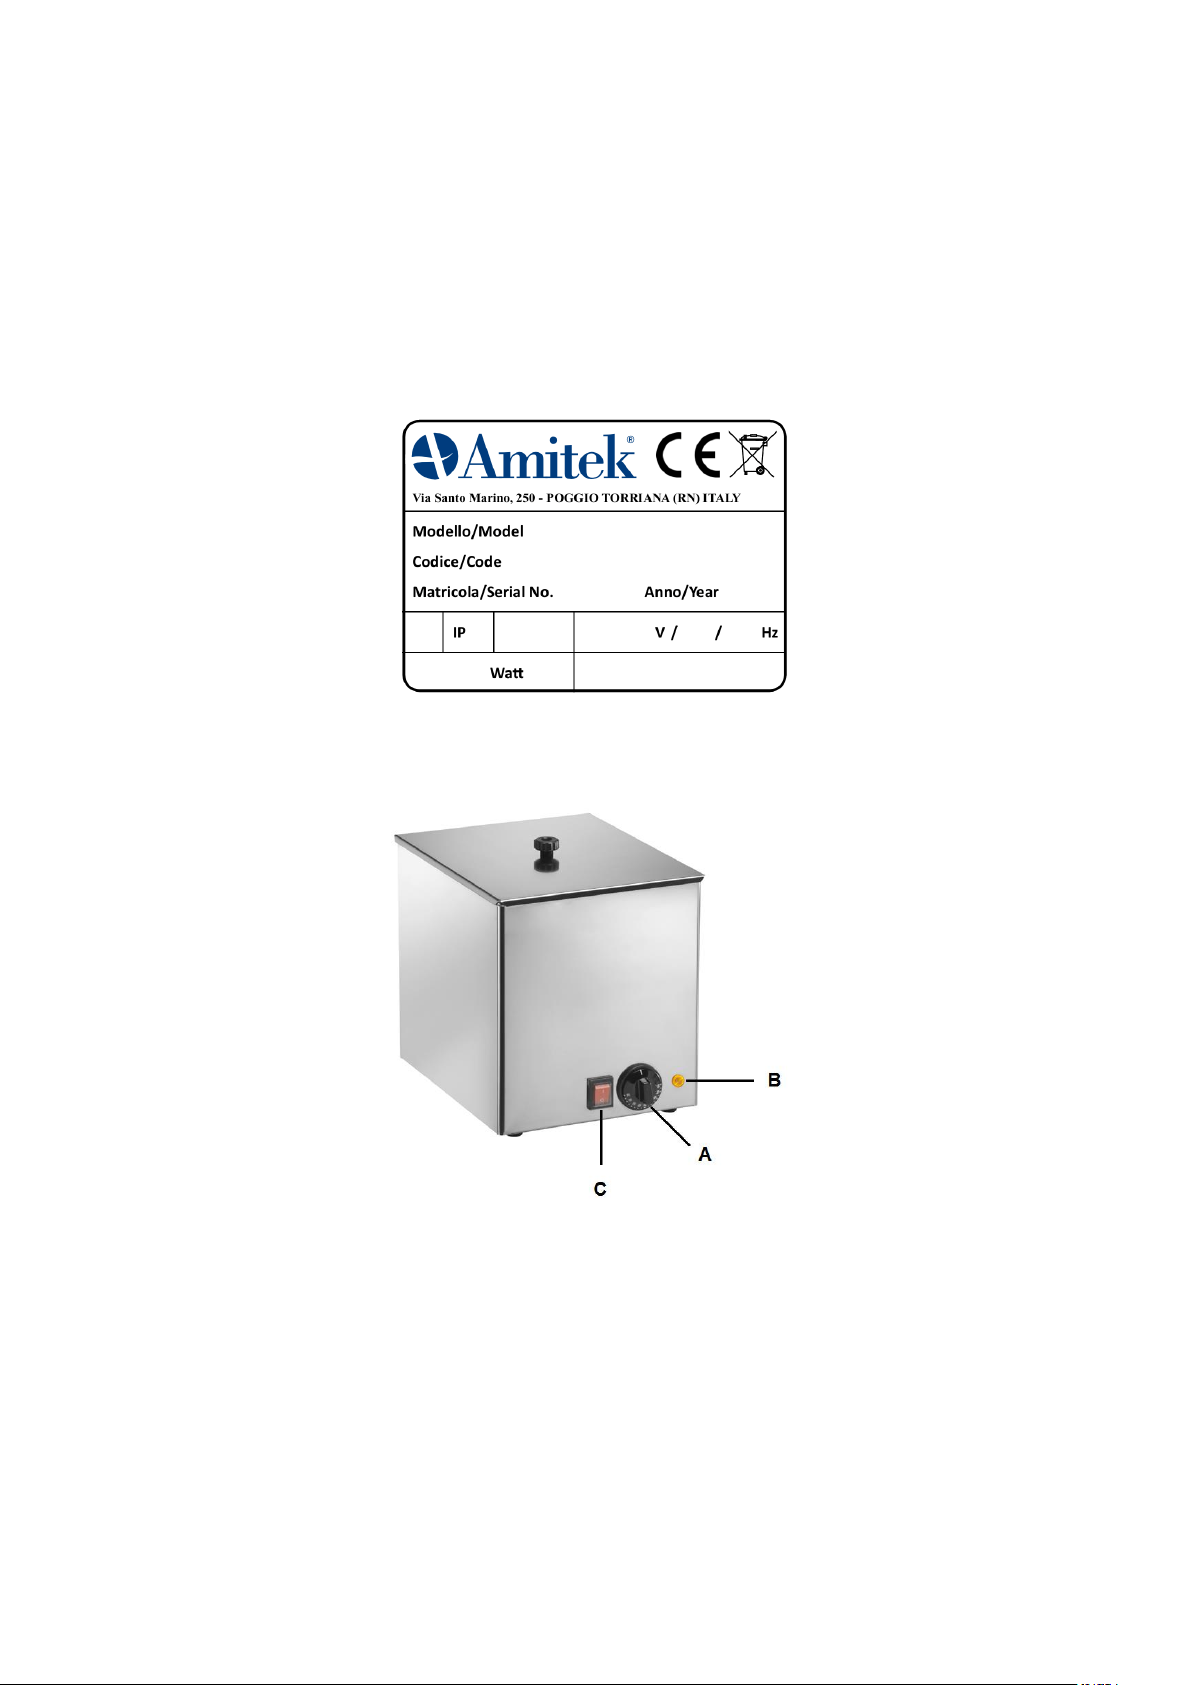
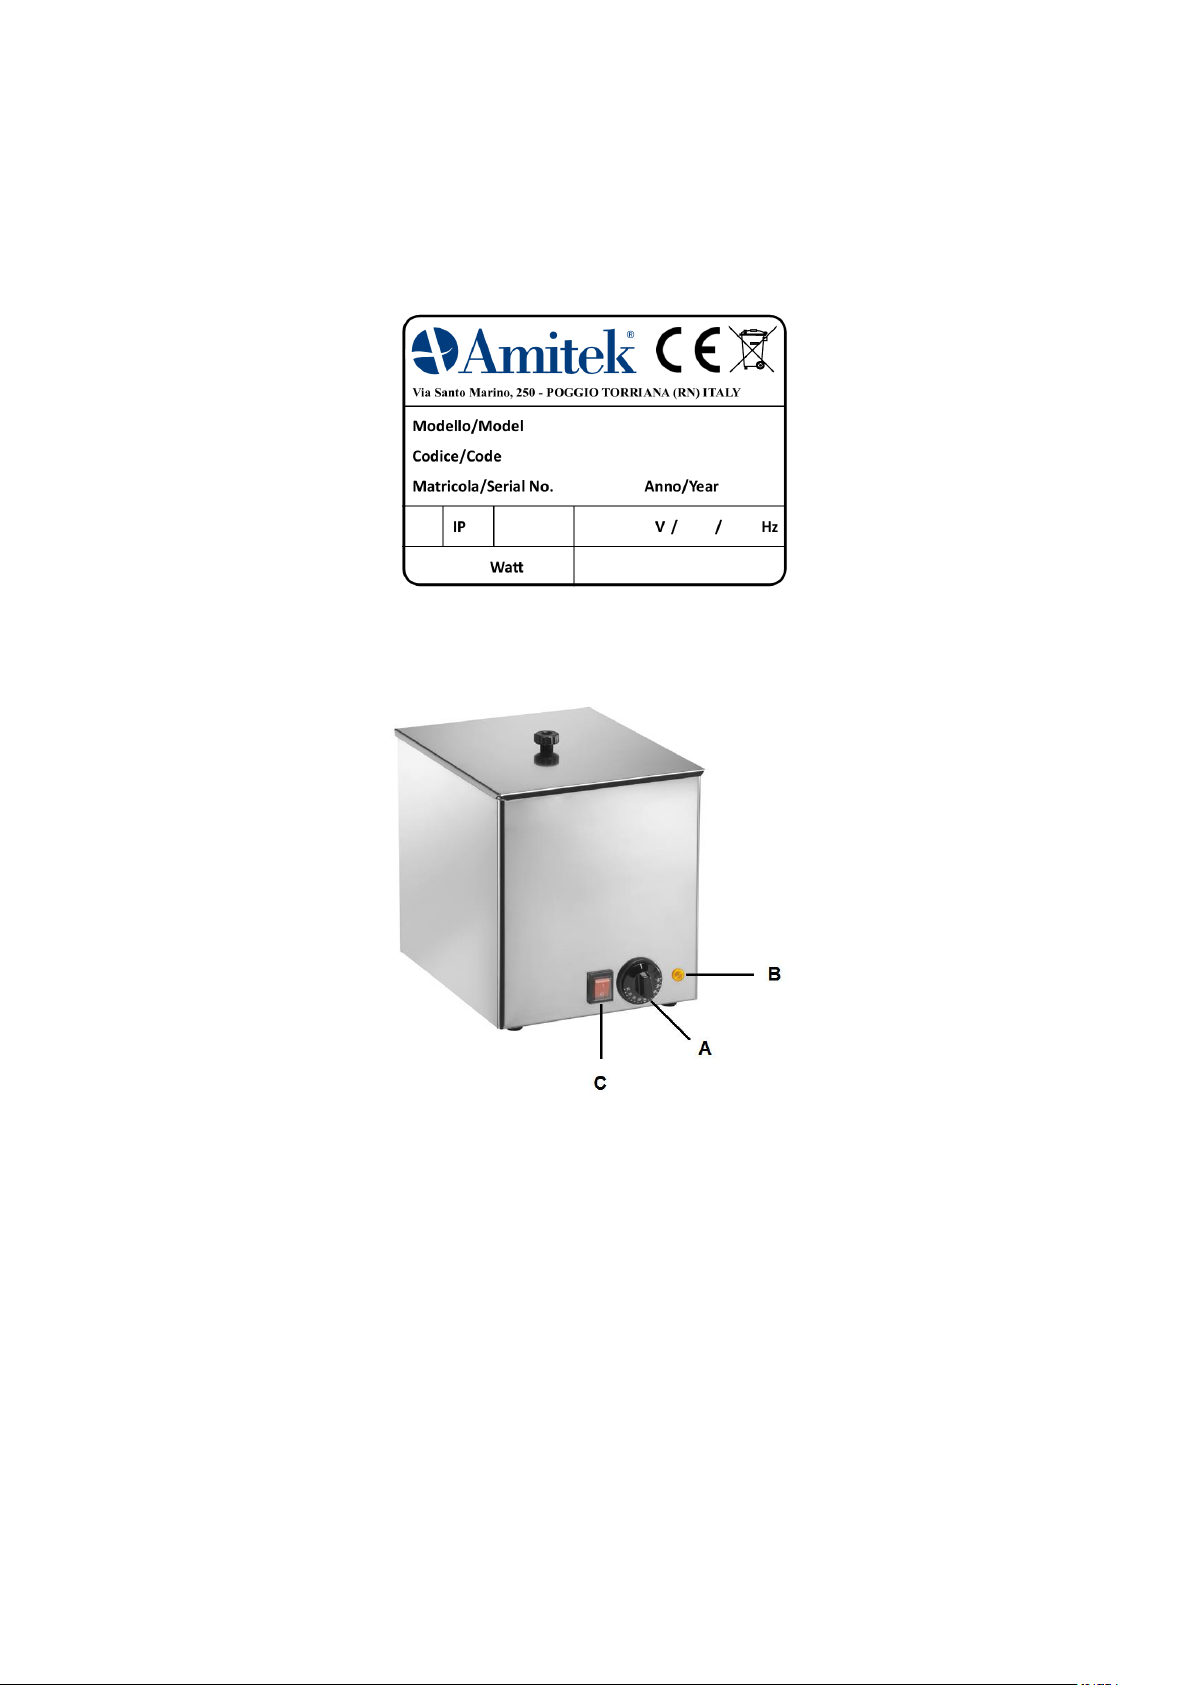
Das technische Typenschild ist auf der Geräterückseite angebracht (Abb.1).
Die Schutzfolie entfernen.
Sicherheitsvorschriften. Grundsätzlich sind folgende Vorschriften zu beachten:
Sicherstellen, dass Spannung und Frequenz des Stromnetzes mit den auf dem Typenschild des Gerätes
angegeben Werten übereinstimmen.
Das Gerät ausschließlich an eine Steckdose mit Erdung nach Normvorschriften anschließen.
Der Anschluss muss an ein Potentialausgleichssystem erfolgen.
Anschluss an das Stromnetz: Das Gerät darf nur von Fachpersonal unter Einhaltung der gültigen Sicherheits-
vorschriften angeschlossen werden. Das Netzkabel muss so gelegt werden, dass es an keener Stelle einer
höheren Temperatur als max. 50 °C über der Umgebungstemperatur ausgesetzt ist. Vergewissern Sie sich vor
Anschluss des Gerätes, dass die Steckdose oder der verwendete Einschalter leicht zugänglich ist.
ACHTUNG: der Hersteller übernimmt keine Haftung, wenn diese unfall-verhütenden Vorschriften nicht befolgt
werden.
GEBRAUCHSANWEISUNG
Das Gerät ist für den gemeinschaftlichen Gebrauch bestimmt und darf nur von ausgebildetem Personal
verwendet werden.
Vor der ersten Benutzung das Gerät gründlich reinigen.
Vor der Inbetriebnahme der Maschine, gießt Wasser in den Behälter des Hot Dogs.
EINSCHALTEN
Das Netzkabel in die Steckdose stecken und schalten Sie den Hauptschalter (C, Abb.2).
Den Thermostatknebel (A, Abb.2) bis zur gewünschten Temperatur-einstellung drehen. Die Kontrolllampe (B, Abb.2)
leuchtet auf und erlischt, sobald die eingestellte Temperatur erreicht ist.
An diesem Punkt ist das Gerät einsatzbereit.
AUSSCHALTEN
Drehen Sie den Thermostatknopf (A, Abb.2) in Position „0“, dann prüfe, dass die Kontrolllampe (B, Abb.2)
deaktiviert ist. Schalten Sie den Hauptschalter (C, Abb.2).
Achtung: Auch wenn das Gerät ausgeschaltet ist, der Stecker sich aber noch in der Steckdose befindet, steht das
Gerät unter Spannung.

WARTUNG UND REINIGUNG
Vor allen Reinigungsarbeiten, Gerät abkühlen lassen und Netzkabel aus der Steckdose ziehen. Das Gerät mit
feuchtem Tuch und Pflegemittel abwischen und mit sauberem Tuch trocknen (keine Schleifmittel verwenden).
GENERELLE SICHERHEITSANWEISUNGEN
Wenn das Netzkabel beschädigt ist, von qualifiziertem Fachpersonal austauschen lassen.
Das Gerät nicht mit nassen Händen berühren.
Gerät vor ungünstigen Bedingungen schützen (Regen, starkem Solarlicht).
Gerät nach Verwendung bzw. vor der Reinigung abschalten.
Kinder vom Gerät fernhalten.
Abb.1
Abb.2

ALLEGATI - ANNEXES - PIECES JOINTES - ANLAGEN
SCHEMI ELETTRICI - ELECTRICAL DIAGRAM - SCHÉMA ÉLECTRIQUE - SCHALTPLAN

ESPLOSI - EXPLODED DRAWINGS - ÉCLATÉE - EXPLOSIONZEICHNUNGEN

This manual suits for next models
1
Table of contents
Languages:
Other Amitek Fryer manuals