Amperes iPX5200 User manual

Thank you for choosing another quality product fromAmperes Electronics.
AmperesiPXSeriesofIPequipmentprovidesmultipleadvantagesoverconventionalsystemsintermsofcabling
infrastructure and future expansions. With continuous development of more IP products in the pipeline, the possibilities of
more applications based on IP shall be beyond imagination.
With iPX modules, existing conventional system can be converted into IP without much changes, thus reducing the cost of
upgrading. With our policy of understanding the needs of the market, we offer some simple tools with powerful functions to
achieve the requirements.Asimple graphical illustration and basic engineering knowledge shall be sufficient to apply these
products into your installations, making them systems of countless limitations.
iPX5200 is a IP Network Audio / BGM server (Network Audio Inserter) , which would enable analogue audio output from
players to be fed into the IP network and played at iPX5300 music clients at remote buildings.
INSTRUCTION MANUAL
iPX5200
IP Network Audio / BGM Server
(Network Audio Inserter)
VER 1 / 2014
NEW
IPX 5200 amperes
UP
PRE
DOWN
SOURCE NEXT
STREMING 1 2 345678
MUSIC CLIENT GROUP
ETHERNET MUSIC SERVER
POW
START / STOP

Parts Identification
Page 2
IPX 5200 amperes
UP
PRE
DOWN
SOURCE NEXT
STREMING 1 2 345678
MUSIC CLIENT GROUP
ETHERNET MUSIC SERVER
POW
START / STOP
microSD
ON/OFF IPX 5200
ETHERNET MUSIC SERVER
Quality Product From
AMPERES ELECTRONICS
RESET
+
-
DC 24V
100mA
LEFT
RIGHT
ETHERNETADDRESS :
SERIAL NO :
ETHERNET
Front View
Rear View
134
25
6 7 8 9 10 11
1. LCD DISPLAY
2. POWER LED
2 X 18 character LCD displaying the units’ parameters and programming instructions.
5. MUSIC CLIENT GROUP KEY
8 front group buttons for direct music client activation.
4. PLAY BUTTON
To control start / stop the playlist.
6. POWER CONNECTORS
24V DC input for power, use only regulated power supply or Amperes PS9400 power supply unit.
7. POWER SWITCH
Power switch for the unit.
8. RESET BUTTON
Button for resetting the unit to factory default. Use only when required as settings done previously would be lost.
Voice files stored in the SD card shall not be affected.
In recording mode, the blue LED shall flash.
3. CONTROL BUTTON
Button for menu, various playback and source.
iPX5200 IP NETWORK AUDIO / BGM SERVER

iPX5200 IP NETWORK AUDIO / BGM SERVER Page 3
Parts Identification
9. ETHERNET PORT
10. MICRO SD CARD SLOT
Connectivity to network switch.
11. LINE INPUTS
RCA jack for receiving external audio source with line output, such as CD, MP3 players, etc.
SD Card Slot, up to 16GB capacity is supported by the unit (standard supplied card is 4GB).

Page 4 iPX5200 IP NETWORK AUDIO / BGM SERVER
iPX5200 Application Note
Application Diagram
IPX 5200 amperes
UP
PRE
DOWN
SOURCE NEXT
STREMING 1 2 345 6 78
MUSIC CLIENT GROUP
ETHERNET MUSIC SERVER
POW
START/ STOP
LAN
iPX 5300
ETHERNET MUSIC CLIENT
ETHERNET ADDRESS
ETHERNET
RESET
BALANCED LINE
OUTPUT
amperes
iPX 5300
ETHERNET MUSIC CLIENT
ETHERNET ADDRESS
ETHERNET
RESET
BALANCED LINE
OUTPUT
amperes
microSD
iPX5300
Music Client
LOCATION 1
CD1001
iPX5200
IPX5200isamusicserver whichissimilarto pre-amplifiermixer/source selectorofanalogueversion.Thedifferenceis thatit works
in LAN environment for music transmission over IP Network to multiple locations in installations such as university campus, facto-
ries, multi tower complexes and soon over the internet to remote locations.
It accepts analogue music sources such as CD player, tuner or perhaps music from IPOD / IPAD and converts the selected source
intohigh qualitydigital formatand thereaftertransmit itover theIP.In addition,the unithas aslot forSD cardinput, whichcan trans-
fer files such as MP3, WAV directly over the network.
Onedistinctivedifferencefrom othersimilarproductis theclient selectionfeature.Thecentralhas thecontrol overwhich destination
to broadcast the music by push of buttons, which can be easily configured.
MP 1020
am p e r e s
MIN MAX MIN MAX
CH 1 CH 2
/V- /V+
MODE
OFF/ON
FM
/V- /V+
MODE
OFF/ON
FM
DUAL CHANNEL DIGITAL MEDIA PLAYER
MP1020
Local
PASystem
Local
PASystem
iPX5300
Music Client
LOCATION 2
LOCATION N
(SD Card Input)
Analogue
Inputs

iPX5200 IP NETWORK AUDIO / BGM SERVER Page 5
Connecting to iPX5200
microSD
ON/OFF IPX 5200
ETHERNET MUSIC SERVER
Quality Product From
AMPERES ELECTRONICS
RESET
+
-
DC 24V
100mA
LEFT
RIGHT
ETHERNET ADDRESS :
SERIAL NO :
ETHERNET
24VDC Power
Supply (Amperes
PS9400) 0.5A Mini SD
Card
Unbalanced stereo input (RCAjack)
CD Player
AM / FM Tuner
MP3 Player
iPX5200
Back View
PCAudio Source
CAT5e
Network Switch
Fiber Optic
Convertor
--------------
iPX 5300
ETHERNET MUSIC CLIENT
ETHERNET ADDRESS
ETHERNET
RESET
BALANCED LINE
OUTPUT
amperes
iPX5300
Single mode /
Multimode
~
~
Fiber Optic
Convertor
iPX 5300
ETHERNET MUSIC CLIENT
ETHERNET ADDRESS
ETHERNET
RESET
BALANCED LINE
OUTPUT
amperes
iPX5300
Audio Output to Local
PASystem / Mixer amp.
Remote
Location via
Fiber Optic
BASS
CH2 CH3 CH4 CH6CH5 TREBLE MASTER
O
I
CH1
Speaker
24 VDC
LineAudio Output
(Balanced)
MA2024
MixerAmp
CAT5e

Device Setup Via Browser
Page 6 iPX5200 IP NETWORK AUDIO / BGM SERVER
IP Address
Subnet Mask
Gateway Address
Multicast IP Address
Communication Port
Broadcast Port
Streaming Port
Network Settings
MAIN
Info
Network Configuration
System Configuration
Music Server
Application Settings
iPX5200shallrequiresomesimplesetups,kindlyfollowthestepbystepinstructionsaslistedbelow.Theunitshallbeconnected
toLAN network together with iPX5300IPClients to form a complete system. The default IP address is 192.168.0.120. Login
page shall appear and the default User ID and Password are both “admin”.
Info / Main Page
Info: Providing hardware, network and Software information.
This shall be the first page once you entered the system’s http
browser.
Network Configuration: For configuration of IP address
and its related ports.
System Configuration: ForApplication Settingssuch as
volume controls, User and Password setup and System’s web
page and firmware updates.
Music Server: Providing real time information on stream-
ing status, Client connections and file information in SD Card.
Network Configuration
Unless required, you are recommended to change the IP
addressonly,leavingothersettingsuchasportnumberas
default. Once the address has been changed to suit the
environment, click the “Save Changes” button.
Info
Network Configuration
System Configuration
Music Server
Network Information
Hardware Information
Firmware Version
Hardware Revision
Serial Number
Device Name
MAC Address
IPV4 Address
Subnet Mask
Gateway Address
MAIN

iPX5200 IP NETWORK AUDIO / BGM SERVER Page 7
Device Setup Via Browser
System Configuration
Application Setting: The volume, bass and treble for
selectedgroupscanbesetaccordingly.Thedefaultsourcerefers
to the unit’s selected source every time it is turned on.
Authentication: You can alter the user name and password
to avoid unnecessary access to the system.
System Config: Both thebrowser andfirmware arestored in
the unit’s memory. Should there be any updates available, use
this section to perform system upgrades accordingly.
Application Settings
Authentication
VOLUME
BASS
TREBLE
Group Group 1
Group 5 Group 2
Group 6 Group 3
Group 7 Group 4
Group 8
Default Source
Device Name
New User Name
Old Password
New Password
Confirm Password
System Configuration
Update Web Page No file chosen
Update Firmware No file chosen
Music Server
Streaming Status: It shows the streaming status
of files from SD Card.
Connected Clients: iPX5300 Music Clients
connected to the server are listed accordingly.
SD Card Files: Files available from SD Card can
be viewed from this section.
Streaming Status
Streaming Status
Destination Group
Audio Source
Connected Clients
SD Card Files
Client Name Client Status Client IP Address
Connecting 192.168.1.130
Connected 192.168.0.132
MUSIC CLIENT 01
MUSIC CLIENT 02
File Name
No. Duration

Page 8 iPX5200 IP NETWORK AUDIO / BGM SERVER
amperes
UP
PRE
DOWN
SOURCE NEXT
STREMING 1 2 345678
MUSIC CLIENT GROUP
POW
START / STOP
1234
The buttons for streaming target ( 8 nos ) is similar to zone selector. The administrator shall have the control over which client
to receive the music streaming. Each button can be assigned a single client ( iPX5300 ) or a group of clients.
Setup : Front Button Setting
Application Settings
Active Connection Connect To Server Automatically & Supports Multiple Servers
Music Server IP
Sync With Server
VOLUME
BASS
TREBLE
Group
Device Name
Group 1
Group 5 Group 2
Group 6 Group 3
Group 7 Group 4
Group 8
To set the matching Client Button ( Destination ) with related iPX5300 Music Client, it is required to access the browser of the
Client. The default IPaddress of iPX5300 is 192.168.0.130. Follow the steps below :
1.Openbrowserof iPX5300at192.168.0.130.Gointo SystemConfiguration page.(IPaddressof Clientsare tobe changed
accordingly to avoid IP crash ).
2. Enter the Music IP server address. If the Server address had been changed, enter the new address at this box.
3. At the Application Settings ( shown below ), tick the Group box. More than one box can be ticked. If more than one box is
ticked, it means that selecting any related buttons at Music Server would enable the Client to receive the streaming.
4. The client can be renamed for easy identification ( ie. BuildingA). The volume, bass and treble can be adjusted accordingly.
5. Save any changes made.

iPX5200 IP NETWORK AUDIO / BGM SERVER Page 9
Operating iPX5200
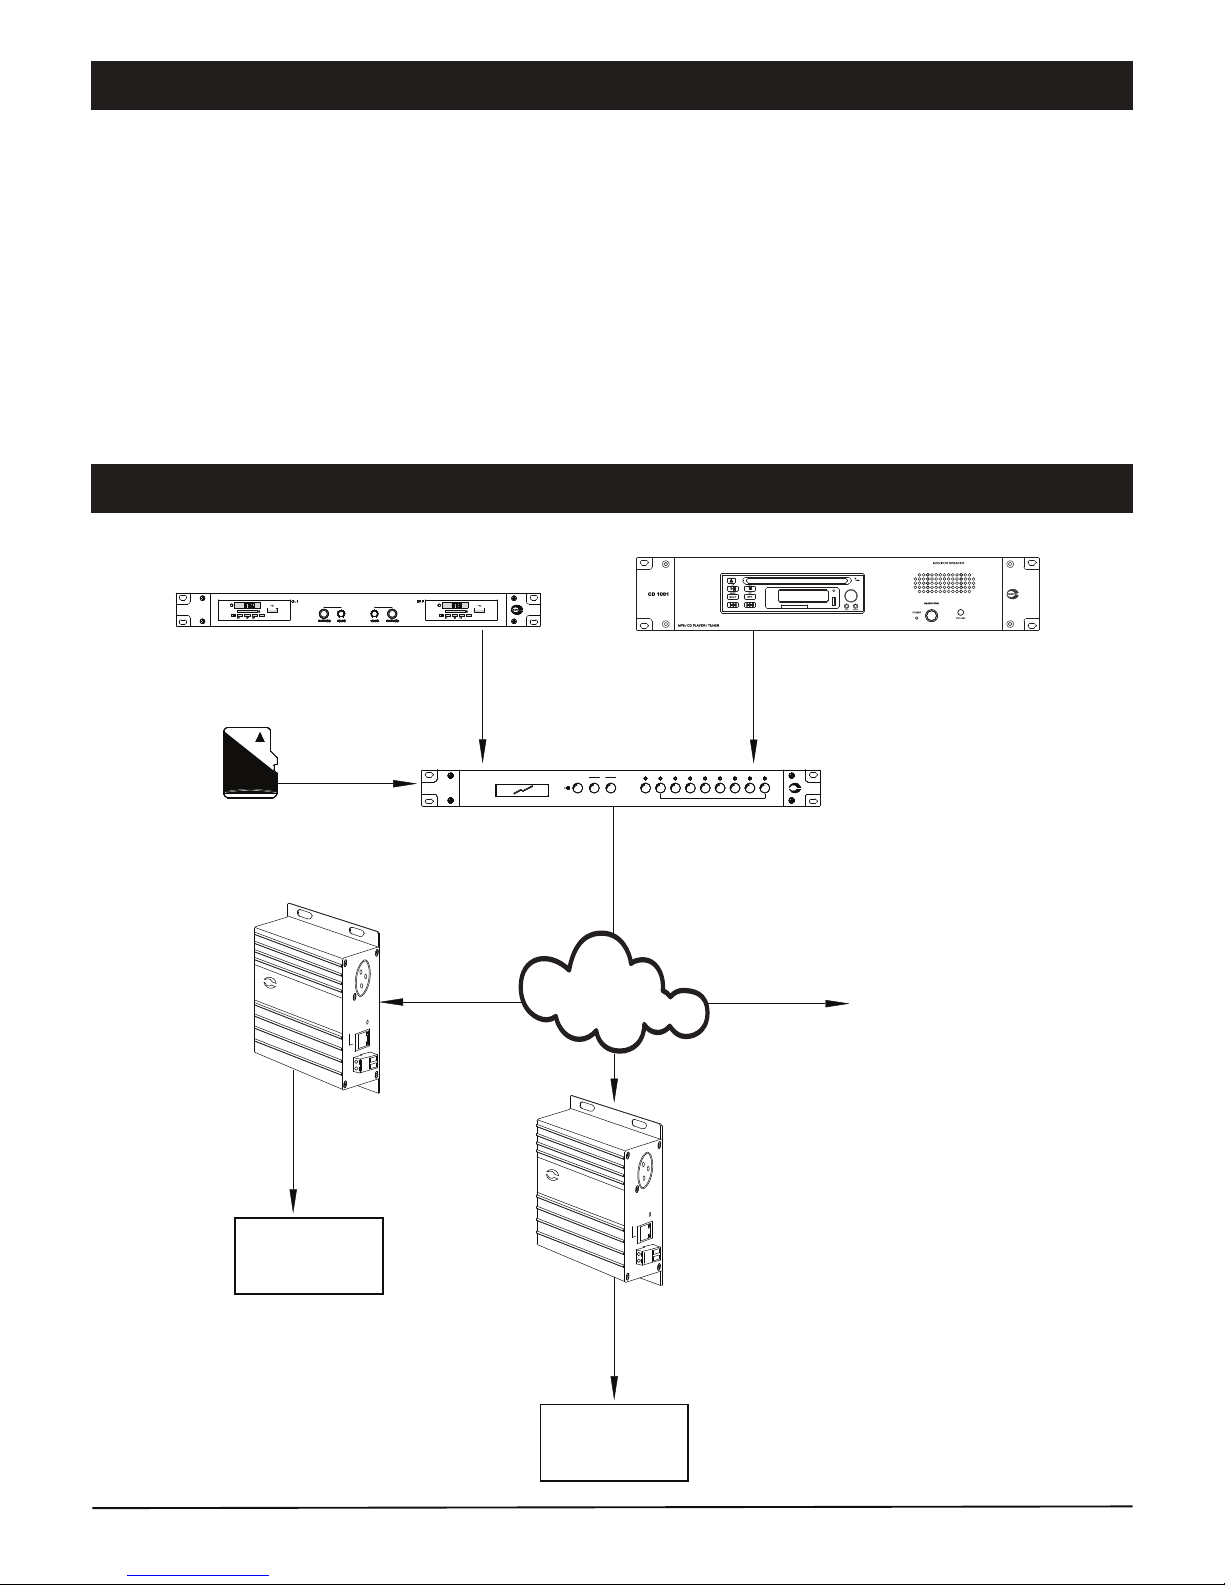
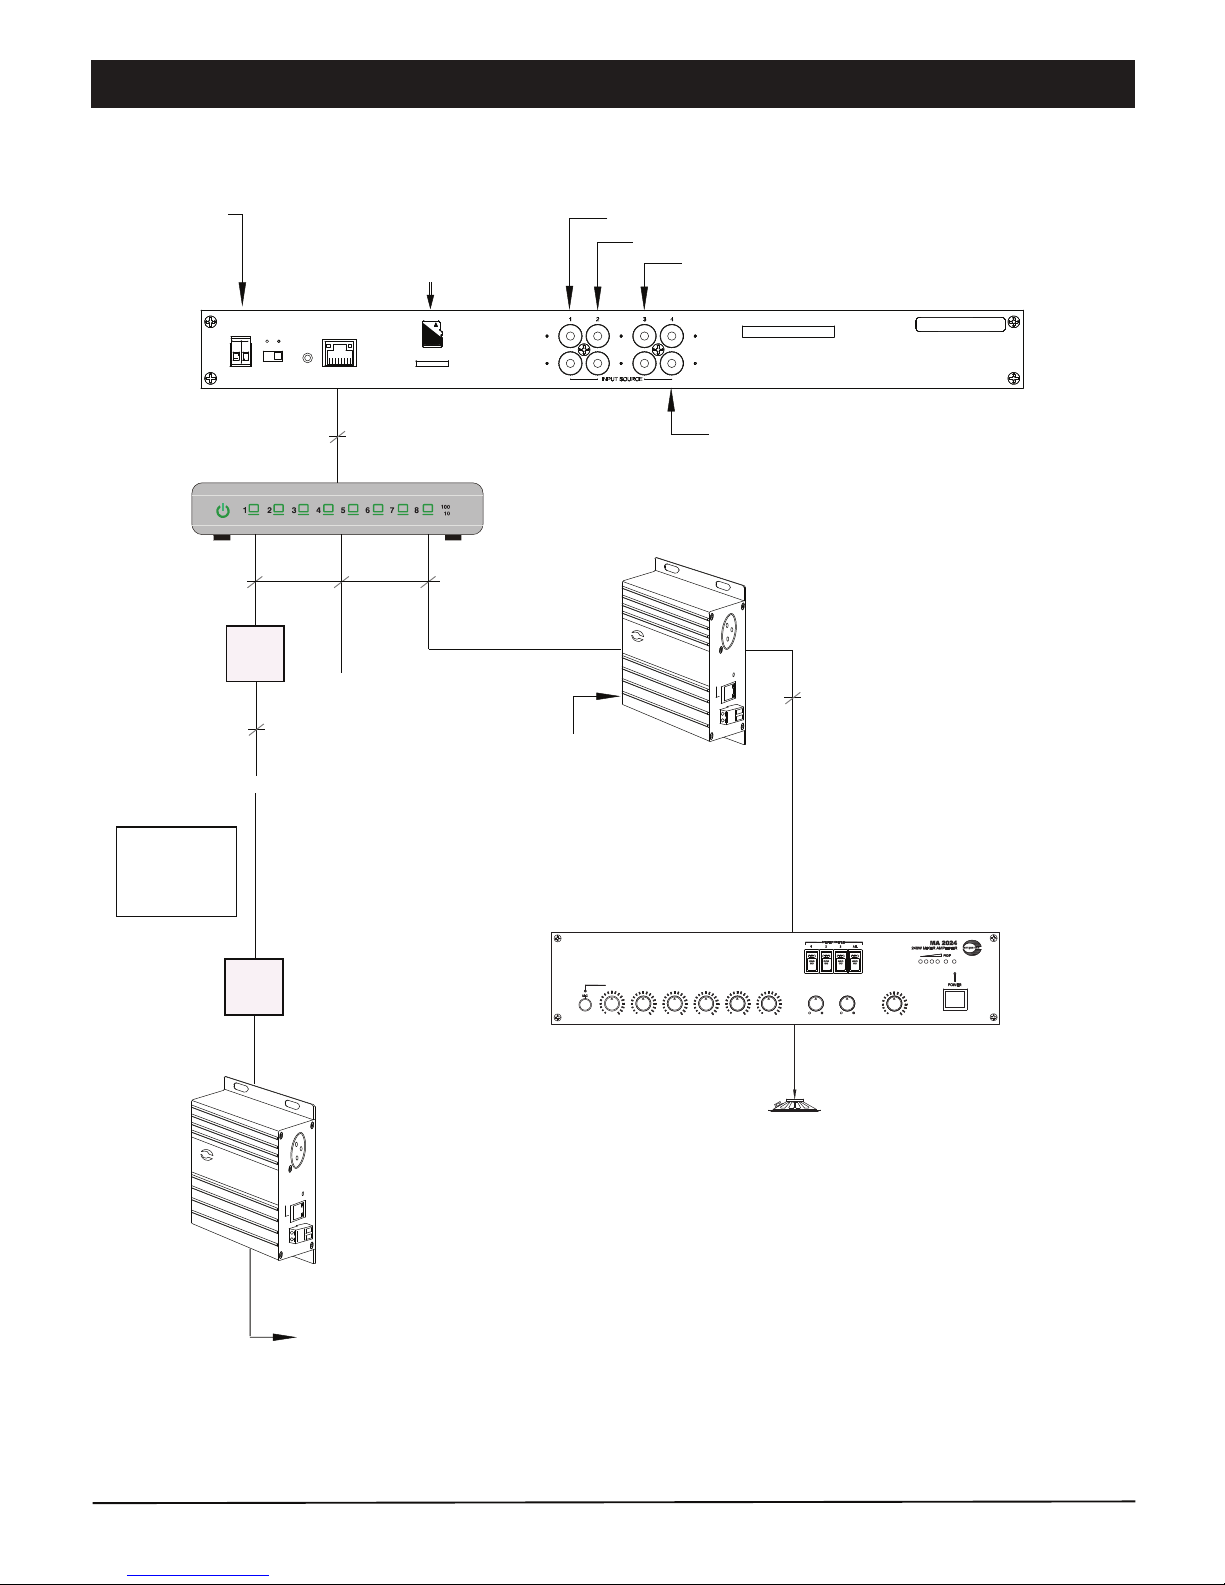
On Powering Up, the Server shall be assigned automatically to the input source which was set previously. ( Refer to System
Configuration ). By default, it is SD Card audio source. To stream music ;
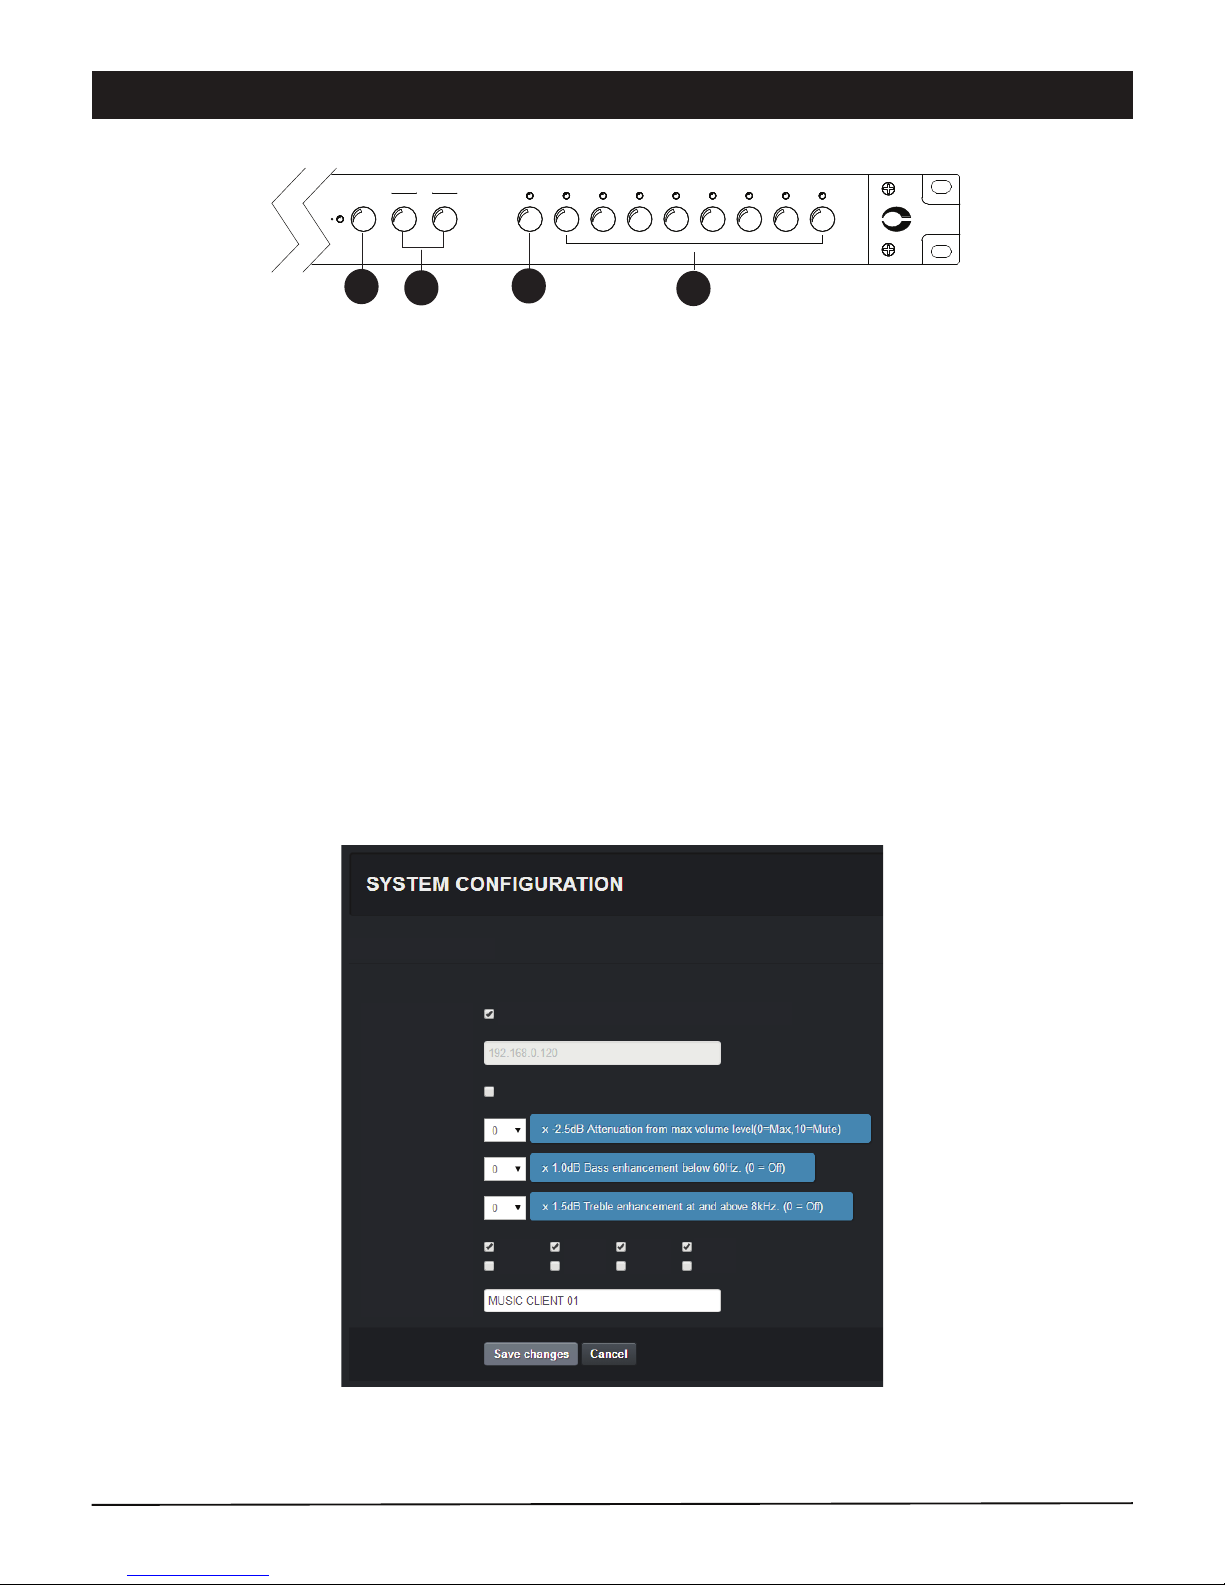
1. Select Source ( Button 1 ) and the related source information shall be displayed by the LCD panel. Use Next or Prev (
Button 2 ) to toggle between the sources.
2. Press Stream ( Button 3 ) to start streaming.
3. Select Destination ( Button 4 ).
If SD Card is selected, Button 2 shall be used to select the music files.At the destination end, the mixer / audio processing
equipment / zone selector must be activated to broadcast the music.
System firmware or Browser shall be updated once in a while when new features are available or to fix bugs. There are 2
methods of doing;
Server Reset Bootloading
If the server “hanged”, it is required to perform system reset by :
1. With power off, press Reset button located at the rear panel ( Part Nbr 8 ) and switch on the power.
2. The front LCD display shall go into Boot Menu, as shown below.
3. Use Next button to switch between the functions and press Source button to select.
System Bootloding ( Firmware / Browser Update)
Boot Menu
1. Net BootloaderNext / Source Next / Source Next / Source
Boot Menu
2. Reset Factory Boot Menu
3. Run to App
*Press the Next button for the next menu / Source button for Enter.
Net Bootloader
Reset
Run to App
:For firmware and browser upgrade
:to return the system to factory default
:to skip the above and return to main menu.

Page 10 iPX5200 IP NETWORK AUDIO / BGM SERVER
System Bootloding ( Firmware / Browser Update)
1.To updatethe firmware,choose binaryfile with“appbin” extension( newfile downloadedfrom websiteor sourcedirectly from
us ) and click update.
2. To update the browser, choose binary file with “webbin” extension and click update.
System Configuration
Update Web Page No file chosen
No file chosen
Update Firmware
To update firmware & browser via html page, enter the IPAddress (192.168.0.120) and go to ‘System Configuration’ page for
firmware or browser update.
Update Firmware :
- To update firmware, choose binary file with “appbin”
extension ( new file downloaded from website or source
directly from us ) and click update.
Update Web page :
- To update web page, choose binary file with “webbin”
extension and click update.
4. At the web browser, enter the IP address 192.168.0.120 and the page below shall appear. This is a “Safe Mode” page for
Browser or Firmware update.
Bootloading Using Browser

Page 11
iPX5200 IP NETWORK AUDIO / BGM SERVER
Technical Specifications
iPX5200 Music Server
Power Requirement :
Voltage
Current
Connectivity
- LAN Interface
- Common Protocols
- Priority Protocols
Audio
-Analogue Input (peak-to-peak)
- Input Load resistance
- Input Load Capacitance
- Total Harmonic Distortion (THD)
- S/N Ratio (full scale signal)
- Digital Format
Client Connection
User Interface
Firmware Upgrade
Operating Condition :
Temperature
Humidity
Case :
Dimension
Weight
18 ~ 30V DC (Normal DC 24V)
<100 mA
RJ-45, 100Mb/s
TCP/IP, UDP, IGMP, HTTP
UDMP,ADP
1.25Vrms
30 Ohm
100 pF
0.1%
83 dB
IMAADPCM / MP3 (CBR / 320 kbps max) / WAV
255 Max
(Web Browser) IE V8+, Firefox V22+, Google Crome V25+
RS485
Via Web Browser
-20°C ~ 80°C
0 - 70%
482 x 44 x 130 mm
1.9 kg

Warranty Conditions
Disclaimer
AMPERES ELECTRONICS SDN BHD
MADE IN MALAYSIA
Published : August 2014
ISO 9001: 2008
Design & Manufacture of Public Address Equipment and Systems
Certicate No. 16895 / A / 0001 / UK / En
Only Amperes Electronics Service Centres are allowed to make warranty repairs : a list of Amperes
Electronics Service Centres may be asked for by the purchaser or send directly toAmperes Electronics Sdn
Bhd at 70 Jalan Industri PBP 3, Tmn Perindustrian Pusat Bandar Puchong, 47100, Puchong, Selangor,
Malaysia or its authorized master distributor, TNT Links Sdn Bhd / MyPASystems Sdn Bhd. This warranty is
not valid if repairs are performed by unauthorized personnel or service centres.
This warranty covers only repairs and replacement of defective parts ; cost and risks of transportation as
well as removal and installation of the product from the main system are for the account of the purchaser.
This warranty shall not extend to the replacement of the unit.
This warranty does not cover damages caused by misuse, neglect, accident of the product as well as using
the product with power supply voltage other than shown on the product, or any other power supply source /
adaptor not recommended by the manufacturer.
This warranty does not cover damages caused by fire, earthquakes, floods, lightning and every cause not
directly related to the unit.
This warranty does not include any indemnity in favor of the purchaser or the dealer for the period out of use
of the unit; moreover the warranty does not cover any damages which may be caused to people and things
when using the product.
This warranty certificate is valid only for the described product, and is not valid if modifications are made on
this certificate or on the identification label applied on the product.
This warranty covers all the material and manufacturing defects and is valid for a period of 12 months from
the date of purchase or for a longer period in countries where this is stated by a national law. In this case,
the extension is valid only in the country where the product is purchased.
Amperes Electronics Sdn Bhd is not obliged to modify previously manufactured products under warranty if
the design changes or improvements are made.
Information contained in this manual is subject to change without prior notice and does not represent a
commitment on the part of the vendor. AMPERES ELECTRONICS SDN BHD shall not be liable for any
loss or damages whatsoever arising from the use of information or any error contained in this manual.
It is recommended that all services and repairs on this product be carried out byAMPERES ELECTRONICS
SDN BHD or its authorized service agents.
AMPERES series must only be used for the purpose they were intended by the manufacturer and in
conjunction with this operating manual.
AMPERES ELECTRONICS SDN BHD cannot accept any liability whatsoever for any loss or damages
caused by service, maintenance or repair by unauthorized personnel, or by use other than that intended by
the manufacturer.
AMPERES ELECTRONICS SDN BHD
Other manuals for iPX5200
1
Table of contents
Other Amperes Server manuals
Popular Server manuals by other brands

SpectraLink
SpectraLink IP-DECT 200 Interoperability guide

IBM
IBM QRadar Core Appliance 21 G2 Series Problem determination and service guide

SSS Siedle
SSS Siedle AS 670-0 S Product information

Furuno
Furuno FI-3005 Operator's manual

NEC
NEC NEC Express5800 Series Getting started guide

Lenovo
Lenovo ThinkSystem SR850 V2 Maintenance manual

Supermicro
Supermicro SuperServer SYS-821GE-TNHR user manual

Bosanova
Bosanova RBT-416 Specifications

Digital Watchdog
Digital Watchdog Blackjack DW-BJER4U-LX quick start guide

Twinhead
Twinhead Durabook Z141 user manual

Lenovo
Lenovo ThinkSystem SR860 V3 System configuration guide

TYAN
TYAN GN70-B8236-HE Service engineer's manual