ANEKEN GC-1020 Guide

METAL DETECTOR
GC-1020
ANEKEN Metal Detector
with a 2-year Warranty and
Lifetime Support, please Contact us
by [email protected]om
if you have any problem
USE MANUAL


Language / Sprache
English 01------------------
Deutsch 18-----------------

1
Attention
These operating instructions are to be considered
a component of the device.
Please read the safety instructions and the operating instruc-
tions carefully before use.
Keep these instructions for renewed use at a later date. When
the device is sold or given to someone else, the instruction
manual must be provided to the new owner/user of the product.
Thank you
We are thrilled that you have chosen to purchase
the ANEKEN Metal Detector.
At ANEKEN, we are committed to providing you with a product
that enhances your daily life. We also aim to give our customers
excellent support.
Should you have any question or feedback about your new
product, simply get in touch with our customer support team by
email at ANEKEN8888@163.com.
Enjoy your new product.

2
Contents
General safety instructions...................................................... 031.
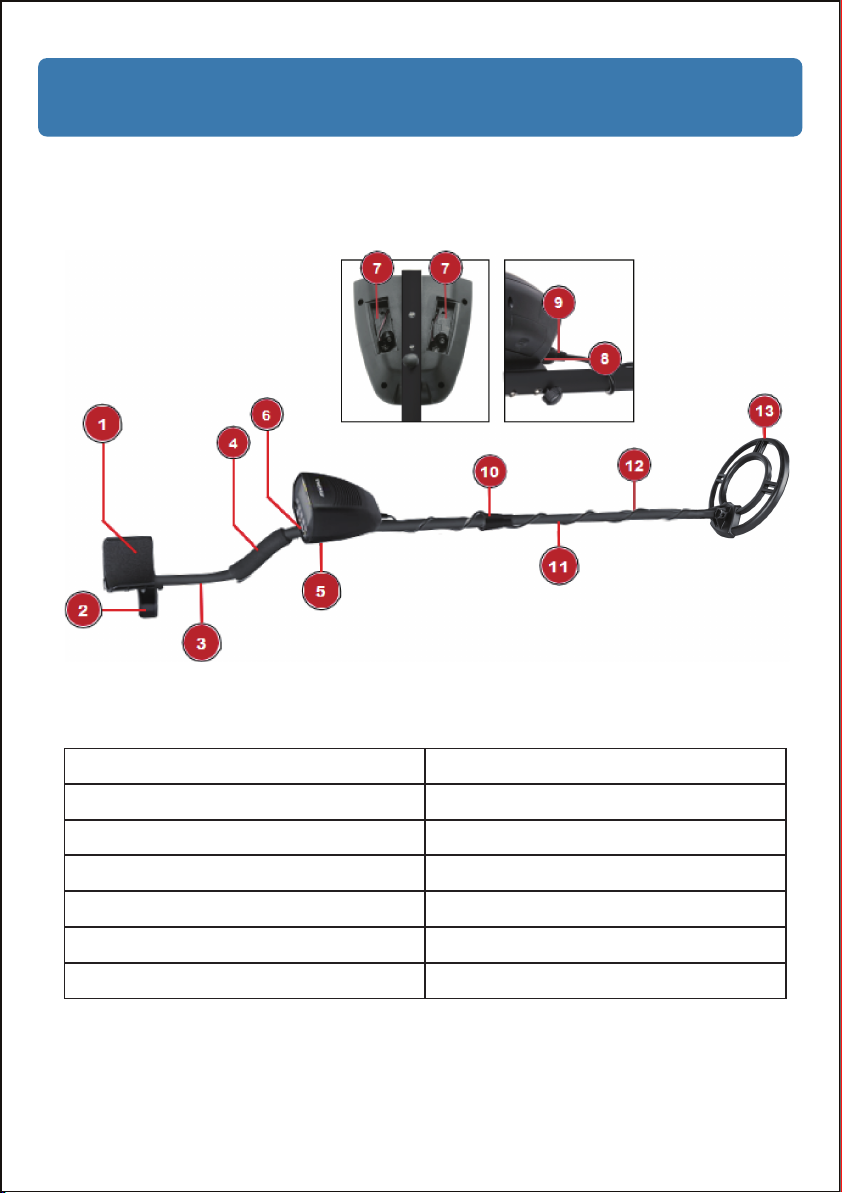
Parts overview and scope of delivery...................................... 052.
Terminology .............................................................................063.
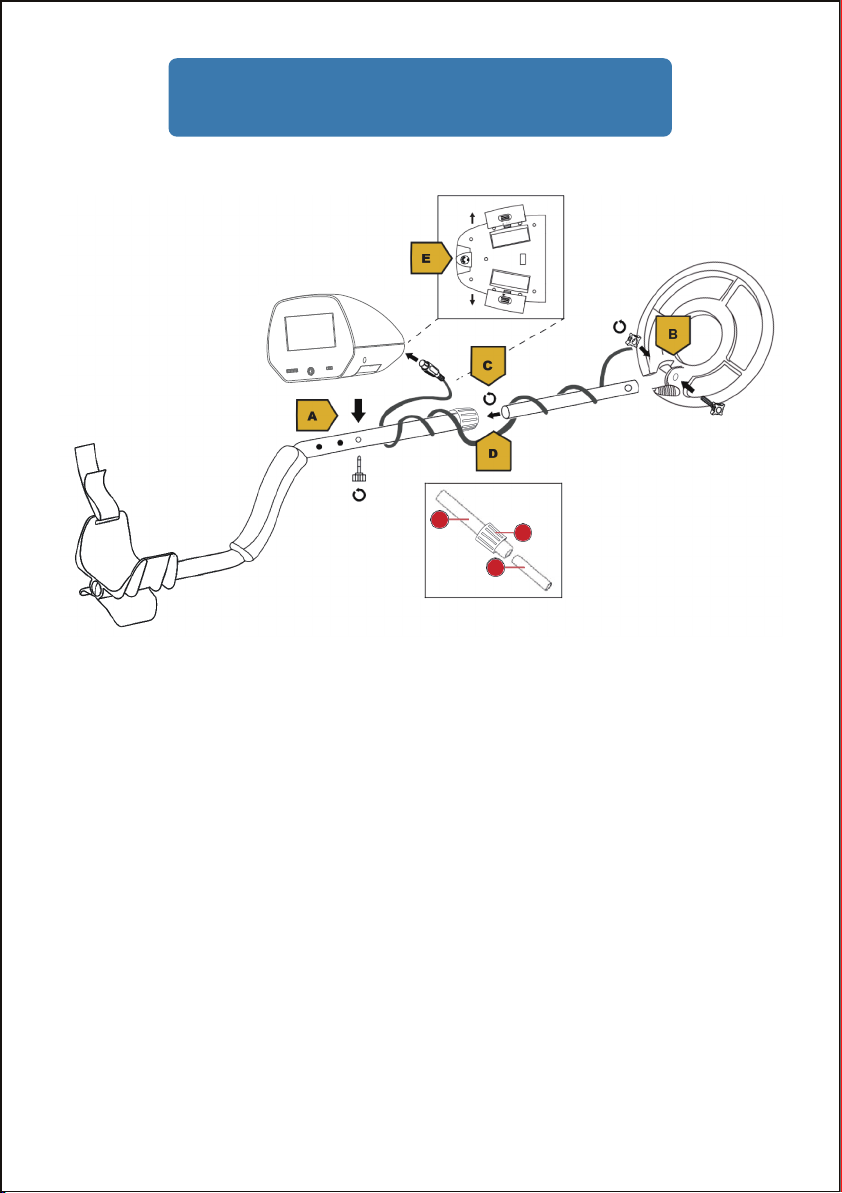
Component Assembly............................................................. 074.
Before starting operation.........................................................085.
Setting up power supply..........................................................086.
Control buttons ....................................................................... 097.
LCD Display .............................................................................108.
Features ................................................................................... 119.
Product Parameter .................................................................. 1210.
Operation .................................................................................1211.
Practice Test ............................................................................ 1312.
Exact localization of the object................................................1413.
Search coil movement............................................................. 1414.
Beep tones ............................................................................... 1515.
Depth indicator ........................................................................1516.
Headphones ............................................................................ 1617.
Disposal ................................................................................... 1618.
WARRANTY ............................................................................... 1719.

3
DANGER
Ammunition findings harbour risks!
Should you encounter ammunition or remains of ammunition,
please stop excavation immediatly and inform the relevant
authorities.
1. General safety instructions
DANGER
Risk of electric shock
This device has electronic parts operated via a power source
(power supply and/or batteries). Im- proper use of this product
can cause an electric shock. An electric shock can cause serious
or poten- tially fatal injuries. The following safety information
must be observed at all times.
Before starting up the device, check the device, the cables and
the connections for signs of damage.
DANGER
Risk of suffocation
Improper use of this product can result in suffocation. This is
particularly dangerous for children. The following safety infor-
mation must be observed at all times.
Keep packaging materials (plastic bags, rubber bands etc.) away
from children. They can cause suffocation.

4
DANGER
Risk of explosion
Improper use of this product can cause an explosion. The
following safety information must be ob- served at all times to
prevent an explosion.
Do not expose the device to high temperatures. Use only the
recommended batteries. Do not short-circuit the device or
batteries, or throw them into a fire! Excessive heat or improper
handling could trigger a short-circuit, a fire or an explosion!
NOTICE
Risk of damage to property
Improper handling can result in damage to the device and/or to
the accessories. Always observe the following safety information
when using the device.
Never disassemble the device. In the event of a fault, please
contact your specialist retailer. The specialist retailer will contact
the service centre and send the device for repair if necessary.
Protect the device from severe shocks!
Use only the recommended batteries. Always replace weak or
empty batteries with a new, com- plete set of batteries at full
capacity. Do not use batteries from different brands or with
different ca- pacities. Remove the batteries from the unit if it has
not been used for a long time.
Never use rechargeable batteries.
NOTICE
Risk of voltage damage!
The manufacturer is not liable for damage related to improperly
installed batteries!

5
2. Parts overview and scope of delivery
Illustration 1: Parts overview for Metal detector
Recommended batteries: 2 pcs. 9V alkaline batteries
1. Armrest
3. Upper stem (S-stem)
5. Control unit with Display
7. Battery compartment
9. Plug
11. lower stem
13. Search coil
2. Detector stand
4. Comfort Hand-grip
6. Headphone Jack
8. Connector
10. Locking collar
12. Coil cable

6
3. Terminology
ELIMINATION: An "eliminated" metal does not emit a beep
tone and is not shown in the display.
DISCRIMINATION: The detector emits different tones for
different types of metals, and when the de- tector "eliminates"
certain metals, we refer to this as the detector "discriminating"
among different types of metals. Use this to filter out garbage or
other unwanted items.
HIDDEN FROM DETECTION: An element or a region of an
element within the metal spectrum is left out from detection and
thereby "eliminated".
RELIC: A relic is an object of interest by reason of its age or its
association with the past. Many relics are made of iron, but can
also be made of bronze or precious metals.
IRON: Iron is rarely a desirable search object because it is a
commonly used, inferior metal.
FERROUS: Metals which are made of, or contain, iron.
PULL-TABS: Discarded pull-tabs from beverage containers.

7
4. Component Assembly
Assembly is easy and requires no special tools.
1. Hold the control unit on to the upper stem, right above the
intended hole, and fasten the unit using the supplied screw (A).
2. Attach the search coil to the lower stem (B) using the screws and
knurled nuts.
3. Open the locking collar (1) (C).
4. Push the lower stem (3) into the upper stem (2) (S-stem) (D).
5. Adjust the stem to a length that suits your body height and then
turn the locking collar firmly.
6. Wrap the coil cable around the stem. Leave sufficient leeway.
7. Insert the plug into the connector on the control unit (E).
A
D
2
3
1
E
C

8
6. Setting up power supply
5. Before starting operation
1. This metal detector is only intended for outdoor use. Do not
use the device inside the house. Incor- rect signals can be
caused by electrical interference or metal scrap.
2. If there are any errors, set the sensitivity to the lowest level.
Always begin at a reduced sensitivity level when using. After
you become familiar with the detector, you may try it at full
sensitivity.
3. In areas with a high mineralization, beep tones may sound
even if there is no metal. In this case, lower the sensitivity level
and increase the height between the search coil and the
ground until the wrong signal disappears.
1. Remove the battery compartment cover.
2. Insert battery(ies) into the battery compartment. Ensure that
the battery polarity (+/-) is correct.
3. Replace the battery compartment cover.

Illustration 2: Control buttons
1. On / off power switch: To turn the
metal de- tector on or off.
3. Button ALL METAL: Find all kinds of
metal.
5. Button NOTCH: selectively eliminate a
cat- egory from detection within the
metallic spec- trum
7. Headphone Jack
2. + / - buttons: Increase or decrease
value.
4. Button DISC: eliminate unwanted
objects from detection
6. Button SENS: Sensitivity adjustment
mode
8. Button DISC/NOTCH: To set the
MIN/MAX target range, first press the
DISC/NOTCH but- ton and then the +/-
buttons to increase or de- crease.
9. Volume wheel: For adjusting the
volume.
9
7. Control buttons
3
4
5
2
2
1
9
6
7
8

10
8. LCD Display
1. Metal category: Shows the detected or
elimin- ated metal type by DISC or NOTCH
mode. Strong signal: The arrow appears
constantly. Weak signal: Arrow flashes or
does not ap- pear
3. Depth indicator: Displays the probable
depth of the target object.
4. Sensitivity indicator: Set the
sensitivity level for detection.
5. Currently active mode 6. Battery status: Shows the current
battery level.
2. DISC/NOTCH MIN/MAX Range
Note:
If detection is interrupted for 5 seconds, the arrow disappears.
When an arrow points to a metal type, the detector may have detected either
a coin or other type of metal (such as jewellery, tokens, medals or even scrap
metal) of similar size and type to the coin.

9. Features
11
Gold Range:
IRON FOIL — indicates that the target is probably iron or foil. Some oxidized
iron might register within the SILVER range.
5¢ (NICKEL) — Indicates the target is probably 5¢ or a nickel. Some small
gold rings can be re- gistered in this range.
PULL TAB — Indicates that the target is probably a pull tab of an aluminum
can. Some small gold rings could also be in found this range.
S-CAPS — indicates that the target is probably a metal bottle cap with whorl.
Some medium sized gold rings might register in this category.
1¢ — indicates that the target could be a penny made of copper or zinc.
Some coarse gold pieces could be registered within this 1¢ category.
Silver Range:
1¢ / 25¢ — indicates that the target is probably a silver coin, 25¢ or 1¢. Some
large aluminum coins could also be registered within the 1¢ 25¢ category.
As these are approximate values, the detector may not have found the object
being displayed. The indicator is only a visual reference that helps you
decide whether an item is worth examining.
Three Operating modes:
» ALL METAL (find all kinds of metal)
» DISC (eliminate unwanted objects from detection)
» NOTCH (selectively eliminate a category from detection within the metallic
spectrum)
LCD screen
The LCD screen shows sensitivity, depth and metal type.
Three tones to indicate different types of metal
Sensitivity > 18 cm (e.g. for a coin)
8.5“ waterproof search coil
Speaker and headphone jack
Two 9V alkaline batteries

Product number:
Net weight:
Dimensions (WxDxH):
Main material:
Frequency:
Waterproof coil:
Adjustment angle:
Sensitivity level:
Explore depth:
Folding shovel size:
Folding shovel weight:
LCD screen:
GC-1020
1.04KG
21.5* 21.5 * 106(121) CM
ABS
6.6khz
10 inches
180°
1~6
>18cm
40*9.5CM
500G
75*32mm
Slide the power switch to the right to turn on the unit. The unit
displays all icons on the LCD screen. The beeps low, medium, high
sound. After approx. 2 seconds, the device switches to standby mode.
Now the LCD display shows ALL METAL and SENS. The value of SENS
on the segment is 5, the range from MIN to MAX for DISC/NOTCH can
now be set.
ALL METAL: Search of metals of any kind. The detector gener-
ates a simple signal tone for any kind of metal. DISC and NOTCH
settings do not work in this mode. To adjust the sensitivity, press
+ to in- crease or - to decrease.
10. Product Parameter
11. Operation
12

DISC: Sort out the detection of undesirable metals by metal
discrimination. You can set the target range from MAX (Maxi-
mum) to MIN (Minimum) with the DISC/NOTCH and + / - buttons.
The detector can detect the type of metal shown on the display.
Meanwhile, other types of metal are sorted out and not
displayed on the screen.
NOTCH: To ignore metal types, you can hide different types of
metal in this mode. Press + or - to select the desired metal type
(e.g., S-CAPS) to be eliminated.
SENS: Setting the sensitivity
Press + (increase) or - (decrease) to increase or decrease the
sensitivity.
VOLUME: Adjust volume
Use the volume wheel to adjust the volume to the desired value.
12. Practice Test
13
1. You need the following items:
a. A nail
b. A 50 cent coin
c. A big silver coin
2. Press the on / off button to turn the unit on.
3. Find an area that is free of metallic objects.
4. Place the three objects on the floor, maintaining sufficient distance
5. Swing the search coil slowly over each object.
6. Try different search modes to filter out unwanted items

13. Exact localization of the object
14. Search coil movement
14
1.Keep the search coil always level with the ground
2.Slowly perform half-circle movements.
3.As soon as a metal is detected, a beep sounds and the metal type is
shown in the display.
4.To ensure proper detection, always perform multiple swings, so that
no objects are overlooked.
An exact localization of the object facilitates the subsequent
excavation work.
1. Always start with a low sensitivity. Increase sensitivity only when you are more
familiar with the device.
2. If the device detects a buried metal object, perform an approaching pivot
movement.
3. Mark the place of discovery.
4. Perform drawing an "X" movement above the place of discovery.

IRON (GOLD RANGE) MEDIUM (GOLD RANGE) SILVER RANGE
Low tone Medium tone High tone
Iron or ferrous objects
will report here (5¢).
Pull-tabs, zinc, small bass
objects, some bottle caps
will report here (S-CAPS, 1¢)
Silver and copper coins,
big brass coins, 25¢, 10¢
(1982 or earlier) and other
precious coins.
15. Beep tones
15
The device has three beep tones which indicate the type of the buried
object. In ALL METAL mode, a single tone will sound. When the detector
is set to DISC or NOTCH mode, the built-in audio identifica- tion system
sounds a unique tone for each of the three metal categories, which
correspond to the cat- egories shown on the LCD display.
16. Depth indicator
1. The Depth Indicator indicates the relative depth of the target. It is
accurate for coin-sized objects. When passing over an object, the
depth indicator will light up and stay illuminated until another object
is scanned. Repeated indication at the same depth level indicates an
accurate target depth.
2. If the depth indication varies with each sweep, try sweeping at
different angles. There may be more than one target present. After
practice, you will learn the difference of accurate readings, multiple
tar- gets, and highly erratic readings.
NOTE: Depth value indication in air is different from that of under the
ground.

17. Headphones
18. Disposal
16
1. The device has a built-in speaker. But it is also possible to
connect headphones (3.5 mm jack) (not included).
2. To protect your hearing, set the volume to the lowest setting
before you begin listening.
1. Sort packaging into different materials for disposal. Contact the
local waste disposal service provider or environmental agency for
information about appropriate waste management.
2. Do not dispose of electrical devices with the household waste.
3. In accordance with European Directive 2002/96/EC regarding waste
electrical and electronic equipment and its incorporation into
national law, used electrical devices must be collected separately
and recycled in an environmentally friendly manner.
4. Do not dispose of batteries and rechargeable batteries with the
household waste. You are leg- ally required to return used batteries
and rechargeable batteries. After they are used, the bat- teries can
be returned free of charge to our point of sale or to a nearby location
(for example, retailers or municipal collecting points).
5. Batteries and rechargeable batteries are marked with a symbol of a
crossed-out dustbin and the chemical symbol of the pollutant. “Cd”
stands for Cadmium, “Hg” stands for mercury and “Pb” stands for
lead.

19. WARRANTY
17
Dear friend, thank you for your purchase. Our customer service
Team is standing by to assist you if you have any questions or
concerns.
Every product purchased from us come with a 2-year warranty
and lifetime support by [email protected]om
Table of contents
Languages: