Anova TC98S Instruction Manual

1
EN
INSTRUCTIONS AND USER MANUAL
TC98S
Millasur, SL.
Rúa Eduardo Pondal, nº 23 - Pol. Ind. Sigüeiro
15688 - Oroso - A Coruña - 981 696465 - www.millasur.com

2
EN
ANOVA wishes to congratulate you for choosing one of our
products and guarantees the assistance and cooperation that has
always distinguished our brand over time.
This machine is designed to last for many years and to be very
useful if used in accordance with the instructions contained in the
user manual. We therefore recommend that you read this
instruction manual carefully and follow all our recommendations.
For more information or questions, you can contact us through our
web supports such as www.anova.es
INFORMATION ABOUT THIS MANUAL
Pay attention to the information provided in this manual and on the machine
for your safety and that of others.
•This manual contains instructions for use and maintenance.
•Take this manual with you when you go to work with the machine.
•Contents are correct at time of printing.
•The rights to make alterations are reserved at any time without
affecting our legal responsibilities.
•This manual is considered an integral part of the product and should
remain with it in the event of loan or resale.
•Ask your dealer for a new manual in case of loss or damage.
READ THIS MANUAL CAREFULLY BEFORE USING THE MACHINE
To ensure that your machine provides the best results, please read the
usage and safety guidelines carefully before using it.
OTHER WARNINGS:
Incorrect use could cause damage to the machine or other objects.
Adapting the machine to new technical requirements could cause differences
between the content of this manual and the product purchased.
Read and follow all instructions in this manual. Failure to follow these
instructions could result in serious personal injury.

3
EN
Content
1. Safety instructions
2. Identification of the machine and its components
3. Unpacking and assembly
4. Controls and instruments
5. Instructions for use
6. Maintenance
7. Technical data
8. Environment
9. Exploded view
10. CE conformity declaration
1. Safety instructions
Important
The riding mower must always be used
with the utmost caution. To keep safety
precautions and operating instructions
close at hand, labels have been
attached to the machine displaying
pictographs illustrating the main
operating precautions.
Since these labels are considered an
integral part of the machine in
accordance with applicable safety
regulations, the user is responsible for
replacing them if they become
detached or illegible.

4
EN
1.1. Security labels position
1.2. Please note the following safety points
- The machine should never be left in a condition that allows an untrained or
unauthorized person to use this machine.
- The operator must take all due care and diligence for the safety of and with respect
to those in the vicinity while using the machine.
- Some or all of the following: PPE warning signs, symbols and / or pictograms may
appear throughout this manual. You must comply with their warnings.
Note: Failure to do so may result in personal injury to you or those around you.
The following safety notes will help prevent or reduce the risk of injury or
death.
Danger
Indicates a hazard which,
if not avoided, could
result in serious injury or
death.
Warning
Indicates a hazard which, if
not avoided, could result in
serious injury.
Caution
Indicates a hazard which, if
not avoided, could result in
minor injury or operation.
Note or Important
Indicates a situation that
could easily result in
equipment damage.
Read and keep the manual
in a safe place and pass it
on if the machine is loaned
/ sold to another user.
You should read the
instructions completely to
make sure you use and
operate the machine safely.
Appropriate personal protective equipment (PPE)
It must be used at all times when the machine is in use or under repair
ALWAYS keep the work area clear of non-essential people, including but not limited
to children, the elderly, and the vulnerable.
NEVER ALLOW an untrained person to use this machine.
1.3. General safety rules
1.3.1. Training
1. Read the instructions carefully. Familiarize yourself with the controls and how to

5
EN
use the equipment correctly.
2. Never allow children or people who are not familiar with these instructions to use
the machine. Local regulations may restrict the age of the user.
3. Never mow when people, especially children or pets are nearby or
carry passengers on the equipment.
4. Never mow in the dark.
5. Note that the user is responsible for accidents or hazards that other
people or their property may suffer.
6. All drivers should seek and obtain professional and practical instruction. Such
instruction should emphasize:
- The need for care and concentration when working with riding machines.
- You cannot use the brake to regain control of a seated machine sliding
down a slope. The main reasons for loss of control are:
i. Insufficient wheel grip
ii. Speeding
iii. Inadequate braking
iv. The type of machine is not suitable for your task
v. Lack of knowledge of the effect of soil conditions, especially slopes
vi. Incorrect hitch and load distribution
1.3.2. Preparation
1. When mowing the lawn, always wear sturdy shoes and long pants.
Do not wear the equipment barefoot or open sandals.
2. Thoroughly inspect the area where the equipment will be used and remove all
objects that may be thrown from the machine.
3. Danger
Gasoline is very flammable:
- Store fuel in containers specifically designed for this purpose.
- Refuel only outdoors and do not smoke while refueling.
- Add fuel before starting the engine. Never remove the fuel tank cap or add
gasoline while the engine is running or when the engine is hot.
- If you spill gasoline, do not start the engine and move the machine away
from the area of the spill. Do not create any source of ignition until gasoline
vapors have evaporated.
- Replace and securely tighten all fuel tank and tank caps.
4. Replace faulty silencers.
5. Before use inspect the machine to verify that the various components of the
machine such as blades, blade bolts or the cutter assembly are not worn or
damaged. Replace worn or damaged blades and bolts in kits to preserve balance.
6. On multi-blade machines, remember that rotating one blade can cause others to
rotate.
1.3.3. Functioning
1. Do not start the engine in a confined space where dangerous carbon monoxide
fumes can accumulate.
2. Mow only in daylight or good artificial light.
3. Before starting the engine, disengage the blades and change to neutral.

6
EN
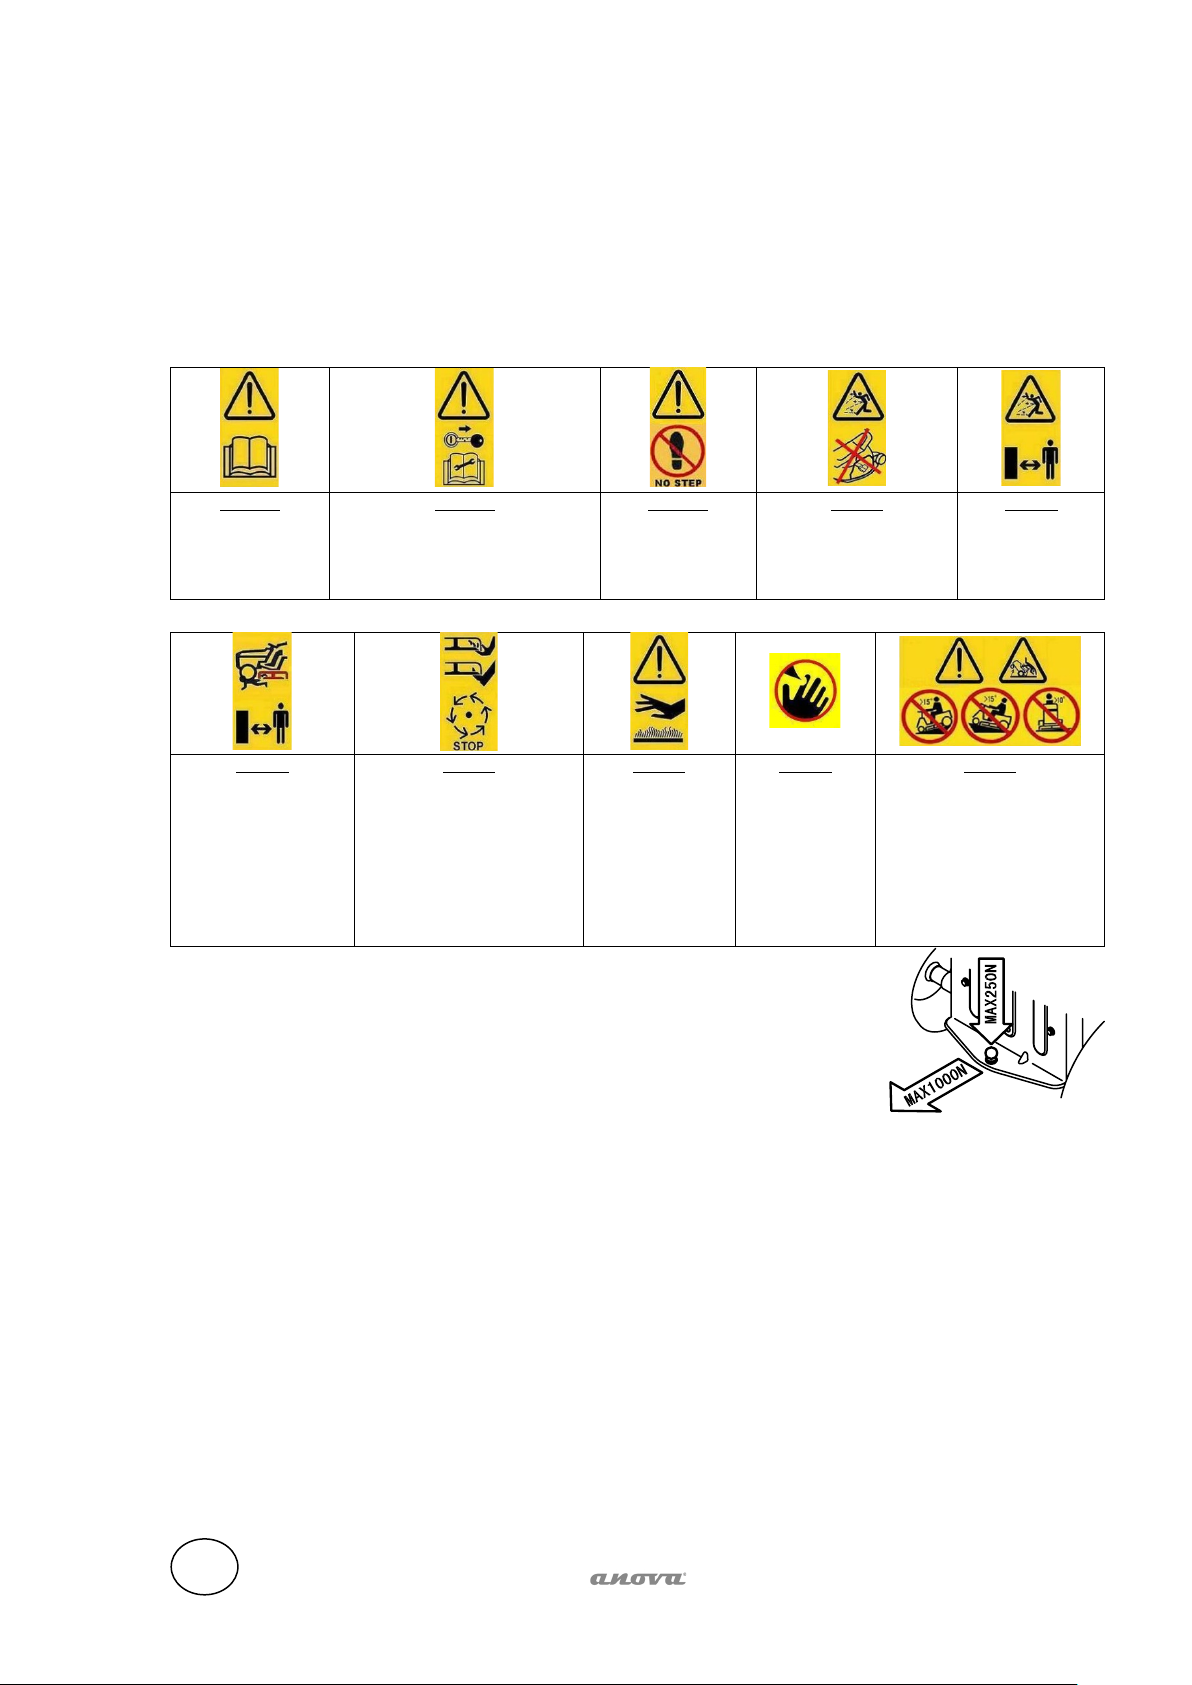
4. Do not use the machine on grass with slopes greater than 15 ° (27%) ;do not
use the machine on grass with side slopes greater than 10 ° (18%).
5. No slope is safe. Traveling on grassy slopes requires special care. To protect
against tipping:
- Do not stop or start suddenly when going up or down an incline.
- Shift the gear slowly and always keep the machine running, especially when
descending a slope.
- Machine speeds should be kept low on slopes and during sharp turns.
- Stay alert for slopes and other hidden dangers.
- Never mow along the face of the slope.
6. Be careful when pulling loads or using heavy equipment:
- Use only approved drawbar hitch points.
- Limit loads to those you can safely control.
- Do not turn sharply. Be careful when backing up.
- Use counterweights or wheel weights whenever indicated in the instruction
manual.
7. Stop blades before crossing surfaces other than grass.
8. Never use the machine with the guards damaged or without the safety guards in
place.
9. Do not change the engine governor setting or over-speed the engine. Running the
engine at excessive speed can increase the risk of personal and equipment injury.
10.Before leaving the driver's seat:
- Disengage the blades and lower the accessories.
- Shift into neutral and set the parking brake.
- Stop the engine and remove the ignition key.
11.Disengage the blades, stop the engine, and remove the ignition key:
- Before clearing obstructions or unclogging the collecting channel.
- Before cleaning, checking or repairing the machine.
- After striking a foreign object (inspect the machine for damage and make
repairs before restarting and operating the machine).
- If the machine starts to vibrate abnormally (check the causes immediately).
12.Unhook blades for transport or when not in use.
13.Stop the engine and disengage the blades:
- Before refueling.
- Before height adjustment, unless adjustment can be made from the
operator's position.
14.Reduce the throttle while the engine is running. If the engine is equipped with a
shutoff valve, cut off the fuel when you have finished mowing.
15.Be careful of traffic when crossing or near roads.
16.Never direct the discharge of material towards bystanders or allow anyone to
approach the machine while it is in operation.
1.3.4. Maintenance and storage
1. Keep all nuts, bolts, and screws tight to ensure equipment is in safe operating
condition.
2. Never store equipment with gasoline in the tank inside a building where the vapors
can reach an open flame or spark.
3. Allow the engine to cool before storing it in any enclosure.
4. To reduce the risk of fire, keep the engine, engine escape, battery compartment
and gasoline storage area free of grass, blades, or excessive grease.
5. Check the grass catcher frequently to see if it is worn or damaged.
6. Replace worn or damaged parts for safety reasons.
7. If it is necessary to empty the fuel tank, it should be done in the open air.

7
EN
8. When the machine must be parked, stored, or left unattended, lower the cutting
means unless a positive mechanical lock is used.
1.4. Security labels
Your machine must be used with care. That is why illustration labels have been affixed to
the machine, to remind you of the main precautions to take during use. These labels
should be considered an integral part of the machine.
If a label comes off or becomes illegible, it must be replaced. Its meaning is explained
below.
Warning
Read the
instructions before
using this machine.
Warning
Disconnect the ignition key and
read the instructions before doing
any repair or maintenance work.
Warning
No step on the
cover or discharge
protection.
Danger
Ejected objects:
Do not use without the
discharge guard or grass
catcher in place.
Danger
Ejected Objects -
Keep Bystanders
Away
Danger
Dismemberment:
Make sure children
stay away from the
machine at all times
when the engine is
running.
Danger
Risk of injury.
Blades in motion, keep
hands and feet away. The
blade will continue to rotate
for some time after the
engine is turned off or blade
control is disabled.
Danger
Risk of burns
Wait for the
engine to cool
completely before
making any
adjustments or
repairing the
engine.
Danger
Risk of serious
injury. Keep
your hands and
feet clear before
the blade and all
moving parts
stop.
Danger
Risk of tipping over on steep
slopes
Do not use the machine on
lawns with slopes greater
than 15 ° (27%).
Do not use the machine on
lawns with side slopes
greater than 10 ° (18%).
1.5. Regulation for trailer
The drag kitIt must be installed following the instructions provided.
When using the towing kit, do not exceed the recommended loads
indicated on the label and follow the safety instructions.
2. Identification of the machine and its
components
2.1. Identification of the machine
The label located on the seat support has the essential data of each machine.

8
EN
1. Name and address of the
manufacturer
2. Machine type
3. Blade speed in rpm (if indicated)
4. Cutting width
5. Year of manufacture
6. Weight in kg
7. engine power
8. Serial number
9. Sound power level according to
directive 2000/14 / CE
10. Mark of conformity according to
directive 2006/42 / CEE
2.2. Identification of its components
1. Engine cover.
2. Engine
3. Steering wheel
4. Ignition key
5. Seat
6. Parking brake lever
7. Battery
8. Front wheels
9. Brake pedal
10. Transmission activation pedal
11. Discharge protector
12.Blade
13.Blade cover
14.Rear drive wheels
15.Hydrostatic transmission release lever
16.Engine throttle lever
17. Blade deck up / down adjustment lever and cutting
height
18. Blade operating lever
19. Safety notices and labels
3. Unpacking and assembly
For storage and transportation purposes, some machine components are not factory
installed and must be assembled after unpacking. Follow the instructions below.
Important: The machine is supplied without motor oil and fuel. Before starting the engine,
fill with oil and fuel following the instructions given in the engine manual.

9
EN
3.1. Unpacking
When unpacking the machine, take care to gather
all individual parts and accessories and do not
damage the cutting deck when removing the
machine.
First remove the 6 bolts at the bottom of the
packing shelf, then you can lift the upper frame to
release the machine (operation to be performed by
two people).
Cut the fixed wire at the front and rear of the mower
frame, then remove the machine from the pallet.
The packaging contains:
1. Machine
2. Steering wheel
3. Steering connecting shaft
4. Steering axle cap
5. Wheels
6. Bumpers
7. Instruction manual
8. Nuts, bolts, washers, bushing and starter
key
9. Tools
10. Seat
Note: To avoid damage to the mower deck, raise it
to its full height and use extreme care when
removing the machine from the pallet.
3.2. Flywheel mounting
Place the machine on a flat surface and straighten the front wheels.
Mount the shaft on the outgoing shaft with the bolt and nut.
Place the steering wheel on the steering link shaft with the spokes directed towards the
seat.
3.3. Seat mounting
Mount the seat on the plate with the screws
12345
6
7
9
10
8

10
EN
3.4. Battery connection
# Electrolytic fluid is a sulfuric acid solution.
Danger
Sulfuric acid is corrosive and dangerous.
Sulfuric acid can cause blindness or severe burns.
Keep out of reach of children.
Never dispose of the battery in the environment. If it is necessary to change the
battery, follow the disposal procedures established by local authorities.
1) Place the battery in its housing.
IMPORTANT
Place the battery with the polarities (+)and (-)
2) Connect the battery connectors to the connecting
cables of the machine and tighten the 2 screws.
Then cover the protective cap so that the 2 wires are in
place.
3) Secure the battery with the small rubber strap.
Note: This machine uses the battery: 12V, 18Ah.
3.5. Cover wheel assembly
Mount the dual deck wheel to the deck using the bolts, bushings, washers, and nuts.
3.6. Front bumper assembly
Mount the front bumper to the bottom of the frame with the screws.

11
EN
4. Controls and instruments
A. Throttle lever
Regulates engine revolutions. The positions are indicated on a label with the following
symbols:
CHOKE (choke) - Cold start
The "CHOKE" setting enriches the mixture so it should only be used for as long
as necessary when starting cold.
SLOW - for minimum engine speed
FAST - for maximum engine speed
- When moving from one zone to another, place the lever in a position between
"SLOW" and "FAST".
- When cutting, switch to "FAST"
B. Steering wheel
Turn the front wheels
C. Headlight switch
To turn on the headlights when the key is in the «ON» position
D. Ignition key switch
This key operated control has three positions:
«OFF» everything is off.
«ON» activate all parts
"START"connect starter motor
If you release the key at «START», it will automatically return to «ON»

12
EN
E. Brake pedal
This pedal operates the brake on the rear wheels.
F. Parking brake lever
With the machine stopped:
1) Hold down the pedal
2) lift the parking brake lever and keep it raised
3) release the pedal.
In this way, the rear wheels remain braked. To release the parking brake, fully
depress the pedal (the parking brake lever automatically releases and returns
to the low position).
Note: The engine can only be started in the park position.
G. Cutting height adjustment lever
Raises or lowers the blade deck, thereby adjusting the mowing
height.
There are seven positions for this lever (shown as "1" to "7" on
the label), corresponding to various heights between 30 and 90 mm
To move from one height to another, press the button on the handle and
move the lever to the required position. When the button is released, the
lever remains in the selected position.
H. Knife rotation drive lever
Starts or stops blade rotation
Blade hooked
Blade unhooked
I. Driving pedals
This pedal activates the transmission on the wheels and also modulates the forward and
reverse speeds of the machine.
- To activate advance, push it towards "F" with the toe box.
As the pressure on the pedal increases, the speed of the
machine increases.
- Reverse gear is activated by pressing the pedal with the
heel towards "R".
- The pedal automatically shifts to neutral "N" when
released.
Warning: Reverse gear should only be activated when the machine is stopped.
Note: Remember to release the parking brake.

13
EN
J. Lever to operate the hydrostatic transmission
This lever has two positions as shown on the label:
- «A» Transmission activated: for all uses, during movement
and during cutting.
- «B »Transmission Off - This makes it much easier to move
the machine by hand, with the engine off.
Important: To avoid damage to the transmission unit, this operation should only be
carried out with the engine stopped.
5. Instructions for use
5.1. Security Recommendations
Attention: The machine must only be used for the purpose for which it was designed
(mowing grass). Remember that the user is responsible for damage and injury to other
people or objects. Do not tamper with or remove the safety devices installed on the
machine for safety.
Before using the machine:
- Read the general safety regulations, paying special attention to driving and cuts
on slopes
- Read the instructions for use carefully, make sure you are familiar with the controls
and know how to stop the blades and the motor quickly if necessary.
- Never put your hands or feet next to or under rotating parts and always stay away
from the exit.
Do not use the machine when you are in a precarious state of health or under the
influence of medicines or any other substance that may reduce your reflex actions and
your ability to concentrate. It is the user's responsibility to assess the potential risk in the
area where the work is to be carried out, and to take all necessary precautions to ensure
their own safety and that of others, especially on slopes or uneven, slippery and unstable
terrain.
Do not leave the machine on tall grass with the engine running to avoid the risk of starting
a fire.
Warning: Do not use the machine on lawns with slopes greater than 15 ° (27%). Do not
use the machine on lawns with side slopes greater than 10 ° (18%). If the machine is
likely to be used primarily on sloping terrain, place counterweights under theaxisof the
front wheels. These improve stability at the front end and reduce the chances of tipping.
Important: All references related to the positions of the controls are described in the
previous section.
5.2. Safety devices
Safety devices work in two ways: They prevent the engine from starting if all the safety
requirements are not met, and they stop the engine if even one of the safety requirements
is missing.
•To start the engine it is necessary that:

14
EN
oBlades are not engaged
oThe parking brake is set and the transmission is disengaged
•The engine stops when:
oThe operator leaves his seat and the parking brake is deactivated
oThe operator leaves his seat and the blades catch
oThe blades are engaged and the machine is in reverse
5.3. Instructions before starting work
Before you start cutting, several checks and operations are necessary to ensure that you
can work efficiently and in maximum safety.
5.3.1. Seat adjustment
To change the position of the seat, loosen the four setscrews and slide it
along the slots.
Once you have found the correct position, tighten the four screws.
5.3.2. Tire pressure
Having the correct tire pressure is the main condition to ensure that the
mower deck is horizontal and cuts evenly.
Unscrew the valve caps and connect a compressed air line with a pressure gauge to the
valves.
THE PRESSURES ARE
FORWARD
1.0 bar (15 x 6.0-6)
REAR
1.2 bar (18 x 8.5-8)
5.3.3. Checking the fuel and oil
With the engine off, check the oil level. According to the instructions in the engine manual,
debe be between the MIN and MAX marks on the dipstick.
Refuel with a funnel, but do not fill the tank completely. The tank capacity is approximately
7.5 liters.
Warning: Refueling should be done in an open or well ventilated
area with the engine off. Always remember that gasoline fumes
are flammable. Don't smoke when you refuel.
Do not use live fire as a lighting methodto look inside the tank.
Important: Do not drip gasoline on the plastic parts to avoid
damaging them. In the event of accidental spills or leaks, rinse immediately with water.
The warranty does not cover damage to plastic parts of the bodywork or the engine
caused by gasoline.
5.3.4. Checking the safety and efficiency of the machine
- Verify that the safety devices work as described above.
- Check that the brake is in perfect working order.
- Do not start mowing if the blades vibrate or if you are not sure if they are sharp
enough. Always remember that:

15
EN
oA poorly sharpened blade pulls through the grass and causes the grass to
turn yellow.
oA loose blade causes unwanted vibrations and can be dangerous.
Warning: Do not use the machine if you are not sure whether it works safely or efficiently.
If in doubt, contact your official dealer to carry out the necessary checks and repairs.
5.4. Using the machine
5.4.1. Beginning
Warning: The engine should be started in an open or well ventilated place. Always
remember that exhaust gases are toxic.
To start the engine:
- Open the fuel cock (at "I")
- Close the engine cover
- Raise the mower deck as high as possible
- Disengage the blades
- Release the transmission activation pedal in neutral.
- Apply the parking brake
- When starting from cold, move the throttle to position «CHOKE»Indicated on the
label
- If the engine is already warm, place the lever between "SLOW" and "FAST"
- Put the ignition key and turn to «ON» to make electrical contact, then turn to
«START» to start the engine
- Release the key once the engine has started
- When the engine has started, move the throttle to "SLOW"
Important: The choke should be closed as soon as the engine is running smoothly. Using
it when the engine is already warm can foul the spark plugs and cause the engine to run
erratically.
Note: If there are problems starting the engine, do not insist as you may risk discharging the
battery and flooding the engine. Turn the key to the «OFF» position, wait a few seconds and then
repeat the operation. If the malfunction persists, consult your official dealer.
Important: Always bear in mind that the safety devices prevent the engine from starting
if the safety requirements are not met. In these cases, once the situation has been
corrected, the key must first be returned to the «OFF» position before the engine can be
started again.
5.4.2. Starting and moving the machine without mowing
Warning: This machine has not been approved for use on public roads. It must be used
(as indicated by the highway code) in private areas closed to traffic.
When moving the machine, the blades must be disengaged and the mower deck raised
as high as possible (position "7").
- Place the throttle between "SLOW" and "FAST" and the gear lever in first gear.
- Fully depress the brake pedal to release the parking brake.

16
EN
- Press the transmission activation pedal in the “F” direction and go to the required
speed by gradually increasing the pressure on the pedal and moving the
accelerator appropriately.
Warning: Driving must be activated as already described in section 4 to avoid a sudden
engagement causing a rollover and loss of control of the vehicle, especially on slopes.
5.4.3. Braking
First, slow down the machine by reducing engine speed, and then step down on the pedal
to slow down even more until the machine stops.
Note: The machine already reduces speed considerably just by releasing the drive pedal.
5.4.4. Reverse
Important: Reverse gear should only be activated when the machine has stopped.
When the machine is stopped, initiate the reverse movement by pressing the transmission
activation pedal in the "R" direction.
5.4.5. Lawn mowing
To start cutting:
- Move the throttle to «FAST»
- Raise the mower deck as high as possible
- Engage the blades
- Start moving across the grass very slowly and with the utmost caution, as
described above.
- Adjust the cutting height and speed taking into account the conditions of the lawn
(the height, density or humidity of the lawn)
Warning: When mowing on steep terrain, reduce speed to ensure safe conditions.
Regardless of conditions, always reduce speed if you notice a drop in engine speed.
- If you go too fast compared to the amount of grass you are cutting, you will not be
able to cut the grass well.
- Disengage the blades and raise the mower deck as high as possible whenever
you need to overcome an obstacle.
5.4.6. Unlocking the collector channel
Mowing very tall or wet grass, especially at excessively high speed, can clog the collector
channel. If this happens, proceed as follows:
- Stop moving, disengage the blades and stop the engine
- Open download protection
- Remove grass clippings; they can be reached from the outlet of the collecting
channel.
Warning: This work should only be done with the engine off.
5.4.7. End of harvest
When you are done mowing, disengage the blades, reduce engine speed, and drive the
machine with the cutting deck raised as high as possible.

17
EN
5.4.8. End of work
Stop the machine, move the throttle to "SLOW" and turn the engine off by turning the key
to "OFF". When the engine has stopped, close the fuel cock.
Warning: To avoid kickback, place the throttle in "SLOW" for 20 seconds before stopping
the engine. Always remove the ignition key before leaving the machine unattended.
Important: To keep the battery charged, do not leave the key in the "ON" position when
the engine is not running.
5.4.9. Cleaning the machine
After use, clean the exterior of the machine, empty the grass catcher and shake it to
remove grass and other debris.
Clean the plastic parts of the body with a damp sponge using water and detergent, taking
care not to get the motor, electrical parts or electronic circuit board located under the
dashboard. Never use hose nozzles or strong detergents to clean the body or engine.
When washing the inside of the mower deck and the collecting channel, the machine
must be on firm ground with:
- The grass catcher or discharge guard installed
- The seated operator
- Engine running
- Transmission in neutral
- The hooked blades
Connect a water hose to each of the pipe fittings one at a time
and run water through each one for a few minutes, with the
blades moving.
When washing, the cutting deck should be lowered down.
Remove the grass catcher, empty it and rinse it; then place it in
a position where it can dry quickly.
5.4.10. Storage and inactivity for long periods
If you intend not to use the machine for a long period
(more than 1 month), disconnect the battery cables and
follow the instructions in the operation manual.
instructions.
Important: The battery should be stored in a cool, dry
place. Before a long period of storage (more than 1
month), always charge the battery and then recharge it before using it again.
- Empty the fuel tank by disconnecting the hose located at the fuel filter inlet and
follow the instructions in the manual.
- Carefully remove any dried grass that may have accumulated around the engine
or muffler to prevent them from catching fire the next time you use the machine.
- Store the machine in a dry, protected place and preferably covered with a cloth.
- The next time you use the machine, check that there are no fuel leaks from the
pipes, the fuel cock or the carburetor.
5.4.11. Card protection device
The electronic circuit board has an automatic reset protector that breaks the circuit if there
Oil filter

18
EN
is a fault in the electrical system. It results in the engine stopping and the lamp turning
off.
The circuit resets automatically after a few seconds, but the cause of the failure must be
determined and addressed to prevent reactivation of the protective device.
To avoid activating the protection device:
- Do not reverse the battery terminal wires;
- Do not use the machine without its battery or the charge controller may be
damaged;
- Be careful not to short circuit
5.4.12. Summary of the main steps to follow when using the machine
For…
You should…
To start the engine
Open the fuel cock, make sure all the conditions that allow starting are
met, and then turn the key
Move forward
Press the pedal down, engage the gear, and then gradually release the
pedal.
Brake or stop
Reduce engine speed and press brake pedal.
Move backwards
Stop the machine, put it in neutral, step down on the pedal, engage
reverse gear, and then gradually release the pedal.
Cut the grass
Mount the discharge protection; apply the accelerator; hook the blades;
adjust the cutting height, step down on the pedal, engage the gear, and
then gradually release the pedal.
Unlock the collector channel
Stop moving forward, disengage the blades, and turn off the engine.
Open the discharge guard and clean the collector channel.
Finish mowing
Disengage blades and reduce engine speed.
Stop the engine
Reduce engine speed, wait a few seconds, turn the key and close the
fuel cock.
Storing the machine
Set the parking brake, remove the key and, if necessary, wash the
machine, the interior of the mower deck, the collector chute and the
grass catcher.
5.5. Use on slopes
Only cut on slopes with inclination up to the maximum already
mentioned above: slopes greater than 15 ° (27%) and lateral
slopes greater than 10 ° (18%).
- Lawns on a slope should be cut moving up and down and
never across them.
- When changing direction, be very careful that the wheels facing up the slope do
not hit any obstacles (such as stones, branches, roots, etc.) that could cause the
machine to slide sideways, tip over or knock you over. to lose control.
Warning: Reduce speed before any direction change on slopes and always apply the
parking brake before leaving the machine stopped and unattended.
- Begin very carefully on slopes to avoid the risk of tipping over.
- Reduce forward speed before going down a slope, especially downhill.
- Never use reverse gear to slow down when going down a hill - this could cause
you to lose control of the vehicle, especially on slippery terrain.
- Go down hills without touching the pedal to take advantage of the braking effect of
the hydrostatic drive when the transmission is not engaged.

19
EN
5.6. Transport
Warning: If the machine is transported on a truck or trailer, use suitable lifting equipment
and enough people for the weight involved and the type of lifting system used. The
machine should never be lifted with ropes and rigging. During transport, close the fuel
cock, lower the cutting deck, apply the parking brake, and securely attach the machine
with ropes or chains to the transport device.
5.7. Lawn maintenance
- To maintain a green, smooth and attractive lawn, it must be cut regularly without
damaging the lawn. A lawn can be made up of different types of grass. If the grass
is mowed frequently, the grass and roots grow stronger, forming a solid lawn. If
the lawn is cut less frequently, taller grass and weeds begin to grow (plus daisies
and clovers, etc.).
- It is always best to mow the grass when it is dry.
- The blades must be in good condition and sharp so that the grass is cut straight
without a ragged edge leading to yellowing at the ends.
- The motor should run at full speed, both to ensure a sharp cut in the grass and to
get enough thrust to push the clippings through the collecting chute.
- The frequency of mowing should be in relation to the growth rate of the lawn. The
grass should not be allowed to grow too large between one mowing and the next.
- During hot and dry periods, the grass should be cut
slightly higher to prevent the soil from drying out.
- The best grass height on a well-groomed lawn is
approx. 4-5 cm. With a cut, it is not necessary to
remove more than a third of the total height. If the
grass is very tall, it should be cut twice in a twenty-
four hour period: the first time with the blades at full height, possibly reducing the
width of the cut, and the second cut at the desired height.
- When mowing large areas, start by turning clockwise so that the cut grass is
discharged away from shrubs, fences, driveways, etc. After one or two turns, cut
in the opposite direction making left turns until finished.
- The appearance of the lawn will improve if you alternate mowing in both directions.
- If the harvesting system tends to block with grass, you should reduce the ground
speed as it may be too fast for the grass conditions. If the problem persists, the
likely causes are poorly sharpened blades or deformed fins.
- Be very careful when cutting near shrubs or curbs as these could distort the
horizontal position of the deck and damage its edge and blades.
6. Maintenance
6.1. Security Recommendations
Before cleaning or performing maintenance work, remove the ignition key and read the
corresponding instructions. Wear suitable clothing and work gloves whenever your hands
are at risk.
Never use the machine with worn or damaged parts. Defective or worn parts should
always be replaced and not repaired. Use only original spare parts: Parts that are not of

20
EN
the same quality can damage the equipment and affect your safety and that of others
Never dispose of used oil, fuel, batteries, or other contaminants in unauthorized locations!
6.2. Maintenance scheduling
6.2.1. Maintenance schedule
Operation
Hours
Completed
1. Machine
Checking the clamping and the sharpness of the blades.
25
Blade replacement
100
Checking the drive belt
25
Drive belt replacement *
-
Checking the blade belt
25
Blade Belt Replacement *
-
Unit adjustment and verification
10
Checking the brake and blade coupling
10
Checking bolts and screws
25
General lubrication **
25
Engine oil change
……
Checking and cleaning the air filter
……
Air filter replacement
……
Checking the fuel filter
……
Replacement fuel filter
……
Checking and cleaning the spark plug contacts
……
Spark plug replacement
……
* At the first signs of wear, contact your dealer to replace the part.
** General lubrication of all joints should also be carried out whenever the machine is not used for a long
period
The table above is to help you maintain the safety and performance of your machine. It
shows the main maintenance and lubrication operations and their frequency. To the right
of each item, there is a box where you can write the date or after how many hours of
operation the job was done.
Warning: All checks, adjustments and replacements not described in chapters 6.3 and
6.4 of this manual must be carried out by your official dealer or a specialized service
center.
6.2.2. Summary of the main situations in which maintenance operations may
be necessary
Whenever…
You will need to…
The blades vibrate
Contact your dealer
Blades tear the grass and the lawn turns yellow
Contact your dealer
The cut is uneven
Align the mower deck
The blades fit abnormally
Contact your dealer
The machine does not brake
Contact your dealer
Forward movement is erratic
Contact your dealer
Table of contents
Other Anova Lawn Mower manuals
Popular Lawn Mower manuals by other brands

Jacobsen
Jacobsen AR-522 jossa ROPS Maintenance manual

Coopers of Stortford
Coopers of Stortford G543 Instructions for use

Yard-Man
Yard-Man 999 Series owner's manual

MTD
MTD 122-440R000 owner's guide

Schiller Grounds Care
Schiller Grounds Care BOB-CAT QUICKCAT 912480 Operator's manual

Exmark
Exmark ULTRAVAC BAGGER 126-6954 Operator's manual