Ansr Audio Group.X Evo User manual


Group.X Evo Portable
Group.X Evo Lite Portable
Table of Contents
Page
1. Introduction 2
2. Safety 2
3. Environ ent 2
4. Wireless Notes 2
5. Quick Start Guide 3
6. Group.X Evo Portable PA 4
7. Evo Headwor Microphone with Trans itter
7.1 Charging the Evo
7.2 Evo transmitter channel set
8
9
10
8. Group.X Evo Lite Portable PA
11
9. Syste Specifications 15
10. Troubleshooting 16
11. Warranty
12. Notes
16
17

1. Introduction
Thank you for purchasing the the only portable PA systems featuring the Evo True Wireless
transmitter. This Patent Pen ing PLL synthesize wireless microphone system operates in an FCC
approve UHF ban frequency with 16 selectable channels. Please rea this instruction manual
carefully before operating your system. This manual covers the function an operation of the wireless
microphone system an portable PA system.
2. Safety
•While the Evo transmitter is water resistant, the Group.X portable electronics are not. Please
observe all safety precautions.
•Do not spill liqui on the Group.X an o not rop either unit.
•Do not place the units near heat sources such as ra iators, amplifiers, or etc.
•Do not expose it to irect sunlight, extremely usty con itions, excessive moisture, or vibration.
3. Environ ent
•Do not throw use electronics into a fire or garbage bin with omestic rubbish. Be sure to ispose
of use batteries in accor ance with local waste isposal rules.
•You want to say you are green? Both the Evo Hea worn Transmitter an the Group.X portables
feature recharging battery systems. Even better, you on't have to keep buying batteries!
4. Wireless Notes
•Before setting up, make sure that the transmitter an receiver are tune to the same frequency.
•Do not use two transmitters tune to the same frequency.
•Always operate your system with a fully charge battery.
•While checking soun , move the transmitter aroun the area where you use the system to look for
ea spots (loss of signal). If you fin any ea spots, change the receiver position. If it oes not
work, avoi such places.
•To help avoi interference, o not put the receiver too near substantial metal or reflective objects
an avoi obstructions between transmitter an receiver.
•Avoi the interference from TV, ra io, other wireless appliances an etc..
•Wireless systems epen on fully charge batteries. Low batteries will seriously egra e
performance. Be certain to allow charge time prior to use.
•Be certain that the Group.X portable PA is expose an in 'line of sight' with the transmitter.
2

5. Quick Start Guide
•Fully charge the Evo transmitter by connecting the Evo to the supplie wall plug transformer.
Leave your Evo trans itter powered OFF while charging.
•Fully charge the Group.X or Group.X Lite Portable PA.
•Set master volume to minimum, switch Group.X portable PA power on. Leave Evo off.
•With wireless receiver turne on, but with volume turne own, set the receiver to the esire
channel. If the RF lights (with the Evo transmitter OFF), select another channel with no RF
activity.
•Turn on your Evo transmitter an select the matching channel. Note the below table escribing
the channels! Note that position 0 in icates channel 16. See Section 7 for details. Also –
be sure to watch the receiver RF in icator for activity as you select the transmitter channel, as
escribe in the next step. If the RF lights lights fully on one switch position, you have likely
foun the correct channel.
Evo Transmitter Switch Transmit Channel Evo Transmitter Switch Transmit Channel
1 1 9 9
2 2 A 10
3 3 B 11
4 4 C 12
5 5 D 13
6 6 E 14
7 7 F 15
8 8 0 16
•Raise wireless volume to approximately mi way.
•Slowly raise main PA volume to esire level. If nee e , wireless volume may also be
a juste .
•If setting up a secon Evo an PA receiver (optional), follow the first five steps for the secon
unit before checking volume on each. It is goo practice to skip at least one channel when
using multiple transmitter/receivers.
•Go forth an be truly wireless!
3

6. Group.X Evo Portable PA
The Group.X Evo is esigne for use only with Ansr Au io / Special Projects 16-channel
selectable channel transmitters. The receiver operates in UHF 682-697 MHz frequency ban
with PLL synthesize control.
4

A) Built-in Storage: I eal for external mics, MP3 players, AC power an charging cables.
B) Wireless Receiver Mo ule(s): LED channel isplays the channel number. Secon receiver
optional.
B1: RF In icator – illuminates to in icate signal reception on the selecte channel
B2: Selecte Channel Display
B3: AF In icator – illuminates to in icate au io signal (talking, etc.)
B4: Channel Selector
B5: Power On/Off In icator – illuminates to in icate wireless system is on
B6: Power/Volume Control – after switching on, this controls wireless volume
C) Multi-input CD Player: Anti-shock esign stan s up to transport an heavy use. USB an SD
inputs for easy MP3 playback.
5

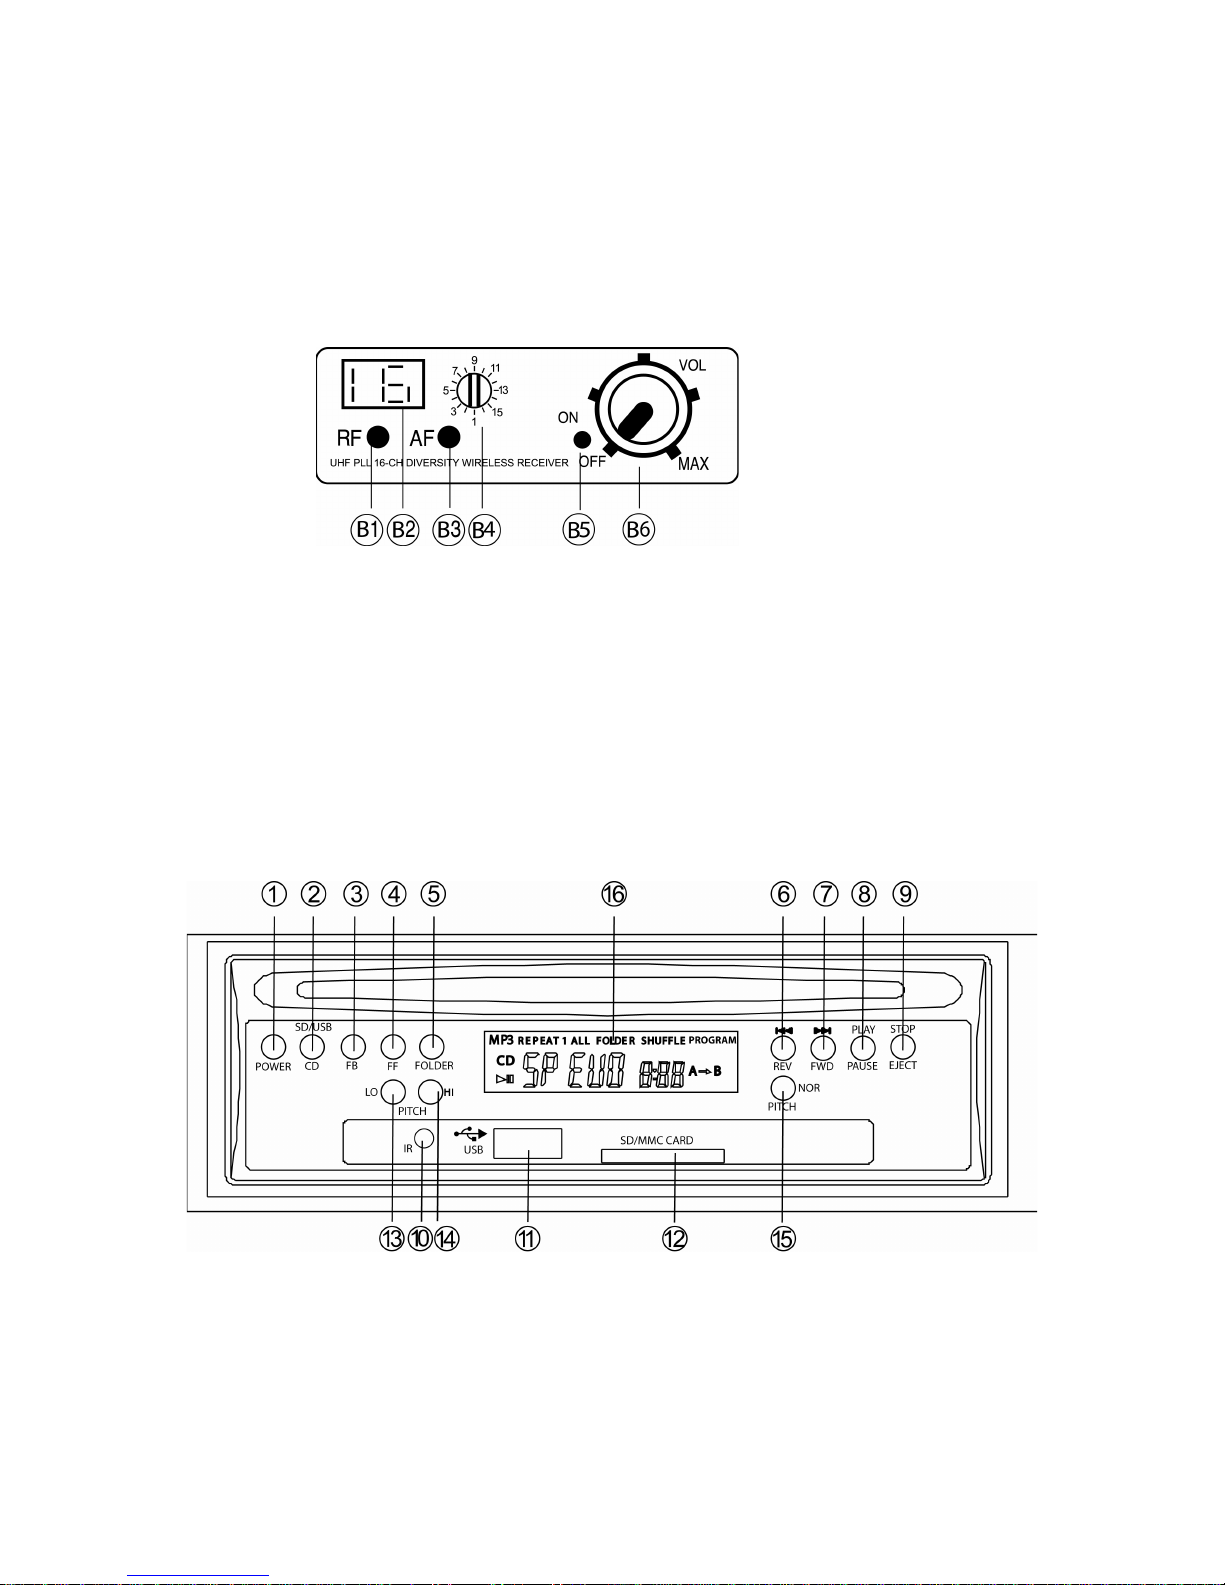
CD Controls From Previous Page:
C1: CD Power On/Off
C2: CD/USB/SD Input Select: Switch between CD or SD/USB input. If you are trying to
play from the USB or SD an get nothing, try this. To go back to the CD player,
you must set this switch back to CD.
C3: FB: Fast Backwar s
C4: FF: Fast Forwar
C5: Fol er – If your au io files are arrange in fol ers, this will scroll through them
C6: Track Skip Reverse
C7: Track Skip Forwar
C8: Play / Pause – From stop, this will play; from play, this will pause
C9: Stop / Eject – From play, this will stop; from stop, this will eject
C10: IR Win ow – Receives control signal from remote; o not cover this up
C11: USB Input – To connect MP3 player or storage evice (note C2 if using USB)
C12: SD / MMC Input – To connect SD or MMC storage (note C2 if using SD/MMC)
C13: LO PITCH – press to slow playback in increments -1 to -10 (if applicable)
C14: HI PITCH – press to spee playback in increments +1 to +10 (if applicable)
C15: NOR PITCH – press to reset playback to normal spee (if applicable)
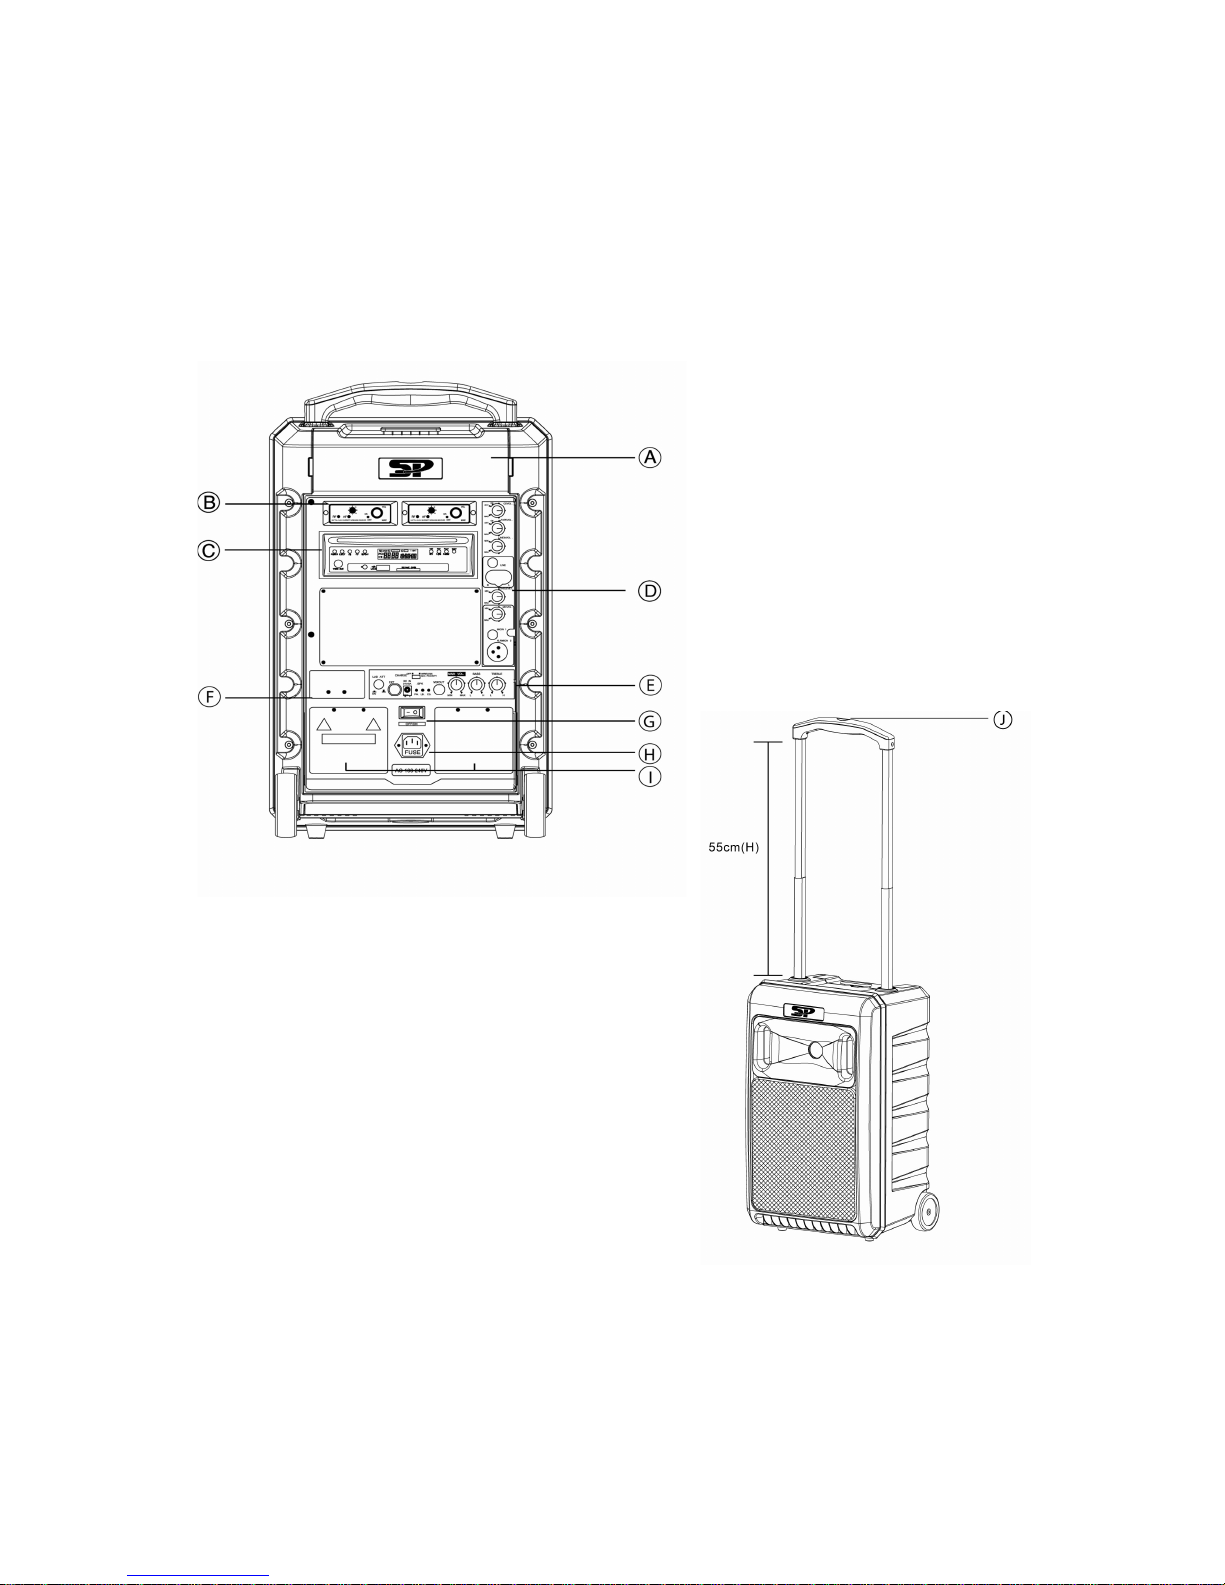
D) Input Panel: Line input an volume, external microphone input an volume.
D1: CD VOL - volume with ON/OFF switch
D2: TAPE VOL - is not use on this version
D3: LINE IN VOL – volume control for ¼ inch or RCA
input. Do not try to use both the ¼ inch an RCA at
the same time.
D4: LINE IN Connections - If you o not use the USB
input for your MP3 player, you will use one of these.
The most common connection is using a cable that
connects from your earbu output connector to the
RCA connectors (re an white).
D5: ECHO LEVEL – Digital echo effect, if applicable.
D6: MIC VOL – External, wire mic volume control
associate with the ¼ inch an XLR inputs
imme iately below.
D7: WIRELESS MIC PRIORITY – In the ON position,
music will be lowere when the wireless mic is use .
In fitness applications, this will likely be left OFF.
D8: MICROPHONE INPUT – For use with a ynamic
microphone (no phantom power). Do not use both the
¼ inch an XLR inputs at the same time.
6

E) Master Control Panel:
E1: External Speaker Out - For connecting an unpowered speaker.
E2: DC IN – Function not use on this mo el.
E3: Battery Charge In icator: Will flash green when charging. Meter in icates battery level
uring use.
E4: Mix Out - If you want to sen your mixe signal to a recor er or other au io equipment,
use this output.
E5: Master Volume: For overall volume control – set mic/music balance, then use this master
volume to control your overall mix level.
E6, E7: Tone Controls: Bass an treble controls, a just to taste.
F) Auxiliary Battery Charger: Designate for future use.
G) Primary Power ON /OFF
H) AC Power Input
I) Primary Rechargeable Battery Compartments: This system features a built-in charging
system, eliminating the nee to remove the batteries. Contact Ansr Au io / Special Projects
prior to accessing the batteries.
J) Retractable Transport Han le
7

7. Evo True Wireless Headworn Trans itter
1. Microphone Element: Shown without the win screen. Always be sure the si e with the yellow
ot is towar the mouth. In the event that you experience a low au io level with excessive
fee back, check the irection of the microphone element. DO NOT twist the element.
2. Flexible Boom: A just so that the microphone element is at the corner or just un er the mouth.
To prevent fee back, the Evo uses a noise-canceling element. Mic place ent is very
i portant for a good experience. If you notice the volume ' ip', check to be certain the
element is place properly.
3. Power On/Off Switch: Turns transmitter power on an off. Press an hol one secon to
power on, three secon s to power off. The LED will flash to in icate a change in power status.
After powering on, LED will flash re at 4-5 secon intervals to in icate the Evo is on.
4. Channel Selector an Cover: Lift cover to set the transmitter channel via the rotary selector
with the inclu e mini screw river. Always be certain that this cover is co pletely closed
prior to use. Failure to o so may affect water resistance an voi your warranty!
5. LED In icator: Green in icates charging, single re in icates power ON, multiple re in icates
power OFF.
6. A justable Strap: The Evo hea ban is esigne so that most users can comfortably use the
system with no a justment. If you nee a more snug fit, you may slip this strap forwar . Also
see (7) below.
7. Recesse Antenna: Prior to use, always be certain the antenna is securely recesse into the
hea ban . If you nee to a just the strap, be certain the antenna is still properly recesse .
8. Form Fitting Hea ban : The Evo hea ban is esigne for maximum comfort on most users
without a justment. See points (6) an (7) for etails. The hea ban will flex for comfort, but
on't test it's limits by sprea ing it wi er than a human hea ! Really, we know someone out
there will...
9. Charging Connector an Cover: For use with the supplie external charging a apter. Be
certain to replace the cover before use – failure to o so may voi your warranty.
8

7.1 Charging The Evo True Wireless Fitness Trans itter
NOTICE: Prior to use, it is necessary to fully charge your Evo trans itter. Initial charge
fro a depleted state ay take up to two hours or ore.
NOTICE: The supplied charger is designed specifically for use with the Evo True Wireless
syste . Use of any other charger ay cause syste da age and will void your
warranty. Do not use the receiver DC out to charge the Evo!
•Open the charger cover an insert the charging connector into the Evo as illustrate below.
Only the supplie wall charger shoul be use . Do not use the receiver’s DC out to charge
the Evo.
•Insert the charging cable into the
charging a apter as illustrate at
right. Insert the cable fully.
•Connect the charging transformer to AC power (that's 'manual talk' for 'plug it in to the wall').
•Note that the Evo transmitter shoul be powere OFF while charging.
•GREEN LED in icates battery charging.
•GREEN LED will turn off when battery is charge .
IMPORTANT : If your Evo was supplied with a YELLOW, re ovable charging adapter (part
9 on page 8), be certain to dry the headset and charging points before charging and re ove
the adapter before use.
If your Evo was supplied with a BLACK charging adapter and cover, DO NOT atte pt to
re ove it. Just charge nor ally and replace the cover before use.
9

7.2 Evo Headworn Trans itter Channel Set
NOTICE: Prior to setting up, please check that the trans itter and receiver are tuned to the
sa e frequency. Two or ore trans itters operating in the sa e frequency can not be used at
the sa e ti e and area. So for each extra trans itter, please select a different frequency which
can be used si ultaneously at local area.
Power the Evo transmitter ON by pressing the POWER button for one secon .
•Open the channel selector cover an set the rotary selector to the esire channel. Note that the
rotary selector is alpha-numeric. You may refer to the chart below:
Channel Selector Channel Selector
1 1 9 9
2 2 10 A
3 3 11 B
4 4 12 C
5 5 13 D
6 6 14 E
7 7 15 F
8 8 16 0
•Note that to set the transmitter to channel 16, you must use the '0' setting on the rotary selector.
•When the transmitter is set to the same channel as the receiver, the receiver’s RF meter shoul
in icate a strong signal, regar less of whether or not you are speaking into the mic.
•Be certain that the selector cover is securely closed prior to use. Failure to close the cover
ay affect water resistance and void your warranty.
10

8. Group.X Evo Lite
NOTICE: PRIOR TO USE, BE CERTAIN TO FULLY CHARGE THE INTERNAL BATTERY.
SEE (H) BELOW FOR DETAILS.
The Group.X Evo Lite is esigne for use only with Ansr Au io / Special Projects 16-
channel selectable channel transmitters. The receiver operates in UHF 682-697 MHz
frequency ban with PLL synthesize control.
11

A) USB Control: Supports a variety of MP3 players an USB storage evices.
1) On/Off/Volume: In epen ent volume control for the USB input. Clockwise turn
increases volume. Leave in the OFF position if not use .
2) Error LED: Will flash to in icate a rea error.
3) Stop: Just that – the 'stop' button.
4) EQ/Repeat: Scroll through EQ presets (normal, jazz, pop, classical, rock, live) by
momentarily pressing this button. Hol ing for 3 secon s will set the player to repeat
the current selection.
5) Play/Pause: No surprises here – press to play, press to pause.
6) Fast Forwar : Searches forwar .
7) Reverse: Searches backwar .
8) USB Input: Compatible with most any USB storage evice.
12

B) Wireless Receiver: 16 frequency UHF wireless system.
1) On/Off/Volume Control: In epen ent volume control for the USB input. Clockwise
turn increases volume. Leave in the OFF position if not use . PW LED below
in icates power on or off.
2) Wireless Channel Selector: With Evo True Wireless transmitter turne OFF, select
a channel on the Group.X Evo Lite that shows no RF present, as in icate by the
RF LED below.
3) Power Status LED: In icates power status as etermine by the On/Off control
above.
4) RF In icator: LED will light in the presence of RF (wireless signal) on the selecte
channel. After selecting a channel as escribe in (2) above, an setting the Evo
transmitter to the same channel as escribe in Section 7.2, this LED shoul remain
on, in icating that the unit is receiving the signal from the hea set transmitter.
C) External Microphone Input: ¼ inch input for use with a ynamic microphone. Volume is
controlle by the Main Volume control (G).
D) Aux Input: 1/8 inch (3.5 mm) input for connecting a variety of au io sources (MP3, CD,
tape, etc.). Volume is controlle by the Main Volume control (G).
13

E) Mix Output: 1/8 inch (3.5 mm) output for connecting to an external recor er or au io
system. For example, if you wish to recor a presentation, an au io recor er coul be
connecte to the Mix Out. This woul preserve your mix of relative levels (mic to
music).
F) Tone: Applies a tone control over the entire output. If your soun is 'muffle ', try setting
the tone towar the High setting. If your soun is 'thin', try setting the tone towar the
Low setting.
G) Main On/Off/Volume: Controls the overall volume, preserving your relative mix/mic blen .
H) DC Input: Charging input. While charging, the green CG (charging) LED will flash,
turning soli when fully charge . During use, the re BL (battery level) LED will remain
soli . A flashing BL LED in icates an insufficient charge.
I) Battery Compartment: Stores the lithium-ion battery pack. As the charger is built-in to the
unit, there is no nee to remove the battery pack.
J) Shoul er Strap Anchors: Shoul er strap inclu e .
14

9. Syste Specifications
Evo True Wireless Trans itter
Carrier Frequency Range: UHF ban , 682 – 697 MHz
RF Power Output: 7.5 mW
Microphone Element: Noise canceling, bi- irectional con enser
Battery: Rechargeable Lithium-Polymer
Operating Range: Up to 300 feet
Talk Time: Up to 4+ hours, epen ing on use
Group.X Evo Portable PA Syste
Carrier Frequency Range: UHF ban , 682 – 697 MHz
Power Output: 120W RMS, 190W peak
Frequency Response: 40 Hz – 15kHz +/- 3 B
Speakers: 10 inch LF, 1 inch HF rivers
Operating Range: Up to 300 feet
Battery: 12V, 4.5 Ah (x2), recharging
Talk Time: 3-10 hours, epen ing on volume use
Charge Time: 6-8 hours, epen ing on charge status
Weight: 34 poun s, inclu ing battery
Dimensions: 11.4 (D) x 12.6 (W) x 19.7 (H)
Accessories: Storage case
Group.X Evo Lite Portable PA Syste
Carrier Frequency Range: UHF ban , 682 – 697 MHz
Power Output: 40W RMS, 80W peak
Frequency Response: 60 Hz – 15kHz +/- 3 B
Speaker: 5.25 inch full range
Operating Range: Up to 300 feet
T.H.D.: <0.1%
S/N: >90 B
Battery: Rechargeable 14.4 V Lithium
Talk Time: 6-8 hours, epen ing on volume use
Charge Time: Up to 4.5 hours, epen ing on charge status
Weight: 4.8 poun s, inclu ing battery
Dimensions: 11.4 (D) x 6.3 (W) x 8.3 (H)
Accessories: Shoul er strap, storage case
15

10. Troubleshooting
NOTICE: Most 'proble s' associated with wireless syste s are caused by low trans itter
battery power. Always keep your trans itter fully charged. If operating your Group.X units on
battery power, be certain that you are operating on a full charge for best perfor ance.
Sy pto Possible Solution
No soun Be certain that the Group.X primary power an the components
(receiver, CD) are switche ON. Be certain that the Evo transmitter is
switche ON.
Be certain that both receiver an transmitter are set to the same
frequency.
Re-check all levels on your PA system.
Be certain that the transmitter is not out of range.
Au io interference If using two or more systems, be sure all systems are operating in
ifferent frequencies.
Re-check your operating frequency accor ing to the proce ure note in
the Quick Start Gui e (Section 5).
Note that interference can come from a variety of sources. If interference
is experience on multiple channels, the source is likely nearby (other
electronic systems in the same buil ing).
Note that some cell phone signals are known to interfere with au io
systems, regar less of operating frequency.
Distortion Check the receiver’s volume control – if it is too high, it may overloa
your system.
Those with lou voices may move the element away from the mouth.
Below the lips or to the si e of the mouth are recommen e positions.
Incorrect placement may cause istortion by overloa ing the
microphone.
Diminishe performance Be certain the transmitter battery is fully charge .
Be certain the Group.X battery is fully charge .
11. Warranty
Your Evo True Wireless Fitness System is covere for one year against efects in materials an
workmanship. In the event of such efects, Ansr Au io will repair our pro uct free of charge unless
otherwise specifie in etail, or replace with a new pro uct of equal or greater value .This warranty
exclu es efects ue to normal wear, shipping amages or failure to use pro ucts accor ing to instructions
for proper use. This warranty is voi in the event of unauthorize repairs or mo ifications not ma e by Ansr
Au io. Any attempt to open or service any component of your wireless system will voi this warranty. If
you have any questions, please call us at 866-491-2677 or email techsupport@ansrau io.com.
16

12. NOTES
What kin of notes? How about which channel worke well in ifferent locations? Default
volume settings in ifferent classes? Any particular points you might ten to forget (like be
sure to close the channel selector cover!). You can even use it for your grocery list, it's up to
you – we're just offering this space to use as you see fit.
17

Ansr Audio, Inc.
3800 HWY 271 N
Powderly, TX 75473
Phone: 866-491-2677
Fax: 866-746-4366
www.ansraudio.co
www.specialprojectsaudio.co
Copyright Ansr Audio, Inc., 2009
This manual suits for next models
1
Table of contents
Popular Fitness Equipment manuals by other brands

Finnlo
Finnlo AQUON XTR manual

Sunny Health & Fitness
Sunny Health & Fitness SF-E3911 user manual

Dogtra
Dogtra Edge RT owner's manual

Gaiam
Gaiam WELLBEING 05-62327 Setup, Workout Tips and Care & Safety Guide

BH FITNESS
BH FITNESS H8702R Instructions for assembly and use

Weider
Weider Pro 120 WEEVBE70200 user manual

Insportline
Insportline IN 7120 user manual

BenchK
BenchK 110 quick start guide

HOMCOM
HOMCOM A90-304 Assembly & instruction manual

Pure Fitness
Pure Fitness G290 Instructions for assembly and use

CYMEDICA Orthopedics
CYMEDICA Orthopedics QB1 Go user manual

Sunny Health & Fitness
Sunny Health & Fitness SF-XF9938 user manual