ANTENERGY ANTPAK DC-20 User manual

The World’s Most Innovative Battery box
Powered byANTENERGY
Models:ANTPAK DC-20
ANTPAK BP-800
ANTPAK BP-300
Instruction manual
Please read this manual thoroughly before operating this product.

2
Content
Page
Content…………………………………………………..……………..…………..……………2
Warnings……………………………………………………………………….….…………….3
Get to know your gear….………………………………………………………………………4
Accessories…………………………………………………………………..……….…………6
Getting Started………………………………………………………………..……….…………7
Main Data Screen Overview…………………………………………..……………..…………9
Getting Charged……………………………………………………………………………..…10
Technical Specs of DBMP…………………………………………………..…………………13
Jump start a car……………………………….………..………………………………..………14
Mounting Bracket Installation……………………………………………..……………………15
Power of load……………………………………………………….……………………………16
Technical Information……………………………………………………………………………17
Frequently Asked Questions………………………………………………….…………………18

3
Warnings
1. Please read this manual carefully before use.
2. The external AC power supply and AC charger is for indoor use only. Never use the
240V AC socket outdoors if it is raining.
3. Do not block air vents on the side of the unit (ANTPAK BP-800 / ANTPAK BP-300).
4. Forbid to use incongruent parts or applications.
5. Do not attempt to disassemble the ANTPAK battery box as this may result in electric
shock, fire or explosion. Any attempt to disassemble the unit, make unapproved repairs
or modifications will void warranty and the user’s authority to operate the ANTPAK
battery box.
6. Ensure the battery box avoids contact with water
7.Please away from fire and high-temp while using.
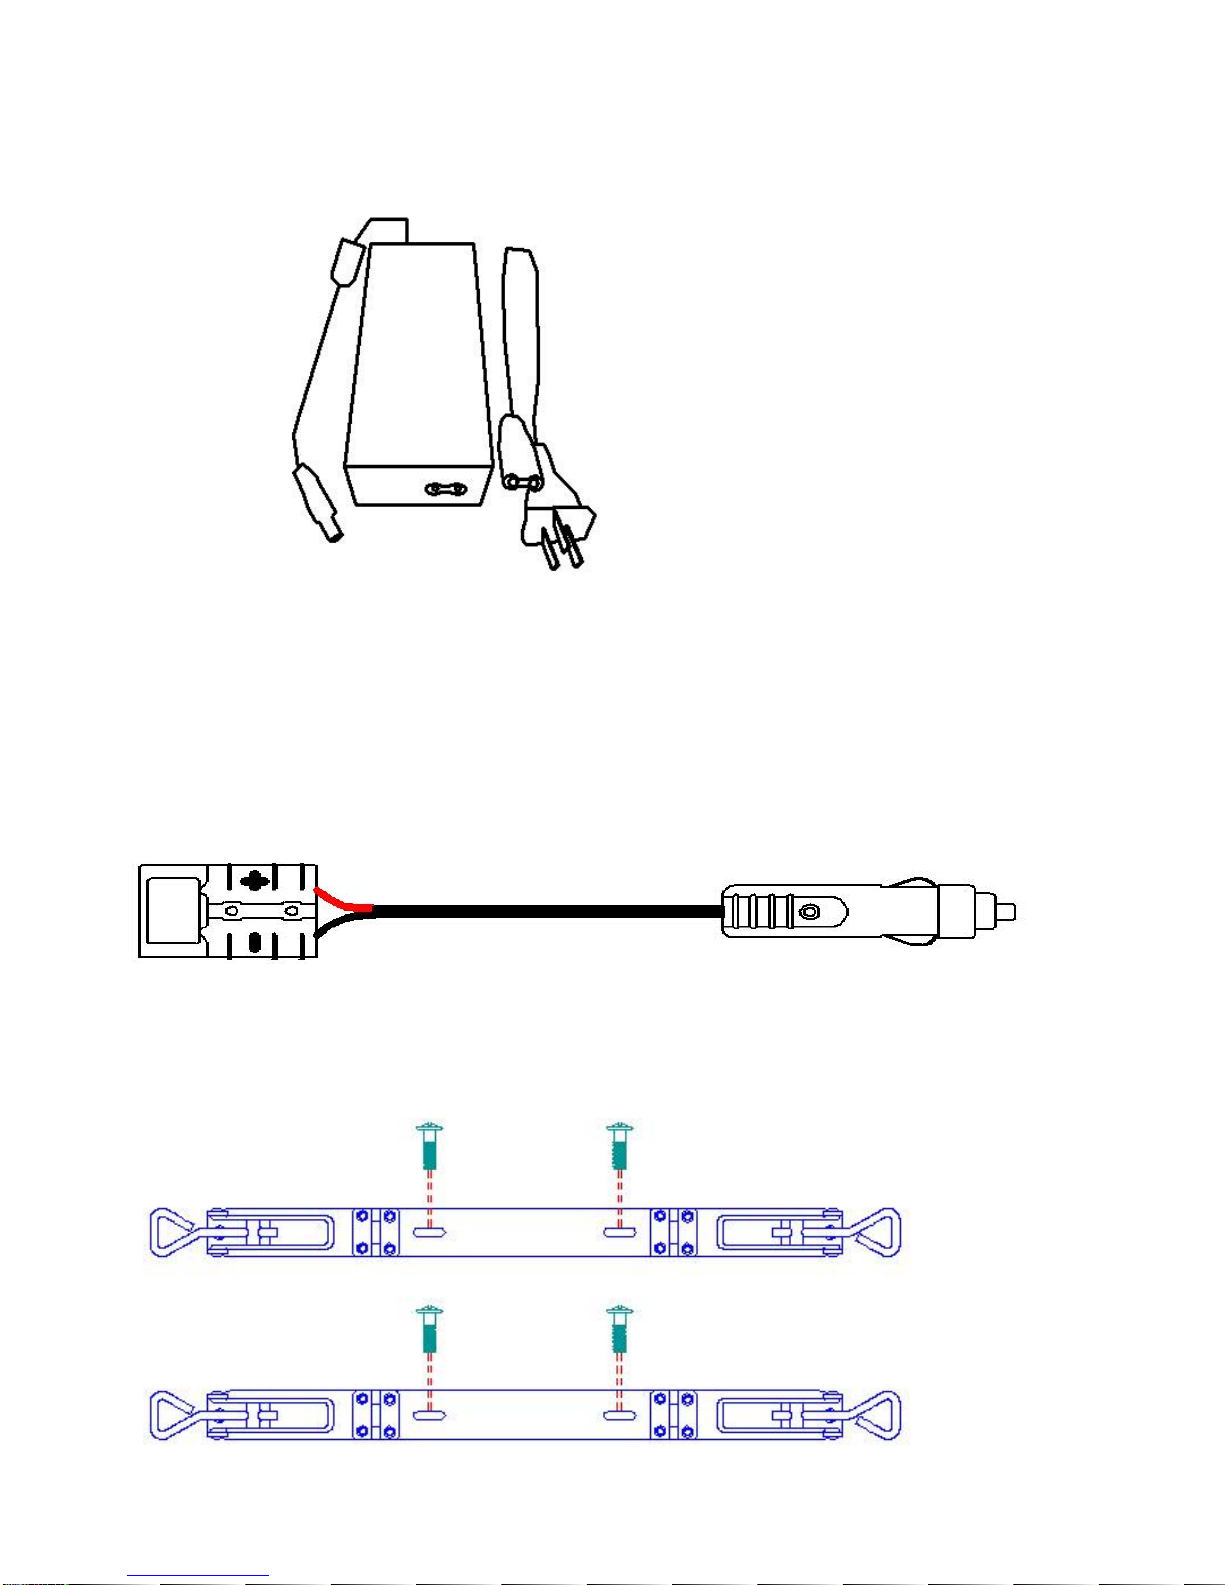
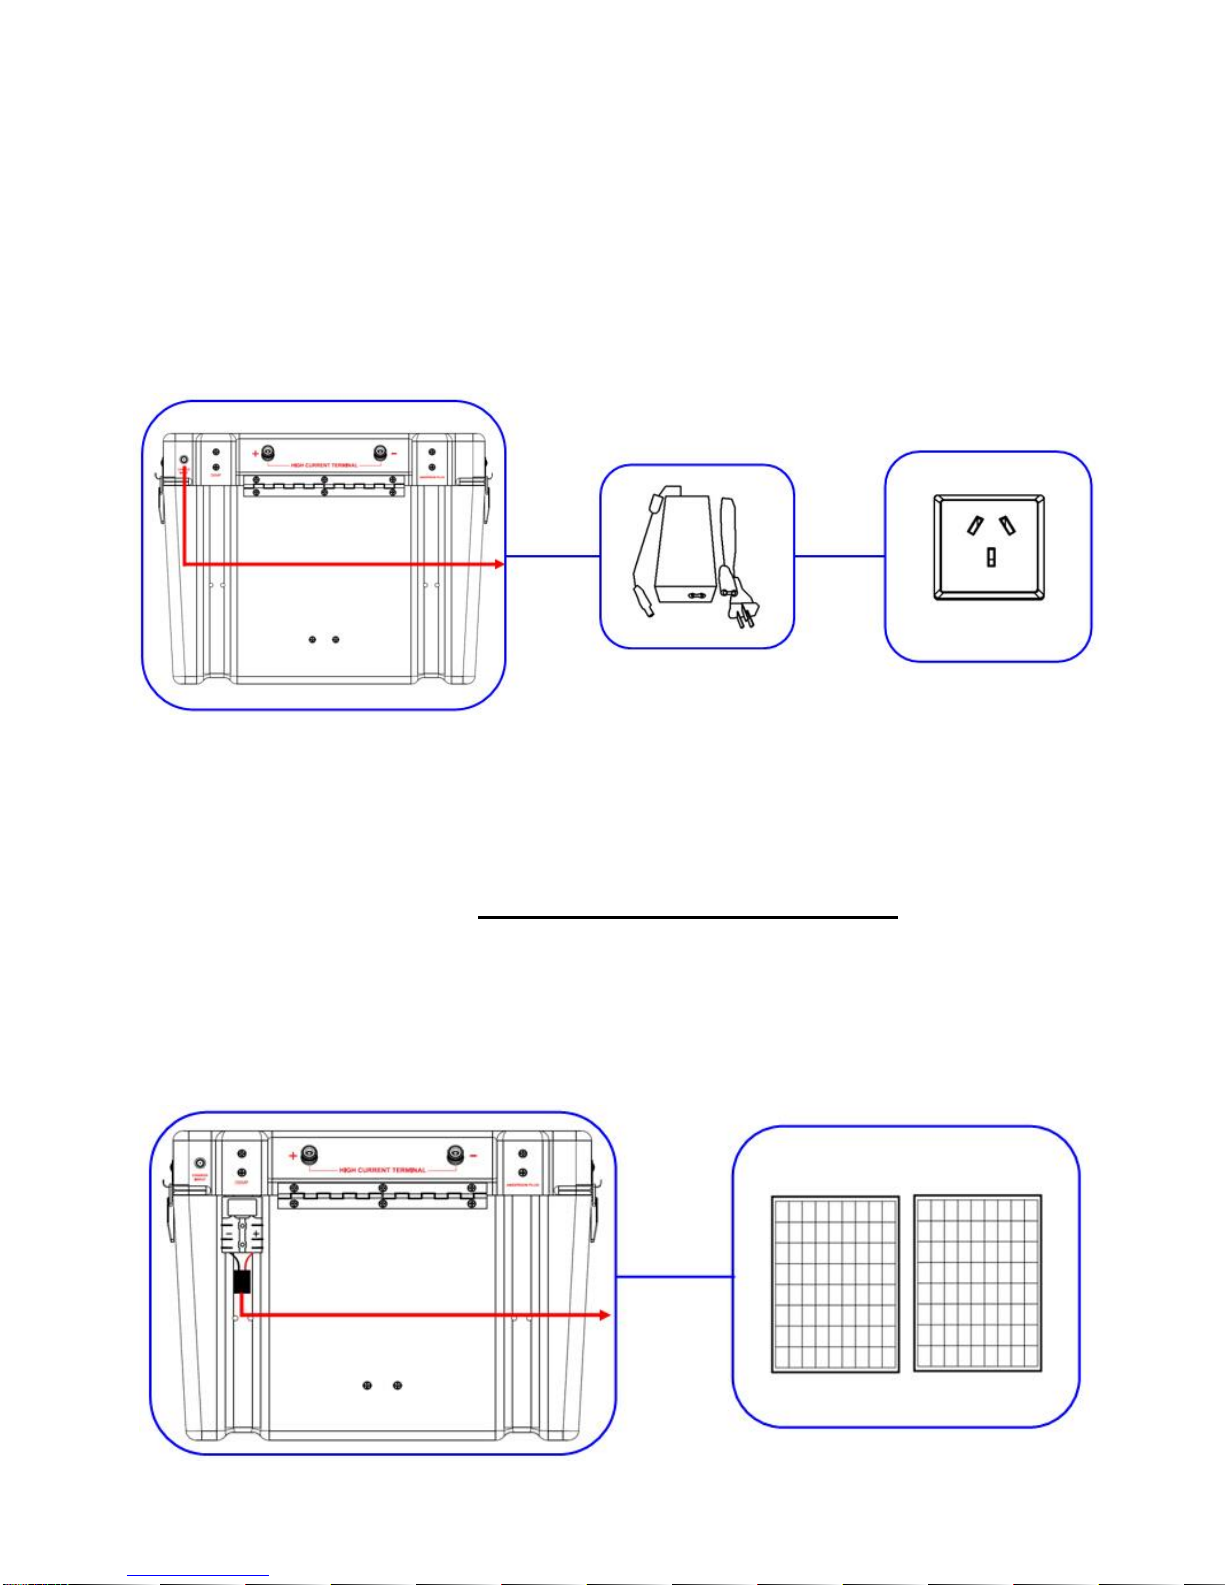
8.For the first time user, please do assemble according to oddments 1, pay attention
to the battery positive and negative, don’t reverse connect.
9.It is recommended to always charge the battery fully per month when long time no use.
Continuously discharging the battery down to 0% may reduce its serviceable life.
10.Save power at raining or cloudy days, it is recommended to always leave at least 20%
capacity unused.

4
Get to know your gear
Models:
(ANTPAK DC-20)
(ANTPAK BP-800 / ANTPAK BP-300)

5
Front panel:
Rear panel:

6
Accessories
External AC Power 19V5ASupply (included)
PS: External AC power supply will be matched according to shipping
destination
Car cigarette lighter charging lead (included)
Mounting Brackets (included)

7
Getting Started
Connecting the Battery
Step 1: Release the side latches and open the battery box lid
Step 2: Place a 12 volt lead acid battery (not supplied) into the base of the ANTPAK and
secure it with the Velcro belt
Step 3: Connect the red cable to the positive battery terminal. Then connect the black cable
to the negative terminal. Make sure the nuts on the battery terminals are firmly fastened.
Please refer to below assemble diagram
Step 4: Close the lid and fasten the latches.
Step 5: Turn “400A main switch” on
Step 6: Turn “Control Panel Switch” on, LED indicates green after seconds
Step 7: Turn “AC switch” one and AC 240V is ready to use.(BP-800 & BP-300 models only)

8
Remark:Please turn off the 400A main switch before assemble.

9
Main Data Screen Overview
The ANTPA K’s i n form ati ve L CD s c ree n d i s p l a ys a l l t h e re l e vant
information regarding charging process.
You can press LED switch button to turn ON/OFF LED display
Battery Level Icon
Battery box internal temperature or charging current (during
charging process)
Battery Voltage
Inverter ON/OFF (BP-800 and BP300 only)
** If no loads on battery box, please turn off the main switch during charging
process to charge batter faster.

10
Getting Charged
Charging the Battery using DC 19V5A (12V 7Amp Charging Current)adapter
(supplied):
Connecting 19V5A b a tt ery adapte r ’s wi re corr e c tly via the battery box
“CHARGE INPUT”, please check the wire is plugged in stable,then
connect the other side to AC -240V.
Caution: Max current for charging port is 10A.
Charging the Battery using 18V solar panel without regulator(not supplied)
◆Charging the battery via ‘DBMP’(Dual Battery Management Point)
directly without regulator. To do this, connecting 18V solar panel to
s ys te m ’s ‘ DBMP’ And e r s o n p l ug .
Battery box
19V5A adapter
Solar panel
Battery box
AC –240V
10A Max
20A Max

11
Charging the Battery using 18V solar panel with regulator(not supplied)
◆Connecting 18V solar panel through 12Vsolar regulator (not
supplied),then plug in“ 5 0A ANDE RS ON PLU G .
Place the solar panel to somewhere fully sunlight and set face to the sun, better to
adjust the position to follow the sun’s move; efficient time for solar panel starts from 10AM to
3PM, it need to be 30~45 degree from the sun to the underground of the solar panel, clouds
impact the power generation someway, but it could be ok with strong sunlight and rain, the
more sunlight the more power generated, also could set stable outdoors and face to the
sun.
Solar panel
Battery box
12V controller
50A
Max

12
Car charger with isolator (not supplied)
Car cha rge r of the ca r ciga r lighter le ad (su ppl ied )
CAUTION –In some vehicles the 12V accessory socket may still provide power even if the
ignition is turned off. In this case continued and un-monitored use of the ANTPAK in DC mode may
result in a flat vehicle starter battery
12V Main battery
ANTPAK
Isolator
50A
Max
ANTPAK
The car cigarette lighter wires
Car Cigaretee Socket
10A
Max

13
Technical Specs of DBMP
◆DBMP Specifications:
Input Voltage
12V
Charging System Suitable for
10 Amps
Cut In Voltage
13.2 VDC
Cut Out Voltage
12.8 VDC
◆DPMP Features:
The ANTPAK DPMP is a 12 Volts 10 Amp in-vehicle DC to DC charger designed
for keep your auxiliary battery charged whilst driving or with portable solar panels
when you are parked.
The system charges your auxiliary battery to their optimum levels, using
multi-stage DC DC charging.
The ANTPAK DPMP also features a DC to DC solar regulator, allowing you to
deliver the maximum amount of power from your solar panels to your auxiliary
battery.
With multiple levels of fault protection. The smart charger will act as a dual battery
isolator, should the voltage get too low, the start battery will be protected.
Charges AGM, Gel, Calcium content, VRLA and Standard Lead Acid batteries
The smart charger will act as a dual battery isolator, should the voltage get too low,
the start battery will be protected.

14
Jump start a car
CAUTION: Please connect the positive and negative terminals correctly,otherwise will
damage the system.
Battery box
100A Copper wire (not supplied)
Jump start car

15
Mounting Bracket Installation (Supplied)

16
Power of loads
AC loads(ANTPAK BP-800/ ANTPAK BP-300 only)
ANTPAK BP-800:The AC socket is powered by pure sine wave maximum output of
800W, if inverter temperature exceeds 60℃─65℃, the inverter is protected by Over-Temp
Protection function.
ANTPAK BP-300:The AC socket is powered by pure sine wave maximum output of
300W, if inverter temperature exceeds 60℃─65℃, the inverter is protected by Over-Temp
Protection function.
Caution:The inverter will start to sound a warning alarm once the battery voltage is
getting low and reaches 11V. At this stage the inverter should be switched off or the device
disconnected. In this stage, inverter is in auto self-protection mode, and no output. To
restart inverter, please turn ON/OFF AC switch from main screen. This inverter can be used
outdoors but not in wet weather
DC loads
Loads
Power
USB*2PCS
Maximum load/Socket 5V/2.5A
Engel
Maximum load/Socket 10A
DC power*2PCS
Maximum load/Socket 12V/20A
Cigar lighter *2PCS
50AAnderson plug*1PC
Maximum load 50A/500W
Operation:①To use the USB: Turn on400AMain Switchthen turn ON/OFF from main
screen, once LED indicates green,USB is ready to use.
②To use the Cigar lighter、DC Power、50AAnderson plug: Turn on 400AMain Switch,
sockets are ready to use.
CAUTION:battery box’s DC loads can’t exceed above voltage and current,otherwise
the battery box auto self-protect and stop all loads output.

17
Technical Information
Model name
ANTPAK DC-20
ANTPAK BP-800
ANTPAK BP-300
Maximum Solar panel
Capacity
≤300W solar panel with 18V(carrying idler 21.5V)
Pure sine inverter
Nil
DC12V-AC240V,
800W
DC12V-AC240V,
300W
Output
voltage
DC
output
12V power*2PCS,max output current:20A;12V cigar
lighter*2PCS,max output current:20A;
(12V power*2PCS+12V lighter*2PCS,4PCS total max
current is 20A);
USB 5V*2PCS,max output current:2.5A;
50AAnderson plug*1PC,max output current:12V/50A
AC
output
Nil
AC240V*1PC,max
output power:
800W;
AC240V*1PC,max
output power:300W;
Internal battery
60AH-MAX130AH,lead acid battery
Charge time
Depends on the charge method
Discharge time
Depends on the power of loads
Rated charging
current
10AMAX
Rated discharge
current
20A
System voltage
12V
Wastage of carrying
idler
<50mA
Over-voltage protect
14.4V
Charging voltage
15V
Voltage of under
voltage
10.5V
Over discharge
voltage
10.5V
Temperature
-100Cto+630C
Over-load 、short
protect
10ms respond
protection circuit:
Over-load、short
protect
Burn fuse
Warranty
12 Months
***battery box specs according to actual model.

18
Frequently Asked Questions
What batteries can be used?
The ANTPAK can charge most types of rechargeable 12V lead-acid type battery from 60Ahr
capacity up to 140Ahr. There are four main types of 12V lead acid battery - conventional wet
lead-acid battery, calcium, AGM and gel. The ANTPAK can charge both cold cranking type
car batteries and deep cycle batteries.
How do I charge?
Please refer to content ‘Getting Charged’ on page 9.
Is it waterproof?
No, care should be taken to shield it from direct sunlight and the elements.
How do I know if the battery is fully charged?
The Battery Level Icon is solid and not flashing, battery will is fully charged.
If AC adaptor gets hot when charging, is that normal?
Yes, it is okay, It can reach 70°C
Can I leave the ANTPAK continually plugged in?
Yes, the ANTPAK will keep on float cycle. Usage is plug-and-play. The built-in battery
management system prevents over-charging and over-discharging of batteries. The USB
output will only supply the amount of power needed.
This manual suits for next models
2
Table of contents