Apacer Technology Disc Steno AD330 User manual


English
---------------------------------------------------------------------------------
Notices
1. The copyright on this user manual remains with Apacer Inc. No part of
this user manual may be transmitted, reproduced, or changed.
2. Other companies’ product names that may be used herein remain the
property of their respective owners.
3. The product specifications, design and this user’s manuals content are
subject to change without notice.
4. If you have any questions, please contact your merchant or our
service center for clarification. We are not responsible for any losses
resulting from using this product no matter what the reason.
5. The guarantee and repair information is on the warranty card.
6. This product incorporates copyright protection technology that is
protected by method claims of U.S. patents and other intellectual
property rights owned by MacroVision Corporation and other rights
owners. Use of this copyright protection technology must be
authorized by MacroVision Corporation, and is intended for home and
other limited viewing uses only unless otherwise authorized by
MacroVision Corporation. Reverse engineering or disassembly is
prohibited.
2

English
---------------------------------------------------------------------------------
Content
1. Before Use.........................................................................4
1.1 Warning...................................................................4
1.2 Notice......................................................................4
1.3 Contents of the product packaging .........................5
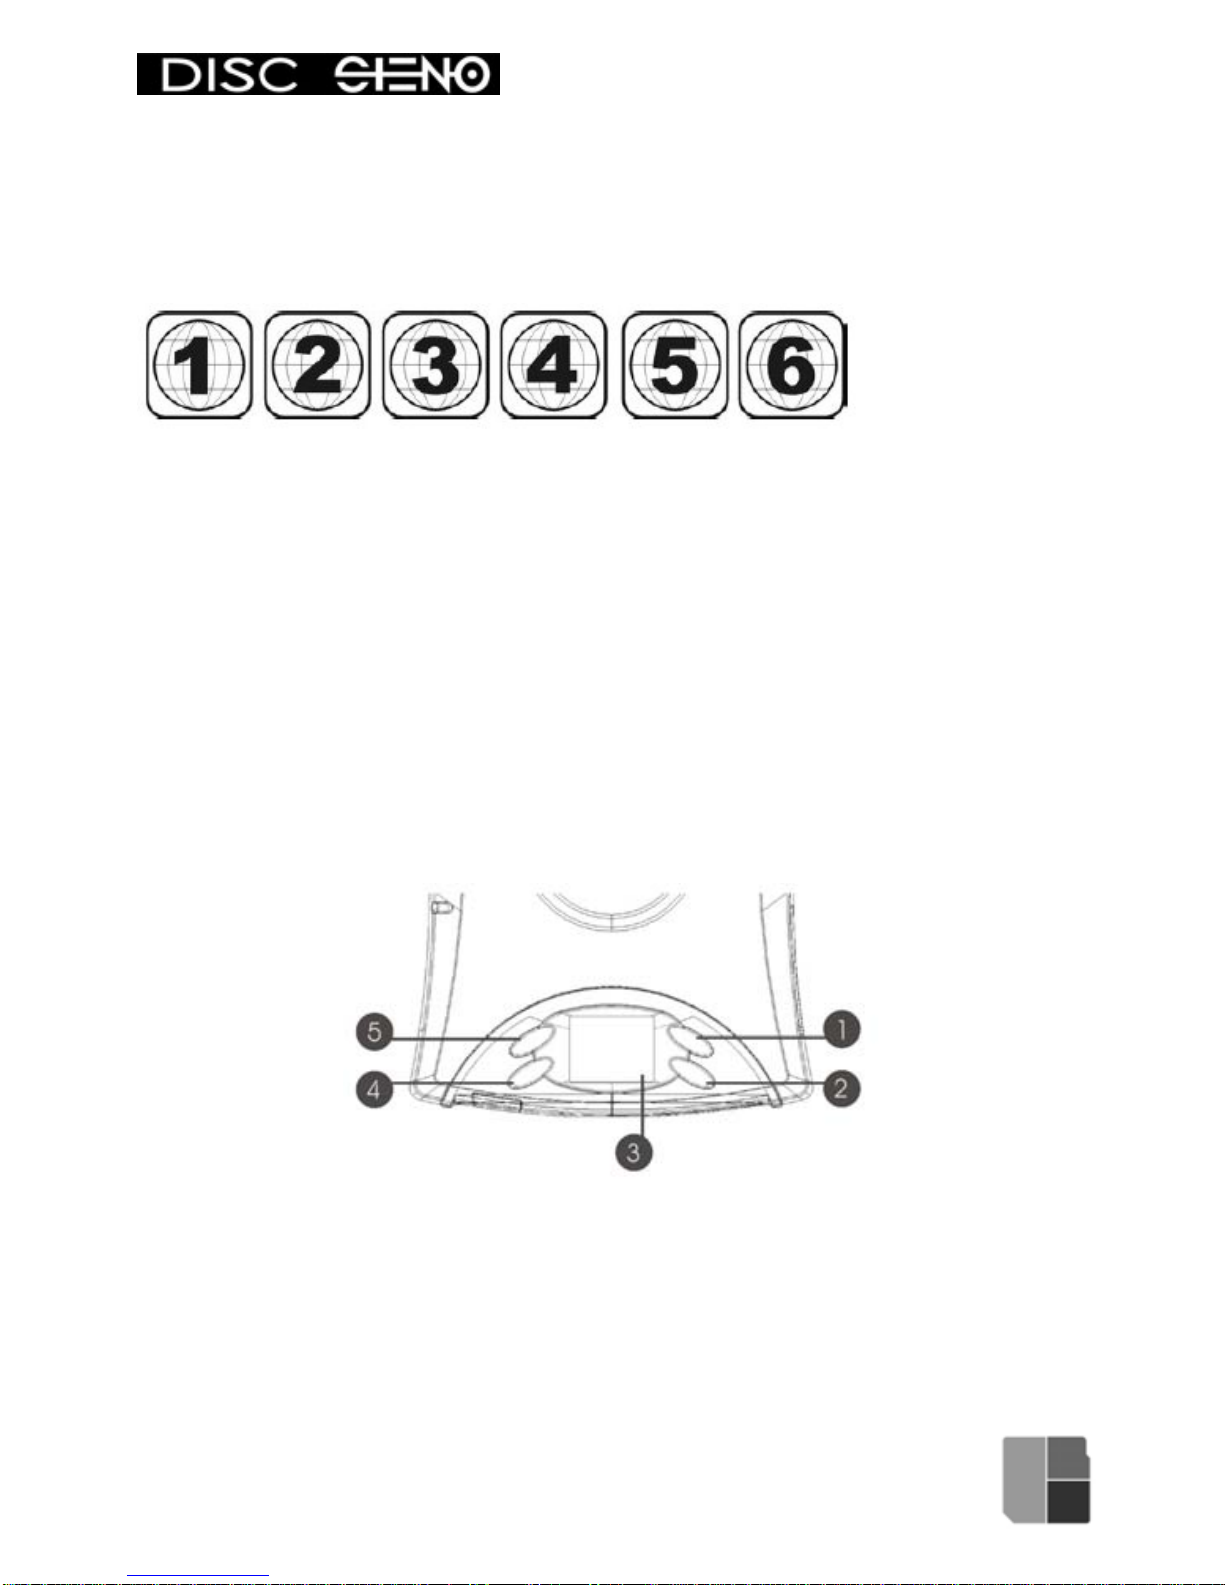
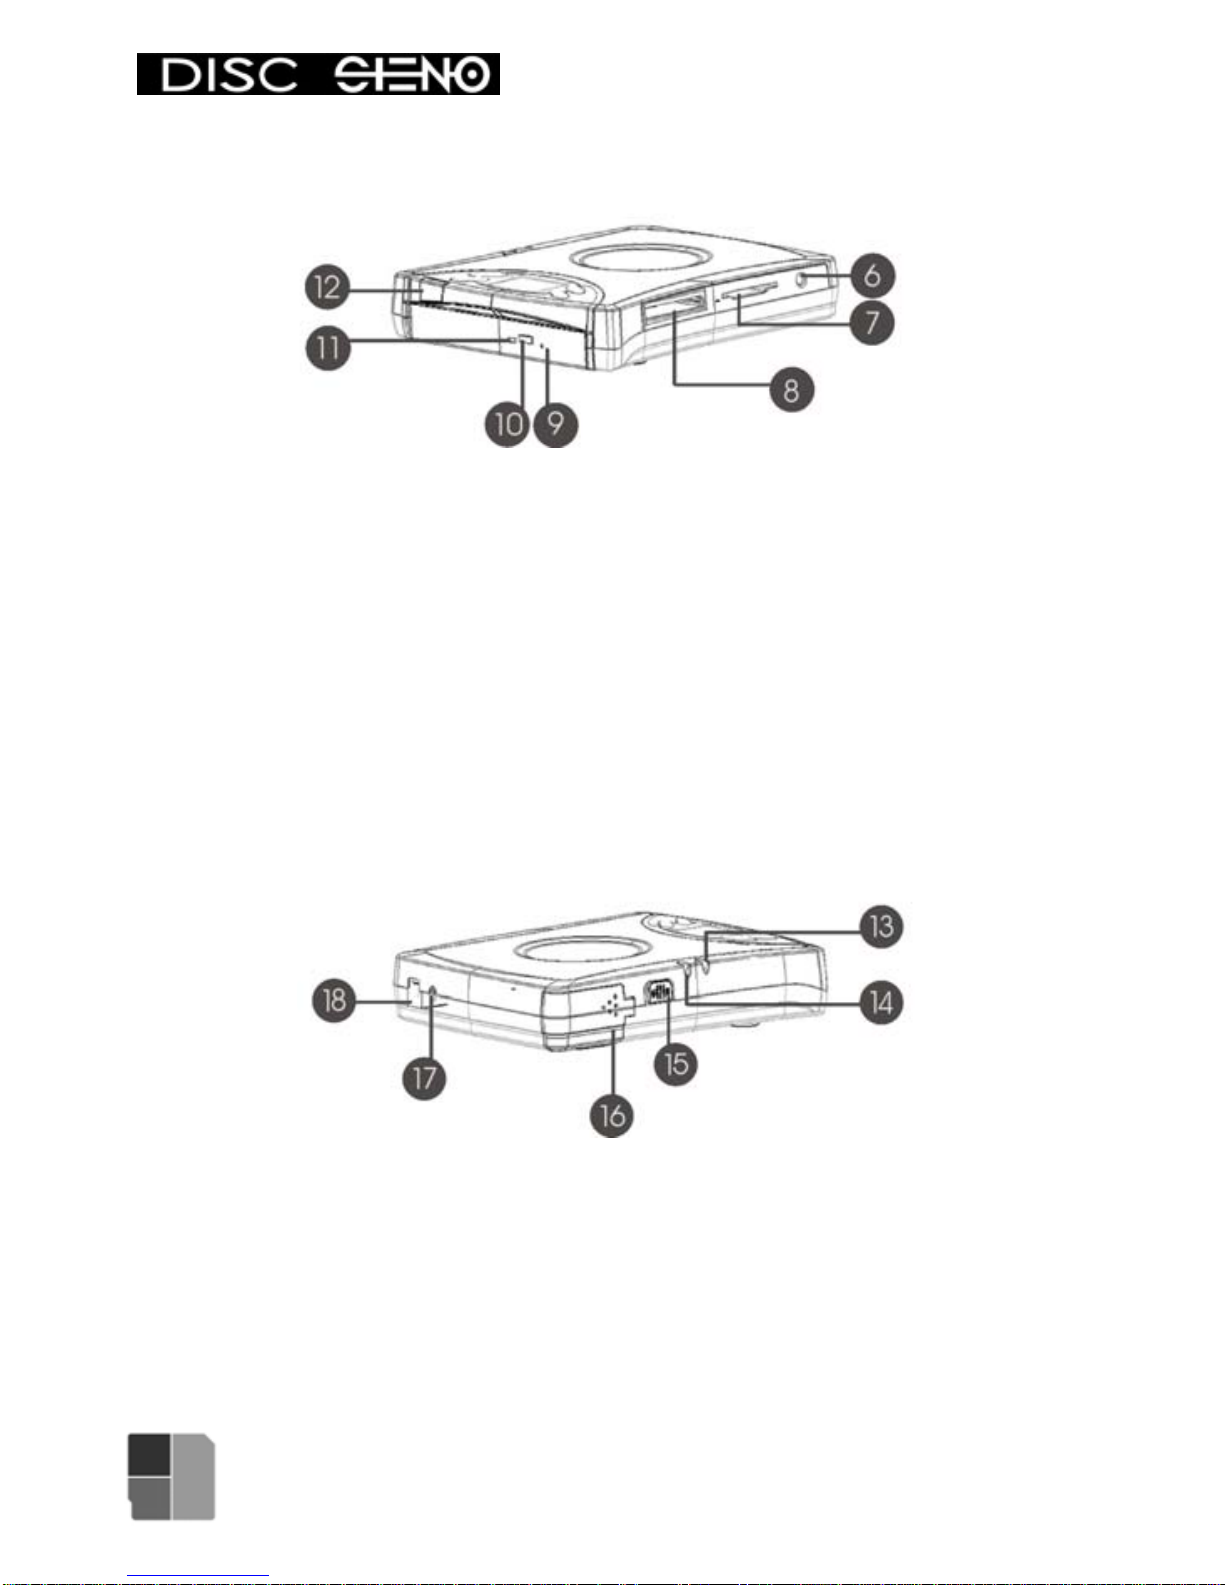
2. Product features and appearances....................................6
2.1 Appearance and display..........................................7
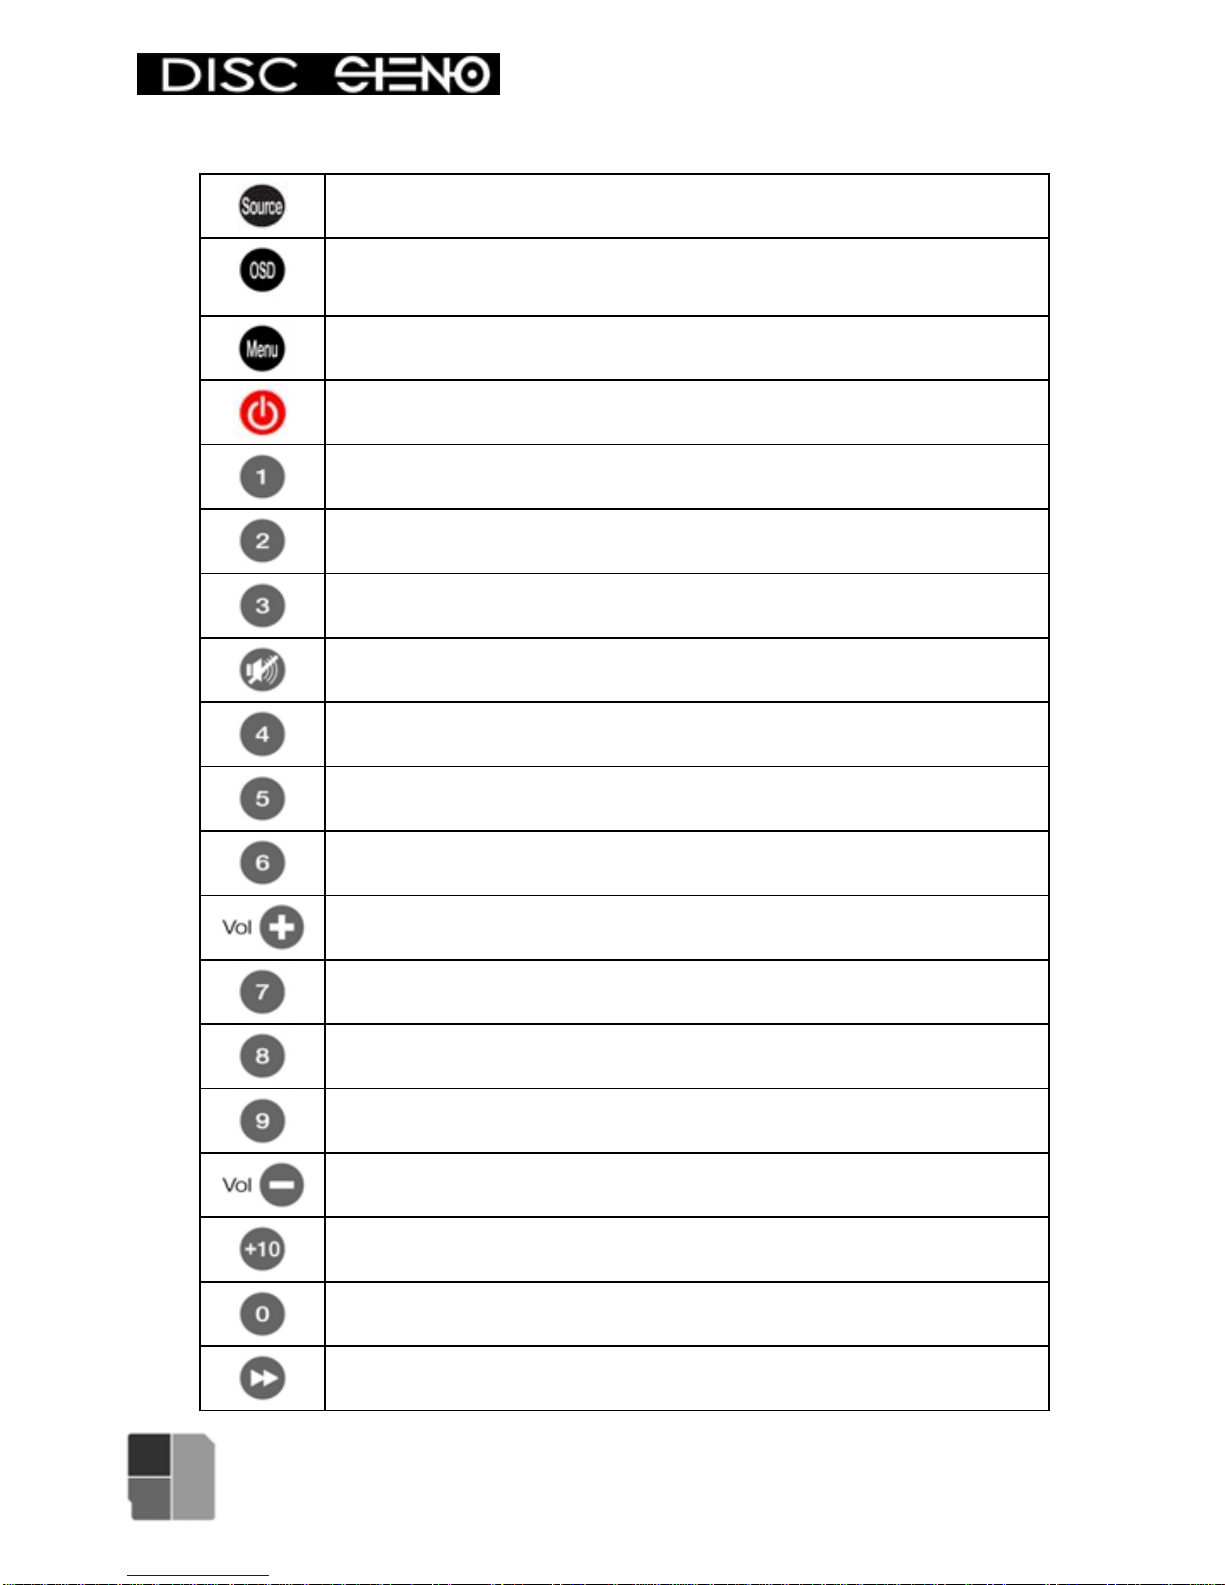
2.2 Remote control........................................................9
3. Quick Start .......................................................................12
3.1 Before Use ............................................................12
3.2 LCD Display..........................................................13
3.3 Menu instruction....................................................15
4. Usage...............................................................................17
4.1 Copy......................................................................17
4.2 Photo View............................................................21
4.3 DVD Playback Mode.............................................22
4.4 DVD Convert Mode...............................................25
4.5. USB Mode............................................................31
5. Setting..............................................................................33
6. Firmware Upgrade...........................................................35
7. Driver Installation.............................................................36
7.1 Install the burning software...................................36
7.2 Under the Windows 2000 operating system.........36
7.3 Usage with Macintosh systems.............................36
8. General operation............................................................37
8.1 Charging the battery..............................................37
8.2 Emergency eject ...................................................37
8.3 Daily cleaning and maintenance...........................37
9. Hardware specifications...................................................38
10. Frequently asked questions...........................................39
3

English
---------------------------------------------------------------------------------
1. Before Use
Note: To use this product safely, note the following instructions:
1.1 Warning
Please observe the following to avoid accidents.
1. In order to prevent electric shocks or other harm, do not take the
AD330 apart or refit this product or attempt to repair it yourself.
2. To prevent fire, electric shock or breakdown, do not use this product in
humid conditions (like the bathroom).
3. If there is smoke, a strange sound or smell when using this product,
please immediately switch off the power and/or disconnect the AD330
from your computer.
4. This product is a precision electronic product, do not drop or subject it
to physical shocks.
5. Only use the supplied AC power adapter. Any other types of AC power
adapter are prohibited. Apacer is not liable for any damage caused by
using any other type of AC power adapter.
1.2 Notice
To avoid personal loss or injury:
1. When your hands are wet, do not touch this product.
2. Touch a metal item to discharge any static electricity that may be
present in your body before use.
3. Do not switch off the power or reboot when this product is in the middle
of data transferring. We are not responsible for any data loss or
damage.
4. Use only the supplied accessories (like the AC adapter and the
rechargeable battery).
5. To avoid disc compatibility issues causing data loss, please refer to the
latest disc compatibility list ofApacer web site before use.
6. To avoid DVD conversion error. Please use AC adapter to convert your
DVD
4

English
---------------------------------------------------------------------------------
1.3 Contents of the product packaging
Item Number
AD330 1
AC adapter 1
RCA video cable (3-in-1; 1.5 m) 1
USB 2.0 cable: one of mini-A, one of mini-B 2
Remote control (with battery) 1
Quick Start & User manual (English version) 1
Warranty card 1
User manual CD 1
Blank CD-R 1
Blank DVD+R 1
Nero Recording software 1
Bag 1
Optional item listed
Item Number
Rechargeable Li-ion battery: 7.4 V, 2200 mAh 1
Car Charger 1
5

English
---------------------------------------------------------------------------------
2. Product features and appearances
The DISC AD330 is designed to incorporate flexibility and high
performance. It has the following features and functions:
‧ Portable photo recorder
‧ Standalone DVD converter through USB connector
‧ Standalone CD/DVD writer
‧ Able to view photos via LCD panel
‧ Support most types of flash memory cards
‧ USB 2.0 external card reader, USB external DVD/CD writer.
‧ Rechargeable Li-ion battery (optional), AC adapter, and car cigarette
charger (optional) for anywhere, anytime data backup
Notices:
1. This product doesn’t support the 5 V Smart Media Card specifications.
2. This product supports Memory Stick/Memory Stick Pro and is compliant
with Memory Stick Duo (works via a transfer card).
3. This product does not support the Memory Stick Magic Gate function.
4. This product doesn’t support the copyright protection function of SD.
5. This product supports mini-SD, RS-MMC and T-FLASH card through an
adapter or holder.
6. This product supports XD-picture card through a CF card adapter.
7. Use of this product does not guarantee that discs recorded can be read by
other brand CD-ROMs or DVD-ROMs.
8. Full erasure of rewritable DVD+/- RW or CD-RW media has to operate via
a computer. AD330 only provides quick-erase function.
9. Remember the copying of digital data such as music, videos, computer
programs and so on is prohibited. We are not responsible for the
consequences of any acts of infringement.
10. AD330 can’t guarantee playback of all kinds of Dolby title.
11. Disc formats supported by this DVD-Drive:
CD-R/CD-RW DVD-R/DVD-RW DVD+R/DVD+RW
8CM: 156MB
12CM: 650MB 8CM: 1.4GB
12CM: 4.7GB 8CM: 1.4GB
12CM: 4.7GB
6

English
---------------------------------------------------------------------------------
12. Region Coding:
Since DVD movies are released at different times around the world, all
DVD discs are “region coded” and will only play in a DVD player of the same
region.
Please recheck the Disc Region before you play it.
The world is divided into 6 main regions, and the discs are identified by the
region number superimposed on a globe :
Region 1: Canada, USA, US Territories.
Region 2: Europe, Japan, Middle East (include Egypt).
Region 3: Southeast Asia, East Asia (include Hong Kong).
Region 4: Central America, South America, Mexico, Australia, New Zealand,
Pacific Islands, Caribbean.
Region 5: Russian Federation, Africa (not Egypt), North Korea, Mongolia.
Region 6: China.
2.1 Appearance and display
1. “Right” button: press to select the next option
2. “Exit” or “Cancel” button: Return the previous action selections. If
pressing this button over 3 seconds, the screen will show “Please turn
off power”.
3. Display screen: it shows the operation status and function settings
4. “OK” or “View” button: selects the action indicated on the display
5. “Left” button: press to select the previous option
7

English
---------------------------------------------------------------------------------
6. A/V out jack.
7. Card Slot 2 (5-in-1 card slot): supports flash memory cards including
Secure Digital, Multi-Media Card, Smart Media, and Memory Stick /
Memory Stick PRO directly.
8. Card Slot 1 (Compact Flash slot): supports Type I / Type II cards and
Micro Drives directly.
9. Emergency eject: ejects the DISC if the eject button doesn’t work.
10. Eject button
11. Status LED: indicates the drive status (LED flashing: busy)
12. IR receiver: receives the signal from the remote control - do not cover.
13. Battery LED: turns green when charging the battery via the AC adapter.
After charging, it turns off. Shows red when the battery power is
insufficient.
14. Power LED: when the power is on, it glows green.
15. Power switch
16. Battery cover
17. DC-in jack
18. USB 2.0 port: for connecting to a computer or camcorder
8

English
---------------------------------------------------------------------------------
2.2 Remote control
When you connect AD330 to TV to play VCD or DVD, please use remote
control. You may also use remote control for normal operation of AD330.
Note:
Before using the remote control, please remove the transparent wrapping.
The table below lists the function of each button on the remote control.
9

English
---------------------------------------------------------------------------------
2.2.1 functions of keys
No function
Displays the file and the video data
DVD playback system setting
“DVD Playback mode” switch
Selects 1
Selects 2
Selects 3
Press to mute, or to resume normal volume
Selects 4
Selects 5
Selects 6
Increase volume
Selects 7
Selects 8
Selects 9
Decrease volume
Select 10 or more, increases 10 per time
Numeric 10
Fast forward: 1X2X4X8X20X1X in sequence
10

English
---------------------------------------------------------------------------------
Fast backward: 1X2X4X8X20X1X in sequence
Switch to previous video
Switch to next video
Play video or Pause
Stop playing
Enable and select language type
Enable and display the subtitle
Eject VCD or DVD disc
Select options in the menu or “Left” button
Confirmation key or “OK” or “View” button
Select options in the menu or “Right” button
Cancel the function or return the previous option or “Exit”
or “Cancel” button
“DVD convert” button / “Long press “OK” button
11

English
---------------------------------------------------------------- -
12
----------------
3. Quick Start
3.1 Before Use
1. Make sure the power switch is in the OFF position. Plug
in the supplied AC adapter or insert the supplied rechargeable battery (if
have the battery please see picture for the battery placement and direction)
then switch the power on.
The Power LED light turns green and then you can start using your AD330.
2. After the AD330 has started normally, the display will show the main
screen.
3. Press the “Left” or “Right” button to switch to other functions. Press
“OK” to start the operation you selected.
4. If you don’t use the AD330 for more than 3 minutes (the default setting),
the display will shut down to save battery or AC electrical power. Once you
press any button on the panel or remote control, the display returns to the
normal mode and you can select the functions you want.
Note:
Before using the AD330 for the first time, charge the battery for a full 8 hours.
Avoid using the AD330 on the edge of a desk or any other unstable places.

English
---------------------------------------------------------------------------------
13
3.2 LCD Display
3.2.1 AD330 LCD display and function descript
c. Device indicator
a. Power display b. USB mode
h. Notice icon d. Selection name
e. Selection icon
f. “OK” button function display g. “Exit” button function display
a. Power display
Battery status display
AC adapter is currently in use
b. USB mode indicator
USB mode has set to connect to PC (default)
USB mode has set to connect to Printer
c. Device indicator
Disc inside
Card in Slot 1
Card in Slot 2
Camcorder plug-in

English
---------------------------------------------------------------------------------
d. Selection name
Name of selected icon.
e. Selection icon
Copy
Photo view
Setting
DVD playback
DVD convert
f. “OK” button function display
Operation function base on display status operation
g. “Exit” button function display
Operation function base on display status operation
h. Notice icon
Processing, please wait.
Processing, please don’t touch any key
3.2.2 Turning off the device
If you want to exit and power off system,
please move to main menu and press “Exit”
button for 3 sec. The LCD will show “Please turn
off power or press any key back to main menu”.
If you want to exit, please turn off power or else
press any key to return to the main menu.
14

English
---------------------------------------------------------------------------------
3.3 Menu instruction
There are five modes in Main menu: Copy、Photo view 、Setting、DVD
playback、DVD convert.
a. Copy
Backup the photos or movies from your memory card or camcorder by default
mode. End of backup, press “OK” button into preview mode, press “Exit”
button return to main menu
b. Photo View
Display JPEG files from medias, not support USB device. Press “OK” into
sub-function select mode. If put into card & disc at the same time, Please
select the source list (Disc, Slot1 or Slot2) and select target folder, and click
the options to view photos. After confirm AD330 will base on default mode
(Single mode or thumbnail mode) to browse, than if you press “OK” you can
perform the functions below.
Single Mode sub-function: Thumbnail Mode sub-function:
Single photo slideshow
Go to thumbnail mode
Rotate the current photo
Print the current photo
Thumbnail photos slideshow
Go to single mode
15

English
---------------------------------------------------------------------------------
c. DVDPlayback
AD330 will automatically check the disc. If the VCD or DVD can be played,
AD330 will play it automatically.
d. DVD Convert
Make a DVD Video from Camcorder
OTG Device source:
OTG1: HDD or Micro Drive
OTG2: SD card
Convert Type:
All files / Select file / Playlist
Folder contains source files
Files for DVD convert:
Movie File in 4: 3 aspect ratio / Movie File in 16: 9 aspect ratio
16

English
---------------------------------------------------------------------------------
4. Usage
4.1 Copy
4.1.1 Copy from memory card
To perform a quick backup function, it is recommended to insert a single card
only.
Insert the memory card that you want to copy into the appropriate slot.
Slot 1: CF Type I/II, Micro Drive
Slot 2: SD, MMC, SM, MS & MS pro Card
4.1.2 Copy from camcorder
Please plug in USB mini-A (short cable) to AD330, Plug in USB mini-B (long
cable) to camcorder.
OTG1: HDD or Micro Drive
OTG2: SD card
Press the eject button on the front panel to open the tray.
Insert a disc and push the disc tray closed.
Note: Make sure the disc is placed securely on the spindle of the disc tray
and has clicked in place. Please prepare blank discs or erase rewritable discs
before doing Copy function. AD330 can’t erase discs during Copy or DVD
conversion period.
17

English
---------------------------------------------------------------------------------
There are two modes for copying: go to Setting Mode to change setting
before using.
Copy
In this mode, the AD330 utilizes fast copying to record digital
data from the memory card to the DISC.
S-Copy
In this mode, after completing the copy work, the AD330 checks the
DISC to ensure all digital data has been recorded securely from the
memory card to the DISC.
Press the “Left” or “Right” button to choose Copy
mode. Press “OK” button, AD330 will burn the
Disc directly and show the copy status. If multiple
cards or devices are detected by AD330, it is
necessary to select device before burning.
The following image appears, showing the capacity of the memory card and
the Disc. While copying, you will be able to track the progress of the copy
work from the following image on the display.
Note:
1. Do not press any button or switch off the
power at this time, otherwise the data in the
memory card could be damaged or not copied
properly. We are not responsible for any loss
resulting from this operating error.
2. The Copy (S-Copy) processing can’t cancel
or stop, please make sure the copy function
before starting.
3. The 12cm empty DVD Disc size is 4.7 GB, the 8cm empty DVD Disc
size is 1.4GB, the 12 cm empty CD Disc is 650MB. AD330 will reserve 5%
outside Disc track space to avoid Data loss.
4. The Copy function just shows the total sizes of card for copying,
remaining space size of Disc to burn, but can’t know status of all users’
Discs to determine the total number of Discs for copying.
18

English
---------------------------------------------------------------------------------
4.1.3 Copy status and information
1. If the copying is successful, the display will
show the following image. You can press “View”
to check the photo disc directly or eject
both the memory card and the Disc.
2. If the disc capacity is less than the source
data,AD330 will span more than one disc to do
Copy function. The display will show the
following image.
3. Press “burn” to start recording. Once disc is
full, it will show “Change Disc”.
4. Eject the Disc and insert a new one, press
“burn” to record again.
If you don’t want to record more than one Disc,
please press “cancel”
4.1.4 About the finished Disc
The Disc is a Joliet format with “Apacer” disc label.
The folders, file types and file content on the Disc are consistent with the
source data.
The folder names are numbered as 001, 002, 003 …… They will increase
with each “Copy”.
The Disc can record until full.
Previous DVD-ROM or player might not support the multi-border
(multi-session) DVD disc.
4.1.5 Erase data.
> > >
19

English
---------------------------------------------------------------------------------
4.1.6 Error messages/ Warning messages
The display may show an Error/ Warning Message. The following is the list
of Error message:
No Reason Solution
1
Check that the memory card is properly inserted
and check your memory card for any faults.
2
Check the DISC is placed securely on the spindle
of the disc tray, or the card is not inserted in slot.
3
Make sure the DISC in the AD330 is writeable and
not previously recorded by other recorders than
AD330 in “stand alone mode”.
4
The AD330 can’t read the data on the DISC: check
the disc surface for any scratches
5
The Disc can’t be written to: replace with another
DISC.
20
Table of contents