Appliance 365 UEHC602 User manual

Model: UEHC602
Your 1 Year Guarantee
Your appliance carries a 1 year parts and labour warranty. To fulfil the conditions of your
guarantee, the appliance must be correctly installed, operated in accordance with the
instructions and only be used for normal domestic purposes.
Please note that the guarantee and service availability only apply to the United Kingdom
mainland.
Customer Service
In case of difficulty please call the Customer Service Helpline number.
0844 800 7848
- When calling customer service, please ensure you have the model and serial number to
hand.
- Please keep your receipt or invoice in a safe place as they will be required as proof of date
of purchase.
Make a note of the serial number of your appliance here for future reference. You will find this
on the rating plate on the underside of the hob:
Serial Number: _______________________________________
Appliance 365 Limited, 730 Mandarin Court, Centre Park, Warrington, WA1 1GG

USER INSTRUCTIONS
Installation
All operations relating to the installation (eg; electrical connection) must only be carried out by
a qualified electrician following the regulations and standards in force. For specific
instructions, please read the section ‘Installation Instructions’.
Safety Precautions
•To avoid any possible hazard, the appliance should be installed by a qualified
electrician only.
•Hot fat is highly flammable so pay extra attention when preparing food with grease or
oil. Frying should only be carried out under constant supervision.
•In the event of a fire:
oDon’t take any risks
oTurn the heat off only if it is safe to do so.
oNever throw water over a fire.
oDon’t tackle the fire yourself.
oGET OUT, STAY OUT and CALL 999.
•Warning! Never allow small children in the vicinity of the hob. Older children may use
the appliance only under adequate supervision.
•The hob will become hot during use and will remain hot for a period of time afterwards
– keep children at a safe distance.
In the event of even a slight fracture on the cooking surface, disconnect the electric power
supply immediately and call customer service. DO NOT USE THE HOB.
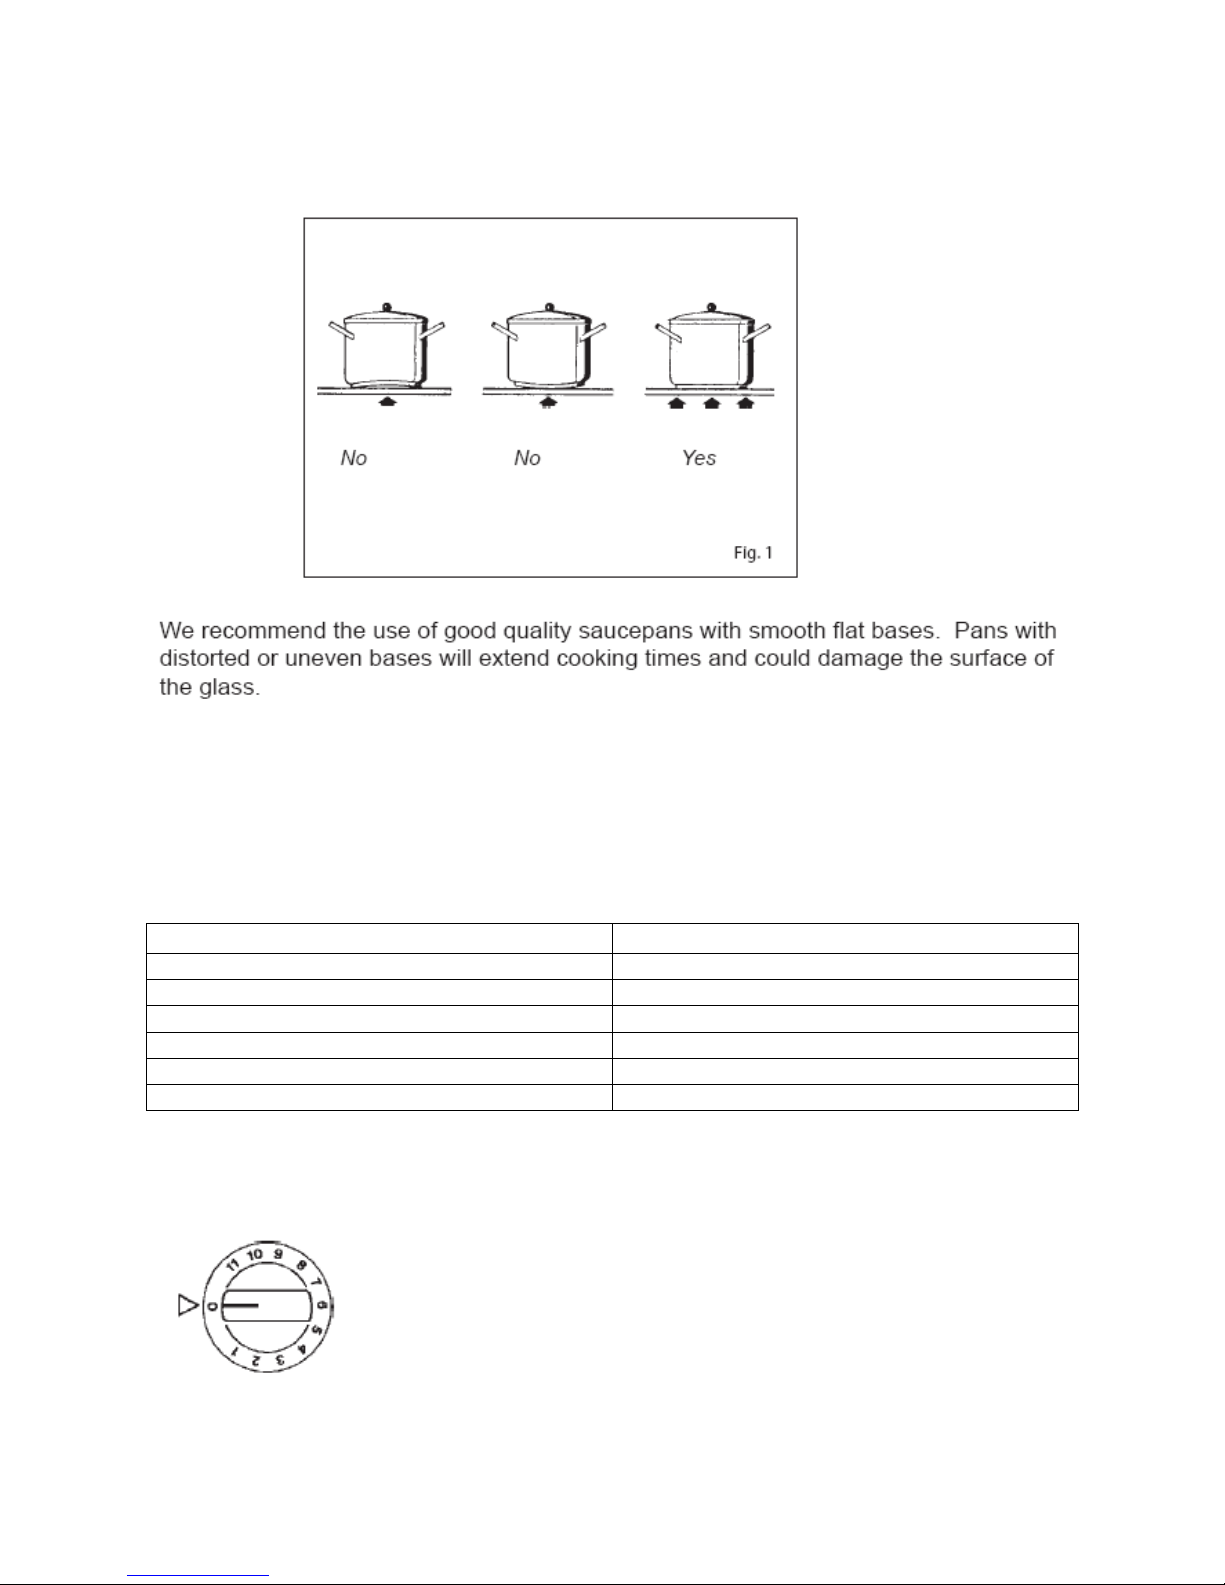
How to use the hob
To turn the hob on / off
To turn the hob on, select a cooking zone then rotate the control knob to the power setting
required. This hob has 11 power settings labelled 1 to 11. The higher the number, the more
powerful the heat as detailed in the table below:
Temperature Setting Heat Intensity
1 - 2 Weak
3 - 4 Gentle
5 - 6 Low
7 - 8 Medium
9 - 10 Strong
10 - 11 Maximum
Always ensure the control knob is retuned to the off position (0) once cooking is complete.
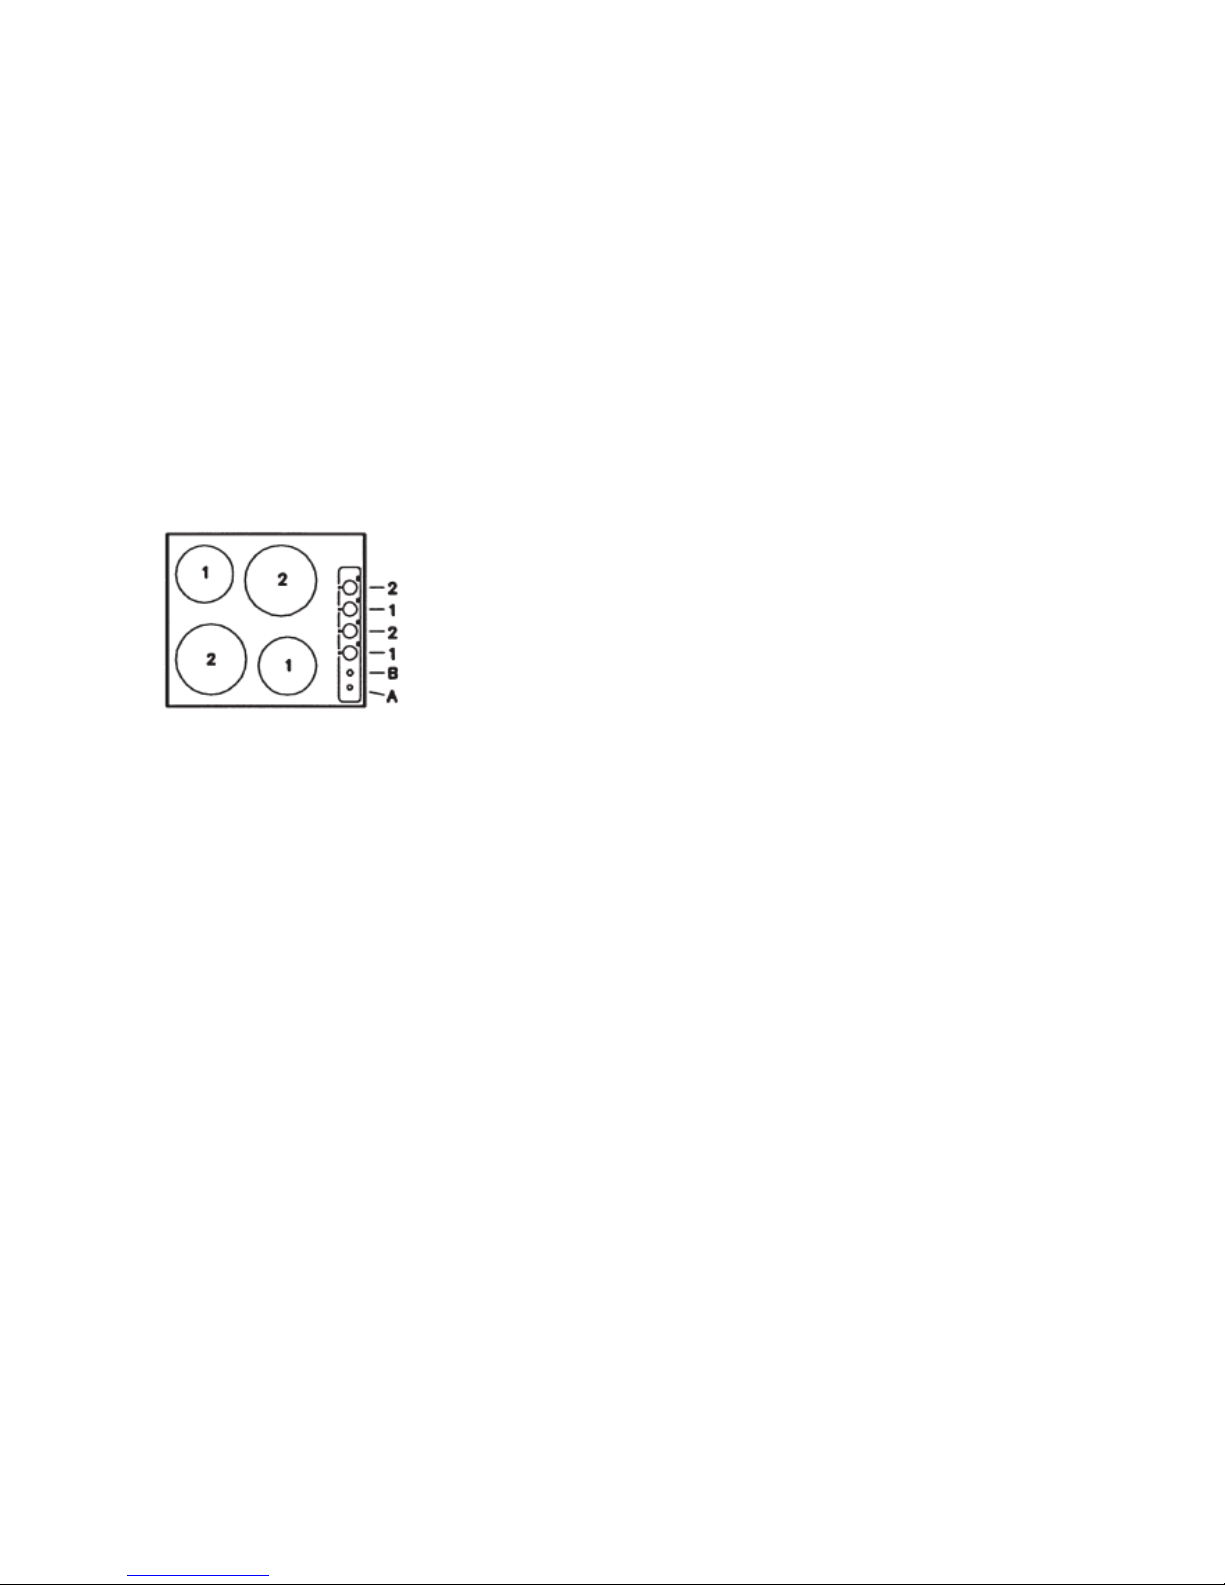
Pilot lights
This model is equipped with a series of pilot lights. When illuminated these lights signify the
following:
A – One or more heating elements are switched on.
B – Residual heat indicator confirming that the temperature of the designated element is
above 50°C.
Note: In certain instances there may be a slight illumination even after the element has been
switched off and the hob is cool. This is quite normal and not a cause for concern or
complaint.

Scraper shown for illustration purposes only
Remove stray bits and grease drops from the cooking surface with a special ceramic hob
scraper (fig 4). Ceramic hob scrapers can be purchased from any DIY retailer or Kitchen
Specialist. Clean the hot area with “Hob Brite” or another specialist hob cleaner and a paper
towel. Rinse with a small amount of water and dry with a clean cloth.
Pieces of aluminium foil and plastic material which have inadvertently melted, sugar remains
or foods with a high sugar content have to be removed immediately from the hot cooking area
with a special scraper (fig 4). This is to avoid any possible damage to the surface of the hob.
Under no circumstances should abrasive sponges or irritating chemical detergents be used
such as oven sprays or spot removers.
INSTALLATION INSTRUCTIONS
Installation
These instructions are for a qualified electrician as a guide to the installation, adjustment and
maintenance, according to the regulations and standards in force. The appliance must always
be disconnected from the electricity supply before carrying our any of these operations.
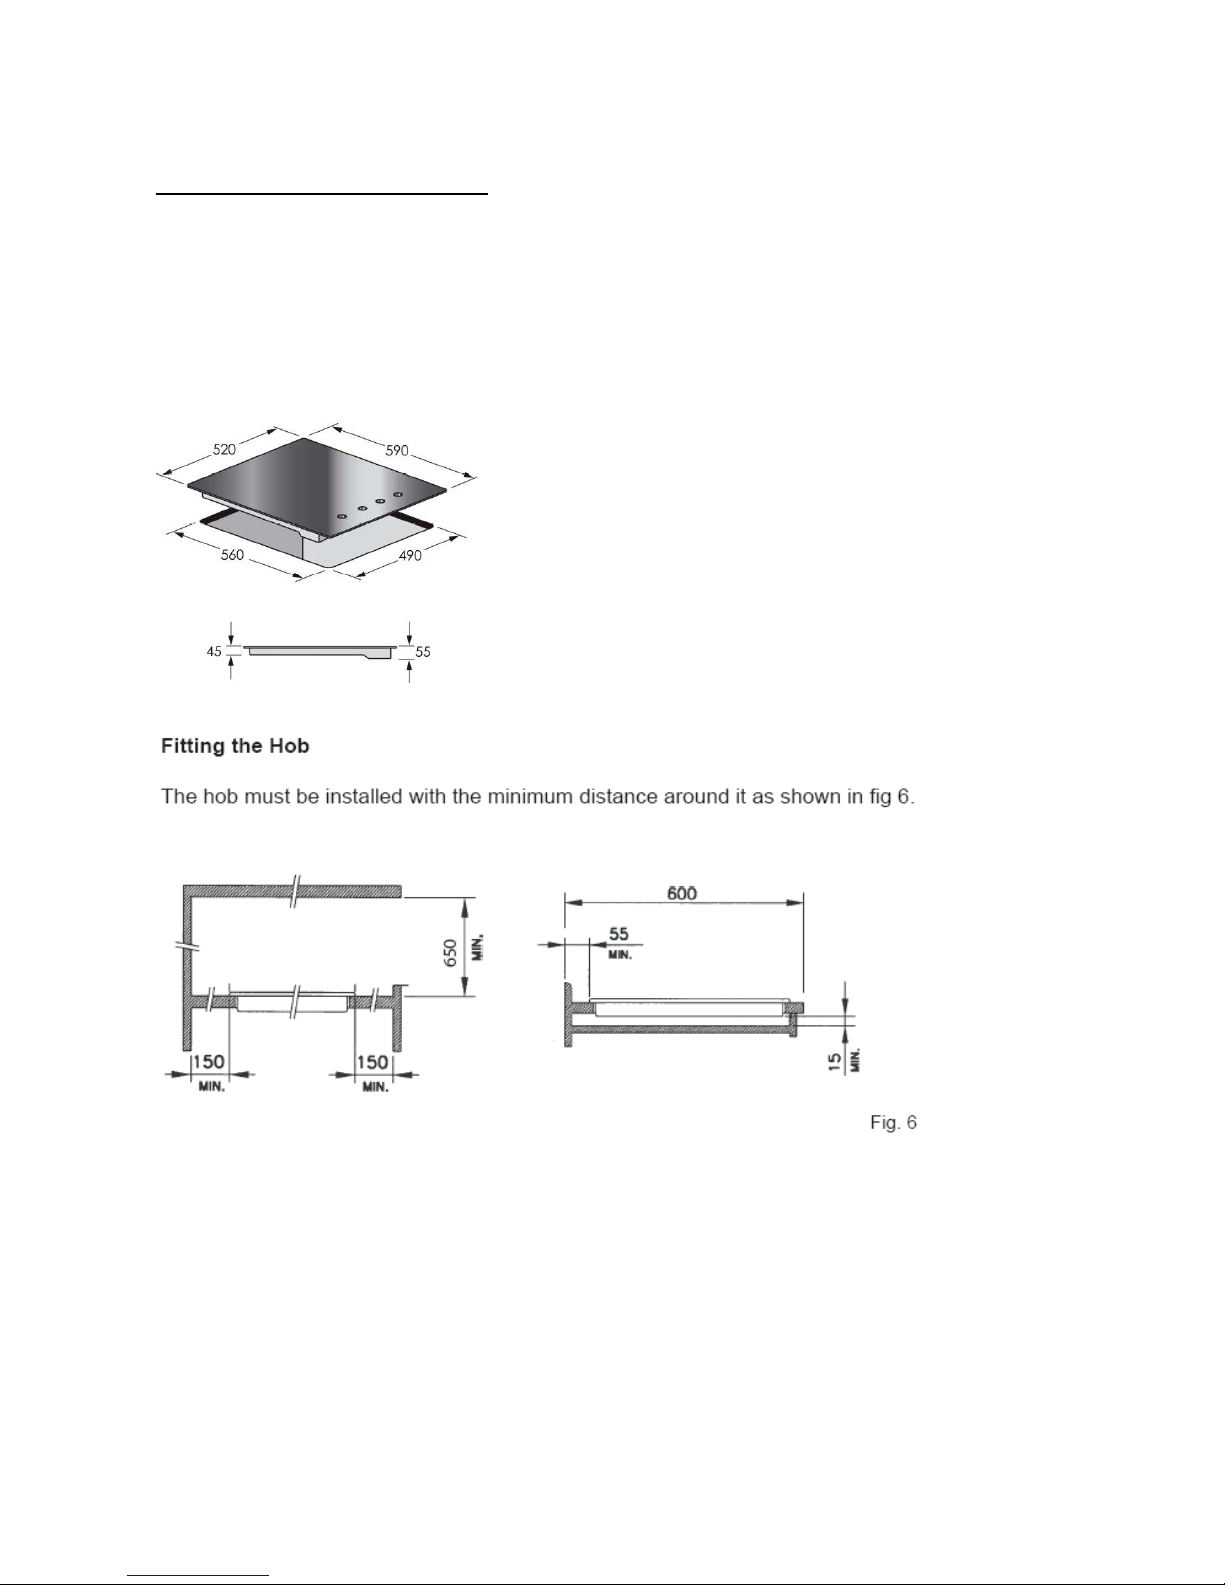
The appliance should be fitted into a worktop as illustrated below:
Front view Side view
All dimensions are shown in millimetres.
- Apply the seal to the underside edges of the hob
- Ensure the hob is centralised in the cut-out in the worktop.
- Ensure the clips are fitted in the correct orientation for the thickness of your worktop as
shown in Figure 7 and that they grip the worktop before fully tightening.

- Ensure the power supply cable is installed clear of the hob and any other possible heat
sources.
Figure 7

TECHNICAL INFORMATION
Heating Elements
Element type
Diameter Power Heat settings
Standard x 2 145mm 1200W 1 - 11
Medium 180mm 1700W 1 - 11
Large 210mm 2100W 1 - 11

Appliance365 End User Warranty Conditions
The conditions below outline the prerequisites and scope of the warranty offered by Appliance 365
Limited (“we / us” to consumer end users of appliances supplied by or through us. Please note that
these conditions do not affect your statutory rights or the obligations of your retailer and your contract
with them.
We provide warranty cover for appliances supplied by or through us for a period of 12 months from the
date of delivery of the appliance to the initial end user subject always to the following conditions:
1. The appliance must be correctly installed and operated in accordance with its instructions and
only be used for normal domestic purposes. Warranty cover is available only to consumer end
users of the appliance; professional or commercial use of the appliance is not covered by this
warranty.
2. For the warranty to be valid you must register the warranty together with your details within 28 days
of delivery of the appliance to the initial end user. To register the warranty, please follow the
instructions on the form included in the document package accompanying your appliance.
3. In accordance with the conditions below (items 4 - 8 , defects affecting the appliance which are
clearly attributable to material and/or manufacturing faults will be rectified, provided they are
reported immediately after being identified and within 12 months of delivery of the appliance to
the initial end user.
4. To make a claim under this warranty please contact our customer service department using the
number provided in the appliance’s service manual, giving full details of the appliance concerned
(such as make, model and serial number and the defect in respect of which the claim is being
made. We reserve the right to inspect the appliance following notification of the alleged defect to
verify whether a warranty claim is valid in accordance with the terms and conditions of this
warranty. You must (wherever possible retain the appliance in the condition as when the defect
was reported until inspection has been carried out. If no defect is identified in the appliance upon
inspection a reasonable call out charge may be applied.
5. The warranty does not cover fragile items such as glass or cosmetic parts or consumable items such
as light-bulbs. Warranty liability will not be triggered by minor variances from nominal features
which are of no significance to the appliance's value or fitness for purpose, or damage caused by
the chemical or electrochemical effects of water and generally by exceptional environmental
conditions, inappropriate operating conditions, or the appliance having come into contact with
unsuitable materials. Likewise, no warranty liability will be accepted if the defects stem from
transport damage for which we are not responsible, improper installation and assembly, improper
use, poor maintenance or failure to follow operating or assembly instructions or any other
instructions or guidance in respect of the storage, use or operation of the appliance. Furthermore,
warranty does not apply to any defect arising from fair wear and tear, wilful damage, accident or
negligence by the end user or any third party.
This warranty will not apply: -
Table of contents
Other Appliance 365 Hob manuals


