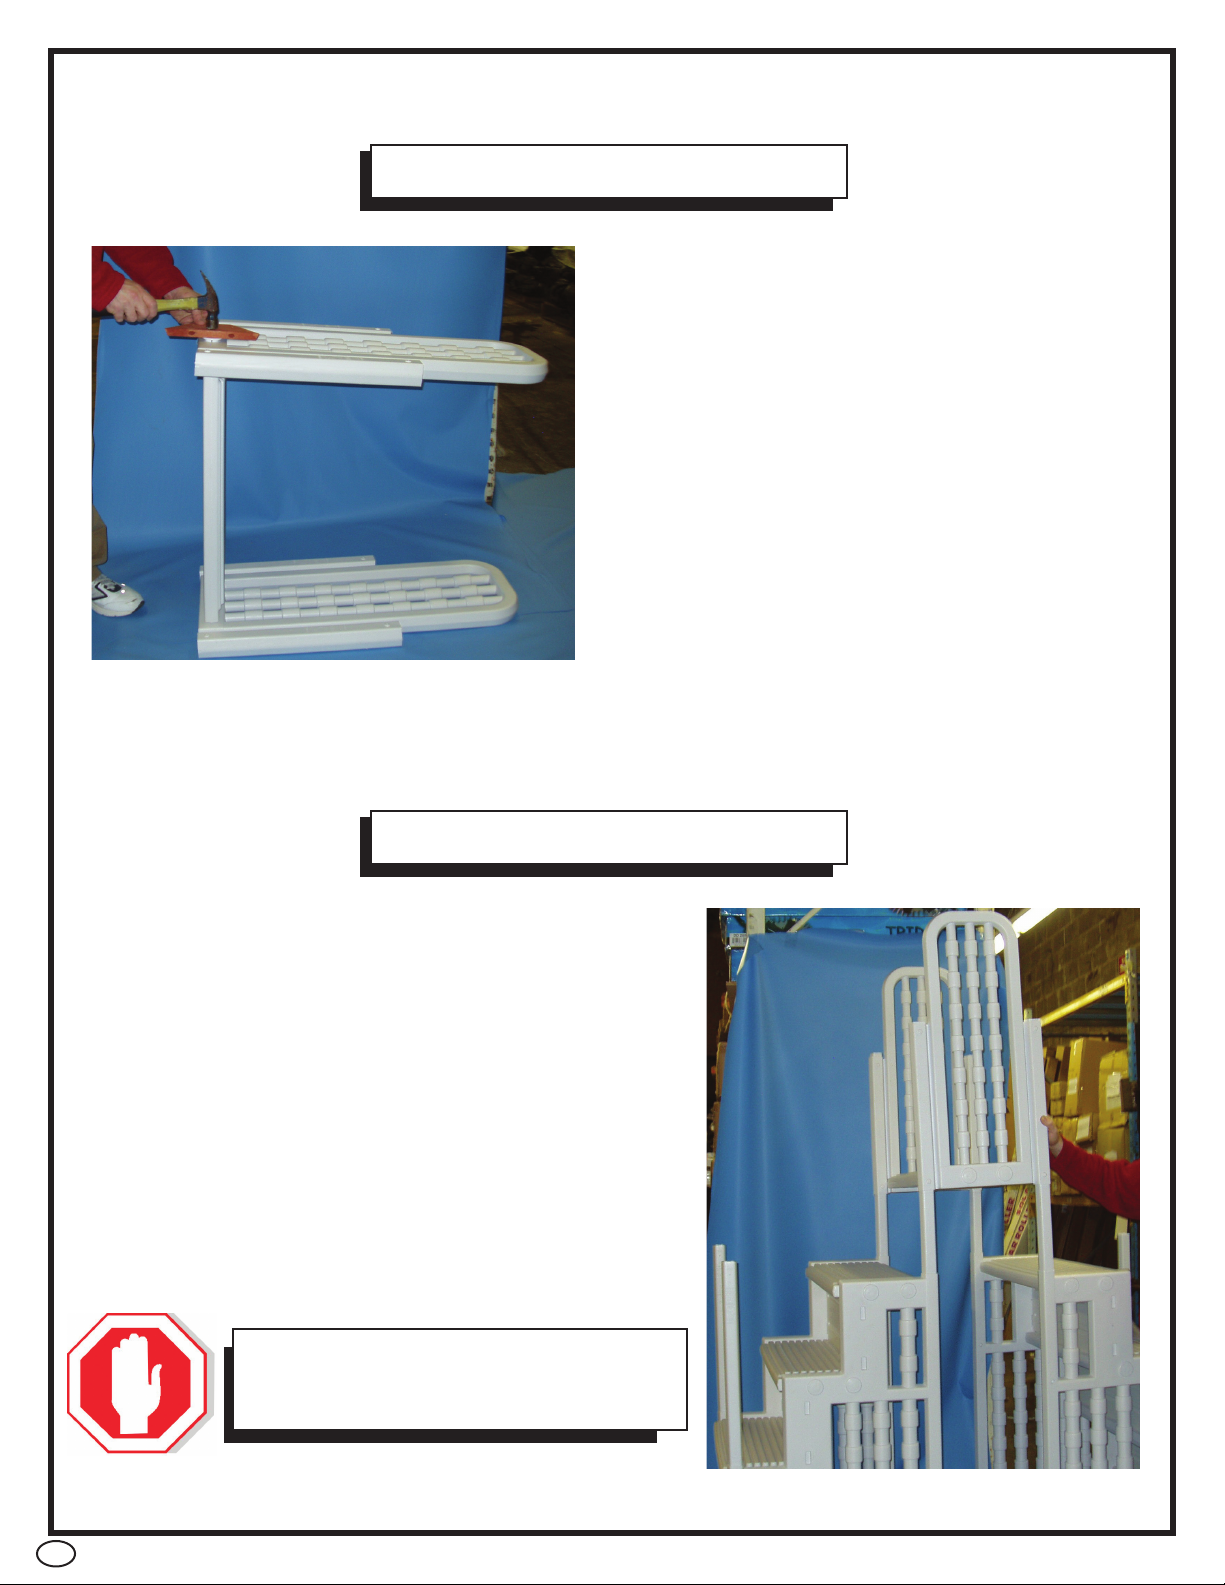
Aqua Select 832405B User manual

8259
Aqua Select® Crossover and Enclosure
Model 832405B
•Hammer and a wood block or rubber mallet
•Phillips head screwdriver •Drill with 1/8” drill bit
•Pliers •Liquid soap or lubricant
This crossover is intended for use with the Aqua Select® Everest Bridge Systems. Please start by assembling
BOTH steps using instructions provided in the STEP BOX, model 832402B. Refer to these directions once you
have assembled both steps.
If you are installing the Aqua Select® Everest Bridge System, please check the carton labeled “GATE CARTON”
model 832406 for instructions on gate assembly and attachment, upon completion of installation of crossover.
TOOLS REQUIRED
FOR USE WITH:
EVEREST
BRIDGE SYSTEM
(832421B)
(2) 832402B — Aqua Select® Everst Steps
(1) 832405B — Aqua Select® Crossover and Enclosure
(1) 832406 — Aqua Select® Gate
CARTONS REQUIRED

PARTS & HARDWARE FOR CROSSOVER
A. CONNECTING STEP
(832402WS)
B. CONNECTING RAILS (2)
(AC CONRAIL)
C. SINGLE PICKETS (2)
(AC PICKETS1)
D. DOUBLE PICKETS (2)
(AC PICKETS2)
E. TRIPLE PICKETS (2)
(AC PICKETS3)
F. LOCK CAPS (5)
(832402LC)
2
G.
(40) #10 x 1-1/4” Screw
H.
(12) #10 x 3/4” Screw
HARDWARE
(LL HDW30937)

3
PART # MODEL # DESCRIPTION QTY
1 AC CONRAIL Connect Rail 1
2 832402WS Connect Step 1
3 832402LC Lock Caps 1
4 AC PICKITS3 Picket 3 2
5 AC PICKITS2 Picket 2 2
6 AC PICKETS1 Picket Single 2
AQUA SELECT® CROSSOVER AND ENCLOSURE PARTS
3
1
2
4
5
6
7

4
STEP 1
Lay one of the connecting rails (B)down on a
clean, flat surface. Make sure the tread surface of
the connecting step (A)is facing up towards the
rails. Push the end of the connecting step into the
openings of the connecting rail until fully seated.
STEP 2
Lay the second connecting rail (B)down
and push the opposite end of the
connecting step (A) into the openings
until fully seated.

STEP 4
•One step (32402B) should already be inside
the pool and weighted in place.
•Place second assembled step (832402B) on
outside of the pool, lined up with the step
placed inside the pool during step installation.
Make sure step is on level ground.
•Slide the assembled crossover down over the
upper handrail posts of the steps until
it is resting on the pool top rail. It may be
necessary to lubricate posts prior to installing
crossover.
CAUTION
DO NOT attempt to stand
on crossover until bridge is
fully assembled.
5
STEP 3
•Center one of the lock caps (F)over any hole
on the side of the connecting rail.
•Using a small rubber mallet or (a block of wood
and a small hammer), tap on the locking cap
until it is secured over the pin sticking through
the side of the connecting rail.
•Repeat this procedure for each of the additional
openings. You will only need to use a total of
(4) lock caps.

6
STEP 5
•The crossover must be
screwed into the handrail posts
using (16) #10 x 1-1/4” screws
(G). Each of the locations
where a screw must be drilled
into handrail posts is
pre-marked. There are eight
per side.
STEP 6
•Lubricate the end of the handrails (packed with
832402B) with liquid soap or lubricant and slip the ends
of the handrails into the open ends of the posts on the
inside and outside steps.
•Push handrails down until they are fully seated on posts.
•Secure in place using (1) #10 x 1-1/4” screw (G) per post
(2 on each side).
If you are installing Aqua Select® EVEREST BRIDGE System with gate
(832421B) you should install handrails on INSIDE step only at this time. Please
refer to Aqua Select® gate (832406) instructions for further details.
NOTE

7
STEP 7
•Align one of the triple pickets (E)with the notches at the top of
the handrail of the
OUTSIDE step. The triple picket will line up with the openings in
the handrail on the top step.
•The double picket (D)will fit on the second step down (shown).
•The single picket (C)will be attached to the handrail on the third
step down.
•Fasten the pickets in place one at a time at the top and bottom
using the #10 x 3/4” screws (H).

8
STEP 8
Crossover installation is completed at this time. If you are installing the
Aqua Select® EVEREST BRIDGE SYSTEM please refer to gate
carton (LL 832406) for gate assembly instructions and completing
installation of your bridge system.
SAFETY INFORMATION
•When lifting heavy or awkward loads, it is suggested that two people lift
to avoid injury.
•DO NOT use the pool entry system for any purpose other than that for
which it is intended.
•Maximum weight on steps should NOT exceed 350 lbs.
WARNING
Exceeding the recommended weight limit may cause the
step to fail and may result in injury.
MAINTENANCE
•Step/ladder/bridges must be removed for winter, failure to do so can
cause the step to crack.
•When removing step/ladder/bridges for winter, it is recommended that you
spray down step with hose water to rinse off any chemical residual prior to
storing.
•When storing step/ladder/bridges for winter, it should be protected from
the elements and stored either in a shed or garage, or covered with a tarp.

9
STEP MATS
1. Remove step mat from packaging
2. Place step mat onto the bottom of the pool with the smooth side facing down towards the liner
3. Place fully assembled step on top of the step mat. Make sure the step is centered on the step mat
4. Properly secure step to your pool
STEP MATS ARE SOLD SEPARATELY
FROM YOUR POOL STEP
HOW TO INSTALL YOUR STEP MAT
•The use of a step mat is STRONGLY RECOMMENDED with any pool step. Step mats
prevent your pool liner from being damaged by slight movements of your pool step.
USE MODEL 832213
Aqua Select® 36” x 48” MAT
Table of contents