manuals.online logo
Brands
  1. Home
  2. •
  3. Brands
  4. •
  5. AQUA SZUT
  6. •
  7. Water Pump
  8. •
  9. AQUA SZUT T-HEAD 550 User manual

AQUA SZUT T-HEAD 550 User manual

1
PL
I N S T R U K C J A O B S Ł U G I
GB
INSTRUCTION MANUAL
D
BEDIENUNGSANLEITUNG
PL
Dane techniczne / Technical data / Technische Daten
D
GB
BUDOWA POMPY:
1.Wężyk do napowietrzania Ø 4mm 2.Regulator
napowietrzania 3.Suwak 4.Wieszak na akwarium
5.Przyssawki 6.Wieszak 7.Silnik 8.Wirnik 9.Regulator
przepływu 10.Pokrywa wirnika 11.Nasadka napowie-
trzająca 12.Kruciec ssawny
PUMP CONSTRUCTION:
1.Air hose Ø 4mm 2.Aeration regulator 3.Guide bar
4.Aquarium hanger 5.Vacuum cups 6.Hanger 7.Engine
8.Impeller 9.Water ow regulator 10.Impeller cover
11.Air cap 12.Suction connection
PUMPENBAU:
1.Lüftungsschlauch Ø 4mm 2.Lüftungsregler 3.Schie-
ber 4.Aquariumsaufhänger 5.Saugnäppchen 6.Au-
fhänger 7.Motor 8.Rotor 9.Durchussregler 10.Rotor-
deckel 11.Lüftungsansatz 12.Saugstutzen
T-HEAD 550 / 750
T-HEAD 550 / 750
Do akwariów o pojemności
Capacity of the aquarium
Bis zu Aquariumsgröße
40-150 l 80-200 l
Napięcie / częstotliwość
Voltage / Frequency
Spannung / Frequenz
230 V~ / 50 Hz
Pobór mocy
Power consumption
Leistungsaufnahme
4 W 5,5 W
Max. wydajność ltra
Max. lter productivity
Max. Filterleistung
550 l/h 750 l/h
Max. głębokość napowietrzania
Max. aeration depth
Max. Belüftungstiefe
10 cm 25 cm
Szczelność
Leak tightness
Dichtigkeit
IPX 8
rys. / pic. / abb.
2
PL
4
3
PL GB
WARUNKI GWARANCJI.
AQUA-SZUT Sp. z o.o. z siedzibą przy ul. Opolskiej 11/19 we Wrocławiu (52-010) gwarantuje nabywcy poprawne działanie urządzenia, na
które została wystawiona niniejsza karta gwarancyjna, pod warunkiem użytkowania go zgodnie z przeznaczeniem oraz zasadami określonymi
w instrukcji obsługi doręczonej Nabywcy wraz z tym towarem. Urządzenie objęte jest 24-miesięczną gwarancją (licząc od daty zakupu) i obejmuje
towary zakupione na terenie całej Europy. Gwarancją nie są objęte uszkodzenia powstałe w wyniku nieprawidłowej eksploatacji. Gwarancja
ogranicza się tylko do urządzenia, obejmuje wady materiałowe i błędy wykonania, nie obejmuje szkód następczych. Gwarancja jest realizowana
przez naprawę urządzenia lub jego wymianę. W przypadku stwierdzenia nieprawidłowej pracy lub wad wykonania prosimy o kontakt telefoniczny
pod numerem (+48 71) 34 35 773. W celu dokonania naprawy gwarancyjnej należy dostarczyć urządzenie wraz z kartą gwarancyjną do punktu
sprzedaży. Naprawa gwarancyjna zostanie dokonana w ciągu 14 dni od dostarczenia urządzenia i zgłoszenia reklamacji. Gwarancja na sprzedany
towar konsumpcyjny, nie wyłącza, nie ogranicza ani nie zawiesza uprawnień kupującego wynikających z niezgodności towaru z umową.
Dla zachowania wysokiej sprawności urządzenia zaleca się przeprowadzanie regularnego czyszczenia wkładu
ltrującego, wirnika i jego komory. Do tych celów nigdy nie należy stosować detergentów (mydła, płynów do mycia
naczyń itp.) oraz rozpuszczalników; resztki tych środków pozostałych w ltrze mogą powodować choroby i śnięcie
ryb.
Uwaga ! - Przed przeprowadzeniem jakichkolwiek prac w akwarium, lub przy pompie, należy koniecznie wyłączyć
wszystkie urządzenia przez wyciągnięcie wtyczki sieciowej z gniazdka.
W przypadku zakłóceń pracy silnika (ciężko pracujący silnik) należy oczyścić wirnik i jego komorę.
Czyszczenie wirnika i jego komory:
1. Wyłącz urządzenie przez wyjęcie wtyczki sieciowej z gniazdka (rys.8) !
2. Wyjmij pompę z wody (rys.9).
3. Zdejmij pojemnik/wkład ltracyjny z korpusu silnika (rys.10).
4. Przekręć komorę wirnika tak aby znalazła się w pozycji +/- 90° i zdejmij pokrywę wirnika (rys.11).
5. Wyjmij wirnik z komory i starannie wypłucz pod bieżącą wodą, usuń osad z wirnika. Przemyj także komorę
wirnika oraz regulator.
6. Zmontuj pompę w odwrotnej kolejności.
Demontaż i kasacja:
„Producent odpadów” - tj. użytkownik pompy, w chwili likwidacji wyrobu czy też wymiany zużytych części, powinien
podjąć następujące działania:
- części nadające się do dalszego wykorzystania poddać regeneracji bądź przechować,
- elementy z tworzyw sztucznych, gumy itp. Przekazać do punktów prowadzących recykling,
lub postępować zgodnie z miejscowymi przepisami o postępowaniu
z odpadami metalicznymi, nieorganicznymi, organicznymi i mieszanymi.
Nieprzestrzeganie niniejszych instrukcji wyklucza możliwość uznania roszczeń gwarancyjnych.
UWAGA: Producent, czyli rma AQUA-SZUT Sp. z o.o. z siedzibą we Wrocławiu, zastrzega sobie prawo do zmiany
parametrów technicznych urządzenia.
T-HEAD - POMPA WIRNIKOWA
Zanurzenie robocze:
- minimalne: górna krawędź korpusu silnika poniżej lustra wody
- maksymalne: cały regulator przepływu powietrza wystaje ponad lustro wody
Wskazówki dotyczące użytkowania:
- Akwariowa pompa wirnikowa służy do wytwarzania przepływu wody niezbędnego do oczyszczania, przelewania i
napowietrzania wody w akwarium.
- Przed instalacją i uruchomieniem należy bezwarunkowo dokładnie przeczytać poniższą instrukcję oraz przestrze-
gać wskazówek dotyczących użytkowania, montażu i bezpieczeństwa!
Warunki bezpieczeństwa pracy:
- Przy uruchamianiu i konserwacji pompy oraz przy innych pracach
w zbiorniku wodnym wyłączyć wszelkie urządzenia elektryczne znajdujące się w akwarium wyciągając wtyczki z
gniazda sieciowego.
- Pompa wirnikowa przeznaczony tylko do akwariów i wyłącznie w pomieszczeniach!
- Urządzenie może pracować tylko do temperatury wody nie przekraczającej 35°C!
- Przed każdym uruchomieniem sprawdzić ltr oraz przewód zasilania sieciowego!
- Zabrania się dokonywania napraw lub wymiany przewodu zasilania sieciowego!
- Zabrania się używania pompy bez wody.
- Urządzenie montować zgodnie z instrukcją.
Niniejszy sprzęt nie jest przeznaczony do użytkowania przez osoby (w tym dzieci) o ograniczonej zdolności zycz-
nej, czuciowej lub psychicznej, lub osoby nie mające doświadczenia lub znajomości sprzętu, chyba że odbywa się
to pod nadzorem lub zgodnie
z instrukcją użytkowania sprzętu, przekazanej przez osoby odpowiadające za ich bezpieczeństwo.
Należy zwracać uwagę na dzieci , aby nie bawiły się sprzętem.
W przypadku uszkodzenia przewodu zasilania sieciowego urządzenie podlega złomowaniu! Niebezpieczeństwo
zagrożenia życia!
Charakterystyka pompy wirnikowej:
- nieskomplikowana obsługa, prosta konserwacja,
- małe rozmiary, niski poziom hałasu,
- wykonanie zgodnie z normami bezpieczeństwa RP i UE,
- doskonałe wzbogacanie wody w tlen dzięki nasadce napowietrzającej,
- płynna regulacja natężenia przepływu wody za pomocą regulatora bez konieczności wyjmowania pompy z akwa-
rium,
- przewód zasilający o długości 1,5m.
Montaż:
1. Nałóż wężyk doprowadzający powietrze na nasadkę napowietrzającą. Na drugą stronę wężyka nałóż regulator
napowietrzania. (rys.1)
2. Tak przygotowana nasadkę wsuń na wylot komory wirnika (rys.2)
3. Zamocuj teraz wieszak pompy do szyby akwarium, za pomocą przyssawek i nasuń pompę na prowadnice
(rys.3). Całość powinna być poniżej poziomu wody w akwarium (rys.4).
4.Jeżeli pompa ma pracować z wkładem ltracyjnym to przed uruchomieniem należy zainstalować wkład. Pompa
jest przystosowana do : Filtra 100 i 200, Pojemnika z włókniną, gąbki, itp (rys.5).
5. Włącz pompę wkładając wtyczkę przewodu przyłączeniowego do gniazdka sieciowego (rys.6).
6.Przesuwając regulator dostosuj przepływ wody przez pompę odpowiednio do potrzeb swojego akwarium (ilości
ryb, wielkości zbiornika) (rys.7).
Niedozwolona jest praca pompy na sucho (bez wody) !!! Pompa
w trakcie pracy musi być całkowicie zanurzony w wodzie, a regulator napowietrzania w całości powinien wystawać
ponad lustro wody.
Uwaga na skutek parowania poziom wody w akwarium obniża się!
Przegląd kontrolny i konserwacja:
T-HEAD - IMPELLER PUMP
Working immersion:
- minimum: the upper edge of the motor body is below the water mirror.
- maximum: the whole air ow regulator protrudes above the water mirror.
Indications related to the usage:
- The aquarium impeller pump is designed to create a water ow, which is necessary for cleaning, owing and
aeration of water in the aquariums.
- Before installing and setting in motion you should absolutely read this manual thoroughly and follow the guidelines
for usage, mounting and safety!
Operation safety requirements:
- You should unplug all electrical devices placed in the aquarium when you set the pump in motion or perform any
maintenance works.
- Impeller pump is assigned only for aquariums and only to be used indoors!
- The unit may operate at the water temperature not exceeding 35°C!
- Before each putting into operation, check the lter and the power supply cord!.
PL
6
5
GB
- It is forbidden to make any repairs or replacements of the power supply cord!
- It is forbidden to use the pump without water.
- Install the unit following the instruction.
In case of a damage to the power supply cord, the unit should be scrapped!
Danger of a risk to life!
Impeller pump characteristics:
- Non-complicated service, easy maintenance
- Small dimensions, low noise level
- Made to RP and UE safety standards
- Perfect oxygen enrichment thanks to the air cap.
- Smooth adjustment of water ow without a need to remove the pump from the aquarium.
- 1.5 m long power supply cord.
Mounting:
1. Install the air-outlet hose on the air cap. Set the aeration regulator (pic.1) on the other side of the hose.
2. Slip the prepared cap on the impeller tank outlet (pic. 2)
3. Mount now the pump hanger to the aquarium glass with the vacuum cups and slide the pump on the guide bar
(pic.3). The whole lter construction should be placed below the water level in aquarium(pic.4).
4. If the pump is supposed to be working with a ltrating inset you should install the inset before setting in motion.
The pump is tted for: the Filter 100 and 200, Container with the unwoven fabric, sponge, etc (pic.5)
5. Turn the pump on by plugging in (pic.6).
6.While moving the regulator adjust the water ow in the pump according to the needs of your aquarium (number of
sh, size of the reservoir) (pic.7).
It is forbidden to let the pump work while dry (without water)!!! The pump must be submerged completely while
operating and the aeration regulator should stand out entirely above the water level.
Note !!! Due to evaporation, the water level in the aquarium sinks!
Inspection survey and maintenance:It is recommended to clean the ltrating inset, the impeller and its chamber
frequently to maintain high efciency of the device. To this aim, never use detergents (soap, dish washing liquids,
etc.) and solvents; the residue of these means left in the lter may result in diseases and sh mortality.
Caution ! - Before starting any works in the aquarium or by the pump you should remember utterly about unplug-
ging all devices !
In case of any engine trouble (heavily operating engine) you should clean the impeller and its chamber.
Impeller and impeller tank cleaning:
1. Disconnect (unplug) the device(pic.8) !
2. Take the pump out of water (pic.9).
3.Take the ltrating inset container off the engine body (pic.10).
4. Turn the impeller tank so it will be positioned +/- 90° and take the impeller cover off (pic. 11).
5. Take the impeller out of the tank and rinse it carefully under owing water, remove the mud from the impeller.
Rinse also the impeller tank and the regulator.
6. Put the pump together in reversed order.
Disassembly and withdrawal from use:
„The producer of waste” - that is the user of the pump, at the moment of liquidating the product or replacing the
worn-out parts, shall take the following actions:
- parts that are good for further use shall be subjected to reclaiming or stored,
- rubber, plastic elements, etc. shall be delivered to the recycling centers,
or handled according to the local prescriptions on treating metallic, inorganic, organic or mixed waste.
The non-observance of these instructions excludes the potentiality of recognizing warranty claims.
NOTE: The manufacturer, that is the company AQUA-SZUT Sp.
z o.o. having its ofces in Wroclaw, reserves the right to modify the engineering parameters of the unit.
D
GUARANTEE TERMS AND CONDITIONS.
AQUA-SZUT Sp. z o.o. with permanent establishment ul. Opolska 11/19 in Wrocław (52-010) is offering to the buyer a guarantee of correct
operation of the device, for which this guarantee card has been issued, under the condition that it is used according to the intended use and the
rules specied in the User’s Manual delivered to the Buyer together with this item. The unit is covered by 24-month guarantee (from the date
of purchase). and it includes the products bought in any part of Europe. The guarantee excludes defects resulting from improper operation. It
is conned to the unit itself, covers material and workmanship defects, but excludes any consequential damages. The guarantee is effected by
repair or replacing the defective unit. To effect guarantee repair, please deliver the unit with its guarantee card to the retail outlet. The repair will
be completed within 14 days of delivering the unit and raising the claim. The guarantee for the sold consumer goods does not exclude, limit or
suspend the rights of the buyer following from goods contrary to the agreement.
T-HEAD - KREISELPUMPE
Betriebstiefe:
- minimal: Oberkante des Motorkörpers unterhalb des Wasserspiegels
- maximal: der gesamte Luftregler oberhalb des Wasserspiegels
Benutzungshinweise:
- Die Aquariumskreiselpumpe eignet sich für den Wasserdurchlauf, der notwendig für das Reinigen, den Durchlauf
und das Lüften des Aquariumswasser ist.
- Vor der Installation und Inbetriebnahme soll unbedingt diese Gebrauchsanweisung gelesen werden und die Ge-
brauchs-, Montage- und Sicherheitsanweisungen sollen durchaus befolgt werden!
Arbeitssicherheitsbedingungen:
- Während der Installation oder Konservierung der Pumpe und während anderer Arbeiten im Wasserbecken schal-
ten Sie alle elektrische Geräte im Aquarium aus indem Sie den Stecker aus der Steckdose herausnehmen.
- Die Aquariumskreiselpumpe ist nur für Gebrauch in Aquarien und nur in den Räumen geeignet.
- Das Gerät ist ausschließlich für Wassertemperaturen unter 35 °C!
- Vor jeder Inbetriebnahme den Filter und das Netzkabel überprüfen!
- Es ist verboten, jegliche Reparaturen an den Gerät bzw. an dem Netzkabel vorzunehmen!
- Es ist verboten die Pumpe ohne Wasser zu gebrauchen.
- Das Gerät gemäß der Anleitung installieren.
Bei einer Beschädigung des Netzkabels ist das Gerät zu entsorgen! Lebensgefahr!
Charakteristik der Kreiselpumpe:
- einfache Bedingung und Wartung
- kompakt, niedriger Lärmpegel
- entspricht den RP- und EU-Sicherheitsnormen.
- Perfekte Sauerstoffaufbereitung dank dem Lüftungsansatz.
- stufenlose Regelung des Wasserdurchusses mit Hilfe des Reglers , ohne dass die Pumpe aus dem Aquarium
herausgenommen werden muß
- Stromversorgungskabel mit einer Länge von 1,5m
Montage:
1. Montieren Sie den Lüftungsschlauch auf den Lüftungsansatz. Auf der anderen Seite des Schlauchs montieren
Sie den Lüftungsregler (Abb. 1).
2. So vorbereiteten Ansatz schieben sie auf den Aususs der Rotorkammer ein (Abb. 2)
3. Befestigen Sie den Pumpeaufhänger mit Hilfe der Saugnäpfe an der Aquariumsscheibe und stellen Sie die
Pumpe gut auf die Führungsschiene (Abb.3). Das ganze soll sich unter der Wasseräche im Aquarium benden
(Abb.4).
4. Falls die Pumpe mit dem Filtereinsatz installiert wird, muss vor der Inbetriebnahme der Einsatz installiert werden.
Die Pumpe eignet sich für: Filter 100 und 200, Vliesbehälter, Schwamm, usw (Abb.5).
5. Schalten Sie die Pumpe indem Sie die Stromleitung in die Steckdose einsetzen (Abb.6).
6. Durch das Einstellen des Regulators passen Sie den Wasserdurchlauf der Bedürfnissen Ihres Aquariums (An-
zahl der Fische, Beckengröße) zu (Abb.7).
Die Arbeit der Pumpe ohne Wasser verboten!!!! Die Pumpe soll während der Arbeit völlig unter Wasser stehen und
der Belüftungsregulator soll voll über dem Wasserspiegel strecken.
PL
7
D
GARANTIEBEDINGUNGEN.
AQUA-SZUT Sp. z o.o. mit dem Sitz in ul. Opolska 11/19 in Wrocław (52-010) garantiert dem Käufer eine korrekte Arbeit der Einrichtung, worauf
diese Garantiekarte ausgestellt worden ist, unter der Bedingung das sie bestimmungsgemäß und gemäß der in der an den Käufer gelieferten
Gebrauchsanweisung und der Ware bestimmten Regeln gebraucht wird. Die Gewährleistungsfrist beträgt 24 Monate (von Einkaufsdatum). und
umfasst die in ganzem Europa eingekauften Waren. Ausgenommen von der Garantie sind Shaden, die infolge einer unsachgemäßen Bedinung
enstanden sind. Die Gewährleistung beschränkt sich auf das Gerät es wird für die Mängel gewährt, die auf Material und Fertigungsfehler zurück-
zuführen sind. Die Folgefehler sind von der Garantie ausgenommen. Die Garantieleistungen fassen Reparatur oder wechsel des Gerätes um.
Zur Garantiereparatur schicken Sie das Gerät und die Garantiekarte an die Stelle, wo Sie Ihr Gerät eingekauft haben. Garantiereparatur folgt
innerrhalb von 14 Tagen von der Gerätslieferung und der Beanstandung. Die Garantie auf die verkauften Verbrauchsgüter schließt die Rechte des
Käufers aus der Nichtübereinstimmung der Ware mit dem Vertrag nicht aus, beschränkt sie nicht und beendet sie nicht.
GWARANCJA / GUARANTEE / GEWÄHRLEISTUNG
nazwa urządzenia / name of product / der Name
8
data / date / Datum
pieczęć punktu sprzedaży / stamp of the place of purchasing /
Stempel der Verkaufsstelle
AQUA-SZUT Sp. z o.o. POLAND, 52-010 Wrocław ul. Opolska 11/19
phone (+48) 71 34 35 769, (+48) 71 34 35 773, fax (+48) 71 34 24 564
e-mail: [email protected], www.aquaszut.pl
Achtung durch das Verdampfen des Wasser sinkt der Wasserspiegel kontinuierlich !
Kontrollrevisionen und Wartung:
Um die gute Funktionierung der Pumpe zu halten, wird regelmäßige Filtrierungseinsatz-, Rotor- und Rotorkammer-
reinigung empfohlen. Zu diesem Zweck keine Reinigungsmittel (Seife, Geschirrspülmittel usw.) oder Lösungsmittel
nutzen; Reste dieser Mittel im Filter können Krankheiten oder selbst das Sterben der Fische verursachen.
Achtung !!! - Bevor Sie alle Arbeiten im Aquarium oder an der Pumpe verrichten, schalten Sie alle Geräte aus
indem Sie den Stecker aus der Stechdose herausnehmen.
Bei Motorstörungen (schwierig wirkender Motor) sollen Rotor und Rotorkammer gereinigt werden.
Rotor- und Rotorkammerreinigung:
1. Schalten Sie das Gerät aus, indem sie den Stecker aus der Steckdose herausnehmen (Abb.8) !
2. Nehmen Sie die Pumpe aus dem Wasser heraus (Abb.9).
3. Nehmen Sie den Behälter Filtrierungseinsatz vom Motorgestell ab (Abb.10).
4. Drehen Sie die Rotorkammer so, dass sie sich in der Position +/- 90° bendet und nehmen Sie den Rotordeckel
ab (Abb. 11).
5. Heben Sie den Rotor von der Kammer auf und spülen Sie gründlich unter laufendem Wasser, entfernen Sie den
Niederschlag vom Rotor. Spülen sie auch die Rotorkammer und den Regler.
6. Montieren Sie die Pumpe in der umgekehrten Reihenfolge ein.
Demontage und Entsorgung:
„Der Produzent des Abfalls“ d.h. der Pumpebenutzer soll im Moment der Beseitigung des Gerätes oder seiner
Teile folgende Maßnahmen treffen:
- Teile, die wiederverwendet werden können, regenerieren lassen bzw. aufbewahren.
- Teile aus Kunststoffen, Gummi usw. zu Recyclingpunkten bringen,
bzw. gemäß den lokalen Vorschriften über das die Behandlung von metallischen, anorganischen, organischen und
gemischten Abfällen vorgehen.
Das Nichteinhalten dieser Anleitung schließt jegliche Garantieansprüche des Benutzers aus.
ACHTUNG: der Produzent, die Firma AQUA-SZUT Sp. z o.o. mit sitz in Wroclaw, behält sich das Recht auf Ände-
rungen der technischen Daten des Gerätes vor.

This manual suits for next models

1

Other AQUA SZUT Water Pump manuals

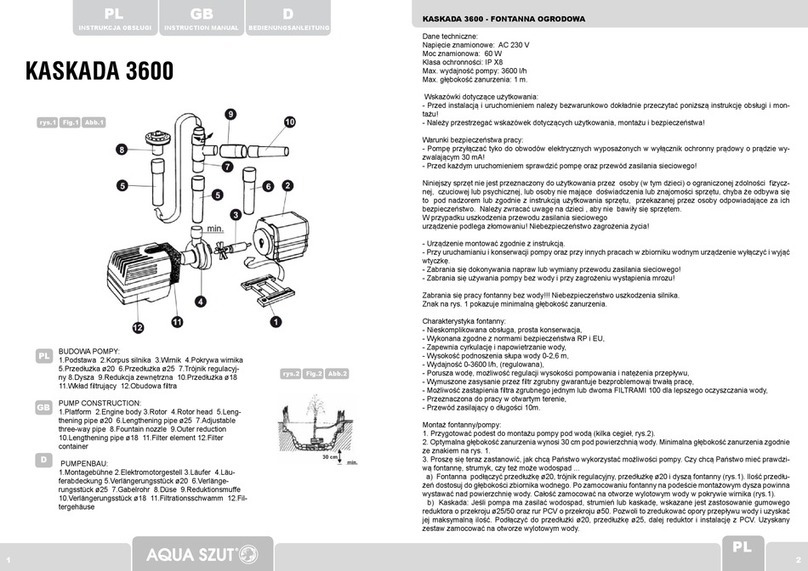
AQUA SZUT KASKADA 3600 User manual

AQUA SZUT

AQUA SZUT KASKADA 3600 User manual

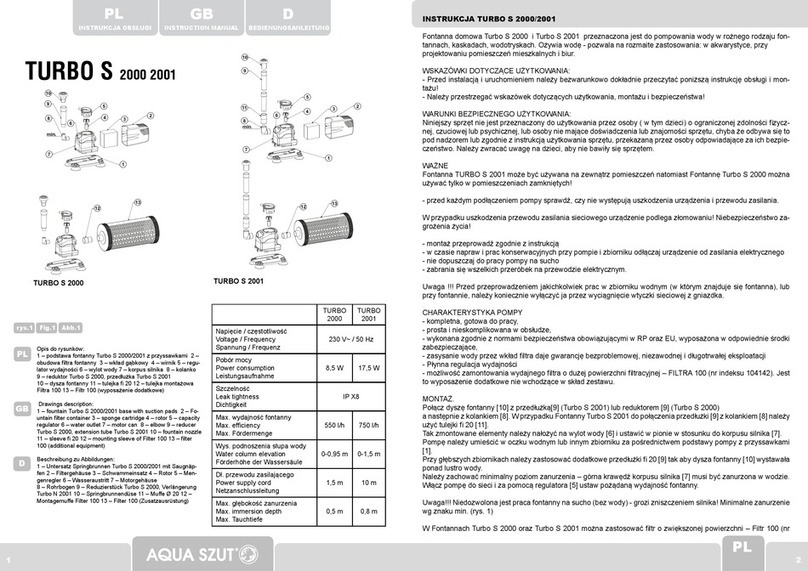
AQUA SZUT TURBO S 2000 User manual

AQUA SZUT

AQUA SZUT TURBO S 2000 User manual

Popular Water Pump manuals by other brands

Elmo Rietschle ZEPHYR VLR Series Instruction and service manual

Elmo Rietschle

Elmo Rietschle ZEPHYR VLR Series Instruction and service manual

Gardner Denver Elmo Rietschle zephyr C-VLR 1000 VSD operating instructions

Gardner Denver

Gardner Denver Elmo Rietschle zephyr C-VLR 1000 VSD operating instructions

ITT GOULDS PUMPS 3796 i-FRAME Installation, operation and maintenance manual

ITT

ITT GOULDS PUMPS 3796 i-FRAME Installation, operation and maintenance manual

EUROM SP400i manual

EUROM

EUROM SP400i manual

Miksan Motor EP 150 user manual

Miksan Motor

Miksan Motor EP 150 user manual

RIDGID TP-4000 user manual

RIDGID

RIDGID TP-4000 user manual

Utilitech UT25PCP manual

Utilitech

Utilitech UT25PCP manual

Grundfos BMS Series Installation and operating instructions

Grundfos

Grundfos BMS Series Installation and operating instructions

Rainman WM Series quick start guide

Rainman

Rainman WM Series quick start guide

GORMAN-RUPP PUMPS S8B1-E100 460/3 Installation, operation and maintenance manual

GORMAN-RUPP PUMPS

GORMAN-RUPP PUMPS S8B1-E100 460/3 Installation, operation and maintenance manual

Deltec E-Flow Series operating instructions

Deltec

Deltec E-Flow Series operating instructions

CRANE PUMPS & SYSTEMS Three Phase Simplex Installation Instructions and Operation/Troubleshooting Manual

CRANE PUMPS & SYSTEMS

CRANE PUMPS & SYSTEMS Three Phase Simplex Installation Instructions and Operation/Troubleshooting Manual

AMT 489B-98 Specifications information and repair parts manual

AMT

AMT 489B-98 Specifications information and repair parts manual

cetoni neMESYS Hardware Manual and Reference

cetoni

cetoni neMESYS Hardware Manual and Reference

Magnum MSD 1021 Operating & parts manual

Magnum

Magnum MSD 1021 Operating & parts manual

VT 400 User instructions

VT

VT 400 User instructions

Waterway SMF-115 owner's manual

Waterway

Waterway SMF-115 owner's manual

ProMinent Sigma 1 Basic operating instructions

ProMinent

ProMinent Sigma 1 Basic operating instructions

manuals.online logo
manuals.online logoBrands
  • About & Mission
  • Contact us
  • Privacy Policy
  • Terms and Conditions

Copyright 2025 Manuals.Online. All Rights Reserved.