AQUA SZUT KASKADA 3600 User manual

1
PL
I N S T R U K C J A O B S Ł U G I
GB
INSTRUCTION MANUAL
D
BEDIENUNGSANLEITUNG
2
KASKADA 3600
rys.1
rys.2
Fig.1
Fig.2
Abb.1
Abb.2
BUDOWA POMPY:
1.Podstawa 2.Korpus silnika 3.Wirnik 4.Pokrywa wirnika
5.Przedłużka ø20 6.Przedłużka ø25 7.Trójnik regulacyj-
ny 8.Dysza 9.Redukcja zewnętrzna 10.Przedłużka ø18
11.Wkład ltrujący 12.Obudowa ltra
PUMP CONSTRUCTION:
1.Platform 2.Engine body 3.Rotor 4.Rotor head 5.Leng-
thening pipe ø20 6.Lengthening pipe ø25 7.Adjustable
three-way pipe 8.Fountain nozzle 9.Outer reduction
10.Lengthening pipe ø18 11.Filter element 12.Filter
container
PUMPENBAU:
1.Montagebühne 2.Elektromotorgestell 3.Läufer 4.Läu-
ferabdeckung 5.Verlängerungsstück ø20 6.Verlänge-
rungsstück ø25 7.Gabelrohr 8.Düse 9.Reduktionsmuffe
10.Verlängerungsstück ø18 11.Filtrationsschwamm 12.Fil-
tergehäuse
PL
GB
D
KASKADA 3600 - FONTANNA OGRODOWA
Dane techniczne:
Napięcie znamionowe: AC 230 V
Moc znamionowa: 60 W
Klasa ochronności: IP X8
Max. wydajność pompy: 3600 l/h
Max. głębokość zanurzenia: 1 m.
Wskazówki dotyczące użytkowania:
- Przed instalacją i uruchomieniem należy bezwarunkowo dokładnie przeczytać poniższą instrukcję obsługi i mon-
tażu!
- Należy przestrzegać wskazówek dotyczących użytkowania, montażu i bezpieczeństwa!
Warunki bezpieczeństwa pracy:
- Pompę przyłączać tyko do obwodów elektrycznych wyposażonych w wyłącznik ochronny prądowy o prądzie wy-
zwalającym 30 mA!
- Przed każdym uruchomieniem sprawdzić pompę oraz przewód zasilania sieciowego!
Niniejszy sprzęt nie jest przeznaczony do użytkowania przez osoby (w tym dzieci) o ograniczonej zdolności zycz-
nej, czuciowej lub psychicznej, lub osoby nie mające doświadczenia lub znajomości sprzętu, chyba że odbywa się
to pod nadzorem lub zgodnie z instrukcją użytkowania sprzętu, przekazanej przez osoby odpowiadające za ich
bezpieczeństwo. Należy zwracać uwagę na dzieci , aby nie bawiły się sprzętem.
W przypadku uszkodzenia przewodu zasilania sieciowego
urządzenie podlega złomowaniu! Niebezpieczeństwo zagrożenia życia!
- Urządzenie montować zgodnie z instrukcją.
- Przy uruchamianiu i konserwacji pompy oraz przy innych pracach w zbiorniku wodnym urządzenie wyłączyć i wyjąć
wtyczkę.
- Zabrania się dokonywania napraw lub wymiany przewodu zasilania sieciowego!
- Zabrania się używania pompy bez wody i przy zagrożeniu wystąpienia mrozu!
Zabrania się pracy fontanny bez wody!!! Niebezpieczeństwo uszkodzenia silnika.
Znak na rys. 1 pokazuje minimalną głębokość zanurzenia.
Charakterystyka fontanny:
- Nieskomplikowana obsługa, prosta konserwacja,
- Wykonana zgodne z normami bezpieczeństwa RP i EU,
- Zapewnia cyrkulację i napowietrzanie wody,
- Wysokość podnoszenia słupa wody 0-2,6 m,
- Wydajność 0-3600 l/h, (regulowana),
- Porusza wodę, możliwość regulacji wysokości pompowania i natężenia przepływu,
- Wymuszone zasysanie przez ltr zgrubny gwarantuje bezproblemowąi trwałą pracę,
- Możliwość zastąpienia ltra zgrubnego jednym lub dwoma FILTRAMI 100 dla lepszego oczyszczania wody,
- Przeznaczona do pracy w otwartym terenie,
- Przewód zasilający o długości 10m.
Montaż fontanny/pompy:
1. Przygotować podest do montażu pompy pod wodą (kilka cegieł, rys.2).
2. Optymalna głębokość zanurzenia wynosi 30 cm pod powierzchnią wody. Minimalna głębokość zanurzenia zgodnie
ze znakiem na rys. 1.
3. Proszę się teraz zastanowić, jak chcą Państwo wykorzystać możliwości pompy. Czy chcą Państwo mieć prawdzi-
wą fontannę, strumyk, czy też może wodospad ...
a) Fontanna podłączyć przedłużkę ø20, trójnik regulacyjny, przedłużkę ø20 i dyszą fontanny (rys.1). Ilość przedłu-
żeń dostosuj do głębokości zbiornika wodnego. Po zamocowaniu fontanny na podeście montażowym dysza powinna
wystawać nad powierzchnię wody. Całość zamocować na otworze wylotowym wody w pokrywie wirnika (rys.1).
b) Kaskada: Jeśli pompa ma zasilać wodospad, strumień lub kaskadę, wskazane jest zastosowanie gumowego
reduktora o przekroju ø25/50 oraz rur PCV o przekroju ø50. Pozwoli to zredukować opory przepływu wody i uzyskać
jej maksymalną ilość. Podłączyć do przedłużki ø20, przedłużkę ø25, dalej reduktor i instalację z PCV. Uzyskany
zestaw zamocować na otworze wylotowym wody.
PL
2

PL
4
3
PL GB
WARUNKI GWARANCJI.
AQUA-SZUT Sp. z o.o. z siedzibą przy ul. Opolskiej 11/19 we Wrocławiu (52-010) gwarantuje nabywcy poprawne działanie urządzenia, na które
została wystawiona niniejsza karta gwarancyjna, pod warunkiem użytkowania go zgodnie z przeznaczeniem oraz zasadami określonymi w instrukcji
obsługi doręczonej Nabywcy wraz z tym towarem. Urządzenie objęte jest 24-miesięczną gwarancją (licząc od daty zakupu) i obejmuje towary zaku-
pione na terenie całej Europy. Gwarancją nie są objęte uszkodzenia powstałe w wyniku nieprawidłowej eksploatacji. Gwarancja ogranicza się tylko
do urządzenia, obejmuje wady materiałowe i błędy wykonania, nie obejmuje szkód następczych. Gwarancja jest realizowana przez naprawę urzą-
dzenia lub jego wymianę. W przypadku stwierdzenia nieprawidłowej pracy lub wad wykonania prosimy o kontakt telefoniczny pod numerem (+48
71) 34 35 773. W celu dokonania naprawy gwarancyjnej należy dostarczyć urządzenie wraz z kartą gwarancyjną do punktu sprzedaży. Naprawa
gwarancyjna zostanie dokonana w ciągu 14 dni od dostarczenia urządzenia i zgłoszenia reklamacji. Gwarancja na sprzedany towar konsumpcyjny,
nie wyłącza, nie ogranicza ani nie zawiesza uprawnień kupującego wynikających z niezgodności towaru z umową.
4. Pompę osadzić na przygotowanym podeście montażowym.
5. Pompę przyłączać tylko do obwodów elektrycznych wyposażonych w wyłącznik ochronny prądowy o prądzie
wyłączającym 30 mA!
6. Włączyć pompę.
7. Za pomocą trójnika wyregulować przepływ wody i dostosować go do własnych potrzeb.
Przegląd kontrolny i konserwacja:
Dla zachowania wysokiej sprawności fontanny zaleca się przeprowadzanie regularnego czyszczenia wkładu ltrują-
cego, wirnika i jego komory.
Czyszczenie wkładu ltrującego:
1. Wyłącz pompę przez wyjęcie wtyczki sieciowej!
2. Wyjmij pompę.
3. Zdejmij obudowę ltra z korpusu pompy.
4. Wyjmij wkład ltrujący z obudowy ltra i umyj ją w letniej wodzie.
5. Zmontuj pompę w odwrotnej kolejności.
W przypadku zakłóceń w pracy silnika (ciężko pracujący silnik) należy oczyścić wirnik i jego komorę.
Czyszczenie wirnika i jego komory:
1. Wyłącz pompę przez wyjęcie wtyczki sieciowej!
2. Wyjmij pompę
3. Zdejmij obudowę ltra z korpusu pompy.
4. Przez obrót wysuń pokrywę wirnika z mocowania na korpusie.
5. Wyjmij wirnik z komory i starannie wypłucz pod bieżącą wodą, usuń osad
6. Zmontuj pompę w odwrotnej kolejności.
Przedłużki, złączki redukcyjne, regulator i dysze należy od czasu do czasu przeczyścić.
Demontaż i kasacja:
„Producent odpadów” - tj. użytkownik pompy, w chwili likwidacji wyrobu czy też wymiany zużytych części, powinien
podjąć następujące działania:
- części nadające się do dalszego wykorzystania poddać regeneracji bądź przechować,
- odpady metaliczne przekazać do punktu skupu złomu,
- elementy z tworzyw sztucznych, gumy itp. przekazać do punktów prowadzących recykling,
lub postępować zgodnie z miejscowymi przepisami o postępowaniu z odpadami metalicznymi, nieorganicznymi,
organicznymi i mieszanymi.
Nieprzestrzeganie wytycznych instrukcji wyklucza możliwość uznania roszczeń gwarancyjnych.
UWAGA: Producent, czyli rma AQUA-SZUT Sp. z o.o. z siedzibą we Wrocławiu, zastrzega sobie prawo do zmiany
parametrów technicznych urządzenia.
4
KASKADA 3600 - GARDEN FOUNTAIN PUMP
Technical characteristics:
Voltage rating: 230 V AC
Power rating: 60 W
Safety classication: IP X8
Capacity: 3600 l/h
Maximum immersion: 1 m
Tips for use:
- Make sure to become familiar with this instruction before installing and turning the fountain on!
- Follow exactly the instructions of use, mounting and safety precautions.
Work safety requirements:
- Connect the pump only to electric circuits equipped with a differential protection switch with 30 mA tripping current.
- Each time before turning the instrument on, check the fountain and the power supply cord.
In case of the power supply cord’s damage it must be disposed of! Use of a damaged power supply cord may prove
fatal!
- Assemble the instrument following the instruction.
- During maintenance procedures or when otherwise handling the water reservoir, always remember to turn the
instrument off by detaching the plug from the socket.
- Any repairs and replacement of the power supply cord prohibited!
- Never use the fountain without water or when the temperature is likely to drop below freezing.
Never use the fountain outside or without water!!! Risk of damaging the engine!!!
The mark on Fig. 1 shows the minimum immersion.
Features:
- Easy-to-use, simple maintenance,
- Compliance with Polish and EU safety requirements,
- Ensures water circulation and aeration,
- Water rise head: 0÷2,6 m,
- Capacity: 0-3600 l/h (adjustable),
- Sets water in motion,
- Adjustable water elevation and ow rate,
- Forced suction through a roughing lter guarantees problem-free, reliable and long-lasting operation,
- Suitable for outdoor use,
- An option to replace the coarse lter with two FILTERS 100 for better ltration of the water,
- 10 m power supply cord.
Mounting:
1. Prepare the platform for under-water pump mounting (a few bricks are needed, Fig. 2).
2. The optimal immersion is 30 cm below the surface of the water. The minimum immersion see the mark on Fig. 1).
3. Now, please decide how you would like to use the pump. Do you want to have a real fountain, a streamlet or maybe
a waterfall...
a) Fountain attach a lengthening pipe ø20, a regulation
T-connector, another lengthening pipe ø20 and a nozzle
(Fig. 1). The number of lengthening pipes should be adjusted to the depth of the reservoir. After xing the fountain
to the mounting platform the nozzle should stick out over the surface of the water. Attach the complete system to the
water outlet in the rotor’s head (Fig. 1).
b) Cascade - if the pump supplies a waterfall, a streamlet or a cascade, it is recommended to use a rubber reducer
(ø25/50) and PCV-pipes (ø50). This will reduce resistance of water ow and help to obtain maximal water output.
Connect a ø25 lengthening pipe, the reducer and the PCV tubing to the ø20 lengthening pipe. Attach the complete
system to the water outlet.
4. Place the pump on the prepared mounting platform.
5. Connect the pump only to electric circuits equipped with a differential protection switch with 30 mA tripping current.
6. Turn the pump on.
7. Adjust the ow rate to your requirements using the T-connector.

Control survey and maintenance:
To ensure optimal operation of the fountain we recommend regular cleaning of the lter element, the rotor and the
rotor’s chamber.
Cleaning the lter element:
1. Turn the pump off by unplugging it!
2. Take the pump out of the water.
3. Remove the lter container from the pump’s body.
4. Take the lter element out of the lter container and rinse it thoroughly in lukewarm water.
5. Reassemble the fountain (in reverse order).
Should there occur any engine’s disturbances (heavy operation of the engine), clean the rotor and its chamber.
Cleaning the rotor and the rotor’s chamber:
1. Turn the pump off by unplugging it!
2. Take the fountain out of the water.
3. Detach the rotor’s head from the engine’s body.
4. Remove the rotor’s head form the mounting on the engine’s body, by turning it.
5. Take the rotor out of the chamber, rinse it thoroughly in running water and remove the deposit.
6. Reassemble the fountain (in reverse order).
Lengthening pipes, reducing pipes and nozzles require periodical cleaning.
Disassembly and withdrawal from use:
„Waste producer” i.e. the product user, should perform the following tasks when discontinuing the use of the product
or when replacing used parts:
- regenerate all parts, which can be reused, or store them for later use
- deliver all metallic waste to a scrap metal buying facility
- deliver all plastic, rubber etc. parts to an appropriate recycling facility
or comply with local regulations pertaining to handling and disposing metallic, nonorganic, organic and mixed waste
products.
Negligence to follow the instructions and precautions mentioned above shall exclude recognition of any claims.
NOTE: The manufacturer, that is the company AQUA-SZUT Sp. z o.o. having its ofces in Wroclaw, reserves the
right to modify the engineering parameters of the unit.
KASKADA3600 - GARTENFONTÄNE
Technische Daten:
Nennspannung: AC 230V
Nennleistung: 60 W
Schutzgrad: IP X8
max. Fördermenge: 3600 l/h
max. Tauchtiefe: 1m
Gebrauchshinweise:
- Vor Installation und Inbetriebnahme unbedingt nachfolgende Bedien- und Montageanleitung gründlich lesen!
- Die Gebrauchs-, Montage- und Sicherheitshinweise sind eizuhalten!
Betriebssicherheitsbedingungen:
- Die Pumpe nur an Stromkreise anschließen die über einen Fehlerstrom-Schutzschalter mit einem Bemessungs-
-Auslösestrom nicht über 30 mA gesichert sind!
- Die Pumpe und die Netzanschlussleitung jedesmal vor Inbetriebnahme prüfen!
Bei beschädigter Netzanschlussleitung das Gerät verschrotten! Lebensgefahr!
- Das Gerät nach der Anleitung montieren.
- Bei der Instandsetzung und Unterhaltung der Pumpe und bei anderen Arbeiten am Wasserbecken das Gerät aus-
schalten und den Netzstecker ziehen.
- Reparaturen oder Ersatz der Netzanschlussleitung sind verboten!
- Verwendung der Pumpe ohne Wasser und bei Frostgefahr sind verboten!
Die Arbeit der Fontäne ohne Wasser ist verboten! Gefahr der Motorzerstörung.
Die minimale Eintauchtiefe zeigt das Zeichen (Abb.1)
Fontänecharakteristik:
- Unkomplizierte Bedienung, einfache Instandhaltung,
- Die Ausführung entsprechend der Polnischen und der EU Sicherheitsnormen,
- Sichert den Wasserumlauf und die Wasserbelüftung,
- Die Höhe der Wassersäuleförderung 0÷2,6 m,
- Fördermenge 0-3600 l/h, (regelbar),
- Bringt das Wasser in Bewegung, die Förderhöhe und die Durchussmenge sind einstellbar,
- Erzwungenes Ansaugen durch das Groblter garantiert einen problemlosen und dauerhaften Betrieb,
- Für die Arbeit in freiem Gelände bestimmt,
- Möglichkeit 1 oder 2 Filter 100 anstelle eines Groblters anzuschließen, um bessere Wasserreinigung zu erreichen,
- Netzanschlussleitung - 10m.
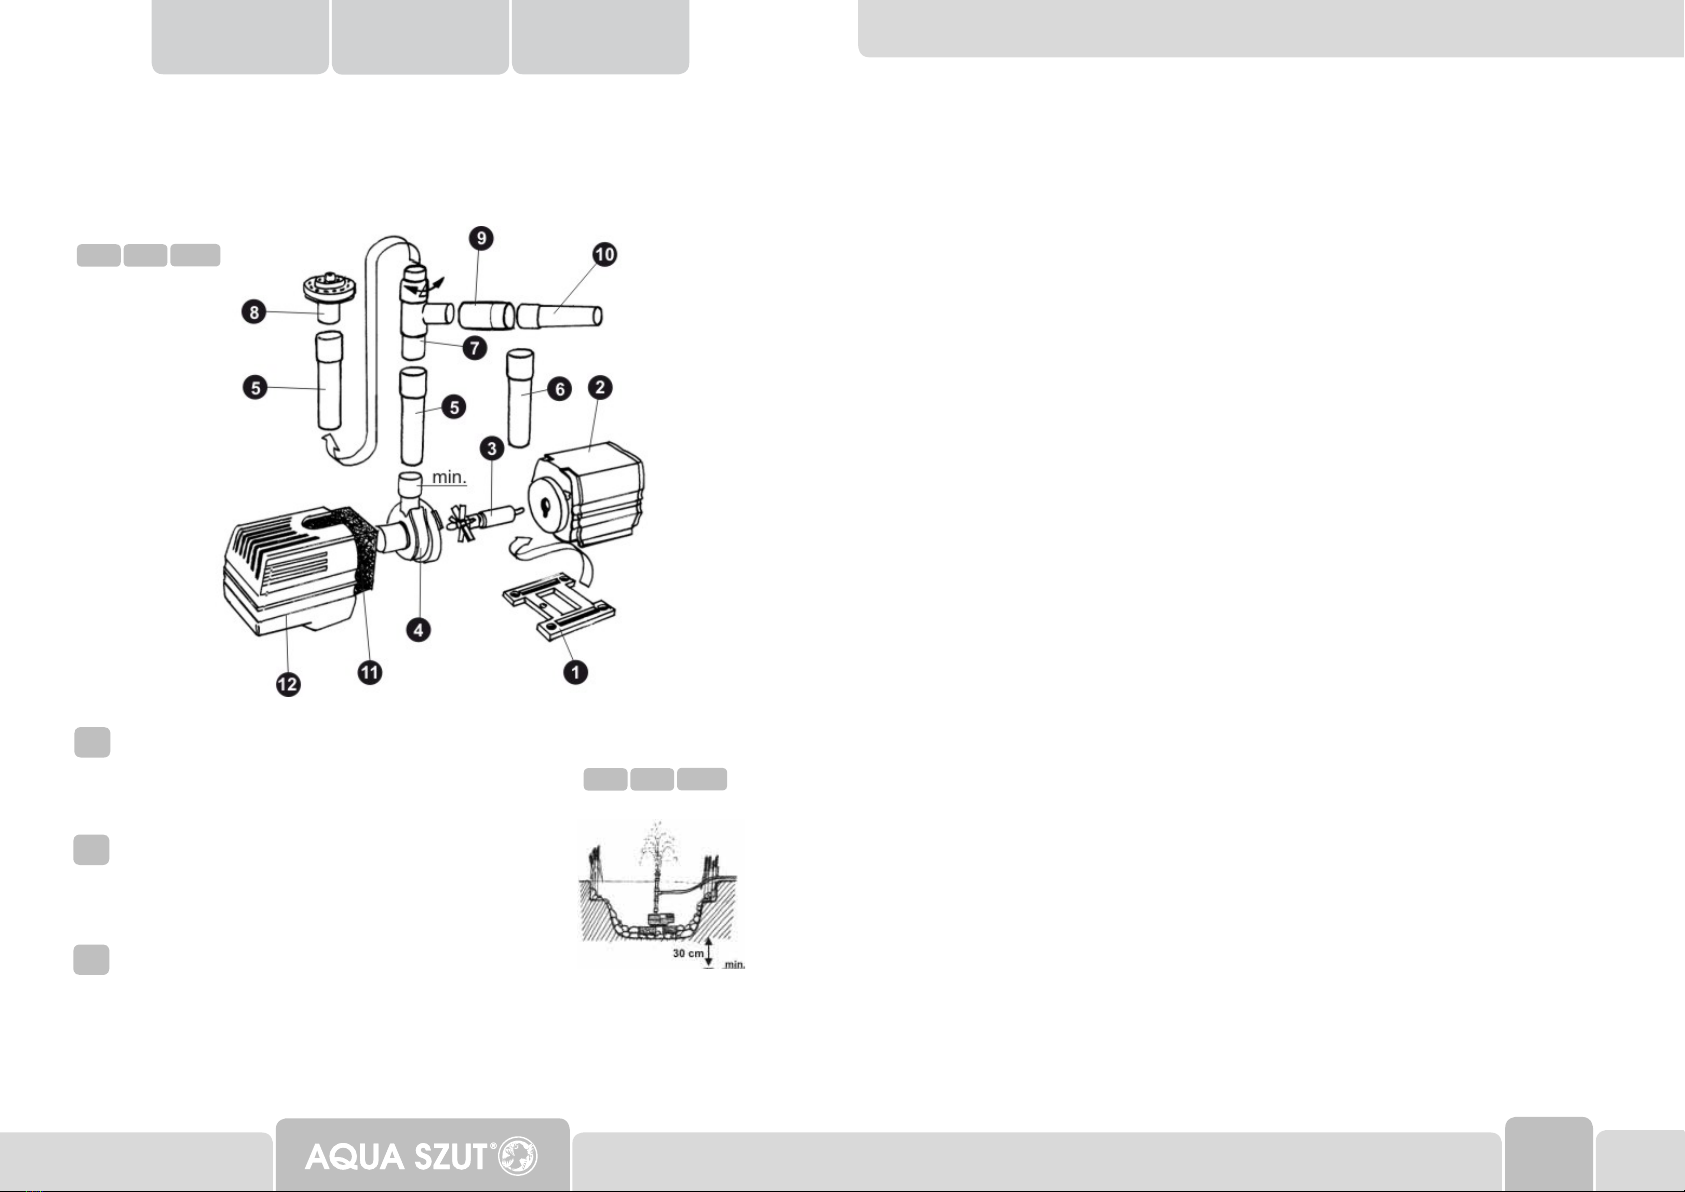
Montage der Fontäne/der Pumpe:
1. Pumpenmontagebühne unter Wasser vorbereiten (einige Ziegel, Abb.2).
2. Die optimale Eintauchtiefe beträgt 30 cm unter der Wasseroberäche. Die minimale Eintauchtiefe nach dem
Zeichen (Abb.1).
3. Denken Sie jetzt nach, wie wollen Sie sich die Möglichkeiten der Pumpe zunutze machen. Wollen Sie eine richtige
Fontäne, ein Bächlein oder vielleicht einen Wasserfall haben...
a) Fontäne Verlängerungsstück ø20, Gabelrohr, Verlängerungsstück ø20 und die Fontänedüse verbinden (Abb.1).
Die Anzahl der Verlängerungsstücke an die Wasserbeckentiefe anpassen. Nach der Befestigung der Fontäne auf
der Montagebühne soll die Düse über die Wasseroberäche herausragen. Das Ganze an der Ausussöffnung in der
Läuferabdeckung befestigen (Abb.1).
b) Kaskade - wenn die Pumpe einen Wasserfall, ein Bächlein oder eine Kaskade speisen soll, ist empfohlen
eine Gummireduktionsmuffe ø25/50 und die PCV-Rohren ø50 zu verwenden. Dadurch wird Durchusswiderstand
reduziert und die maximale Wassermange gewonnen. Das Verlängerungsstück ø25 an das Verlängerungsstück
ø20 anschließ dann die Reduktionsmuffe und die PCV-Anlage. Die Einrichtung an der Ausußöffnung befestigen.
4. Die Pumpe auf die vorbereitete Montagebühne setzen.
5. Die Pumpe nur an Stromkreise anschließen die über einen Fehlerstrom-Schutzschalter mit einem Bemessungs-
-Auslösestrom nicht über 30mA gesichert sind!
6. Die Pumpe einschalten.
7. Mit dem Gabelrohr die Wasserströmung regulieren und an eigene Bedürfnisse anpassen.
GUARANTEE TERMS AND CONDITIONS.
AQUA-SZUT Sp. z o.o. with permanent establishment ul. Opolska 11/19 in Wrocław (52-010) is offering to the buyer a guarantee of correct ope-
ration of the device, for which this guarantee card has been issued, under the condition that it is used according to the intended use and the rules
specied in the User’s Manual delivered to the Buyer together with this item. The unit is covered by 24-month guarantee (from the date of purchase).
and it includes the products bought in any part of Europe. The guarantee excludes defects resulting from improper operation. It is conned to the
unit itself, covers material and workmanship defects, but excludes any consequential damages. The guarantee is effected by repair or replacing
the defective unit. To effect guarantee repair, please deliver the unit with its guarantee card to the retail outlet. The repair will be completed within
14 days of delivering the unit and raising the claim. The guarantee for the sold consumer goods does not exclude, limit or suspend the rights of the
buyer following from goods contrary to the agreement.
5 6
D
GB

7
D
8
Kontrolldurchsicht und Instandhalten:
Es empehlt sich eine regelmäßige Reinigung des Filtereinsatzes, des Läufers und des Läufergestells, um den
hohen Wirkungsgrad der Fontäne zu erhalten.
Reinigung des Filtereinsatzes:
1. Die Pumpe ausschalten und den Netzstecker ziehen!
2. Die Pumpe herausnehmen.
3. Filtergehäuse aus dem Pumpengestell herausziehen.
4. Bio-Schaum aus dem Filtergehäuse herausnehmen und im lauen Wasser waschen.
5. Die Pumpe in umgekehrter Reihenfolge wieder montieren.
Ergeben sich Motorstörungen (schwergängiger Motor), so sollten der Läufer und das Läufergehäuse gereinigt wer-
den.
Reinigung des Läufers und des Läufergestells:
1. Die Pumpe ausschalten und den Netzstecker ziehen!
2. Die Pumpe herausnehmen.
3. Filtergehäuse aus dem Pumpengestell herausziehen.
4. Durch Drehen die Läuferabdeckung von dem Spannelement am Motorgestell herausziehen.
5. Den Läufer aus dem Läufergestell herausziehen und sorgfältig unter ießendem Wasser waschen.
6. Die Pumpe in umgekehrter Reihenfolge wieder montieren.
Die Verlängerungsstücke, Reduktionsmuffe, Regler, Düsen sollen von Zeit zu Zeit gereinigt werden.
Demontage und Entsorgung:
„Der Abfallproduzent” - d.h. der Vorrichtungbenutzer sollte beim Austausch bzw. bei der Entsorgung von verschlis-
senen Teilen folgende Maßnahmen ergreifen:
- Teile, die weiterverwendet werden können, sollten regeneriert bzw. aufbewahrt werden,
- metallische Abfälle sollten zum Schrott gebracht werden,
- Teile aus Kunststoffen, Gummi usw. sind bei Recycling-Firmen abzugeben,
oder entsprechend den Lokalvorschriften über die Entsorgung von metallischen, anorganischen, organischen und
gemischten Abfällen vorgehen.
Sollte gegen diese Anweisungen verstoßen werden, ist die Anerkennung der Garantieansprüche ausgeschlossen.
ACHTUNG: der Produzent, die Firma AQUA-SZUT Sp. Z o.o. mit sitz in Wroclaw, behält sich das Recht auf Ände-
rungen der technischen Daten des Gerätes vor.
GWARANCJA / GUARANTEE / GEWÄHRLEISTUNG
nazwa urządzenia / name of product / der Name
data / date / Datum
pieczęć punktu sprzedaży / stamp of the place of purchasing /
Stempel der Verkaufsstelle
AQUA-SZUT Sp. z o.o. POLAND, 52-010 Wrocław ul. Opolska 11/19
phone (+48) 71 34 35 769, (+48) 71 34 35 773, fax (+48) 71 34 24 564
e-mail: [email protected], www.aquaszut.pl
GARANTIEBEDINGUNGEN.
AQUA-SZUT Sp. z o.o. mit dem Sitz in ul. Opolska 11/19 in Wrocław (52-010) garantiert dem Käufer eine korrekte Arbeit der Einrichtung, worauf
diese Garantiekarte ausgestellt worden ist, unter der Bedingung das sie bestimmungsgemäß und gemäß der in der an den Käufer gelieferten
Gebrauchsanweisung und der Ware bestimmten Regeln gebraucht wird. Die Gewährleistungsfrist beträgt 24 Monate (von Einkaufsdatum). und
umfasst die in ganzem Europa eingekauften Waren. Ausgenommen von der Garantie sind Shaden, die infolge einer unsachgemäßen Bedinung
enstanden sind. Die Gewährleistung beschränkt sich auf das Gerät es wird für die Mängel gewährt, die auf Material und Fertigungsfehler zurück-
zuführen sind. Die Folgefehler sind von der Garantie ausgenommen. Die Garantieleistungen fassen Reparatur oder wechsel des Gerätes um. Zur
Garantiereparatur schicken Sie das Gerät und die Garantiekarte an die Stelle, wo Sie Ihr Gerät eingekauft haben. Garantiereparatur folgt innerrhalb
von 14 Tagen von der Gerätslieferung und der Beanstandung. Die Garantie auf die verkauften Verbrauchsgüter schließt die Rechte des Käufers aus
der Nichtübereinstimmung der Ware mit dem Vertrag nicht aus, beschränkt sie nicht und beendet sie nicht.
Other AQUA SZUT Water Pump manuals
Popular Water Pump manuals by other brands

Liberty Pumps
Liberty Pumps 2LE Series installation manual

Pentair
Pentair FAIRBANKS NIJHUIS 5430 Installation, operation and maintenance manual

ULTIMATE SPEED
ULTIMATE SPEED 12 V UOP 12 C1 Operation and safety notes

Zoeller
Zoeller SHARK 800 Series owner's manual

Neptun
Neptun NGP 100 i Original operating instructions

Crane
Crane Deming BAF-8 installation manual