Aquaris M104G User manual

Complete User Manual
(M10 / M10 4G)

Aquaris M10/M10 4G
The BQ team would like to thank you for purchasing the new Aquaris M10/ M10 4G tablet.
We hope you enjoy using it.
You can browse the internet rapidly, check your email, enjoy games and apps (which you
can download directly onto the device), read e-books, transfer files via Bluetooth, record
audio, watch films, take photos and record videos, listen to music, chat with your friends
and family or enjoy your favourite social networks.
About This Manual
· To ensure correct usage of the device, please read this manual carefully before using it.
· Some of the images and screenshots shown in this manual may differ slightly from those
of the final product. It is also possible that some of the information in this manual does
not correspond exactly to the operation of your device due to firmware updates.To obtain
the latest version please go to bq.com
· BQ shall not be held liable for any issues relating to performance or incompatibility
resulting from modification of the registry settings by the user, or for any incompatibility
issues with third-party applications available through the app stores.
Icon guide
Danger:this icon indicates situations that could pose a risk to personal safety or health.
Warning: situations which pose a risk to the correct functioning of the device but not
to personal safety or health.
Tip: additional information to help you make the most of your device.

© 2016 Mundo Reader SL. All rights reserved. The reproduction, copying, distribution, publication or modification of this material is
strictly prohibited unless carried out with the express prior written consent of Mundo Reader. As a sole exception to the previous, Mundo
Reader authorises the translation to other languages for educational purposes only. Profit making or commercial purposes are forbidden.
The clarification:“The present text is not an official BQ translation” must be included in these translations. Mundo Reader shall not be
responsible for the accuracy of said translations and reserves the right to request their removal from the public domain if it sees fit.
Trademarks
The BQ logo is a registered trademark of Mundo Reader, S.L.
The Android and Google SearchTM logos are registered
trademarks of Google Inc.
Wi-Fi®is a registered trademark of the Wi-Fi Alliance.
Bluetooth®is a registered trademark of Bluetooth SIG, Inc.
MicroSDTM and the corresponding logo are registered
trademarks of SD-3D, LLC.
Dolby, Dolby Audio and the double-D symbol are registered
trademarks of Dolby Laboratories.
All other trademarks are the property of their respective
owners. All rights reserved.

Contents
06 Before Starting
06 Box Contents
07 Product Overview
08 Getting Started
08 How to Insert a SIM card*
09 Switching the Device On and Off
10 Inserting and Removing the MicroSD Card
11 Charging the Device and Transferring Files
13 Setup Wizard
14 Learning to Use the Multi-Touch Screen
16 Desktop Features
16 Adjusting Screen Rotation
16 Buttons and Icons
17 Screen Lock
18 Home Screen
21 Status Bar
22 Notification Bar
24 Keyboard
24 Lock Screen
25 Settings
25 WIFI AND NETWORK SETTINGS
25 Wi-Fi
26 Bluetooth
27 Data Usage
28 More...
29 DEVICE SETTINGS
29 Screen
30 Sounds and Notifications
32 Apps
35 Storage and USB
36 Battery
37 Memory
37 Users
38 PERSONAL SETTINGS
38 Location
39 Security
39 Accounts
40 Google
41 Language and Input
42 Backup and Reset
* For the Aquaris M10 4G model only

43 SYSTEM SETTINGS
43 Date and Time
43 Scheduled Power On and Off
44 Accessibility
47 Printing
47 About the Tablet
48 Developer Options
49 Multimedia
49 Camera
50 Camera Mode
51 Video Mode
51 Panoramic Mode
52 Time Lapse Mode
52 Settings
54 Photos
55 Play Music
55 Play Movies
56 Apps
56 Applications from Unknown Sources
57 Play Store
57 Internet Browser
58 Hangouts
58 Calendar
58 Maps and GPS Navigation
58 Dolby ATMOS
59 Email
60 News and Weather (Genie Widget)
60 BQ Plus
60 Voice Recorder
60 Contacts
63 Calculator
63 Clock
64 FM Radio
65 Useful Advice
65 Optimising Battery Life
65 OTA Updates
66 Voice Search
67 Text Selection
68 Appendices
68 Appendix A:Technical Specifications
68 Appendix B: Cleaning and Safety
71 Appendix C: Information on Exposure to Radio Waves and SAR (Specific
Absorption Rate)
71 Appendix D: Disposing of this Product Correctly

6
// Aquaris M10 / M10 4G
Complete User Manual - English
Before Starting
Before Starting
Box Contents
Please check the contents of the box before using your BQ device for the first time. If any
of the following items are missing, contact the dealer from whom you acquired the device.
Aquaris M10/M10 4G
USB (type A) to micro-USB (type B) cable
Mains adapter
SIM key*
Documentation:
Quick Start Guide
Warranty and important information
BQ accessories
* For the Aquaris M10 4G model only

7
// Aquaris M10 / M10 4G
Complete User Manual - English
Before Starting
Product Overview
Do not attempt to remove the rear cover of your Aquaris M10/M10 4G as this may damage the device.
Do not attempt to remove the battery. Removing it may invalidate the warranty.
Microphone
Capacitive button
Notification LED
Micro-SIM slot*
Back Menu
Speaker
Home
Micro-USB port
Micro-HDMI port
Earphones jack
Rear camera
Front camera
Light sensor
Volume
button
Power button
Screen lock
MicroSD
slot
Speaker
* For the Aquaris M10 4G model only

8
// Aquaris M10 / M10 4G
Complete User Manual - English
Getting Started
How to insert a SIM card*
Your Aquaris M10 4G has a slot for a micro-SIM card.
The tray is accessed from the exterior of the device, do not attempt to remove the battery
cover.
The SIM key is found in the device’s box. With the device switched off, insert it into the ejector
hole and extract the tray. Place the micro-SIM card on the tray. Ensure correct positioning by
aligning the notch on the card with that on the tray (see image). Insert the tray and micro-SIM
into the slot.
Your Aquaris M10 4G only accepts micro-SIM cards
* For the Aquaris M10 4G model only
Getting Started

9
// Aquaris M10 / M10 4G
Complete User Manual - English
Getting Started
Switching the Device On and Off
To switch on your Aquaris M10/M10 4G press and hold the power button for a few seconds.
It is located on the right side of the device.
To switch it off, press and hold the power button for two seconds. A menu will appear with
various options. Select Power off.
A brief press on the power button will switch off the screen but not the device.

10
// Aquaris M10 / M10 4G
Complete User Manual - English
Getting Started
Inserting and Removing the MicroSD Card
MicroSD cards or USB drives (a pendrive or compatible hard drive connected via OTG) can be
installed providing complete functionality. Using a microSD card the internal memory of the
Aquaris M10 and Aquaris M10 4G can be expanded by up to 64 GB and 256 GB respectively.
When a new microSD card or OTG drive is inserted into the device a message appears in the
notification bar indicating it is ready together with the Explore and Eject options.
It can only be used as an external microSD/USB drive. It will only serve to support the
device’s internal memory and applications will not be able to be installed on it. Information
such as photos and videos can be stored here.
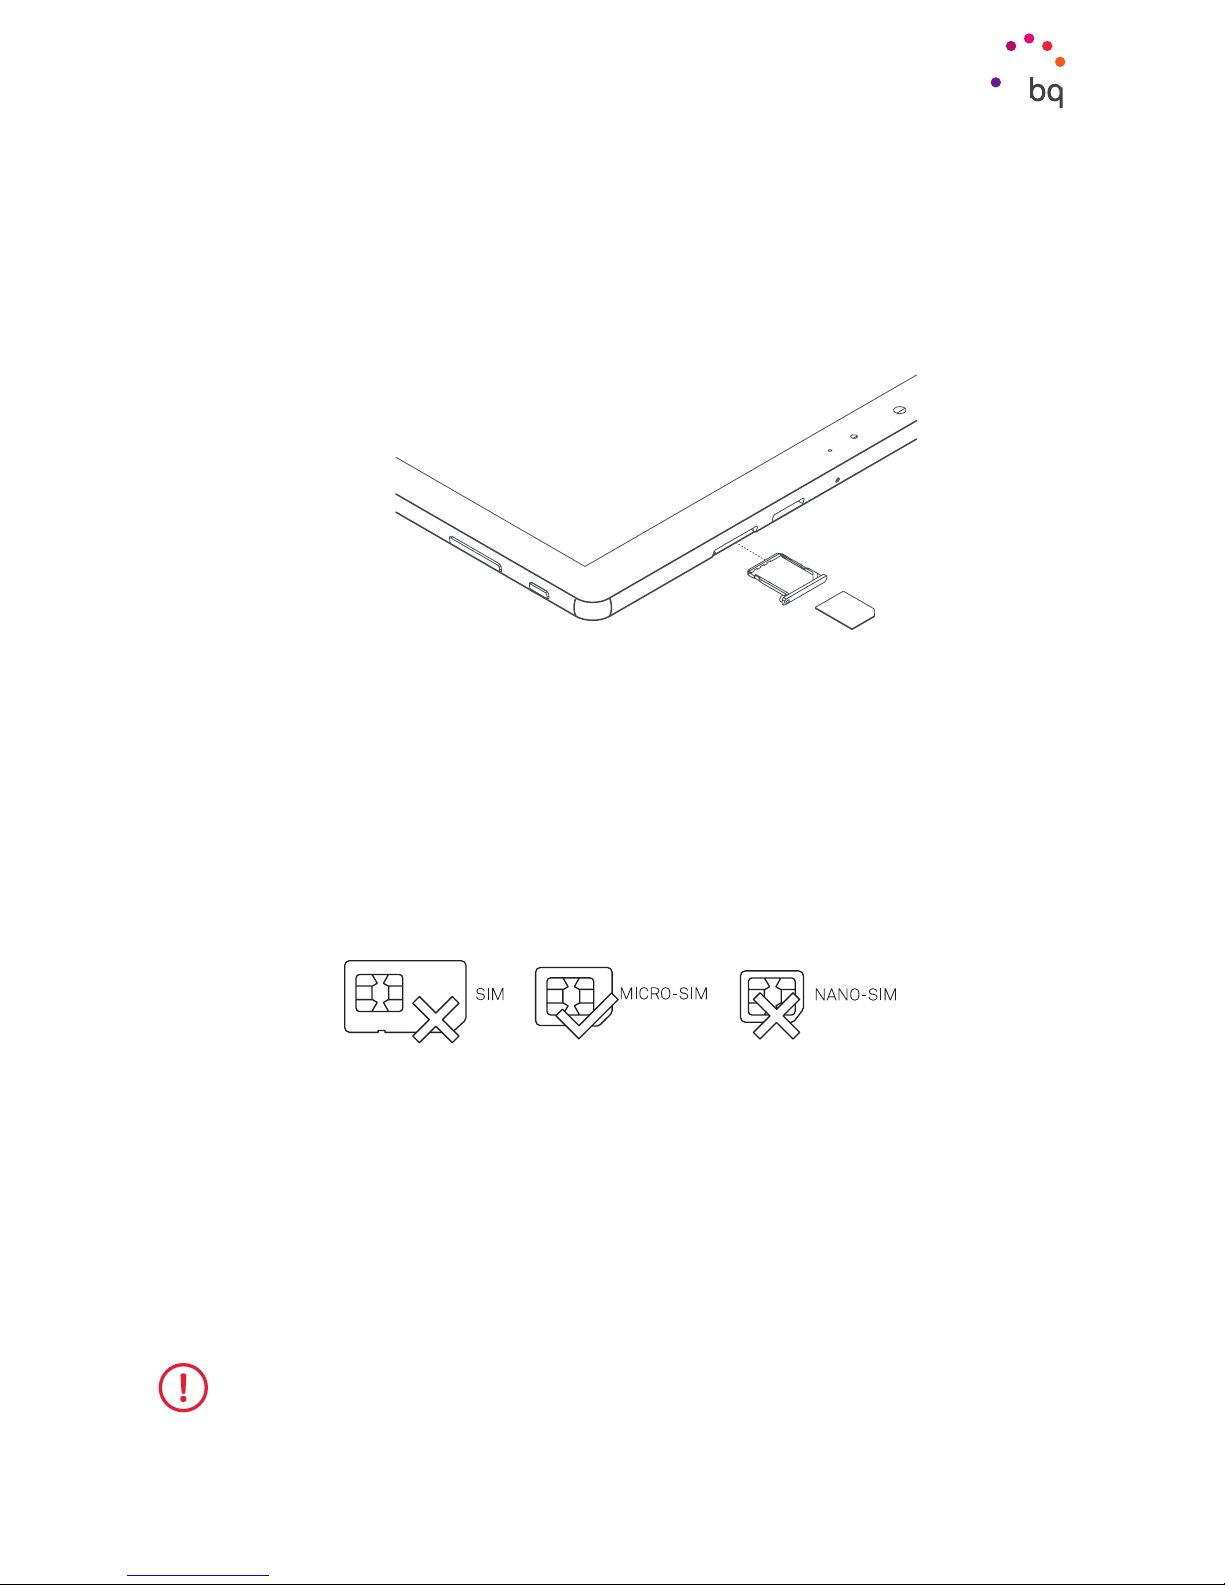
To insert a microSD card, follow these steps:
Insert the microSD card into the slot making sure the metal pins enter first and that they
face toward the back of the device.
Push the card in until you hear a slight click, which indicates that it has been inserted
correctly. If it is not inserted correctly the device may not recognise it and its contents will
not be accessible.
To remove the microSD card, follow the steps in the previous section in reverse order while
taking into consideration a few important points:
a. For greater security, we recommend switching the device off before removing the
microSD card.
b. If you need to remove the microSD card while the device is switched on, unmount it
first to avoid damaging the card and losing data. To do this select Settings > Storage
and USB > SD Card > > Settings > Eject.
You can choose whether to store your multimedia files on your tablet’s internal memory or directly
to the external microSD card. Note that any content stored on the external card will not be available
when it is removed.
Be aware that formatting the microSD card or USB drive will erase any data stored thereon.

11
// Aquaris M10 / M10 4G
Complete User Manual - English
Getting Started
Charging the Device and Transferring Files
Your tablet has a rechargeable (non-removable) 7280 mAh battery which is charged via the
micro-USB port situated on the left of the device. A mains adapter and a USB (type A) to
micro-USB (type B) cable are provided with the tablet for charging the battery.
To charge, follow these simple steps:
A) Using a mains adapter:
1. Plug the USB cable into the USB port on the mains adapter.
2. Plug the mains adapter into any standard power socket (220 V/50 Hz).
3. Plug the other end of the cable into the micro-USB port on your tablet.
B) Using a laptop or desktop computer:
1. Connect the USB cable to a compatible USB port on your computer.
2. Plug the other end of the cable into the micro-USB port on your tablet.
The battery in your Aquaris M10/M10 4G is non-removable. Removal by anyone other than our
Technical Support staff may damage the device and invalidate the warranty.
It is recommended the battery be charged fully (5h 15 min) the first time it is charged. This will help
calibrate the battery meter. Bear in mind that some batteries perform better after completing a
number of charge cycles.
The time required to charge your device can vary markedly depending on whether it is charged via a
mains adapter or a computer USB port.
For optimal charging, we recommend using a 5 V 2 A charger with your device.

12
// Aquaris M10 / M10 4G
Complete User Manual - English
Getting Started
Connecting your tablet to a computer via a USB cable also allows you to transfer files
between these (from its internal memory or from the inserted microSD card).This will allow
you to use, copy or store images, videos, music, text documents, etc. on one or both devices.
You can select the file transfer mode when you connect your Aquaris M10/ M10 4G to
a computer. On connecting it, a USB connection menu will appear. Connecting with the
Charging option eliminates data connections and file transfers between the computer and
the device allowing for improved charging speed.Other options include File transfers (MTP),
Photo transfer (PTP) or MIDI, which allows the connection of musical instruments or other
devices with MIDI inputs such as keyboards.
There are a number of ways to transfer files. The following steps explain how to do this via
a USB connection:
1. Connect your Aquaris M10/M10 4G to a computer using the supplied micro-USB to USB
cable. Insert the micro-USB connector into the device’s micro-USB port and the generic
USB connector into the computer’s USB port.
2. Select and copy the desired files to your device or computer. Note that you can store files
on the tablet’s internal memory or the microSD card if you are using one.
To transfer files in MTP or PTP mode from your tablet (and/or microSD card) to a Mac OS
computer and vice versa, you will need to download and install the free Android File Transfer
application to your computer: www.android.com/filetransfer/.
Do not disconnect the cable while files are being transferred.

13
// Aquaris M10 / M10 4G
Complete User Manual - English
Getting Started
Setup Wizard
The first time you switch on your Aquaris M10/M10 4G a setup wizard will help you configure
the basic settings for your device, such as:
· Language
· SIM cards*
· Wi-Fi networks
· Add your account
· Protect your tablet
· BQ Plus
* For the Aquaris M10 4G model only
After adding your Google account you have the option to add another account to the Gmail application.

14
// Aquaris M10 / M10 4G
Complete User Manual - English
Learning to Use the Multi-Touch Screen
Your device has a capacitive multi-touch screen with five simultaneous detection points.
Different movements can be made over these points which are linked to different functions:
Touch. Touch the screen briefly to select an icon, open an app, activate a
text-entry box, etc.
Touch and hold. Touch the screen and hold for approximately 2 seconds to
bring up an options menu.
Drag. To move an icon, press and
hold down, drag it to the desired
position and then release.
Getting Started

15
// Aquaris M10 / M10 4G
Complete User Manual - English
Swipe or slide.Press briefly on the Home screen and slide your finger left or
right to access the extended screens. Slide your finger up or down to scroll
through a website, list or menu.
Pinch. Place two fingers on the screen at the same
time, separate them to zoom in and bring them
together to zoom out.
Double-tap. Tap the screen twice in quick succession to zoom in. Repeat the action to zoom
out. You can also use this to activate/deactivate the screen.
Getting Started

16
// Aquaris M10 / M10 4G
Complete User Manual - English
Desktop Features
Desktop Features
Adjusting Screen Rotation
In some apps, the screen will rotate automatically from portrait (vertical) to landscape
(horizontal) mode and vice versa, depending on how your device is being held. To stop screen
rotation go to the Apps menu > Settings > Display > When device is rotated and select Stay in
current orientation.
You can also enable and disable automatic screen rotation using the Auto-Rotate toggle in the
quick settings menu.
Buttons and Icons
To facilitate navigating through your device’s screens the nav bar is displayed by default.
While using an app, you can return to the previous screen by pressing the Back button .
Go to the Home screen at any time by pressing the Home button. You can also press and
hold it to access the Google Now application.
Access the recent screens list by pressing Menu .If you press and hold it,a pop-up window
will appear offering a choice between Wallpapers, Widgets or Settings.
Your M10/M10 4G tablet features a new, configurable capacitive button . The Double-tap and
Long-press actions can be customised to perform given functions like accessing the camera, opening
an app or muting/unmuting the volume. Do this via Settings > Display > Configurable buttons.

17
// Aquaris M10 / M10 4G
Complete User Manual - English
Desktop Features
Screen Lock
By default, your tablet screen will lock itself automatically after a prolonged period of
inactivity. To configure the screen timeout, tap the Apps menu button, go to Settings >
Display > Screen timeout and select the desired interval. To manually switch the screen off
and lock the device, press the power button briefly.
To unlock it, press the power button briefly. The screen will display the configured unlock option.
To change the unlock option, press the Apps menu button, go to Settings > Security > Screen
lock and choose from the following options: None, Swipe, Pattern, PIN and Password. For more
information on each of these options go to Settings > Security.
Your Aquaris M10/M10 4G includes a feature that enables you to lock the tablet by double-
tapping the top part of the screen where the notification bar is located. Double-tapping any
part of the screen will make it turn on and request the unlock pattern. Double-tap again to
turn it off.
This feature is disabled by default.To activate it go to Settings > Display > Double tap control.

18
// Aquaris M10 / M10 4G
Complete User Manual - English
Desktop Features
Home Screen
The Home screen or Desktop, is the main access route to the tools and apps installed on
your Aquaris M10/M10 4G. From here you can check the status of your device,visit websites,
open apps, etc.
1Status and notification bar. Check the time, Wi-Fi signal status, audio profile,
Bluetooth status and remaining battery power. The notifications and quick settings
have now been integrated into one screen. Swipe downward to view it. On the first
swipe the notifications appear; on the second swipe the quick settings appear.
2Google Search. Tap the search bar to enter the text you want to search for on the
internet. Voice searches can also be performed.
3Apps menu. Here you can access all the apps installed on your device.
4Shortcuts. These give you quick access to the apps you use most frequently.
5 Widgets. Add widgets such as Power control (in the illustration), time, news and
weather, etc.
1
2
3
2
4
5
4

19
// Aquaris M10 / M10 4G
Complete User Manual - English
Desktop Features
Customising the Home screen
You can customise the Home Screen by adding images, shortcuts, applications or widgets.
To change the wallpaper or add a widget, press and hold on one of the screens until a pop-
up window appears containing these options:
· Wallpapers: select the image you want to use as a background for the Home Screen
then tap Set wallpaper to confirm. If the selected image is too large it will need to
be cropped.
· Widgets: select the widgets you want to have on the Home Screen. They are
distributed vertically and in alphabetical order to make them easier to find. Widgets
belonging to the same app are positioned horizontally for more clarity. Long-pressing
the sidebar displays the first letter of the applications, which facilitates searching.
· Settings: a shortcut to the Device settings menu.

20
// Aquaris M10 / M10 4G
Complete User Manual - English
Desktop Features
To create a shortcut to an app or contact go to the Apps menu, press on the app’s icon and
drag it to the desired position on the desktop.
Swiping the desktop screen to the right accesses Google Now where you can see relevant
cards and perform searches. You will have to configure this beforehand. Go to Settings >
Google > Search and Now > Now Cards and activate Show all cards.
Moving and Deleting Icons on the Home Screen
To move an element on the Home screen, press and hold to detach it from the background,
drag it to the desired position and release.
To delete an element, drag it to the cross at the top of the screen. When the icon turns red,
release it to delete.
To uninstall an app, drag it to the icon labelled Uninstall at the top of the screen. When
the icon turns red release the app to uninstall.
Keep in mind that only user-installed applications can be uninstalled.
This manual suits for next models
1
Table of contents
Other Aquaris Tablet manuals