ARE Short Towers User manual

SHORT TOWER INSTALLATION MANUAL
ARE
Tilt-up, Guyed, Pipe Towers for
ARE110
&
AWP-3.6
Wind Generators
Short Towers – 43, 64, and 85 feet tall

- 1 -
Contents
1) Introduction 2
2) Site Selection and Preparation 2
3) Tools List 3
4)PartsList 4
5) Tower Foundations 6
6) Tower Section Preparation 8
7) Lightning and Grounding Protection 9
8) Tower Raising Options 11
9)TowerAssembly
Step 1 (Base Installation and Anchor Setup) 11
Step 2 (First Tower Section Installation & Raising) 13
Step 3 (Prepare the Gin Pole) 13
Step 4 (Raising the Gin Pole) 16
Step 5 (Gin Pole Guy Wire Attachment) 16
Step 6 (Tower Assembly) 16
Step 7 (Top Guy Wire Attachment) 17
Step 8 (Hoist Guy Wire Attachment) 18
Step 9 (First Tower Raising) 19
Step 10 (Tower Adjustment) 21
Step 11 (Tower Lowering) 21
Step 12 (Re-Raising the Tower) 22
Step 13 (The Final Raising of the Tower) 22
Step 14 (Final Check) 22
10) Tower Maintenance 23
Appendix
D1
D2
D3
D4
D5
D6
D7
D8
D9
D10
D11
D12
101011
101013
101014

- 2 -
1) Introduction
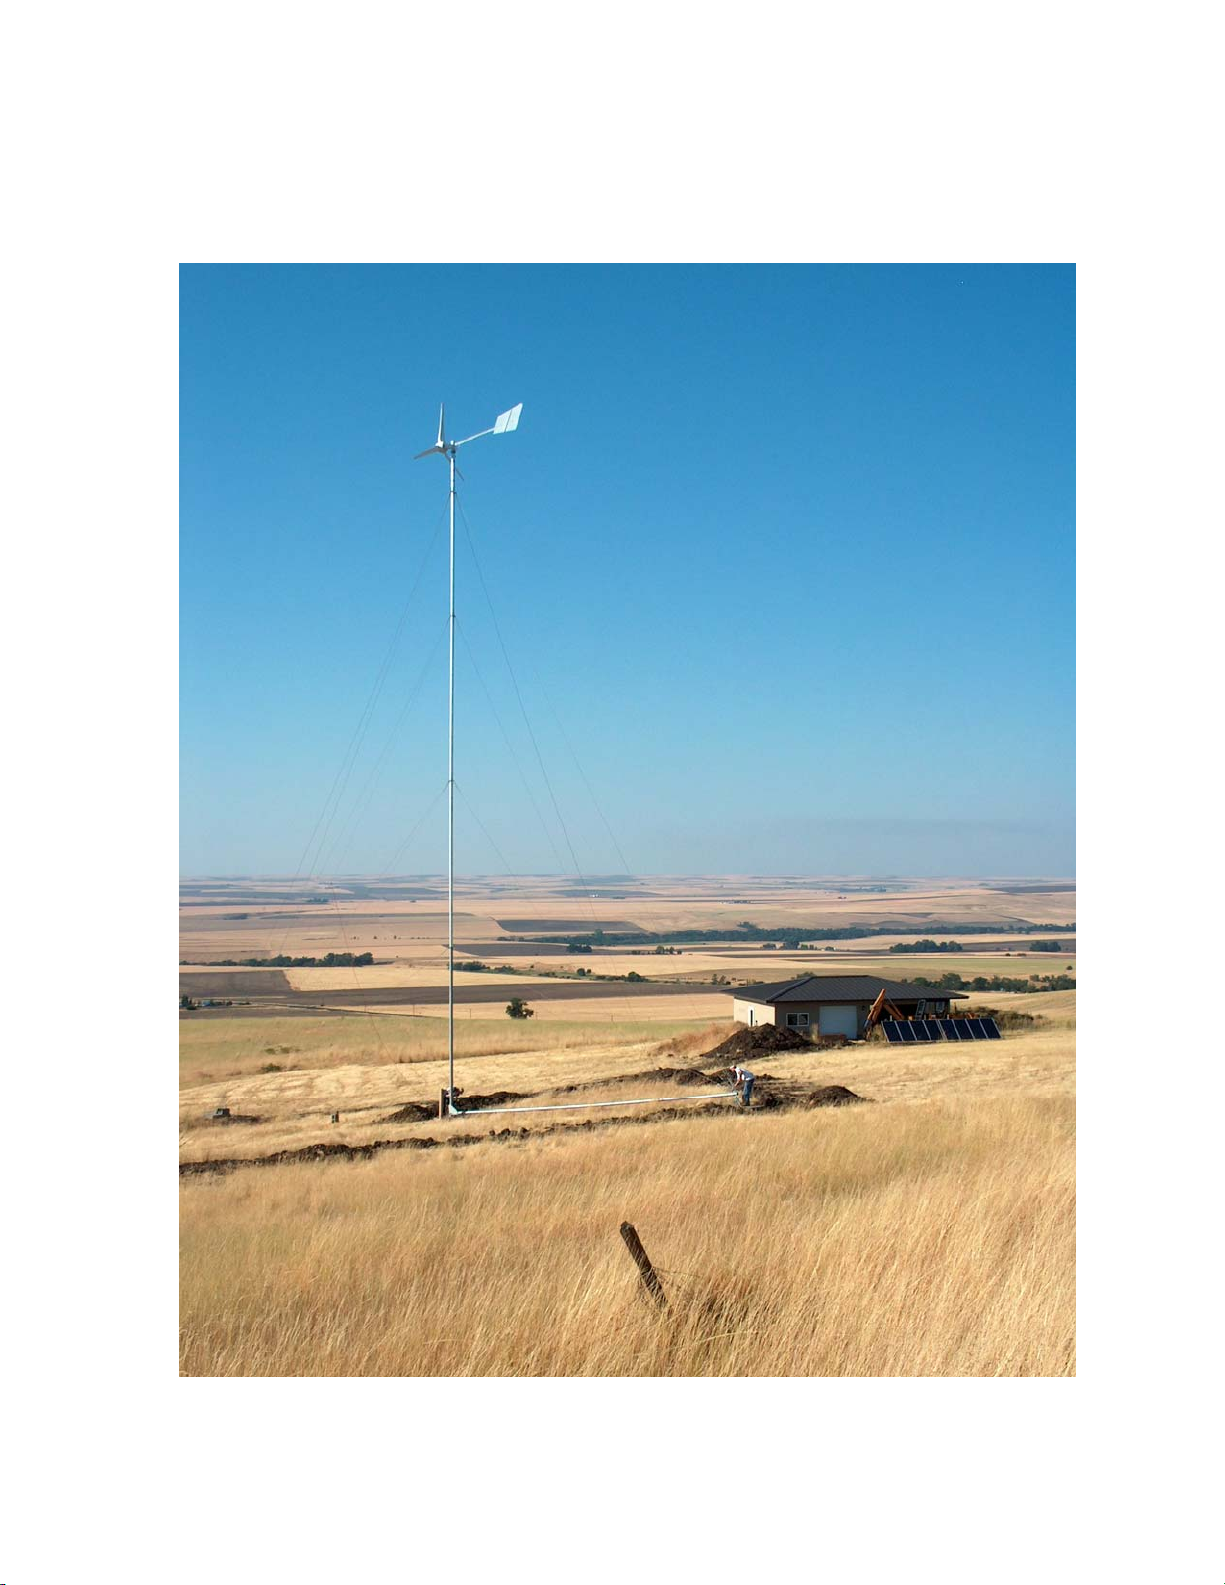
This is an installation manual for a set of towers designed and manufactured by
Abundant Renewable Energy (ARE) for the AWP3.6 wind generator. These
towers are tilt up, guyed, pipe towers, from 43 to 127 feet tall. This manual will
only cover towers which are 43, 64 and 85 feet tall. The 106 and 127 foot towers
are covered in the “Tall Towers” Manual. All of the towers are based on 4-inch,
schedule-10 pipe. The tower consists of a series of 21-foot sections, joined
together by couplers. These couplers are the attachment points for the guy
wires, except for the top guy attachment, which is made at a point below the wind
generator to allow for blade clearance. These towers work in conjunction with a
gin pole, which acts as a lever arm to raise and lower the tower. The gin pole is
21 feet long. The tower is secured by the guy wires connected to anchors at
three points and to the gin pole for the fourth point. For these towers, there are
five concrete foundations that must be created, one for the tower and four for the
guy wire anchors.
Tilt-up towers are NOT designed to be climbed at any time.
2) Site Selection and Preparation
The ideal site for a tower is a flat, level field. However, any area in which there is
sufficient space for the foundations, and which is reasonably level, will work. A
hillside can also be made to work if there is a line available that allows the side
guy anchors and the base to be level with each other.
For these towers, the anchors are about 22 feet 6 inches from the base. The site
should be free from obstructions and the tower height should extend at least 35
feet above any obstacles in 500-foot radius from the tower (remember that trees
grow). See the wind generator installation manual for more information on siting.
The site for the tower will need to be cleared of all trees and brush to allow for
the assembly and raising of the tower. The foundation radius from the center
foundation is about 27 feet. Additional area will need to be cleared for the tower
when it is in the down position. This will be in the down side direction opposite
the hoist side. The distance needed to be cleared is 51 feet, 72 feet and 93 feet
from the center foundation for the 43, 64, and 85 foot towers respectively.
Drawings D2, D7, D8 D9 and D12 in the appendix can be used to help determine
how to select and lay out your site.

- 3 -
3) Tools & Materials List
Foundation:
•Gloves
•Shovel
•Tape measure (50-100 ft.)
•Leveling tool
•Laser level or string
•Site level or transit
•Masonry mortar type “S”
•Clamps
•Rebar bender
•Wire mesh or rebar (see section “5. Tower Foundations”, subsection
“Center Foundation”)
•Wire ties
Tower Installation
•Concrete (min. 5 yards)
•Pliers/channel locks
•Combination wrenches for saddle clamps (7/16” & 1/2") , pivot and pin
bolts (3/4”, 15/16”, 1-1/16”), and turnbuckles (7/8” & 9/16”)
•Round file
•Cable cutter
•Galvanizing spray
•Heavy hammer and block of wood
•Rope

- 4 -
4) Parts List
The complete tower kits contents are listed in the tables below.
PART 43’ 64’ 85’
Foundation Kit:
Anchors 4 4 4
J Bolts 5/8” x 8” 4 4 4
Nuts and Washers 5/8” galv. (# of each) 8 8 8
Eye Bolts 1/2” x 6” 2 2 2
Nuts and Washers 1/2” galv. (# of each) 4 4 4
Base Plate 1 1 1
Tower and Guy Wire Attachments:
4 Hole Gin Pole End Fitting 1 1 1
Top Flange Fitting 1 1 1
Top Guy Tangs 4 4 4
Shackles 1/2” 4 4 4
5/8” x 7” Bolts 2 2 2
5/8” Nylok Nuts 2 2 2
J & E Turnbuckles 1/2” x 12” 8 12 16
J & J Turnbuckles 5/8” x 6” 1 1 1
Thimbles 5/16” for Ø3/16” wire 6 11 16
Thimbles 1/2” for Ø 5/16” wire 5 5 5
Saddle Clamps 3/16” 18 33 48
Saddle Clamps 5/16” 15 15 15
Tower and Anchor Attachments:
Gin Pole Gusset 2 2 2
Pivot Bolt 3/4” x 8” 1 1 1
Pivot Nuts and Washers 3/4” (# of each) 2 2 2
Pin Bolts 1/2” x 6” 5 5 5
Pin Nuts 1/2” Nylok 5 5 5
Pin Washers 1/2” 10 10 10
Shackles 1/2” 4 4 4
4 Hole Equalizer Plates 3 3 3
Gin Pole Equalizer Plate 1 1 1
TOWER SECTIONS
Gin Pole Section 1 1 1
Tower Base Section 1 1 1
Tower Mid- Section NA 1 2
Tower Top Section 1 1 1

- 5 -
Hoist Rigging
PART 43’ 64’ 85’
3/16” Cable 65’ 100’ 135’
Pulleys 3” 2 3 4
Shackles 3/8” 4 5 6
Saddle Clamps 3/16” 3 3 3
Thimbles 5/16 for Ø3/16” wire 1 1 1
Gin Pole Guy Wires with Crimped Eyes (Qty 2)
Tower Height 3/16”
43 foot 35’
64 foot 35’
85 foot 35’
Tower Guy Wires without Crimped Eyes
Tower Guy Wires with Crimped Eyes
Tower Couplers with Guy Wires Attached
Tower Height Wire Size Qty Length
NA NA NA
43 foot Ø5/16 1 50’
Ø3/16” 1 52’
64 foot Ø5/16 1 67’
Ø3/16” 1 52’
Ø3/16 1 73’
85 foot Ø5/16 1 88’
Tower Height Wire Size Qty Length
43 foot Ø5/16” 3 50’
64 foot Ø5/16” 3 67’
85 foot Ø5/16” 3 88’
Tower Height Wire Size Qty of Wires
per Coupler Length
43 foot Ø3/16” 4 35’
Ø3/16” 4 35’
64 foot Ø3/16” 3 52’
Ø3/16” 4 35’
Ø3/16” 3 52’
85 foot Ø3/16” 3 73’

- 6 -
5) Tower Foundations
The foundations are concrete blocks 4 feet deep with a 3 foot square foot print,
using steel anchors and reinforcing bar or wire mesh. The foundations are cast
in holes dug in the ground. The minimum concrete strength is 2500 psi.
Foundations in areas that freeze deeper than 4 feet need modified foundations
that extend below the frost line. The depth of the standard foundation can be
increased until it is difficult to excavate within the 3 foot square footprint. Then a
drilled foundation can be used. No forms are required if the foundations are
poured flush with the soil surface. Use forms if the foundation must extend
above the soil surface to create a level anchor line. When using forms the depth
of the hole should still be a minimum of 4 feet below the surface of the soil and
extent below the frost line. Ensure that the soil walls of the holes are undisturbed
during the excavation process. This will produce a uniform foundation wall
resistant to cracking.
Center Foundation
The center foundation is reinforced using wire mesh or a rebar lattice. Use No. 2
or No. 3 rebar, (1/4” or 3/8” diameter) for the lattice. Wire mesh can be 4x4
(W1.4xW1.4) to 6x6 (W4.0xW4.0).
The center foundation needs to have reinforcement on the sides and top faces of
the block. Locate the reinforcement 3 to 5 inches in from the surface of the cube
faces. See drawing D10 in the appendix for a typical rebar lattice.
The center foundation supports the tower base. This is anchored to the
foundation using 5/8” x 8” J-bolts. See drawings D5 and D9 for locations of the
J-bolts. It is suggested to use the tower base or a pattern of the bolt holes to
assist in location of the J-bolts.
Outer Guy Wire Anchor Foundations
The remaining foundations are also reinforced using wire mesh or rebar as
described for the center foundation, except reinforcement is only required on the
top and the side facing the center tower base. Drawing D11 illustrates a typical
rebar lattice for the outer foundations.
The outer foundations support anchors for the tower and gin pole guy wires. The
steel anchors for the tower guy wires are cast in the concrete at the angle ‘A’
indicated in Table 1.

- 7 -
Table 1
Tower Height A
43 feet 57 degrees
64 feet 65 degrees
85 feet 70 degrees
See drawings D2, D3, D4, D7, D8 D9 and D12 for anchor locations.
Get as much of the anchor in the concrete as possible consistent with obtaining
proper height and placement. It is fine to increase the excavation size or depth
to get more of the anchor in the concrete. If necessary you can use a form and
raise the foundation height as required above the soil level to keep the anchor
buried in the foundation. Maintain a minimum of a 4 foot deep, 3 foot square
block below the soil surface. The eye of the anchor should be no more than 4
inches above the surface of the foundation.
Hoist Anchor
See drawing D12 for possible locations for the hoist anchor. A set of holes are
provided in the gusset plates to adjust for higher or lower placement of the
anchor. Each hole is a 5 degree adjustment and moves the end of the gin pole 1
foot 9 inches at the hoist anchor.
If the locations shown in drawing D12 for the anchor are difficult to meet, an
extension kit consisting of 1/2” chain and a 7/16” shackle is offered to attach the
retaining turnbuckle to the gin pole end fitting.
More extreme variations can be used, especially lower hoist anchor placement.
You will need to obtain an extended leash for the hoist turn buckle, a longer hoist
cable and move the hoist anchor further from the base to keep the angle correct.
Consult with ARE for difficult installation adjustments.
Down Side Anchor
The downside anchor eye height is not as critical as the hoist side. The anchor
may vary up to a foot higher or lower than the tower base. Please consult ARE
for larger variations.

- 8 -
Left and Right Side Anchors
The anchor eye on the left side and right side should be level with, (same height
as), the tower base pivot pin. The side anchors are offset 4 inches toward the
down side anchor from the centerline of the center foundation. See drawing D3.
This allows the side guy wires to become slack during the lowering of the tower
reducing the possibility of over tensioning the wires.
The eyebolts for the gin pole guy wires are located on the left and right side
foundations. They are offset 4 inches toward the hoist side anchor from the
centerline of the center foundation for the same reason. See drawing D3 and
D4.
These locations are important and should be held to plus or minus 1 inch.
Pouring the Concrete
Ensure that all anchors, bolts and rebar are securely located before the concrete
is poured. If not they may move during the pouring operation, and realignment
can be difficult or impossible. If you are pouring from a mixing truck, it is
suggested to pour directly over the anchor to avoid displacement.
The foundation should cure for 4 weeks (28 days) before any loads are placed on
them, including tightening the nuts on the base plate anchor bolts. Consult ARE
if shorter curing times are necessary.
6) Tower Section Preparation
If you purchased a tower kit without pipe, you will need to obtain 21 foot long
sections of 4 inch schedule 10 galvanized steel pipe. Do not use any other size
or material, as doing so will compromise the design of the tower. Inspect the
pipe carefully to ensure that it does not have dents and belled ends. Do not use
pipe that is significantly damaged. Consult A.R.E. with any questions regarding
the use of slightly damaged pipe. Pipe should be straight with no bows. The
pipe that you purchase will need to have some holes drilled to accommodate the
assembly of the tower. For these towers, you will need to prepare four pipe
sections with three different hole layouts. Note: Some tower sections do not
require holes.
The sections you need to drill are:
•Gin Pole Base Section See Drawing 101014
•Tower Base Section See Drawing 101011
•Tower Top Section See Drawing 101013

- 9 -
The following procedure is suggested for drilling holes in the pipe ends that
attach to the gusset plates. The holes must be aligned in order to work properly.
•Lay a piece of angle iron at least 2 feet long on the pipe lengthwise. Mark
a line on the pipe along one side of the angle iron. This line should extend
from the end of the pipe to a point past your last hole.
•Measure, mark and center punch holes.
•On both ends of the line, measure half way around the pipe and mark it.
•Use the angle iron to draw a line between your marks. Measure, mark and
center punch the holes.
•Drill pilot holes and finish holes at each location.
•Remove burrs from the edges of the holes and paint with spray
galvanizing.
7) Lightning and Grounding Protection
Grounding – The tower should be grounded at each foundation point. Legal
requirements in most areas only require grounding of the tower. We recommend
grounding the guy wires as well. You will need five grounding rods and 4 to 8
AWG, single strand, bare copper wire. Place a grounding rod near each of the
foundations. The grounding rods should be 8 feet long and embedded into the
ground so the top of the rod is a minimum of 6 inches below the surface.
Connect a ground wire between each of the outer grounding rods, making a
circle around the center foundation. Next, make a connection between one of
the outer grounding rods and the center grounding rod. These wires need to be
buried 18 inches or deeper below the ground (check your local regulations). At
each guy wire foundation, attach a ground wire from the grounding rod to the guy
wires just above the saddle clamps near the turnbuckle. Never attach the copper
grounding wire directly to the working part of a guy wire. Use one guy wire end
and chain between each of the guy wires using saddle clamps (See Figure 1).
Attach the end of this guy wire to the copper ground wire. Attach a ground wire
between the tower base section or gusset and the center grounding rod.

- 10 -
Figure 1
Junction box – We recommend the use of a junction box at the base of your
tower for access to the wiring that runs between the power controls and the
generator wiring in the tower. This allows a convenient location for maintenance
between the generator and the power controls. Additionally, if your generator
does not have slip rings in the yaw head, you can easily unwind any twists in the
tower wire that may occur due to the generator rotating. It can also serve as a
location for an onsite brake switch. We recommend using a lockable enclosure
for safety.
Lightning arresters – It is advised that lightning arrestors be installed in the wiring
of the system. We recommend that one be installed in a junction box at the base
of the tower and one in the power room. Consult ARE for available lightning
protection packages.
Copper to galvanized
wire connection
Chained wire
between guy wires

- 11 -
8) Tower Raising Options
There are various options for the raising and lowering of a tilt-up tower. The
towers are equipped to be raised and lowered with a vehicle, such as a truck or
tractor. They come with a hoist cable and pulleys for raising with a vehicle. The
ideal vehicle is a heavy pickup with 4 wheel drive and an automatic transmission.
However, there are situations where this is not a viable option.
The other common means of raising a tower is the use of a hand or electric
winch or a “grip hoist”. An optional hand winch that is setup to be driven with an
electric drill and other winches are available from ARE.
Whatever the hoisting method, make sure that it is rated for the load. The 85 foot
tower requires 3,000 pounds and the 64 and 43 foot towers are 2,000 pounds.
This is for a straight pull. Pulleys will reduce the force and increase the cable
length required.
9) Tower Assembly
Step 1 (Base Installation and Anchor Setup)
Base Installation-The start of the tower assembly begins with the base plate.
Mount the base plate on the bolts in the center tower foundation and level it. Use
5/8” nuts on the base bolts under the base plate and adjust them to level the
base. Next, install the base plate with a 5/8” washer, one on each side of the
plate, and a 5/8” nut on top. Tighten the nuts and check for level. If it is not
level, readjust until it is level. When you have it level, use a non-shrinking grout
under the base plate to make a solid support. (See drawing D9 and Figure 2)
Anchor Set Up-Attach the equalizer plates (uneven triangles with holes) to the
side and down anchors. Use the 1/2” shackles provided and make sure that the
pointy end of the equalizer is pointing toward the ground. (See Figure 3) Attach
the jaw side of the Jaw & Eye Turnbuckles 1/2” x 12” to the equalizer plate. Start
with the lowest hole and work up, except always put the last turnbuckle in the top
hole. There is one turnbuckle for each tower section, for example the 64 foot
tower will have 3 turnbuckles. Adjust the turnbuckles so that they are a little
more than half way open. Do this for the left, right and down side foundations.

- 12 -
Figure 2
Figure 3
Tower
Base
Section
Gin
Pole
Non
Shrinking
Grout
Pivot Bolt
Adjustment
Holes

- 13 -
Step 2 (First Tower Section Installation & Raising)
Start with the Tower Base Section laid out between down side anchor and the
tower base foundation. Install the Tower Coupler with the 35’ guy wires in the
top of the tower section. Note: this is the only coupler with all four wires already
attached. Attach a separate rope to the coupler. This will be used to hoist the
gin pole into position later.
Attach the tower base section of the tower and the side gussets to the base plate
with the 3/4” pivot bolt and washers on both sides of the bolt. Hand tighten a 3/4”
nut and then use a second 3/4” nut and jam the two nuts together to allow the
tower to pivot. Install a 1/2” x 6” bolt through one of the 4 holes in the gusset
plates. Include washers on both sides of the bolt and secure with a 1/2” Nylock
nut and tighten until snug. (See Figure 2)
Use drawing D12 to determine Gin Pole and Hoist Anchor positioning for
adjustment hole selection. (See Figure 2)
Have the Gin Pole Base Section handy. Tilt the tower base section up by hand
and attach the gin pole to the tower gussets. Use 1/2” x 6” bolts, washers and
nuts as above. Tighten until snug. Caution: do not over-tighten as this will
deform the pipe.
Step 3 (Prepare the Gin Pole)
Insert the 4 Hole Gin Pole End Fitting in the Gin Pole Base Section and secure
with a 1/2” x 6” bolt, washers and nut. Attach the pulleys using 3/8” shackles to
the bottom side of the gin pole end fitting. (See Figure 4) Attach the jaw side of
the Jaw & Eye Turnbuckles 1/2” x 12” to the top side of the gin pole end fitting.
Start with the hole closest to the center foundation and work back. There is one
turnbuckle for each tower section, for example the 64 foot tower will have 3
turnbuckles.
Attach both gin pole guy wires to the gin pole end fitting with a 3/8” shackle. Use
the end with the crimped eye.
Attach the hoist equalizer plate (equilateral triangle with holes) to the hoist
anchor with a 1/2" shackle. Arrange the pulleys in the holes of the equalizer
plate and gin pole end fitting as required to give a clear cable path. Attach the
pulleys with 3/8” shackles. Attach the end of the crimped eye of the hoist cable
with a 3/8” shackle. See Table 2 for hoist cable end attach point and pulley
locations.

- 14 -
Table 2
Tower
Height Number
of
Pulleys
Hoist Cable End Attach Point Number of
Pulleys
Attached to
Equalizer
Plate
Number of
Pulleys
Attached to
Gin Pole
End Fitting
43 foot 2 Equalizer Plate 1 1
64 foot 3 Gin Pole End Fitting 2 1
85 foot 4 Equalizer Plate 2 2
Figure 4
Attach Guy Wires to Gin Pole
Attach the one 5/16” tower guy wire without an eye at either end to the eye of the
turnbuckle that is farthest away from the center foundation. Use a 1/2" open
thimble. After placing this and all other thimbles, squeeze it closed before
installing the wire and saddle clamps. Secure with three 5/16” saddle clamps.
Refer to saddle clamp installation procedure in Figure 5, and make the dead end
30 inches long.
Attach the guy wire that is already attached to the first tower coupler to the
turnbuckle closest to the tower base. Pull this wire snug before securing with
three 3/16” saddle clamps and a 5/16” open thimble, per the procedure below.
Gin Pole
Guy Wires
Gin Pole
End Fitting
Hoist cable
Equalizer
Plate

- 15 -
Attach the remaining 3/16” guy wires that are not attached to the tower couplers
to the remaining turnbuckle eyes using 5/16” open thimbles. Secure with three
3/16” saddle clamps per guy wire. Install the shortest closest to the tower base
and then work outward with successively longer wires. See Appendix Drawing
D1 and D6. Refer to the saddle clap installation procedure in Figure 5, and make
the dead end 30 inches long.
Saddle Clamp Installation Procedure
1. Locate the first saddle clamp as close to the thimble as possible with the
U-bolt over dead end, the live end rests in clip saddle. See Figure 5.
2. Install two more saddle clamps on 6 inch centers securing the guy wire
with 3 clamps total.
3. Do not over tighten and deform or damage the wires. (Recommended
torque for both 3/16 & 5/16 saddle clamps: 30 in-lb). A nut driver may be
used during set-up and while adjusting the tower to vertical. All saddle
clamps should then preferably be tightened with a thread-locking
compound.
Figure 5
Live End
Dead End
Saddle
U-Bolt

- 16 -
Step 4 (Raising the Gin Pole)
Attach the guy wires between the first coupler on the Tower Base Section and
the Left, Right and Down Side foundations. Use a 5/16” open thimble through
the eye of the turnbuckle. After placing this and all other thimbles, squeeze it
closed before installing the wire and saddle clamps. Pull the guy wires tight and
then slack off about 6 inches and secure with three 3/16” saddle clamps. Refer
to the saddle clamp installation procedure in Figure 5. The guy wires will be
readjusted later during the tuning process, so do not over tighten the cable
clamps and damage the wire. Adjust all the guy wires so that the tower section is
plumb.
Adjust the hoist side guy wire to hold the weight of the gin pole. Ensure the
tower is plumb. Use the turnbuckles to make small adjustments. If larger
adjustments need to be made, loosen the saddle clamps, then adjust the wire
length. The hoist side and down side guy wires will be tight with no slack due to
supporting the gin pole. The left and right side guy wires should have about 4
inches of bow in the wires.
Lift the gin pole to a vertical position and play out the hoist cable as you do so.
After you get the gin pole up about 45 degrees it will reach its balance point.
Maintain control by holding the hoist cable. Go slow and play out the hoist cable
and bring the Tower Base Section toward the ground. When the Tower Base
Section is level, secure the hoist wire so the gin pole will be secure as the rest of
the tower is assembled.
Step 5 (Gin Pole Guy Wire Attachment)
Attach the gin pole guy wires to their anchors at the left and right side
foundations. Use 5/16” open thimbles and three 3/16” saddle clamps at each
location. Refer to the saddle clamp installation procedure in Figure 5. Use a
level to get the gin pole plumb with the tension adjusted so there is about 4
inches of sag in each wire.
Step 6 (Tower Assembly)
Lay Out-Lay out all of the remaining tower sections and tower couplers and guy
wires on the ground. The assembly consists of the Tower Base Section, as
many mid sections as required for your tower height, each connected by a tower
coupler, and finally a Tower Top Section. Set the tower up square to the line of
the side guys and level if possible. This will get you close to level on the first
raising. See drawings D1 and D6 for a general diagram of the assembled tower.
Assembly-Install the second tower section onto the first coupler. Install the
second coupler. Align the open hole in the coupler guy wire ring with the gin
pole. This is the location the hoist side guy wires will attach to in a later
procedure.

- 17 -
Install the next pipe section onto the coupler and repeat the procedure until the
tower is assembled on the ground. See drawings D1 and D6 for a representative
assembly. The tower sections may need to be supported off the ground in order
to facilitate assembly.
Guy Wire Attachment-Attach the guy wires that are attached to the lowest tower
coupler to the lowest free turnbuckles, at the Left and Right side foundations.
Use a 5/16” open thimble through the eye of the turnbuckle. After placing this
and all other thimbles, squeeze it closed before installing the wire and saddle
clamps. Pull the side guy wires tight and then slack off about 6 inches and
secure with three 3/16” saddle clamps. Refer to the saddle clamp installation
procedure in Figure 5. The guy wires will be readjusted later during the tuning
process, so do not over tighten the cable clamps and damage the wire.
Ensure that the tower sections remain square with the base plate so the tower
will be close to vertical when erected.
Next pull the down side guy wire to one of the side guy anchors and mark the
distance on the wire with tape. This will be the reference for attaching the guy
wire to the downside anchor. Please take care to not cross or tangle the guy
wires while you are measuring and marking. Crossed wires could result in
damage to the wires or prevent raising the tower.
Attach the down side guy wire in the same manner as the left and right sides
except use the tape mark and do not add 6 inches. The length of the guy wire
may need to be adjusted to account for a difference in elevation between the
down side guy anchor relative to the side guy anchors. If the down anchor is low
the guys will be short, you can adjust them after the tower is up. If the anchor is
high the guys will be long and you should make an adjustment in the length
before raising the tower. Secure the guy wire with saddle clamps.
Repeat the above procedure with each coupler working your way up the tower
and up the equalizer plates.
Step 7 (Top Guy Wire Attachment)
The top guy wires are attached 4 feet from the end of the top section with tangs.
Install the short leg of the tangs to the tower in 2 locations with 5/8” X 7” bolts.
Note: the bolts are a tight fit through the holes in the tower and tangs. (See
Figure 6) Tighten snug but do not over tighten and crush the pipe. Attach the
Left, Right and Down Side 5/16” guy wires with crimped eyes to the tangs using
1/2“ shackles. Attach the other end of the guy wires to the turnbuckles at the
Left, Right and Down Side foundations per the above procedure using three
5/16” saddle clamps and a 1/2" open thimble at each location.

- 18 -
Figure 6
Step 8 (Hoist Guy Wire Attachment)
With the first two tower sections level, attach the second 3/16” guy wire between
the gin pole end fitting and the open hole in the second coupler guy wire
attachment ring. Use a 5/16” thimble and three 3/16” saddle clamps. Pull the
guy wire tight. Don’t worry about the excess wire at this time; you can trim the
tails after the tower has been adjusted. Refer to the saddle clamp installation
procedure in Figure 5. It will be easier to tighten the saddle clamps if the guy
wire is led through the coupler from above and fed back on the side nearest the
tower base (see figure 7).
Repeat the above procedure for the remaining guy wires attached to the gin pole.
Use a 1/2" thimble, three 5/16” saddle clamps and a 1/2" shackle for the 5/16”
guy wire. Lift or block each section, so they are level, and then pull the guy wire
tight. This will allow the tower to lift evenly.
Tang
Shackle
and Guy
Wire Eye

- 19 -
Figure 7
Step 9 (First Tower Raising)
The tower should now have four guy wires at each coupler and four guy wires
attached to tangs on the tower top section. All the guy wires should be attached
to their foundations or the gin pole.
The purpose of this first lift is to get the rigging checked and adjusted before the
wind generator is attached. Do not install the wind generator at this time. The
hoist cable is used to raise the tower. It is commonly pulled with a vehicle.
There are winch options available—please consult ARE.
Check that all guy wires are securely attached and that they all lead clear with no
tangles or kinks.
Important safety requirements:
¾All people are to remain clear of the tower during hoisting. No one
should walk under the tower or rigging during hoisting.
¾It is critical to raise and lower the tower very slowly. This allows
careful monitoring of all equipment and personnel.
¾Side guy wire tension must be continuously monitored. The guy
wires should always have some visible sag or slack in them
throughout the entire raising. If there is no visible slack, there is no
way to tell if they are getting too tight. If a guy wire gets too tight it
can break and the tower can fall.
¾Gin pole guy tension should also be monitored, but the gin pole guys
should have increased sag as the tower is raised.
¾Remain in contact with members of the lifting team during the entire
process, so that any problems can be immediately responded to.
Everyone should be authorized to call a stop at any time.
Table of contents