ARH CAM S1 User manual

USER’S MANUAL
WWW.ARH.HU
ARH S1
PORTABLE SPEED ENFORCEMENT
AND TRAFFIC MONITORING SYSTEM

ARH S1 User’s manualPage 2/64
Page 2/64
Page 2/64
Page 2/64
Page 2/64
ARH CAM S1 User’s manual
ARH CAM S1
User’s manual
Document version: 2017.04.13.
Table of Contents
1.Turning on and off the ARH CAM S1 device, basics ................................................................................................... 3
1.1Turning on, turning off and usage of the ARH CAM S1 device ............................................................................. 3
1.1.1Capturing image with license plate ............................................................................................................... 5
1.1.2Login ............................................................................................................................................................. 6
1.2Log out, turning off the device ............................................................................................................................... 8
2.Setting the standard features, measurements, data collection .................................................................................... 9
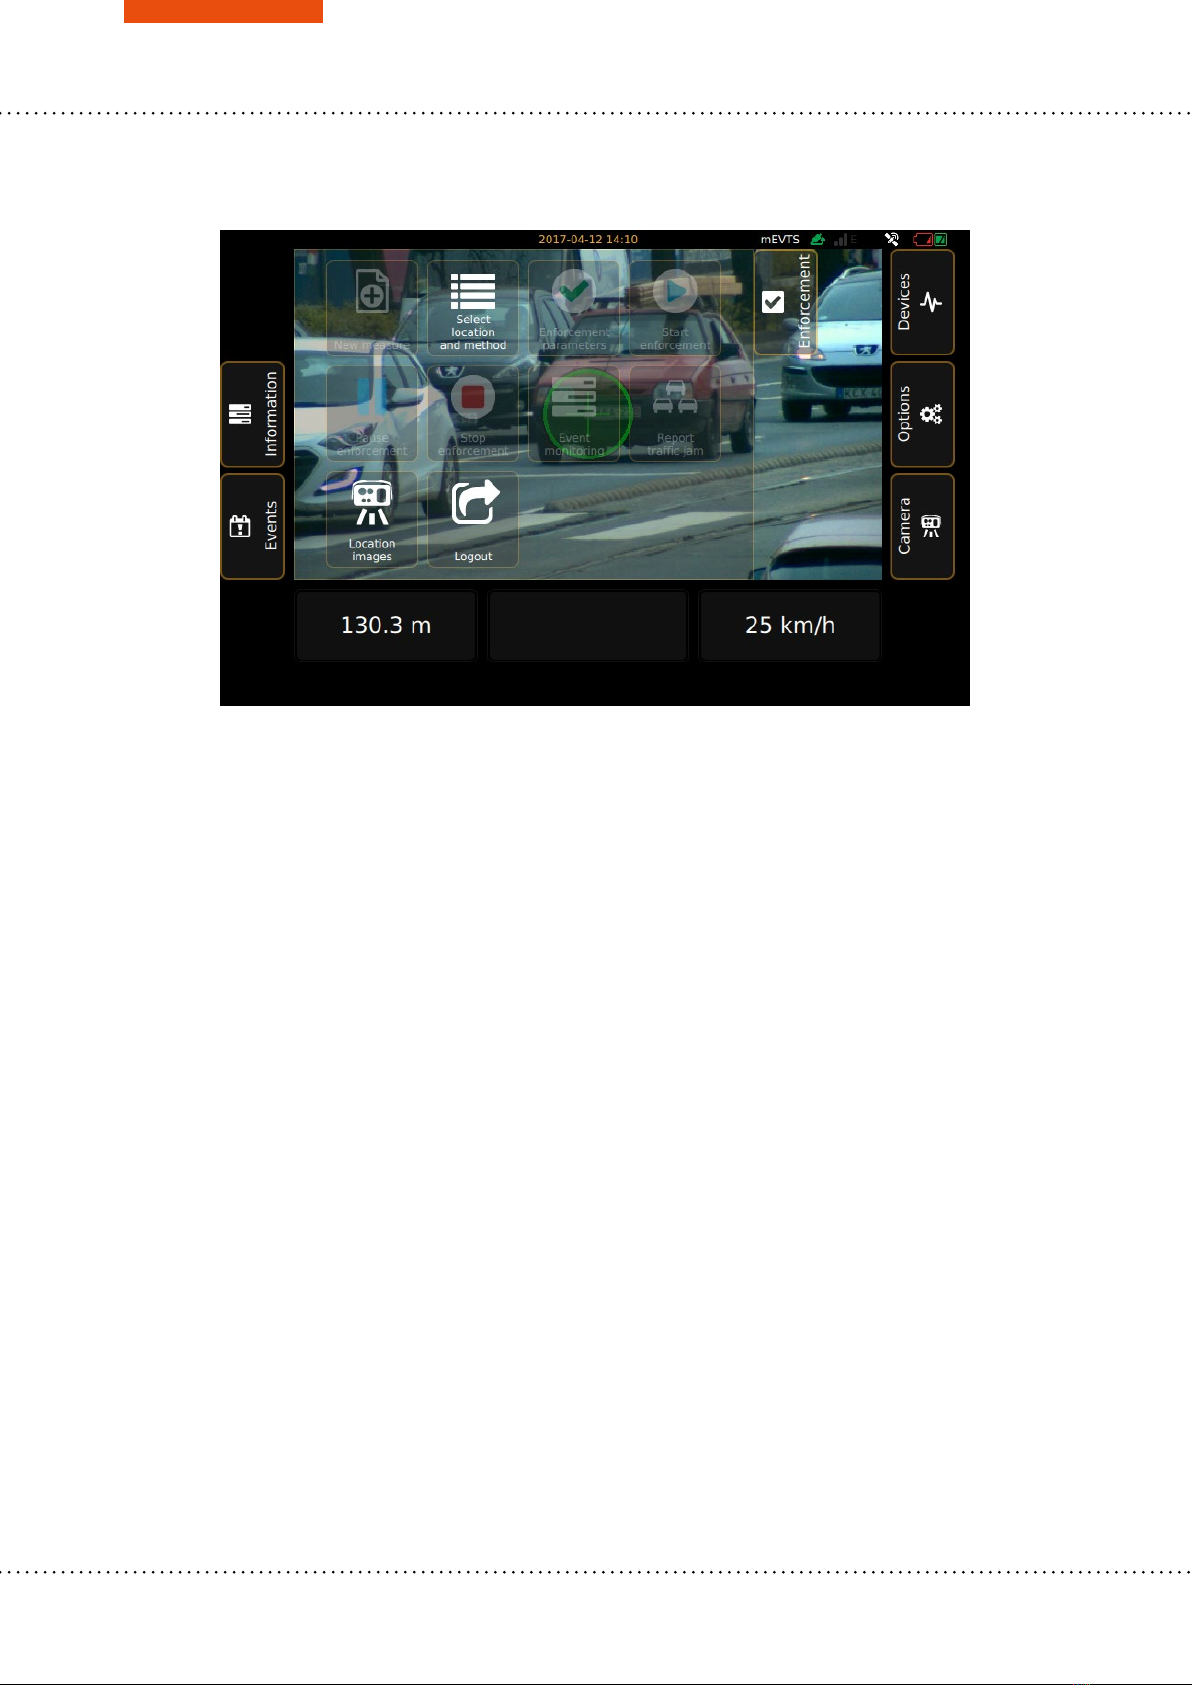
2.1Introduction to the Main screen ............................................................................................................................. 9
2.1.1Enforcement menu ..................................................................................................................................... 10
2.1.2Information menu item * ............................................................................................................................. 11
2.1.3Events menu item ....................................................................................................................................... 12
2.1.4Devices menu item ..................................................................................................................................... 17
2.1.5Options menu item ..................................................................................................................................... 19
2.1.6Camera menu item ..................................................................................................................................... 20
2.2Switching on and handling the control functions ................................................................................................. 22
2.3Detailed description of the speed measurement ................................................................................................. 30
2.3.1Setting and start of the automatic speed measurement ............................................................................. 32
2.3.2Setting and start the manual speed measurement ..................................................................................... 40
2.3.3Information appearing on the main screen during the verification .............................................................. 46
2.3.4Stopping the speed measurement function ................................................................................................ 48
2.4Recorded event data ........................................................................................................................................... 49
3.Setup guide ................................................................................................................................................................ 50
3.1General setup requirements and location features ............................................................................................. 50
3.2Usage in case of day light conditions .................................................................................................................. 52
3.3Usage in case of rainy or cloudy light conditions ................................................................................................ 53
3.4Night light conditions ........................................................................................................................................... 55
3.5Introduction to the Admin screen ........................................................................................................................ 56
Contact Information .............................................................................................................................................................. 64

ARH S1 User’s manual Page 3/64
Page 3/64
Page 3/64
Page 3/64
Page 3/64
ARH CAM S1 User’s manual
1. Turning on and off the ARH CAM S1 device, basics
1.1 Turning on, turning off and usage of the ARH CAM S1 device
Connect the external battery to the ARH CAM S1 device, and then turn on the power by the output switch
of the external battery. After that turn on the device by pressing and holding (approx. 3 seconds) the power
switch of the device, located left to the display. If the power switch is on, the green LED on the button
indicates it. After turning the device on, it starts the installed software. During the startup procedure the
Starting screen will appears with a progress bar, indicating the start.
After the startup process the Login screen will appear:
Figure 1. – Login screen
Upper information bar:
The date and the current time can be seen on the upper edge of the screen:
* The software version, containing the test and educational profiles, are developed in case of occasional usage!

ARH S1 User’s manualPage 4/64
Page 4/64
Page 4/64
Page 4/64
Page 4/64
ARH CAM S1 User’s manual
Signal strength of the data connection (signal strength): weak, good, excellent
Speed of the data connection: EDGE, 3G, HSDPA, 4G
Display example: good signal strength, 4G data connection.
Satellite GPS connection indicator: if there is a connection it is white, if there is not, it is gray
Battery status (external, internal)*
* The battery status indicator on the screen is only indicative. The actual battery level of the external battery
has to be checked on the indicator on the battery!
Display examples:
External power supply / battery is disconnected, internal battery is discharged
External power supply / battery is disconnected, internal battery is good
External power supply / battery is connected, but it is discharged, internal battery is good
External power supply / battery is connected and it is good, internal battery is good

ARH S1 User’s manual Page 5/64
Page 5/64
Page 5/64
Page 5/64
Page 5/64
ARH CAM S1 User’s manual
1.1.1 Capturing image with license plate
Selecting the “Traffic sign images” icon that is the first one from left on the lower third part of the screen,
images with license plates can be made.
Time and GPS coordinates has to be attached to the images with plates, so images can be captured only in
case of active GPS connection!
Images with license plates can be made before and after login as well:
Tap the “+” icon at the top left corner:
Figure 2. – Interface of the Traffic sign images

ARH S1 User’s manualPage 6/64
Page 6/64
Page 6/64
Page 6/64
Page 6/64
ARH CAM S1 User’s manual
Enter the Camera menu with the “Camera” icon (see section 10.2.6.).
The “live image” can be seen on the screen. The pause function freezes the planned image with the plate.
Figure 3. – Icons of the image with table
If the paused image is not suitable, because another car covers it, with the “Live image” icon the live image
can be displayed again. If the paused image is proper, the image with plate can be saved by tapping the
“Record” icon. Any number of images with plate can be captured.
1.1.2 Login
User (operator) login for measurement:
After selecting the “Data Center” icon login by entering the username and password:
Figure 4. – User login 1

ARH S1 User’s manual Page 7/64
Page 6/64
Page 6/64
Page 6/64
Page 6/64
ARH CAM S1 User’s manual
Enter the Camera menu with the “Camera” icon (see section 10.2.6.).
The “live image” can be seen on the screen. The pause function freezes the planned image with the plate.
Figure 3. – Icons of the image with table
If the paused image is not suitable, because another car covers it, with the “Live image” icon the live image
can be displayed again. If the paused image is proper, the image with plate can be saved by tapping the
“Record” icon. Any number of images with plate can be captured.
1.1.2 Login
User (operator) login for measurement:
After selecting the “Data Center” icon login by entering the username and password:
Figure 4. – User login 1
Page 7/64
Page 7/64
Page 7/64
Page 7/64
ARH CAM S1 User’s manual
After tapping the entry field the touch-screen keyboard will appear, where the necessary data can be
entered:
Figure 5. – User login 2 – Virtual keyboard
The available special characters: ( ) / ; ? _ - + ” = and numbers can be entered after tapping the
button.
The button in the upper right corner represents the following: “Back” to the previous state, position.
The entered characters can be deleted with the button in the upper left corner. The cursor can be
moved to any position in the entry field with the buttons on either sides of the entry field.

ARH S1 User’s manualPage 8/64
Page 8/64
Page 8/64
Page 8/64
Page 8/64
ARH CAM S1 User’s manual
The uppercase characters can be displayed by the help of the button. After entering the necessary
characters in the fields, tap the “Next” button.
If all the entry requirements have been met, the Main screen will be displayed:
Figure 6. – Main screen after login
Without online connectivity (3G) with the center and GPS signal measurements cannot be made.
1.2 Log out, turning off the device
After the measurement, when the monitoring process is stopped you have to log out from the system. It can
be done at the “Control” menu item by tapping the “Log out” then the “Turn off” icon. Note: The ARH CAM
S1 device can be turned off only with the “Turn off” icon. The “Turn off” icon appears at the Login screen
and the Error message display as well.
After that turn off the battery and disconnect the power cord from the cigarette lighter socket. After these
steps dismantle the device.

ARH S1 User’s manual Page 9/64
Page 8/64
Page 8/64
Page 8/64
Page 8/64
ARH CAM S1 User’s manual
The uppercase characters can be displayed by the help of the button. After entering the necessary
characters in the fields, tap the “Next” button.
If all the entry requirements have been met, the Main screen will be displayed:
Figure 6. – Main screen after login
Without online connectivity (3G) with the center and GPS signal measurements cannot be made.
1.2 Log out, turning off the device
After the measurement, when the monitoring process is stopped you have to log out from the system. It can
be done at the “Control” menu item by tapping the “Log out” then the “Turn off” icon. Note: The ARH CAM
S1 device can be turned off only with the “Turn off” icon. The “Turn off” icon appears at the Login screen
and the Error message display as well.
After that turn off the battery and disconnect the power cord from the cigarette lighter socket. After these
steps dismantle the device.
Page 9/64
Page 9/64
Page 9/64
Page 9/64
ARH CAM S1 User’s manual
2. Setting the standard features, measurements, data collection
2.1 Introduction to the Main screen
After the login the Main screen will appear. The live view is situated in the center with the information bar.
The functions and settings of the device can be accessed through the floating menus by clicking the icons
on both sides of the screen.
Exit from the displayed floating menu: tap again the icon of the menu or the icon of another menu.
Figure 7. – Elements of the Main screen
The diameter of the circle that indicates the laser beam on the screen is proportional to the extent of the
beam spreading on the distance of the target object:
red ─ no reflected signal
white ─ there is a reflected signal, but no speed value
green ─ there is a reflected signal and a speed value as well

ARH S1 User’s manualPage 10/64
Page 10/64
Page 10/64
Page 10/64
Page 10/64
ARH CAM S1 User’s manual
2.1.1 Enforcement menu
Figure 8. – Enforcement menu
The Enforcement menu contains the following options:
- Selecting a location and method (selecting a location, adding new location, edit location
data, adding measurements limits)
- Enforcement parameters (selecting enforcement functions, adding speed limits, selecting
Traffic sign images)
- Start enforcement
- Pause enforcement
- Stop enforcement
- Event monitoring
- Sending congestion report
- Capturing images with plate
- Logout

ARH S1 User’s manual Page 11/64
Page 11/64
Page 11/64
Page 11/64
Page 11/64
ARH CAM S1 User’s manual
2.1.2 Information menu item *
Parameters and settings of the relevant control (monitoring) can be seen at the information menu item.
- Beginning and the end of the measurement,
- GPS coordinates,
- Distance and speed data
- Status information
Figure 9. – Information menu

ARH S1 User’s manualPage 12/64
Page 12/64
Page 12/64
Page 12/64
Page 12/64
ARH CAM S1 User’s manual
2.1.3 Events menu item
The event data that is saved in the memory of the ARH CAM S1 device can be seen in this menu item:
- the saved event data are listed
- the saved event images (can be enlarged) are listed and assigned to data
Figure 10. – Events menu
Entering into the Events menu, you can choose between displaying the data of the current and previous
measurements.
Events of the current measurement (Enforcement events list)
Figure 11. – Control events

ARH S1 User’s manual Page 13/64
Page 13/64
Page 13/64
Page 13/64
Page 13/64
ARH CAM S1 User’s manual
The event to be displayed can be selected by scrolling, or filtering criteria can be added, or by the
searching icon on the upper left corner:
Figure 12. – Narrowing, searching for events
The narrowed list can be displayed after providing the searching criteria and tapping the “Next” button.
Events can be selected in the Control events list by the help of the “Up” and “Down” buttons or you can
scroll in the list by touching the screen. The slider at the left side of the screen provides information about
the position in the list.
By tapping the image, belonging to the list elements, the stored digital image or images and the stored data
can be displayed full screen:

ARH S1 User’s manualPage 14/64
Page 14/64
Page 14/64
Page 14/64
Page 14/64
ARH CAM S1 User’s manual
Figure 13. – Review of an event
The markers at the midpoints of the image sides show that the laser beam measured the speed of the
passing vehicle designated by the intersection of these markers at the moment of the image capturing. By
tapping the displayed image, you can return to the list.
In case of not tapping the image, but opening the selected event by tapping the „Next” button, the event
with the corresponding data will be displayed according to the following:
Figure 14. – Selecting the event – with the Next button
In the followings, the data content of the captured images will be described.

ARH S1 User’s manual Page 15/64
Page 15/64
Page 15/64
Page 15/64
Page 15/64
ARH CAM S1 User’s manual
Figure 15. - Traffic sign images
Earlier reports (Reports list)
Reports to be displayed can be selected by the “Up” and “Down” arrows in the Reports list or the list can be
scrolled by tapping the touch screen. The slider on the left side of the screen provides information on the
position in the list.
The “Next” button can open the events list that is stored in the selected protocol. In the „Verification events”
list stored data about the events, can be displayed according to the above.

ARH S1 User’s manualPage 16/64
Page 16/64
Page 16/64
Page 16/64
Page 16/64
ARH CAM S1 User’s manual
Figure 16 - Reports
You can go back to the menu login screen by tapping the red arrow button (its meaning=” Back”) what can
be found in the menu in the top right corner.

ARH S1 User’s manual Page 17/64
Page 17/64
Page 17/64
Page 17/64
Page 17/64
ARH CAM S1 User’s manual
2.1.4 Devices menu item
By tapping the ARH CAM S1 icon in the devices menu:…
Figure 17 – Equipments menu
…the ARH CAM S1 data can be displayed:
Figure 18 – appearing of the ARH CAM S1 data

ARH S1 User’s manualPage 18/64
Page 18/64
Page 18/64
Page 18/64
Page 18/64
ARH CAM S1 User’s manual
Figure 19 – appearing of the ARH CAM S1 data
You can go back to the menu login screen by tapping the red arrow button (its meaning=” Back”) what can
be found in the menu in the top right corner.

ARH S1 User’s manual Page 19/64
Page 19/64
Page 19/64
Page 19/64
Page 19/64
ARH CAM S1 User’s manual
2.1.5 Options menu item
In this menu, the image on the screen can be adjusted according to the environment light conditions (so
this setting does not affect the features of the images which are recorded by the camera).
Figure 20 – Settings menu
The settings menu can be displayed during the control (measurement) and the screen’s brightness can be
modified.
Exit the Settings menu: tap the menu icon.

ARH S1 User’s manualPage 20/64
Page 20/64
Page 20/64
Page 20/64
Page 20/64
ARH CAM S1 User’s manual
2.1.6 Camera menu item
In the camera menu, you can set the camera of taking the pictures serving for documentation of the
measurements, and controls:
- Settings for the optics (zoom, focus, etc.)
- Settings for the sensor (Day/night, light, infra)
Figure 21 – Camera menu
In this menu, you can choose the highlighted icon functions. For example: the camera is in night mode, and
(the image on the screen is not colorful) the „Day” mode can be chosen, and its icon is bright. The „Night”
mode cannot be chosen because it is already active.
Note: in the „Night” mode the intensity of the infra units are regulable in 0-1-2-3 levels with the icon below
the „Infra” subtitle.
The Zoom out and Zoom in icons serve for cropping setting of the image.
With the darken and the brighten icons the taken image’s brightness can be set.
The focus setting „Zoom in” and „Zoom out” icons are bright until we reach the extreme value, from that the
focus can be set in reverse direction.
The „Auto focus” value sets the value, which is deemed optional by the equipment.
The optional solution for the focus setting in order to increase the effectiveness of the license plate reading
is the manual setting, which can be displayed by tapping the „Setting” button.
There are two options for the focus fine-tuning:
- Set on the livestream (with „Livestream” icon)
- Set on the event image (with „Trigger sign” icon)
Other manuals for CAM S1
1
Table of contents