Vitalograph 6000 User manual

ALPHA Touch
Instructions for Use
MODEL 6000
© Copyright Vitalograph 2019 Current Edition (Issue 1, 26-Nov-2019) Cat. No. 09100

2Page of 2
ENG
DT_0006 Issue 15
A Global Leader in Respiratory Solutions
Vitalograph Ltd, UK
Maids Moreton, Buckingham
MK18 1SW
England
Tel: 01280 827110
Fax: 01280 823302
E-mail: [email protected]
www.vitalograph.co.uk
Technical Support
Tel: 01280 827177
Email: [email protected]
Vitalograph Ltd, International
Maids Moreton, Buckingham
MK18 1SW
England
Tel: +44 1280 827120
Fax: +44 1280 823302
E-mail: [email protected]
www.vitalograph.eu
Technical Support
Tel: +353 65 6864111
Email: [email protected]
Vitalograph GmbH
Rellinger Straße 64a
D-20257 Hamburg
Germany
Tel: +49 40 547391-40
Fax: +49 40 547391-40
www.vitalograph.de
Technical Support
Telefon: +49 40 547391-14
E-mail: [email protected]
Vitalograph Inc.
13310 West 99th Street
Lenexa, Kansas, 66215
USA
Toll Free: 800 255 6626
Tel: (913) 730 3200
Fax: (913) 730 3232
E-mail: [email protected]
www.vitalograph.com
Technical Support
Tel: (913) 730-3205
Email: [email protected]
Vitalograph (Ireland) Ltd
Gort Road Business Park
Ennis, Co Clare, V95 HFT4
Ireland
Tel: +353 65 6864100
Fax: +353 65 6829289
E-mail: [email protected]
www.vitalograph.ie
Technical Support
Tel: +353 65 6864111
Email: [email protected]
Vitalograph Ltd, Hong Kong/China
P.O. Box 812
Shatin Central Post Oce
Hong Kong
E-mail: [email protected]
www.vitalograph.cn
Technical Support
Tel: +353 65 6864111
Email: [email protected]
© Copyright Vitalograph 2019
Current Edition (Issue 1, 26-Nov-2019)
Cat. No. 09100
Vitalograph is a registered trademark.
Vitalograph Branch Addresses

09100 Issue 1
3Page of 36
ENG
ALPHA Touch - Instructions for Use
Contents
1. Main Components of the Vitalograph ALPHA Touch ......................4
1.1. Features of the Vitalograph ALPHA Touch ..............................5
2. Setting Up the Vitalograph ALPHA Touch .......................................5
2.1. Fitting a New Paper Roll............................................................6
3. Operating Instructions .......................................................................7
3.1. Entering Subject Data................................................................7
3.2. Conducting a Test......................................................................7
3.3. Reporting..................................................................................11
3.4. Deleting Stored Subjects/Test Results ..................................11
3.5. Calibration Verication............................................................12
3.6. Conguration Options .............................................................12
4. Power Management.........................................................................19
4.1. Battery Pack.............................................................................20
4.2. Battery Low Detect ..................................................................20
5. Cleaning & Hygiene ..........................................................................20
5.1. Preventing Cross-Contamination of Subjects........................20
5.2. Inspection of the Vitalograph ALPHA Touch .........................21
6. Fault Finding Guide ..........................................................................22
6.1. Software Check........................................................................23
7. Customer Service.............................................................................24
8. Consumables and Accessories.......................................................24
9. Disposal ............................................................................................25
10. Explanation of Symbols ...................................................................25
11. Description of the ALPHA Touch ....................................................26
11.1.Indications for Use ..................................................................26
12. Technical Specication....................................................................26
13. Contraindications, Warnings, Precautions
and Adverse Reactions ....................................................................28
14. CE Notice ..........................................................................................30
15. FDA Notice........................................................................................32
16. EU Declaration of Conformity..........................................................33
17. Guarantee .........................................................................................34
4Page of 36
ENG
DT_0006 Issue 15
A Global Leader in Respiratory Solutions
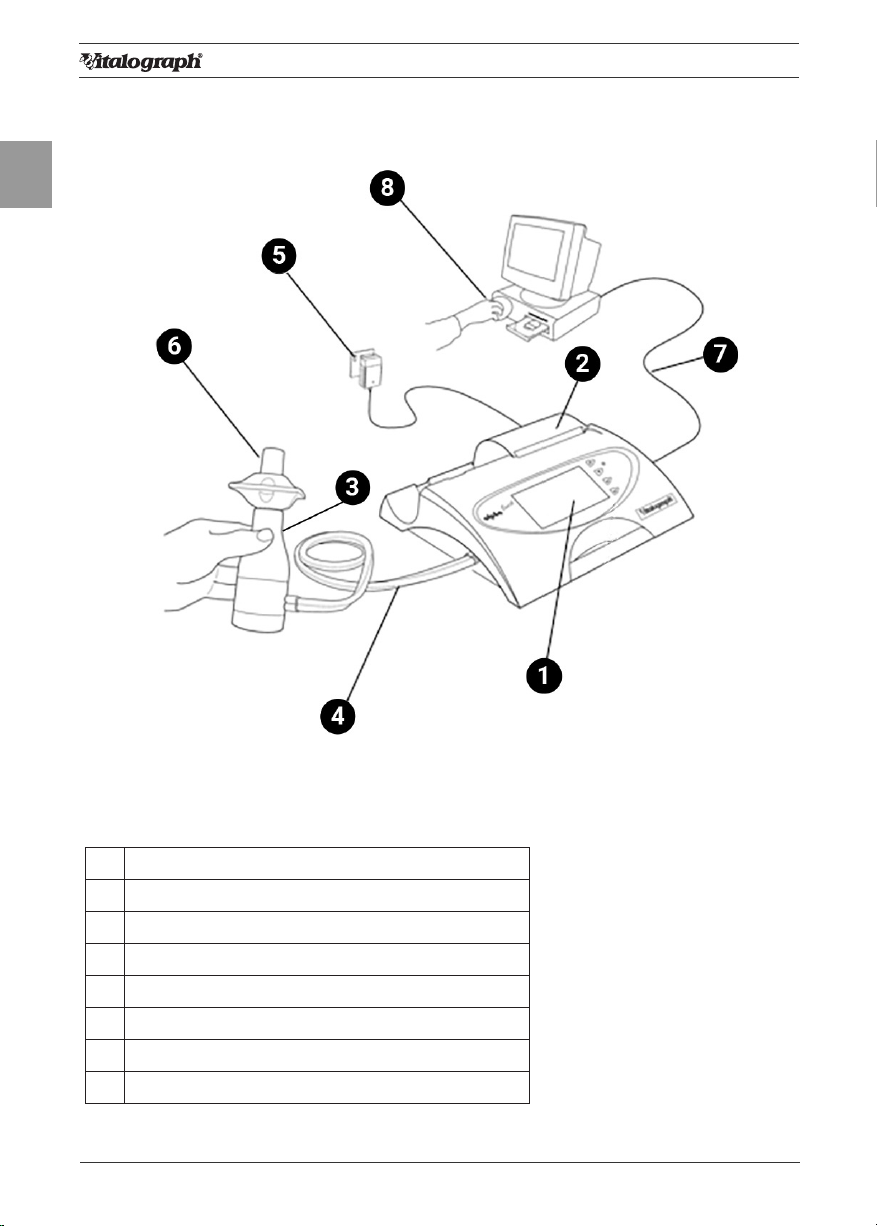
1. Main Components of the Vitalograph ALPHA Touch
Figure 1 Main components of ALPHA Touch
Note: Computer not supplied
1 Display
2Internal Thermal Printer
3 Flowhead
4Flowhead Connection Tubing
5 Medically Approved Power Supply
6 BVF™
7 USB Cable
8 Vitalograph Reports Software (Optional)
09100 Issue 1
5Page of 36
ENG
ALPHA Touch - Instructions for Use
1.1. Features of the Vitalograph ALPHA Touch
• Fleisch type pneumotachograph to measure ow
• Ambient temperature sensor
• Touch screen colour display
• Choice of child incentive displays
• Customisable report format
• 10,000 subject test memory
• Diagnostic interpretation options
• Integral printer
• Vitalograph® Reports PC software (included)
• Compatible with Spirotrac software (purchased separately)
2. Setting Up the Vitalograph ALPHA Touch
1. Connect one end of the owhead connection tubing to the Vitalograph
ALPHA™ Touch base. Ensure that the coloured/ribbed tapping on the
owhead is connected to the ribbed side of the tubing in the connector
housing.
2. Connect other end of owhead tubing to the owhead.
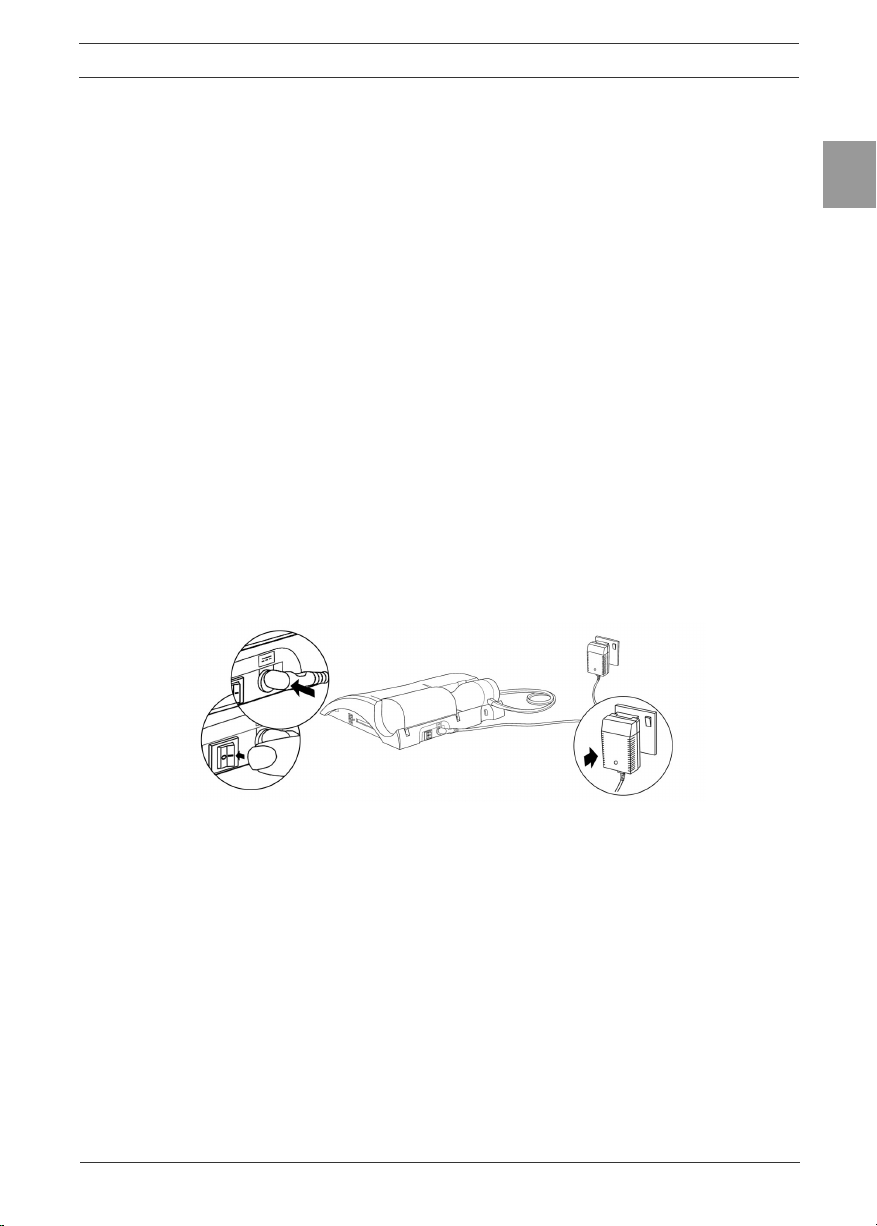
3. Connect the power supply into the rear of the ALPHA Touch. Plug the mains
plug into a suitable socket. Switch the ALPHA Touch on (switch at rear) and
it is ready for use.
Figure 2: Connecting the power supply and switching on the ALPHA Touch
4. The ALPHA Touch comes tted with a rechargeable battery pack, which
allows the device to be used as a portable device without the mains
connected.
5. The ALPHA Touch can print reports directly to its integral printer or
send data to a computer for reporting via Vitalograph Reports software
(supplied). See section 3.6. Conguration Options for instruction on setting
print options.
Note: Only use the ALPHA with the purpose-built low voltage power supply unit
with which it is supplied. Attempted use with other power sources may cause
irreparable damage and invalidate the warranty.
6. If required, install the Vitalograph Reports software provided with the
ALPHA Touch to the computer following the instructions supplied with the

6Page of 36
ENG
DT_0006 Issue 15
A Global Leader in Respiratory Solutions
software and connect the ALPHA Touch to the computer using the USB
cable (via ports marked with the symbol).
7. It is also possible to use the Vitalograph ALPHA Touch in conjunction
with Spirotrac software (purchased separately). Instructions for using
the Vitalograph ALPHA Touch in this way are included in the Spirotrac
Instructions for Use.
If the device has just been unpacked or transported, ensure that it is left sitting,
fully powered so that it is at room temperature prior to testing.
2.1. Fitting a New Paper Roll
The ALPHA Touch is supplied with a roll of paper tted into the printer.
Note: Paper is light sensitive so the outside of the roll of paper will not give a
strong print impression.
To replace the paper (see Figure 3):
1. Open printer door to expose the head of the printer and the paper
cartridge.
2. Take out the cartridge that holds the empty paper roll and remove the
empty roll.
3. Put new roll of paper into the paper cartridge and unroll about 12cm (6
inches) of paper.
Note: To make tting easier, create a point in the middle of the paper by tearing
or cutting the two corners of the leading edge of the paper.
Note:The Vitalograph logo should be facing you on the right edge of the paper.
4. Clip the paper cartridge back into place between the back of the
ALPHA and the inside of the open door. The paper should come out
from the bottom of the roll and point towards the printer. This allows
more access to the printer feed mechanism.
5. In the home screen, lift the green lever on the printer.
6. Feed the leading edge of the paper into the bottom slot of the printer
until the paper appears through the top of the printer. The paper can
now be pulled through. To feed the paper through the printer, press the
Enter key on the keypad. This will feed a short length of paper through
the printer.
7. Close the green lever.
8. Hold the paper over the paper tear bar and close the door.

09100 Issue 1
7Page of 36
ENG
ALPHA Touch - Instructions for Use
Figure 3 – Fitting a new paper roll.
Warning: The paper tear bar has sharp edges. Take care not to cut ngers.
3. Operating Instructions
Turn on the ALPHA Touch (The On/Off switch is at the back of the device).
3.1. Entering Subject Data
When the device is turned on, the Main Menu screen is displayed.
1. Select a subject by tapping the ‘Subject’ button onscreen.
2. List the subjects saved on the device by selecting either the Name or ID
tab.
3. View the subject details by tapping the subject onscreen. This will
select the subject from the database. Select Enter to make this the
current subject.
4. To create a new subject, select the New tab. Touch the required eld
onscreen to highlight, then enter the subject details using the touch
panel keypad. Press the ‘Enter’ button to save the subject to the
database and return to the Home Menu.
Note: The current subject surname and forename will be displayed on
the bottom left hand corner of the screen.
• If the subject name is not entered then the subject ID will be displayed.
• If the subject has test session results associated with it then the
subject name and ID will appear in black.
• If there are no test session results then the subject name and ID will
appear in grey.
3.2. Conducting a Test
Before starting a test session:
1. Ensure that the accuracy of the device was checked recently. (Refer to
section on Checking Accuracy).

8Page of 36
ENG
DT_0006 Issue 15
A Global Leader in Respiratory Solutions
2. Select a subject and ensure the required demographic information is
entered.
3. Wash hands (operator and subject).
4. Fit a new Bacterial Viral Filter (BVF) to the owhead for each test
subject. The use of a disposable noseclip is recommended.
5. Instruct and demonstrate the test.
3.2.1. Testing1
1. Select either ‘VC Test’ or ‘FVC Test’ option from the Main Menu.
2. Select how the results should be presented:
• VC Test – Select from Volume/Time (V/T) graph and Volume
(Bar Chart).
• FVC Test – Select from Volume/Time (V/T) graph and Flow/
Volume (F/V) graph.
3. Wait for the ‘Exhale to Begin’ icon to appear. The device is now
ready to accept a blow.
Example script:
• Sit upright, t the nose clip and relax.
• Place BVF in mouth and close lips around the mouthpiece.
• Seal your lips around the mouthpiece and keep your tongue down.
• Breathe normally.
VC test session
a. Inhale completely with a brief pause when your lungs are completely
full (≤ 2 secs).
b. Exhale with no hesitation until no more air can be expelled while
maintaining an upright posture. It is vital that the operator
encourages the subject to keep exhaling to ensure all air
is expelled (when a plateau has been reached or forced
expiratory time (FET) reaches 15 seconds).The operator
should repeat instructions as necessary, coaching
vigorously.
c. Breathe in with maximal effort until completely full. The manoeuvre is now
complete and the BVF is removed from the mouth.
d. Listen for two beeps. The device is now ready for the next blow.
e. Repeat for a minimum of three manoeuvres, usually no more than eight
for adults.
f. Check VC repeatability and perform more manoeuvres as necessary.
Note: A single-breath VC technique may also be performed on the device.
1 Derived from terminology and guidance taken from ATS/ERS Standardisation of Spirometry 2019 Update Am J Respir Crit
Care Med 2019 Vol 200, Iss 8 pp e70-e88

09100 Issue 1
9Page of 36
ENG
ALPHA Touch - Instructions for Use
FVC test session:
a. Inhale completely and rapidly with a brief pause when your lungs are
completely full (≤ 2 secs).
b. Exhale with maximal effort until no more air can be expelled while
maintaining an upright posture. It is vital that the operator encourages the
subject to keep exhaling to ensure all air is expelled (when a plateau has
been reached or forced expiratory time (FET) reaches 15 seconds). The
operator should repeat instructions as necessary, coaching vigorously.
c. Breathe in with maximal effort until completely full. The manoeuvre is now
complete and the BVF is removed from the mouth.
d. Listen for two beeps. The device is now ready for the next blow.
e. Repeat for a minimum of three manoeuvres, usually no more than eight for
adults.
f. Check FEV1 and FVC repeatability and perform more manoeuvres as
necessary.
Note: A single-breath FVC technique may also be performed on the device.
3.2.2. Saving the Test Session
The test session is saved to the database by default, by following the on-screen
messages.
Note: If a compact ash card is inserted into the compact ash card connector
at the right side of the device, then all test blows and not just the best three will
be saved to the compact ash card. Results are saved as per the format outlined
in the European Respiratory Journal, 2005; 26: Pages 319-338: ATS/ERS Task
Force: Standardisation of Lung Function Testing.
The Post Mode screen also offers the option to save and recall test sessions to
and from a permanent storage location on the device. This permanent storage
does not get deleted when test sessions are sent to Vitalograph Reports or
Spirotrac. To access this option select ‘Permanent Storage’.
The Permanent Storage screen gives you four options:
• Save Test to Permanent Storage: An information message will state
the memory location where the test session will be saved. There are
nine permanent memory locations on the Vitalograph ALPHA Touch.
• Load Test from Permanent Storage: The list of permanent pre-test
sessions will appear. Select the required pre-test session from the list
and select enter to bring you into the Post Mode screen.
• Delete Test from Permanent Storage: A list of stored pre-test
sessions will appear. Select the Test session to delete and press
enter. This location will then be marked as ‘Empty’.
• Delete all Tests from Permanent Storage: A warning message
will appear:- ‘Do you want to delete all tests stored in permanent
storage?’. Select enter to delete all tests.

10Page of 36
ENG
DT_0006 Issue 15
A Global Leader in Respiratory Solutions
3.2.3. Bronchodilator Responsiveness Testing
A Bronchodilator Responsiveness Test session can be performed on an
FVC test session following the administration of drugs. Post drug delivery
performance is measured versus pre delivery.
• To start bronchodilator responsiveness testing select ‘Post Mode’
from the Main Menu.
• To perform a bronchodilator responsiveness test on the Pre-test
Session just performed, select ‘Perform Post test on Current Subject’.
This will bring up the test screen. The text ‘Post Mode’ will appear on
the graph.
• To perform a bronchodilator responsiveness test on a different
subject or Pre-test:
1. Select ‘Select Subject from List’.
2. A message ‘Warning! Current test session will end. Do you want
to save the test session?’ will appear. Select Yes and the Select
Subject screen will appear.
3. Select the subject for bronchodilator responsiveness testing.
4. Select the test session from the Select Test Session screen.
Note: The words Pre, VC or FVC or a combination of these will appear after the
session ID.
• If the word Pre appears then a bronchodilator responsiveness
test session has already been performed on this pre session.
• If the word VC appears then a VC test has been done as part of
the pre-session.
• If the word FVC appears then an FVC test has been performed
as part of the pre-session.
5. Press ‘Enter’ to open the test screen. The text Post Mode will
appear on the graph.
6. Perform an FVC test post drug delivery as outlined in section 3.2.1.
Testing, to assess bronchodilator responsiveness.
3.2.4. Deleting a Test Session
To delete the current session:
1. Select the ‘Clear’ option from the Main Menu.
2. A message will appear ‘Warning! Current Test Session Will End. Do
you want to save the test session?’
• Select ‘Yes’ to save the current test session and return to the
Main Menu.
• Select ‘No’ to clear the current test session and return to the
Main Menu.
• Select ‘C’ to cancel the operation and continue with the current
test session.

09100 Issue 1
11Page of 36
ENG
ALPHA Touch - Instructions for Use
3.3. Reporting
Select ‘Print’ from the FVC Test screen to print the current test session.
Refer to section titled ‘Report Options’ to congure reports.
To produce a report for the Current Subject via the Report option in the ALPHA
Touch Main Menu, the following options are available:
• Current Session: Select the print icon at the top of the session results
screen.
• Saved Test Session for Current Subject: Select the required session
then the print icon at the top of the session results screen.
• All Test Sessions: It is possible to select to print all test sessions for
the current subject via a PC using Vitalograph Reports software. It is
not possible to automatically print all test sessions for a subject from
the internal printer.
To print Test Session(s) from a different subject in the database. Click the
‘Select’ tab in the View and Report screen. The following options are available:
• Select Test Session: Select a subject from the database, and then
select a test session for that subject. To print the selected session,
select the print icon at the top of the session results screen.
• All Test Sessions: It is possible to select to print all test sessions for
a selected subject via a PC using Vitalograph Reports software. It is
not possible to automatically print all test sessions from the internal
printer. Select a subject from the database to use this option.
• All Test Sessions Between…: This will print all sessions stored on the
device between specied dates via a PC using Vitalograph Reports
software. It is not possible to automatically print all test sessions from
the internal printer. Select the required date range to use this option.
The default test parameters on the report will vary according to regional
requirements. Test parameters can be congured to suit individual
requirements. Refer to section on Parameters.
Note: The internal (thermal) printout will fade over time when exposed to light or
heat. If a permanent record is required, photocopy the thermal printout or send
the report to the Vitalograph Reports Utility. Refer to section 3.6. Conguration
Options for information on selecting the internal or Vitalograph Reports Option.
3.4. Deleting Stored Subjects/Test Results
Instructions on deleting subjects/test results that have been stored
permanently on the device may be found in section 3.2.2. Saving the Test
Session.
Instructions on deleting sessions from the device database may be found in
section 3.6.2. Database

12Page of 36
ENG
DT_0006 Issue 15
A Global Leader in Respiratory Solutions
3.5. Calibration Verication
• Attach owhead to the syringe with a BVF tted as per gure 4.
Figure 4: Verifying Calibration
• Select ‘Accuracy Check’ from the Main Menu using the keypad.
• Enter the Syringe volume and reference using the touch panel keypad.
• Depending on how the device is congured, follow prompts to enter the
ambient temperature, humidity (0-99%), pressure (25-31 inHg or 850-
1060 hPa-mbar) and altitude (1-8500m). Enter these values using the
touch panel or keypad.
• Pump air through the owhead to bring it to ambient temperature.
• If the owhead has very recently been used for testing or has come
from a cold environment, its temperature should be equilibrated with
ambient by pumping air through it from the syringe several times.
• Press the ‘Enter’ key to open the Accuracy Check screen and follow the
on-screen instructions.
• If an Accuracy Check report is required, select the Report option.
• Press the ‘C’ key to exit the Accuracy Check screen and return to the
Main Menu. The accuracy check will not be logged to the Vitalograph
ALPHA Touch memory in this case.
Note: If the device is outside calibration, the user is offered the option to update
calibration. Selecting to update calibration repeats the accuracy check routine on
the device.
3.6. Conguration Options
There are a number of Conguration options available on the Vitalograph
ALPHA Touch device. To access these, select the ‘Conguration’ option on the
Main Menu. The options available are:
3.6.1. Test Preferences
The following options are available to congure the test screen to your
requirements:
• FVC Display: Select to show F/V (Flow-Volume) or V/T (Volume-
Time) Graph by default in the FVC test screen. Select the required
option from the drop down menu.
• VC Display: Select to show the Bar Graph or V/T (Volume-Time)
Graph by default in the VC test screen.

09100 Issue 1
13Page of 36
ENG
ALPHA Touch - Instructions for Use
• Test Acceptance: Select whether to manually accept the tests
performed, or allow the device to determine test acceptability
(automatic).
• Graph Scale: Select the default graph scale.
• Posture: Select from ‘no posture selected’, ‘standing’ or ‘sitting’.
• Post VC Test: Selecting ‘off’ here means that selecting Post testing
brings the user directly to the FVC test screen. Post VC testing is ‘on’
by default where VC testing has been done in a pre-test session.
• Temperature: By selecting ‘on’ in the drop down list, the user is
offered the option to manually enter the ambient temperature as they
go into the VC or FVC test screens.
3.6.2. Database
To manage the available memory on the device, the Management tab tells you
how much subject and test session memory has been used up.
• Defragment: Device memory may become fragmented through long
use. To maximise available memory, select the defragment option.
Defragmentation may take several minutes to complete.
• Deletion: To delete a session, select the relevant box. The session
will be deleted from the device after being printed. (Either print to an
internal printer or sent to Vitalograph Reports). It is also possible to
‘Select Test Session(s)’ for deletion, or ‘Delete Subject(s)’ from the
device by pressing the relevant button using the touch panel LCD.
3.6.3. Calibration
The Vitalograph ALPHA Touch should never be outside accuracy limits unless
damaged or in a fault condition. In this event, see the fault-nding guide. In
normal use, calibration traceability certication is recommended as a part of
the routine annual service.
The Calibration Options menu contains the following:
• Calibration: To calibrate the device
• Precision Syringe: To select the volume of syringe used for calibration
• Linearity: To check linearity
• Accuracy Log: To view and print the accuracy log
Calibration
Calibration is not required for normal use. Calibration should only be conducted by,
or under the guidance of Vitalograph Service Agents. See contact details on p. 2.
1. Select ‘Calibration’ from the Calibration screen.
2. Pump air through the owhead to bring it to ambient temperature.
If the owhead has very recently been used for testing or has
come from a cold environment, its temperature should be
equilibrated with ambient by pumping air through it from the
syringe several times.

14Page of 36
ENG
DT_0006 Issue 15
A Global Leader in Respiratory Solutions
3. Press the ‘Enter’ key to bring you into the Calibration screen and
follow the on-screen instructions.
4. If a Calibration report is required select the Report option.
Press the ‘C’ key to exit the Calibration screen.
Note: An Accuracy check must be done on the same day as the device is
calibrated.
Precision Syringe
1. Select ‘Precision Syringe’ from the Calibration screen.
2. Select the volume of the calibrated syringe from the drop down list.
3. Enter the syringe reference number using the touch panel keypad.
4. Press Enter to save the new volume entered and return to the
Calibration screen. Press C to cancel the changes made and return
to the Calibration screen.
Linearity Check
1. Select ‘Linearity’ from the Calibration screen. (Note: Pressing the C
key will exit the Linearity Check screen.)
2. Using a 3L calibrated syringe, pump air through the owhead to
bring it to ambient temperature.
3. If the owhead has very recently been used for testing or has
come from a cold environment, its temperature should be
equilibrated with ambient by pumping air.
4. Enter environmental data if prompted to do so.
5. Press Enter to open the Linearity Check screen.
6. Pump air into the owhead at a slow rate of < 2L/s. Immediately
withdraw the syringe at a slow rate. This manoeuvre should
show on the graph between the two red lines. If it is a correct
manoeuvre the table on the screen will show ‘Test 1’, and the FVC
and FIVC values will be updated. Repeat for the slow rate three
times.
7. Repeat the procedure for a medium rate >2L/s and < 6L/s. This
manoeuvre should show on the graph between the red and green
lines. If it is a correct manoeuvre the test number and the FVC and
FIVC values will be updated in the table. Repeat for the medium
rate three times.
8. Repeat the procedure for a fast rate >6L/s. This manoeuvre should
show on the graph between the outside green lines. If it is a correct
manoeuvre the test number and the FVC and FIVC values will be
updated in the table. Repeat for the fast rate three times.
9. When all the manoeuvres are complete press Enter for the result.
10. If a Linearity Check report is required select the ‘Report’ option.

09100 Issue 1
15Page of 36
ENG
ALPHA Touch - Instructions for Use
Accuracy Log
1. Select ‘Accuracy Log’ from the Calibration screen. The accuracy
log contains a record of all the accuracy checks done on the
device.
2. There are three options:
a. To print the complete accuracy log press ‘Print All’.
b. To print a log of the last 30 accuracy tests done, press ‘Print Last
30’.
c. To view the accuracy log, press ‘View’.
3. Press C to return to the Calibration screen.
3.6.4. Settings
The following options are available in the Device Settings screen:
• Date/Time: Update the date and time including format
• Units: Metric/Imperial
• Sound Options: On/Off/Volume
• Power Save Options: Display dulls after 3 minutes
• Incentive: Select incentive, % predicted and % best test
• Parameters: Select parameters for report/printing
Date/Time
There are two tabs in this screen for the time and date.
1. Change the time by scrolling the hours and minutes to the required
settings by pressing the arrows on the touch panel LCD.
2. Change the time format from 24 hour to 12 hour by switching the
’24 Hour Format’ option off or on.
3. Change the date by scrolling the day, month and year to the
required settings by pressing the arrows on the touch panel LCD.
Units
Modify the units by selecting between Metric and US (Imperial) in the drop
down list.
Sound Options
• Select Off/On options for Key, Flow, Error and Welcome sounds on
the device.
• Adjust the volume by pressing the ‘-/+’ on the touch panel LCD.
Power Save Options
In order to improve battery life the device can be congured to dull the display
after 3 minutes. This can be switched on or off.
Incentive
The Incentive Device is used as an aid in testing of children.

16Page of 36
ENG
DT_0006 Issue 15
A Global Leader in Respiratory Solutions
1. Select the incentive device to be used in testing using the drop down
list. A preview of the incentive will appear on the screen.
2. Modify the % of predicted using the on-screen keyboard. The value
entered must be between 80-150.
3. Modify the % of Best Test value using the on-screen keyboard. The
value entered must be between 80-150.
Parameters
The following parameters can be reported and printed for a test session.
To select/unselect a parameter check/uncheck the relevant check boxes.
Additional parameters are available by selecting the additional index tabs.
Parameter Denition
VC Vital capacity (L)
IVC Inspiratory vital capacity (L)
FIVC Forced inspiratory vital capacity (L)
FVC Forced vital capacity (L)
FEV.5 Forced expiratory volume after 0.5 seconds (L)
FEV.75 Forced expiratory volume after 0.75 seconds (L)
FEV1 Forced expiratory volume after 1 second (L)
FEV3 Forced expiratory volume after 3 seconds (L)
FEV6 Forced expiratory volume after 6 seconds (L)
PEF L/s Peak expiratory ow (L/sec)
PEF L/min Peak expiratory ow (L/min)
FEF0.2-1.2 (F02-12) Mean forced expiratory ow in the volume
interval between 0.2 and 1.2 L of the test (L/sec)
FEF 25-75 (F2575)
Maximal mid expiratory ow: the mean FEF in the
time interval between 25% and 75% of the FVC
(L/sec)
FEF 75-85 (F7585)
Forced late expiratory ow: the mean FEF in the
time interval between 75% and 85% of the FVC
(L/sec)
FEF 25 Forced expiratory ow at 25% of the FVC (L/sec)
FEF 50 Forced expiratory ow at 50% of the FVC (L/sec)
FEF 75 Forced expiratory ow at 75% of the FVC (L/sec)
FIV1 Forced inspiratory volume after 1 second (L)
PIF L/s Peak inspiratory ow (L/sec)

09100 Issue 1
17Page of 36
ENG
ALPHA Touch - Instructions for Use
FIF 25 Forced inspiratory ow at 25% of the FVC (L/sec)
FIF 50 Forced inspiratory ow at 50% of the FVC (L/sec)
FIF 75 Forced inspiratory ow at 75% of the FVC (L/sec)
MVVind Maximum voluntary ventilation indirectly
calculated from the FEV1 (L/min)
FMFT Forced mid-expiratory ow time (sec)
FET Forced expiratory time (sec)
Vext Extrapolated volume (L)
FRC Functional residual capacity (L)
TV Tidal volume (L)
RV Residual volume (L)
TLC Total lung capacity (L)
IRV Inspiratory reserve volume (L)
ERV Expiratory reserve volume (L)
IC Inspiratory capacity (L)
Rind Airways Resistance Indirect measurement.
FIVC/FVC Ratio FIVC of FVC
FEV.5/FVC Ratio FEV 0.5 of FVC
FEV1/FEV6 Ratio FEV1 of FEV6
FEV1/FVC Ratio FEV1 of FVC
FEV1/VC Ratio FEV1 of VC
FEV1/PEF FEV1 divided by PEF (L/L/s)
FEV3/VC Ratio FEV3 of VC
FEV3/FVC Ratio FEV3 of FVC
FEF 25-75/FVC F2575/F) Ratio FEF 25–75 of FVC
FIV1/FVC Ratio FIV1 of FVC
FIV1/FIVC Ratio FIV1 of FIVC
FIF50FEF50 Ratio FIF 50% of FEF 50%
FEV75/FVC Ratio FEV 0.75 of FVC
FEV1/FIVC Ratio FEV1 of FIVC
FEV1/IVC Ratio FEV1 of IVC
FEV1R FEV1 divided by the largest VC from the VC or
FVC manoeuvre.

18Page of 36
ENG
DT_0006 Issue 15
A Global Leader in Respiratory Solutions
Vext/FVC Ratio extrapolated volume of FVC
PIF L/min Peak inspiratory ow (L/min)
Lung Age
Lung age will be displayed if the date of
birth, height, population group and smoking
information have been entered. Lung age will
only be shown if the measured FEV1 value is less
than the lower limit of the predicted normal value
for FEV1.
3.6.5. Subject Options
The following options are available in the Subject Options screen:
• Primary View: Set the default subject list view to either name or ID
using the drop down list.
• Password protection: Select to turn password protection on/off.
Change the password using the touch panel keypad.
• Smoking History, Population Group and Weight: Select whether
to include these elds when creating a new subject on the device.
To change the setting select the on/off button on the touch panel
keypad.
3.6.6. Smart Options
Congure the device to follow a set sequence of operation on power up using
the Smart Options. Turn Smart Options Off/On using the drop down menu.
When turned on there are four areas that may be congured by selecting from a
drop down list:
• After Power Up: Congure the device to go to the Main Menu or the
Subject screen after power up.
• After Subject: Congure the device to go to VC Test, FVC Test or
Main Menu after selecting a subject.
• After VC: Congure the device to go to FVC or Main Menu after
performing a VC test.
• After FVC: Congure the device to go to POST mode, Print the test or
go to the Main Menu after performing an FVC test.
3.6.7. Report Options
Set the Report Content and the Report Method using the Report Options screen.
Report Content
The following information printed on the session reports may be congured by
selecting from a drop down list:
• Table: Congure the device to show the results for the best test only
(Best 1) or the three best tests (Best 3).
• Normal Comparison: Congure the device to print either the % of

09100 Issue 1
19Page of 36
ENG
ALPHA Touch - Instructions for Use
Predicted value or the SDS (Standard Deviation Score) in the session
table of results.
• Test QA: Congure the session report to show the test QA. Select to
turn this on or off.
• Interpretation: Congure the session report to show the device
suggested interpretation. Select to turn this on or off.
• Comments Header: Congure the session report to show a
Comments Header. Select to turn this on or off.
• Ambient Conditions: Congure the session report to show the
Ambient Conditions. The ambient conditions (Humidity, Pressure and
Altitude) are those entered when performing an accuracy check or
calibration update. Select to turn this on or off.
• V/T Size: Congure the Volume/Time graph displayed to either
standard or ATS/ERS 2005 (ATS) requirements.
• F/V Size: Congure the Flow/Volume graph to either standard or
ATS/ERS 2005 (ATS) requirements.
• V/T Graph: Congure the session report to show the V/T (Volume vs.
Time) graph. Select to turn this on or off.
• F/V Graph: Congure the session report to show the F/V (Flow vs.
Volume) graph. Select to turn this on or off.
• Trend Graph: Congure the session report to show the trend graph.
Select to turn this on or off. The trend graph can only be printed
when the trend graph option and the congurable report option are
selected.
Report Method
The ALPHA Touch can print to the internal printer or Vitalograph Reports. The
following options are available:
• Report: Select either ‘Send to PC’ or ‘Internal Printer’ from the drop
down list.
• Content: Select ‘Default report’ or the ‘Congurable report’ option
from the drop down list.
• Colour: The printout can be set to Colour or Black & White. Select on
for a colour printout (print via a PC) and off for black & white.
Note: In order to send the report to the Vitalograph Reports utility it is necessary
to have the Vitalograph Reports Utility installed on the user’s PC and the ALPHA
Touch connected to the PC via a USB cable.
4. Power Management
The Vitalograph ALPHA Touch can be powered using the 12V low voltage
power supply unit with which it is supplied or from the internal battery pack.
When powered from the low voltage power supply, the LED on the front face
on the device will be green. When the device is powered from the battery pack,
20Page of 36
ENG
DT_0006 Issue 15
A Global Leader in Respiratory Solutions
the LED will be orange. The Power Supply unit should be checked regularly and
replaced when necessary.
4.1. Battery Pack
The ALPHA Touch is tted with a rechargeable Battery Pack. This allows the
device to be used without the 12V Power Supply connected. The battery pack
can be re-charged by plugging in the 12 V Power Supply. To fully re-charge
switch off the Vitalograph ALPHA Touch and leave it plugged in over-night.
The battery pack should be replaced after 3 years. Battery replacement should
be carried out only by the manufacturer, the approved importer or by Service
Agents specically approved by Vitalograph.
Note: It is not possible to power the device or charge the batteries from the USB.
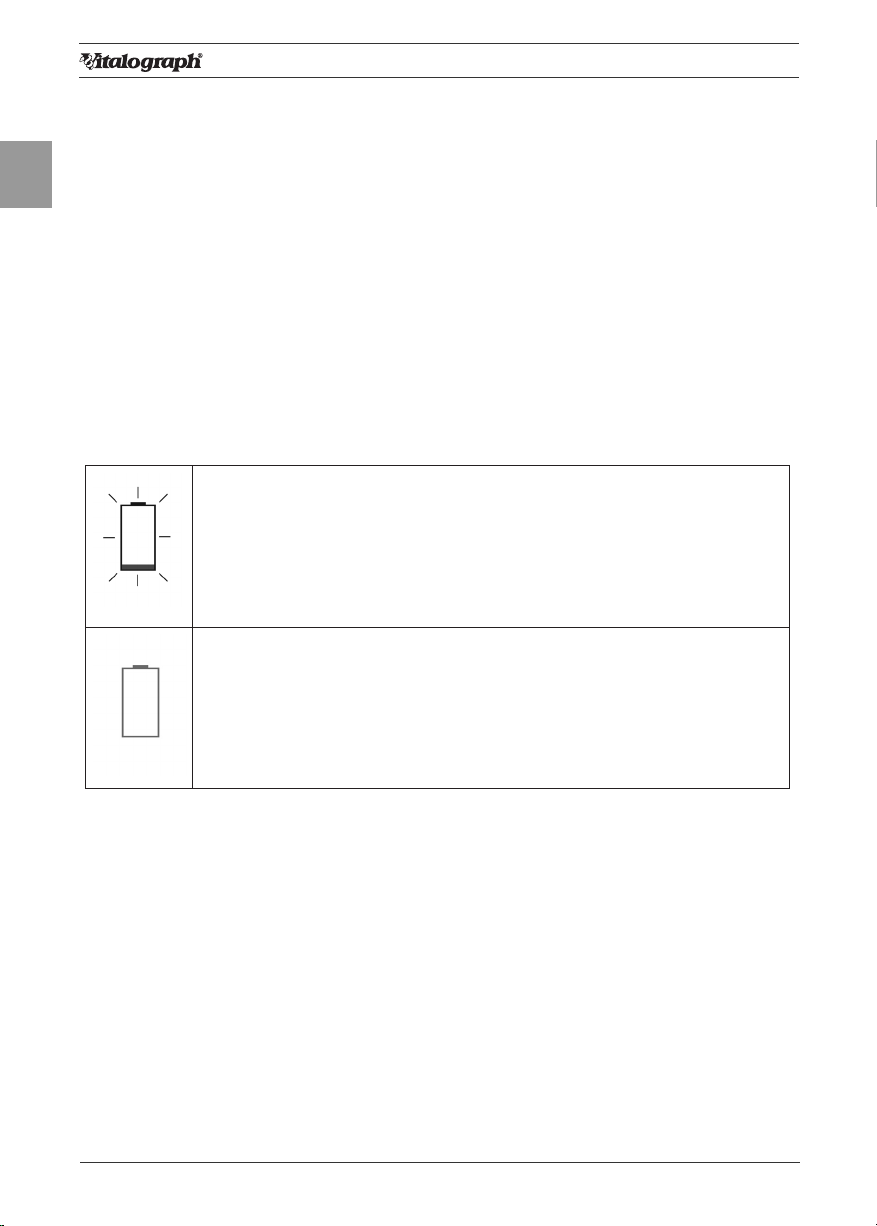
4.2. Battery Low Detect
The battery power detect messages are:
Battery Low: Theicon ashes on and off on theMain
Menuscreen.
The Battery Pack is running low. You may continue to use the
device.
As a precaution, plug in the 12V Power Supply to re-charge the
batteries and continue testing.
Battery Discharged: Theicon appears continuously on theMain
Menuscreen. The Battery Pack is out of power. If you press any
key a warning message appears and you will not be allowed to
proceed further.
Plug in the 12V Power Supply to re-charge batteries and continue
testing.
5. Cleaning & Hygiene
5.1. Preventing Cross-Contamination of Subjects
A spirometer is not designed or supplied as a ‘sterile’ device.
Vitalograph intends that a new Bacterial Viral Filter (BVF) be used for every
subject to prevent cross contamination. Using a new BVF provides a signicant
level of protection of for the subject, the device and the user against cross
contamination during spirometry manoeuvres.
The interior of a Vitalograph owhead does not require decontamination where
a new BVF is used for each subject. The outside surfaces of the device and
owhead tube may becleaned with a 70% isopropyl alcohol impregnated cloth
to remove any visible soiling and for low level disinfection.
Where the user suspects that the owhead has become contaminated or where
local risk assessment identies a need for higher level of decontamination, then
it should be cleaned as per the instructions on ‘Cleaning and Hygiene’ on the
Vitalograph website.
This manual suits for next models
1
Table of contents
Other Vitalograph Measuring Instrument manuals

Vitalograph
Vitalograph asmaPLAN+ User manual

Vitalograph
Vitalograph Spirotrac 7000 User manual

Vitalograph
Vitalograph copd-6 User manual

Vitalograph
Vitalograph micro 6300 User manual

Vitalograph
Vitalograph alpha 6000 User manual

Vitalograph
Vitalograph Vitalograph micro User manual

Vitalograph
Vitalograph micro 6300 User manual

Vitalograph
Vitalograph In2itive 2120 User manual

Vitalograph
Vitalograph copd-6 4000 User manual

Vitalograph
Vitalograph micro 6300 User manual


