Ariston UP 300 X EU Quick start guide

Congelatore
Iinstallazione e uso
Freezer
Installation and use
Congélateur
Installation et emploi
Vriekast
Plaatsing en gebruik
Congelador
Instalación y uso
Congelador
Instalação e uso
Fryseskab
Instrutione
Kaappipakastin
Asennus ja Käyttö
Frysskåp
Installation och användinge
Fryseskap
Installasjon og bruk

Congelatore verticale 1
Istruzioni per l'installazione e l'uso
Upright Freezer 9
Instructions for installation and use
Congélateur armoire 17
Instruction pour l'installation et l'emploi
Vertikale vrieskast 25
Gebruiksaanwijzingen vor de plaatsing en gebruik
Congelador vertical 33
Instrucciones para la instalación y uso
Congelador vertical 41
Instruções para a instalação e o uso
Fryseskab 49
Istrutione
Kaappipakastin 57
Koneen asennus ja käyttö
Frysskåp 65
Instruktioner för installation och användinge
Fryseskap 73
Instruksjon for installasjon og bruk
I
GB
F
NL
E
P
N
DK
SF
S
Per garantire l’efficienza e la sicurezza di questo elettrodomestico:
- rivolgetevi esclusivamente a centri di assistenza tecnica autorizzati
- richiedete sempre l’utilizzo di parti di ricambio originali
To maintain the EFFICIENCY and SAFETY of this appliance, we recommend:
- call only the Service Centers authorized by the manufacturer
- always use original Spare Parts
Pour garantir l’efficacité et la sécurité de ce produit:
- adressez-vous exclusivement aux Centres d’assistance technique agréés
- demander toujours l’utilisation de pièces détachées originales
Om de doelmatigheid en veiligheid van dit toestel te garanderen raden wij u aan:
- voor reparaties alleen de Service Centers te bellen die door de fabrikant gemachtigd zijn
- altijd gebruik te maken van originele onderdelen
Para garantizar la eficacia y seguridad de este electrodoméstico:
- Diríjase exclusivamente al Servicio Técnico Oficial del Fabricante.
- Solicite siempre la utilización de recambios originales.
Para garantir a eficiência e a segurança deste electrodoméstico:
- dirija-se exclusivamente a centros de assistência técnica autorizados
- solicite sempre a utilização de peças originais
For at garantere denne husholdningsmaskinens langvarig funktion og forbrugerens tryghed:
- Man skal henvende sig, ifald maskinen ikke fungerer, kun til en speciel teknisk assistance, som er autori-
seret af fabrikken
- Ved reparationer skal man altid forlange originale reservedele
Jotta tämän kodinkoneen toiminta ja turvallinen käyttö olisi jatkuvasti taattu:
- Vikojen sattuessa on käännyttävä yksinomaan tuottajan valtuuttaman huollon puoleen
- Korjauksissa on vaadittava aina tehtaan omien varaosien käyttöä
För att garantera denna hushållsapparatens långvarig funktion samt förbrukarens trygghet:
- Anlita ändast en av tillverkaren autoriserad kundservice
- Gör alltid anspråk på bruk av originala reservdelar
For å garantere denne husholdsmaskinens langvarig funksjon og forbrukerens trygghet:
- Man må henvende seg, når problemer oppstår, kun til et serviceverksted, som er autoriseret av konstruk-
tøren
- Ved reparasjoner må man be om bruk av originale reservedel
UP 300 X EU
UP 350 X EU
UPA 302 XS EU
UPA 302 X EU/1
UPA 352 X EU/1

1I
La sicurezza, una buona abitudine
le mani bagnate poiché potreste scottarvi o ferirvi. Né met-
tere in bocca cubetti di ghiaccio appena estratti dall'appa-
recchio poiché rischiate di ustionarvi.
7. Prima di procedere a qualsiasi operazione di pulizia stac-
care l'apparecchio dalla rete di alimentazione (disinserendo
la spina o l'interruttore generale dell'appartamento).
8. Prima di farvi ritirare il vecchio congelatore, mettete fuori
uso l’eventuale serratura per evitare che i bambini, giocan-
do, possano rimanere chiusi dentro l’apparecchio.
9. In caso di guasto, prima di chiamare il servizio-assistenza,
controllate al capitolo “C’è qualche problema?” per verificare
se è possibile eliminare l’eventuale inconveniente. Non tentate
di riparare il guasto, cercando di accedere alle parti interne.
10. In caso di sostituzione del cavo di alimentazione rivol-
gersi ai nostri Centri di Aassistenza. In alcuni casi le connes-
sioni sono eseguite con terminali speciali, in altri è richiesto
l’uso di un utensile speciale per accedere ai collegamenti.
11. Non usate apparecchi elettrici all'interno dello scompar-
to conservatore di cibi, se questi non sono del tipo racco-
mandato dal costruttore.
12. Al termine della vita funzionale dell'apparecchio, conte-
nente gas ciclopentano nella schiuma isolante ed eventual-
mente gas R600a (isobutano) nel circuito refrigerante, lo stes-
so dovrà essere messo in sicurezza prima dell'invio in disca-
rica. Per questa operazione rivolgetevi al vostro negoziante
o all'Ente Locale preposto.
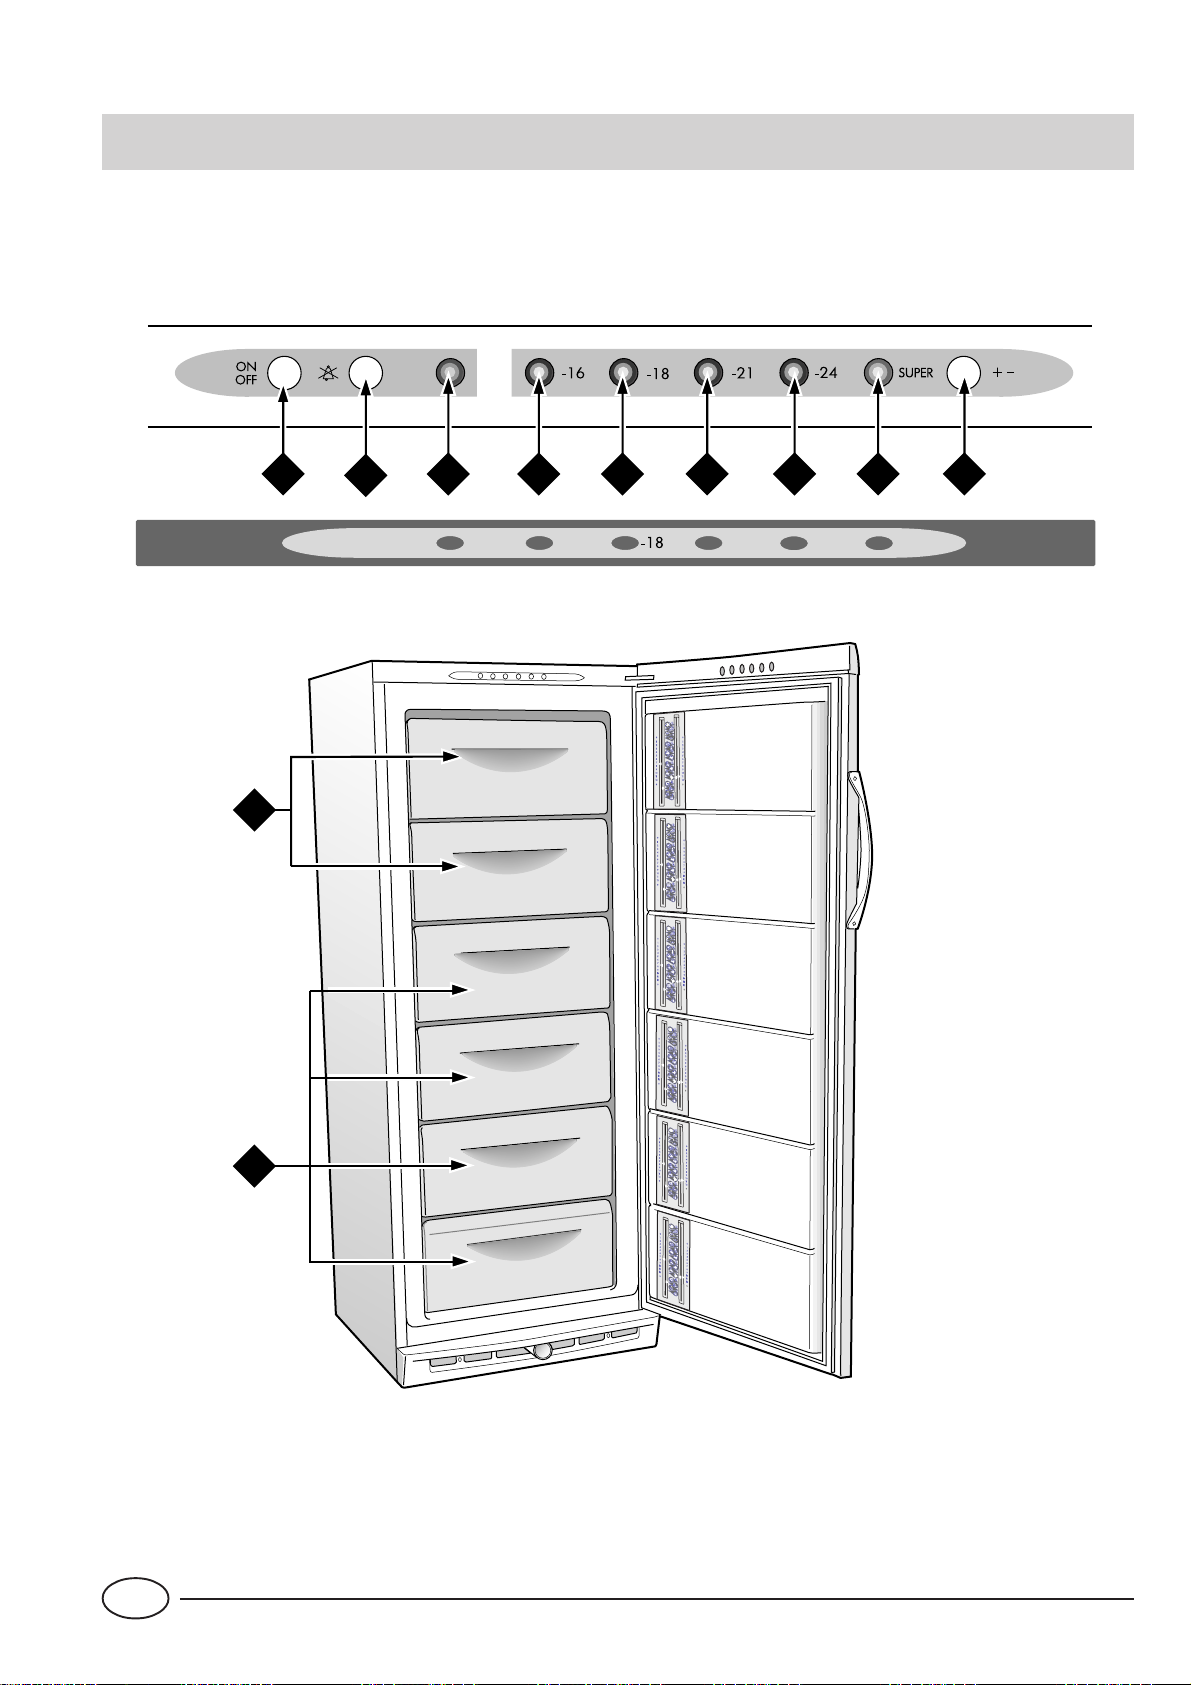
Installazione
Per garantire un buon funzionamento e un consumo
contenuto di elettricità è importante che l’installazio-
ne sia eseguita correttamente.
L’aerazione
Il compressore ed il condensatore emettono calore e richie-
dono perciò una buona aerazione. Sono poco adatti am-
bienti con una non perfetta ventilazione. L’apparecchio va
quindi installato in un ambiente servito da un’apertura (fi-
nestra o portafinestra) che assicuri il necessario ricambio
dell’aria. E che non sia troppo umido.
Fare attenzione, durante l'installazione, a non coprire od
ostruire le griglie che permettono la buona ventilazione del-
l'apparecchio.
Per una buona aerazione dell'apparecchio occorre lasciare:
- una distanza di almeno 10 cm tra la parte superiore ed
eventuali mobili sovrastanti;
- una distanza di almeno 5 cm tra le fiancate ed eventuali
mobili/pareti laterali.
Lontano dal calore
Evitare di posizionare l'apparecchio in un luogo direttamen-
te esposto alla luce solare, accanto alla cucina elettrica o
similari.
In piano
L'apparecchio deve essere ben in piano; se il pavimento non
è livellato, è possibile intervenire con gli appositi piedini re-
golabili posti anteriormente.
Collegamento elettrico e messa a terra
Prima di procedere al collegamento elettrico, controllate che
il voltaggio indicato sulla targhetta caratteristiche, che si trova
all'interno del congelatore, corrisponda a quella del vostro
impianto di casa, e che la presa sia dotata di una regolare
messa a terra, come prescrive la legge sulla sicurezza degli
impianti 46/90. Se manca la messa a terra, la Casa
Costruttrice declina ogni responsabilità. Non usate prese mul-
tiple o adattatori.
Posizionare l’apparecchio in mode che la presa, a cui
è collegato, sia accessibile.
La potenza è insufficiente?
La presa elettrica deve essere in grado di sopportare il carico
massimo di potenza dell’apparecchio, indicata sulla targhet-
ta caratteristiche posta in basso a sinistra all'interno del con-
gelatore.
Prima di collegarlo elettricamente
Dopo il trasporto posizionare l’apparecchio verticalmente ed
attendere almeno 3 ore prima di collegarlo alla presa, per
consentire un corretto funzionamento.
ATTENZIONE
Leggete attentamente le avvertenze contenute nel presen-
te libretto in quanto forniscono importanti indicazioni riguar-
danti la sicurezza di installazione, d’uso e di manutenzione.
Questa apparecchiatura è conforme alle se-
guenti Direttive Comunitarie:
- 73/23/CEE del 19/02/73 (Basse Tensioni) e successive
modificazioni;
- 89/336/CEE del 03/05/89 (Compatibilità Elettromagnetica)
e successive modificazioni.
1. Questo apparecchio non va installato all’aperto, nemme-
no se lo spazio è riparato da una tettoia; è molto pericoloso
lasciarlo esposto alla pioggia e ai temporali.
2. Deve essere usato soltanto da adulti ed esclusivamente
per conservare i cibi, seguendo le istruzioni d’uso scritte in
questo manuale.
3. Non toccate né manovrate mai l’apparecchio a piedi nudi
o con le mani o piedi bagnati.
4. Sconsigliamo di ricorrere a prolunghe e multiple. Se il con-
gelatore è installato tra i mobili, controllate che il cavo non
subisca piegature o compressioni pericolose.
5. Non tirate mai il cavo né il congelatore per staccare la
spina dalla presa a muro: è molto pericoloso.
6. Non toccate le parti interne raffreddanti soprattutto con

2
I
Visto da vicino
H
G
ABCD D D D E F

3I
APulsante per l'accensione (ON) o per lo spegni-
mento (OFF) dell'apparecchio. Pressione singola
del pulsante per almeno due secondi.
B
Pulsante per l'eliminazione dell'allarme sonoro
Pressione singola del pulsante per almeno due
secondi
C
Spia di allarme
Quando questa spia rossa si accende, insieme al
suono del buzzer, significa che il funzionamento del
congelatore non è regolare e che la temperature si
sta alzando troppo.
Il solo suono del buzzer (lampada spia spenta) segnala
che la porta del congelatore è rimasta aperta per più
di 60 secondi.
D
Spie verdi
Queste spie visualizzano la temperatura di conserva-
zione scelta (da -16° a -24°C).
E
Spia gialla di congelazione rapida
Questa spia si illumina quando è stata impostata la
posizione "SUPER" necessaria per effettuare il
congelamento rapido di cibi freschi.
Si spegne in automatico dopo 48 ore, quindi l'appa-
recchio termina il funzionamento in SUPER.
F
Pulsante termostato e SUPER
Serve per impostare la temperatura di conservazio-
ne e di congelamento. La pressione singola del
pulsante per almeno due secondi abilita la
visualizzazione a led lampeggiante del punto
termostatico e SUPER; ad ogni successiva pressione
singola, effettuata entro 5 secondi, è possibile
scegliere l'impostazione della temperaatura di
conservazione (-24, -21, -18, -16 °C.
L'impostazione di SUPER si disattiva automatica-
mente dopo 48 ore con ritorno automatico al punto
termostatico precedentemente impostato,
G
Vani utilizzabili per la conservazione
H
Vani utilizzabili per il congelamento e la conser-
vazione
ATTENZIONE
Dopo il trasporto, posizionare l’apparecchio vertical-
mente ed attendere circa 3 ore prima di collegarlo alla
presa di corrente per favorire un buon funzionamento.
Per un funzionamento ottimale ed economico ricorda-
tevi di impostare la temperatura a -18°C.
Una volta collegato l'apparecchio alla rete di alimentazione
premere il pulsante A(ON-OFF) per più di 2 secondi; in que-
sto modo l'apparecchio si accende.
Impostare la posizione di SUPER tramite il pulsante F, la pres-
sione singola per più di due secondi abilita e visualizza, a led
lampeggianti, la posizione di temperatura impostata; ogni sin-
gola pressione effettuata entro 5 secondi sposta l'impostazione
in modo ciclico; lasciare l'impostazione in modo che il led Esia
lampeggiante e successivamente fisso. L’apparecchio esce dalla
posizione di SUPER dopo 48 ore in modo automatico
riposizionandosi sulla temperatura impostata.
Se dopo aver collegato l'apparecchio alla rete di alimenta-
zione ci sono le luci lampeggianti e allarme sonoro inserito,
premere per almeno due secondi il pulsante B (esclusione
allarme).
Come avviare il congelatore

4
I
Come utilizzarlo al meglio
Per congelare bene
- Un alimento scongelato, anche solo parzialmente, non deve
mai essere ricongelato: lo dovete cuocere per consumarlo (en-
tro 24 ore) oppure per ricongelarlo.
- Per la preparazione dei cibi da congelare consultare un ma-
nuale specializzato.
- Per ottenere una conservazione e una successiva scongela-
zione ottimale è consigliabile dividere i cibi in piccole porzioni
così si congeleranno rapidamente e in modo omogeneo. Sulle
confezioni riportate le indicazioni sul contenuto e sulla data di
congelamento.
- Non congelare mai un quantitativo superiore alla capacità
massima di congelamento indicata sulla targhetta delle carat-
teristiche posta all'interno del congelatore.
- Impostare la temperatura in posizione di SUPER tramite il
pulsante F(led Eacceso).
- Introdurre gli alimenti freschi da congelare nei vani superiori
"H" avendo l'accortezza di non porli vicino a quelli già conge-
lati o surgelati ma possibilmente a contatto con i ripiani raf-
freddanti. Non bisogna infatti dimenticare che la buona con-
servazione degli alimenti congelati dipende dalla velocità di
congelazione. Per questo motivo consigliamo di impostare la
temperatura nella posizione di SUPER 24 ore prima dell'intro-
duzione dei cibi da congelare.
- Dopo 24 ore l'impostazione della temperatura ritorna auto-
maticamente alla precedente posizione di normale funziona-
mento.
- Non aprite la porta del congelatore in caso di mancanza di
corrente o di un guasto, ritarderete così l’aumento della tem-
peratura al suo interno.
- Non mettete nel congelatore bottiglie piene: potrebbero rom-
persi poiché, gelandosi, tutti i liquidi aumentano di volume.
- Riempite le bacinelle dei cubetti di ghiaccio fino a circa 3/4
della loro altezza.
Conservazione
Per ottenere una buona conservazione ed un basso consumo di
energia elettrica si consiglia di impostare la temperatura -18 ,
-21.
Osservare sempre scrupolosamente le istruzioni riportate sulle
confezioni dei cibi surgelati.
All’acquisto di prodotti surgelati occorre sincerarsi che gli stessi
siano conservati a temperatura adeguata e che l’involucro sia
intatto. Per mantenere inalterata la qualità del cibo surgelato è
opportuno trasportarlo in appositi contenitori e riporlo al più
presto all’interno dell’apparecchio.
Al fine di ottenere un volume maggiore il congelatore può es-
sere utilizzato anche senza i cassetti (tranne il primo in bas-
so) sistemando gli alimenti direttamente sulle piastre evapo-
ranti. Verificare, dopo l'introduzione dei cibi da conservare, che
la porta chiuda correttamente.
Allo scopo di verificare la corretta temperatura all'interno del-
l'apparecchio (anche durante il periodo delle ferie o in vostra
assenza), all'interno dei comandi c'è un dispositivo intelligente
che segnala l'innalzamento della temperatura (black out per
mancanza di energia elettrica); tale condizione viene visualizzata
tramite tutti i led accesi in modo lampeggiante e l'allarme acu-
stico inserito. In questo caso i cibi hanno subito una conserva-
zione insufficiente pertanto si consiglia di non consunarli.
Calendario per la conservazione dei cibi
A
B
B
A
Indice "A"
Serve per ricordare quale
tipo di cibo congelato si tro-
va nello scomparto (Es. sa-
lumi, frutta, pollo, selvaggi-
na ecc.)
Indice "B"
Al momento dello stivaggio
dei cibi congelati va sposta-
to sul numero che indica il
mese di scadenza del cibo
(Es.: funghi messi a conser-
vare nel mese di ottobre, da
consumarsi dopo 6 mesi:
aprile dell'anno successivo).
Fig. 1
Questo cassettino (fig. 1), è stato concepito per contenere le
bacinelle destinate alla produzione di ghiaccio.
Va inoltre usato per riporre l’eventuale piastra eutettica (pre-
sente solo in alcuni modelli) che ha la funzione di aumentare
i tempi di conservazione degli alimenti in caso di mancanza
di energia elettrica.

5I
Carni e pesci
Guida all'utilizzo del congelatore
Tipo Confezionamento Frollatura
(giorni)
Conservazione
(mesi) Scongelamento
Arrosto e bollito di
manzo Avvolto in foglio di alluminio 2 / 3 9 / 10 Non necessario
Agnello Avvolto in foglio di alluminio 1 / 2 6 Non necessario
Arrosto di maiale Avvolto in foglio di alluminio 1 6 Non necessario
Arrosto e bollito di
vitello Avvolto in foglio di alluminio 1 8 Non necessario
Bistecche e braciole di
maiale
Ogni fetta avvolta in politene e quindi in
foglio di alluminio in numero di 4-5 6 Non necessario
Fettine e cotolette di
agnello o manzo
Ogni fetta avvolta in politene e quindi in
foglio di alluminio in numero di 4-5 6 Non necessario
Carne macinata In contenitori di alluminio ricoperti con
politene
Freschissi-
ma 2 Lentamente in frigorifero
Cuore e fegato In sacchetti di politene 3 Non necessario
Salsicce In fogli di politene o alluminio 2 A seconda dell’uso
Polli e tacchini Avvolti in fogli di alluminio 1 / 3 9 Lentamente in frigorifero
Anatre e oche In fogli di alluminio 1 / 4 6 Lentamente in frigorifero
Anatre selvatiche,
fagiani e pernici In fogli di alluminio 1 / 3 9 Lentamente in frigorifero
Conigli e lepri In fogli di alluminio 3 / 4 6 Lentamente in frigorifero
Cervo e capriolo In fogli di alluminio o politene 5 / 6 9 Lentamente in frigorifero
Pesci grossi In fogli di alluminio o politene 4 / 6 Lentamente in frigorifero
Pesci piccoli In buste di politene 2 / 3 Non necessario
Crostacei In buste di politene 3 / 6 Non necessario
Molluschi In contenitori di alluminio o plastica
ricoperti con acqua e sale 3 Lentamente in frigorifero
Pesci cotti In fogli di alluminio o politene 12 In acqua calda
Pesci fritti In sacchetti di politene 4 / 6 Direttamente in padella

6
I
Frutta e verdura
Tipo Preparazione Scottatura
(min) Confezionamento Conservazione
(mesi) Scongelamento
Mele e pere Sbucciare e tagliare a
pezzetti 2’ In contenitori ricoperti di
sciroppo 12 Lentamente in frigorifero
Albicocche, pesche,
ciliege e prugne Snocciolare e pelare 1’ / 2’ In contenitori ricoperti di
sciroppo 12 Lentamente in frigorifero
Fragole, more e
mirtilli
Pulire, lavare e lasciare
asciugare
In contenitori ricoperti di
zucchero 10 / 12 Lentamente in frigorifero
Frutta cotta Tagliare, cuocere e
passare
In contenitori,
aggiungere 10% di
zucchero
12 Lentamente in frigorifero
Succhi di frutta Lavare, tagliare e
schiacciare
In contenitori, zucchero
a piacere 10 / 12 Lentamente in frigorifero
Cavolfiori
Spezzettare e scottare
in acqua e succo di
limone
2’ In sacchetti di politene 12 Non necessario
Cavolo e cavolini Pulire e lavare
(spezzettare) 1’ / 2’ In sacchetti di politene 10 / 12 A temperatura ambiente
Piselli Sbucciare e lavare 2’ In sacchetti di politene 12 Non necessario
Fagiolini Lavare e tagliare a
pezzetti 2 In sacchetti di politene 10 / 12 Non necessario
Carote, peperoni e
rape
Tagliare a fette,
pelare, lavare 3’ / 4’ In sacchetti di politene 12 Non necessario
Funghi e asparagi Lavare e tagliare 3’ / 4’ In sacchetti o contenitori 6 A temperatura ambiente
Spinaci Lavare e tagliuzzare 2’ In sacchetti di politene 12 A temperatura ambiente
Verdure varie per
minestra
Lavare e tagliare a
pezzetti 3’ In sacchetti in piccole
porzioni 6 / 7 A temperatura ambiente
Cibi vari Preparazione Scottatura Confezionamento Conservazione
(mesi) Scongelamento
Pane In sacchetti di politene 4 A temperatura ambiente o
nel frigorifero
Torte In fogli di politene 6 A temperatura ambiente e
cuocere a 100/200°C
Panna In contenitori di plastica 6 A temperatura ambiente o
nel frigorifero
Burro Nel suo incarto originale
avvolto in alluminio 6 In frigorifero
Cibi cotti,
minestrone
Suddiviso in contenitori
di plastica o vetro 3 / 6 A temperatura ambiente e
in acqua calda
Uova Congelare senza guscio
in piccoli contenitori 10 A temperatura ambiente o
nel frigorifero

7I
Come tenerlo in forma
Prima di procedere a qualsiasi operazione di pulizia
staccare l'apparecchio dalla rete di alimentazione
(disinserendo la spina o l'interruttore generale dell'ap-
partamento).
Sbrinamento
ATTENZIONE: non danneggiare il circuito refrigerante.
Fare attenzione a non usare dispositivi meccanici o al-
tri utensili per accelerare il processo di sbrinamento,
oltre a quelli raccomandati dal costruttore.
E’ opportuno, di tanto in tanto, togliere la brina che ricopre
i ripiani dell’apparecchio.
Attenzione a non usare, per tale operazione, oggetti metal-
lici appuntiti .che possono provocare forature al circuito re-
frigerante con conseguente irreparabile danneggiamento
dell’apparecchio, ma servirsi del raschietto in plastica forni-
to in dotazione.
Per ottenere il completo sbrinamento dell’apparecchio (da
effettuare una o due volte l’anno) scollegare l'apparecchio
dalla rete di alimentazione e lasciare aperta la porta fino al
completo scioglimento della brina.
L'apparecchio è dotato di un sistema di raccolta dell'acqua
di sbrinamento; sistemare un contenitore come illustrato in
figura 2.
Per accelerare le operazioni di sbrinamento si può introdur-
re all’interno dell’apparecchio una o più bacinelle di acqua
tiepida.
Durante l’operazione di sbrinamento è opportuno avvolge-
re i cibi messi in conservazione con più fogli di carta e siste-
marli in luoghi freschi. Poiché l’inevitabile aumento di tem-
peratura ne abbrevia la durata è consigliabile consumarli a
breve scadenza.
Pulizia e manutenzioni particolari
La pulizia interna dell’apparecchio va effettuata periodica-
mente, dopo aver sbrinato l'apparecchio, impiegando bicar-
bonato di sodio sciolto in acqua tiepida. Evitare in ogni caso
l’uso di prodotti abrasivi, detergenti o saponi; dopo il lavag-
gio risciacquare con acqua pulita ed asciugare con cura.
Effettuate tali operazioni, rimettere in funzione l'apparec-
chio come descritto nel paragrafo "Come avviare il congela-
tore".
Fig. 2 Fig. 3
- Installatelo bene
E cioè lontano da fonti di calore, dalla luce diretta del sole e
in locale ben aerato.
- Il freddo giusto
Impostare la posizione di temperatura a -18. Il troppo fred-
do, oltre a consumare molto, non migliora né allunga la con-
servazione degli alimenti.
- A porta chiusa
Aprite il vostro congelatore il meno possibile perché ogni
volta che lo fate va via gran parte dell’aria fredda. Per rista-
bilire la temperatura il motore deve lavorare a lungo consu-
mando molta energia.
- Occhio alla guarnizione
Mantenetela elastica e pulita in modo che aderisca bene
alle porte; solo così non lascerà uscire nemmeno un po’ di
freddo.
- Niente brina
Controllate lo spessore della brina sulle piastre del freezer
ed effettuate subito lo sbrinamento se lo strato è diventato
troppo spesso (Vedi più avanti “Come tenerlo in forma”).
Consigli per risparmiare

8
I
Spie spente
Avete controllato se:
·non manchi la corrente;
·l'interruttore generale dell'appartamento non è disinseri-
to;
Spia allarme rossa "C" sempre accesa
Avete controllato se:
·la porta non chiude bene o la guarnizione è rovinata;
·la porta viene aperta molto spesso;
·la temperatura di conservazione impostata non è corretta;
·sulle pareti interne la brina è eccessiva
Il motore funziona di continuo.
Avete controllato se:
·il termostato è nella posizione corretta.
L’apparecchio emette troppo rumore.
Avete controllato se:
·Il congelatore è posto ben in piano:
·è stato installato tra mobili o oggetti che vibrano ed emet-
tono rumori;
·il gas refrigerante interno produce un leggero rumore an-
che quando il compressore è fermo (non è un difetto).
Spie lampaggianti e allarme acustico inserito
L'apparecchio è fornito di dispositivo Black out (mancanza
di energia elettrica per lungo tempo). Tale dispositivo si
disinserisce tramite la pressione singola per almeno due se-
condi del pulsante “B” (esclusione allarme) fino a quando
non si spengono le spie verdi lampeggianti.
Il motore non parte
Per favorire una partenza corretta del motore, l'apparecchio
è fornito di un'autoprotezione che prevede una pausa di 7
minuti dall'ultima accensione del motore stesso.
Spia verde -16 e -24 oppure -18 e -21 accese
contemporaneamente
L'apparecchio è fornito di un sistema di autodiagnosi che
registra un eventuale anomalo funzionamento della sonda.
Tale anomalia viene segnalata con l'accensione dei led -16 e
-24 oppure -18 e -21.
In questo caso chiamare il Centro di Assistenza Tecnica per
l'eventuale sostituzione del componente.
C'è qualche problema?
Se, nonostante tutti i controlli, l’apparecchio non funziona e
l’inconveniente da voi rilevato continua ad esserci, chiama-
te il Centro di Assistenza più vicino, comunicando queste
informazioni: il tipo di guasto, la sigla del modello (Mod.) e
i relativi numeri (S/N) scritti sulla targhetta delle caratteristi-
che che si trova all'interno dell'apparecchio (vedi esempio
nella figura seguente).
Non ricorrete mai a tecnici non autorizzati e rifiutate
sempre l’installazione di pezzi di ricambio non origi-
nali.
Mod.
EDF 290.3 X TK
Cod.
93081 720000 S/N 7041 71 328
220 - 240 V- 50 Hz 160 W W
Fuse AMax 15 w
Total
Gross
Bruto
Brut
Compr.
Kompr.
Syst. R 134 a
kg 0,090
Gross
Bruto
Brut
287
Net
Util
Utile
Gross
Bruto
Brut
Freez. Capac
Poder de Cong
62
Made in Italy 008172
Test
P.S-I.
Pressure
HIGH-235
LOW 140
kg/24 h
4,5
Class
Clase N
Classe

9GB
Installation
ATTENTION
Read your manual carefully since it contains instructions
which will ensure safe installation, use and maintenance of
your appliance.
Your Refrigerator is built to International safety standards
(EN60) ans has been awarded the European approval mark
(IMQ) for compliance with UK electrical safety requirements.
It also meets the EC standards on the prevention and elimi-
nation of readio interference (EC directive 87/308 - 02.06.89).
1. This appliance is designed to be used indoors and under no
circumstances should it be installed outside even if protected
by a roof. Leaving the appliance exposed to the rain and
whether is exceedingly dangerous.
2. The appliance should be used only by adults and exclusively
for storing foodstuffs in compliance with the instructions pro-
vided in this manual. Under no circumstances should children
be allowed to operate, or tamper with, this product.
3. Do not attempt to operate or handle this appliance when
barefoot, or with wet hands or feet.
4. It is highly recommended that you do not operate this appli-
ance by connecting it to the power supply with extensions or
multiple socket plugs. If the refrigerator has been installed be-
tween two cabinets, make sure that the supply chord is not
dangerously crimped or trapped beneath a heavy object.
5. Never pull the cable or the appliance to remove the plug
from the socket; this is exceedingly dangerous.
6. Do not touch the internal cooling elements, especially if
your hands are wet, since you could burn or hurt yourself. Do
not place ice cubes straight from the freezer into your mouth
as this may result in burns.
7. Before doing any cleaning, disconnect the appliance from
the electricity (by pulling out the plug or turning off the gen-
eral switch in your home).
8. Before disposing of your old appliance, remember to break
or remove the lock as a safety measure to protect children who
might lock themselves inside the appliance when playing. In
addition, if the appliance is a new one with a lock, keeo the
key out of the reach of small children.
9. If your appliance is not operating properly, read the chapter
entitled, “Trouble Shooting”, which might help you resolve the
problem, before calling an after-sales service centre. Do not
attempt to repair the appliance by tampering with the internal
components.
10. If the power supply cord must be replaced, please contact
one of our Customer Service Centers. In some cases, the con-
nections are made using special terminals and in others a spe-
cial tool must be used to access the connections.
11. Do not use electric appliances inside the compartment for
food storage, if these are not those recommended by the
manufacturer.
12. At the end of the functional life of your appliance –
containing cyclopentane gas in the insulation foam and perhaps
gas R600a (isobutane) in the refrigeration circuit – the latter
should made safe before being sent to the dump.
For this operation, please contact your dealer or the Local
Organisation in charge of waste disposal.
Safety - a good habit to get into.
To ensure that the appliance operates properly and to
reduce energy consumption, it is important that the
appliance is installed correctly.
Ventilation
The compressor and condenser generate heat and, there-
fore, need to be ventilated properly. Rooms with less than
perfect ventilation are not very suited for installation of the
appliance. Therefore, it should be installed in a room with
an opening (window or French window) that provide the
appropriate amount of air re-circulation. It is also important
that the room not be too humid.
During installation, make sure not to cover or obstruct the
grates that allow for proper ventilation of the appliance.
For proper ventilation of the appliance, you must leave:
- a space of at least 10 cm between the top part and any
cabinets above it;
- a space of at least 5 cm between the sides of the appliance
and any adjacent cabinets/walls.
Away from Heat
Avoid positioning the appliance in a place where it is directly
exposed to sunlight or near an oven, cook top or the like.
Level
The appliance must be level. If the floor is not level, the adjustable
feet located in front can be used to level the appliance.
Electrical Connection and Earthing
Before proceeding with the electrical connection, make sure that
the voltage indicated on the rating plate, located within the
freezer, corresponds to the mains voltage in your home and that
the socket is fitted with a standard earthing wire in accordance
with safety standards for 46/90 systems. If the socket is not fit-
ted with an earthing wire, the manufacturer will not be held
liability for any damages and or injuries arising out of the use of
the appliance. Do not use multiple sockets or adapters.
Position the appliance in such a way that you can access
the socket where it is plugged in.
Insufficient power?
The electrical socket must be able to handle the maximum
power load of the appliance, which is indicated on the rating
plate
located within the freezer
.
Before making the electrical connection ...
After the appliance has been delivered, place it in the vertical
upright position and wait at least 3 hours before inserting the
plug into the socket in order to ensure that it functions properly.

10
GB
A Closer Look
H
G
ABCD D D D E F

11 GB
AButton for turning the appliance ON or OFF.
Press the button once and hold in for at least
two seconds.
B
Button to turn off the acoustic alarm.
Press the button once and hold in for at least
two seconds
C
Warning Light
When this red indicator light turns on and the
buzzer sounds, the freezer is not operating correctly
and the temperature is rising too much.
If only the buzzer sounds (with the indicator light
turned off), then the freezer door has been left open
for over 60 seconds.
D
Green Temperature Lights
These indicator lights show the storage temperature
selected (between -16°C and -24°C)
E
Yellow Fast Freeze Light
This light comes on when the "SUPER" setting has
been selected, which is used to fast freeze fresh
foods.
It turns off automatically after 48 hours when the
appliance has finished the SUPER function.
F
Thermostat and SUPER Button
This button is used to set the storage and freezing
temperature. Pressing the button once and holding
it in for at least two second activates the blinking
LED indicating the thermostat and SUPER settings.
Each time the button is pressed again for two
seconds (within a span of 5 seconds) a new tem-
perature setting is selected (-24, -21, -18, -16 °C).
The SUPER setting is automatically deactivated
after 48 hours, and the appliance returns to previ-
ous temperature setting.
G
Storage Compartments
H
Compartments for Freezing and Storage
NOTICE
After transport stand the appliance upright and wait
at least 3 hours before plugging the appliance into the
mains to ensure proper performance.
For the best and most cost effective performance, re-
member to set the temperature at -18°C.
Once the appliance has been connetect to the electrical
mains, press the Abutton (ON-OFF) and hold it pressed in
for more than 2 seconds in order to turn on the appliance.
Activate the SUPER setting using the Fbutton. Each time
the button is pressed for more than two seconds it enables
and displays (with a blinking LED) the temperature setting.
Each time the button is pressed within 5 seconds, the set-
ting advances through the cycle of possible settings. Set
the appliance so that ELED begins to blink and remains
lighted.
The appliance automatically exits the SUPER mode after 48
hours, returning to the temperature set.
If the lights blink and the alarm sounds after the appliance is
connected to the power supply, press the Bbutton (alarm
off button) for at least two seconds.
Setting Up Your Appliance

12
GB
Getting the Most Out of Your Appliance
Tips on Freezing
-
Remember that you should never refreeze products you have
allowed to thaw, even if only partially. Once thawed, cook
the food, then either eat (within 24 hours) or refreeze it.
- Consult a specialized manual when packaging foods for
freezing.
- For the best storage and thawing, remember to freeze small
portions. This will ensure rapid and uniform freezing. Mark
the package with a description of the contents and the date
it was frozen.
- Freeze only the quantities (in kg) shown on the data plate
on the inside of the freezer.
- Set the temperature to the SUPER setting using the Fbut-
ton (the ELED will come on).
- Place the fresh food that is being frozen into the top com-
partments (H), making sure not to place them near food
that has already been frozen, but preferably in contact with
the cooling surfaces. In fact, proper food storage depends
on the speed at which the fresh food is frozen. For this rea-
son, we suggest that the temperature knob be placed on
the SUPER setting 24 hours before fresh food is placed in
the appliance to be frozen.
- After 24 hours have passed the temperature setting will
automatically return to the normal operating setting.
- In the case of power failure or breakdown, do not open the
freezer door. This will help maintain the temperature inside
the freezer.
- Do not place full bottles in the freezer because liquids in-
crease in volume when they freeze and this could cause the
bottles to burst.
- Fill the ice cube trays three-quarters of the way full.
Storage
For best storage and low energy consumption, it is recom-
mended that the temperature be set to -18, -21.
Follow the instructions on the packages of frozen foods scru-
pulously.
When purchasing frozen foods, make sure that they have
been stored at the proper temperature and that the pack-
age is properly sealed. When purchasing frozen foods, it is
best to transport them in appropriate containers to keep
them cold and then place them in the freezer immediately.
To maximize the freezer volume, it is possible to remove the
drawers (except the lowest one), and to arrange the food
directly on top of the evaporating plates. Ensure that the
door is properly closed after putting food in the freezer.
In order to check that the temperature within the appliance
is appropriate (after holidays or extended time away from
the home), the unit is equipped with an intelligent monitor-
ing device that signals when the temperature begins to rise
within the unit (due to power outages or the like). This is
signalled by all of the LEDs blinking and the alarm buzzer
sounding. If this occurs, the food within the freezer has not
been stored properly and should not be consumed.
Food Storage Calendar
"A" Tab
This records what type of fro-
zen food is stored in the
compartment (e.g. cold cuts,
fruit, chicken, wild game,
etc.)
"B" Tab
When the frozen food is
placed in the compartment,
this tab should be moved to
the number of the deadline
month for consuming the
food. For example, mush-
rooms placed in the freezer
in the month of October
should be consumed within
6 months. Therefore, the tab
should be set to April for the
following year.
A
B
B
A
This small drawer (Fig. 1) was devised for you to store the
ice trays.
It should also be used to store any eutectic plates (only
available on certain models), which increase food preserva-
tion times in the event of a power failure.
Fig. 1

13 GB
Guide to Using the Freezer
Food Wrapping Tenderising
(days)
Storage
(months) Thawing Time
Beef Roast Tinfoil 2 / 3 9 / 10 Not required.
Lamb Tinfoil 1 / 2 6 Not required.
Pork Roast Tinfoil 1 6 Not required.
Veal Roast Tinfoil 1 8 Not required.
Veal/Pork Chops Each piece wrapped in cling wrap and then in
tinfoil (4 to 6 slices) 6 Not required.
Veal/Lamb Cutlets Each piece wrapped in cling wrap and then in
tinfoil (4 to 6 slices) 6 Not required.
Minced Meat In aluminium containers covered with cling
wrap. Freshly minced 2 Slowly in refrigerator.
Heart and Liver Plastic Baggies 3 Not required.
Sausages Cling Wrap or Tinfoil 2 As necessary.
Chicken and Turkey Tinfoil 1 / 3 9 Very slowly in refrigerator.
Duck and Goose Tinfoil 1 / 4 6 Very slowly in refrigerator.
Pheasant, Partrige and
Wild Duck Tinfoil 1 / 3 9 Very slowly in refrigerator.
Hare and Rabbit Tinfoil 3 / 4 6 Very slowly in refrigerator.
Venison Tinfoil or Cling Wrap 5 / 6 9 Very slowly in refrigerator.
Large Fish Tinfoil or Cling Wrap 4 / 6 Very slowly in refrigerator.
Small Fish Plastic Baggies 2 / 3 Not required.
Crustaceans Plastic Baggies 3 / 6 Not required.
Shellfish Store in salted water in aluminium
containers or plastic containers. 3 Very slowly in refrigerator.
Boiled Fish Tinfoil or Cling Wrap 12 In hot water.
Fried Fish Plastic Baggies 4 / 6 Directly in pan.
Meat and Fish

14
GB
Food Preparation Blanching
Time Wrapping Storage
(months) Thawing Time
Apples and Pears Peel and cut into slices. 2’ In Containers (cover
with syrup) 12 In refrigerator very slowly.
Apricots, Peaches,
Cherries and Plums Peel and pit. 1’ / 2’ In Containers (cover
with syrup) 12 In refrigerator very slowly.
Strawberries
Blackberries and
Raspberries
Rinse and fry. In Containers (cover
with sugar) 10 / 12 In refrigerator very slowly.
Cooked Fruit Cut, cook and strain. In Containers (add
10% sugar) 12 In refrigerator very slowly.
Fruit Juice Wash, cut and crush. In Containers (sugar to
taste) 10 / 12 In refrigerator very slowly.
Cauliflower
Remove leaves, cut head into
small pieces and blanch in
water and a little lemon juice.
2’ Plastic Baggies 12 Not required.
Cabbage and Brussel
Sprouts
Wash and cut into small
pieces. 1’ / 2’ Plastic Baggies 10 / 12 At room temperature.
Peas Shell and wash. 2’ Plastic Baggies 12 Not required.
French Beans Wash and slice if required. 2 Plastic Baggies 10 / 12 Not required.
Carrots, Peppers and
Turnips
Peel, wash and slice if
necessary. 3’ / 4’ Plastic Baggies 12 Not required.
Mushrooms and
Asparagus Wash, peel and cut up. 3’ / 4’ Plastic Baggies or
Containers 6 At room temperature.
Spinach Wash and mince. 2’ Plastic Baggies 12 At room temperature.
Vegetable for Soups Wash and cut up in small
pieces. 3’ Plastic Baggies or
Containers 6 / 7 Not required.
Various Foods Preparation Blanching
Time Wrapping Storage
(months) Thawing time
Bread Plastic Baggies 4 At room temperature and
in the oven.
Cakes Plastic Baggies 6
About 10 minutes at roo
m
temperature, cook at
100/200°C.
Cream Plastic Containers 6 At room temperature or
in refrigerator.
Butter In original wrapping or
tinfoil 6 In refrigerator.
Boiled Food or
Vegetable Soup
Plastic or Glass
Containers 3 / 6 At room temperature or
in hot water.
Eggs Freeze without shells
in small containers 10 At room temperature or
in refrigerator.
Fruits and Vegetables

15 GB
Caring for Your Appliance
Before doing any cleaning, disconnect the appliance
from the electricity (by pulling out the plug or turning
off the general switch in your home).
Defrosting
WARNING: do not damage the refrigeration circuit.
Do not use mechanical devices or other tools to speed
up the defrosting process, unless they have been rec-
ommended by the manufacturer.
It is a good idea to remove the frost buildup from the inside
of the appliance from time to time.
Make sure not to use pointed metal objects to do so as this
could result in piercing the refrigeration circuits, causing ir-
reparable damage to the appliance. Use the plastic scraper
provided with the freezer.
To defrost the freezer completely (which should be done
once or twice a year), disconnect the appliance from the
power supply and leave the door open until all the frost has
melted.
The freezer is equipped with a system to drain the water
from the defrosting procedure. Simply, place a container in
the position indicated in fig. 2.
To speed up defrosting, one or more pots of warm water
can be placed inside the appliance.
While defrosting the freezer, it is a good idea to wrap the
food taken from the freezer in several layers of paper and
place it in a cool place. Since the temperature of the frozen
food will inevitably rise, it is best to consume it quickly as its
storage life will have been shortened.
Cleaning and Maintenance
The inside of the freezer should be cleaned on a periodic
basis after it has been defrosted. Only use a water and
bicarbonate solution to clean the appliance. Do not use
abrasive cleaning products, detergents or soap. After the
inside has been cleaned, rinse well with clean water and dry
carefully.
Once the appliance has been cleaned, turn on the appliance,
following the instructions in "Setting Up Your Appliance."
Fig. 2
- Install the Appliance Correctly
This means that the appliance should be installed away from
sources of heat or direct sunlight, in a well ventilated room.
- Correct Temperature Settings
Set the freezer temperature knob to one of the medium
settings. Very low temperatures will not only consume a great
deal of energy, but will neither improve nor lengthen the
storage life of the food.
- Shut the Doors
Open your appliance only when strictly necessary - every
time you open the door most of the cold air will be lost. In
order to restore the correct temperature, the motor will have
to run and consume energy.
- Check the Door Seals
Keep the seals clean and pliable so that they fit closely against
the door to ensure that no cold air is lost.
- Avoid Frost Buildup
Remember to check the sides of the freezer for frost. When
the frost becomes too thick, defrost the freezer immediately
(See, "Caring for Your Appliance").
Energy Saving Tips

16
GB
The Lights Are Off
Have you checked if:
·there is power to the unit?
·the main power switch to the house is on?
The Red Warning Light (C) is Always On
Have you checked if:
·the door is closed properly and the seal is still OK?
·the door is being opened too often?
·the temperature knob is on the right setting?
·there is too much frost buildup?
The Motor Runs Constantly
Have you checked if:
·the thermostat is on the right setting?
The Appliance Makes Too Much Noise
Have you checked if:
·the freezer is level?
·the appliance has been installed between cabinets that
vibrate and make noise?
·it is the noise made by the refrigerant, which occurs even
when the compressor is off (this is not a defect)?
Blinking Indicator Lights and Activated Alarm
The appliance is equipped with a black out device (extended
electrical power outage). This device is deactivated by press-
ing the “B” button (alarm off) once and holding it down for
at least two seconds, until the blinking green lights turn off.
The Motor Does Not Start
In order to ensure that the motor starts correctly, the appli-
ance is equipped with a protective feature that prevents the
motor from starting for 7 minutes after the last time it was
turned on.
The Green Lights for -16 and -24 or -18 and -
21 Come On Together
The appliance is fitted with a self-diagnosis system that de-
tects when the sensor is operating incorrectly. This problem
is signalled by the combination of LEDs (-16 and -24, or -18
and -21) coming on at the same time.
If this occurs, call your Service Centre to have replacement
and/or repair work done.
Troubleshooting
If despite all of the checks the appliance does still not oper-
ate properly and the problem persists, call your nearest Serv-
ice Centre and provide them with the following informa-
tion: the nature of the problem, the model code (Mod.)
and the relative numbers (S/N) written on the data plate of
the appliance (see example in the following figure).
Never call upon the services of unauthorized person-
nel and do not accept spare parts that are not origi-
nals.
Mod.
EDF 290.3 X TK
Cod.
93081 720000 S/N 7041 71 328
220 - 240 V- 50 Hz 160 W W
Fuse AMax 15 w
Total
Gross
Bruto
Brut
Compr.
Kompr.
Syst. R 134 a
kg 0,090
Gross
Bruto
Brut
287
Net
Util
Utile
Gross
Bruto
Brut
Freez. Capac
Poder de Cong
62
Made in Italy 008172
Test
P.S-I.
Pressure
HIGH-235
LOW 140
kg/24 h
4,5
Class
Clase N
Classe

17 F
6. Ne touchez pas aux parties internes refroidissantes, surtout
si vous avez les mains mouillées, pour éviter toute brûlure
ou blessure. Ne mangez pas les glaçons tout de suite après
les avoir sortis du congélateur, vous risqueriez de vous brûler.
7. Ne procédez à aucune opération de nettoyage ou d’en-
tretien sans avoir auparavant débranché la fiche de l’appareil.
8. Avant d’envoyer votre ancien réfrigérateur à la déchetterie,
rendez sa serrure inutilisable. Vous éviterez ainsi que des
enfants en jouant, ne restent enfermés à l’intérieur.
9. En cas de panne et avant de faire appel au service après-
vente, consultez le chapitre «Quelque chose ne va pas?»
pour vérifier si vous pouvez vous-même résoudre le problème.
Ne tentez pas de réparer la panne en essayant d’accéder
aux parties internes.
10. En cas de changement du câble d’alimentation, adressez-
vous à nos Services après-vente. Dans certains cas, les
connexions sont réalisées au moyen de bornes spéciales, dans
d’autres, un outil spécial est indispensable pour accéder aux
raccordements.
11. Ne pas utiliser d’appareils électriques à l’intérieur du
compartiment de conservation des aliments s’ils n’appartiennent
pas aux catégories recommandées par le fabricant.
12. Avant d’envoyer votre appareil hors d’usage à la déchetterie,
veillez à le rendre sûr car sa mousse isolante contient du gaz
cyclopentane et son circuit réfrigérant peut contenir du gaz R600a
(isobutane). Pour cette opération, adressez-vous à votre revendeur
ou au Service local prévu à cet effet.
Installation
Pour garantir le bon fonctionnement de votre appareil
tout en réduisant sa consommation d’électricité, il faut
qu’il soit installé correctement.
L’aération
Le compresseur et le condenseur produisent de la chaleur et
exigent par conséquent une bonne aération. Les pièces mal
ventilées sont par conséquent déconseillées. L’appareil doit
donc être installé dans une pièce munie d’une ouverture
(fenêtre ou porte-fenêtre) qui permette de renouveler l’air
et qui ne soit pas trop humide.
Attention, lors de son installation, à ne pas boucher les grilles
d’aération de l’appareil.
Pour une bonne aération de l’appareil, il faut prévoir:
- une distance de 10 cm au moins entre le haut de l’appareil
et les meubles situés au-dessus;
- une distance de 5 cm au moins entre les côtés de l’appareil
et des meubles ou des murs latéraux.
Loin de toute source de chaleur
Evitez d’installer votre appareil dans un endroit exposé à la
lumière directe du soleil ou près d’une cuisinière électrique
ou autre.
ATTENTION
Lire attentivement les avertissements contenus dans ce li-
vret car ils fournissent des indications importantes pour la
sécurité de l’installation, de l’utilisation et de l’entretien.
Ce réfrigérateur a été construit conformément aux normes
internationales de sécurité qui ont pour but de protéger le
consommateur. Cet appareil a en effet obtenu le label IMQ
que les techniciens de l’Institut Italien de Qualité n’accor-
dent qu’aux appareils conformes aux normes du CEI: Co-
mité Electrotechnique Italien.
1. Cet appareil ne doit pas être installé à l’extérieur, même à
l’abri d’un appentis, il est extrêmement dangereux de le lais-
ser exposé à la pluie et aux orages.
2. Il ne doit être utilisé que par des adultes et uniquement
pour conserver et congeler des aliments, conformément à
ce mode d’emploi.
3. Ne touchez jamais ni ne manoeuvrez l’appareil pieds nus
ou avec les mains ou les pieds mouillés.
4. Nous déconseillons d’utiliser des rallonges ou des prises
multiples. Si le réfrigérateur est installé entre des meubles,
veillez par soucis de sécurité à ce que le cordon d’alimenta-
tion ne soit ni plié ni comprimé.
5. Ne tirez jamais sur le cordon ou le réfrigérateur pour dé-
brancher la fiche de la prise murale: c’est extrêmement dan-
gereux.
A plat
L’appareil doit être installé bien à plat; si le sol n’est pas
nivelé, servez-vous des pieds réglables situés à l’avant de
l’appareil pour le mettre à niveau.
Raccordement électrique et mise à la terre
Avant de procéder à tout raccordement électrique, contrô-
lez si le voltage indiqué sur la plaquette des caractéristiques,
placée à l'intérieur du congélateur, correspond bien à celui
de votre installation et contrôlez si la prise est dotée d’une
mise à la terre conforme, comme prescrit par la loi 46/90 sur
la sécurité des installations. S’il n’y a pas de mise à la terre,
le Fabricant décline toute responsabilité. N’utilisez ni prises
multiples ni adaptateurs.
Installez l’appareil de manière à ce que la prise à
laquelle il est connecté soit parfaitement accessible.
La puissance est insuffisante?
La prise électrique doit être en mesure de supporter la charge
maximum de puissance de l’appareil, indiquée sur la plaquette
des caractéristiques placée à l'intérieur du congélateur.
Avant de le raccorder électriquement
Après le transport, pour que votre appareil fonctionne bien,
placez-le à la verticale et attendez au moins 3 heures avant
de le brancher à la prise.
La sécurité, une bonne habitude

18
F
VUDE PRES
H
G
ABCD D D D E F
This manual suits for next models
4
Table of contents
Languages:
Other Ariston Freezer manuals

Ariston
Ariston RG 2330 User manual

Ariston
Ariston UP 1511 F User manual

Ariston
Ariston MBT 1812 IZS User manual

Ariston
Ariston UPS 1701 T F User manual

Ariston
Ariston BCB 333 AVEI FF User manual

Ariston
Ariston BCS 333 A VE I Quick start guide

Ariston
Ariston UPS 1711 EX User manual

Ariston
Ariston UPS 1711 User manual

Ariston
Ariston MZ 1 User manual

Ariston
Ariston MZ 1 User manual