ARMOTECH WG65 Series User manual

ARMOTECH WG065 OWNER’S MANUAL, Compiled for ARMOTECH International, by
John L.R. Dovale, Dangerous Enterprises. Imagery by Mark Chance, Island Designs (ala Section 8)
Armotech International / Armotech Taiwan Ltd. http://www.armotech.net, http://www.armotech.us
6F No 10 Sec 4 Tzu Chiang Rd, San Chung, Taipei Hsien, Taiwan R.O.C.
Technical support forum http://www.armotech.us/forum
WARNING
ARMOTECHPAINTBALLMARKERSARENOTATOY.ANYMISUSEMAYCAUSESERIOUSINJURYORDEATH.
THEUSERANDANYPERSONWITHINRANGEMUSTWEAREYEPROTECTIONDESIGNEDFORPAINTBALLUSE.
READ THIS OWNER’S MANUAL COMPLETELY BEFORE LOADING, PRESSURIZING, OR OPERATING YOUR
ARMOTECHPAINTBALLMARKER.
This paintball marker is intended for sale to adults only, for use in compliance with all applicable laws and regulations. Adult
supervision is recommended at all times whenever a minor is handling this paintball marker. All persons within range MUST wear
protective goggles & headgear specifically designed for paintball when a paintball marker is in use. Paintball safety rules must be
followedatalltimes.
ARMOTECHWG65SERIESPAINTBALLMARKEROWNER’SMANUAL

ARMOTECH WG065 OWNER’S MANUAL, Compiled for ARMOTECH International, by
John L.R. Dovale, Dangerous Enterprises. Imagery by Mark Chance, Island Designs (ala Section 8)
Armotech International / Armotech Taiwan Ltd. http://www.armotech.net, http://www.armotech.us
6F No 10 Sec 4 Tzu Chiang Rd, San Chung, Taipei Hsien, Taiwan R.O.C.
Technical support forum http://www.armotech.us/forum
Table of Contents
CHAPTER 1
Paintball Safety Rules1
Operating Instructions 3
Compressed Air/Gas 6
CO2 Safety 8
Velocity/PSI Adjust 10
E-Trigger Operations12
CHAPTER 2
MARS Series Marker
Specifications 14
WG Parts & Diag. 15
Trigger Parts .17
Maintenance &
Lubrication 18
Assembly/Adjust 20
Sight Adjustment 21
Handguard removal 21
Cleaning Lubing 22
Cupseal Maint. 25
Stock Adjustment 27
CHAPTER 3
Troubleshooting 28
Tips, Hints ‘n Tricks
Warranty Info. 34
This owner’s manual is provided
with several models of the MARS
series paintball marker. Armotech
Inc reserves the right to modify or
change its markers without
incurring any obligation to
incorporate such modifications or
changes in any of its products
that were sold prior to the
modification. The information in
this owner’s manual may be
updated or changed without
notice.
This owner’s manual is intended
to remain with the paintball
marker upon any subsequent
transfer of the marker, whether
through sale, resale, or furnishing
in any manner.

ARMOTECH –THE PERFECT MARKER…THE PERFECT GAME
WG SERIES 1
Paintball Safety Rules
Safety First!
WARNING
ARMOTECH PAINTBALL MARKERS ARE NOT A TOY. ANY MISUSE MAY CAUSE
SERIOUS INJURY OR DEATH. THE USER AND ANY PERSON WITHIN RANGE MUST
WEAR EYE PROTECTION DESIGNED FOR PAINTBALL USE. READ THIS OWNERS’S
MANUAL COMPLETELY BEFORE LOADING, PRESSURIZING, OR OPERATING YOUR
ARMOTECHPAINTBALLMARKER.
•Alwayswearprotectivegoggles&headgeardesignedforpaintballwhenshootingthismarker
•Everyone within range of an area where this paintball marker is used should wearprotective
gogglesandheadgearspecificallydesignedforpaintball
•Operatethispaintballmarkeronlyinareaswhereitissafeandlawfultodoso
•Misuseofthismarkermayresultincriminalchargesorimprisonment
•This marker is intended for sale to adults. Adult supervision is recommended at all times
wheneveraminorishandlingthismarker
•READ THIS OWNER’S MANUAL COMPLETELY BEFORE LOADING, PRESSURIZING, OR OPERATING THE
ARMOTECHWGSERIESPAINTBALLMARKER!
•Neveraimorshootthispaintballmarkertowardsanybodywhoisnotwearingprotectivegoggles
orheadgearspecificallydesignedforpaintball
•Duringgameplay,followreferee’sinstructionsandallfieldsafetyrules.Avoidshootingatanother
player’shead,neckorgroinarea
•Playpaintballonlywheretherulesofsafetyforpaintballarefollowed
•Allpaintballmarkersmustbechronographedregularly.Adjustthemarkertoshootpaintballsata
velocitythisis300feetpersecond(fps)orlessandthatdoesnotexceedthevelocitylimitsetby
Chapter
1

ARMOTECH –THE PERFECT MARKER…THE PERFECT GAME
WG SERIES 2
the Paintball Park or field where the marker is in use. Chronograph the marker at regular
intervalsduringtheday,aswellasanytimethepowersourceisrefilledorchanged,anytimethe
barrel or any part of the power system is changed, and upon request of any player or game
official
•This paintball marker operates using compressed gas or air at specified pressure ranges. Follow
safety procedures when handling compressed gas or air. All filling of compressed gas or air
cylindersmustbedonebyqualifiedpersons
•Follow the rules of safe marker handling: keep finger off the trigger until ready to shoot. Keep
muzzlepointedinasafedirection.Inaddition,firmlyinsertabarrelplugintothemuzzleandpush
the mechanical or electronic safety to “ON” or “SAFE” when the marker is not in use and when in
anynon-shootingarea
•Nevershootatdomesticanimalsorwildlife
•Nevermarkobjectsoutsidetheconfinesofthegameorauthorizedshootingareas
•Neverlookdownthebarrelofamarker
•Before disassembly, storage, or transport of this marker, remove ALL paintballs from the
marker, barrel, and loader: remove power source: and remove all gas or air from the power
system.Insertabarrelplugandputthesafety“ON”
•Carryyourmarkerinacaseorsturdybagwhentransportingitinpublic
•Safelyandsecurelystoremarkertopreventaccesstoitbyunauthorizedpersonsorminors.

ARMOTECH –THE PERFECT MARKER…THE PERFECT GAME
WG SERIES 3
Operating Instructions
WARNING
Every person within range of this paintball marker must
wear protective goggles and headgear specifically
designed for paintball.
1. Before continuing with these instructions please refer to the section in
Chapter 2 on maintenance and lubrication (pg 16). Your marker should
first be properly cleaned internally & lubricated prior to firing to avoid
unnecessary wear or damage on the internals. After completing that
task, return to this section and continue with step 2 if you have the
WG65E (which comes standard with electronic trigger). If you have a
WG65 skip to instruction point 5 and continue.
2. Use the
supplied hex-
wrench tools to
unscrew the
two screws on
the trigger
frame on the
left side of the
gun –(the side
with the pressure gauge) and remove the trigger frame cover.
3. Use a rechargeable 9.6v battery to power the trigger frame. Insert the
battery into the frame, and ensure that no wires are loose, pinched or
unsecured before replacing the frame cover.
4. Turn the trigger frame ON, by pressing the mode button at the back of
the trigger frame one time -the green LED should light up. This
signifies that the marker is in SEMI shot mode. Pressing the MODE

ARMOTECH –THE PERFECT MARKER…THE PERFECT GAME
WG SERIES 4
button again will put the marker in 3-BURST mode. Pressing MODE one
more time will put the marker in FULL AUTO mode. To turn off the
trigger frame, press and hold the MODE button for a few seconds until
ALLLEDs are off.
5. Make sure the safe switch is in the SAFE position. On the WG65E push
the switch to the right to turn safe ON, or the left to put marker in
active firing mode. On the WG Semi, press the button on the trigger
frame to the right for SAFE ON, and to the LEFT (red ring should be
visible on the button) for SAFE OFF.
6. Attach threaded barrel firmly to marker.

ARMOTECH –THE PERFECT MARKER…THE PERFECT GAME
WG SERIES 5
7. At this time do not attach power source or loader, and do not load any
paintballs into the marker.
8. Insert barrel plug firmly into the barrel.
9. Pull the cocking handle (left side as illustated) straight back until the
cocking mechanism locks back in the cocked position
10. Turn the safety switch to the
FIRE position and then squeeze the trigger with an even pressure. The
cocking knob should snap forward into the un-cocked position. You
have just dry-fired your Armotech marker. Do this a few times until you
are comfortable with this operation and the feel of the marker when
cocking, and firing it.
11. Using the supplied hex-wrench make certain to properly tighten all
screws on your marker. These include the trigger frame, the secure
positioning screws on the powerfeed, and the lug inside the cocking
knob. Do not overtighten and take care not to strip ANY of these
screws. Tighten the screw holding the cockingknob–DO NOT TIGHTEN
THIS ALL THE WAY DOWN –IT CAN CAUSE DAMAGE TO THE SPRING.
12. Attach the loader or hopper to the powerfeed via the supplied elbow .
Some loaders may require their feed-necks to be sandpapered in order
for them to fit properly into the elbow or powerfeed of the marker. Do
not overtighten the screws on the elbow as you can crack it (its plastic)

ARMOTECH –THE PERFECT MARKER…THE PERFECT GAME
WG SERIES 6
Compressed Air/Gas
WARNING
The power system contains compressed gas or air
when pressurized. Never disassemble the marker until
removing ALL the gas or air from the power system.
Always keep hands away from escaping CO2 gas. It
can cause frostbite if allowed to come in contact with
skin.
•Before attaching any air or gas power source, read and understand this
section of the owner’s manual. Follow safety rules for handling
compressed air/gas. If any leaks occur in the power system, refer to
troubleshooting section or Armotech support. Use only cylinders for
compressed gas or air that comply with all applicable laws and
regulations, including but not limited to those of the US dept of
transportation, OSHA, Compressed Gas Association and/or American
Society for Testing and Materials.
•VERTICAL AIR: The power source is attached by screwing the threads of
the tank or power source adapter into the threaded ASA in front of the
trigger frame –you can screw it into the 90 degree adaptor, or remove
that and screw into the vertical ASA directly.
•When cocking the pressurized marker do not release the cocking knob
until after the cocking mechanism has locked back into the cocked
position. The marker is now ready to fire.
•Test for function –now that the power source is loaded and the marker
cocked, turn the trigger frame ON (for electronic triggers), and flip the
safety switch to the FIRE position and squeeze the trigger. The marker
should shoot air, and the cocking knob should cycle back to the cocked
position ready to fire again. Repeat this several times to get used to
the action of the marker. You have now fired your marker WITH loaded
power source.

ARMOTECH –THE PERFECT MARKER…THE PERFECT GAME
WG SERIES 7
The ARMOTECH paintball marker may be powered by CO2, regulated
compressed air (HPA), or regulated nitrogen. From the source of gas or air
through the entire power system, there are varying pressures that are applied
to the marker and the components of the power system.
The marker requires a minimum of 450psi for proper operation –if you are
using CO2 please refer to the manufacturer’s information to learn how to
adjust, control and properly maintain your input pressure. The WG marker
doesnot havean inlineregulator system.
If you are using HPA please ensure that the HPA bottle regulator output is at
least 550 PSI.

ARMOTECH –THE PERFECT MARKER…THE PERFECT GAME
WG SERIES 8
SAFETY RULES FOR HANDLING COMPRESSED
AIR OR GAS MUST BE FOLLOWED AT ALL TIMES!
OPERATING PRESSURES AND INPUT PRESSURE
•Operating pressure range 450 p.s.i. to 1150 p.s.i. (Although some
markers have been known to operate at pressures as low as 330 p.s.i.
or pressures over 1200 p.s.i. it is recommended that the specified
operating pressure of the Armotech marker be used in order to avoid
problems.)
•Never exceed recommended pressures, as this may be dangerous to
you and damaging to the marker.
•Do not leave a pressurized marker or cylinder in direct sunlight or
exposed heat source. Increased temperatures will increase the internal
pressure of the compressed gas or air and could cause problems.
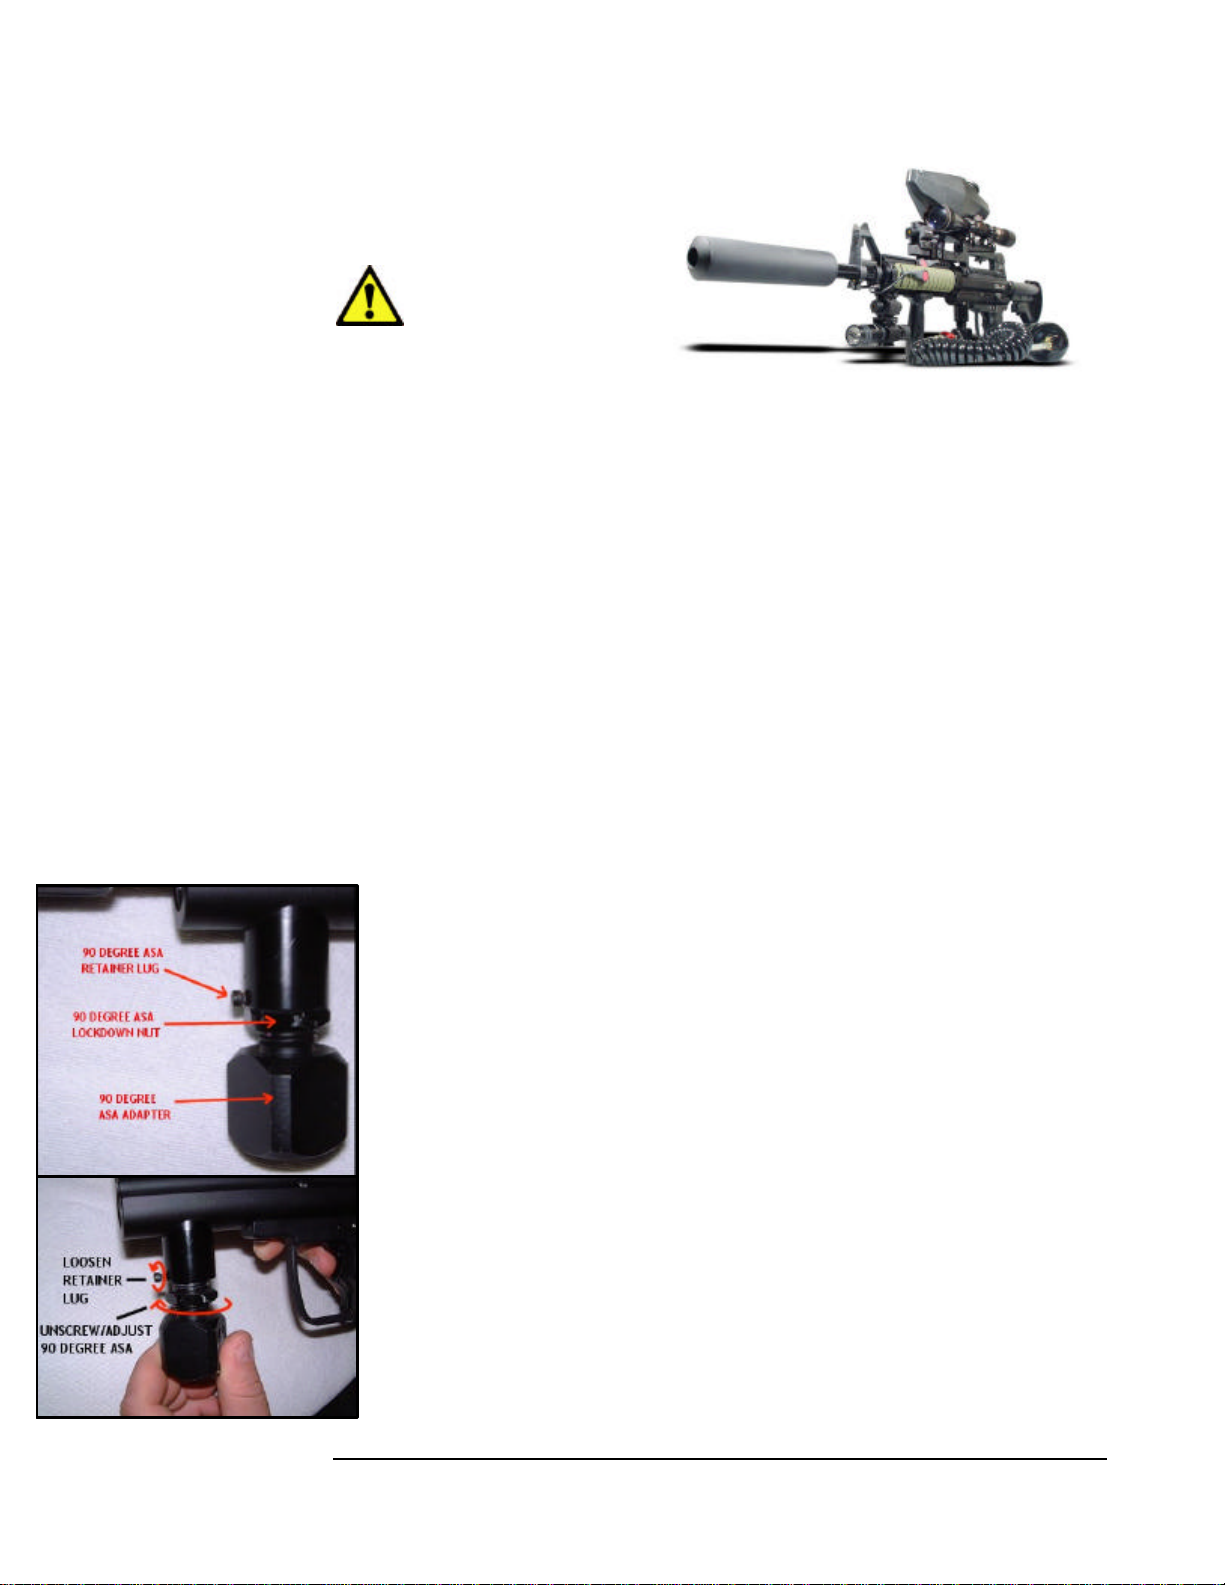
VALVE CYLINDER CONNECTION
•The Valve on a cylinder is to remain screwed into the cylinder. Should it
loosen, the cylinder may detach from the valve with an extremely
dangerous force.
•Every time a cylinder is filled, the connection between the valve and
cylinder must be inspected. If any looseness or leak is detected
between the valve and the cylinder, do not fill. Drain the cylinder and
have it inspected by qualified persons.
•During filling if any looseness or leak is detected between the valve
and the cylinder, filling should be stopped and the cylinder should
immediatelybe drainedtoavoid problems.
FILLING COMPRESSED AIR/GAS
•An overfill of any compressed air or gas cylinder can cause the safety
burst disk on the cylinder to rupture. A cylinder may rupture with
excessive force. Use properly rated disk only for the burst disk.
•A scale must be used for ALL CO2 fills to prevent an overfill. A pressure
gauge must be used for all compressed gas or air fills to prevent
overfills.

ARMOTECH –THE PERFECT MARKER…THE PERFECT GAME
WG SERIES 9
•Many cylinders are required to have US Department of Transportation
hydrostatic tests done at periodic intervals. This interval varies
depending on the cylinder type. The date of the cylinder’s initial or last
testing appears on the cylinder. Out of date cylinders should not be
used.
•Installing the Gas/Air Power Source
oMake sure the BARREL PLUG is placed in the barrel
oPut the trigger frame on SAFE
oScrew the compressed air/gas source into the ASA Adapter
oTighten until you feel a solid stop
oTurn the gas/air on if it has an on/off valve, otherwise it should
be active and ready to go.
oDo not store the marker with power source installed and full
•Removing the Gas/Air Power Source
oAlways remove power source before performing disassembly of
marker
oUnloadall paintfromthe markeranddetach thehopper/loader
oPut the trigger frame on SAFE, (or turn trigger frame OFF if it’s
the electronic version)
oIf the power source has an on/off valve–shut it OFF. Otherwise
point the marker in a safe position and slowly unscrew the
power source.
oYou will hear some compressed gas/air escaping via a bleed-
hole while unscrewing the power source. If you prefer you can
fire the marker to release ANY pressure in the system, while
continuing to unscrew the power source.
oIf the unscrewing is difficult the system still has too much
pressure in it –check to make sure the power source is OFF (if
it has an on/off valve), or to ensure it is completely discharged
before continuing. CO2 can cause damage to O-rings. These
need to be inspected regularly to avoid leaks.

ARMOTECH –THE PERFECT MARKER…THE PERFECT GAME
WG SERIES 10
Velocity Adjustments
WARNING
All paintball markers must be chronographed regularly.
Adjust marker to shoot paintballs at a velocity that is
300 feet per second (fps) or lower. Make sure the
velocity setting is not in violation of the limit set by the
authorities of the location where you are playing.
Chronograph the marker at regular intervals during the
day as well as any time the power source is refilled or
changed or any time a player or game official requests.
•The velocity knob is located at the back on the receiver (marker
body). On the Armotech WG65, 65E, marker this velocity adjuster
can be turned by hex tool only. On the Wg65A1 and A2 there is NO
adjustment screw for velocity.
•The illustrations below show how toadjust thevelocity screw on the
standard WG65(doesnot applyfor A1/A2). It also shows the setup
at the rear of the A1/A2 models which do not have a velocity
screw. You can adjust the velocity by turning the complete striker
plug assembly or by adjusting the length of your spring on this

ARMOTECH –THE PERFECT MARKER…THE PERFECT GAME
WG SERIES 11
model of marker. To adjust velocity after, turn the velocity screw
clockwise in ½ turn increments. To decrease velocities turn the
velocity screw counter-clockwise. Once the desired velocity has
been reached, lock the velocity screw in place.
•Note: velocity may fluctuate depending on factors such as altitude,
type of power source used, and climate conditions. Before using
your marker make sure to perform a safe velocity test.
•Use a chronograph and let’s ensure we are within the safely
allowable velocity range. Velocity should NEVER exceed 300 f.p.s.
Some paintball fields may require your marker to be set under 300
f.p.s. Most Armotech markers are shipped shooting above 300fps
and will require adjustment to turn them down to acceptable limits.
•Velocity of the marker can also be affected or controlled by the
settings of a regulated air/gas supply. On the Armotech WG series
an aftermarket regulator would have to be added for CO2 users
(suchas thepalmer stabilizer, or theCM2000 from fun supply).
•The marker is factory set to operate at 450-500 p.s.i. as the
minimum required operating pressure –Additionally should your
p.s.i. limit exceed 1000 p.s.i. the marker may exhibit strange
behavior such as rapid-firing, or no-recocking. You will either need
to relieve some of the internal pressure on the air bottle, or
regulate your supply to avoid these issues.

ARMOTECH –THE PERFECT MARKER…THE PERFECT GAME
WG SERIES 12
Electronic Trigger Operations
WARNINGFORWG65E-
MARKERSONLY
If using the trigger frame to recharge the battery do not
exceed 3 hours of charging time. Recharging the
battery via the trigger frame for longer than this could
cause overheating and damage the internal circuitry
For optimal performance we recommend using
rechargeable batteries with no less than 180mA rating.
•The Armotech Electronic trigger frame is outfitted with an electronically
controlled SAFE switch. The SAFE switch is located on the left-hand side of
the trigger frame just above and to the back of the trigger assembly.
•To put the marker in SAFE mode –flip the safe switch to the “SAFE” or
“ON” position by sliding it to the right. To put the marker in LIVE FIREmode
–slide the switch to the left.
•All the Electronics as well as the battery pack connection are accessible by
removing the grip frame cover on the left side of the trigger frame (same
side as the SAFE switch). After removing this cover carefully examine the
electronics and become familiar with them.
•The trigger is TOURNAMENT ready. It has a tournament locking switch (or
FORCE SEMI SWITCH) which forces the trigger frame into SEMI fire mode
and cannot be changed from the mode button on the back of the trigger
during play. Some field require this to be activated in order to use the
marker. To turn on SEMI LOCK flip the switch to the left (see fig 5A)
•When the FORCE SEMI SWITCH is off the trigger operates normally. In this
mode, the player can change firing modes using the mode button to the
back of the frame. With a battery inserted, click the MODE button to
activate the trigger. It should activate in SEMI mode, indicated by the green

ARMOTECH –THE PERFECT MARKER…THE PERFECT GAME
WG SERIES 13
LED. Press the MODE button one more time –the setting should change to
TRIPPLE BURST (orange). Press the MODE button again and the mode
changes to FULL AUTO (red). Press and hold the MODE button for a few
seconds and the system will power off.
•Depending on how sensitive you want your trigger frame to function, some
adjustments will be needed. Please consult the ARMOTECH ONLINE
FORUM athttp://www.armotech.us/forum/ for details and information on
this task, or request assistance from your authorized dealer. In most cases
the marker should arrive with all the required trigger frame settings pre-
adjusted to optimal operation
•Armotech recommends that this marker be used with some form of
agitated or force fed electronic loader/ball feeder if a player plans to use
burst mode or full auto mode on the trigger frame. Using an electronic
hopper will allow a player to shoot at a higher rate of fire. Fig 5E shows the
rate of fire DIP SWITCH and the various settings for the different rates of
fire which the trigger frame can handle.
•The marker comes standard set to 6 balls per second (b.p.s.). However, the
rate can be changed up to 13 b.p.s. Set the rate of fire based on the rating
of your loader and test it for optimal performance and minimal ball
breakage.
oFig 5E block A shows the settings for 6 b.p.s.
oFig 5E block B shows the settings for 7 b.p.s.
oFig 5E block C shows the settings for 10 b.p.s.
oFig 5E block D shows the settings for 13 b.p.s.

ARMOTECH –THE PERFECT MARKER…THE PERFECT GAME
WG SERIES 14
WG Series Marker
Specifications
1. LightweightAluminumMilledReceiver Body(realisticweightandfeel)
2. Semi orElectronicTriggerFrame(WG65Eonly)withsemi,3-burst,andfull-automaticmodes
3. Adjustablerateoffirefrom6bpsto13bpsone-triggermodelsonly
4. QuickstripFieldMaintenance
5. RearVelocityAdjustment(onallmodelsexceptA1,A2)
6. VerticalASAwith90degreeadapter
7. Standard14”1piecebarrel–ported
8. Side CockingBlowback
9. Angled,Removable BallFeed
10. AngelStyleBall-BearingBallDetent(newgenerationmodelsonly)
11. FeedmountedrubberadjustableBallDetentsystem(allmodels)
12. AR-15typeWeaverMountSightRailandintegratedcarryhandle(removable)
13. .689CaliberBore
14. Adjustable–collapsibleCarbinestock(WG65,65E,65Elite,65RISmodels
15. FixedRiflestock–WG65-A1andA2modelsonly
16. Frontgriprailsonbarrel
(foregripsdifferdepending
onmodelchosen)
17. FrontbarrelmountedAR15
sightrailsystemwithsling
loops
Chapter
2

ARMOTECH –THE PERFECT MARKER…THE PERFECT GAME
WG SERIES 15
Parts Listing & Diagrams (WG65 standard)
1. WGStandard ReceiverBody 2. Bolt
3. Bolto-ringgroovesand0-03o-rings 4. Bolt/StrikerAlignmentPin
5. Striker0-06strikero-ring 6. NA
7. Cockingknobhousing 8. Cockingknoblockwasher
9. Cockingknobhexscrew 10. StrikerSpring
11. StrikerRubberBuffer 12. StrikerSpringGuide
13. RearStrikerPlug/Housing13-1vel.adjuster 14. ASAAdapterBodyO-ring
15. VerticalASAThreadedSection 16. InternalValvePinAirflowAssembly(16-1o-
ring,16-2lockingadjusternutfor90degreeASA

ARMOTECH –THE PERFECT MARKER…THE PERFECT GAME
WG SERIES 16
17. Screw90degree ASASection 18. Valvealignmentretainerlug
19. Valvepin 20. Hexscrewsforrubberdetentretainingplate
21. lockwashersfordetentretainingplate 22. Detentretainingplate
23. Adjustablerubberballdetent 24. Angledballpowerfeedunit(boltonunit)
25. Hexscrewsforballpowerfeed 26. lockwashersforballpowerfeed
27. MuzzleBreak 28. lockinglugforMuzzleBreak
29. StandardWG14”Barrel(20”onA1/A2model) 30. BarrelO-ringando-ringgroove
31. FrontAR-15sight 32. Frontsitealignment/locklinglug
33. copperspacerforsightalignmentlug 34. slingadapterlockinghexlugonfrontsite
35. Fronthandguardalignmenthousingring 36. Handguardfrontringtosightretainerscrew
37. fronthandguardplasticpieces (2piece) 38. handguard innerstrengthring(exceptA1/A2
models)
39. rearM4handguardretaineralignmentring 40. retainerlockinglug(now4hexlugs)
41. Frontvolumizerretainingplug 42. VolumizerO-rings
43. VolumizerValvePinSpring 44. CupSealAirguide/SpringRetainer
45. Cup-seal 46. ValvePin
47. ValveO-rings 48. TurboValveAssembly
49. semitriggersafetypin 50. Triggersafetypinlockinghexretainerhole
51. triggersafetypinlockinglug 52. triggerretainingpin
53. semisingletrigger 54. uppertriggerfiringmechanics
55. trigger-playfineadjustmentlug 56. triggergrip-framesemimodels
57. Grip-framecovers 58. Grip-framecoverscrews(hex)
59. Seartensionspring 60. Sear
61. Seartensionspringretainingpin 62. Searretainingpin
63. Seartensionspringlowerretainerpin 64. uppertriggermechanismretainerpin
65. Triggerframe attachmentscrews 66. Lockingwashers
67. AR-15carbinestocklockingring 68. AR-15threadedstockrod
69. AR-15carbinestockbutwithadjl.Handle 81. AR-15carryhandleandsightsystem
NOTE:
All WG65 units have the same parts with the exception of the
WG65 A1/A2 where the striker retainer plug has no velocity
adjustment screw, and the but stock, and handguards attach
differently. This will be covered later in this manual

ARMOTECH –THE PERFECT MARKER…THE PERFECT GAME
WG SERIES 17
Semi Trigger Frame Cross Section of Parts
E-Trigger Frame Cross Section of Parts

ARMOTECH –THE PERFECT MARKER…THE PERFECT GAME
WG SERIES 18
Maintenance, Cleaning and Lubrication
The Armotech marker should be cleaned and lubricated after every usage to
ensure proper function and longevity of the product.
NOTE: It is not necessary to disassemble the ENTIRE MARKER to perform
standard maintenance and lubrication tasks. DO NOT DISASSEMBLE OTHER
AREAS OF THE MARKER UNLESS YOU ARE AN EXPERIENCED AIRSMITH, OR
HAVE BEEN ASKED TO DO SO BY AUTHORIZED ARMOTECH SERVICE
TECHNICIANS.
TIGHTENINGSCREWS
•Armotechshipsall markers only lubedwithmachineoil and with most
of the screws lightly tightened to allows for expansion and contracting
fromchangesoftemperatureandpressureduringshippingprocess.As
suchbefore doing ANYTHING withthe marker, careshould be takento
tightenthefollowing:
othescrewssecuringthetriggerframetothereceiverbody(ALL
MODELS)
othe front hand guards, sight rail and rings should be loosened,
Table of contents