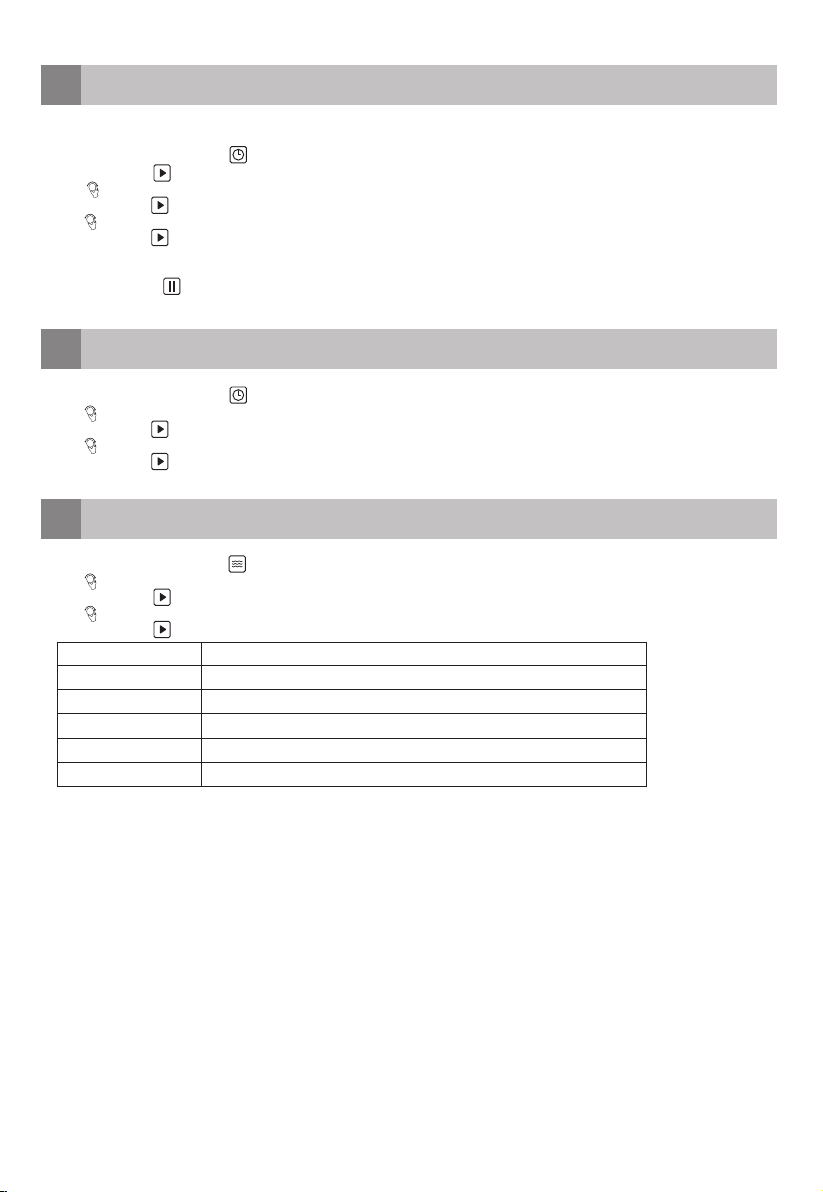
Artusi AMC34BI User manual

AMC34BI
OPERATION MANUAL
APPLIANCES
FOR LIVING

Congratulations, you are now the proud owner of an ARTUSI cooking appliance. Thank you for purchasing ARTUSI
and welcome to the ARTUSI Family.
This instruction manual has been specially created to inform you of the full range of features your ARTUSI appliance
has to offer and serves as an introduction to getting the very best out of your ARTUSI appliance.
We present detailed information on each of the features your ARTUSI appliance consists of. Once you have read
this section you will be able to choose the most appropriate settings for your appliance when cooking different
types of food.
We ask you to read the instructions in this booklet very carefully as this will allow you to get the best results from
using your appliance. KEEP THE DOCUMENTATION OF THIS PRODUCT FOR FUTURE REFERENCE.
TO REGISTER YOUR PRODUCT WITH ARTUSI, PLEASE FILL OUT THE WARRANTY CARD AT THE END OF
THIS BOOKLET AND POST IT TO: REPLY PAID 83617
LEICHHARDT NSW 2040
Dear Artusi Customer, please read this user manual carefully before using the product and, keep it permanently at
your disposal.
Note: This user manual is prepared for more than one model. Some of the features specified in this Manual may not
be available on your appliance.
All our appliances are only for domestic use, not for commercial use. Products marked with (*) are optional.
“THIS APPLIANCE SHALL BE INSTALLED IN ACCORDANCE WITH THE REGULA TIONS FORCE AND ONLY USED
IN A WELL VENTILATED SPACE. READ THE INSTRUCTIONS BEFORE INSTALLING OR USING THIS APPLIANCE”
“Conforms with the WEEE Regulations.”

• Please read these instructions before operating the appliance and
retain for future use.
• The appliance is intended solely for domestic use within the home. Do
not use corrosive chemicals or vapors in this appliance. This microwave oven
use.
• Do not attempt to operate this microwave oven with the door open since this
• Do not place any object between the door of the microwave oven. Don’t
• If the door or door seal are damaged, the microwave oven must not be
• Warning: Liquids and other foods must not be heated in sealed containers
since they are liable to explode.
• It is hazardous for anyone other than a competent person to carry out
any service or repairs that involve the removal of the cover which gives
protection against exposure to microwave energy.
• An electrical appliance is not a toy, and should therefore always be placed
outside the reach of children. Children are not always able to understand
potential risks. Teach children a responsible handling of electrical
appliances.
English
safety instructions
1
break or tamper with the safety interlocks.
can result in harmful exposure to microwave energy. It is important not to
is especially designed to heat. It is not designed for industrial or laboratory
allow soil or cleaner residue to accumulate on the sealing surfaces.
operated until it has been repaired by a competent person.

• This appliance shall not be used by children from 0 to 8 years. This
appliance can be used by children over the age of 8 and above if they are
continuously supervised. This can be used by people with reduced physical,
sensory or mental capabilities or lack of experience or knowledge, if they
have been given supervision or instruction concering use of the appliance in
a safe way and understand the hazards involved. Keep the appliance and its
cord out of reach of children aged less than 8 years.
• Cleaning and maintenance shall not be made by children.
• Children must not play with the appliance.
• Only use utensils suitable for use in microwaves.
• The microwave oven should be cleaned regularly and any food deposits
• When heating food in plastic or paper containers, keep an eye on the
microwave oven due to the possibility of ignition.
• When you see smoke, switch off and unplug the microwave oven. Keep the
• Do not overcook the food.
• Do not use the microwave oven cavity for storage purposes. Do not store
• Remove metal wire twisties and metal handles from paper or plastic
containers/bags before placing them in the microwave oven.
• Install or locate this microwave oven only in accordance with the installation
instructions.
• Eggs in the shell and whole hard-boiled eggs should not be heated in the
microwave oven since they may burst, even after the microwave is shut off.
• Always carry out regular checks of the appliance and the power cord to
ensure no damage is evident. Should there be any signs that the appliance
or the power cord is damaged in the slightest degree, the entire appliance
should be returned to the Customer Service Department. For your own
safety, only use the accessories and spare parts from the manufacturer
which are suitable for the appliance.
should be removed.
door closed in order to stifle any flames.
items, such as bread, cookies, etc. inside.

• Only use and store the appliance indoors.
• Do not use the microwave oven near water, in a wet basement/ garage or
• Attention! Avoid touching hot surfaces, especially the inside of the
appliance.
• Do not cover any vents of the microwave oven.
• Do not let the cord hang over the edge of the table or counter and keep it
away from the heated surface.
• Failure to maintain the microwave oven clean could lead to deterioration
• The contents of feeding bottles and baby food jars shall be stirred or shakes
and the temperature checked before consumption, in order to avoid burns.
• Attention: heating of beverages in the microwave oven can result in delayed
eruptive boiling. Therefore always place a plastic or ceramic spoon in the
cup. Be careful when handling the container.
• The appliance is not intended to be operated by means of an external timer
or separate remote-control system.
• Always use the appliance on a secure, dry, level surface.
• Before plugging into a socket, check that the voltage in your home
corresponds with the voltage printed on the bottom of the appliance.
• Never leave the appliance unattended when in use.
• For your own safety, only use the accessories and spare parts from the
manufacturer which are suitable for the appliance.
• Never unplug it from the socket by pulling on the cable.
• Always ensure that your hands are dry before handling the plug, switch or
power cord.
near a swimming pool.
possible result in a hazardous situation.
of the surface that could adversely affect the life of the appliance and

• Should you decide not to use the appliance anymore, make it inoperative
by cutting the power cord after removing the plug from the socket. We
also recommend making all potentially dangerous parts of the appliance
harmless, particularly for children who might be tempted to play with it.
• Before moving the appliance, make sure it is switched of. Use both hands
when moving the appliance.
• Never immerse any part of the main body, lid, power cord and plug in water
or any other liquid to protect against electrical hazards.
• If the appliance is used for other purposes than intended, or is it not handled
in accordance with the instruction manual, the full responsibility for any
consequences will rest with the user. Any damages to the product or other
things are not covered by the warranty.
• Be careful with the following materials if they can be used in the microwave
oven:
- aluminium foil yes*
- paper yes**
- cling film yes
- aluminium tray no
- microwave dishes yes
- heatproof plastic yes
- unglazed pottery no
- metal cooking utensils no
- ovenproof glass and ceramics yes
- normal glass yes

- roasting bags yes
* By covering thinner parts of foods (such as chicken legs), you prevent them from cooking too quickly.
** Use undecorated kitchen paper to cover food and to absorb grease.
***
Remove the lid and make sure the jar is not heated too long. The jar may break.
•
Legislation requires that all electrical and electronic equipment
must be collected for reuse and recycling. Electrical and electronic
equipment marked with the symbol indicating separate collection of
such equipment must be returned to a municipal waste collection point.
- metallic twists no
- plate with metallic decoration no
- mercury thermometer no
- closed jar no***
- bottle with narrow neck no

appliance description
2
before first use
3
Before you use the appliance for the first time, please do as follows: Carefully unpack the appliance and remove all the packaging
material. Keep the material (plastic bags and cardboard) out of reach of children. Check the appliance after unpacking for any
damage, possible from transportation. Check that the voltage in your home corresponds with the voltage printed on the appliance
and plug it in a socket. Follow the installation instructions in chapter 17 for installing the microwave oven.
Clean the microwave oven and the accessories with warm water and a mild detergent. Rinse well and dry thoroughly.
Using the microwave oven may cause interference to your radio or TV reception. Place the microwave oven therefore as far away
from such devices as possible. Do not place the microwave oven near a heat source.
1. Display
2. Control panel
3. Door open button
4. Grill rack (only to be used in grill/convection function)
5. Turntable ring assembly
6. Turntable shaft
7. Glass tray
8. Door with safety interlock system
9. Observation window
2.1 Oven function knob
2.2 Turn knob for adjusting or choosing auto menu
2.3 START/ + 30 SEC button
2.4 STOP/reset button
9
8
76 5
1
2
4
3
2.1
2.2
2.3
2.4

setting the clock
4
setting the kitchen timer
5
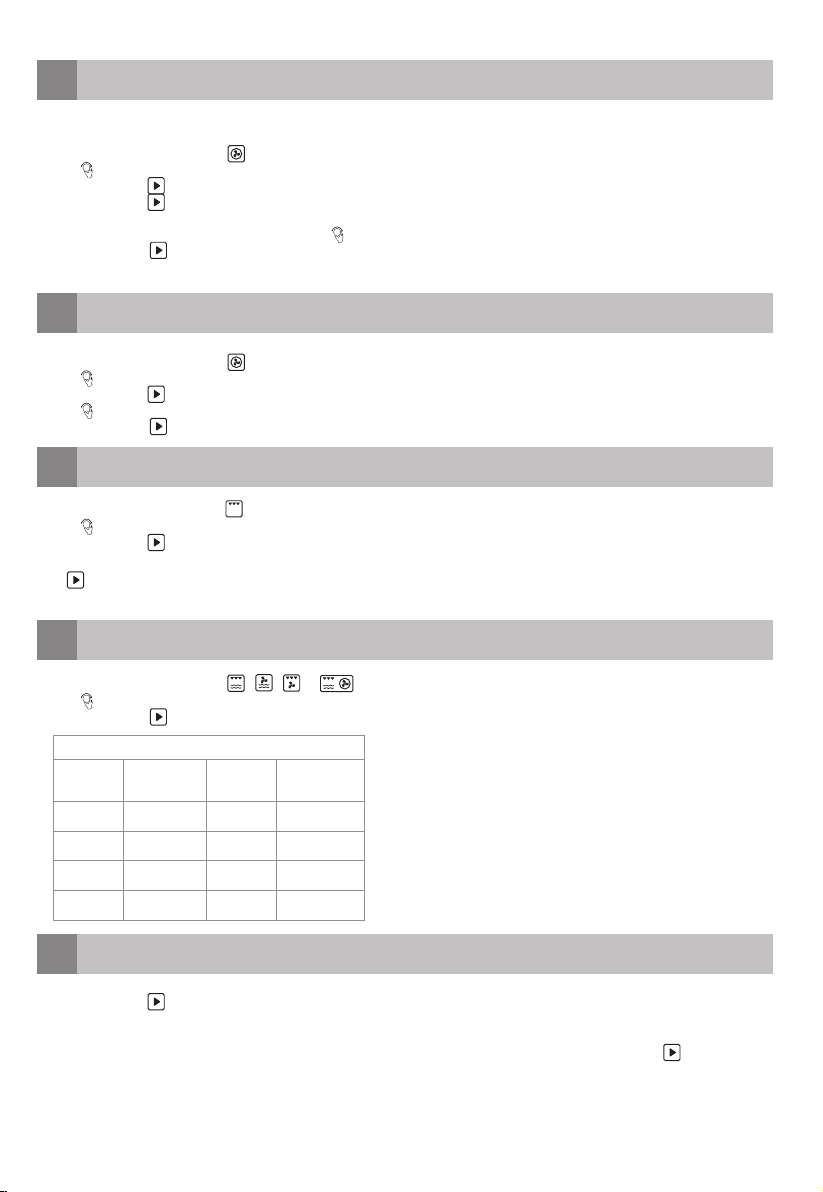
cooking in the microwave
6
As soon as the microwave oven is plugged in, it will display 0:00 and the buzzer will ring once.
• Turn the oven function knob to .The display shows 00:00.
• Press the button , the hours will flash.
• Turn to adjust the hour. The input should be between 0-23 (24 hour).
• Press the button again, the minutes will flash.
• Turn to adjust the minutes. The input should be between - 0-59.
• Press the button again to confirm the time. The colon “:” will blink.
- If the clock is not set, it would not function when powered. The display will show 0:00.
- If you press the button during the process of setting the clock the microwave oven will return to the previous setting.
• Turn the oven function knob to .The display shows 00:00.
• Turn and 00:00 blinks in the display. The kitchen timer can be set.
• Press the button and the display shows 00:00.
• Turn to adjust the cooking time. The maximum time is 95 minutes.
• Press the button to confrum the setting.
• When the set time has ended, the buzzer will ring 5 times and the display will return to the current time.
• Turn the oven function knob to . In the display P100 flashes.
• Turn to change the power. P100-P80-P50-P30-P10.
• Press the button to confirm the power.
• Turn to adjust the cooking time. The cooking time can be set from 0:05 to 95:00.
• Press the button again to confirm the cooking time and start the microwave oven.
Microwave power Application
P10 = 90 Watt Softening butter or ice cream
P30 = 270 Watt Soup, hotchpot or defrosting
P50 = 450 Watt Hotchpot, fish
P80 = 720 Watt Rice, fish, chicken, grounded meat
P100 = 900 Watt Heating, milk, boiling water, vegetables, heating beverages
The step quantities for adjusting the time are as follows:
0-1 minute : 5 seconds
1-5 minutes : 10 seconds
5-10 minutes : 30 seconds
10-30 minutes : 1 minute
30-95 minutes : 5 minutes

convection with preheating function
7
Cooking with convection lets you cook the food as in a traditional oven. The microwave is not used. It is recommended that you
should preheat the oven to the necessary temperature before placing the food in the oven.
• Turn the oven function knob to . In the display 130°C flashes.
• Turn to change the temperature. The temperature can be set from 130 to 220°C.
• Press the button to confirm the temperature.
• Press the button again to start the preheating. When the preheating temperature is reached, the buzzer will ring twice to
remind you to place the food in the oven. The preheated temperature is displayed and will flash.
• Place the food in the oven, close the door and use to set the desired cooking time. The maximum is 95 minutes.
• Press the button to start the baking.
convection without preheating
8
• Turn the oven function knob to . In the display 130°C flashes.
• Turn to change the temperature. The temperature can be set from 130 to 220°C.
• Press the button to confirm the temperature.
• Turn to adjust the cooking time. The maximum is 95 minutes.
• Press the button to start the baking.
grill
9
• Tunr the oven function knob to . In the display Gflashes.
• Turn to set the desired grilling time. The maximum is 95 minutes.
• Press the button to start the grilling.
Extra: If half the grill time passes, the oven will ring twice. This is normal. For a better grilling result, you should turn the food over. Close the door and
press again to continue grilling.
combination cooking
10
• Turn the oven function knob to - - or . In the display blinks respectively C-1, C-2, C-3 or C-4.
• Turn to set the desired time. The maximum is 95 minutes.
• Press the button to start the program.
Combination settings
Display Microwave Grill Convection
C-1 ● ●
C-2 ● ●
C-3 ● ●
C-4 ● ● ●
quick start
11
• Press the button to cook with full power (900 Watt) for 30 seconds. Each press on the same button increases the time with 30
seconds. The maximum is 95 minutes.
or
• Press during the use of the microwave, grill, convection, combination setting and defrosting on time the button to increase the
cooking time full power with 30 seconds. When pressed repeatedly on the same button the time increases with 30 seconds.

defrosting
12
• Turn the oven function knob to to defrost by weight. The display shows dEF-1.
• Turn to select the weight of the food. The weight should be between 100 and 2000 gram.
• Press the button to start defrosting.
• Turn the oven function knob to to defrost by time. In the display appears dEF-2.
• Turn to select the desired defrosting time. The maximum time is 95 minutes.
• Press the button to start defrosting.
auto menu
13
• Turn the oven function knob to . In the display A1 blinks.
• Turn to the right to select the desired menu and A 1, A 2, A 3..... A 10 will be displayed.
• Press the button to confirm the menu.
• Turn to select the desired weight or portion in the menu.
• Press the button to start the menu.
See the next page for the overview of the auto menus.
parental control
14
This microwave oven has parental control. You can block the control panel so your child can not accidentily activate the microwave
oven.
Activating the lock-out:
Press the button for 3 seconds. A long beep will sound and the indicator lights up. The display will show the current time when
set.
De-activating the lock out:
To deactivate the lock out, press the button for 3 seconds. A long beep will sound and the indicator disappears.

Overview auto menu
Menu Weight (g) Display Power
A 1
REHEAT
150 g 150
MICROWAVE P100
250 g 250
350 g 350
450 g 450
600 g 600
A 2
POTATOES
1 (± 230 g) 1
MICROWAVE P1002 (± 460 g) 2
3 (± 690 g) 3
A 3
MEAT
150 g 250
MICROWAVE P100
300 g 350
450 g 450
600 g 600
A 4
VEGETABLES
150 g 150
MICROWAVE P100350 g 350
500 g 500
A 5
FISH
150 g 150
MICROWAVE P80
250 g 250
350 g 350
450 g 450
650 g 650
A 6
PASTA
50 g (with 450 ml. water) 50
MICROWAVE P80100 g (with 800 ml. water) 100
150 g (with 1200 ml. water) 150
A 7
SOUP
200 g 200
MICROWAVE P100400 g 400
600 g 600
A 8 CAKE 475 g 475 Preheat on 180°C
A 9
PIZZA
200 g 200
C-4300 g 300
400 g 400
A 10
CHICKEN
500 g 500
C-4
750 g 750
1000 g 1000
1200 g 1200

problems & solutions
16
Check the solutions below before contacting your supplier or our technical department in case of a problem.
Problem Solution
The microwave oven does not
start
Is the power cord plugged in?
Is the fuse or circuit breaker blown?
The microwave oven does not
heat
Did the door close correctly? Open the door and shut it well again.
The turntable makes noise Clean the roller ring for the turntable and the bottom of the microwave oven.
The food is not well defrosted Has the power and time been set correctly? Did you stir or turn the food at least once whilst
defrosting?
installation instructions
17
• The safety during use can only be guaranteed when the hob is installed correctly and according to the regulations. The installer is
responsible for any damage caused by a faulty installation.
• The electrical connection must be made by a qualified electricien. This person is aware of the national and local regulations the
installation must comply with.
• The appliance falls under protection class I and can only be used in combination with a grounding conductor connection. The
manufacturer accepts no responsibility for any malfunction or damage caused by incorrect electrical installations.
• The appliance must be connected to a fixed installation and the means of disconnecting it from the fixed installation must be
installed according to the installation instructions.
• The connection cable must hang freely. Do not tie the power cable or pass it along sharp edges. It must be positioned so that it
does not touch any of the hot parts of the microwave oven.
• The connection point, the wall socket and/or plug must always be accessible.
• The cabinet into which the microwave is fitted, must be heat resistant (> 75°C).
• Ensure that the cabinet into which the microwave oven is installed is secure. For example, by mounting it to the adjoining elements.
• Damage caused by incorrect connection, incorrect use or incorrect fitting is not covered by the guarantee.
Attention: any change to the appliance’s interior, including fitting and changing the power cable, must only be performed by a
qualified electricien.
cleaning & maintenance
15
Before cleaning the microwave oven be sure to switch it off and unplug it. Leave the microwave ovento cool down completely.
Interior
Clean the inside of the appliance after every use. Use a damp cloth. For a thorough cleaning use warm soapy water and dry the interior.
Accessories
Clean the separate accessories such as the turntable, the roller stay and the grill rack with warm soapy water. These accessories can
also be cleaned in the dishwasher. Thoroughly dry everything before using them again.
Exterior
Clean the exterior of the appliance with a damp cloth or sponge. If necessary use a mild detergent. Also clean the door and the door
seal.
ELECTRICAL CONNECTION
Check that the voltage in your home corresponds with the voltage printed on the appliance.
These groups in the meter must be secured with at least 16 amps each. The connection cable must have a cross-section of at least
2.5mm²and must have a length of at least 1.5 m. When the cable is too short, you have no room to already connect the oven and place
it against the wall before plugging it in.

INSTALLATION DIMENSIONS
In the drawing below, all the dimensions are displayed in mm.
Installation Hole
Screw B
THE FIITING OF THE APPLIANCE
• Check that the cabinet and the space for the microwave oven meet the dimension and ventilation requirements.
• Slide the microwave oven in the cabinet. Note: Make sure the cable is not stuck and does not lie on top of the microwave oven.
• Open the door of the microwave oven. Use the provided screw to fasten the microwave oven to the cabinet and place the plastic
cap on the screw.
• Close the microwave oven door and plug the appliance in.
• The microwave oven is now ready for use.
min.
550
min.
18
560
600
* not suitable for built-under
595
450
20
388
380
min.
850

product fiche
18
Model number AC032B8S
Type of appliance built-in microwave oven
Number of oven cavities 1
Heat source per oven cavity electric
Execution
Capacity 32 liter
Turn table Ø 315 mm
Dimensions (wxdxh) in mm - internal 335 x 340 x 230
Technical specifications
Dimensions (wxdxh) in mm 595 x 467,5 x 388
Nett weight in kg 22,1
Power consumption -microwave [W] 1550 watt
Microwave power 900 watt
Power consumption - grill [W] 1100 watt
Power consumption - convection [W] 2500 watt
Rated voltage [V] / frequency [Hz] 230V/ 50
Remark: on the rating label - which can be found on the inside of the appliance - you will find the technical specifications of the
appliance.

Warranty Card
Worldwide Appliances Pty Limited
A.B.N. 45868077422
Oce:
48-50 Moore Street, Leichhardt N.S.W 2040
Post:
Locked Bag 3000, Annandale, N.S.W 2038
P: 1300 694 583
WARRANTY REGISTRATION
Your ongoing satisfaction with your artusi
product is important to us. We ask that you
complete the enclosed Warranty Registration
Card and return it to us so that we have a record
of the artusi product purchased by you.
PRIVACY
Worldwide Appliances respects your
privacy and is committed to handling your
personal information in accordance with the
National Privacy Principles and the Privacy
Act 1988 (Cth). A copy of the Worldwide
Appliances Privacy Policy is available at
www.artusi.com.au. Worldwide Appliances will
not disclose any personal information set out
in the Warranty Registration Card (“Personal
Information”) without your consent unless
required by:
1. law;
2. any Worldwide Appliances related company;
3. any service provider which provide services
to artusi or assist artusi in providing services
(including repair and warranty services) to
customers. Our purpose in collecting the
Personal Information is
to keep a record of the artusi product purchased
by you, in order to provide a better warranty
service to you in the unlikely event that there is
a problem with your artusi product. Worldwide
Appliances may contact you at any one or more
of the address, email address or telephone
numbers set out in the Warranty Registration
Card. Please contact artusi on 1300 694
583 should you not wish to be contacted by
Worldwide Appliances.
WARRANTY
1. Warranty
Worldwide Appliances warrants that each artusi
product will remain, for a period of either 12
months or 24 months of warranty. All Warranties
are valid from the original date of purchase, And
warranty claims must be accompanied by the
proof of purchase.
24 months warranty products:
All Built-in Appliances – Limited to Ovens,
Gas, Induction and Electric Cooktops, and All
Rangehoods
Freestanding Cookers - Gas and Electric Models
(900mm Width)
artusi.com.au
Dishwashers - Freestanding, Fully Integrated,
Semi Integrated and built-in
12 months warranty products:
Freestanding Cookers - Gas and Electric Models
in 50cm, 54cm and 60cm Widths
Portable Appliances* – Benchtop Models and
Portable Gas Models
2. What is not Covered by the Warranty.
The Warranty does not apply if an artusi product
is defective by a factor other than a defect arising
in the manufacture of the artusi product, including
but not limited to:
(a) damage through misuse (including failure
to maintain, service or use with proper care),
neglect, accident or ordinary wear and tear
(including deterioration of parts and accessories
and glass breakage);
(b) use for purpose for which the artusi product
was not sold or designed;
(c) use or installation which is not in accordance
with any specied instructions for use or
installation;
(d) use or operation after a defect has occurred or
been discovered;
(e) damage through freight, transportation or
handling in transit (other than when Worldwide
Appliances is responsible);
(f) damage through exposure to chemicals, dusts,
residues, excessive voltage, heat, atmospheric
conditions or other forces or environmental
factors outside the control or Worldwide
Appliances;
(g) repair, modication or tampering by the
purchaser or any person other than Worldwide
Appliances, an employee of Worldwide
Appliances or an authorised artusi service
contractor*;
(h) use of parts, components or accessories
which have not been supplied or specically
approved by artusi.
(i) damage to surface coatings caused by cleaning
or maintenance using products not recommended
in the artusi product handbook provided to the
purchaser upon purchase of the artusi product;
(j) damage to the base of an electric oven due to
items having been placed on the base of the oven
cavity or covering the base, such as aluminium
foil (this impedes the transfer of heat from the
element to the oven cavity and can result in
irreparable damage); or
(k) damages, dents or other cosmetic
imperfections not aecting the performance of the
artusi in respect of an artusi product purchased
as a “factory second” or from display
The Warranty does not extend to light globes
used in artusi products.
3. Domestic Use
Each artusi product is made for domestic use.
This Warranty may not extend to artusi products
used for commercial purposes.
Continued over...

4
Please complete and send to ARTUSI at: REPLY PAID 83617
LEICHHARDT NSW 2040
Last Name: First Name:
Address:
State: Postcode: Email:
Home Phone: Mobile:
Purchase Date: / / (Please attach proof of purchase to validate warranty)
MODEL NUMBER SERIAL NUMBER
(if you cannot locate the serial number please call ARTUSI on 1300 694 583)
1
2
3
4
WARRANTY REGISTRATION CARD
01052013
01032014
4. Time for Claim under the Warranty
You must make any claim under this Warranty
within twenty eight (28) days after the occurrence
of an event which gives rise to a claim pursuant
to the Warranty, by booking a service call on the
telephone number below.
5. Proof of Purchase
Customers must retain proof of purchase in order
to be eligible to make a warranty claim in respect
of an artusi product.
6. Claiming under the Warranty
Customers will bear the cost of claiming under
this Warranty unless Worldwide Appliances
determines the expenses are reasonable, in which
case the customer must claim those expenses
by providing written evidence of each expense
to Worldwide Appliances at the address on the
Warranty Registration Card.
7. Statutory Rights
(a) These terms and conditions do not aect your
statutory rights.
(b) The limitations on the Warranty set out in this
document do not exclude or limit the application
of the consumer guarantees set out in the Act or
any other equivalent or corresponding legislation
in the relevant jurisdiction where to do so would:
(i) contravene the law of the relevant jurisdiction;
or
(ii) cause any part of the Warranty to be void.
(c) Worldwide Appliances excludes indirect or
consequential loss of any kind (including, without
limitation, loss of use of the artusi product) and
(other than expressly provided for in these terms
and conditions) subject to all terms,
conditions and warranties implied by custom, the
general law, the Act or other statute.
(d) The liability of Worldwide Appliances to you
for a breach of any express or non-excludable
implied term, condition or warranty is limited at
the option of Worldwide Appliances to:
(i) replacing or repairing the defective part of the
artusi product;
(ii) paying the cost of replacing or repairing the
defective part of the artusi product;
(iii) replacing the artusi product; or
(iv) paying the cost of replacing the artusi
product.
(e) Our goods come with guarantees that cannot
be excluded under the Australian Consumer
Law. You are entitled to a replacement or refund
for a major failure and for compensation for any
other reasonably foreseeable loss or damage.
You are also entitled to have the goods repaired
or replaced if the goods fail to be of acceptable
quality and the failure does not amount to a
major failure.
8. Defects
Any part of an artusi product deemed to be
defective and replaced by Worldwide Appliances
is the property of Worldwide Appliances.
Worldwide Appliances reserves the right to
inspect and test artusi products in order to
determine the extent of any defect and the
validity of a claim under the Warranty.
*To locate your closest artusi authorised service
agent please contact us on 1300 652 100 or visit
www.artusi.com.au
ALL SERVICE CALLS MUST BE BOOKED
THROUGH AN AUTHORISED DEALER OR
WARRANTY DEPARTMENT ON 1300 652 100
OR stokesaps.com.au/artusi-service
01032014
Warranty Card continued artusi.com.au
Warranty Card tear off


ARTUSI.COM.AU
P: 1300 649 583
NSW & ACT (HEAD OFFICE)
48-50 MOORE STREET
LEICHHARDT
F 02 8569 4699
QLD
1/42 CAVENDISH ROAD
COORPAROO
F 07 3397 0850
VIC,TAS & SA
1211 TOORAK ROAD
CAMBERWELL
F 03 9809 2155
WA & NT
UNIT 10/55 HOWE STREET
OSBORNE PARK
F 08 9201 9188
NZ
PO BOX 11.160
SOCKBURN CHRISTCHURCH
F 03 344 5906
ARTUSI OFFICES ARE OPEN DAILY FROM 9AM–5PM AND SATURDAYS 10AM–4PM
DISCLAIMER
Worldwide Appliances PTY LTD, trading as ARTUSI, is continually seeking ways to improve the design specifications, aesthetics and production
techniques of its products. As a result alterations to our products and designs take place continually. Whilst every effort is made to produce
information and literature that is up to date, this brochure should not be regarded as an infallible guide to the current specifications, nor does it
constitute an offer for the sale of any particular product. Product dimensions indicated in our literature is indicative only. Actual product only
should be used to define dimension cutouts. Distributors, and retailers are not agents of ARTUSI and are not authorised to bind ARTUSI by any
express or implied undertaking or representation.
Other manuals for AMC34BI
1
Table of contents
Other Artusi Microwave Oven manuals